yogabook / functional exercises / front raise
Contents
„front raise“
Feedback: We’d love to hear what you think about this description, give us feedback at:
postmeister@yogabook.org
Last modified: 30.12.2018
Name:
trivial name: front raise
Level: FA
- classification
- contraindications
- effects
- preparation
- follow-up
- derived asanas
- similar asanas
- diagnostics
- instructions
- details
- variants
Classification
classical: functional exercise
physiological: strengthens the deloids and other frontal abductors
Contraindications
This exercise may be contraindicated for disorders of the shoulder joint, e.g. SLAP lesion or biceps tendinitis. Even in the case of external shoulder impingement, it is advisable to refrain from this exercise and instead train the humeral head caudalising muscles, even if performing this exercise should be pain-free.
Effects
- (632) strenghtening the autochthonous muscles of the thoracic spine
- (242) strenghtening the frontal abductors of the shoulder joint
Preparations
Follow-up
Derived asanas:
Similar asanas:
Diagnostics (Nr.)
Variants:
Instructions
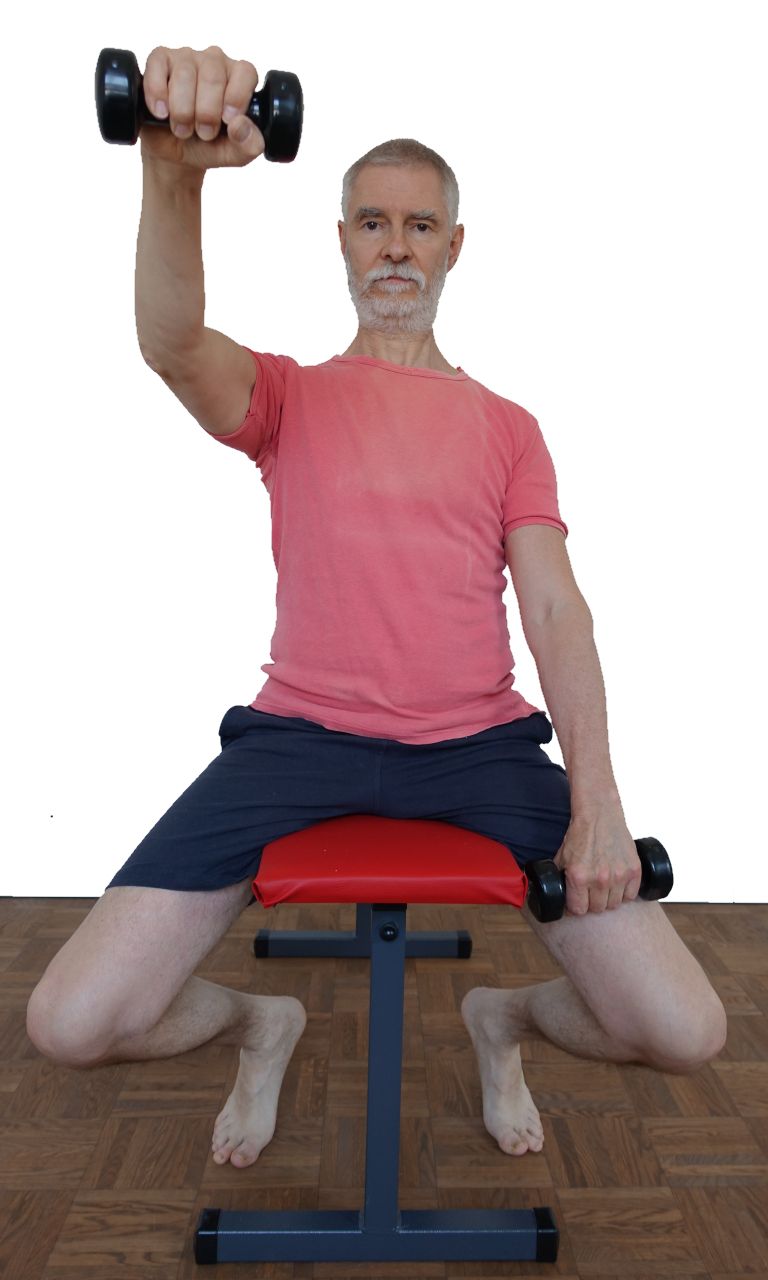
- Sit comfortably and with your upper body straight, e.g. cross-legged or on a chair.
- Grip a light dumbbell with each hand, between one and a few kilos depending on your strength.
- Stretch your arms forwards, elbows joints almost but not completely stretched.
- Place a dumbbell with a little weight on one leg and slowly lift the other one forwards and upwards.
- When the dumbbell has crossed the horizontal line by approx. 45°, slowly lower it again.
- When it has reached the leg, place it on the leg with a little weight and start to lift the other one in exactly the same way.
- Lift and lower the dumbbell alternating sides for as long as possible.
Details
- The weight acts much more on the long lever arm of the arms than directly at the trunk. The lever of the arm with a dumbbell would bend the thoracic spine (into flexion) without counteraction, so that constant work of the autochthonous back muscles is required, especially in the thoracic spine. Few other poses are as successful as this one in promoting strength endurance in the thoracic spine. This is due to the fact that the lever arm on which strengthening of the thoracic spine is possible, for example by lifting the shoulder area from the prone position, is quite small, even if the partial body weight to be lifted is greater than that of the arm in the exercise described here. This is why an appropriate dumbbell is used.
- The appropriate weight is of course very individual. With very low physical strength, half a kilogramme may be sufficient, but rarely more than 3 to 5 kg is required. The amount of weight is clearly secondary to the duration of the exercise, and the number of repetitions also plays a very subordinate role.
- The dumbbells should be raised and lowered slowly. The focus is not on speed or acceleration but solely on the duration of the impact on the thoracic spine. If possible, the dumbbell, which is not currently in motion, should not be placed heavily on the leg but held by the arm with a certain amount of force.
- The raised arm should be slightly bent. The dumbbell is gripped with an overhand grip, i.e. the palm of the hand is above the bar connecting the two weights. If a limiting effect occurs that jeopardises further uninterrupted execution, such as fatigue of the deltoid or finger flexors or the onset of burning muscles on the dorsal side of the forearm, you can switch from the overhand overhand grip to the underhand grip. This shifts some load from the deltoid to the biceps but that does not affect the aimed strengthening of the thoracic spine.
- The shoulder blades must not be raised but remain in depression.
- In the case of tennis elbow, this exercise is generally not pain-free with adequate weight and is contraindicated (with a weight that is adequate for the posture) because it can contribute to maintaining the irritation. With an adjusted weight, on the other hand, it can be useful for rehabilitative training.
The underhand grip should be problem-free for tennis elbow, but can be problematic for golfers‘ elbow.
With adjusted weight, however, both grips can provide good service in rehabilitative training for the respective disorder. - If you feel that this exercise does not strengthen your back enough, you can choose a different position. The cross-legged pose has very little tendency to tilt the pelvis (top) backwards. If instead a seat is chosen that shows this tilt more clearly, such as baddha konasasana or, particularly noticeable with limited flexibility of the hamstrings, dandasana or upavista konasana, a much more pronounced strengthening of the back is achieved. However, in some cases the rectus femoris may also tend to cramp due to the fact that it is intensively involved in holding the pelvis upright. In this case, a very moderate flexion of the knee joints can be considered, which goes just far enough so that the tendency to cramp no longer occurs, but not so far that the effect of the shortened hamstrings tilting the pelvis backwards and increasing the required work of the back muscles no longer takes effect. It is also possible to place the feet in front of the pelvis so that the restricted mobility of the short hip extensors and the Adductors, which reduce flexion at large flexion angles, tilt the pelvis backwards.
- If this exercise is not primarily used to strengthen the autochthonous muscles accompanying the thoracic spine, but primarily for the purpose of significantly increasing strength or hypertrophy of parts of the deltoids, it can be performed with a correspondingly higher weight and a lower number of repetitions and holding time. The tendency to move the upper body backward and thus make it easier to lift the dumbbells can be countered by pressing the shoulder area (or more precisely: the shoulder blades) against a wall, i.e. practising leaning against it.
Variants
lying
Contraindication:
Tendency to posterior or anterior dislocation of the shoulder joint
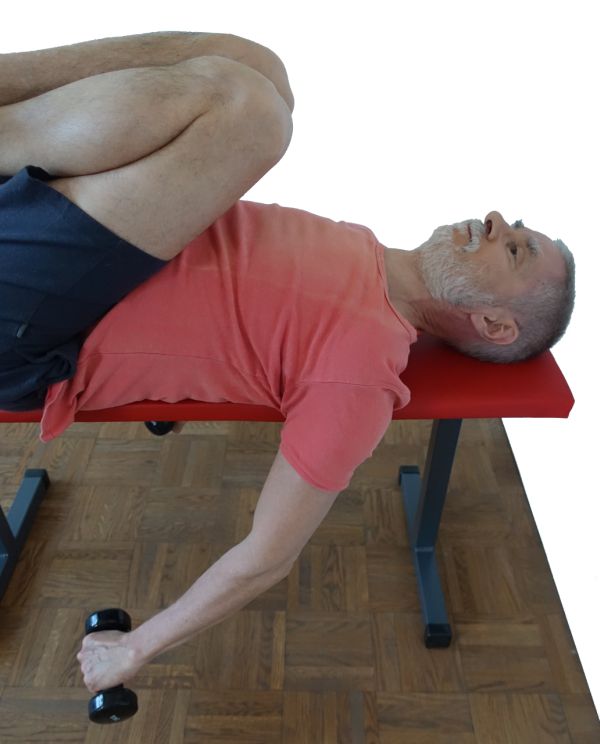
Instructions
- Perform the above described frontal abduction in the shoulder joints in supine position, e.g. on a weight training bench, see details.
details
- To be able to perform this position well, the back needs to be supported so that the arms can still move relatively freely in retroversion. Flat weight training benches, which are commonly used in weight training, are the first choice here due to their narrow support for the upper body; the shoulders only rest on them so little that retroversion is not hindered.
- The weight that should be selected for this variation is significantly lower than that of the basic pose described above. This is due to the position of the arm. While it is vertical in the basic position at first and the first lifting does not require any overcoming of gravity, the exact opposite is the case here: at the beginning, the dumbbell and arm counteract a large part of the full, possible gravitational effect for the anteversion. From the horizontal, it becomes a little easier with each degree lifted, barely noticeable at the beginning. Once you have overcome the 45° against the horizontal, you can feel how it gets easier from degree to degree. Of course, care must be taken to ensure that, firstly, there is no swinging movement in the later phase of the lift and, secondly, that the arm is not lifted as far as to the vertical in order to be effective, as the relevant muscles are relieved there as the frontal abductors no longer need to work. The last 20° of the lift are hardly relevant and can therefore be omitted; you should not approach the vertical by more than about 10°.
- Depending on the flexibility of the shoulder joint in the direction of retroversion, the starting position (supine position with the dumbbells still on the floor) will require significant flexibility. It may be necessary to support the dumbbells here so that the initial retroversion is manageable or better start from a different position ond lower the arm a little more with each repetition.
- At first glance, you might think that this pose corresponds to a version of the basic pose described above from a little before 0° to just before 90° frontal abduction. This is only the case geometrically, but physiologically the two options differ fundamentally in terms of the load applied: lifting from just under 0° to well over 90° in a standing position is initially extremely light at great sarcomere length and becomes increasingly difficult towards medium sarcomere length. Lifting from the supine position is very difficult at the beginning and becomes increasingly easier with further lifting. In the second case, the greater strengthening therefore takes place with a greater sacomere length, which has a positive influence on excessive tone and also represents better strengthening; it is even possible to achieve positive longitudinal muscle adaptation.
- As the lift is performed from a long to maximum sarcomere length against a large force of gravity, the relevant muscles only have a fraction of their maximum achievable tendon force available for the initial lift in accordance with the force-length function. Secondly, the lever arm is smaller, i.e. the distance of the muscles or their executing tendons from the centre of rotation of the glenohumeral joint. On the one hand, this leads to a significantly lower maximum weight that can be moved and, on the other hand, to the need for increased caution when choosing the weight and execution. It also requires sufficient warm-up. Otherwise, an irritating sensation is quickly felt, especially in the tendon of the biceps. Furthermore, it is essential to avoid giving in too much to the effect of gravity during the downward movement of the arm after lifting, so that excessive acceleration is achieved, which must be stopped with great force towards the end of the movement. Although some may be inclined to consider this a particularly intensive training success, this is the classic situation in which strains occur: stopping a large load quickly in an eccentric contraction, which easily exceeds the muscular capacity and the load-bearing capacity of various structures. After all, the tendon strength possible in eccentric contraction is significantly greater than that achievable in concentric contraction, which also means a greater approach to the load capacity limit of the structures, and not just the Z-discs of the sarcomeres, which suffer small micro tears that heal completely in a short time when muscle soreness occurs, but other structures that take much longer to heal, which more than cancels out the presumed increase in training success due to a longer training break caused by injury. The time it takes to heal a pulled muscle is certainly an order of magnitude longer than the muscle’s recovery phase after heavy, injury-free training that produces muscle soreness. The expectancy value of this risky training method is therefore extremely poor.
- If there is a known tendency towards anterior or (very rarely occurring) posterior dislocation of the shoulder joint, this variant must be avoided.