yogabuch / asanas / baddha konasana
Contents
- 1 baddha konasana„grasped angle“
- 2 Variants
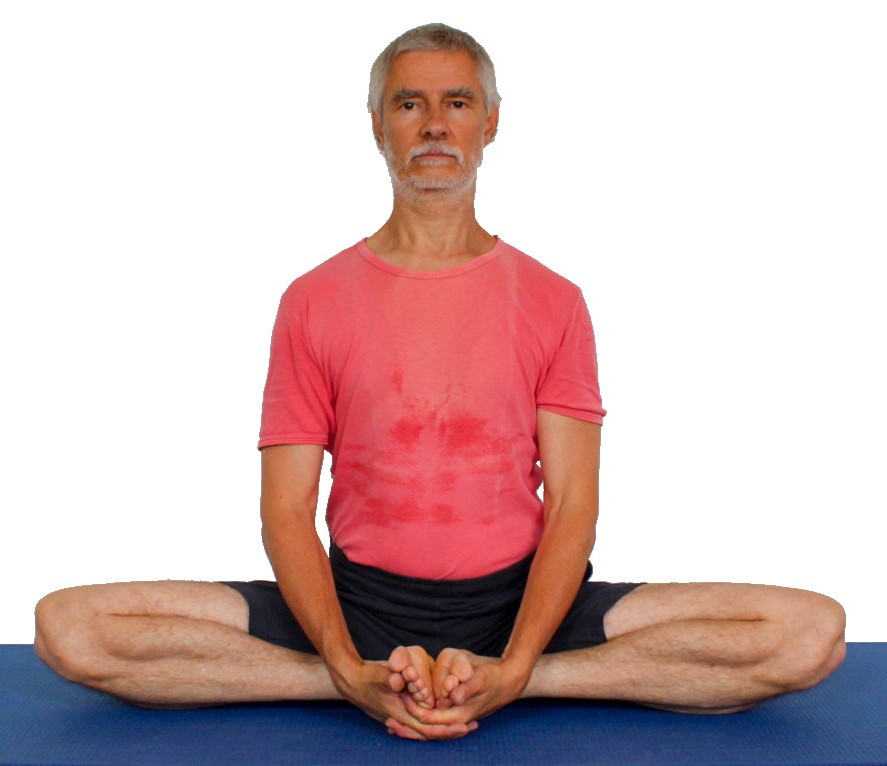
baddha konasana
„grasped angle“
 Anleitung und Details mit funktionsfähigen Links als PDF zum Downloaden/Drucken
Feedback: We’d love to hear what you think about this description, give us feedback at:
postmeister@yogabook.org
Last modified: 30.12.2018
Name: baddha konasana
Trivial name: grasped angle
Level: FA
- classification
- contraindications
- effects
- preparation
- follow-up
- derived asanas
- similar asanas
- diagnostics
- instructions
- details
- variants
Classification
classic: seated posture
physiological: stretching of monoarticularadductors
Contraindication
Effects
- (751) Stretching of the adductors
- (871) Stretching the pronators of the ankle (with rather low flexibility of the adductors)
Preparation
As baddha konasana is an exercise for wide external rotation of the thighs in the hip joint (the forward bend would rotate even more) with simultaneous flexion and abduction in the hip joints and maximally flexed knees, pain can occur in the knees – see the diagnostic notes and the FAQ – which is caused by the flexion of the knees and a leaking capability to turn out the thigh in the hip joint; this is caused by inflexible glutes and adductors, among other things. To improve this, practise:
- hip opener 3
- half lotus forward bend
- hip opener at the edge of the mat
- warrior 2 pose
- caturkonasana
- parsvakonasana
- counter
- supta baddha konasana
- parivrtta trikonasana (with falling contralateral hip)
- parivrtta ardha chandrasana (with falling contralateral hip)
Poses that generally promote the flexibility of the adductors:
- supta baddha konasana
- adho mukha supta baddha konasana
- warrior 2 pose
- parsvakonasana
- counter
- caturkonasana
If it is difficult to pull the feet towards the pelvis in the pose, the cause is probably the tension in the monoarticular parts of the quadriceps; help here:
- virasana
- quadriceps stretch 1 on the wall
- krouncasana and, to a lesser extent, its relatives
- tryangamukhaikapada pascimottanasana
Follow-up
If you stay in the pose for longer, you may have the feeling that the backs of the legs (hamstrings) have shortened. This can indeed be the case, especially for the caput breve of the biceps femoris. This can help:
- uttanasana as a generally effective and efficient stretch for the hamstrings
- prasarita padottanasana very similar to uttanasana
- parsvottanasana as a stretch that goes beyond uttanasana
- pascimottanasana
- janu sirsasana
- tryangamukhaikapada pascimottanasana
- downface dog as another good preparation for the hamstrings when the pelvis is tilted powerfully
- hip opener 5 as a very effective stretch of the hamstrings that goes beyond uttanasana
- warrior 3 pose
- trikonasana
- parivrtta trikonasana
- ardha chandrasana
- parivrtta ardha chandrasana
Derived asanas:
supta baddha konasana, adho mukha supta baddha konasana
Similar asanas:
Diagnostics (No.)
The adductors are stretched in this pose. This allows damage to them to be recognised:
- Shortening.
- Irritation of the tendons at the origins and attachments, which manifests itself in pulling pain with an elongated course. These are insertional tendinopathies, such as the so-called gracilis syndrome, although this adductor is unlikely to be noticeable here as the knee joint is widely flexed. This pain phenomenon is also known as footballer’s groin.
- Tension that causes an agonising feeling in the muscles that goes far beyond normal stretching.
- Tearing/partial tearing of adductors, which, in the event of a tear, impresses with a loud noise, possibly followed by haematoma formation and swelling.
- Side discrepancies in flexibility, which can cause pelvic obliquity and consecutive scoliosis. In addition to the FAQ, see also the information on baddha konasana on the wall.
The main cause of the inability to move the heels towards the pelvis and therefore the distance of the heels from the pelvis in the pose is the extensor moment in the knee joint, which results from the tension in the (especially monoarticular) quadriceps parts. It can be regularly recognised that if the ischial tuberosities do not press firmly on the floor in virasana, the distance between the buttocks and the pelvis in this pose is at least the same as in virasana. This can be estimated in relation to each other, as in virasana a large partial body weight bends the knee joint along the direction of gravity. Conversely, it can be estimated that if the buttocks reach the wall in quadriceps stretch 1, this problem no longer exists here. There, the quadriceps of the bent leg exert a large force that bend the knee joints, but they are also bent much further when the buttocks are against the wall. The following poses are mainly suitable for improving flexibility:
(704) Hip joint:
The widely turned out, abducted poses and movements in particular trigger pain in the case of existing hip damage.
- Arthrotic change (degenerative with cartilage atrophy) of the joint
- Arthritis (joint inflammation) of various kinds
- Perthes‘ disease would classically react markedly to this pose
- Dislocation / subluxation, which would cause a significantly increased sensation of tension in various muscles covering the hip joint
- Joint trauma suffered, which may cause pain in the joint even after many weeks or months
- Hip dysplasia and its consequential damage
(884) Knee joint:
In this pose, knee problems associated with wide flexion become very apparent. These can be, for example: traumatic or degenerative meniscus damage, arthrosis, arthritis, subluxations, Hoffa syndromes, ligament damage, plica syndromes and others, see the FAQ.
Variants:
against the wall with a block between the feet
on the wall with feet on a block
(S) Place your legs on your thighs
(S) Dog position head down on thighs
Instructions
- Sit in dandasana. Bend the right leg. To do this, grasp the right outer foot with the left hand and grasp the right inner thigh with the right hand to pull the latter outwards as far as possible and thus turn the leg out as far as possible. Then place the leg in the centre of the body before the pelvis and as close to the pelvis as possible.
- Do the same with the left leg as with the right: grasp the left outer foot with the right hand and the left inner thigh with the left hand to pull it outwards and thus turn the leg out as far as possible, placing this foot as close to the centre of the body as possible next to the pelvis.
- Erect the pelvis.
- Interlace your fingers.
- Reach under the outer edges of the foot with the interlaced fingers and build up a moderate to medium-strong pull.
- Use the strength of the autochthonous back muscles to stretch the chest to the maximum against the increased tilt of the upper body resulting from the use of strength in the arms, as this causes the pelvis to tilt backwards more.
- Move the knees towards the floor as far as possible.
Details
- Pull the feet as close as possible to the pelvis before reaching under the outer edges of the feet with the clasped hands. If the quadriceps, for example, are less flexible, the heels may remain up to 10 cm or more away from the pelvis.
- Straighten the pelvis to the maximum. Use the strength of the hip flexors and the arms, which you press diagonally behind the pelvis on the floor, to further straighten the upper body and bring the pelvis into a vertical position. It may also be helpful to pull your buttocks back a little.
- Use some arm strength to pull on the feet. However, this should not lead to discomfort in the ankles or knees. This variation, which is considered by many to be the original, not least because its execution corresponds to the name of the pose, naturally harbours a constructive weakness with the pull on the feet, as this causes varus stress in the knee joint, which places additional strain on the inner meniscus, which is already compressed in this pose and cannot be compensated for by any muscular activity. This is aggravated by the already existing internal rotation of the lower leg in the knee joint, which is increased by the traction on the feet and is all the more pronounced the less mobile the adductors are. The variation on the wall should therefore be considered and practised as the standard variation, in which not only the varus stress caused by the traction on the feet is absent, but the hands also relieve the inner meniscus through the turning out the thighs. If the ankles hurt due to the use of arm strength, the front feet can be actively pushed downwards against the force of the arms by the force of the biceps femoris which reduces the internal rotation of the lower leg in the knee joint. This should relieve the ankle joint.
- If the knees hurt, proceed as usual in such cases, see also the FAQ. Heer are only two tips:
- Try to turn the thighs out more forcefully before you put your feet down and, if necessary, also during the execution.
- Support the knees with a block or a mat.
- Bend the knee joints less
- The inner feet will separate as the knees move far towards the floor. Do not push them back towards each other, but allow this movement, as otherwise avoidable tension may build up in the adductors again, which needs to be stretched.
- This variation can also be used to strengthen the arm biceps. Bend your arms strongly outwards to the side so that you can clearly see and feel your biceps working. The use of the arms is limited by the occurrence of discomfort in the ankle or knee joint (the pull creates greater varus stress).
- Make sure that the shoulder blades are pulled downwards and backwards, i.e. in depression and retraction.
- As always when sitting up straight, erect the pelvis, lift the sternum and the back of the head. Here too, the hip flexor muscles are primarily responsible for erecting the pelvis and the back muscles for lifting the sternum. In this pose, the strength of the erector spinae can be used against the strength of the arm biceps, which, as the latter is the weaker, leads to its strengthening.
- If the tendency of the pelvis to tilt backwards and downwards is difficult to control, it may be better to practise the variation against the wall. It is also possible to support the buttocks. The support is used correctly when you have the feeling that you are almost slipping forwards from the support. Pulling the buttocks backwards at the start of the pose regularly proves helpful.
- If the neck muscles (trapezius) are tense, the head can be carefully bent forwards and/or tilted to the side. As this pose enables excellent fixation of the shoulder blades in the sense of their passive depression through arm strength, a good stretching of the descending part of the trapezius is possible. Take precautions when tilting to the side: do not pull the head towards the shoulder too forcefully using muscle strength, as this could cause the muscles performing this movement to cramp, and start with small time intervals when changing sides.
- If a side discrepancy is recognisable, i.e. one knee is higher than the other with the same intensity of stretching in the adductors, see the instructions for baddha konasana on the wall.
- Baddha konasana is one of the important preliminary exercises for lotus pose. It is less favourable for the internal meniscus than hip opening 3 under almost all conditions. Damage to the internal meniscus in particular can be noticeable in posture. This is generally all the more true the closer the feet are to the pelvis and therefore the greater the flexion angle of the knee joints. If one leg is bent in a vertical plane with one foot placed in front of the pelvis and the knee is moved outwards and downwards from this position, it becomes apparent that this movement is a knee joint, that this movement is an abduction in combination with an exorotation in the hip joint. In the variant with a block between the feet, abduction is increased, but exorotation is not, on the other hand, the exorotation is increased with feet on a block, which is the more important preliminary exercise for the lotus sit and all its relatives. After all, in lotus sit the knees are further down than their corresponding feet, which corresponds to an exorotation of over 90°. Any lack of exorotation ability will manifest itself in the form of side effects: pressure between the lower legs, excessive supination in the subtalar joints, varus stress in the knee joints and, of course, compression of the structures of the inner knee.
Known problems that can occur even when performed correctly
Knee pain
As explained above, complaints can occur depending on the health of the knee. If the flexion of the knee joint is reduced, the discomfort should subside without directly rendering the exercise ineffective. Tricks for dealing with this type of knee pain can be found in the FAQ.
Variants
Forward bend

Unusual and intensive stretching of monoarticular adductors.
Instructions
- Take baddha konasana, place the fingertips shoulder-wide apart on the floor in front of you.
- Walk the fingers further and further forwards away from the pelvis, stretching the upper body more and more forwards and downwards and tilting the pelvis further and further forwards.
- If possible, rest your forehead on the floor and stretch your arms out in front of you.
Details
- It can be useful to pull the buttocks back.
- Until the pose can be taken with the arms outstretched as described, place the forearms on the floor as soon as possible and move the elbows towards the body against the friction of the floor, which helps to stretch the upper body. This pull should be felt in the pelvis and act as flexion in the hip joint.
- Pay close attention to the rotation of the thighs in this pose, as the movement could otherwise put more pressure on the inner menisci. In particular, it is recommended not to start this variation too early.
- With the lower leg in the same position, the flexion in the hip joints creates an internal rotatory moment on the thigh, which further increases the internal rotatory moment in the knee joint, so that it is all the more likely that there will be discomfort in the inner menisci.
Known problems that can occur even when performed correctly
Knee pain
As already mentioned above, complaints can occur depending on the health of the knee. If the flexion of the knee joint is reduced, the discomfort should subside without directly rendering the exercise ineffective. Tricks for dealing with this type of knee pain can be found in the FAQ.
Pressure on the outer edge of the foot
The pressure exerted by the outer edges of the foot on the floor can be very intense in this variation. Patches or a sufficient number of layers of blankets should help.
On the wall

Allows intensive and strictly physiological stretching of the adductors with extensive protection of the medial menisci, even with rather stiff adductors and often also in cases of pre-damaged medial menisci.
Instructions
- Sit in dandasana with your back directly against the wall or with the wall a few centimetres behind you. Raise the pelvis by supporting yourself on the floor with your hands, press the pelvis against the wall and, while maintaining the pressure against the wall, let it sink back down to the floor rubbing against the wall.
- Bend the right leg as described in the basic pose while turning it out and place the outer edge of the foot on the floor as close as possible to the centre of the pelvis.
- Do the same with the left leg as with the right: bend it while turning it out and place the outer edge of the foot on the floor as close to the centre of the pelvis as possible.
- Pull both feet towards the pelvis again.
- Reach with both hands into the spaces between your thighs and lower legs near your knees and use your arms to turn your thighs out as far as possible.
- Slowly push the knees down further with the arms, maintaining the rotation as the exercise progresses.
Details
- The strength of the arms used to push the knees downwards is generally only limited by
- the strength or endurance of the arms themselves
- any pain that occurs in the knees
- the sensation of stretching in the inner adductors.
Else, the pressure can be persistent and strong.
- If the knees easily reach the floor, the possibility of further stretching of the adductors (at least in terms of this pose) is exhausted. In this variation, one (or more than one) block can therefore be placed lengthways between the soles of the feet. The usual blocks have three edges of different length. Start with the lowest difficulty and, if necessary, rotate the block along its longitudinal axis to palce it on its largest surface. By using the block(s), it is not only possible to achieve further stretching when otherwise the knees would already be on the floor, but also to move the knees further back (towards the wall):
One or more blocks between the feet not only move the feet further apart, but also move the knees slightly apart and towards the wall in an arc around the knee joints. This brings the feet forward a little with the same angle in the knee joints, so they can be pulled slightly towards the pelvis. - As this variation does not deal with the issue of erecting the pelvis, it should perhaps not be the only variation practised in the long term, even though it is often the main one practised due to its effectiveness and protection of the knees. As previously discussed, this variation is certainly one of the most tolerable for the knee joints, especially in contrast to the one that pulls on the feet, which is why it is also suitable for frequent use. One recommendation would be to practise this variation over a longer period of time, at least until the knees reach the floor with the first upright block between the feet, and then, if there is no objection from the knee joints, to start practising the forward bend unless it affects the knees.
- Use the forearms to get the strength to turn out the thighs and not from the back. If possible, keep the shoulder blades down (in depression) and the trapezius soft.
- This variation is very important from a therapeutic point of view, as side discrepancies in the flexibility of the adductors can probably be recognised and treated better here than in any other pose. To do this, first check for a lateral discrepancy by ensuring that
- the pelvis presses on the wall and the floor as evenly as possible on both sides
- both feet are as close as possible to the pelvis
- an equally intense stretch can be felt in both inner thighs
- the feet are placed precisely symmetrically in the middle of the pelvis
If these conditions are met, the distance between the knees and the floor can be measured. This is, of course, a pre-scientific test, but the results are meaningful and usable. If there is a lateral discrepancy, a dumbbell of adequate weight is placed on the thigh of the more difficult side, ideally pushed slightly backwards (out of the field of vision, i.e. towards the lateral side of the thigh) so that the dumbbell, in addition to its gravitational effect vertically downwards, which stretches the adductors, also causes a certain external rotation moment in the hip joint, which benefits the knee. The correct choice of external weight is of course important here. If weights are only available in coarse increments, you can work with the effective lever arm to adjust the effect: the further the dumbbell or weight is away from the pelvis (towards the knee), the more effective the weight is. In this way, the flexibility of the adductors can be equalised through repeated exercises, thereby eliminating an important prerequisite for a (leg/pelvis-induced) pelvic obliquity, which is often necessary if you want to tackle this and the scoliosis that usually develops as a result. For this procedure, the „against the wall“ variant is much more suitable than the free variant because the pelvis is better fixed and the measurement result is expected to be more accurate, especially as in some cases a hand is needed to secure the dumbbell against slipping backwards or towards the pelvis, which is particularly likely to be the case in less mobile performers who often have to support their hands on the floor behind the pelvis to keep the pelvis halfway upright and therefore do not have them available. It is not uncommon to find that the measurement result is unusable and does not reflect the flexibility of the adductors because the feet have been placed a few millimetres away from the centre of the pelvis. This inevitably leads to the knee to the side of which the feet have been offset being closer to the wall and higher above the floor. To prevent this distortion, a supporter can look from a standing but close-to-body perspective to see whether the distance between the knees and the wall is the same. This is made much easier by a surface with strips parallel to the wall, such as strip parquet. If necessary, a centimeter ruler should be used to first ensure that the knees are the same distance from the wall and then to compare their distance from the floor.
Known problems that can occur even with correct execution
Pressure of the vertebrae on the wall
Depending on the constitution, the spinous processes of the vertebrae may press uncomfortably on the wall, which may require a blanket as a softness mediator between the wall and the affected area of the spine.
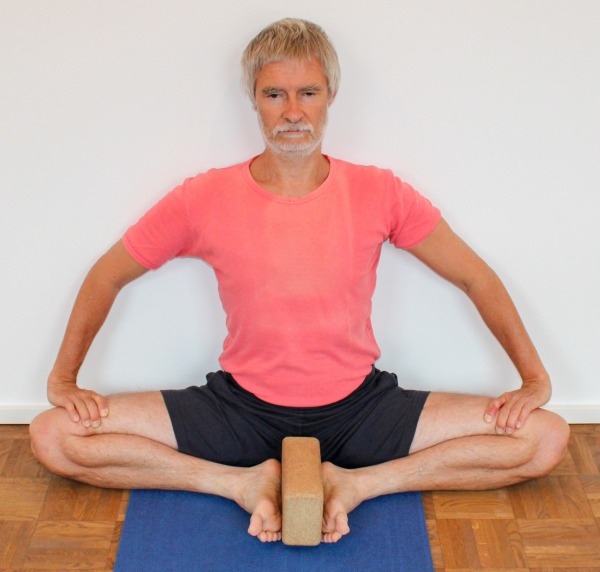
on the wall with a block between the feet
Instructions
- Take the pose as described in the variation on the wall, but place a block between your feet, initially with the largest surfaces facing the soles of your feet.
Details
- This variation can be considered the standard variation for more advanced peformers. It enables very intensive stretching and focussing on the turning out the thighs in the hip joint to protect the knee joint through strong manual rotation.
- In the first step, the block lies with its largest surface on the soles of the feet, i.e. its longitudinal extension is parallel to the longitudinal axis of the feet and it stands on the second smallest surface. Later, the block can be rotated by 90° around its longitudinal axis to place the largest surface on the floor before an additional second block is used in the same orientation as the first. More than three blocks are rarely useful; instead, the variant with feet on one or more blocks can be practised.
- Make sure that the feet are still as close to the pelvis as possible. By applying the block, the knees will be able to sink less towards the floor and both the current stretch and the possible increase in flexibility through this exercise will be significantly increased.
- The benefits of this position must be weighed up against the impact on the knee joint, particularly in the case of existing damage to the anterior cruciate ligament. In these cases, the variant with feet on blocks is more tolerable than the variant with blocks between the feet.
- Blocks between the feet also increase the opening angle between the thighs, i.e. the abduction, which provides an additional benefit compared to the other variants, which is why this variant should also be practised as soon as it can be performed sensibly.
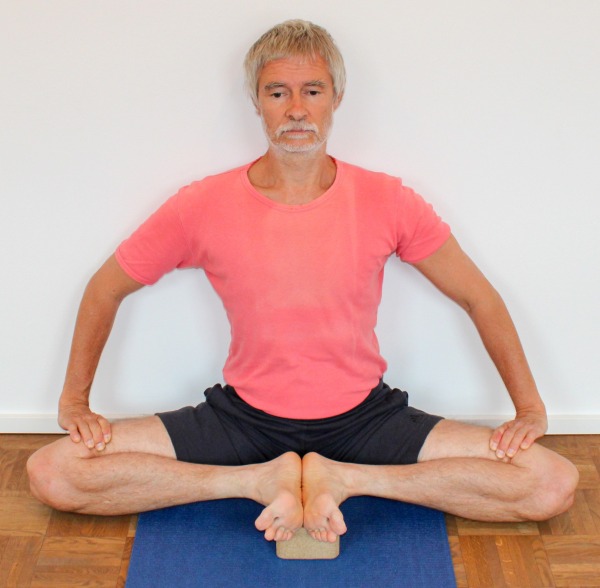
on the wall with feet on a block
Instructions
- Take the pose as described in the variation on the wall, but place your feet on a block (or on several blocks) instead of placing blocks between your feet.
Details
- This variant continues the variant in which one or more blocks are placed between the feet. It increases the demands to turn out even more, which can also require even more use of the arms to turn the legs out, depending on flexibility. This makes it an excellent preliminary exercise for lotus.
- As described above, there is no increased anterior thrust of the Tibia on the Femur, so this variant can be practised without concern even with anterior cruciate ligament damage. However, the blocks under the feet do not increase the opening angle between the thighs, which is why the variant with the blocks between the feet should only be avoided if the knees are not healthy.
reduce supination
Instructions
- Take the pose as described in the variation on the wall, but place a dumbbell on one or both heels, depending on where you want to reduce the supination.
Details
- The weight of the dumbbell presses the calcaneus to the floor, the palmar side of which lifts off the floor as supination continues. As the external malleolus is the fixed point of the movement, supination is reduced. However, this increases the pressure with which the external malleolus presses against the floor. If this becomes uncomfortable, a softening agent such as a few layers of patches or a blanket is required.
mit Gürtel
Anleitung
- Nimm die Haltung wie in der Variante an der Wand beschrieben ein.
- Lege einen Gürtel um der Kreuzbein, durch die Außenleisten und um die Fußaußenkanten, der das Rutschen der Füße weg vom Becken verhindert.
Details
- In verschiedenen Varianten ergibt sich das Problem, daß die Füße auf dem Boden vom Becken weg rutschen. Grund dafür ist vor allem das Streckmoment in den Kniegelenken aus der Spannung der Quadrizeps. Wird mit den Händen an Oberschenkeln gearbeitet, um diese in Richtung Boden zu drücken und ein exorotatorisches Moment in den Hüftgelenken zu erzeugen, welches die Kniegelenke schont, so besteht keine Möglichkeit mehr mit den Händen zu verhindern, daß die Füße rutschen. Der Gürtel kann dies einfach und zuverlässig leisten. Die Tendenz zu rutschen ist umso großer, je höher die Spannung des Quadrizeps und je rutschiger der Untergrund ist. Insbesondere, wenn wegen unangenehmen Drucks auf den Fußaußenkanten eine Decke unter den Füßen verwendet wird, wird meist ein Gürtel erforderlich sein.
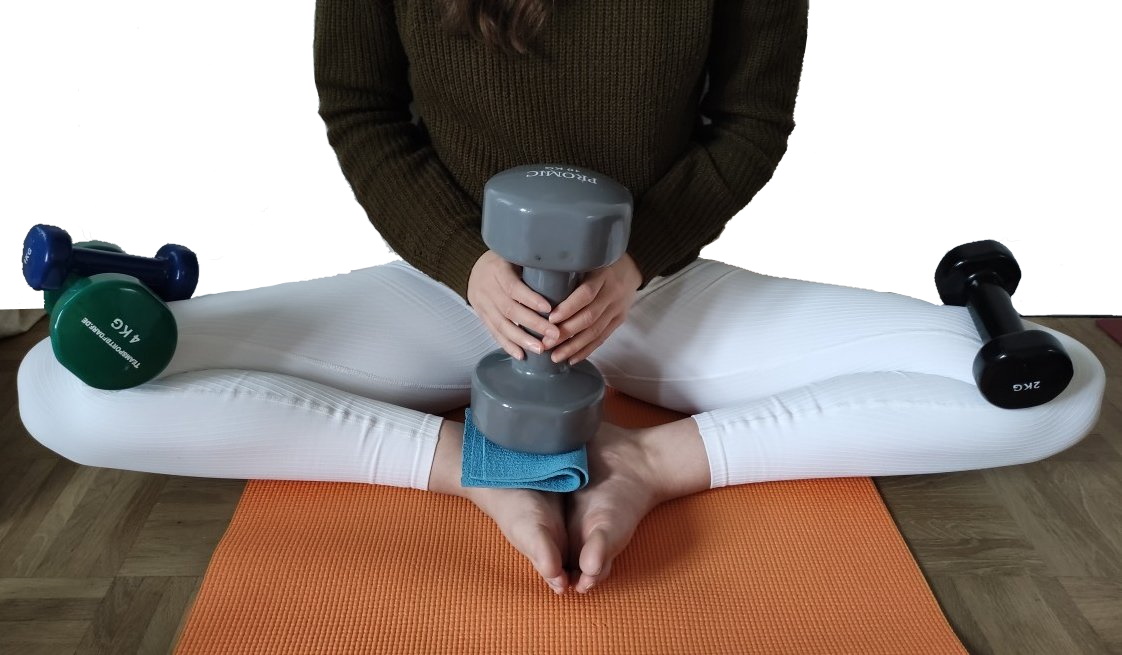
mit Hanteln
Anleitung
- Take the pose as described at the wall.
- Place a dumbbell on one or both thighs (see details) just before the knee, pressing it firmly enough against the thigh to hold it.
Details
Es gibt zwei Indikationen für die Verwendung von Kurzhanteln: Erstens: die Kraft, die die Arme aufbringen müssen, um beim Herabdrücken der Oberschenkel eine hinreichende Wirkung zu erzielen, ist so groß, dass dies nicht lange genug gehalten werden kann. Die Kraftausdauer vor allem des Trizeps ist in vielen Fällen vorzeitig erschöpft. Der zweite Fall liegt bei Seitendifferenzen der Beweglichkeit der Adduktoren vor, wenn also ohne oder bei gleicher manueller Einwirkung auf die Beine eine Höhendifferenz der Knie resultiert. In diesem Fall kann ein Bein mit einer Kurzhantel beschwert werden, was dem drückenden Arm viel Arbeit abnehmen kann. In einigen Fällen ist es notwendig, das andere Bein ebenfalls, aber dann mit einer weniger schweren Hantel zu beschweren, damit das Becken nicht durch die Einwirkung der schwereren Hantel zur Seite kippt. Günstig ist es, die Hanteln so abzulegen, daß sie ein wenig nach dorsal kippen und damit ein exorotatorisches Moment in den Hüftgelenken erzeugen. Ist die Reibung zwischen Hantel und Bein bzw. dessen Bekleidung zu gering um eine nennenswerte exorotatorische Wirkung zu erzeugen, so kann ein Reibvermittler wie ein Patch dazwischen verwendet werden.
There are two indications for the use of dumbbells: Firstly, the force that the arms have to apply to achieve a sufficient effect when pressing down on the thighs is so great that it cannot be held long enough. In many cases, the strength endurance of the triceps in particular is prematurely exhausted. The second case is when there are differences in the mobility of the adductors on each side, i.e. when there is a difference in the height of the knees with no manual intervention on the legs or with the same manual intervention on both legs. In this case, a dumbbell can be added to one leg, which can take a lot of work off the arm doing the pushing. In some cases, it is necessary to weight the other leg as well, but then with a lighter dumbbell, so that the pelvis does not tip to the side due to the effect of the heavier dumbbell. It is advantageous to place the dumbbells so that they tilt slightly backwards, creating an exorotatory moment in the hip joints. If the friction between the dumbbell and the leg or its clothing is too low to produce a significant exorotatory effect, a friction enhancer such as a patch can be used in between.
(S)
Instructions
- Adopt the posture described above, preferably against the wall.
- The supporter presses the thighs to the floor with both hands, kneeling close to the floor and twisting out vigorously.
Details
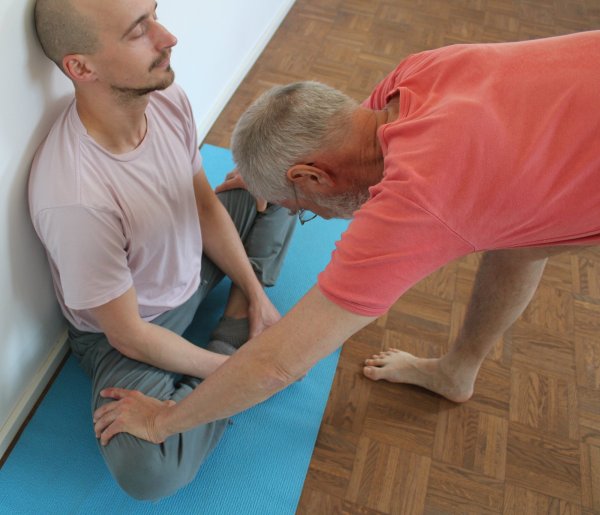
(S) Resting the legs on the thighs

Longer, passive and easily adjustable intensity variation with supporter
Instructions
- It is recommended that you do not perform baddha konasana freely but rather baddha konasana against the wall as described above. The supporter lies on their back on the floor in front of the performer so that they can carefully place their lower legs near the ankles or their heels on the performer’s thighs near the pelvis or if it is known to be tolerable further towards the knee.
- The supporter carefully puts the full weight of their legs on the performer’s thighs. As long as the stretch remains bearable, the supporter can gradually and carefully position the heels further out towards the performer’s knees.
Details
- Care must be taken with this variation as the full weight of the supporter’s legs, if applied abruptly or too far outwards towards the knees, may cause excessive stretching and strain with a corresponding risk of injury to the adductors. Nevertheless, this variant can be recommended unconditionally if used carefully. It is also important that the supporter lies comfortably and quietly on their back so that they do not want or need to change position in between. Removing the legs at the end of the pose also requires a certain amount of care so that the supporter does not temporarily rest their legs on the performer’s thighs. When removing the support, it is advisable for the supporter to first move their heels/feet towards the performer’s pelvis to relieve the pressure on the performer’s due to reduced lever arm before removing their feet completely.
- Depending on the performer’s constitution, this variation may be too weakly effective.
(P) Dog position head down on thighs

Variation in which the thighs can be turned out well by the supporter.
Instructions
- This variation should also be performed against the wall as described above. The supporter stands in front of the performer in uttanasana with their feet pointing towards them at such a distance that they can reach out with their arms and grasp the performer’s thighs near the pelvis and turn them out.
- The supporter cautiously puts more and more weight on the performer’s thighs and carefully walks one foot, then the other, further back so that they take a downface dog.
Details
- When turning the legs out, the supporter’s thumbs point approximately in the direction of his feet and the hands grip the performer’s thighs as far as possible.
- The wider the downface dog, the easier it is to turn the legs out, but the less they are pressed to the ground.
- If the stretch in the adductors that can be achieved in this way is not sufficient, the position of the hands should not be changed in the pose, but rather the support should be retaken, as in practice it is only possible to change the position of the hands one after the other, which not only puts one-sided strain and tilts the performer, but also transfers the weight of the removed hand to the other, which may lead to excessive stretching.
- In order to build up the support as gently and comfortably as possible, the supporter can take the dog from knees placed on the floor or from a stepping position with successive unloading of the front foot.
(P) Forward bend table

Instructions
- Take the pose as described above
- The supporter stands facing the performer, bends forwards from the hips with the back straight as for the desk-variant of uttanasana, grasps the performer’s thighs near the knees with the hands, turns them out and presses them down as firmly as tolerable.
- The performer pulls themselves further and further into the forward bend using the supporter’s restraints.
Details
- This pose provides very good support for the forward bend. Whereas in the pose performed alone, the further the forward bend was assumed, the more the knees tended to move away from the floor and at the same time the ability to push them down using the strength of the arms diminishes, the support now eliminates both deficiencies simultaneously. The forward bend can be pushed forward at will by pulling on the ankles and at the same time the weight of the supporter is available to push the thighs down.
- The pressure on the legs should simultaneously push down the thigh and turn out the hip joint, i.e. push the gripped inner thighs backwards (dorsally in relation to the performer). This external application of force usually prevents or eliminates the tendency to discomfort in the inner knee, which is not uncommon when bending forwards.
- In the case of known disc problems in the lumbar spine, this variation can be more tolerable than the usually contraindicated forward bend performed alone, as the traction of the arms relieves the lumbar spine when the forward bending ability in the hip joints is already somewhat better.