yogabuch / asanas / parsvakonasana
Contents
- 1 parsvakonasana„sideways angle“
- 2 Variants
- 2.1 Hand on the inner leg
- 2.2 Hand on the inner foot
- 2.3 Hand on the hip
- 2.4 Turning the head
- 2.5 Supported on a block
- 2.6 Hand on the wall
- 2.7 Back foot against the wall
- 2.8 Block in the hand
- 2.9 Back against the wall
- 2.10 Standing against the wall
- 2.11 (P) Turn your upper body
- 2.12 (P) against the wall
- 2.13 (P) Pressure against the hand
- 2.14 (P) Levering the thigh backwards
- 2.15 (P) Testing the pressure of the thigh
- 2.16 (2P) on the wall
- 2.17 (P) Transition to 2nd warrior pose
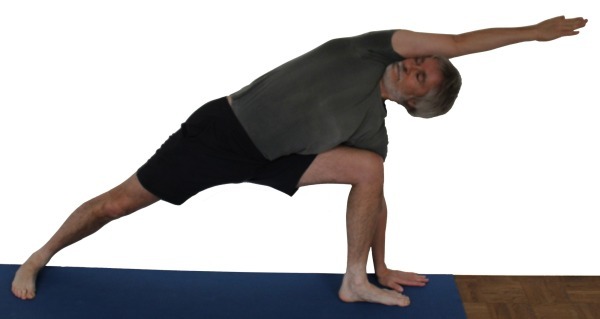
parsvakonasana
„sideways angle“

 instructions and details with working links as PDF for download/print
Detailfotos
Upper shoulder towards the wall, lower shoulder away from the wall |
Feedback: We’d love to hear what you think about this description, give us feedback at:
postmeister@yogabook.org
last update: 30.12.2018
Name: parsvakonasana
Trivial name: side angle
Level: A
- Classification: A
- Contraindication
- Effects of
- Preparation
- follow-up
- derived asanas
- similar asanas
- diagnostics
- Instruction
- details
- Variants
Classification
classic: standing posture
Contraindication
This posture is not strictly contraindicated for lumbar disc problems, but if the flexibility of the hip extensors is restricted, the lumbar spine may laterally flex and the familiar pain may reappear. Appropriate support for the hand to be placed on the floor is therefore essential.
Effects
- (212) Neck : rotation force
- (217) Neck: lateral flexion force
- (252) Shoulder joint: lateral abduction force
when the supporting hand is pushed away from the feet - (602) Strengthening the back extensors
- (662) Strengthening the rotator muscles of the trunk
- (677) Strengthening the oblique abdominal muscles obliqui abdomini
- (727) Strengthening the short/monoarticular hip extensors (especially gluteus maximus)
- (737) Strengthening the exorotators of the hip joint
- (742) Strengthening the abductors of the hip joint
- (812) Strengthening the quadriceps
- (822) Strengthening the hamstrings as exorotators of the knee joint
- (862) Strengthening the supinators
- (211) Neck : rotation stretching
- (216) Neck: lateral flexion stretching
(only with gravity-induced lowering of the head) - (231) Shoulder joint: stretch for frontal abduction
- (341) Stretch for dorsiflexion in the wrist
- (726) Stretching the monoarticular hip extensors (especially gluteus maximus)
- (751) Stretching the adductors
both legs, but differently - (871) Stretching the pronators of the ankle
Preparation
Even if the flexed leg is at about a 90° angle, the wide flexion in the hip joint can significantly outweigh the relief of the hamstrings in the flexed knee joint in terms of stretching and it requires good flexibility to allow the required sharp flexion, prepare with:
- uttanasana as a generally effective and efficient stretch of the hamstrings to prepare for flexion in the hip joints in this pose
- prasarita padottanasana, very similar to uttanasana
- parsvottanasana as a stretch that goes beyond uttanasana
- pascimottanasana
- janu sirsasana
- tryangamukhaikapada pascimottanasana
- downface dog as another good preparation for the hamstrings when the pelvis is tilted powerfully
- hip opener 5 as a very effective stretch of the hamstrings that goes beyond uttanasana
- warrior 3 pose
- trikonasana
- parivrtta trikonasana
One of the two main reasons why the pelvis with the upper body cannot be tilted well towards the bent leg is the restricted flexibility of the hip extensors (including the pomus muscles), after all a very wide flexion – even if exorotated – is required here. Prepare them with:
- half lotus forward bend
- hip opener at the edge of the mat
- hip opener 3
- parivrtta trikonasana
- parivrtta ardha chandrasana
- malasana
- maricyasana 1
- maricyasana 3
- balasana
However, the pomus muscles are not only required to be flexible, but also to constantly exert considerable force in order to push the bending leg backwards against the arm supporting it. This results in a situation where the pomus muscles have to work intensively over a very short sarcomere length and therefore close to active insufficiency, which explains the tendency to cramp. Prepare them with strengthening exercises:
- caturkonasana
- counter
- warrior 2 pose
- purvottanasana
- urdhva dhanurasana
- eka pada variation of urdhva dhanurasana
- setu bandha sarvangasana
- eka pada variation of setu bandha sarvangasana
- warrior 3 pose
- backwards against the wall“ variation of warrior 3 pose
and other various backbends Prepare the adductors of the bent and straight leg with:
- baddha konasana and variations
- warrior 2 pose
- trikonasana
- ardha chandrasana
- counter
- caturkonasana
As the bent leg is also in exorotation, practise in preparation:
- baddha konasana
- baddhakonasana as a forward bend
- Half lotus forward bend
- hip opener at the edge of the mat
- hip opener 3
- warrior 2 pose
- caturkonasana
- counter
If it is difficult to press the outside foot down in the extended leg (i.e. supination), this can also be prepared:
The outstretched arm is in approx. 180° frontal abduction, which can be prepared with:
- Head down dog, especially the „wide“ variation
- Back extension, especially the „raised“ variation
- Right-angled handstand
- handstand
- Elbow stand
- right-angled elbow stand
- Dog elbow stand
- Hyperbola as one of the most effective and efficient stretches in the direction of frontal abduction without exorotation of the arms
- Shoulder opening on the chair as one of the most effective and efficient stretches in the direction of frontal abduction with exorotation of the arms
The rotation of the upper body corresponds to that in trikonasana, so practise it:
- seated twisting as a very effective and efficient exercise for twisting
- trikonasana
- ardha chandrasana
- maricyasana 1
- jathara parivartanasana (contralateral twist)
- maricyasana 1
- maricyasana3 (contralateral twist)
- parivrtta trikonasana (contralateral twist)
- ardha chandrasana (contralateral twist)
Wrap-up
Due to the intensive work on the pomus muscles, they may feel tight, tense or shortened after the pose:
- half lotus forward bend
- hip opener at the edge of the mat
- hip opener 3
- parivrtta trikonasana
- parivrtta ardha chandrasana
derived asanas:
similar asanas:
Diagnostics (No.)
(880) Hyperextension of the knee joint in the extended leg:
Overextension of the knee joint refers to the ability to or the current state of an angle of more than 180° in the knee joint. To a certain extent, this is considered normal by anatomists and is on average more common and more pronounced in women. However, it can also indicate a weakness of the hamstrings or the quadriceps. Furthermore, hyperextension often causes unphysiological sensations that are not caused by stretching or exertion of the muscles and should be avoided, see also the FAQ.
Here the flexibility of the shoulder joint can be recognized on the side of the respective extended arm, including side discrepancies, and there may be indications of diseases of the shoulder:
- Irritable hypertonus of the deltoid: ambitious beginners in yoga in particular tend to develop irritation in the deltoid, which is localized in the area of the muscle origins, presumably due to overstraining of the structures through frequent repetitive demands in full frontal abduction and is also noticeable under such stress, see FAQ.
- Various pathological changes in the shoulder joint such as impingement syndrome, frozen shoulder, calcification of the biceps tendon, calcified shoulder, which cannot all be discussed here and require clarification.
- side discrepancies in flexibility
The flexibility of the shoulder joint can be recognized by the degree of deviation in the three dimensions of movement:
- Outward deviation of the upper arms with or without flexion of the elbows
- Loss of rotation of the arms
- Incorrect angle of frontal abduction that does not reach 180° or not permanently
(650) Kyphosis and lordosis of the spine:
A stretched back should be achieved here, possibly a residual physiological thoracic kyphosis remains and, depending on the ability to flexin the hip joints, a certain degree of lateral flexion occurs in the lumbar spine and thoracic spine. There should be a certain degree of lordosis (convex spine from the front) in the lumbar and cervical spine and only a small degree of kyphosis (convex spine from the back) in the thoracic spine or, better still, the back should be able to be extended beyond this. See the FAQ. If the lateral flexion of the spine appears to be laterally different, it should be checked to what extent this is due to side discrepancies in the flexibility of the hip joints(hip extensors, adductors).
Lateral deviations of the spine from the median plane, known as scolioses, may become visible in this posture, especially if, due to limited flexion abilityand limited exorotation in the hip joint, the spine should be recognizably convex laterally, but a certain area remains straight or concave. See the FAQ.
(950) Foot deformities:
Deformities of the supinated foot may lead to abnormalities here. (721)(724) Ischiocrural group:
In the flexed leg, the outer side of the hamstrings(biceps femoris muscle) in particular is under tension but also under load. Various disorders can therefore be found here:
- Shortening of the hamstrings, see FAQ
- Damage to the hamstrings that causes pain or functional limitations can also be easily recognized here, from simple tension to strains to muscle (attachment/detachment/tear). Tears would lead to a reduction in strength when leaving the posture quickly
- Irritation of the sciatic nerve: irritation of the sciatic nerve, which innervates the leg and foot, can become symptomatic during forward bends in particular, even if they are otherwise rather calm. See the FAQ.
- Irritation of the origin of the hamstrings at the ischial tuberosity (at the ischial tuberosities, also known as PHT: proximal hamstring tendinopathy) can become clearly evident in this posture, as the wide flexion in the hip joints outweighs the relief of the hamstrings from stretching through flexion in the knee joint. They require protection from intensive stretching, as required by this posture; see the FAQ.
- Baker’s cysts create a feeling of tension or a foreign body in the back of the knee, see FAQ.
This posture stretches the adductors. This can be used to detect damage to them:
- Shortening
- Irritation of the tendons at the origins and insertions, which manifests itself in pulling pain with an elongated course. These are insertional tendinopathies, e.g. Gracilis syndrome
- Tension that causes an agonizing sensation in the muscles that goes far beyond normal stretching
- Tearing/partial tearing/tearing of adductor muscles, which, in the event of a tear, impress with a loud noise, possibly followed by hematoma formation and swelling
- side discrepancies in flexibility, which can cause pelvic obliquity and consecutive scoliosis, see the FAQ.
Especially the widely exorotated, abducted postures and movements cause pain with existing hip damage
- Arthritic changes to the joint
- Arthritis (joint inflammation) of various kinds
- Perthes‘ disease in children or general hip dysplasia can react strongly to this posture
- Dislocation / subluxation, which would cause a significantly increased sensation of tension in various muscles covering the hip joint
- joint trauma, which may cause pain in the joint even after many weeks or months
Wrist weaknesses are most likely to occur in extensive dorsiflexion and under load:
- Ganglion, usually in the dorsal area between the hand and forearm, produces a sensation of pressure when the wrist is dorsiflexed
- Tendinitis of the tendons of the palmar flexors or finger flexors
- Carpal tunnel syndrome: worsening of symptoms in this position
- Fractures and fractures of carpal bones, especially the scaphoid bone
- Arthritic changes to the joint
- Arthritis (joint inflammation) of various kinds
- Dislocation / subluxation, which would cause a significantly increased sensation of tension in various muscles covering the wrist or the carpal bones
- joint trauma, which may cause pain in the joint even after many weeks or months
but also purely muscular symptoms such as
- Shortening/hypertonus of the dorsal flexors of the wrist, which then become noticeable in the dorsal side of the wrist in the form of cramps
- Shortening/hypertonus of the palmar flexors of the wrist, which makes the dorsal flexion of the wrist in the performing muscles on the palmar side of the forearm painful or even restricts it.
- Golfer’s elbow: Strain pain at the point of origin of flexors of the forearm in the transition to the upper arm
In this pose, knee problems associated with bending under load are very well revealed. These can be, for example: traumatic or degenerative meniscus damage, arthrosis, retropatellar events such as chondropathia patellae or retropatellar arthrosis, plica syndrome, arthritis, subluxations, ligament damage, Hoffa syndrome (of the extended leg) and others, see the FAQ.
In this pose, the abductors are called upon for strength to push the flexing leg backward against the arm. A tendency to cramp indicates hypertonicity or weakness of the abductors. If this is one-sided, it should be checked whether this is the cause of a pelvic obliquity and consecutive scoliosis, see the FAQ.
(960) Foot:
In this pose, misalignments(subluxations) of foot bones of the foot in sharp supination, usually tarsal bones or the metatarsal bones, can become noticeable directly or in the adjacent joints. In addition, in the case of hallux valgus or hallux ridigus, the metatarsophalangeal joint area of the big toe may show increased pressure pain. Metatarsalgia is pain due to pressure or movement in the area of the ball of the foot and can have various causes.
(215) Neck:
Holding the head means work for the cervical spine muscles in their lateral flexor and rotator parts, strength endurance deficiencies and hypertonus can be detected in this posture.
(711) Hip flexors: flexibility
An extended leg that does not reach 0° extension in relation to the pelvis indicates a shortening of the hip flexors. A hollow back tendency should then be recognizable when standing. For the risks of a hollow back, see the FAQ. The following are helpful:
- hip opener 1
- hip opener 2
- warrior 1 pose
- upface dog
- urdhva dhanurasana (back arch)
- ustrasana (camel)
- setu bandha sarvangasana
and other backbends with extension in the hip joint.(231) Shoulder :
In parsvakonasana, the flexibility of the shoulder joint can be recognized and there may be indications of diseases of the shoulder joint:
- Irritable hypertonus of the deltoid: especially ambitious beginners in yoga tend to develop irritation in the deltoid, which is localized in the area of the muscle origins, presumably due to an overstraining of the structures by frequently repeated demands in full-frontal abduction and is also noticeable in such stress, see the FAQ.
- Various pathological changes in the shoulder joint such as impingement syndrome, frozen shoulder, calcification of the biceps tendon(calcified shoulder), which cannot all be discussed here and require clarification.
- side discrepancies in flexibility
The flexibility of the shoulder joint can be recognized by the degree of deviation in the three dimensions of movement:
- Outward deviation of the upper arms with consecutive flexion of the elbow joints
- Loss of rotation of the arms
- Incorrect angle of frontal abduction that does not reach 180° or not permanently
(501) Shortening and tendency to spasm in the latissimus dorsi:
The movement of pushing the supporting hand towards the opposite foot can cause a tendency to spasm in the latissimus dorsi. This is all the more true if it is shortened or under increased tension, which is also visible in many postures in the form of reduced frontal abduction in the shoulder joint. Regular activities such as pull-ups or climbing and pulling activities can predispose to this.
Variants:
(P) testing the pressure of the thigh
Transition to 2nd warrior stance
Instruction
- Assume the 2nd warrior p ose (right).
- Bring more strength into the right, bending leg and slowly tilt the pelvis with the upper body down to the right until the right hand can be placed on the outside of the foot.
- Extend the left arm in line with the left side of the body. Turn it out(biceps past the head backwards/upwards) and push it away from the pelvis as far as possible ( cranially), thus elevating the shoulder blade.
- Turn the upper body away from the bending right leg as far as possible, i.e. the left shoulder backwards.
- Press the right knee or lower leg firmly against the right arm behind it.
Details
- Ensure that the left arm is well rotated so that the trapezius remains as soft as possible and the latissimus dorsi can be stretched as much as possible. The left arm therefore rotates in the opposite direction to the upper body, pelvis and right leg. Similar to the hip joint, the shoulder joint also exhibits a clear dependency of abduction abilityon exorotation. Complete abduction is therefore only achieved with maximum exorotation.
- After assuming parsvakonasana, correct the distance between the feet if necessary so that the right lower leg is vertical. The right thigh should then be horizontal.
- Press the bending leg firmly backwards against the arm standing there. This can lead to a cramp-like strain in the right gluteal muscles after a short time, but this usually calms down again after 20-30 seconds.
- Extend the raised arm in all parts, including the fingers, and stretch the arm strongly away from the upper body, so that the shoulder blade is elevated. The arm should be held exactly in extension of the upper body and not hanging on the ear. Normally the palm of the hand points towards the floor, but if there is a clear tendency to spasm in the trapezius, not only extend the upper arm to the maximum, but also supinate the forearm to the maximum so that the palm turns backwards (towards the back of the head).
- In this pose, similar to the 2nd warrior pose, all relevant body parts should move backwards from the hip joint of the bending leg: right leg, left hip, left leg.
- The left leg should perform three movements:
- straighten it in the knee joint.
- turn it out (the outer leg, which is now at the top, backwards).
- move it backwards.
- Make sure that the outer left foot does not lift off or become lighter, as this requires the left leg to be fully turned out. Push both feet away from each other against the friction of the mat using the strength of the bending leg(quadriceps; together with the rotation of the left leg, this also makes it easier to press the outer left foot firmly onto the floor.
- Do not sink your pelvis so low that it is lower than your right knee; instead, make sure that your right thigh is horizontal. People with good flexibility in the hamstrings and in the gluteal muscle area in particular find it easy and less strenuous to keep the pelvis too low. In particular, if the pressure of the feet away from each other is strong enough, the pelvis will not be too low of its own accord. However, the pressure of the feet away from each other often results in a tendency to lift the pelvis if you are less flexible. Therefore, everyone should pay attention to the position of the pelvis.
- Bring the right hand down to the floor slowly and in a controlled manner, not rushing as if the floor would save you from falling further. If there is not enough flexibility to place the hand fully parallel to the outside foot as required, use a block to press the hand onto. If no aid is available, the fist can also be placed so that the palmar side of the hand points towards the foot.
- The hand on the ground can provide powerful support if the other movements in the posture are also performed with strength. However, in those cases where flexibility and strength in the legs are hardly sufficient to hold the posture for a longer period of time and in a controlled manner, the support should be weakened and more emphasis should be placed on the work of the legs so that the performer does not begin to perceive this posture as a support posture but has the chance to grasp the standing posture character of parsvakonasana.
- Of course, the rotation of the upper body and the backward push of the bending leg against the supporting arm appear contradictory or opposing for a long time and must be understood as apparent contradictions typical of asanas, which will be resolved through practice or the flexibility and strength improved through practice, in general, all aspects that make up the ability to perform the movement.
- Press the right hand towards the left foot. This helps to stretch this side of the body a little and thus reduces the frequently occurring lateral curve of the spine. Nevertheless, in some cases there may be a compressed or cramp-like feeling in the right side of the body, which can usually be remedied by raising the right hand (block) and stretching the right side of the body better (moving the armpit away from the hip). In rare cases, this only improves with external intervention in the same way. This feeling of compression is directly related to the degree of flexibility in the hip joint, in which all three dimensions of flexibility are required simultaneously:
- Exorotation
- flexion
- AbductionAnexplanation and prognosis of the sensation of compression results from
- the flexibility restrictions in the hip joint that prevent the combination movement to be performed
- possible lack of support height with the lower hand
- the possible lack of flexibility of the trunk in the direction of lateral flexionThemovement of pushing the hand in the direction of the opposite foot can naturally lead to a tendency to spasm in the shoulder joint, depending on the tension of the latissimus dorsi as the adductor muscle in the shoulder joint. In this case, press less forcefully and often perform postures that improve shoulder flexibility in the direction of frontal abduction, i.e. postures with overhead movement of the arm and elevation of the shoulder blades including the corresponding inversion postures and backbends.
Variants
Hand on the inner leg

Instructions
- Take the pose as described above, but do not hold the upper arm in the extension of the side of the body, but reach behind the back with it and try to grasp the inner thigh of the bending leg with your hand.
Details
- This variation, if reasonably successful, is a good way to rotate the upper body more powerfully by pressing the fingers of the hand of the upper arm against the inner leg. Of course, this requires a clearly flexible shoulder in the direction of retroversion and adduction so that the hand can reach its target.
- In the case of a tendency to spasm in the trapezius of the upper arm, this posture can be a valuable alternative, as retroversion means that the shoulder blade is not externally rotated for wide abduction and therefore the tendency of the trapezius to spasm is eliminated, which is all the more true the better the shoulder blade is properly depressed.
Hand on the inner foot

Instruction
- Take the pose as described above, but place the palm of the hand on the floor parallel to the foot in the inner foot area instead of the outer foot area.
Details
- This variation can often be seen in various media, but it lacks one of the most interesting features of the pose: pushing the bending leg backwards and still turning the upper body away from the same leg as much as possible. Not only is the apparent contradiction and the resulting work gone, but there is also no longer any significant opportunity to strengthen the pomus muscles of the bending leg. In addition, there is no longer a limiting factor for the pelvis to move backwards.
Hand on the hip

Instructions
- Take the pose as described above, but place the hand of the upper arm on the hip instead of extending the arm to the side of the body.
Details
- This variation allows you to focus on the two details: pushing the feet away from each other on the floor and pushing the bending leg backwards while still rotating the upper body to the maximum.
- Pay attention to the depression of the corresponding shoulder blade. The arm moves backwards, i.e. exorotating in retroversion.
Turning the head

Instructions
- Take the pose as described above, but turn your head a little more or a little less upwards.
Details
- This is a variation for cases of clearly tense trapezius and head turners, in which holding the head in its rotation towards the ceiling tends to cause cramps. The constant alternation usually prevents cramps.
Supported on a block

Instructions
- Take the pose as described above, but place the palm of your hand on a block rather than on the floor.
Details
- Depending on your flexibility, you may need one or more blocks on top of each other, standing on their largest surfaces. One block standing on its second largest surface can also be sufficient.
Hand on the wall

Instructions
- Take the pose as described above, but place the mat at a 90° angle to the wall with the body oriented so that the head is facing the wall and keep such a distance that the fingers of the outstretched upper arm can easily reach the wall.
- Now walk the fingers of the upper arm as far back as possible to encourage the upper body to rotate.
Details
- This variation requires you to experiment to find the right distance. It is not enough for the fingertips to just reach the wall – the distance must be a little smaller, as the fingers run backwards on the wall due to the force of the finger flexors and the arm describes an arc-shaped movement in the shoulder joint.
- Using the arm makes it possible to rotate the upper body much better, but it is also more difficult to maintain the pressure of the leg against the lower arm and the extrenal rotation of the arm.
- In some cases, working the upper arm causes an unexpectedly intense stretch of the latissimus dorsi, which is to be welcomed.
- Make sure that the upper arm remains turned out and stretched despite its intensive work and does not deviate upwards, i.e. adducts.
Back foot against the wall

Instructions
- Take the pose as described above, but the mat is positioned at a 70° angle to the wall so that the rear foot, which is turned in 20°, can press against the wall over as large an area as possible (from the heel up).
Details
- Although the ability of the straight leg to turn out is less than in warrior position 2, the turning out of the leg also has an important function here: it supports the movement of the pelvis and upper body, which turn in the same direction. The pressure against the wall is very helpful in providing good feedback about the pressure built up between the feet and whether the outer edge of the foot is pressed against the floor or not (which often indicates that the leg is not turned out strongly enough).
- If the pressure of the outer foot against the wall is uncomfortable, which usually affects the area of the 5th metatarsal bone (the joint of the metatarsal bone of the small toe with the tarsal bones), a softness mediator such as one or more patches is required.
- The pressure against the wall should be strong, but it must not cause the pelvis to lift.
Block in the hand

Effects: (502) Strengthening the latissimus dorsi
Instruction
- Take the pose as described above, but hold a block in the hand of the outstretched arm.
Details
- The block, although small in size, provides a better feel for the posture and work of the arm. It is not uncommon for performers to feel that their muscles are not strong enough to hold the outstretched arm cleanly in position on their own. What applies to the arm without additional weight should apply all the more when using an additional weight, so that a good training effect can be achieved here. Of course, over time, heavier objects such as small dumbbells can be held instead of the block, which only has a small mass.
- In addition to promoting awareness, the mass of the object held can also be used to improve the stretching effect in the latissimus dorsi , whereby this stretch also has a limited strengthening effect. However, care must be taken to ensure that the arm neither turns in nor moves forward.
Back against the wall
Instructions
- Take the pose as described above, but with your bent leg along a wall.
- Rotate the upper body as forcefully as possible so that not only the lower shoulder but as much of the back as possible rests on the wall. The aim is to move the upper shoulder towards the wall.
Details
- Positioning the bending leg along a wall requires leaving space for the hand on the floor in the outer foot area. With the buttocks against the wall, a posture is therefore assumed that is inclined by a few degrees, in which the heel of the extending leg can usually be positioned against the wall. This makes it all the more challenging to press the upper shoulder against the wall. As a rule, this is not possible without a slight backbend in the upper body. However, this should be no problem because there is far less load on the autochthonous back muscles than in unsupported postures. This is interesting work for the autochthonous back muscles, as the combination of rotation and extension addresses the oblique system very well.
- This variation serves to control the flexibility of the upper body. Rotation and a slight ability to extend the spine are required. In the case of a pronounced thoracic spine kyphosis, only the spine would rest on the wall, but not the shoulders. Of course, the distance or support of the upper shoulder on the wall also depends on the flexibility of the adductors.
Standing against the wall

Instructions
- Stand in tadasana just under half a meter away from the wall with the inner feet parallel to the wall.
- Raise the leg closest to the wall and place the foot pointing upwards on the wall at about head height with the knee joint bent at 90°.
- Place the hand closest to the wall on the wall parallel to the outer foot without exerting any significant pressure, turn your upper body away from this hand and stretch your other arm upwards in extension of the corresponding side of your body.
Details
- Depending on the flexibility of the hip extensors, more or less distance between the foot and the wall is required. The less flexibility available, the more the performer must lean against the wall with the foot if the distance between the standing foot and the wall is greater.
- The strong rotation of the upper body can tend to make the foot on the wall lighter, which may need to be compensated for by increasing the distance between the foot and the wall.
- Stand on the entire foot and not – in order to build up more pressure on the wall – only on the outer foot.
- The pelvis will tend to tilt forwards, especially if the hip flexors are not very flexible. If this is corrected with force from the hip extensors, the iliopsoas pulls the thigh of the leg forwards, resulting in an inclination of the leg to bend.
- Depending on individual mobility, this will not only result in stretching of the adductors of the lifted leg, but possibly also that of the support leg, as they have a flexing effect from zero flexion of the hip joint. In addition, if the ischiocrural group of the lifted leg is less mobile, the pelvis tilts outwards at the top of the supporting leg, i.e. in abduction, which additionally increases the tension of the adductors. Conversely, these are factors that can pull the pelvis forwards into flexion.
(P) Turn your upper body
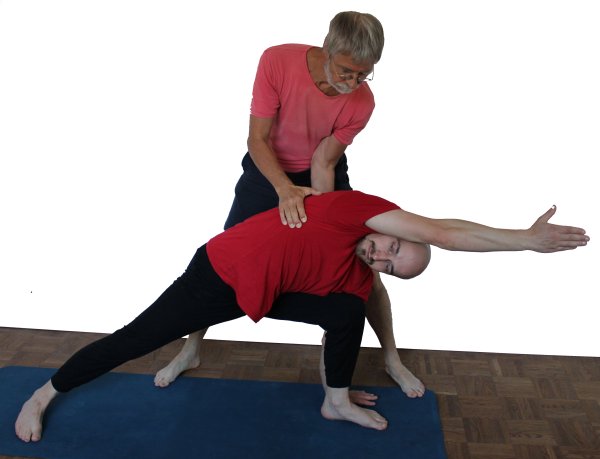
Instructions
- Take the pose as described above.
- The supporter has several options for positioning his body in order to turn the performer’s upper body:
- The supporter rotates the performer’s upper body by pushing the upper arm backwards while pulling the lower shoulder towards them with the same force. To do this, the supporter squats or kneels in front of the performer and grips with one hand between the thigh of the bent leg and the flank of the upper body until they can pull the shoulder blade, while pushing the shoulder blade or upper arm away from them with the other hand , turning it out approximately in the middle.
- the supporter stands with one leg in front of and one behind the thigh of the performer’s outstretched leg and presses on the lower shoulder blade with one hand while pushing the upper shoulder blade backwards (out of the performer’s field of vision) with the other.
- The supporter stands slightly bent behind the performer’s back and pushes the lower shoulder blade away from him/her with one hand (in the direction of the performer’s field of vision) while pulling the upper arm towards him/her with the other hand, approximately in the middle and with a clear twisting movement.
Details
- The third support proves to be the most favorable in practice. This is due to the fact that pressure and traction can be well controlled, the traction on the upper arm is performed on a favorable lever arm, i.e. in a force-saving manner, and the rotation of the upper humerus, the loss of which would usually lead to a significant undesirable lateral adduction, can be easily ensured. It is ergonomically designed so that it is comfortable for both performer and supporter and large forces can be transmitted, so that the additional rotation achieved is very likely to propagate into the pelvis, perhaps even into the extended leg.
- Make sure to exert the same force when pushing as when pulling, bearing in mind that pulling is generally easier for people than pushing and that the lever arm being pulled on is very favorable. Subjectively, the supporter will therefore have to push harder than pull.
- Avoid losing the rotation of the upper part of the upper arm, i.e. reach so far between the head and arm that the pull automatically promotes exorotation.
- Strictly prevent the gripped upper arm from deviating laterally, i.e. tend to push it towards the performer’s head.
(P) against the wall
Instructions
- Take the pose as described above in the back against the wall variation.
- There are two distinctly different support options:
- The supporter rotates the upper body by pushing the upper arm backwards while pulling the lower shoulder away from the wall with the same force. To do this, the supporter squats or kneels in front of the performer and reaches between the thigh of the bent leg and the flank of the upper body with one hand until they can pull the shoulder blade, while pushing the upper arm away from them with the other hand , turning it out approximately in the middle.
- As in other standing postures, such as the second warrior stance against the wall with support, the supporter lies across (i.e. at a 90° angle to the wall) in front of the performer and presses the thigh with the arch of the foot approximately in the middle and with an outward turning tendency towards the wall
Details
- The first variation of the support does not go much further than the above variation for external rotation of the upper body, but the performer may clearly feel the extra rotation as the upper shoulder rests on the wall. The second variation is the exact analogy to the support in caturkonasana or the 2nd warrior pose, but the position of the upper body is only improved indirectly via the pelvic position.
(P) Pressure against the hand

gives a feeling for the elevation of the shoulder blade
Instruction
- Take the pose as described above.
- The supporter presses with the flat of the hand against the fingertips of the performer’s outstretched arm.
Details
- This support should give a good feeling for the elevation of the shoulder blade of the extended arm, i.e. the „stretching out“ of the shoulder. Depending on the flexibility of the shoulder in terms of the flexibility of the adductors, i.e. the ability to perform wide frontal abduction, this movement may be less pronounced or may not yet be found. It is the same movement as, for example, in the head-down dog position or in a handstand. If the adductors are not very mobile and abduction to 180° is not yet possible, it will not yet be possible to „stretch out of the shoulder“ either, and the attempt may result in a change of angle in the shoulder joint. In all cases, however, the support clearly sets the task, and once the elevation has improved, the movement is also clearly perceptible to the supporter.
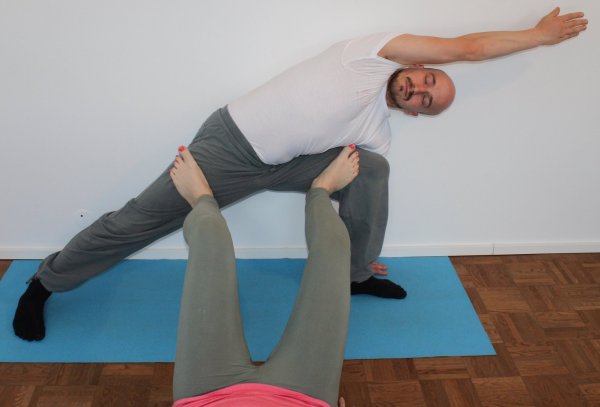
(P) Levering the thigh backwards

Improving the abduction of the flexed leg
Instructions
- Take the pose as described above.
- The supporter stands behind the performer and places their palm or fist on the inner thigh of the bent leg while supporting themselves with their forearm on the performer’s back in order to lever the bent leg further back.
Details
- The abduction of the bent leg, which is described with the instruction „push the leg backwards against the arm placed on the outside of the foot“, is not easy to learn for many people. In many cases, there is also a lack of flexibility in the adductor group, which restricts this movement, or a lack of strength in the abductors, especially the gluteus maximus. With the support of the supporter, the direction and the fact that it is actually possible to exert pressure on the arm with the leg, which is then felt accordingly, is often recognized for the first time. The performer should then try to build up similarly intense pressure against the arm using their own strength.
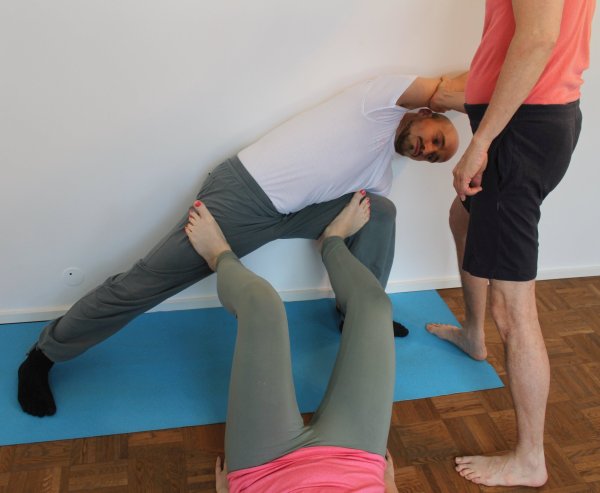
(P) Testing the pressure of the thigh
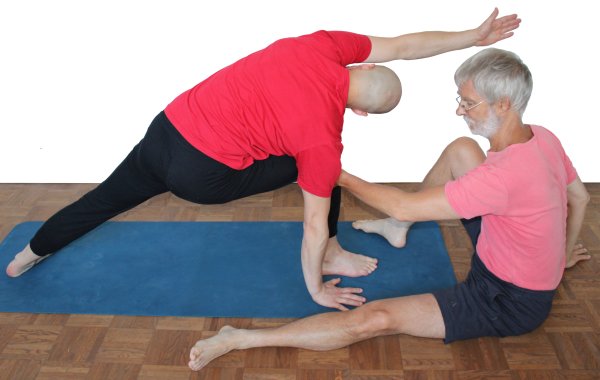
Instructions
- Assume the position described above.
- The supporter stands behind the performer and places the palm of their hand between the knee of the bent leg and the thigh against which it is pressing in order to perceive the resulting pressure and provide feedback to the performer.
Details
- The pressure felt through the abduction of the flexed leg is a good indicator of how intensively the performer is working on these details and also provides information about the flexibility of the adductors, because if this is not good, it will hardly be possible to exert a strong pressure against the leg or hand. In some cases, the bending leg will not even reach the supporting arm or hand of the supporter.
(2P) on the wall
Instructions
- Take the pose described above against the wall.
- The first supporter turns the upper body from the front as described above, the second supporter lies on the floor in front of the performer and presses the performer’s thighs towards the wall with the feet in the same way as the corresponding variations of caturkonasana and especially the 2nd warrior pose, whereby, as described for the latter, the pressure on the bending leg must come later and be less than that on the straight leg and, especially in the latter, the twist must be supported by the foot pushing the thigh upwards.
Details
- In this variation, it may be a little tight in front of the performer, but it should be possible to find an arrangement that allows both assistance positions to be used simultaneously. As already described above and in the analogous supports mentioned there, the pressure is built up slowly by the supporter while observing the pelvic position, it must be applied to the extended leg first and also be much stronger than the pressure on the bent leg. However, as the 2nd warrior pose is much more demanding than parsvakonasana in terms of the position of the pelvis, this is much less critical here than in the 2nd warrior pose.
- As the pose is performed against the wall, the best option for external rotation of the upper body is not available here and it must be rotated from the front instead.
(P) Transition to 2nd warrior pose
Detailed photos

from warrior 2 pose.. | .. tilt the pelvis ..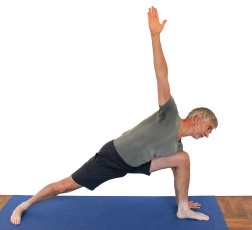 | .. place the hand.. |
Instructions
- Take the pose as described above in the back against the wall variation.
- The supporter sits straight in front of the bending leg and holds the lower leg close to the knee with clasped hands from behind to prevent the bent leg from stretching when moving to the 2nd warrior position.
Details
- The performer often deliberately or unconsciously seeks to ease the transition by bending the knee joint less. The pull of the supporter should ensure that the 90° angle is not exceeded. If this is not possible because of the fixed lower leg, the performer may seek relief by changing the position of the foot, further away from the other foot. The supporter can prevent this by fixing the performer’s foot from above with one foot.
- The grip around the lower leg should be as close to the knee as possible, as this is where the lever arm around the center of rotation, the foot as punctum fixum, is greatest.
- If the performer does not have enough strength for this precise execution, they can support themselves with their hand on a block instead of on the floor. The resulting slightly less tilted pelvis allows the upper body to come less close to the horizontal, which reduces the effect of gravity on the rotation around the hip joint of the bent leg.