yogabuch / asanas / warrior 3 pose
Contents
- 1 virabhadrasana 3„warrior 3 pose“
- 2 Variants
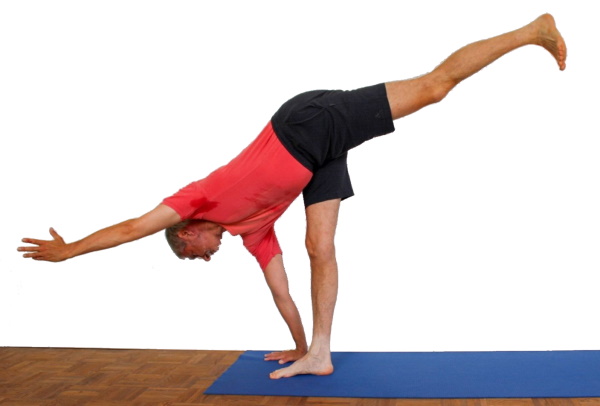
virabhadrasana 3
„warrior 3 pose“

 instructions and details with working links as PDF for download/print
Feedback: We would love to hear what you think about this description, give us feedback at:
postmeister@yogabook.org
last update: 30.12.2018
Name: virabhadrasana 3
Trivial name: 3rd warrior pose
Level: A
- Classification: A
- Contraindication
- Effects of
- Preparation
- follow-up
- derived asanas
- similar asanas
- diagnostics
- Instruction
- details
- Variants
Classification
classic: standing posture
psychomental: introverted concentration, balance
physiological: balance, strengthens lower leg, back and gluteal muscles, back-friendly
Contraindication
Effects
- (602) Strengthening the back extensors
- (632) Strengthening the muscles of the thoracic spine
- (642) Strengthening the muscles of the lumbar spine
- (722) Strengthening the hamstrings
- (727) Strengthening the gluteal muscles
- (842) Strengthening the foot lifts
- (852) Strengthening the monoarticular calf muscles (soleus)
- (857) Strengthening the gastrocnemius
- (862) Strengthening the supinators
- (862) Strengthening the supinators
- (872) Strengthening the pronators
- (721) Stretching the hamstrings
Preparation
The main preparation is for flexion in the hip joint of the standing leg:
- uttanasana as a generally effective and efficient stretch of the hamstrings to prepare for flexion in the hip joint of the standing leg in this pose
- prasarita padottanasana, very similar to uttanasana
- parsvottanasana as a stretch that goes beyond uttanasana
- pascimottanasana
- janu sirsasana
- tryangamukhaikapada pascimottanasana
- downface dog as another good preparation for the hamstrings when the pelvis is tilted powerfully, especially in the „tight“ variation and the one-legged variations
- hip opener 5 as a very effective stretch for the hamstrings that goes beyond uttanasana
- warrior 3 pose
- trikonasana
- parivrtta trikonasana
- parivrtta ardha chandrasana
The arms are in frontal abduction, this can be prepared with:
- Head down dog, especially the „wide “ variation as a general stretch for the muscles of the shoulder joint
- back extension, in particular the „raised “ variation as a general stretch of the shoulder joint muscles
- Right-angled handstand as a posture related to the shoulder joint
- Handstand as a synergistic posture related to the shoulder
- Elbow stand as a synergistic posture with exorotation of the arms
- right-angled el bow stand as a synergistic posture with exorotation of the arms
- Dog elbow pose as a related and synergistic pose with exorotation of the arms
- Hyperbola as one of the most effective and efficient stretches in the direction of frontal abduction without exorotation of the arms
- Shoulder opening on the chair as one of the most effective and efficient stretches in the direction of frontal abduction with exorotation of the arms
The extensors located in/around the pelvis (especially the pomus muscles), as well as the hamstrings, must allow flexion in the hip joint of the standing leg, prepare with :
- half lotus forward bend
- hip opener at the edge of the mat
- hip opener 3
- parivrtta trikonasana
- parivrtta ardha chandrasana
The pomus muscles do a certain amount of work and effort to hold the pelvis (and therefore the upper body, head and arms) in position:
- caturkonasana
- parsvakonasana
- counter
- warrior 1 pose
- warrior 2 pose
- purvottanasana
- urdhva dhanurasana
- eka pada variation of urdhva dhanurasana
- setu bandha sarvangasana
- eka pada variation of setu bandha sarvangasana
and various other backbends
To prepare for the powerful stretching of the back:
- „Table“ variation of the uttanasana
- right-angled uttanasana
- upavistakonasana in the „pull on the feet“ variation
- upavistakonasana in the „with block“ variation
- halasana
If the lower back currently has too much tension, this can be reduced in advance with
- parsva uttanasana
- balasana (virasana forward bend, child’s pose)
- parsva upavista konasana
- parivrtta trikonasana
- parsvottanasana
- Half lotus forward bend
- karnapidasana
- hip opener at the edge of the mat
and various seated forward bends
If there is too much tension in the calf muscles, practise in advance:
- Head down dog(gastrocnemius), especially the one-legged variations
- warrior 1 pose (gastrocnemius)
- parsvottanasana (gastrocnemius)
- parivrtta trikonasana (gastrocnemius)
- Squat 2 (soleus)
Prepare for balance work on one foot:
- vrksasana
- hasta padangusthasana, straight and sideways
- eka pada prasarita (one leg lifted)-variant of uttanasana
- ardha chandrasana
- parivrtta trikonasana
- parivrtta ardha chandrasana
- parsvottanasana
Wrap-up
If the lower back has too much tension after the pose, this can be reduced with:
- parsva uttanasana
- virasana forward bend (child’s pose)
- parsva upavista konasana
- parivrtta trikonasana
- parsvottanasana
- Half lotus forward bend
- karnapidasana
derived asanas:
similar asanas:
Diagnostics (No.)
(880) Hyperextension of the knee joint:
Overextension of the knee joint refers to the ability to or the current state of an angle of more than 180° in the knee joint. To a certain extent, this is considered normal by anatomists and is on average more common and more pronounced in females. However, it can also indicate weakness of the quadriceps or hamstrings. Furthermore, hyperextension often causes unphysiological sensations that are not caused by stretching or exertion of the muscles and should be avoided, see also the FAQ.
(852) Calves:
In this pose, the calf muscles are clearly strained, the further the load moves from the heel towards the balls of the feet, the greater the strength endurance demand on the calf muscles (the triceps surae). However, the calf is less prone to cramps when the foot is fully planted on the ground. If calf cramps occur quickly, this often indicates a lack of strength endurance or a supply problem such as a lack of magnesium in the blood or poor circulation. As a rule, this has nothing to do with calf cramps occurring at night, which are usually caused by sustained stretching movements(plantar flexion) in the ankle due to the current dream event. However, if cramps occur at rest, this may indicate a calcium deficiency.
(721)(724) Ischiocrural group:
The supporting leg is in extensive flexion in the hip joint and also bears some weight to keep the pelvis and the partial body weight of the upper body, head, arms and lifted leg held by it in a stable position, therefore various disorders can be found:
- Shortening of the hamstrings, see FAQ.
- Damage to the hamstrings, which causes pain or functional limitations, can also be easily recognized here, from simple tension to strains to muscle (attachment/detachment/tear). Tears would lead to a reduction in strength when leaving the posture quickly and possibly to better flexibility in a side-to-side comparison
- Irritation of the sciatic nerve: irritation of the sciatic nerve, which innervates the leg and foot, can become symptomatic during forward bends in particular, even if they are otherwise rather calm. See the FAQ.
- Irritations(insertional tendinopathies) of the origin of the hamstrings at the ischial tuberosity(also known as PHT: proximal hamstring tendinopathy) will become clearly evident in this posture and require protection from the intensive stretching that this posture demands; see the FAQ.
- Baker’s cysts create a feeling of tension or a foreign body in the back of the knee, see also the FAQ.
(960) Foot:
In this pose, misalignments(subluxations) of foot bones, usually tarsal bones or the metatarsal bones in the adjacent joints, can also become noticeable. Subluxations in one of the ankle joints are particularly noticeable under the weight of a large part of the body. In addition, in the case of hallux valgus, the metatarsophalangeal joint area will show increased pressure pain. Metatarsalgia is pain due to pressure or movement in the area of the ball of the foot and can have various causes.
(187) Neck:
Holding the head means work for the cervical spine muscles, lack of strength endurance and hypertonus can be detected in this posture.
In this pose, the strength endurance capacity of the back extensors is revealed. Any tension, whether caused by posture, professional or other demands, scoliosis, hyperkyphosis of the thoracic spine or misaligned vertebrae, should be revealed here.
Variants:
Transition to ardha vasisthasana
Instruction
- Stand in tadasana and keep the feet hip-width apart.
- Stretch your arms powerfully upwards as in urdhva hastasana and turn them out. The palms face each other and the shoulder blades are elevated.
- Shift your weight completely onto the right leg and lift the left leg slightly.
- Lift the left leg back up and slowly tilt the pelvis and upper body forwards to the same extent. Continue the tilting movement until the upper body and the lifted leg are horizontal. Continue to stretch your arms forwards and upwards .
Details
- Keep pressure on the inside of the foot, especially on the inner ball of the big toe. Pressure distribution in the foot is very important for standing calmly and safely. To achieve this, it is necessary to distribute the pressure evenly in the longitudinal direction of the foot between the heel and the ball of the foot and in the transverse direction between the inner and outer ball of the foot. It is usually observed that there is too little pressure on the inner ball of the foot and too much pressure on the heel. Both lead to swaying around the longitudinal axis of the foot.
- Keep the toes soft, i.e. do not lift them or press them against the ground, as it is difficult to maintain even pressure from the toes on the ground and at the same time pressing the toes affects the pressure on and distribution of pressure between the balls of the foot. It can be helpful to spread the toes by hand before starting the pose, in particular to bend the little toe, which tends to bend significantly, outwards and turn it so that its entire underside is on the floor instead of just the lower front outside.
- Keep the standing leg straight in the knee joint by working the quadriceps a little.
With increasing flexion of the standing leg, it would become increasingly possible, balancing from an alternation between the combination of adduction and endorotation in the knee joint on the one hand and abduction and exorotation on the other. This would not only bring more unrest into the stance, but would also take away the possibility of learning how balancing should actually happen here, namely from the rein system of the ankle. The strengthening of these muscles that can be achieved in this way would also fail to materialise, which is particularly important in cases such as unstable foot joints, footddeformities or a tendency to shin splint syndrome would represent a real loss.
The less the three overlapping joints – ankle, knee joint and hip koint – wobble, the easier and smoother the stance will be. Furthermore, the extended knee joint gives you a much better feel for the stretch in the hamstrings, which for many people is a major limiting factor in this posture. - When assuming the posture, make sure that the pelvis does not deviate. A backward and upward evasive movement of the hip associated with the lifted leg is often observed. This is generally an evasive movement in favor of less stretching in the hamstrings and the glutes. With the lateral shift of the center of gravity from the initial urdhva hastasana, in which it was exactly centered between the feet, to centered under the foot of the standing leg, the pelvis must move a little towards the standing leg, resulting in a slight adduction of the standing leg. However, this is not a fault of the posture but a physical necessity: the center of gravity perpendicular must lie in a static position in the physical base of support. This leads to a minimally increased demand on the flexibility of the hamstrings and the monoarticular hip muscles compared to a non-adducted position of the leg, which further increases the frequently seen evasive movement of turning the pelvis away from the standing leg.
- When assuming the posture, it is advisable to primarily try to lift the back of the thigh of the leg to be lifted and not primarily to bring the upper body down. If the leg is lifted further and further backwards and upwards, the upper body cannot help but move forwards and downwards to the same extent once the extension capacityin the hip joint of the lifted leg, i.e. the stretching capacity of the iliopsoas, has been exhausted. In addition, this focus results in a better awareness not only of the rear leg but also of any rotation (to be prevented) and the position of the associated hip. With this focus, make sure that the lower back on the side of the leg to be lifted does not contract excessively; do not confuse extension of the hip joint of the leg to be lifted with a backbend in the lower back. It is essential that the upper body is lowered at the same speed as the leg being lifted. The lumbar spine in between should not leave its physiological lordosis during this process. It would tend to hyperlordosis if the leg lifted faster than the upper body, and it would lose its lordosis or even kyphosis if the upper body lowered too quickly in relation to the leg. The entire structure of the leg to be lifted and the upper body with the lumbar spine in between should be and remain stable and stretched without movement as if it were splinted. Apart from this, a different speed at which the leg is lifted or the upper body is lowered would lead to an undesirable displacement of the center of gravity along the midline of the foot, which is detrimental to the stability of the posture. This precise way of assuming the posture often leads to an unexpected increase in the work of the gluteus maximus.
- Keep the arms parallel and stretched at the elbow joints. Raise the arms to the maximum (elevation the shoulder blades) and turn them out (biceps upwards). The palms face each other. If there is a tendency to cramp in the trapezius, turn the palms upwards as far as possible.
- Pay close attention to the position of the pelvis when assuming the pose. The hip of the leg to be lifted usually lifts imperceptibly so that the pelvis is at an angle when the posture is assumed. It is best to use the sacrum or the iliac crest as a guide rather than the surface of the pomus muscles, as the gluteus maximus of the leg to be lifted in particular contracts and thickens in the process.
- Stretch both sides of the trunk away from the pelvis. On the side of the supporting leg, you tend to bring the upper body into a contracted lateral curve, i.e. push the hips forwards and inwards and the armpits backwards and outwards. Consciously counteract this.
- Extend the chest, i.e. the sternum away from the pubic bone, i.e. forwards and upwards. The body parts should not hang down as in a fir tree, but should be horizontal, which is more like the raised position of the branches of a spruce tree. In particular, the yphosis should be neutralized as far as possible. However, a real extension of the thoracic spine would not be in keeping with the posture.
- If the hamstrings are very flexible, it is possible, even with the physiological lordosis maintained, to lower the upper body further than the horizontal in order to possibly exert a stretching effect on the hamstrings. The effect that the strengthening effect for the autochthonous muscles of the lumbar spine decreases because the gravity effect decreases with increasing downward deviation from the horizontal is likely to be negligible for most people. Alternatively, the upper body can be kept in a horizontal position, which should mean slightly more powerful work by the hamstrings than if the hip joints are tilted further.
- The work of the gluteus maximus to lift the leg creates besides the abductory also an exorotatory moment which must be equalised by consciously turning in the leg.
- In the trapezius, quite a few people experience a tendency to spasm, as it is intensively occupied with keeping the shoulder blades outwardly rotated on the one hand, so that the arms can assume and maintain the wide frontal abduction, on the other hand, to hold the elevation of the shoulder blades. As a result, the pars descendens of the trapezius is particularly challenged and often close to sarcomere length due to its very short cramp. This is all the more true if the traction of the adductors of the shoulder joint and, above all, the latissimus dorsi and, secondarily, the teres major is still very high due to a lack of flexibility. Various modified arm postures, such as folded arms, the arm posture of the warrior 1 pose with folded hands or the arm position of caturkonasana, in which the trapezius does not have to work for the external rotation of the shoulder blades.
- For the best possible stability, the surface should be as hard as possible. On the one hand, any softness of the surface causes the force used for balancing to be dissipated proportionally in the elasticity of the material and, on the other hand, the feedback from the proprioceptors in the foot to the changing pressure conditions is poorer.
Variants
Hands together

Simplification for better concentration on the work in the legs and upper body.
Instructions
- Take the pose as described above, but place your palms on top of each other and cross your thumbs.
Details
- Use the resources freed up (compared to the original pose) to work more precisely in the pelvis and stretch the upper body evenly on both sides as well as stretching the chest strongly.
- This variation makes it much easier to hold the arms and can be used if there is a pronounced tendency to cramp the trapezius and the maximum rotation of the arms and upturned palms do not provide sufficient relief.
- Balancing can be subjectively a little more difficult, as small mass equalisations from an outward movement of the arms are no longer possible.
Hands on the hips

Focus on the posture of the pelvis
Instructions
- Take the pose as described above, but keep the fingertips on the hip bones.
Details
- The hands make it easier to assess whether the hip of the lifted leg is too far up and whether it is further forward than the other leg. The latter would tend to bring the upper body into a sideways curve, which is often observed in practice.
- The shortening of the effective lever arm has a clearly positive effect on stability. This variation is therefore a good alternative for beginners.
Hand on the sacrum

Concentration on the horizontal position of the pelvis
Instructions
- Take the pose as described above, but then place the hand on the side of the supporting leg flat on the sacrum.
Details
- The flat hand on the sacrum allows you to assess whether the pelvis is horizontal. This is best assessed on the sacrum, but not on the buttocks, which are inevitably shaped differently in this posture. As the hip of the leg to be lifted is usually too high, the grip with the hand on the side of the supporting leg is more favorable.
- This variation provides a good perception of whether and how the position of the lumbar spine changes, which often occurs when adopting the posture. If the lumbar spine changes in the direction of hyperlordosis or a steep position, the distance between the fingertips and the palm area becomes shorter or longer, i.e. the hand is flexed or extended, which can be perceived very well.
Palms facing upwards

Reduces the tendency to spasm in the trapezius.
Instructions
- Take the pose as described above, but don’t just turn your arms out, supinate your forearms so that your palms are facing upwards as far as possible.
Details
- Before you stop working your arms in this pose altogether due to a tendency to cramp in the trapezius, as in the „hands on hips“ pose, you can try this variation, which has a lower tendency to cramp than the standard variation.
Backwards against the wall

More conscious work in the standing leg, strengthening of the calves
Effects: (642) Strengthening the muscles of the lumbar spine
(722) Strengthening the hamstrings
(602) Strengthening the back extensors
(552) Strengthening the quadratus lumborum
(852) Strengthening the monoarticular calf muscles (soleus)
Instructions
- Stand backwards against the wall at a distance slightly greater than the length of your own leg; the foot of the leg you are standing on points away from the wall at a right angle.
- Press the foot of the leg to be lifted against the wall at pelvic height so that the foot is pointing exactly vertically downwards with its center line.
- Build up strength in the lower leg of the standing leg and straighten the lifted leg.
- Slowly raise your upper body with your arms outstretched.
- Maximize the pressure with which the heel of the lifted foot presses against the wall.
Details
- In this variation, subjectively much greater force is required from the calf muscles of the standing leg, which is due to the fact that the plantar flexors must also be used to push the body backwards in order to exert sufficient pressure on the raised foot to suppress the tendency of the leg to turn out.
- The position of the foot of the raised leg is decisive for the intensity and effect of the posture. A foot that is not vertical generally indicates a lifted leg that is not pointing straight downwards but is exorotated and therefore usually indicates a lifted hip, which significantly reduces the effect of the posture in the standing leg: there is often a significant stretch in the hamstrings with simultaneous strong work of these muscles. The reference for the foot is its midline. The tendency to turn out the lifted leg results from the work of the gluteus maximus to lift the leg, which also creates an externally rotating moment in the hip joint. It is therefore all too easy for the ROM to unintentionally rotate, partly because rotation is not evenly distributed over the two possible directions, but the endorotation is significantly less possible, from which it follows that the neutral position, which results from the relevant muscle tensions, corresponds to a certain degree of exorotation.
Only when the force with which the foot presses against the wall is sufficiently high, the externally rotatoring torque is absorbed by the friction of the foot on the wall. This requires intensive work by the plantar flexors of the standing leg, which increases the smaller the distance between the foot and the wall. To make matters worse, a smaller distance means a greater sarcomere length of the plantar flexors, which can mean lower maximum strength on the one hand, but can also cause an intense stretching sensation, especially in the gastrocnemius. - Of course, lifting the upper body upwards from the floor is a straightening movement of the pelvis and, depending on the flexibility, stretching the lifted leg against the resistance of the hip flexors, which is why it often seems impossible to do both at the same time. Lifting the upper body upwards is often perceived as very strenuous and is a good way of strengthening the autochthonous back muscles and the extensors of the hip joint. The reason for the difficulty in extending the lifted leg is often less due to the gravity of the leg than to the restriction of movement by the hip flexors. Lifting the upper body requires a lot of strength due to the large partial body weight and the large effective lever arm at an optimum gravitational effect due to the horizontal direction.
- When taking the pose, first straighten the lifted leg before using more energy to lift the upper body. By restricting the movement of the hip flexors, the pelvis is automatically pushed down with the upper body so that good work can be expected in the hip extensors and autochthonous back muscles. Dorsiflexion in the ankle is rarely so restricted that a different approach is required.
- First raise your arms forwards into an overhead position before you start to lift your upper body. This creates an optimal flexoing torque in the hip joint for maximum strengthening.
The pressure of the heel against the wall results almost exclusively from the work of the calf muscles of the standing leg when the stance foot is in an optimal position. If the distance between the foot and the wall is too great, this undesirably reduces the need for the calf muscles to work, but requires more flexibility in the hamstrings of the standing leg. If the distance is too small, the stance is not possible, if at all, without bending the lifted leg, and there is a great tendency to tip forward. At the same time, the calf muscles would not be able to work hard enough to develop significant pressure of the heel of the lifted leg against the wall or even to keep the posture upright at all.
Hands against the wall

Instructions
- Extend your back.
- Build up strength in the back of the standing leg and slowly raise the other leg until it is horizontal.
Details
- This variation is identical to the back extension with one leg raised.
- Make sure that the distance between the standing leg and the wall is not too small, otherwise the weight plumb line will be too unfavorable to exert sufficient pressure on the wall with your hands. The distance should also not be too great so that the stretching effect in the back of the supporting leg is not lost.
- As usual for the back extension and other overhead postures of the arms, stretch backwards from the shoulders(elevation of the shoulder blades) and turn the arms out fully. Press the ischial tuberosities backwards from the hands, especially from the base of the fingers.
- There is nothing wrong with lifting the raised leg above the horizontal. However, the lower back should not fall into a backbend and contract excessively; the hip extensors of the standing leg must control the position of the pelvis.
- As in comparable poses, make sure that you are not standing primarily on the outside of the supporting foot, but rather that you achieve an even distribution of pressure between the inner and outer foot.
- Keep your arms straight. The frequently observed bending of the arms can be a sign that the distance between the standing foot and the wall is too small or simply an attempt to avoid stretching the back of the standing leg.
- The tendency to cramp in the trapezius that sometimes occurs in the original posture should not occur here.
- In the raised leg, stretch the inner foot and the front edge of the heel backwards. Lift the inner leg in particular to avoid turning out of the lifted leg.
- A tendency to cramp on the back of the hand is a fairly reliable indication that the pressure of the hands against the wall is insufficient, which means that the distance between the standing foot and the wall is probably too small. It can also be a sign of insufficient activity of the wrist palmar flexors or high tone of the wrist dorsiflexors.
Transition to ardha vasisthasana
Detailed photos
From warrior 3 pose..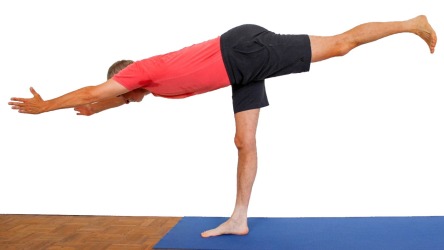 | .. tilt upper body, place the hand..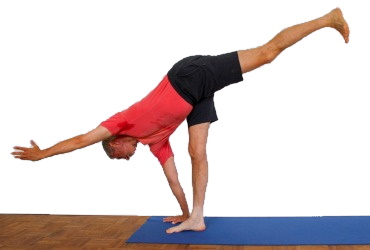 | .. bend the knee, place the foot..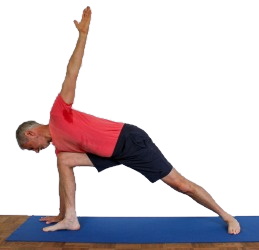 | .. turn and stretch the hips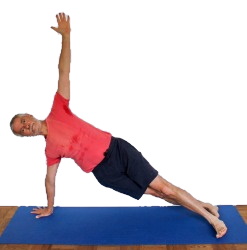 |
Instructions
- Take the pose as described above.
- Bend the upper body slightly forward to place the right hand next to the right foot.
- Keep the left arm up while bending the standing leg and turning the upper body away from the supporting leg.
- When the standing leg is bent as far as possible, place the foot of the lifted left leg on the floor at a distance suitable for ardha vasisthasana with the inner edge of the foot at a 90° angle to the foot of the standing leg. Release the previous standing leg, lift it off the floor and place its foot behind the other. Place the inner edge of the first foot on the floor on the inner edge of the second foot so that both inner edges of the feet are on top of each other.
- Turn the upper body completely into a vertical plane and stretch the hip joints to fully assume ardha vasisthasana.
Details
- This transition has a certain lack of elegance in that the foot of the supporting leg must later be the lower one, and therefore the foot of the lifted leg must be placed provisionally.
- The distance can only be measured correctly with a little experience. If it is too small, it will not be possible later to bring the pelvis into the line connecting the feet with the sternum without the supporting arm being too oblique in the sense that the hand is too close to the feet. In many cases, this would cause discomfort on the dorsal side of the wrist. If, on the other hand, the distance is too great, active lateral abduction in the shoulder joint of the supporting arm is hardly possible and thus a good opportunity to strengthen the relevant muscles, the deltoids, is no longer available. If possible, place the feet so that the wrist of the supporting arm is 1-2 cm beyond the perpendicular point of the shoulder.
- Depending on your flexibility, it may be necessary to bend the standing leg in the first step so that the hand can be placed on the floor.
- The tendon of the middle finger on the back of the hand should point towards the heels when the pose is assumed.
- As in ardha vasisthasana in general, a lack of strength in the abductors of the hip joint would be noticeable here, so that the pelvis cannot be held at the correct height, but sinks unsustainably according to gravity. In this transition, the situation is additionally aggravated in the phase in which the first foot brought to the ground is placed on the second, because the adductors of the upper leg cannot cooperate as long as the leg is in the air. This situation can be used as a second stage of the test for (significant) lack of abductor strength.
Transition to ardha chandrasana
Instructions
- Take the pose as described above.
- Take both arms out to the side at 90° to the spine.
- Turn the pelvis with the upper body to a horizontal position, shifting the pelvis slightly to the side of the support leg.
- Place the fingertips of the lower hand on the floor on the outside of the foot so that the fingers are approximately under the shoulder.
- Press the fingers backwards (out of the field of vision) and towards the heel.
Details
- The greatest difficulty with this not too complex transition is probably the shifting of the centre plumb line, which is caused by the rotation of the pelvis. Because the pelvis is no longer horizontal but almost vertical above the support leg, the centre of gravity of the body is significantly altered, which makes a successive adjustment during the transition necessary so that the centre of gravity remains in the physical support base throughout. The pelvis must therefore also be shifted backwards (on the outside of the foot) with increasing rotation downwards into a horizontal position.
Transition to parivrtta ardha chandrasana
Instructions
- Take the posture as described above.
- Take both arms out to the side at 90° to the spine.
- Turn the pelvis with the upper body from the horizontal to the vertical as far as possible, i.e. away from the support leg, whereby the pelvis must be moved slightly away from the side of the leg.
- Place the fingertips of the lower hand on the floor on the outside of the foot so that the fingers are approximately under the shoulder.
- Push the fingers backwards (out of the field of vision) and towards the heel.
Details
- This at the transition to the ardha chandrasana about the shift of the centre of gravity and centre of gravity applies much less here. Although the upper body rotates in space, the pelvis remains horizontal so that there is hardly any displacement of the centre of gravity, which would require precise observation and successive adjustment. On the other hand, the sensation of stretching in the ischemiocrural group and in the gluteus maximus increases with each degree of rotation. If the pelvis on the contralateral side (that of the lifted leg) is allowed to sink further than the horizontal line, there may also be an additional stretching of the small gluteus maximus, which was already working more or less intensively to keep the pelvis in position.
Transition to downface dog
Instructions
- Take the pose as described above.
- Bend the support leg wide.
- Tilt the ankle of the leg backwards, i.e. in the direction of less dorsiflexion.
- Place the rear foot, which is still raised, on the floor at a large distance from the front foot.
- Place the hands on the floor as far apart as possible, shoulder-width apart at the front.
- Place the front foot hip-width apart next to the rear inner foot.
- Flex to the maximum in the hip joints and continue to develop the head down dog position.
Details
- The bending of the support leg is, in addition to the force of the quadriceps is also characterised by the available dorsiflexion of the ankle. A less mobile soleus stops the flexion prematurely here. For geometric reasons, the rear foot can be placed less far back on the ground if you don’t want to tip roughly backwards during the transition, which should of course be avoided due to the associated risk of injury to the ankle.