yogabook / asanas / karnapidasana
Contents
- 1 karnapidasana„Pressure on the ears (half roll backwards)“
- 2 Variants
- 2.1 Curls
- 2.2 on rollers
- 2.3 Shoulder supported
- 2.4 Feet on block
- 2.5 Feet against the wall
- 2.6 Supported with a chair
- 2.7 (P) Support when taking the pose
- 2.8 (P) Support when taking the pose on rollers
- 2.9 Transition to sarvangasana (shoulder stand)
- 2.10 Transition to halasana (plough)
- 2.11 Detailed photos
- 2.12 Transition to downface dog
- 2.13 Transition to uttanasana
- 2.14 Detailed photos
- 2.15 Transition to pascimottanasana
- 2.16 Transition to janu sirsasana
- 2.17 Transition to the rectangular shoulder stand
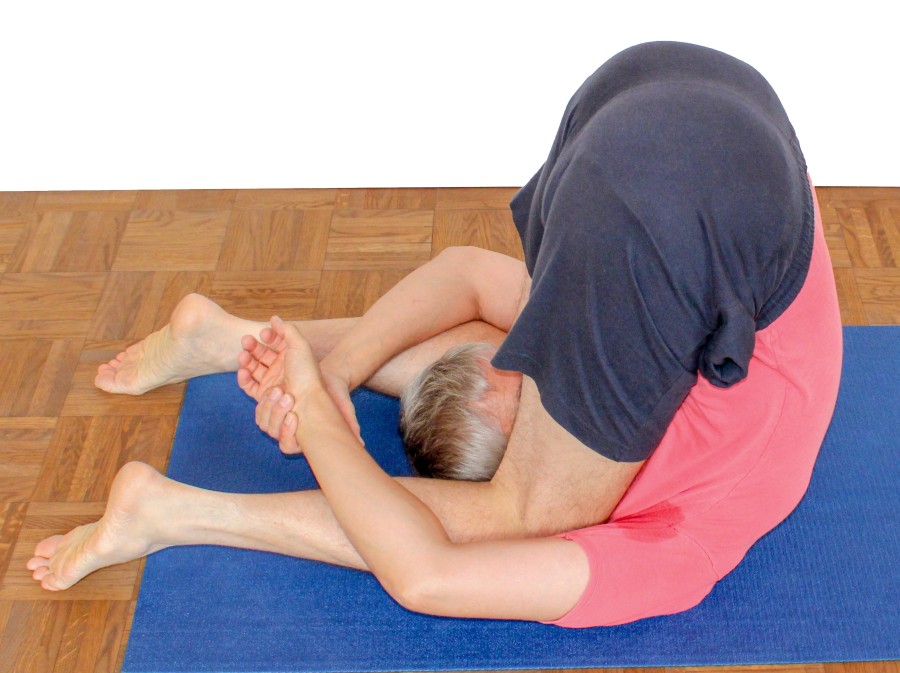
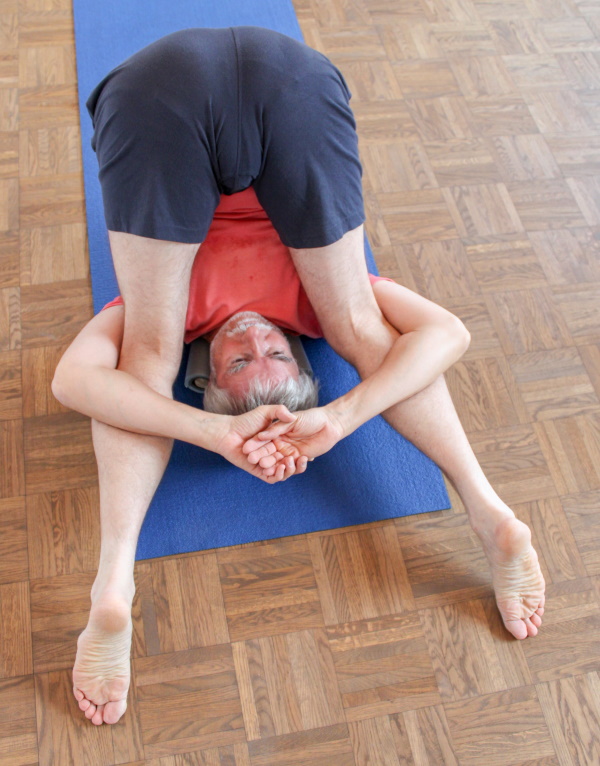
karnapidasana
„Pressure on the ears (half roll backwards)“
 instructions and details with working links as PDF for download/print
Feedback: We’d love to hear what you think about this description, give us feedback at:
postmeister@yogabook.org
last update: 30.12.2018
Name: karnapidasana
Trivial name: pressure on the ears (half backward roll)
Level: A
- Classification: A
- Contraindication
- Effects of
- Preparation
- follow-up
- derived asanas
- similar asanas
- diagnostics
- Instruction
- details
- Variants
Classification
classical: lying pose / reverse forward bend
psychomental: introverting, calming
physiological: stretches the back muscles, stretches the cervical spine muscles
Contraindication
In the case of acute herniated discs in the lumbar spine oder any other part of the spine, poses and movements that convexly round (flex) the spine are contraindicated and can trigger pain and have a detrimental effect on the alleviation of symptoms. If this position leads to reflux (GERD), it must also be avoided.
Effects
- (682) Strengthening of the inspiratory intercostal muscles
- (201) Stretching of the neck / cervical spine in the direction of flexion
- (246) Shoulder joint: stretching for retroversion
- (291) Stretching the trapezius
- (551) Stretch of the quadratus lumborum
- (601) Stretching of the erector spinae
- (621) Stretching the neck / cervical spine
- (631) Stretching of the thoracic spine
- (641) Stretching the muscles of the lumbar spine
Preparation
Neck: as karnapidasana is THE elementary pose for stretching the neck, it is difficult to give preliminary exercises, but those that have a synergistic effect or are otherwise helpful:
- Headstand is a good way to warm up the neck muscles. These muscles are „of a slightly different character“ to the muscles that move the extremities; they have more of a „holding muscle“ character, which is why experience has shown that they react positively to being warmed up first before being stretched, as they are in karnapidasana.
- Halasana is very similar in terms of the cervical spine.
- Shoulderstand is very similar in terms of the cervical spine.
Back of the leg (hamstrings): Although the knee joints are bent widely, in cases where the hamstrings are very immobile, it can be helpful to stretch the hamstrings before karnapidasana so that the feet can reach the floor:
- uttanasana THE standard to warm up and stretch the hamstrings
- prasarita padottanasana similar to uttanasana
- downface dog good preparation when tilting the pelvis strongly. The angle in the ankle joint can be neglected here, even the heels can be supported if necessary.
- parsvottanasana preparation beyond uttanasana
- hip opener 5 preparation beyond uttanasana
The monoarticular (single-jointed) or short extensors of the hip joint (mainly the glutes) can also prevent the feet from reaching the floor if they are very immobile:
- half lotus forward bend
- hip opener at the edge of the mat
- hip opener 3
- parivrtta trikonasana (also with a bent front knee)
- parivrtta ardha chandrasana
- malasana forward bend
Follow up
If the neck feels tense after the pose, practise:
Derived asanas:
Similar asanas:
Diagnostics (No.)
(680) Oesophagus/stomach/intestine:
A disturbed closure function of the stomach or oesophagus can be particularly noticeable here, as can an overfilled stomach or intestine, which can exert pressure on the heart and lungs.
(184) Goitre (struma):
In karnapidasana, a sensation of pressure can occur in the throat area:
- Due to the extensive flexion of the cervical spine, a sensation of pressure in the throat area caused by a goitre can occur. A goitre is the thyroid gland’s attempt to extract more iodine from the bloodstream to produce its hormones T3 and T4 through tissue growth. It is therefore usually an attempt to compensate for iodine deficiency and often indicates an underactive thyroid gland (hypothyreosis). This needs to be clarified.
- Other thyroid diseases such as Hashimoto’s thyroiditis or carcinoma, usually with, less frequently without endocrinological changes, can also lead to pressure sensations. In general, they all require clarification.
(680) Difficulty swallowing:
In karnapidasana, swallowing difficulties (also the physiological swallowing of one’s own saliva) can occur for the first time or become more obvious.
- There are many causes of dysphagia, and there are several reasons why this symptom requires clarification.
(650) Kyphosis and lordosis of the spine:
Here the back should round reasonably evenly, still a little in the lower lumbar spine, then steadily increasing. The spinous processes of the vertebrae (perhaps apart from the lowest lumbar spine) should all come out evenly or evenly increasing. A hyper- or less kyphosis of the thoracic spine or a hyperlordosis of the lumbar spine become quite visible in this pose. See the FAQ. The following observations can be made in this pose:
- Reduced kyphosis (also: steep posture and remaining lordosis) of the lumbar spine: reduced flexibility of the lumbar spine, possibly a hollow back.
- Hyperkyphosis of the lumbar spine: very rare, would occur more clearly in other poses (especially forward bending).
- Less kyphosis of the thoracic spine: presumably a steep position of the thoracic spine with reduced flexibility.
- Hyperkyphosis of the thoracic spine: is probably also present when standing and can be secondary in a hollow back.
All changes in parts of the spine should not be considered in isolation and are often compensations for other changes. Consider the whole and all its parts.
In this pose, the erector spinae should allow the back to fall into rounding (flexion). If the tone is too high, this can be prevented or cause a distinct stretching sensation. Any tension, whether caused by posture, occupational or other demands, scoliosis, hyperkyphosis of the thoracic spine or misaligned vertebrae, should be clearly visible here.
(611) Pelvicobliquity/scoliosis of the spine:
The lateral deviations of the spine from the sagittal plane known as scoliosis are also quite visible in this pose. See the FAQ.
(181) Neck:
In karnapidasana, various types of neck pain can become noticeable, from simple muscular tension to neuroradicular pain caused by herniated discs.
- Simple stretching sensations can be tolerated to a small extent. If the sensation of stretching becomes too great, this may indicate an impact, the consequences of which do not necessarily disappear immediately after the pose is stopped.
- If there is a herniated disc (protrusion, herniation, etc.), pressure on a nerve root can lead to neurological symptoms such as numbness, pain, sensory disturbance, paraesthesia). Of course, this is not tolerable. In the case of a known herniated disc, karnapidasana should only be performed after consultation with the treating therapists, see contraindications above.
If dizziness occurs, this should be clarified.
Variants:
(S) Support during taking on tubes
Transition to sarvangasana (shoulderstand)
Transition to halasana (plough)
Transition to head down dog pose
Transition to pascimottanasana
Transition to rectangular shoulderstand
Instruction
- Lie on your back and place your feet close to your pelvis with your knees bent wide.
- With momentum, pull the legs towards the upper body (flexion movement in the hip joints) and at the same time bend the upper body using the strength of the abdominal muscles.
- If the swing was strong enough, the body’s centre of gravity will be on the head side of the shoulder line and – unless there are massive flexibility restrictions in the back, the hamstrings and the dorsal cervical spine muscles – it will be possible to put the feet down.
- Let your back sink passively to the floor with your knees next to your ears.
- Place the back of one hand in the palm of the other hand and both forearms on the lower legs from above.
- Breathe in regularly and deeply enough against the resistance caused by the compression of the front of the body, the exhalation then follows automatically and without effort.
Details
- Karnapidasana is one of the most important stretches for the whole back in terms of flexion (in addition, of course, there is also lateral flexion, i.e. side bending, and rotation, i.e. twisting as possible movement of the spine), from the cervical spine to the lumbar spine. If parts of the spine are damaged, e.g. due to herniated discs such as protrusions, prolapses or other conditions that cause acute or potential neurological disorders, karnapidasana should only be performed after consultation with the treating therapist. Take a defensive approach to the cervical spine and its muscles. The cervical spine is one of the weaker parts of the human body, just like the lumbar spine (where herniated discs are even more common) and the knees. If the stretching of the dorsal muscles of the cervical spine is felt to be too intense, move the pelvis a little away from the feet. Too intense an impact, especially on a clearly restricted cervical spine, is not tolerable! During karnapidasana, there should be no significant discomfort in the cervical spine; the sensation of stretching there should remain fairly moderate. The other parts of the back may show more pronounced stretching sensations. Practise more often, more gently and for longer rather than too intensively. If necessary, use a support for the shoulders, see below.
- It is rarely necessary to support the back with the hands, and only for people with limited flexibility; in these cases, the tips of the toes usually do not reach the floor.
- In cases where the back muscles are under too much tension, this tension can extend into the lumbar spine and cause or contribute to lumbago, for example, or into the cervical spine and cause dizziness or nuchal (neck-side) tension headaches, for example. Here karnapidasana can be very useful both preventatively and therapeutically! If karnapidasana is used for such a purpose over a long period of time with only moderate success and the back’s ability to stretch is already quite good, but the complaints still persist, it may be that the back muscles are quite weak and are unable to cope with the daily holding work (or physical activity). In this case, back strengthening should be practised in particular, but not exclusively and not daily backbends. If the tone of the back muscles increases as a result of the training, karnapidasana should also be practised from time to time, and a doctor should be consulted in the event of complaints such as frequent dizziness or persistent headaches.
- In order to relieve the cervical spine, the shoulder area can be placed on quite high support so that the head is lower than the shoulders so that the bending radius of the cervical spine remains larger and the angles in the vertebral segments smaller. Pressure on the C7 (vertebra prominens, 7th cervical vertebra) is a recurring theme in karnapidasana. If used correctly, the shoulder support should provide sufficient relief, otherwise an additional blanket can be used under the head and shoulder, but never just under the head, to cushion the C7. It is also possible to work with smaller shoulderstand plates that are placed a little distance apart so that the C7 lies free. The shoulder support is used in such a way that there is still two fingers‘ width of space behind the shoulder on the support (blanket or mat) when taking the supine position with the shoulder blades depressed. In contrast to headstand, the support here can be quite high, up to standard shoulderstand plates.
- The exact position of the arms is crucial for the effect. The standard position is to rest the forearms on the lower legs. Also try moving the upper arms on the floor further sideways towards the head and turning them out more.
- If the knees sink relatively easily to the floor at the start of the pose, move the feet a little further away from the shoulders to create space for further stretching in the back, possibly also slightly outwards. This is particularly often necessary with mobile sitting dwarfs.
- In the pose, the spinous processes of the vertebrae of the back should clearly emerge, evenly increasing from the delordosed (no longer concave) lumbar spine approximately up to the mid thoracic spine and then decreasing again very slightly. It is best to have the spine examined by a second person, but alternatively you can also feel the spinous processes of the vertebrae with the fingers of one hand to assess them.
- Although outwardly very similar to halasana, this pose is not about strengthening the autochthonous back muscles and, maybe, stretching the hamstrings, but the latter plays no role due to the bent knees. Instead of strengthening, the back is stretched: the erector spinae is stretched along its entire length, while in halasana it is strengthened along the entire length of the lumbar and thoracic spine.
- It is not uncommon for discomfort to occur in karnapidasana, which is described as „pressure“, „tightness“, „discomfort“, „nausea“ and apparently goes beyond the compression of the front of the body. It can be assumed that they belong to the broad field of interactions of the poses with the human energy system and consciousness. Basically, one would expect the effects of disturbances in chakras 3, 4 or 5.
- If there is uncomfortable pressure on the 7th cervical vertebra, support the shoulder so high that the pressure is reduced to a tolerable level or even disappears. The material of the support is of secondary importance. It is important that the head is lower than the shoulder area in order to reduce the bending demand on the cervical spine. If necessary, use two shoulderstand plates with distance to each other as explained before.
Known problems that can occur even when performed correctly
„Nausea“, „anxiety“ and similar sensations
As described above, such sensations, which can only be physiologically justified to a limited extent, can occur and may limit the duration or uninterrupted performance more or less tightly. Due to the interaction of the poses with the human energy system and consciousness, it is to be expected that practising improves the subtle structures and, conversely, that the improvements achieved facilitate the poses.
Various forms of neck pain
Some forms are likely to be purely muscular, others go beyond this to pathologies of the intervertebral discs such as protrusion and herniation or of the spine such as spinal stenosis. The forms that are not purely muscular (which usually improve more or less recognisably with exercise) generally require clarification.
Variants
Curls
Instructions
- Take karnapidasana as described above and support your back with your hands.
- Keep the knee joints and hip joints passively bent according to gravity, as they were in karnapidasana. Then slowly stretch the back from the mid thoracic spine to the lumbar spine without changing the position of the upper thoracic spine, which can be supported with the hands.
- Then release the stretch in the back and return to karnapidasana by the effect of gravity.
- Repeat the two steps as long as you have enough strength to perform them in a controlled manner.
Details
- This variation is an analogue to the bent leg lowering variation of headstand.
- In karnapidasana, the pelvis is not necessarily above the shoulders but moves down towards the chest and head. To stretch the back, the pelvis must therefore be moved upwards and away from the head. To ensure that the cervical spine is in a calm, unaffected position, hold the back firmly with the hands. The support should be deep enough so that it is not affected by the stretching of the back, the caudal part of which moves dorsally.
- As long as the feet are resting heavily on the floor, the exact position of the pelvis in karnapidasana allows the degree of pressure of the head on the floor, the extension of the cervical spine and the strength of the accompanying muscles to be regulated quite well. If you begin to set the autochthonous back muscles more and more under tension, the feet gradually lose their support, which inevitably leads to greater forces in the muscles of the cervical spine and to greater force with which the head presses on the floor. The concave curvature of the cervical spine is also reduced. It must therefore be carefully determined at which position of the pelvis these parameters are still tolerable.
- In the case of lumbago, depending on which muscles are affected by the spasmodic hypertonus, the typical bright, sharp lumbago pain may be triggered with each new extension and flexion of the back. This is due to the fact that the affected muscles, which often lie more deeply, bear a significant part of the load for a brief moment in a very specific geometry of the back. Depending on the severity of the lumbago and the stage of healing, an attempt can be made to accelerate healing with this variant, as each repetition makes a tiny contribution to tone regulation of the affected muscle. However, this should not be tried by inexperienced people without therapeutic supervision. The occurrence of vegetative symptoms that go well beyond the sweating triggered by pain or strain is a contraindication, at least temporarily. In any case, this variation should not be carried out too excessively. Allow some time to pass (at least two hours in which some full-body movement takes place) before the next round and evaluate. Even if this variation cannot be performed during the acute phase of lumbago due to excessive pain intensity according to subjective perception, it should be performed more frequently for some time as soon as it becomes possible, so that the strength of the autochthonous back muscles can be improved and a harmonious tonus balance of their parts can be established. In addition, in the case of lumbago, larger parts of the back muscles and also the dorsal hip muscles (the gluteal and pelvitrochanteric muscles) are often tense due to efforts to avoid pain. This variant can also make a contribution here. If complete stretching of the back is not possible due to pain, only go as far as is still tolerable. Over time, you will be able to stretch further and further. Of course, in the case of lumbago, attention must be paid to pseudoradicular or neuroradicular symptoms such as pain radiating towards the buttocks and leg, because in a rather small proportion of cases lumbago is associated with lumbalgia or ischialgia. In these cases, this variant would of course be contraindicated. Pain radiating into the buttocks in the days following the onset of lumbago is not necessarily easy to assess, as often the gluteal and pelvitrochanteric muscles are affected secondarily.
- This variant represents an interesting strengthening of some parts of the autochthonous back muscles.
on rollers
Detailed photos

Very good and well-dosed passive stretching of the trapezius.
Effects: (291) Stretching the trapezius
Instructions
- Place two small rollers with limited compressibility on the floor in a V-shape, diverging cranially, starting where the upper end of the sternum will be.
- Place the back on the floor, lying on the rollers from the upper end of the sternum.
- Swing quickly backwards into karnapidasana without wobbling the rollers.
- Dose the pressure on the trapezius through the position of the pelvis and the position of the arms.
Details
- This variation is one of the best things you can do for a tight trapezius. Taking the pose without wobbling the rollers is certainly not easy at first, and it is also not easy to readjust the rollers if necessary, but you will be rewarded with a very beneficial relaxation of the trapezius afterwards. It can be helpful if a supporter aligns the rollers and holds them in place when taking karnapidasana.
- Approximately 3.5 cm thick wooden sticks encased in a hollow cylindrical foam material, such as that used to insulate the flow pipe of heaters, have proven to be effective as rollers. The length of the rolls does not need not exceed 40 cm.
- The rolls lie together at the caudal end (i.e. under the upper end of the sternum) and lie at the other end right next to the ears, i.e. diverging cranially.
- Experiment carefully with the position of the pelvis and arms and find the optimum, still tolerable effectiveness. As a rule, if the arms are moved further away from the pelvis in the direction of the head from a position roughly close to the body, the associated shift of the shoulder blade leads to a significant increase in the effect.
- Quite a few people do not manage karnapidasana particularly well, especially in the first few hours after getting up. In order for this variant to be successful, it is helpful to perform the normal karnapidasana beforehand and to alleviate or eliminate any restrictions caused by the extensive flexion of the cervical spine.
Shoulder supported

Reduced demand on the cervical spine
Instructions
- Place the shoulder on a raised surface, but leave the head unsupported, i.e. lower than the shoulders, and take the pose described above.
Details
- Due to the elevation, the pose may be a little more difficult to take.
- There is an upper limit for sensible support. The following applies to the first few centimetres of elevation: the more elevation, the more the cervical spine is relieved. However, if the shoulder area is excessively supported, the upper body tilts towards the head and there is a risk that the angle will cause more and more weight to rest on the head and cervical spine instead of the shoulders.
- Shoulderstand plates, folded mats or blankets are useful props for elevation. In contrast to some other poses, the friction of the surface hardly plays a role here.
- It is not uncommon for the pressure on the seventh cervical vertebra (HW 7, vertebra prominens) to be perceived as unpleasant, and there is still discomfort the day after. In these cases, you can try to make the support much softer (blankets) or position the 7th cervical vertebra just behind the support so that it is free in the air. It is also very favourable to use two shoulder support plates that are positioned at such a distance from each other that the spinous processes of the spine are left out.
Feet on block

Relieving the cervical spine, enabling the pose
Instructions
- Take karnapidasana as well as possible. If the tips of the toes do not reach the floor, position a block or other elevation (e.g. shoulderstand plates) under both feet (presumably then only under the undersides of the toes).
Details
- Restricted flexibility in the cervical spine and upper thoracic spine are not the only reasons why karnapidasana cannot be performed in full. Depending on how stiff the entire back is, the front of the body may be compressed so uncomfortably that a feeling of oppression or even breathlessness arises. Although an increased body mass leads to „soft tissue inhibition“, it is generally not the sole reason for these sensations; however, together with the compression of the front of the body resulting from the stiffness of the back, relief may be necessary there and in the respiratory tract. In most cases, support for the feet is sufficient to reduce the flexion requirement of the spine and provide weight relief. It also gives the person performing the exercise the assurance that (for the time being) they do not have to and cannot go any further than what is tolerable.
Feet against the wall

Relieving the cervical spine, enabling the pose
Instructions
- Sit with your back to a wall at a distance that is about twice the length of your upper body.
- Take karnapidasana as best you can, but try not to place your feet on the floor but on the wall behind you.
Details
- This is a variation that can be practised without blocks if the cervical spine needs to be relieved.
Supported with a chair

Relieves the cervical spine, enables posture
Instructions
- Perform karnapidasana as described above, but do not place your feet on the floor with your knees bent, instead place your thighs on a chair.
Details
- The supported version is used to relieve pressure on the neck. In some cases, the flexibility of the cervical spine and upper thoracic spine is restricted to such an extent that karnapidasana cannot be performed without noticeable tearing in the muscles of the cervical spine or other localised discomfort. In contrast to halasana with the support of a chair, the aim of this variation is still to stretch the back muscles and also, as far as this is still applicable and tolerable, the neck muscles and not to strengthen the autochthonous back muscles in the area of the thoracic and lumbar spine as is the task of halasana.
- The knees should not lie directly on a hard chair. It is better if the distance and the nature of the chair are such that the thighs can rest on the chair. To do this, the chair is used crosswise and must be free of low struts at the sides. Chairs with upholstery that curves upwards towards the centre are less suitable than those with flat upholstery, as the former can cause the thighs to rotate and tend to slide sideways. Chairs with a seat that slopes forwards or backwards are not suitable as the load distribution between the two sides of the body would be uneven. Chairs whose seat cushions are so saggy that the thighs (and possibly also the lower legs) rest hard on the side supports of the seat are also unsuitable. However, this could be remedied with an appropriate number of blankets.
- Positioning the head under the chair is not always easy, both because of the subjective feeling of having the head tightly surrounded on all sides and simply because of the process of getting it into this position. It is helpful if a supporter passes the chair after the performer has moved into the supine position.
- Depending on the length of the upper body and the height of the chair, the upper body may not be able to bend fully into flexion. In these cases, however, the pose can still be used to promote flexibility of the cervical spine, especially if the pelvis is carefully(!) positioned further back (towards the head) than the shoulders.
- If the chair is too high to place the legs on, i.e. if they are not resting flat but only with a small part, karnapidasana can be performed on shoulderstand plates to reduce the height difference.
(P) Support when taking the pose

Provides support when taking the pose
Instructions
- The performer lies in supta dandasana, but bends the knees slightly.
- The supporter stands to the side of the performer’s pelvis, grasps the ankles and presses them slowly towards a point behind the performer’s head until karnapidasana is taken as far as possible. The supporter presses increasingly slowly and carefully so as not to overstrain the performer’s cervical spine and waits for the performer’s feedback on how far they can go into the pose.
Details
- There are several reasons why karnapidasana cannot be held by the performer. Restricted flexibility of the back and cervical spine are just as much a part of this as an imbalance between the body mass and the strength of the muscles performing the transition and any supporting arms. In principle, the first part of the transition can be performed with momentum, but the further into the pose you go, the more caution must be exercised so that the cervical spine is not overstrained. This applies to the independent take-up as well as to the support.
- The thrust exerted on the ankles will first stretch the legs at the knees up to the point at which the hamstrings do not want to give way any further. From this point, the force exerted on the legs will lift the pelvis with the upper body. If the upper body slowly moves further and further over the shoulder area, i.e. the gravity perpendicular moves towards the shoulder line, the force required to lift it will steadily decrease. At a certain point, the body mass could pull the upper body down again on the other side and, if this movement is vigorous, overstrain the cervical spine. The final phase in particular must therefore be performed very carefully.
- If the performer feels discomfort in the cervical spine during the support, karnapidasana may need to be performed on shoulderstand plates or a sufficient number of mats. This does not change the nature of the support, except that the feet are lower in relation to the shoulder area at the beginning, so that the distance to be covered is slightly longer.
(P) Support when taking the pose on rollers
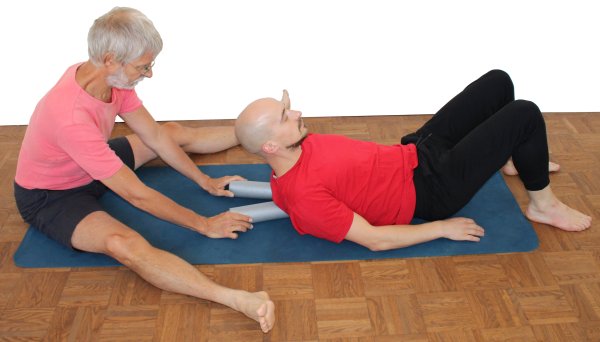
Instructions
- The performer sits in dandasana
- The supporter sits behind the performer’s back and places the rollers to be attached in a V-shape where they expect the performer’s shoulders to lie. The end of the rollers pointing towards the pelvis is in contact with each other, the other end is more than head-width apart.
- The performer now slowly lowers the back while the supporter adjusts the rollers so that they press on the trapezius at a small distance from the neck.
- When the performer is correctly positioned on the rollers, they swing the legs behind the head to take karnapidasana.
Details
- Suitable rollers are those that are not too thick (around 5 or 6 cm in diameter), not too hard so that the pressure is bearable, but also not too compressible so that any significant effect can be achieved. A wooden round bar with a diameter of 3.5 to 4 cm surrounded by a foam tube, as used as insulation in heating systems, is suitable. The result is sufficiently soft on the outside, but the compression is limited to the diameter of the wooden core.
- When taking the pose, there is a tendency to wobble the rollers with small movements. A supporter can hold them by the free, diverging ends. To do this, the supporter sits next to the performer and holds the rollers with both hands so that they are not in the way when the performer takes karnapidasana.
- Sometimes the position of a rollers needs to be corrected a little. However, this is hardly possible when the roller is fully loaded. By supporting the pelvis and shifting it a little to the side, the performer can take the weight off the roller to be corrected so that the supporter can push it into the correct position.
Transition to sarvangasana (shoulder stand)

Instructions
- See shoulder stand.
Details
- The transition from karnapidasana or halasana to sarvangasana (shoulderstand) is the standard variation described there.
Transition to halasana (plough)

Detailed photos

Instructions
- When the backs of the feet are placed on the floor in karnapidasana, turn the feet over and place the bottoms of the toes on the floor.
- Straighten the knees.
- Stretch the entire back vertically from the upper thoracic spine to the lumbar spine and bring the pelvis into a vertical position.
Details
- Depending on how far into karnapidasana you have been able to go, the flexion requirement of the cervical spine may be increased during the transition to halasana. Try to perceive the load limit subjectively.
- Whereas in karnapidasana the back muscles were completely relaxed and the back had taken on a shape that was mainly due to the flexibility restrictions of the cervical spine and the hip extensors (hamstrings, gluteal muscles and others) and of course the ability of the back to flex, the back should become completely straight in halasana. In many cases, this requires the full strength of the back muscles, but often this is not enough to achieve a straight back due to the body’s internal resistances. These resistances are primarily the aforementioned hip extensors as well as the cervical spine and upper thoracic spine and their muscles. Sometimes they also lie in the thoracic spine, which cannot leave its kyphosis because the extension capability is not sufficient for a stretched back. In these cases, this should be practised with the help of appropriate postures, including:
– Lying on a roller
– Raised back extension
– ustrasana
– back arch (urdhva dhanurasana)
– setu bandha sarvangasana
and many other (upper body) backbends. Often the strength or endurance of the back muscles is lacking to achieve or maintain the stretch. In this case, appropriate strengthening of the back should be practised, e.g.- sarvangasana (shoulder stand)
- rectangular shoulder stand
- urdhva dhanurasana
- warrior 3 pose
- warrior 3 pose backwards against the wall
- rectangular uttanasana
- deadlift
- salabhasana
The transition from karnapidasana to a good halasana requires a lot of practice and strength. Not only is the halasana the exact opposite of karnapidasana in terms of the back, its demands are also far greater than in most other poses, even those in which the back has to be stretched against the effect of gravity on the partial body weight, such as in warrior pose 3, simply due to the fact that in many people the flexibility restrictions from above (cervical spine) and below (hips: (hamstrings) force the back to bend.
- An important detail is the transition from the inclined position of the pelvis in karnapidasana to the vertical position in halasana.
- In halasana, the backs of the legs move towards the ceiling. However, the feet should not lift off the floor as in the rectangular shoulderstand, but remain firmly on the floor. There is a slight stretching movement from the ankles which, in contrast to karnapidasana, pushes the pelvis away from the feet and supports stretching the back.
Transition to downface dog

Instructions
- This transition is known as chakrasana and is described there.
Details
- ..
Transition to uttanasana

Detailed photos

Instructions
- From karnapidasana, roll the back on the floor towards the pelvis, keeping the upper body on the thighs with the knees bent to the maximum.
- Take enough momentum as you roll over your back so that you can land on your feet and have the centre of gravity under your feet.
- After landing on the feet, lift the pelvis and straighten the knees for uttanasana. Allow the upper body to move away from the legs as little as possible.
Details
- This is a very dynamic transition. The back is rolled down with momentum and the landing is made on the feet, which are held close to the buttocks so that the transition from the contact of the back with the floor to squatting on the feet is seamless. Of course, this requires good flexibility in the monoarticular quadriceps parts so that the upper body can be held against the thighs with the knees bent wide. Once on your feet, keep your upper body as close to your thighs as possible while slowly straightening your legs and lifting your pelvis further towards the ceiling.
- Make sure that the sacrum does not hit the floor roughly at the end of the roll. The spine shows uneven flexibility. Although the thoracic spine has a rather low flexibility (compared to the lumbar and cervical spine), its natural kyphosis (convex when viewed from behind) together with the existing ability to flex further is very favourable for even rolling. The lumbar spine, on the other hand, is naturally concave (lordotic). In some people this cannot be reversed at all, so the lumbar spine does not reach the extended state, let alone become convex (kyphotic), as would be necessary for even rolling. Rolling then occurs abruptly from approximately the uppermost (L1) to approximately the last lumbar vertebra (L5) or to the sacrum, and the flat immobile sacrum (or the SIPS of the hip bones) following the lumbar spine hits the floor as a result of the swinging movement. As this often is hardly accompanied by any pronounced autochthonous back muscles, the sacrum or the pelvis surrounding it hits the ground hard and unpleasantly. This effect sets an upper limit to the rolling speed, particularly in cases of reduced flexibility of the lumbar spine in the direction of kyphosis. However, it must still be sufficient for the gravity perpendicular to be moved under the feet. If the lumbar spine has such limited flexibility in the kyphotic direction, it is advisable to practise flexibility by rolling up the back or the forward bend of malasana until this works smoothly.
- It is well known that the way in which a pose is taken is a decisive factor in how it becomes and how it feels. Trying to keep the upper body as close to the legs as possible may result in better contact between the upper body and the thighs than could be achieved in a conventional uttanasana with the knees extended from above. In addition, those with an irritation of the origin of the hamstrings at the ischium (the PHT, see also the FAQ) will benefit if the hip joints are first flexed maximally into flexion, as is the case in the transition, and then the knee joints are extended. What exactly can be pressed on the legs naturally depends very much on the flexibility of the hamstrings. If it is good, the lower ribs and part of the abdominal wall can be pressed onto the legs even when the legs are stretched, and possibly the forehead can also be pressed onto the lower legs, or the head can even be pushed through the legs.
- When transitioning to uttanasana, you can of course also practise the variation with the hands on the ankles in order to better hold the upper body against the thighs.
- As there is a short phase after the feet touch down in which the lower legs are clearly bent forwards into dorsal flexion in relation to the feet, a certain degree of flexibility of the calf muscles (triceps surae, especially the soleus) is required.
- The more successful the transition, the easier it is to lift the pelvis during the roll with landing on the feet.
- Both a steep position of the thoracic spine with little flexibility in the direction of kyphosis and a hyperkyphosis of the thoracic spine impair the rolling of the spine.
Transition to pascimottanasana

Instructions
- Roll your back out of karnapidasana similar to the transition to uttanasana.
- As the legs fly, straighten the knees and land on straight legs.
- Following the swinging movement, lower the upper body onto the thighs and stretch it towards the feet.
- Reach the hands towards the outer edges of the feet and extend into pascimottanasana.
Details
- The transition to pascimottanasana is similar to that of uttanasana and is quite dynamic with a sweeping roll. Most of the comments made there apply analogously here.
- The legs should touch the floor fairly gently with the knees straight without the heels striking the floor uncomfortably.
- The swinging movement of the legs is stopped abruptly by the floor, the upper body will then continue to move with its inertia in the direction of the legs, which is very favourable for assuming pascimottanasana.
Transition to janu sirsasana

Instructions
- Roll your back out of karnapidasana (similar to the transition to uttanasana).
- In the flight of the legs, straighten the right knee and bend the left leg. Land both legs on the floor and immediately afterwards place the sole of the bent leg on the other inner thigh.
- Following the swinging movement, lower your upper body onto the thigh of the straight leg and stretch it towards the foot.
- Reach the hands towards the outer edges of the foot and extend into pascimottanasana.
Details
- The transition to janu sirsasana is very similar to the transition to pascimottanasana, except that here one leg is bent in order to place the foot on the thigh of the extended leg immediately after the legs have landed.
- The bent leg can be placed on the inner thigh with the help of the hands. The foot should be as close to the pelvis as possible.
- In the usual way of taking janu sirsasana, the bent leg is turned out vigorously. This can also be done here to avoid disturbing pressure in the inner knee and should definitely be done if there is known damage to the inner meniscus. As a result, the transition naturally loses its actual dynamic.
Transition to the rectangular shoulder stand

Instructions
- The following instructions correspond roughly to the transition to halasana.
- There are two ways to take shoulderstand from karnapidasana, the more interesting version with straight legs is described here.
- From karnapidasana, straighten your legs. Do not keep the feet as far away from the shoulders as possible so that the neck does not have to support too strongly. Stretch the ankles to move the pelvis a little further away from the toes, also to relieve the neck during the following transition.
- Extend the back with the strength of the erector spinae and bring the leg as close to vertical as possible.
- Apply force to the hip extensors (this is largely achieved using strength from the hamstrings, the load is still too low for intensive use of the glutes) to make the legs lighter.
- Then lift the legs and bring them into a horizontal position.
- Once the legs are raised, bring the pelvis back over the shoulders as far as the neck can tolerate.
- Place the palms of the hands horizontally as low as possible on the back and push the back further up and over the shoulders using the strength of the arm flexors and the supination of the forearms. Keep repositioning the hands on the back if the hands slip.
Details
- The above-described evasive movement of the pelvis away from the feet is essential for beginners and for people with weaker or more sensitive necks. If the neck is healthy and strong, the evasive movement of the pelvis can be omitted, which leads to increased support of the neck and better strengthening of the neck. On the other hand, the evasive movement of the pelvis makes a later correction necessary. When exactly this is initiated and how quickly it takes place is also a question of how much load the neck can bear and how much strengthening it can be expected to do. The more limited the capability to flex in the hip joints, the more difficult this small relief is.
- Strictly speaking, the arms play no role in the entire transition. They are only used in the already taken right-angled shoulderstand. Depending on how practised you are and your sense of balance, you may also need to use your arms in between.
- Depending on how intensively karnapidasana has been practised, the angle of the cervical spine joints may be more flexed than in rectangular shoulderstand, but the neck is passive in karnapidasana and is stretched. In the rectangular shoulderstand, the neck may be subject to significantly greater moments due to the high partial body weight and the extremely long lever arm of the legs.
- Work out the difference in the back as best you can: in karnapidasana the back rounds to the maximum and is completely passive, in the rectangular shoulderstand the back muscles have to work hard to stretch the back against the flexibility restrictions of the cervical spine and upper thoracic spine as well as the hamstrings. As the restrictions come from both sides at the same time, this is a particular challenge, which is compounded by the weight and leverage of the legs.
- Be careful when applying force to the arms in the back: if the back is pressed further over the shoulders with the hands, this has a double effect on the cervical spine: firstly, the bending requirement increases and secondly, the centre of gravity shifts towards the head, which means that the bending moments in the vertebral segments of the cervical spine increase, which means more work for the muscles of the cervical spine.
- You can easily switch between halasana, rectangular and full shoulderstand. Try to move the pelvis away from the head as little as possible if the cervical spine and its muscles allow this. Of these three poses, the retangular shoulderstand requires the most support by the cervical spine.