yogabuch / asanas / parivrtta ardha chandrasana
Contents
parivrtta ardha chandrasana
„twisted half moon“
 instructions and details with working links as PDF for download/print
Detailfotos
von vorn  |
Feedback: We’d love to hear what you think about this description, give us feedback at:
postmeister@yogabook.org
last update: 30.12.2018
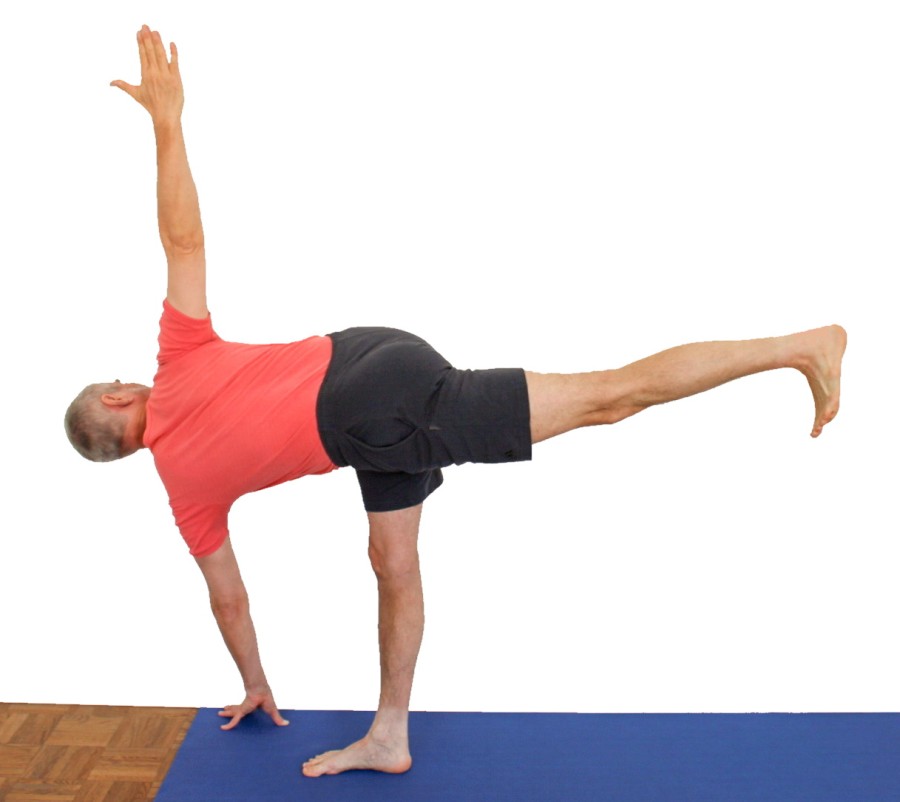
Name: parivrtta ardha chandrasana
Trivial name: twisted half moon
Level: A
- Classification: A
- Contraindication
- Effects of
- Preparation
- follow-up
- derived asanas
- similar asanas
- diagnostics
- Instruction
- details
- Variants
Classification
classic: standing posture
Contraindication
Effects
- (212) Neck : rotation strength
- (217) Neck: Strengthening for lateral flexion
- (247) Shoulder joint: strength for retroversion
- (662) Strengthening for rotation of the spine
- (727) Strengthening the short hip extensors (especially the gluteus maximus)
- (742) Strengthening the abductors of the hip joint
- (852) Strengthening the monoarticular calf muscles (soleus)
- (862) Strengthening the supinators of the ankle joint
- (872) Strengthening the pronators of the ankle joint
- (211) Neck: rotation stretching
- (661) Stretching for rotation of the spine
- (721) Stretching the hamstrings
- (726) Stretching the short hip extensors (especially the gluteus maximus)
- (741) Stretching the abductors
Preparation
THE pre-exercise par excellence due to its geometric similarity and similar effect, which proves it to be a 45° tilted parivrtta ardha chandrasana and therefore has similar effects and requirements:
Ischiocrural group A very important prerequisite for this pose is flexibility in the hamstrings so that the pelvis can tilt sufficiently and there is no ongoing (physical and mental) struggle with the sensation of stretching in the back of the leg. Practice this:
- uttanasana as a generally effective and efficient stretch of the hamstrings to prepare for flexion in the hip joints
- prasarita padottanasana, very similar to uttanasana
- parsvottanasana as a stretch that goes beyond uttanasana
- pascimottanasana
- janu sirsasana
- tryangamukhaikapada pascimottanasana
- downface dog as another good preparation for the hamstrings when the pelvis is tilted powerfully
- hip opener 5 as a very effective stretch of the hamstrings that goes beyond uttanasana
- warrior 3 pose
- trikonasana
- parivrtta trikonasana
The ability to rotate the torso is also important, preparations for this:
- Seated twisting as a very effective and efficient exercise for twisting
- parivrtta trikonasana
- maricyasana 1
- maricyasana 3
- jathara parivartanasana
The glutes should be sufficiently flexible and warmed up for this pose. This will help:
- half lotus forward bend
- hip opener at the edge of the mat
- hip opener 3
- parivrtta trikonasana
- parivrtta parsvakonasana
The pomus muscles hold the torso, head, arms and raised leg much more intensively than in ardha chandrasana, see explanation in the details. Preparatory exercises can be practiced to strengthen the muscles:
- caturkonasana
- parsvakonasana
- parivrtta parsvakonasana
- counter
- warrior 2 pose
- purvottanasana, especially with outstretched legs or one leg raised
- urdhva dhanurasana
- eka pada variation of urdhva dhanurasana
- setu bandha sarvangasana
- eka pada variation of setu bandha sarvangasana
- warrior 3 pose
- backwards against the wall“ variation of warrior 3 pose
as well as various other backbends. If the lifted leg cannot be held in the same plane as the upper body due to less flexible hip flexors, but instead moves forward:
- Quadriceps stretch 1
- Quadriceps stretch 2
- hip opener 1
- hip opener 3
- warrior 1 pose
- supta virasana
- urdhva dhanurasana
- ustrasana
- setu bandha sarvangasana
As the standing leg has to turn out, it can be useful to prepare this movement too:
- baddha konasana, also the forward bend
- supta baddha konasana
- Half lotus forward bend
- hip opener at the edge of the mat
- hip opener 3
- warrior 2 pose
- caturkonasana
- parsvakonasana
- counter
- parsvakonasana
- trikonasana
Follow-up
derived asanas:
similar asanas:
Very similar in terms of geometry, effect and loads:
- parivrtta trikonasana is the same pose tilted by 45°
- parivrtta parsvakonasana is even more intense in the rotation of the upper body
Diagnostics (no.)
(880) Hyperextension of the knee joint:
Hyperextension of the knee joint refers to the ability to or the current state of an angle of more than 180° in the knee joint. To a certain extent, this is considered normal by anatomists and is on average more common and more pronounced in females. However, it can also indicate weakness of the quadriceps or hamstrings. Furthermore, hyperextension often causes unphysiological sensations that are not caused by stretching or exertion of the muscles and should be avoided, see also FAQ.
(852) Calves:
In this pose, the calf muscles are clearly strained, the further the load moves from the heel towards the balls of the feet, the greater the strength endurance demand on the calf muscles (the triceps surae) and on the other lower leg muscles that stabilize with small pronationand supination movements. However, the calf muscles are less prone to cramps in the sarcomere length present here. However, if calf cramps occur quickly, this often indicates a lack of strength endurance or a supply problem such as a lack of magnesium in the blood or poor circulation. As a rule, this has nothing to do with calf cramps occurring at night, which are usually caused by sustained stretching movements(plantar flexion) in the ankle due to the current dream event. However, if cramps occur at rest, this may indicate a calcium deficiency.
(721)(724) Ischiocrural group:
Various disorders can be found in forward bending movements(flexion in one/both hip joints), but also under load in the muscles of the back of the leg:
- Shortening of the hamstrings, see FAQ.
- Damage to the hamstrings, which causes pain or functional limitations, can also be easily recognized here, from simple tension to strains to muscle (attachment/detachment/tear). Tears would lead to a reduction in strength when assuming and releasing the posture
- Irritation of the sciatic nerve: especially in forward bends, irritation of the sciatic nerve, which innervates the leg and foot, can become symptomatic, even if they are otherwise rather calm. See the FAQ.
- Irritations of the origin of the hamstrings at the ischial tuberosity (at the ischial tuberosities, also known as PHT: proximal hamstring tendinopathy) will become clearly evident in this posture and require protection from intensive stretching, as this posture demands; see the FAQ.
- Baker’s cysts create a feeling of tension or foreign body in the back of the knee, see FAQ.
Far more than gravity, the restricted flexibility of the hip flexors pushes the lifted leg out of the posture towards the ground and limits its lifting even when the extensors are fully engaged. However, as is often the case, a hollow back as a result of shortened hip flexors is not to be expected here. To make this possible, the hamstrings of the standing leg and the associated pomus muscles would have to be extremely flexible.
(880) Hyperextension of the knee joint:
This posture is certainly one of those in which hyperextension of the knee joint occurs easily and is rather difficult to control. Overextension of the knee joint refers to the ability to or the current state of an angle of more than 180° in the knee joint. To a certain extent, this is considered normal by anatomists and is on average more common and more pronounced in females. However, it can also indicate weakness of the quadriceps or hamstrings. Furthermore, hyperextension often causes unphysiological sensations that are not caused by stretching or exertion of the muscles and should be avoided, see also the FAQ.
(650) Kyphosis and lordosis of the spine:
The deviations from the physiological double-S shape of the human spine are clearly visible in postures with an extended upper body. However, existing restrictions in the flexibility of the hamstrings as the hip extensor of the standing leg reduce an existing hyperlordosis or cancel out the physiological lordosis. The thoracic spine should be stretched in this posture, even beyond the physiological kyphosis, but without really extending. There should be a certain degree of lordosis in the lumbar spine and cervical spine. See the FAQ.
The lateral deviations of the spine from the median plane known as scoliosis can also be visible to the trained eye in this posture despite rotation if the lower hand is supported at an adequate height, i.e. if there are significant restrictions in flexibility, on appropriate support that helps to prevent the lumbar spine from having to flex laterally. See the FAQ.
(950) Foot deformities:
As a one-sided posture, deformities of the foot are even more observable here than in symmetrical postures, most notably fallen arches and flat feet, but also others. Whereas in uttanasana, tadasana, urdhva hastasana and other standing postures they might tend to appear less pronounced because the feet are pushed away from each other by the force of the abductors, this possibility is eliminated here and the full picture becomes visible, especially as this posture allows a clear view of the inner foot.
Since a large part of the body weight rests in a hip joint, existing hip damage can cause pain here:
- Arthrotic change (degenerative with cartilage loss) of the joint
- Arthritis (joint inflammation) of various kinds
- Dislocation / subluxation, which would cause a significantly increased sensation of tension in various muscles covering the hip joint
- Joint trauma, which may cause pain in the joint even after many weeks or months
(886) Knee joint:
In this pose, knee problems associated with long extensions under a certain load may become apparent, even if the extension moment to be applied is minimal when the leg is extended: these could be, for example: traumatic or degenerative meniscus damage, arthrosis, arthritides, subluxations, ligament damage, plica syndromes, Hoffa syndromes (of the extended leg), retropatellar cartilage damage(chondropathia patellae, retropatellar arthrosis) and others, see the FAQ.
(742) Lack of strength in the abductors:
In this pose the abductors are required to hold the pelvis in position, failure to do so also indicates weakness of this musculature and it should be tested for Trendelenburg and Duchenne signs. If it is one-sided, it should be checked whether this could be the cause of a pelvic obliquity and the scoliosis that often results, see the FAQ.
(676)(677) The oblique abdominal muscles (Obliqus externus abdominis and Obliqus internus abdominis):
The rotation of the upper body is mainly driven by the oblique abdominal muscles, a part of the autochthonous back muscles and the muscles that perform the retroversion of the arm (with the hand on the ground). oblique abdominal muscles allow this movement on the one hand by their given flexibility and according to the measure of their flexibility, on the other hand their contralaterals cooperate in the movement. A lack of strength in these muscles means that the upper body cannot rotate very powerfully using its own muscles; a lack of flexibility limits this rotation far in advance of the anatomical possibilities.
Variants:
Transition to parivrtta trikonasana
Instruction
- Assume parivrtta trikonasana with the right leg in front.
- Bend the front leg wide.
- Place the left fingertips of the hand that is in the right outer foot area further forward in the outer foot area; place minimal weight on the fingertips.
- Bend the right knee joint and shift the entire body weight onto the front foot so that the back foot no longer has any weight.
- When the back foot is completely weightless on the floor, slowly lift the straight back leg off the floor without momentum.
- Raise the back leg as far as possible.
- Slowly extend the standing leg and the arm with the fingertips on the floor all the way through.
- Complete the rotation of the upper body that may have been lost a little.
- The lifted leg is extended, the midline of the foot points downwards.
Details
- The left hip should be as high as the right, i.e. the pelvis should be horizontal. As lowering the left hip means stretching the gluteus maximus in particular, which is often less flexible in beginners, it is advisable to override the above rule for the first few years of practice and let the left hip drop as far as possible. Only when the flexibility of the glutes, the general stability of the posture and the ability to rotate the upper body have become good is it advisable to pay attention to the horizontal position of the pelvis, which will then probably lead to reduced rotation of the shoulder area in space (not in relation to the pelvis). The effort to keep the pelvis horizontal then leads to significantly greater effort and strengthening in the right gluteal muscles.
- Make sure that the upper body does not fall into a sideways curve, as is often observed in all variations of trikonasana and ardha chandrasana. Stretch the lower side of the body in particular. Both curves are possible here: if the hip extensors are very flexible, the hip joint of the standing leg can flex further than 90° and the body can sink from there, which corresponds to a concave (lordotic in the lumbar and thoracic spine) back. If they are less flexible, the pelvis will tend to rise and the back will appear convex (kyphosis in the lumbar spine and thoracic spine).
- The lifted leg tends to droop and bend at the knee joint during the course of the posture. Lifting the leg requires sustained work by the mono-and biarticular hip extensors (pomus muscles and hamstrings). However, the use of the hamstrings also results in an increased flexion tendencyin the knee joint, which would hardly occur without its use, as the force of gravity of the lower leg causes a supporting extension moment in the knee joint. This means that the quadriceps must sustainably extend the knee joint. In practice, the knee joint is usually flexed if the performer does not consciously stretch the knee joint and also feels the work of the quadriceps. The greater the force used to lift, the greater the tendency to bend. Here, parivrtta ardha chandrasana behaves like the 3rd warrior pose.
- Turning the head upwards often causes significant difficulties because the feedback from the foot’s sensors is much less accurate than the visual feedback, and the nerve conduction time until the information reaches the brain is also much longer (there is a two-digit factor between the nerve conduction via the optic nerve and that from the pressure sensors of the foot to the brain), so that looking down to the floor, and possibly also to the foot of the standing leg, is certainly the much more stable option. The first step beyond this is to look straight ahead, i.e. in the direction in which your sternum is pointing, before turning your head upwards as far as possible in the final step.
- Do not support yourself with your arm on the floor: the fingertips should only have enough weight so that their friction on the floor is sufficient to prevent them from slipping away when the fingertips are pressed backwards at an angle towards the heel. Stronger support (more weight on the hand) dilutes the character of parivrtta ardha chandrasana as a standing pose in the direction of a supporting pose and usually results in significantly poorer stability, as there is a certain amount of swaying between the hand and foot. As in parivrtta trikonasana, use the arm whose hand is resting on the floor for two movements: push the hand against the friction of the mat (so that the hand does not move, but the arm exerts a resulting force on the upper body):
- towards the pelvis, i.e. parallel to the outer edge of the foot, which supports the stretching of the upper body.
- to the „back“, i.e. out of the field of vision and towards the outer foot, which supports the rotation of the upper body.
To avoid valgus stress and varus stress in the joints of the fingers as far as possible, hold the tendon of the middle finger on the back of the hand at 180° to the direction of the force exerted, i.e. parallel to it. In this position, the finger flexors alone transmit the force exerted as far as possible and the finger joints are not subjected to varus or valgus stress.
- to the „back“, i.e. out of the field of vision and towards the outer foot, which supports the rotation of the upper body.
- towards the pelvis, i.e. parallel to the outer edge of the foot, which supports the stretching of the upper body.
- As the glutes play a major role in lifting the lifted leg and are one of the exorotators of the hip joints, there is a more or less clear tendency to turn the lifted leg out. So consciously lift the inner knee rather than the outer knee so that the midline of the foot becomes and remains vertical. It is less common for the leg to deviate into the third of the three dimensions in which the gluteus maximus moves the leg: outwards.
- The hip of the lifted leg tends to move away from the head as an evasive movement before the stretch in the standing leg, which corresponds to both reduced exorotation in the hip joint and lateral flexion of the spine. Instead, move the hips backwards so that both hips are at the same height to prevent the pelvis from rotating horizontally.
- For advanced students, you can also ask the pelvis to remain horizontal against the downward tilt of the pelvis on the side of the lifted leg resulting from the rotation and use of the lower arm – always assuming that the pomus muscles are sufficiently flexible. For the average beginner who is not overly flexible, this requirement makes no sense, as sufficient flexibility of the pomus muscles is often still on the to-do list and is worked on with the described application of force. However, if the pelvis is to be held horizontally, this can be felt as increased work of the gluteus maximus, which as an abductor cancels out the slight adduction.
- The weight must be shifted to the standing foot carefully, slowly and with sufficient use of the calves and quadriceps as well as the pomus muscles of the standing leg. The plumb bob should move forward exactly along the midline of the foot. It is essential to avoid lightening the inner foot. Use the strength of the calf muscles to press the metatarsophalangeal joint area firmly onto the floor.
- The phase of taking the the pose, when the body weight is shifted to the foot and the phase in which the knee joint of the support leg are extended require a special combination of attention and sustained use of strength. If the weight is shifted in the direction of the future foot, the ankle moves into more and more dorsiflexion. In the process, the soleus, which reaches the edge of its space of movement in this dimension of movement, generates an ever-increasing supinatory moment in the subtalar joint, which also becomes significant due to the load in its main direction of plantar flexion. As a result, the metatarsophalangeal joint tends to become lighter or even lift off. This makes a more significant use of the fibular group necessary. If the knee joint is slowly stretched, the soleus is then slowly released, the supinatory moment decreases, so that the use of the fibularis group must be reduced. With further and ultimately complete stretching of the knee joint, the fundamentally same phenomenon occurs again, this time induced by the gastrocnemius, which, depending on its flexibility, however, reaches a less extreme sarcomere length. Nevertheless, an additional supinatory moment will again arise in the subtalar joint, which must again and now permanently be balanced with work of the fibular group.
- Make sure that both arms turn out. This is particularly important for the lower arm so that the elbow joint is not mechanically blocked in the direction in which the force is exerted with the arm, accepting valgus stress, but instead the middle head of the triceps takes over the stretching of the elbow joint. This is very important for the upper arm in order to minimize the tendency to spasm in the trapezius. Stretch both arms sideways away from the trunk, so don’t pull the shoulder blades towards the spine, but lateralize them as much as possible. For the lower arm, this means that the upper body does not rest on the lower arm.
- The stability of the posture itself must not depend on the lower arm or its fingertips on the floor. Only when the arm is used to support the rotation and extension of the upper body may a dependency arise. As soon as the force exerted by the lower arm is reduced to zero, the posture must be stable again even without the fingertips on the floor.
- Compared to ardha chandrasana, the gluteus and dorsal hip muscles not only work at a completely different sarcomere length, but above all the horizontal lever arm between the center of rotation of the hip joint and the center of gravity of the partial body weight supported by the standing leg is incomparably larger, which makes this pose an intensive strengthening of these muscles at very interesting sarcomere lengths.
Variants
unsupported

Instructions
- Take the pose as described above, but lift the hand from the floor in the initial parivrtta trikonasana and do not sit up again as usual.
Details
- In the unsupported version of parivrtta ardha chandrasana, the loss of further rotation of the upper body is greater than in the corresponding ardha chandrasana due to the lack of use of the lower arm. On the other hand, the unsupported version is slightly less problematic for weak backs. The sensation of stretching in the standing leg increases at least as much as the work of the back muscles.
Against the wall

Instructions
- Stand with your bottom against the wall. Turn your right leg out 90° at the hip joint and place the outer edge of your foot 15-20 cm from the wall to the right of you. Turn your left leg in through 45° to 60°.
- Turn your pelvis 90° to the right, bend the right knee joint and from this position take first parivrtta trikonasana and then parivrtta ardha chandrasana.
- With the right arm clearly bent, place the right hand on the wall with the fingers pointing upwards and the left hand on the floor close to the wall under the shoulder.
- Using the strength of the left arm,press the left fingertips away from the wall towards the heel so that the left shoulder moves towards the wall and press the right shoulder away from the wall with the right arm. The right arm must not push harder than the left arm.
- Keep the left leg raised as far as possible while the upper body turns to the right as far as possible using its strength and the strength of the arms.
- If you can stand stably and your flexibility allows it, also turn your head up to the right.
Details
- This variation is a very good construction for using the strength of the upper body and the lower arm in addition to the strength of the upper arm to rotate the upper body to the maximum. The force is transferred to the pelvis and pushes the hip of the lifted leg further down, which leads to an even greater sensation of stretching in the standing leg. If there is nothing to prevent it, the hip of the lifted leg can sink as far as possible (which anatomically corresponds to the state of adduction of the standing leg ). For advanced users, you can also demand that the pelvis should remain horizontal against the forces acting on the pelvis from the arms via the trunk. In this case, the distance between the shoulders and the wall would not reach the maximum level that is possible without this requirement. If this is not done and the pelvis sinks to the maximum on the side of the raised leg, the increased stretching in the hamstrings of the standing leg on the same side is accompanied by a significant stretching of the pomus muscles. Depending on the individual’s weaknesses, these two features may require extensive preparation.
- It is important that the left arm works as hard as possible to rotate the upper body and the right arm only hard enough to prevent the pelvis from being pushed away from the wall. The left arm must also start working first.
- The right hip can be leaned against the wall to ensure a secure stance and to control it. The pressure you feel against the wall is a good way to determine whether the work of your arms is jeopardizing your stability.
Finger on block

Instructions
- Take the pose as described above, but place your fingertips on a block rather than on the floor.
Details
- The support in the form of a block or several blocks serves to „bring the floor closer“ in cases where the hamstrings is less mobile, i.e. to reduce the demand on the flexion in the hip joint of the standing leg, to reduce the associated stretching that is perceived as excessive and to avoid the otherwise necessary flexion of the upper body.
- The pad should provide sufficient friction to forcefully push the fingertips towards the heel. If necessary, a patch can therefore be used on the block or on (and depending on their nature even between) the blocks to increase friction.
- To visually clarify the work of the lower arm, the block should be placed at an angle so that it points in the direction of the heel, then it is easy to see whether the tendon of the middle finger is parallel to it and whether the biceps and inner elbow are parallel to the length of the block.
Block in the upper hand

The block in the hand gives a little more feeling for stretching the arms upwards from the side of the body and for the exact position of the arm
Instructions
- Take the pose as described above, but hold a block in the upper hand and stretch the shoulder blade, arm and block away from the spine.
Details
- This variation gives you a little more feeling for the lateralization of the shoulder blade, i.e. the stretching of the shoulder blades and arm away from the spine. If the arm is held too far back in relation to the back, the gravitational effect ofthe block can be felt more clearly and the position of the arm is therefore better perceived. This also prevents rotation of the upper body.
- A light dumbbell can also be used instead of the block.
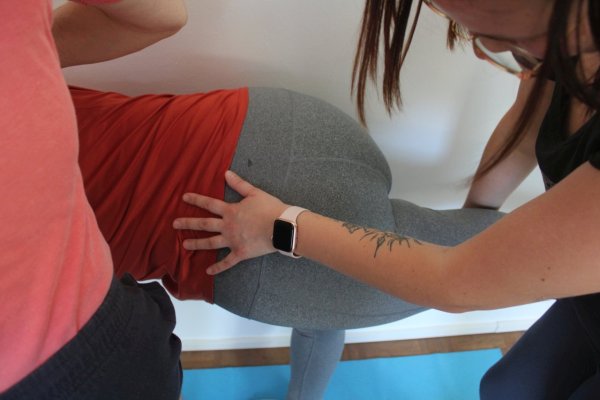
(P)

Instructions
- Take the pose as described above.
- The supporter stands behind the performer’s back and rotates the upper body by pulling on the upper shoulder head(acromion) with one hand and pressing against the lower shoulder blade with the other.
Details
- This support is exactly the same as in parivrtta trikonasana.
- The support enables an excellent rotation of the upper body that is difficult to achieve on your own. However, care must also be taken here to ensure that the curve of the upper body is not all the more powerful.
- The leverage exerted by both arms must be equal. As the lever arm is slightly larger when pulling on the upper shoulder head than when pushing on the lower shoulder blade, the work of the arms must be adjusted accordingly so that the performer’s upper body is neither pulled forwards nor pushed backwards. If the performer exhibits this tendency of their own accord, this can be easily corrected here.
- Increase the support slowly and carefully and reduce it slowly at the end so that the posture remains stable.
- If there is a risk of the performer tipping over, their pelvis can be supported from behind with the supporter’s hips.
(P) against the wall

Instructions
- Take the pose as described above. The supporter stands with the pelvis level with the performer’s pelvis and pushes it sideways with the hips against the wall.
- The supporter’s right hand grasps the performer’s right shoulder and pulls it away from the wall while the left hand presses against the left shoulder blade from behind and pushes the left shoulder towards the wall.
Details
- What has been said about the work of the two arms or the forces that push the upper shoulder away from the wall and those that push the lower shoulder towards the wall when practicing the posture alone against the wall still applies here in a weakened form: the pull on the upper shoulder together with the pressure exerted by the performer should not be greater than the pressure on the lower shoulder together with the force used by the performer to push this shoulder towards the wall so that the posture remains stable. Furthermore, the force exerted by the supporter on the upper shoulder should generally not be greater than the force exerted on the lower shoulder, so that the performer does not have the feeling of being dependent on the supporter for stability.
- The supporter has a good view of the entire posture and can correct all aspects verbally.
(2S) with 2 supporters
Anleitung
- Take the variant described above with a supporter on the wall.
- The second supporter pulls the lifted inner leg upwards with one hand while preventing the corresponding hip from moving further upwards than the same height as the other hip with the other hand.
Details
- As the lifted leg is raised further, the mobility restriction of the iliopsoas tends to lift the associated hip, which makes a corrective necessary. The second supporter can do this with the second hand.
- When the lifted inner leg is raised, the second supporter generates an endorotatory moment in the hip joint, which counteracts the exorotatory moment, which the performer generates actively with the gluteus maximus when lifting the leg and passively via the tension of the iliopsoas.
Transition to Warrior III

Instruction
- Take the pose as described above.
- Turn the upper arm out and move it in the extension of the side of the body, i.e. a further 90° in the direction of lateral abduction in the shoulder joint.
- Rotate the pelvis and upper body towards the floor. Keep the lifted leg as high as possible, but rotate it out of the maximum rotation into the anatomically zero midline position so that the knee and foot are pointing towards the floor.
Details
- The upper arm is already fully extended in ardha chandrasana. However, this is often lost when the arm is lowered and moved towards the head. In order to bring the arm into the correct position, however, it is important that the arm is fully exorotated so that this must be consciously restored if necessary. With complete external rotation in the shoulder joint, the limit value of lateral abduction, which is 90° in parivrtta ardha chandrasana already, and 180° frontal abduction, with which the 3rd warrior pose is taken, is essentially the same.
- Depending on the flexibility of the hamstrings of the standing leg, body proportions and any support under the hand on the floor, a slight lateral curve of the upper body has developed in ardha ch andrasana. As there is also a tendency for the upper body to curve to the side in the 3rd warrior pose, you must be very careful to move the hip of the standing leg and the armpit on the same side away from each other so that this side of the body does not shorten in relation to the other, as is often the case. Although the upper body side curve in parivrtta archa chandrasana is different, namely contralateral in relation to the standing leg(standing leg on the right results in a left curve), and the cause is also different (in parivrtta ardha chandrasana the flexibility restriction of the hamstrings), both curves indicate a lack of proprioception, muscular competence or mindfulness.
- As in the 3rd warrior pose and similar postures with the pelvis rotated towards an extended leg with flexion in the relevant hip joint, there is a more or less clear evasive movement due to the pelvis being rotated away from that leg. The 3rd warrior pose behaves in a similar way to parsvottanasana and parivrtta trikonasana. The reason for this is the more or less conscious effort to avoid the sensation of stretching in the standing leg or to ease it a little. Care must therefore be taken to keep the pelvis precisely horizontal. As already shown in the 3rd warrior position, the standing leg is therefore slightly adducted so that the center of gravity can lie in the physical base of support.
Transition to parivrtta trikonasana

Detailfotos
from parivrtta ardha chandrasana..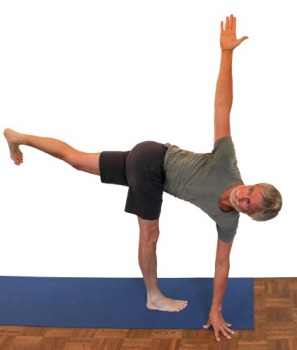 | .. bend the knee of the supporting leg wide..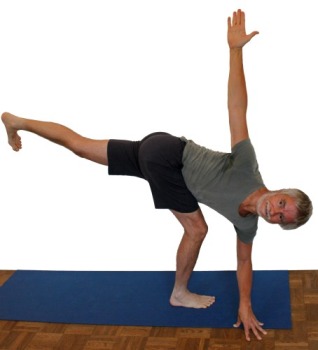 | .. shift weight ..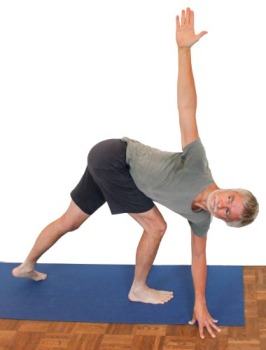 | .. place the foot ..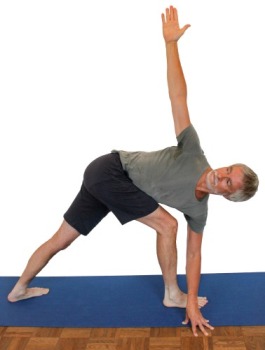 | .. extend the standing leg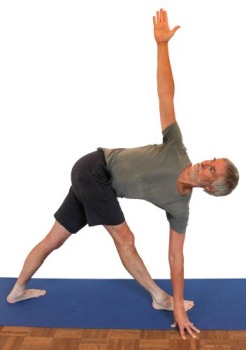 |
Instructions
- Take the pose as described above.
- Keep the lifted leg maximally raised while bending the standing leg to the maximum.
- Lower the lifted leg and place its foot on the floor far back at an angle so that it touches down at a 30°-45° angle to the front foot and the center line of the front foot points to the back heel.
- Slowly straighten the front leg and pull the fingertips of the left hand backwards in the right outer foot area.
- Extend the rotation of the upper body to the right as far as possible and straighten the pelvis straight forward to create a clean parivrtta trikonasana.
- Keep the head in line with the spine and, depending on what is possible, look towards the foot if this is necessary for the stability of the pose, otherwise look straight ahead in the direction in which the sternum is pointing, or turn the head upwards if the stability is good.
Details
- The lifted leg should be raised to the maximum until the standing leg is bent to the maximum. Only then should it be slowly lowered. By changing the work of the lower leg muscles, the whole body is then tilted backwards at the ankle joint, i.e. the dorsiflexion of the ankle joint caused by bending the knee joint is reduced so that the foot of the lifted leg can be slowly placed far back. Ideally, it can be placed as slowly as desired. How far the standing leg can be flexed, and therefore how gently the lifted foot can be placed on the ground, depends on various factors, including the flexibility of the hip extensors, the strength of the leg and the dorsiflexion capacityof the ankle: the further the knee joint is flexed, the greater the dorsiflexion must be.
- The foot of the lifted leg is immediately placed at the appropriate angle of 30°-45° so that only a few steps are required to assume parivrtta trikonasana. Above all, the front (previously standing) leg must be stretched, while at the same time the fingertips of the left hand should be pulled backwards in the outer foot area. The front inner foot should not become light when the knee joint is extended. This tendency occurs again and again in practice because the stretch in the hamstrings in parivrtta trikonasana is significantly greater than it was when the leg was bent and, depending on the distance between the feet, correct plantar flexion without supination is a real challenge. For this reason, the pelvis is often turned away from the front leg and the front inner foot is lifted to avoid or facilitate the stretch.
- When bending the standing leg, the center of gravity should not move sideways, but should remain below the midline of the foot, even if it moves backwards towards the heel. This maintains stability.
- Once the legs are in the final position, the upper body, which should have lost its maximum rotation by now, should be rotated beyond the front leg again. Rotate it slowly and carefully so as not to jeopardize stability. Use the strength of the lower arm to do this.
From the third warrior stance

Instruction
- Assume the 3rd warrior pose with the right leg as the supporting leg.
- Turn the upper body and the right arm slightly to the right and place the left fingertips in the outer foot area, 10-20 cm to the side of the outer foot and a good 50 cm from the heel in the longitudinal direction of the foot, so that the left hand will probably be under the shoulder in the pose. If necessary, bend the standing leg slightly.
- Keep the left leg raised as far as possible while turning the upper body to the right as far as possible.
- Extend the right arm with its shoulder blade as far as possible laterally from the spine in the shoulder line (i.e. at 90° lateral abduction).
- If you can stand stably, also turn your head up to the right.
Details
- The inner foot of the standing leg has a key position: if it becomes too light, there is a risk of tipping over onto the outer foot, see also the FAQ. Therefore, press the inner foot onto the floor, or more precisely the ball of the big toe (metatarsophalangeal joint), by exerting continuous force on the calf muscles(pronation plus plantar flexion). Leave the toes soft. It may seem tempting to use them for stabilization, but since they can hardly exert much force for long, you would be thrown back onto the balls of your feet, which would then have become deformed due to the use of the toes, which would mean a worse condition for standing quietly than before the toes were used.
- Even if the instructions for adopting the posture here appear simpler and shorter than described above, the resulting posture is generally not as stable, which is why this method is not recommended as standard. One of the reasons for this is probably that the transition described above does not require the critical rotation of the pelvis and upper body that is necessary in this transition. Another, more subtle, but equally important reason is that in the standard transition, the widely bent standing leg requires a much greater overall effort and therefore forces a greater presence.
- When the pelvis and upper body rotate, there is a tendency to shift the centre of gravity towards the outside foot, which significantly destabilizes the posture. Care must be taken to ensure that the metatarsophalangeal joint exerts sufficient constant pressure on the floor, which keeps the center of gravity pl umb line below the midline of the foot and provides sufficient reserve for balancing.