yogabook / asanas / caturkonasana
Contents
caturkonasana
„square pose“
 instructions and details with working links as PDF for download/print
Feedback: We’d love to hear what you think about this description, give us feedback at:
postmeister@yogabook.org
Last modified: 30.12.2018
Name: caturkonasana
Trivial name: square pose
Level: FA
- classification
- contraindications
- effects
- preparation
- follow-up
- derived asanas
- similar asanas
- diagnostics
- instructions
- details
- variants
Classification
classic: standing pose
psychomental: strength, stability
physiological: hip opening, leg strengthening
Contraindication
Effects
- (221) Stretching to lateralise the shoulder blade
Here the shoulder blades are not pulled fully forwards, but lateralised to the maximum. - (257) Strengthening lateral adduction of the shoulder
Pressing the hands together is an adduction movement in the shoulder joints and strengthens not only the latissimus dorsi but also other lateral adductors of the shoulder joint. - (502) Strengthening the latissimus dorsi
Pressing the hands together is an adduction movement in the shoulder joints and strengthens the latissimus dorsi. - (727) Strengthening the short/monoarticular hip extensors (especially the gluteus maximus)
The hip extensors are involved in keeping the pelvis in position - (737) Strengthening the external rotators of the hip joint.
- (742) Strengthening the hip abductors, e.g. gluteus maximus
Moving the legs backwards (out of the field of vision) strengthens the abductors, especially the glutes - (812) Strengthening the quadriceps
Holding the body against gravity with bent legs and the movement of pushing the feet away from each other is work of the quadriceps - (822) Strengthening the hamstrings as external rotators of the knee joint
- (231) Stretching: frontal abduction shoulder
The overhead movement of the arms stretches the adductors of the shoulder joint by maximising (frontal or adduction) - (295) Stretching rhomboideus major, rhomboideus minor
Pressing the hands together moves the shoulder blades apart and stretches the muscles that contract and internally rotate them. - (751) Stretching the adductor muscles of the hip joint
Moving the legs away from each other and out of the field of vision stretches the (mainly monoarticular) adductor muscles
Preparation
The shoulder can be prepared for the requirement for frontal abduction with:
- downface dog, in particular the „wide“ variant as a general stretch of the shoulder.
- back extension, especially the „elevated “ variant as a general stretch of the shoulder.
- rectangular handstand.
- handstand.
- elbow stand as a pose with arms turned out wide.
- rectangular elbow stand as a related pose with arms turned out wide
- dog elbow stand as a pose with arms turned out wide
- hyperbola as one of the most effective and efficient stretches in the direction of frontal abduction without significant exorotation of the arms.
- shoulder opening on the chair as one of the most effective and efficient stretches in the direction of frontal abduction with external rotation of the arms.
In analogy to warrior 2 pose, the glutes must work both to erect the pelvis against its tendency to tilt forwards and to pull the knees backwards. If you are not used to using the glutes or want to strengthen them, there are several other poses that offer the opportunity to practise this:
The following poses only strengthen the gluteus maximus through extension, but not through external rotation:
- purvottanasana
- urdhva dhanurasana
- eka pada variation of urdhva dhanurasana
- setu bandha sarvangasana
- eka pada variation of setu bandha sarvangasana
- warrior 3 pose
- backwards against the wall“ variation of warrior 3 pose
- various backbends
The resistance against which the glutes pull the legs backwards are the adductors, which should feel a significant stretch in this pose. Practise to prepare them:
To facilitate the required external rotation of the thighs in the hip joints, the following poses are available:
- baddha konasana
- supta baddha konasana
- adho mukha supta baddha konasana
- half lotus forward bend
- hip opener at the edge of the mat
- hip opener 3
- warrior 2 pose
- parsvakonasana
- trikonasana
- ardha chandrasana
- counter
Follow-up
If the glutes feel tense after the pose, practise:
- half lotus forward bend
- hip opener at the edge of the mat
- hip opener 3
- parivrtta trikonasana
- parivrtta ardha chandrasana
Derived asanas:
Similar asanas:
Diagnostics (No.)
As in other overhead poses of the arms, symptoms can also occur in the shoulders, even if this is less common here. However, there may be indications of shoulder disorders:
- irritable hypertonus of the deltoid: ambitious beginners in yoga in particular tend to develop irritation in the deltoid, which is localised in the area of the muscle origins, presumably stems from an overstraining of the structures due to frequent repeated demands for full frontal abduction and is also noticeable in the same kind of strain, see FAQ. However, this effect is likely to be less pronounced here than in the downface dog.
- Various pathological changes to the shoulder joint such as impingement syndrome (with pain between approx. 70° and 130° frontal abduction), frozen shoulder, calcareous shoulder, which cannot all be discussed here and require clarification, can show symptoms particularly when taking the pose.
- Side discrepancies in flexibility:
The flexibility of the shoulder is recognisable in the form of the degree of deviation in the three dimensions of movement:
- Outward deviation of the upper arms with consecutive flexion of the elbow joints
- Loss of external rotation of the arms
- Incorrect angle of frontal abduction that does not or not permanently reach 180°
(293) Trapezius:
The trapezius, which plays a key role in lifting and outward rotating the shoulder blades, is probably one of the most tense muscles in Western civilisation. Internal and external posture, including today’s widespread VDU workplaces, contribute significantly to this. The fact that the arms are maximally turned out and the hands folded in this pose and the hands also press forcefully against each other, which does not properly protract the shoulder blades, but at least lateralises them, should not lead to a clear tendency to cramp in the trapezii, but if it does, this indicates a very clearly increased tone, which should also be noticeable in everyday life.
(650) Kyphosis and lordosis of the spine:
The deviations from the physiological double-S shape of the human spine become quite visible in this pose. There should be a certain degree of lordosis (convex spine from the front) in the lumbar and cervical spine and a certain degree of kyphosis (convex spine from the back) in the thoracic spine. In this pose, the thoracic spine is stretched a little beyond the physiological kyphosis in the direction of extension until the back is straight, but not truly extended. The inability to straighten indicates a lack of flexibility in the thoracic spine in the direction of extension. See the FAQ.
(611) Unequal shoulder height and scoliosis of the spine:
Lateral deviations of the spine from the median plane, known as scolioses, are also quite visible in this pose. See the FAQ.
(743) Tension in the abductors:
Tension in the abductors, especially the gluteus maximus or the tensor fasciae latae, located outside of the pelvis, can become clearly evident here.
The adductors are stretched in this pose. This can be used to recognise damage and conditions:
- Shortenings.
- Irritation of the tendons at the origins and attachments, which manifests itself in pulling pain with an elongated course. These are insertional tendinopathies, e.g. gracilis syndrome.
- Tension that causes an agonising sensation in the muscles that goes far beyond normal stretching.
- Tearing/partial tearing of adductor muscles, which, in the event of a tear, impress with a loud noise, possibly followed by haematoma formation and swelling.
- Side discrepancies in flexibility, which can cause pelvic obliquity and consecutive scoliosis. See the FAQ.
(885) Knee:
In this pose, knee problems associated with bending under load can become very apparent. These can be, for example: traumatic or degenerative meniscus damage, arthrosis/osteoarthritis, retropatellar events such as chondropathia patellae or retropatellar arthrosis/osteoarthritis, patellar tip syndrome, arthritis, subluxations, ligament damage, plica syndrome and others, see the FAQ.
Variants:
(S) press your legs against the wall with your hands
(S) push legs against the wall with feet
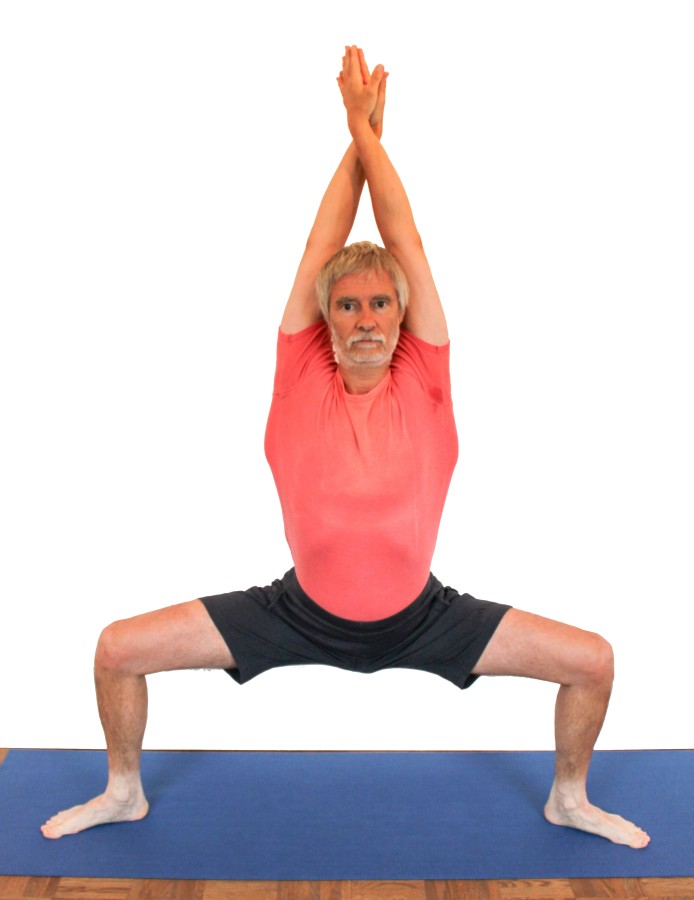
Instructions
- From tadasana, provisionally take a straddle with your legs well apart.
- First turn the feet out at 45°, this will be adjusted later.
- Bend the knee joints until the thighs become horizontal. Keep the pelvis upright.
- Pull your knees back as far as possible using the strength of your gluteal muscles without lifting your pelvis.
- Correct the position of the feet so that they are parallel to the thighs.
- First stretch your arms forwards approximately horizontally, then turn your thumbs inwards and further downwards (turning in your upper arms slightly into your shoulders) so that your palms are facing away from each other.
- Place your palms on top of each other (crossing your forearms) and press them firmly together with your arms straight.
- In this way, move the arms backwards and upwards, if possible behind the head, elevating the shoulder blades and maximising the extension of the arms, i.e. the biceps move backwards.
Details
- Often and always when the iliopsoas muscle or the adductors are shortened, the pelvis wants to tilt forwards significantly. Use the glutes (and the hamstrings) to prevent this as much as possible. This is one of the two jobs of the glutes in this position: the one that stretches the iliopsoas. Erecting the pelvis prevents hyperlordosis of the lumbar spine and therefore prevents the muscles in the lower back from having to work in an uncomfortable way. The upper body should be able to be stretched upwards from the pelvis. In addition to the iliopsoas, shortened adductors also pull the pelvis cranially forwards/downwards, as they also have a hip flexing effect.
- Applying force to counteract the friction on the floor with a turning in movement of the lower legs in the knee joint helps a little to move the knees further backwards.
- Extend the arms upwards from the shoulders (with elevation of the shoulder blades) and turn them out so that the deltoids and trapezius do not cramp.
- Press your palms firmly together. This is unusual work. It causes the latissimus dorsi muscle and other adductor muscles of the shoulder joint, such as the teres major and teres minor, to start working in the area of greater sarcomere length. This can be clearly seen in many people as these muscles, together with the shoulder blades, protrude laterally from the body, often by several centimetres.
- Turn the feet so that their centre lines are parallel to the thighs. The plane formed by the hip joint, heel and knee should be as vertical as possible. If this plane deviates significantly from the vertical (that is, it tilts), unhealthy pressure may occur in the knee, whether in the inner or outer knee depends on whether the knee is in front of the imaginary vertical plane through the hip joint and ankle (then the pressure or pain is usually in the inner knee) or behind it (then usually more in the outer knee), so it is strongly dependent on the flexibility of the adductors. The work of the gluteus maximus to pull the knees backwards relieves the knee joint.
- Measure the distance between the feet so that the heels are exactly the same distance apart as the knees in the pose, i.e. the knees are above the heels when viewed from the front, but further forwards in the sagittal plane. If the knees extend well beyond the heels, this puts uncomfortable pressure on the area of the front knee below the kneecap and unnecessary strain on the retropatellar cartilage. This must be avoided, especially in the case of disorders such as patellar tendinopathy, Osgood-Schlatter disease, Jumper’s knee / chondropathy patellae and retropatellar arthrosis/osteoarthritis.
- Once the pose has been taken, pull the knees backwards with the strength of the glutes. Make sure that the pelvis remains vertical and that you do not push the pelvis upwards, which almost always happens if no attention is paid to preventing it.
- The pelvis cannot fully straighten if the adductors are less mobile, partly because the gravity perpendicular would then no longer be between the feet: if the upper body and pelvis were vertical, the gravity perpendicular would be clearly behind the heels and therefore outside the physical base of support if the adductors were less flexible. In most cases, however, less flexible adductors and ilipopsoas pull the hip joints so far into flexion that the upper body tilts forwards and downwards enough to bring the gravity perpendicular into the physical base of support.
Known problems that can occur even when performed correctly
Tendency to cramp in the glutes
Depending on the constitution, a cramp-like sensation can occur in the glutes, on one or both sides. In rare cases, a tense feeling is also present after the end of the pose.
Variants
Hands on the hips
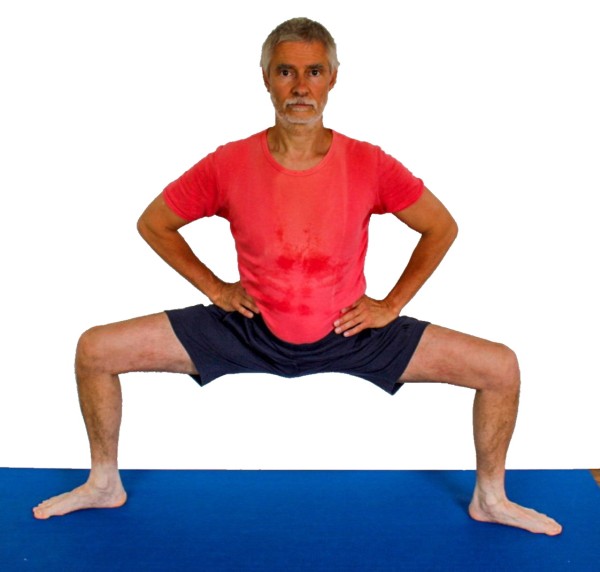
This variation is more suitable for people with high blood pressure, also for some shoulder joint disorders.
Instructions
- Keep your hands on your hip bones instead of lifting them as described above.
- Use your hands to erect your pelvis further, i.e. move your bottom downwards and your ASIS upwards.
- If possible, keep your shoulders low and move your shoulder blades backwards and inwards.
- Move the elbows backwards, but do not force them so far backwards that the forearms become parallel, because then there is less strength available to align the pelvis.
Details
- Be careful not to raise the shoulders to avoid tension and cramping in the trapezius, but allow the shoulder blades to sink down in depression and move them inwards (in retraction) while the elbows move backwards.
- In contrast to the „rotate thighs“ variation, no body weight can be supported here via a shorter lever arm in relation to the knee joint, which would relieve the quadriceps, so that the full strengthening effect is maintained here.
Turning out the thigh

Supporting the external rotation movement of the thighs
Instructions
- Take the pose as described above, but without the arm position. Instead, use your hands to turn your thighs out as far as possible, close to your knees, i.e. pull the tops of your thighs backwards.
Details
- Compared to the „hands on hips“ variation, this variation has the risk of supporting significant body weight on the thighs. Although the body weight remains the same regardless of whether the hips are supported or the thighs are turned out with the hands, in the latter case a large partial body weight can be supported by the arms on a very short lever arm on the knee joints, which massively relieves the quadriceps and reduces the possible strengthening accordingly.
On the wall

This variant can be performed by people whose sense of balance is not so well developed that they can stand stably in the standard variant. Of course, this also applies to cases in which the sense of balance is impaired, for example when dizziness occurs. It can also be used to concentrate more on work in the pelvis.
Instructions
- Set up the pose as described above, but with the buttocks at a short distance (approx. 5 cm) in front of a wall.
- A little trick helps to erect the pelvis a little better: first lower the pelvis a little too far without pressing it hard against the wall. Then increase the pressure of the pelvis against the wall and push the pelvis up again a few centimetres using the strength of the legs. The friction of the buttocks against the wall helps to straighten the pelvis.
Details
- The variation on the wall provides more stability, especially with good flexibility of the adductors, i.e. a large opening angle of the legs. The increase in stability is particularly pronounced with very mobile adductors and therefore a very flat physical base of support.
- The trick for straightening the pelvis (point 2 of the instructions) should not be forgotten, especially by those whose hip flexors and adductors are so shortened that the pelvis is always tilted forwards into flexion in the hip joints in this pose in order to avoid a hollow back feeling.
- Here too, pull the knees back strongly. Normally you tend to let the pelvis come up a little during this movement, but the wall partially prevents this and to the extent that it happens, it helps to erect the pelvis.
(S) Turn the thighs out

Instructions
- Take the pose as described above.
- The supporter stands behind the performer and turnes out the thighs as far as possible with the hands relatively close to the knees without affecting the balance of the pose, i.e. without pulling backwards or pushing forwards.
Details
- Once the pose has been taken, the thighs are essentially turned out as far as possible in the hip joints and the external rotators work hard to achieve this. Therefore, no clearly visible effect can be expected from the support. However, in rare cases of pain in the inner knee, an attempt can be made to provide relief.
(S) Turning out the arms

Instructions
- Take the pose as described above.
- Standing behind the performer, the supporter turnes out the performer’s upper arms with his hands, approximately in the middle, i.e. the biceps is turned backwards (away from the field of vision), and pulls the arms upwards with the shoulder blades. Press the arms towards each other to improve their extension. If the elbow joints are already hyperextended, this is of course not done.
Details
- The rotation of the upper arms reduces any tendency to cramp in the trapezii.
- The upward pull of the arms should not cause the performer to lift the pelvis and stretch the knee joints.
(S) Pull on the legs

Partner exercise: the support promotes the stretching of the adductors.
Instructions
- The supporter stands behind the performer, supports the sacrum/coccyx region with one knee and pulls the knees/thighs backwards with their hands (slowly increasing the force exerted). The supporter grasps the thighs from above just in front of the knees to promote external rotation.
Details
- Make sure that the knee/thigh is supported just as strongly as the hands pull.
- Placing the knee/thigh of the assistant in the sacrum/coccyx region of the performer as well as pulling on the knees could lead to the undesirable effect of the performer lifting the pelvis, which must be avoided. To avoid this, the supporter’s thighs should be as steep as possible or the leg or pelvis should be pressed sideways against the performer’s pelvis.
(S) Press legs against the wall with hands

more powerful stretching of the monoarticular adductors
Instructions
- As in the previous variation, the performer stands with their buttocks and back against the wall.
- As the supporter, stand slightly bent forward in a stepping position in front of the performer and grasp the performer’s thighs close to the knees with your thumbs down and fingers pointing upwards to push the thighs towards the wall.
- Keep leaning further forwards until the performer instructs you to stop applying further pressure. At the same time, turn the thighs out strongly (turn the inner thighs upwards).
Details
- By applying pressure from the front upwards with the performer’s bottom on the wall, it is easier to keep the performer’s pelvis down than in other variations. At the same time, external rotation can be effectively supported.
(S) Press legs with feet against the wall

Powerful stretching of the monoarticular adductors
Instructions
- The performer stands in caturkonasana with the buttocks against the wall. The assistant lies on his back in front of the performer so that he can press the performer’s thighs towards the wall near their knees with the feet.
Details
- As the supporter, place the feet on the inner thighs so that the arches of the feet are in contact with the thighs and the heels do not exert any uncomfortable pressure. Also push the feet upwards to support the external rotation of the thighs. To do this, place the feet at a slight angle to the vertical. Again, make sure that the pelvis is not pushed upwards as a result.
- As a supporter, do not press the feet against the knees themselves but against the area of the thighs close to the knees. In some cases, the two tremble together, which can usually be stopped by the supporter applying more even force.
- The trick described above can be used here to erect the pelvis better: 1. the supporter reduces the pressure, 2. the performer then sinks downwards with the pelvis, 3. the pressure is slowly built up again, 4. the performer liefts the pelvis a few centimeters.
- The pressure against the legs should start slowly enough to be able to observe the effect. Rapid and excessive pressure could lead to a strain in the adductors.
Jumping with tadasana

Powerful, dynamic transition; invigorating, endurance-enhancing.
Instructions
- Take caturkonasana as described above.
- Only jump directly into tadasana if you have sufficient strength in the adductors and have warmed up well, otherwise stretch the knee joints 15-20° before jumping.
- Extend tadasana cleanly.
- Jump back into caturkonasana, bringing the arms and legs into the appropriate position at the same time.
- Repeat as desired.
Details
- If there is any doubt about the strength of the adductors, the knee joints should be stretched a little before jumping from caturkonasana back into tadasana. The jump from deep caturkonasana can otherwise overstrain the adductors.
- Of course, the jump into tadasana and back can be performed at different speeds. At a higher tempo, this becomes cardiopulmonary relevant because some larger muscles are involved and the body has significantly greater potential energy in tadasana. The delta must be generated by these muscles. The faster the jump, the more muscle power is required and the more energy is used, the higher the metabolism and gas exchange, which requires sufficiently deep breathing.
- Breathing must be synchronised with the jump. The jump from caturkonasana back into tadasana should always be performed with the exhalation. If you jump in quick succession, you should breathe once per jump, i.e. exhale as you jump from caturkonasana into tadasana and jump back into caturkonasana on an inhalation. Depending on how long you spend in each pose, one or more complete breathing processes (inhalation and exhalation) are added.
- It takes a little practice to regularly hit the correct position of the feet when jumping into caturkonasana, both in terms of distance and angle. Corrections to the foot position should not be necessary later on. Those whose adductors are very flexible face a greater challenge here than those with less flexible adductors, as the physical base of support is less deep in the former and therefore the tilting moment backwards/forwards is significantly lower, thus the pose is less stable.