yogabuch / asanas / supta baddha konasana
Contents
supta baddha konasana
„horizontal fixed angle“

 instructions and details with working links as PDF for download/print
Feedback: We would love to hear what you think about this description, give us feedback at:
postmeister@yogabook.org
last update: 30.12.2018
Name: supta baddha konasana
Trivial name: lying held angle
Level: A
- Classification: A
- Contraindication
- Effects of
- Preparation
- follow-up
- derived asanas
- similar asanas
- diagnostics
- Instruction
- details
- Variants
Classification
classic: exercise while lying down
psychomental: calming, opening
physiological: lateral hip opening (passive)
Contraindication
Due to the limited flexibility of the iliopsoas hip flexor, which attaches to the lesser trochanter, and the hip-flexing effect of the adductors, this posture almost always has a tendency towards hyperlordosis in the lumbar spine and is therefore contraindicated in spondylolisthesis (spondylolisthesis), facet syndrome and spinal canal stenosis. It can also lead to a worsening of symptoms in acute lumbago.
Effects
Preparation
The lower back tends to be uncomfortable in this posture because the hip flexors and adductors (also flexors of the hip joint) pull the pelvis into a hollow back. Prepare the back by stretching it:
- parsva uttanasana
- balasana (virasana forward bend, child’s pose)
- parsva upavista konasana
- parivrtta trikonasana
- parsvottanasana
- Half lotus forward bend
- karnapidasana
An excessive hollow back in this pose indicates shortened hip flexors or shortened adductors. For the risks of a hollow back, see the FAQ. The adductors are the functionally most important group that requires great flexibility, prepare them extensively:
- baddha konasana and its forward bend
- Half lotus forward bend
- hip opener at the edge of the mat
- hip opener 4
- warrior 2 pose
- caturkonasana
- parsvakonasana
- counter
- upavista konasana
- ardha chandrasana
- trikonasana
The tension of the monoarticular quadriceps parts determines how far the knee joint can be bent and therefore indirectly how well the adductors can be stretched. Preliminary exercises:
- virasana
- supta virasana
- Quadriceps stretch 1 on the wall
- Quadriceps stretch 2 on the wall
- ardha supta krouncasana
- supta krouncasana
The dorsal flexion in the ankles can be prepared with:
Wrap-up
derived asanas:
similar asanas:
Diagnostics (No.)
(711) Hollow back: hip flexors and adductors
An excessive hollow back in this posture can be caused by shortened adductors or shortened hip flexors. If it is the hip flexors, there is usually also a general tendency towardsa hollow back. For the risks of a hollow back, see the FAQ.
The adductors are stretched in this posture. This can be used to detect damage to them, among other things:
- Shortening
- Irritation of the tendons at the origins and insertions, which manifests itself in pulling pain with an elongated course. These are insertional tendinopathies, e.g. gracilis syndrome, which is conceptually confusing in that the adductor gracilis should not play a role here due to the widely flexed knee joint. Therefore, the common term „footballer’s groin“ is more appropriate here.
- Tension that causes an agonizing feeling in the muscles that goes far beyond normal stretching
- Tears/partial tears/tears of adductor muscles, which make a loud noise when torn, followed by hematoma formation and swelling if necessary
- side discrepancies in flexibility, which can cause a pelvic obliquity and consecutive scoliosis, see the FAQ and the explanations on baddha konasana on the wall.
The widely exorotated, abducted postures and movements in particular trigger pain in the case of existing hip damage
- Arthrotic change (degenerative with cartilage atrophy) of the joint
- Arthritis (joint inflammation) of various kinds
- Perthes‘ disease in children, or hip dysplasia in general, can react to this posture
- Dislocation / subluxation, which would cause a significantly increased sensation of tension in various muscles covering the hip joint
- joint trauma suffered, which may cause pain in the joint even after many weeks or months
The main cause of the inability to move the heels towards the pelvis and thus the distance of the heels from the pelvis in the stance is the extensor moment in the knee joint, which results from the tension of the (especially monoarticular) quadriceps parts. It can regularly be seen that if the ischial tuberosities do not press firmly against the floor in virasana, the distance between the buttocks and the pelvis in this pose is at least the same as in virasana. Conversely, it can be estimated that if the buttocks reach the wall in the quadriceps stretch on the wall, this problem no longer exists here. If the feet slide too far away from the pelvis, the variation with a belt is recommended
(926) foot:
In this pose, with good flexibility, the feet are in extensive dorsal flexion, the inability to move the knees towards the pelvis without moving the heels apart indicates a shortening of the soleus and the need for improvement with regard to the health of the feet and Achilles tendons. In the case of hallux valgus, hallux rigidus, hallux limitus or metatarsalgia, the metatarsophalangeal joint area may have increased tenderness.
Variants:
Instruction
- Sit in dandasana. Bend the right and left leg one after the other and bring them into baddha konasana.
- If you are using a belt, place it around the outer edges of the feet, through the groin and around the sacrum. Bring it relatively tight.
- Lean back and come up onto your elbows first and then lower your whole back. Actively stretch the upper body backwards so that there is only minimal hyperlordosis of the lumbar spine.
- Push the buttocks away from the back towards the feet so that the lower back can lie relaxed, also to minimize the hyperlordosis of the lumbar spine.
- Stretch the arms overhead away from the body.
Details
- If you are using a belt, make sure that it fits comfortably, that the buckle cannot pinch you and that the belt does not twist. Adjust the belt tight enough to keep the heels close to the perineum and at the same time loose enough to allow the pelvis to tilt as far back as possible (reducing flexion in the hip joints) so that the lower back remains relatively relaxed.
- If the stretching sensation in the adductors is too great, the knees can be supported, e.g. with a block or a mat.
- If pain occurs in the medial meniscus, try to relieve it by twisting the thighs out vigorously; if necessary, do not raise your arms above your head, but use your hands to maintain the twist. If this is not enough, support the knees (see above) until the pain is relieved. If none of the tricks described in the FAQ help, this exercise is currently unsuitable. If necessary, the posture with support can be applied to the SIAS in the form of the head down dog position with the focus on turning out the thighs.
- The inner feet may fall apart. Keeping them together could cause tension in the adductors, which would counteract the desired stretch.
- The exercise is very much about allowing the emerging stretch, which does not necessarily start right at the beginning, to take effect over time. If possible, practise this pose for no less than approx. 3-5 minutes.
- As the adductors have a hip-reflecting effect due to their origin in front of the acetabulum, they pull the pelvis more or less upwards at their origin and therefore pull the back into a hollow back when the shoulders are dropped. To avoid uncomfortably compressing or toning the lower back in this posture, push the buttocks away from the back with your hands. Working the glutes or abdominal muscles to reduce the hollow back should not normally be necessary in this pose.
- Stretch the abdomen so that the upper body can lie still and move freely backwards and downwards.
Known problems that can occur even when performed correctly
Knee pain
As in other poses with a similar leg position, discomfort can also occur in the inner knee. Tricks for dealing with this type of knee pain can be found in the FAQ.
Tendency to tensionin the traction belt
Some people react to the long, wide abduction in the hip joints when the knee joint is bent far (here the tension in the tensor fasciae latae and iliotibial tract is maximally relaxed and can contract over time) by developing tension in the iliotibial tract.
Variants
with knee support

Detailfotos
Block so far towards the pelvis that knee pain no longer occurs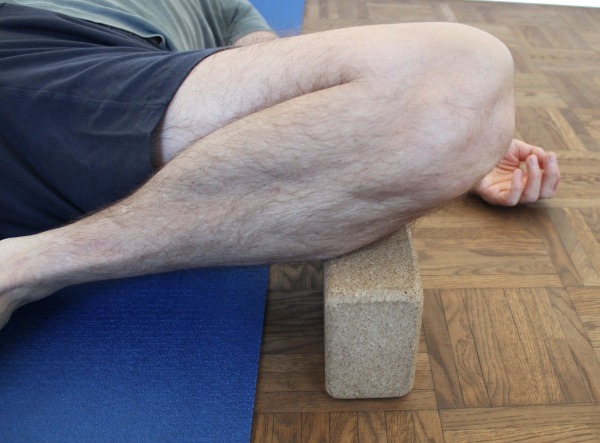 |
Facilitate stretching if too intense.
Instructions
- Take the pose as described above, but place your knees (or thighs close to your knees) on an appropriate support so that any stretch that is too intense is softened.
Details
- Depending on the object used for support, it may have an edge that presses uncomfortably on the vastus lateralis of the quadriceps or the iliotibial tract. In this case, use appropriate softness mediators such as a folded blanket between the support object and the leg.
- This variation can also be used if dropping the knee too far leads to discomfort in the medial meniscus.
- The support can reduce the tendency to hollow backa little.
Known problems that can occur even when performed correctly
Individually high pressure sensitivity of the supported structures
Some people do not tolerate the pressure on the supported structures well or, in combination with the long, wide abduction in the hip joints when the knee joint is flexed far (here the tensor fasciae latae and iliotibial tract are maximally relaxed and can contract over time), react by developing tension in the iliotibial tract.
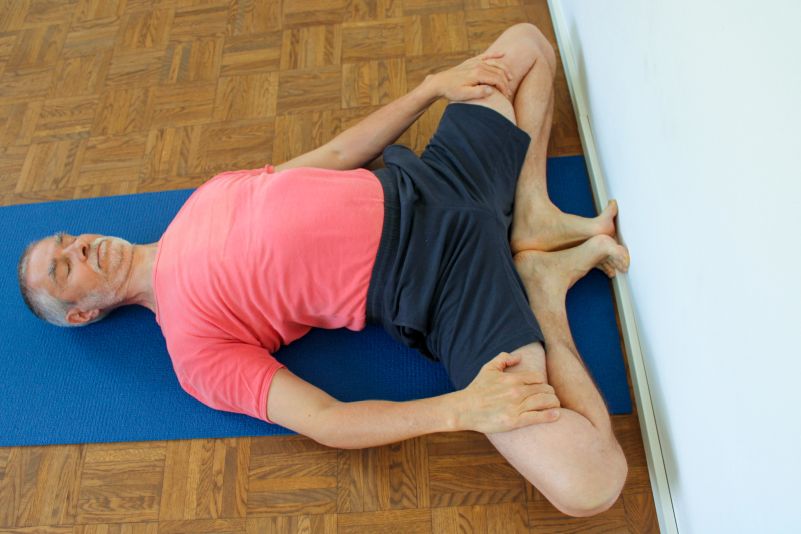
against the wall
Contraindication
Hallux valgus, hallux rigidus, hallux limitus or metatarsalgia can cause pain in the metatarsophalangeal joints, which contraindicates execution.
Instructions
- Take the pose as described above, but press the undersides of your toes against a wall, pointing away from each other.
Details
- This variation – performed alone without support – is probably the optimum. The feet can no longer slide away from the pelvis as the friction of the body on the floor compensates for the tension of the quadriceps and they will also no longer lift off as the friction of the toes on the wall normally completely absorbs the corresponding forces resulting from the hip-flexing effect of the adductors.
- As with all variations, make sure that you are not too hunched over.
Known problems that can occur even when performed correctly
Lack of sensation in the metatarsophalangeal joints
Depending on the flexibility of the toes in the direction of dorsiflexion in the metatarsophalangeal joint, intense discomfort can occur here, limiting the angle that can be achieved there to less than 90°.strong stretching sensation in the sole of the foot
People who play sport or spend long periods on their feet every day often have high tension in the muscles of the sole of the foot, which can lead to very intense stretching sensations in the metatarsophalangeal joints when dorsiflexion is required. In principle, however, this stretch is correct and necessary until it is tolerated.
With belt
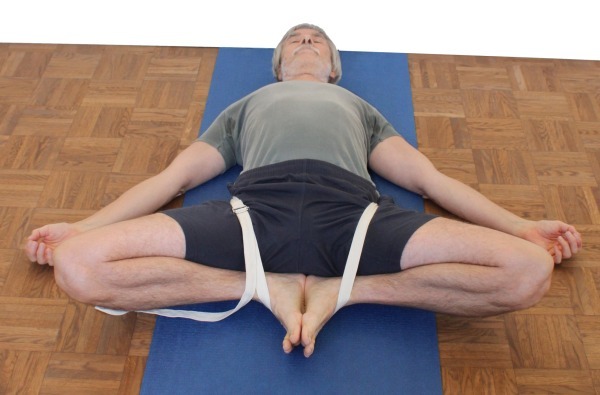
Instructions
- Take the pose as described above, but secure the feet with a belt to prevent slipping by placing it around the outer edges of the feet, through the groins and around the lower sacrum.
Details
- The tension in the quadriceps causes an extension moment in the knee joint that pushes the feet away from the pelvis. This variation is particularly suitable for people with less flexible quadriceps (see how far the buttocks remain from the floor in virasana ) in addition to the variation against the wall further down.
- Make sure that you are not lying with a hollow back. As the stretched adductors have a hip-flexing effect, this can easily occur. In addition, the belt must be positioned as low as possible on the sacrum, i.e. as close as possible to the coccyx, as the hip joints would also be pulled into further flexion further towards the head, i.e. the back would be pulled into a further hollow back due to the shoulders lying on the floor.
- Make sure that the belt is not twisted. The buckle should also not be able to press uncomfortably anywhere, ideally it should not rest on one part of the body, but should be on a line between the thigh and lower leg, for example.
- If the belt is pulled too tight, the feet can no longer rest heavily on the floor and the force is all the greater, pulling the pelvis into a hollow back.
With belt against the wall

Detailed photos
seen from the side |
Instructions
- Take the pose as described above, but secure the feet with a belt to prevent slipping by placing it around the outer edges of the feet, through the groins and around the lower sacrum. Then push your body towards the wall so that the bottoms of your toes are pointing outwards on the wall.
Details
- This variation is the best way of counteracting the tendency to sway. Lifting the feet off the floor is also prevented by them rubbing against the wall. The same applies here as for the above variant with a belt.
(P)
Anleitung
- Nimm supta baddha konasana ein, vorzugsweise gegen die Wand.
- Der Supporter steht fußseitig des Ausführenden mit Blick auf dessen Brust. Er greift bedie Oberschenkel kniehnah und drückt sie langsam und vorsichtig mit kraftvoller Ausdrehung herunter. Der ausführende signalisiert, wenn die Intensität reicht.
Details
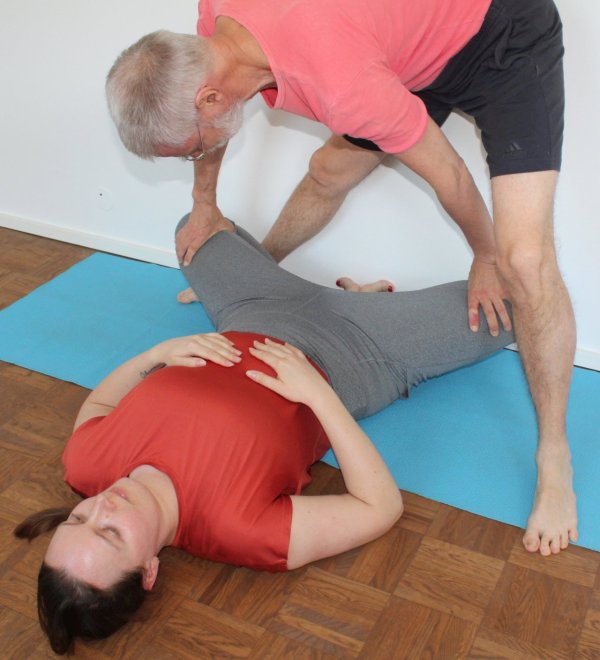
(P) downface dog on thighs
Instructions
- Take the pose as described above.
- The supporter performs a head down dog position on the performer’s thighs from the foot side of the performer.
Details
- As in comparable postures, supporting further towards the knees via the larger lever arm to the hip joint leads to a more intensive effect, while supporting close to the pelvis has a moderate effect. This means that the effect of the support can be scaled well.
- The greater the distance between the supporter’s feet and hands, the more exorotatory the force exerted and the less the thighs are pressed towards the floor.
- In order to build up the support as smoothly and gently as possible, the supporter can adopt the downface dog with the knees resting on the floor.
(P) right-angled handstand on the thighs
Instructions
- Take the pose as described above close to a wall, with your head pointing away from the wall.
- The supporter performs a right-angled handstand on the performer’s thighs from the performer’s foot side.
Details
- As in similar poses, the support continues towards the knees via the larger lever arm to the hip joint leads to a more intensive effect, while support close to the pelvis has a moderate effect. This allows the effect of the support to be scaled well. As the full body weight of the supporter acts on the performer, this variation should only be performed if the dog head down on the thighs appears to be too ineffective. In addition, the hands should first be placed on the thighs close to the pelvis. If this does not seem intense enough, a greater distance from the pelvis should be chosen with a sense of proportion. Under no circumstances should the supporter try to increase the distance from the pelvis during the exercise, but should always reduce the support first and then build it up again with a greater distance.
- The greater the distance between the supporter’s feet and hands, the greater the effect of the force applied exorotatory and the less the thighs are pressed to the floor.
- In order to build up the support as gently and comfortably as possible, the supporter should not take the right-angled handstand in a jump but should slowly release one leg at a time and place it on the wall.