yogabuch / asanas / warrior 1 pose
Contents
- 1 virabhadrasana 1„warrior 1 pose“
- 2 variants
- 2.1 hands on hips
- 2.2 move hands apart
- 2.3 heel up
- 2.4 hands on the back leg
- 2.5 grasp elbows
- 2.6 head not backwards
- 2.7 arms crossed behind
- 2.8 arms in caturkonasana-pose
- 2.9 knee against block
- 2.10 front foot against the wall
- 2.11 rear foot against the wall
- 2.12 rear foot at an angle against the wall
- 2.13 block in the hands
- 2.14 ball of foot on block
- 2.15 heel on block
- 2.16 rear outer foot on supporting mat
- 2.17 (S) turn the back leg in
- 2.18 (S) stretch the back leg
- 2.19 (S) bend the chest
- 2.20 (S) correct the pelvis
- 2.21 (2P) Bend the chest and twist the leg
- 2.22 transition to warrior III pose
- 2.23 transition to parsvottanasana
- 2.24 transition to parivrtta ardha chandrasana
- 2.25 transition to parivrtta trikonasana
- 2.26 transition to parivrtta parsvakonasana
- 2.27 transition to hip opener 1st
- 2.28 transition to hip opener 5th
- 2.29 transition to handstand
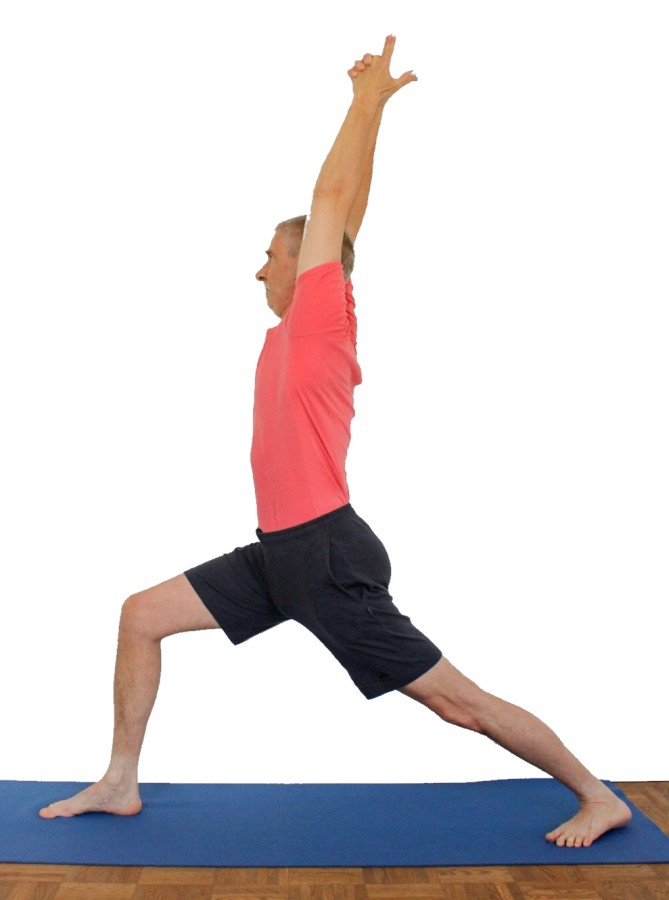
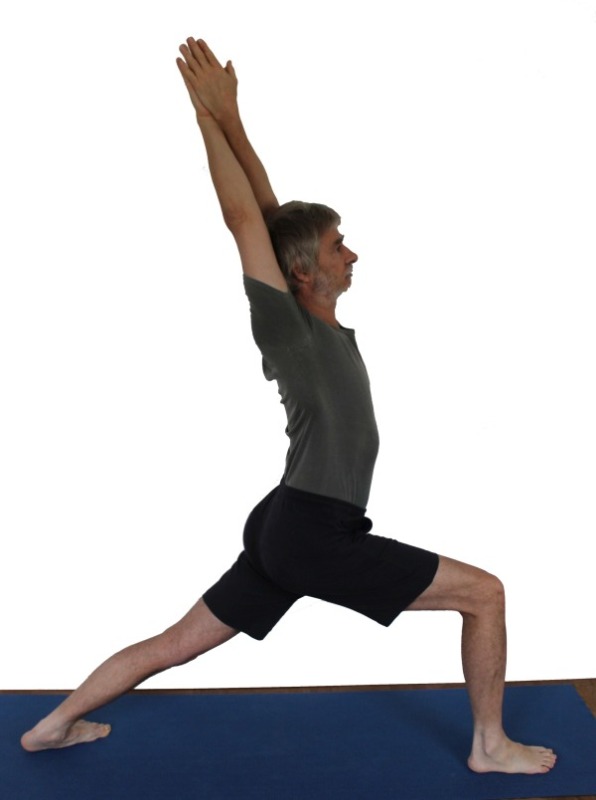
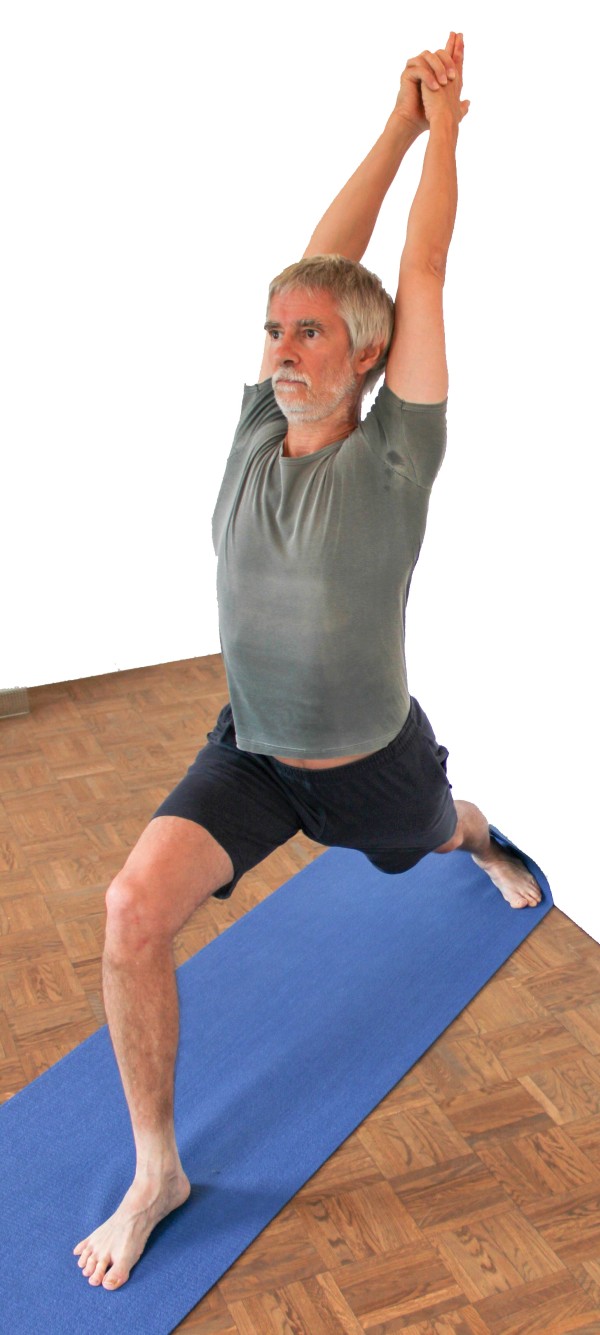
virabhadrasana 1
„warrior 1 pose“
 instructions and details with working links as PDF for download/print
do and don’t
without lateralization of the shoulder blades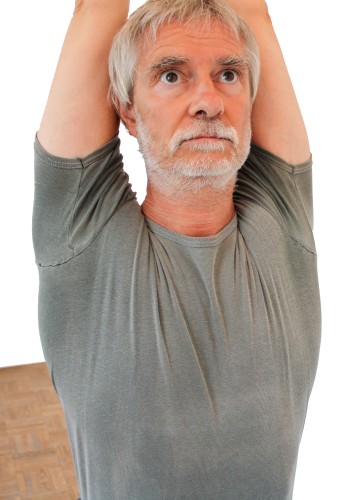 | with lateralization of the shoulder blades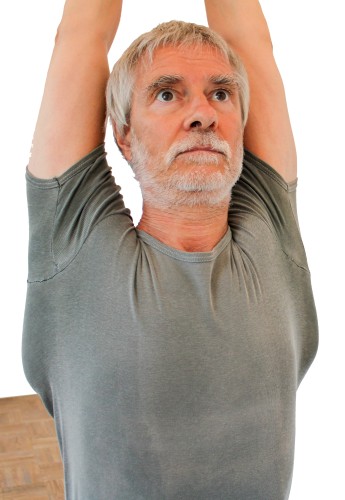 |
Feedback: We’d love to hear what you think about this description, give us feedback at:
postmeister@yogabook.org
Last updated: 30.12.2018
Name: virabhadrasana 1
Trivial name: warrior 1 pose
Level: beginner
- classification
- contraindications
- effects
- preparation
- follow-up
- derived asanas
- similar asanas
- diagnostics
- instructions
- details
- variants
classification
classic: standing pose
psychomental: stimulating
physiological: leg strengthening, possibly slight backbend, stretching of the iliopsoas and possibly slight stretching of the rectus femoris
contraindication
If facet syndrome, spondylolisthesis or spinal canal stenosis is present, strict care must be taken to avoid a hollow back or hyperlordosis of the lumbar spine, as this could worsen the symptoms or cause them to flare up again.
effects
- (641) Strengthening the muscles of the lumbar spine
- (727) Strengthening the short hip extensors (especially the gluteus maximus)
- (812) Strengthening the quadrizeps
- (852) Strengthening the monoarticular calf muscles (soleus)
(front leg) - (857) Strengthening the gastrocnemius
(front leg) - (862) Strengthening the supinators of the ankle
- (872) Strengthening the pronators of the ankle
- (231) Shoulder joint: stretching for frontal abduction
- (711) Stretch the hip flexors
(both parts of the iliopsoas: psoas major and iliacus). - (831) Stretching of the sartorius
- (851) Stretching of the calf muscles
- (856) Stretch the gastrocnemius
because the back leg is stretched, the gastrocnemius is stretched almost exclusively.
preparation
warrior 1 pose is probably – apart from some backbends – the one with the greatest demands in the extension capability in the hip joints of all supposedly simple poses. If the pose is to come closer to its ideal (horizontal front thigh and vertical, forward-turned pelvis), this corresponds to an extension that most anatomists consider impossible. Preparation in this direction should be correspondingly intensive.
- hip opener 1
- hip opener 2
- upface dog
- urdhva dhanurasana (back arch)
- ustrasana (camel)
- setu bandha sarvangasana
as well as further backbends with extension in the hip joint. Since the arms are in maximum frontal abduction, this can also be prepared:
- downface dog, especially the variant „wide“ as a similar stretching of the muscles of the shoulder joint
- back stretching, esp. variant „raised“ as a general, intensive stretching of the muscles of the shoulder joint
- rectangular handstand as a related and synergistic pose for the arms
- handstand as a related and synergistic pose for the arms
- elbow stand as a synergistic pose with regard to the arms with external rotation of the arms
- rectangular elbowstand as a synergistic pose with regard to the arms with external rotation of the arms
- elbow downface dog as a synergistic pose with regard to the arms with external rotation of the arms
- hyperbola as one of the most effective and efficient stretches in the direction of frontal abduction without external rotation of the arms
- shoulder opening at the chair as one of the most effective and efficient stretches in the direction of frontal abduction with exorotation of the arms
The hip extensors (especially the butt muscles) have to work extremely hard against the high resistance of the hip flexors in this pose to keep the pelvis upright. Other poses that also place high demands on the extensors prepare you for the work:
- caturkonasana
- parsvakonasana
- counter
- warrior 2 pose
- purvottanasana in all variations, especially with the leg raised (eka pada) or with the knees stretched
- urdhva dhanurasana
- eka pada-variant of urdhva dhanurasana
- setu bandha sarvangasana
- eka pada-variant of setu bandha sarvangasana
- warrior 3 pose
- „backwards against the wall“-variant of warrior 3 pose
- supta virasana
as well as various other backbends with hip extension. If there is a high level of tension in the lumbar spine muscles, these can be stretched beforehand:
- parsva uttanasana
- balasana (virasana forward bend, child’s pose)
- parsva upavista konasana
- parivrtta trikonasana
- parsvottanasana
- half lotus forward bend
- karnapidasana
- parsva karnapidasana
In order for the rear heel to rest on the floor, which is important for the stability of the pose, the gastrocnemius should be stretched beforehand:
- downface dog, especially variants with one foot raised off the ground
- parsvottanasana
- parivrtta trikonasana
- crouch
- uttanasana with the ball of the foot on a block
Since the rear leg has to be extended against the flexion generated by the hip flexors, the quadriceps can be prepared for intensive work:
- warrior 2 pose, esp. transition to parsvakonasana and back
- utkatasana
- ustrasana, esp. on the wall
- caturkonasana
- setu bandha sarvangasana
- parsvakonasana
- counter
- urdhva dhanurasana
follow-up
It is not uncommon to feel increased tension in the lumbar spine muscles after the warrior 1 pose, stretch them with:
- parsva uttanasana
- balasana (virasana forward bend, child’s pose)
- parsva upavista konasana
- parivrtta trikonasana
- parsvottanasana
- half lotus forward bend
- karnapidasana
- parsva karnapidasana
If your butt muscles feel tense or tight after the pose, compensate with:
- half lotus forward bend
- hip opener at the edge of the mat
- hip opener 3
- parivrtta trikonasana
- parivrtta ardha chandrasana
derived asanas:
similar asanas:
diagnostics (no.)
(711) hip flexors:
In most cases, an excessive hollow back indicates shortened hip flexors. However, this statement must be qualified by the extreme demands of this pose. For the risks of a hollow back inclination, see the FAQ.
The flexibility of the shoulder joint in the direction of frontal abduction can be assessed here, including side differences, and there may be indications of disorders of the shoulder joint:
- Irritable hypertonicity of the deltoid: ambitious beginners in yoga in particular tend to develop irritable conditions in the deltoids, which are localised in the area of the muscle origins. They presumably result from an overstraining of the structures due to frequently repeated demands in full frontal abduction and are also noticeable under the same strain, see FAQ.
- Various pathological changes of the shoulder joint such as impingement syndrome, frozen shoulder, calcifications of the biceps tendon, which cannot all be discussed here and require clarification.
- side differences in flexibility
The flexibility of the shoulder joint is recognisable in the degrees of deviation in the three dimensions of movement:
- Outward deflection of the upper arms with consecutive flexion of the elbow joints (as the palms are on top of each other)
- Loss of external rotation of the arms
- Incorrect angle of frontal abduction that does not reach 180° or does not reach it permanently
(650) kyphosis and lordosis of the spine:
The deviations from the physiological double-S shape of the human spine are quite clearly visible in this pose. Apart from the tendency towards hyperlordosis, which results from the requirements of the pose and the actual flexibility of the hip flexors, the spine should be able to become quite straight and remain straight or slightly extended beyond the physiological kyphosis of the thoracic spine. Depending on the variant, the cervical spine should be in physiological lordosis or maximally extended. For hollow back inclination, see the FAQ. If a clear thoracic spine kyphosis remains, this indicates an inadequate low amount of extension capability of the thoracic spine.
(611) pelvic tilt/unequal shoulder height/scoliosis of the spine:
The lateral deviations of the spine from the median plane, known as scoliosis, also become quite visible in this pose. To do this, you must ensure that both hips are at the same height by performing the pose correctly. See the FAQ for more information.
(812) quadriceps:
In this pose, the quadriceps are clearly required to extend the back leg against the flexion moment generated by the hip flexors, which requires a great deal of strength, endurance and the ability to perform well even in the range of minimal sarcomere length (applies to the monoarticular quadriceps parts). As the rectus femoris works in a slightly more favorable range of sarcomere length due to the hip extension, it will probably do the most powerful job of stretching the knee joint. This can lead to a tendency to cramp, which can have various causes such as the supply of blood to the muscles, electrolyte deficiency or neurological causes. If you stand in a deeply bent pose for a long time, you will inevitably reach the limits of your muscles‘ strength and endurance. A certain amount of trembling in the muscles is physiological during great exertion. If it occurs with little or no exertion, this may be a symptom. The quadriceps in the front leg works at a medium sarcomere length , and usually the front knee joint is only moderately bent. Thus, the perceived exertion in the quadriceps of the front leg is significantly lower compared to that of the back leg.
variants:
rear foot at an angle against the wall
rear outer foot on supporting mat
transition to parivrtta ardha chandrasana
transition to parivrtta trikonasana
transition to parivrtta parsvakonasana
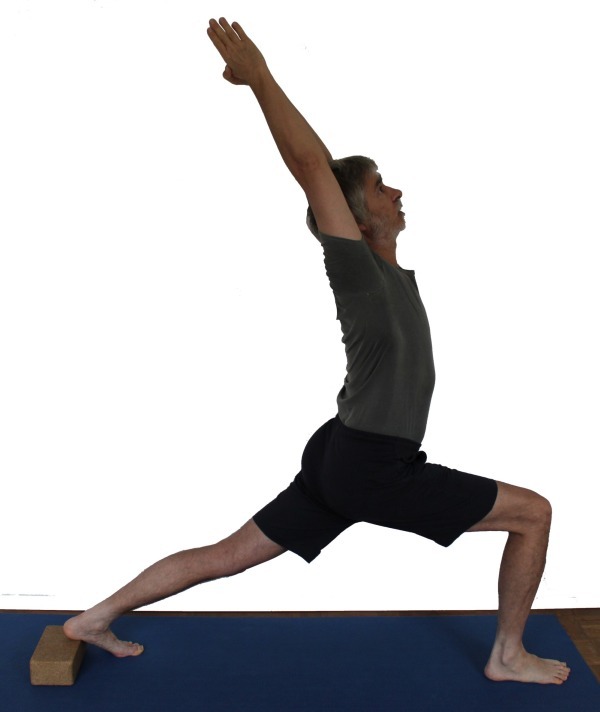
instructions
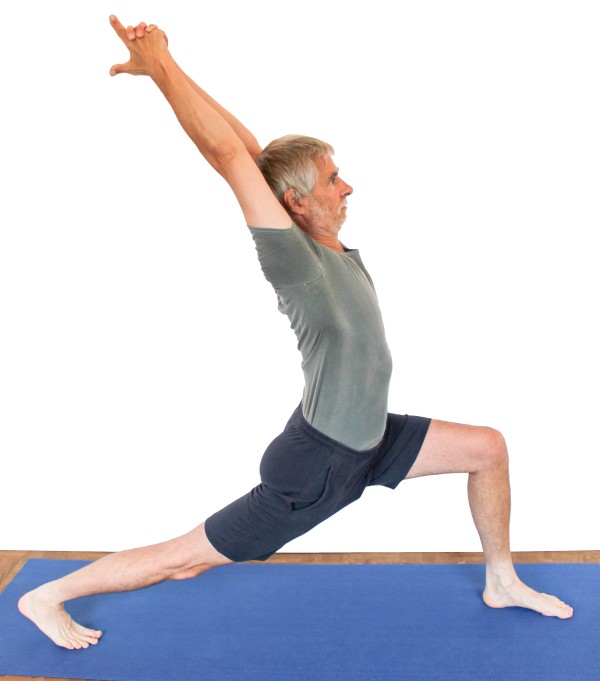
- From a straddle that is significantly wider than leg width, turn the left leg in (visible on the foot) by 45° to 60°, the right leg (visible on the right foot) by 90° out.
- Rotate the pelvis with the upper body 90° towards the right leg, turning the „right“ leg into the „front“ leg and the „left“ leg into the „back“ leg.
- If the pelvis has tilted forwards and downwards, use the strength of the butt muscles to straighten the pelvis back into a vertical position. Keep the position of the pelvis (in terms of front/back, i.e. rotation in the plane) stable by working with the legs. Maximally rotate the left (rear) leg inwards from the hip joint. Push your feet apart against the resistance of the floor. Press the left heel and the ball of the right foot towards the floor (without letting the heel become light on the ground). Keep the hips parallel to the ground and equally far forward.
- Bend the right knee in a controlled manner. Increased bending also allows you to push the feet away from each other with more force.
- Place your arms next to your body and rotate the arms outward, while keeping the palms facing each other.
Then bring your arms up overhead and your hands together above/behind your head, palms still facing each other, thumbs crossed. Stretch the arms upwards (including elevation of the shoulder blades) upwards and move them as far back as possible while keeping the arms turned out. - If necessary, straighten the pelvis again with the strength of the butt muscles and bring the trunk and arms into an extension, preferably also into a slight backbend in the thoracic spine, less so or not at all in the lumbar spine.
- As long as you can keep the pelvis both upright and rotated exactly forwards, you can bend your front knee joint further. If the knee comes forward beyond the heel, increase the distance between the feet so that the knee is directly above the heel and your front knee is maximally bent (while maintaining an upright pelvis).
details
- With the flexion of the right knee joint, the use of the quadriceps becomes possible for:
- pushing the feet apart (a kind of stretching movement in the knee joint, which nevertheless does not push the pelvis up, as the hamstrings prevent this in the knee joint and possibly also the hip flexors in the hip joint of the front leg ).
- pressing down the back heel.
- pushing the pelvis into the correct position. The legs push the corresponding hips in the correct direction, the back leg keeps the corresponding hip forwards as a counterfort and the front leg pushes the corresponding hip backwards.
- maintaining the height of the pelvis, as it is pushed down by its own weight and that of the part body weight above it. However, this movement is quite regularly prevented by the restricted flexibility of the hip flexors of the rear leg.
- The pelvis should be straight, i.e. the hip bones should be the same distance forward. This is important for:
- healthy pressure conditions in the sacroiliac joint.
- the condition of the back (especially the lower back): the straighter the pelvis, the less one-sided strain occurs in the back muscles.
- the possibility of stretching the iliopsoas and, secondarily, the rectus femoris of the rear leg.
- the possibility of stretching the calf and intrinsic foot muscle area (rear leg).
- The pelvis should be erected to the maximum for:
- the possibility of stretching the iliopsoas (back leg) and, clearly secondary, the rectus femoris (back leg).
- the condition of the lower back (see above).
- upholding the possibility of a backbend in the thoracic spine. A person whose lower back hurts will hardly want to do a backbend in the middle back.
- the strengthening of the gluteus maximus that takes place (especially on one side: on the side of the bent leg)
- Turn the rear leg (not the foot!) in to the maximum in the hip joint despite a 30°-45° turned out position of the leg the, which helps to keep the corresponding hip in front, i.e. to move the inner knee backwards in relation to the outer knee.
- Keep the right leg straight in the sense that the knee, heel and hip are in a vertical plane that is parallel to the sagittal plane. The front foot is in the same plane, i.e. the knee does not tilt inwards or outwards and the foot is not at an angle. Ideally, the knee would be vertical above the heel and the thigh would be horizontal at the same time.
- Only tilt your head back if this does not significantly affect the stability of your pose.
- If you have high blood pressure, do not bend your head or raise your arms.
- Only let the back heel come up if:
- you only want to use the pose primarily for coarse leg strengthening or
- otherwise the pelvis cannot be kept straight or the front knee cannot be bent if the pelvis is kept straight. Note that bringing the back heel up destabilizes the pose, as the support base is significantly narrower.
- Prevent the shaking movement around the longitudinal axis of the front foot by using the lower log muscles (esp. the rein system of the ankle) strongly to press the ball of the feet firmly and evenly onto the floor. As in many other poses in which a narrow base of support means that a secure stance depends primarily on the front leg, the moment when you think you are standing securely and youn may therefore reduce the activity in the front lower leg a little, is the moment when you start to wobble or even tip over.
- The front foot points in its exlongation to the back heel, in experienced people possibly to the back center of the foot. Both correspond to varying degrees of slight adduction of the rear leg.
- Stretch your arms maximally from the shoulders backwards and upwards (elevation of the shoulder blades). Turn out your arms to the maximum. Keep your palms together and your thumbs crossed. Change the interlocking of the thumbs with the side of the asana. Extend the arms to the maximum without hyperextending them. A flexion of the elbow joints could have two causes: Evasive lateral movement of the upper arms due to limited flexibility in the direction of frontal abduction or also the high tension of the biarticular biceps, which is used as a frontal abductor and inevitably also generates a flexing torque in the elbow joints.
- The angle of the back foot to the front foot should be between 30° and 45°. Note that everyone has an individual optimum. This results as a compromise from the restrictions on the flexibility of the foot and pelvis. Here, warrior 1 pose is similar to parivrtta trikonasana, even if the distance between the feet is usually smaller there. The following five rules of thumb apply:
- if the heel cannot reach the ground at a 30° angle or remains too light, the angle must be increased to 45°
- if the hip belonging to the stretched rear leg cannot move far enough forward or only when the front knee joint does not bend fully (90°), the angle must be reduced to 30°.
- if you cannot simultaneously rotate your pelvis forward and keep your back heel on the ground, the distance between your feet is too large.
- if the anterior knee joint cannot be flexed with the rear leg turned out at 30° and the pelvis upright, the hip flexors are too restricted in their flexibility to fulfill all conditions at the same time and some kind of cutbacks must be made that obey the maxim „maximum effectiveness with ideally zero side effects“! In practice, conditions 1) and 2) often apply, so that once you may practice with the focus on wide bending of the anterior knee joint with the pelvis straight but the heel lifted, and another time with the heel on the floor and the pelvis straight but insufficient flexion of the anterior knee joint. The first of the two options serves more to strengthen the anterior thigh and the posterior quadriceps as well as the muscles of the anterior lower leg, as the support base is much narrower and therefore the front foot has to perform more compensatory movements by the strength of the lower leg muscles, the other serves more for improving the flexibility of the ankle and the hip flexors. It is therefore important to find your personal optimum through experimentation and to observe over time whether and how it changes.
- The rear leg should be extended with force, not only to ensure stretching of the hip flexors, but also to minimize the effect of occurring rotational moments in the knee joint. In particular, if pain occurs in the posterior inner knee, the force exerted by the posterior quadriceps should be increased and the internal rotation of the posterior leg should also be increased. With the exception of pathologically altered knee joints, such pain is almost always a result of a not fully extended knee joint or an insufficiently turned in leg. Note: although the leg is in a turned out position in the hip joint, it makes an inward-rotating movement from this position.
- Rarely and only with very good mobility of the iliopsoas can hyperextension-related discomfort occur. Then flex the anterior knee joint further, so that the flexion moment in the posterior knee joint is large enough from the pull of the iliopsoas, so that overstretching can no longer occur.
- Note: if the pose is taken from a straddle by turning one leg 45° to 60° in and the other leg 90° out, at the beginning of the process, when the first leg is 45-60° turned in, this leg is in strong endorotation, which is at the edge of the range of motion or even beyond it, so that the pelvis is forced to deviate (in the sense of rotation in the plane). After the second leg has been rotated 90° out and the pelvis has been rotated 90° in the same direction, the second leg is therefore in 0° rotation, but the first leg is no longer in internal– but at around 30° in external rotation! When the pelvis rotates, the rear leg therefore changes from internal to external rotation. Nevertheless, the movement that this leg must make in the pose is the strongest possible internal rotation, which must not release the rear heel from the ground.
- As most adductors have a hip flexing effect in small flexion angles of the hip joint, a stretch can also be felt in these.
variants
hands on hips
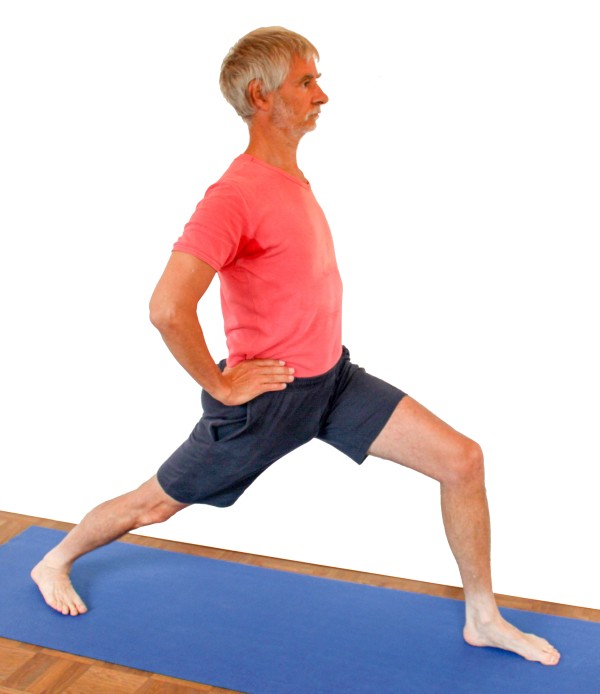
better control over the position of the pelvis
instructions
- Take the pose as described above, but place the fingertips of the index and middle fingers on the ASIS („hip bone“).
details
- The elbows move backwards, the shoulder blades in retraction.
- Be careful not to lift the shoulder blades, but push them towards the lower back (in depression).
- With the fingers on the ASIS, it is easier to assess whether both hip bones are equally far forward; at the same time, it is possible to push the pelvis further in the right direction using the strength of the arms: by pressing the buttocks down with the thumbs and lifting the ASIS with the fingers, the impulse is given to further extension in the hip joint of the back leg.
move hands apart

Changed work of the arms causes activity of the latissimus dorsi and other adductors of the shoulder joint.
instructions
- Place your palms on top of each other in the position described above and place your thumbs on top of each other. Against the support provided by the overlapping of the thumbs, pull the hands (more precisely: the whole arms) away from each other using the strength of the m. latissimus dorsi and other adductors of the shoulder joint. In terms of movement physiology, this is a lateral adduction in the shoulder joint. The middle, biarticular part of the triceps, Teres major and Teres minor are also involved.
details
- Also pay attention to the rotation of the arms in this variation (rotate the biceps backwards). This is easily lost as both the latissimus dorsi and the stronger of the two teres, the Teres major are endorotators of the shoulder joint and generate corresponding torques in the shoulder joint.
- With vigorous work and some flexibility in the m. latissimus dorsi, it moves outwards with the shoulder blades clearly visible and moves them in a maximum lateralization. This work is reminiscent of caturkonasana.
- Despite the applied tension, stretch the elbow joints and ensure maximum elevation of the shoulder blades.
heel up
more intensive strengthening of the anterior quadriceps and more intensive stretching of the hip flexors.
instructions
- Take the pose as described above, but allow the back heel to come up straight backwards from the start.
details
- The back heel moves backwards and downwards without being able to reach the ground.
- In this variation, bend the front knee joint at a right angle so that the thigh is horizontal and the lower leg is vertical. To achieve this, the distance between the feet must be chosen appropriately.
- Also use the strength of the front thigh to push the body backwards. In some people, this is not only noticeable but also visible as additional activity of the front thigh, as some parts of the quadriceps as the vastus lateralis also become more clearly visible.
- Due to the much narrower support base (the width is just the width of a foot), more attention and muscular work is required in the front lower leg than in the normal pose. Press the ball of the front foot firmly and steadily onto the ground using the strength of the calf muscles.
- This variation works quite strongly on the hip flexor muscles on the side of the back leg and the quadriceps of the front leg. You should be able to perceive this.
- This variant is not recommended for irritation of the insertion of the iliopsoas (the psoas-syndrome, a insertional tendinopathy/enthesiopathy).
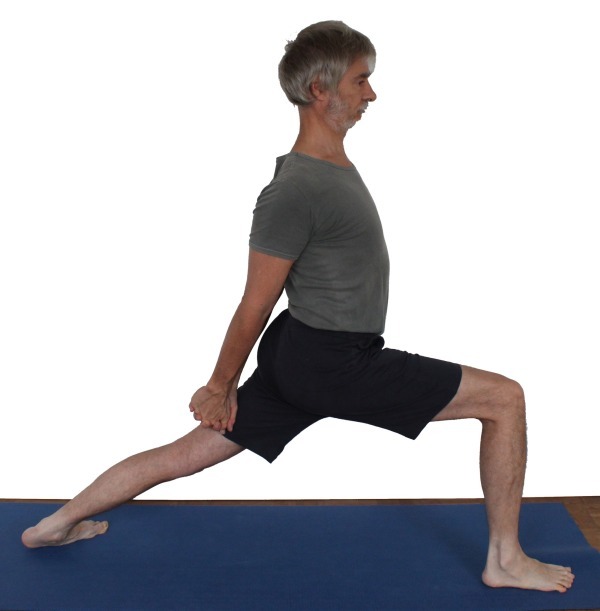
hands on the back leg

Gives more feeling for the upper body backbend
instructions
- Set up the pose as described above, but do not raise your arms upwards, instead keep your arms stretched backwards and downwards behind your upper body and interlock your fingers.
- Straighten your arms and rotate them out (biceps forwards).
- Place your clasped hands on your back thigh and move them down and backwards along it. Move your upper body further and further into a backbend.
details
- Make sure that the backbend, which allows you to push your hands further back and down, comes more from the middle/upper back, i.e. the thoracic spine, and less from the lower back and the gluteus maximus maximally extends the hip joints.
- The shoulder blades move inwards and downwards (in depression).
- The head goes into the neck (reclination).
grasp elbows
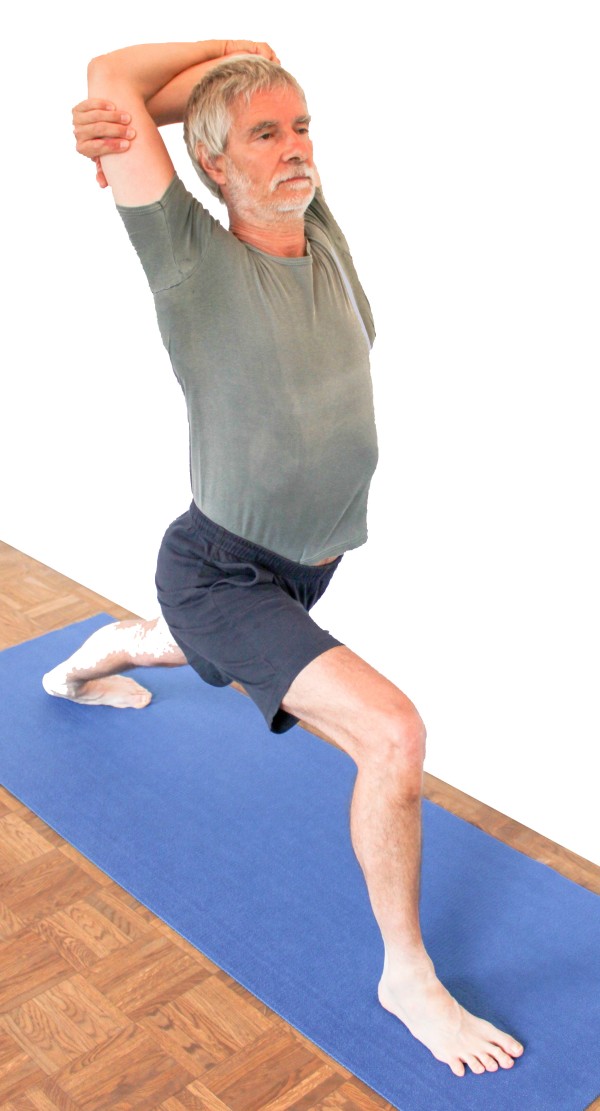
ease in the shoulders
instructions
- Take the pose as described above, but do not straighten your arms, instead grasp your elbows with your hands and move them backwards with elevated shoulder blades.
details
- Extend the arms upwards from the shoulders (elevation of the shoulder blades) and turn the arms out (biceps backwards).
- This position can prove to be much more comfortable if there is a tendency to cramp in the trapezius. The opposite upper arm can also be gripped alternately with one hand and turned out.
head not backwards
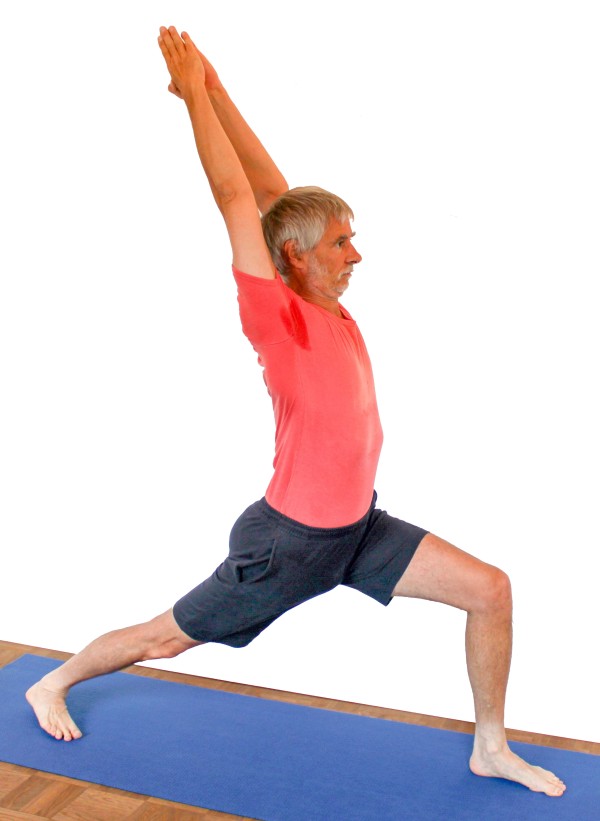
better stability
instructions
- Take the pose as described above, but keep your head in line with your thoracic spine.
details
- The position of the head in the maximum backbend makes many performers quite shaky. This may be due to the largely lost 3D localisation, which normally evaluates fluctuations and movements of the body via visual impressions in the form of observing the floor in front of us, for example. If the head is bent backwards, this is no longer possible in the usual way and some parameters may even have to be interpreted in reverse. This is why it is often recommended to look at a fixed point on the ground at a distance of 3-4 metres for stable standing. Although balancing is mainly done by the strength of the front calf, the information is partly obtained visually.
arms crossed behind
instructions
- Take the pose as described above, but cross your arms behind your back without bringing your hands to the back of your thighs as in the „hands on the back leg“ variation, thus bringing your upper body into a wide backbend.
details
- This variant relieves the shoulders and arms. It is therefore suitable for both hypertension and a tendency to cramp in the trapezius.
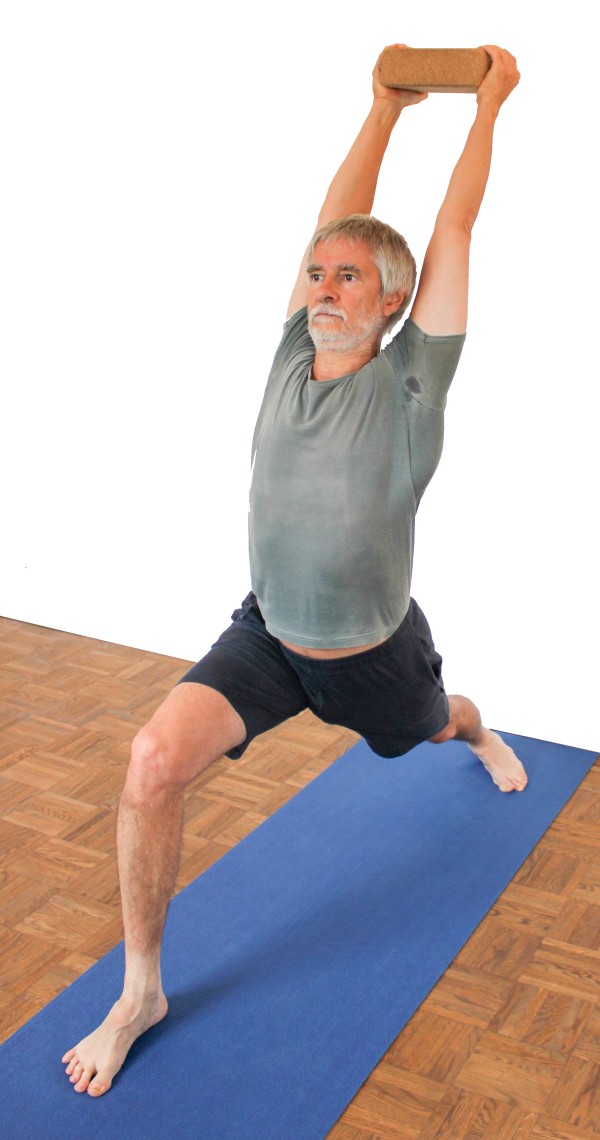
arms in caturkonasana-pose
instructions
- Take the pose as described above, but press the hands together with pronated forearms as in caturkonasana.
details
- This variation relieves the shoulders and arms. A tendency to cramp in the trapezius should not occur here.
knee against block
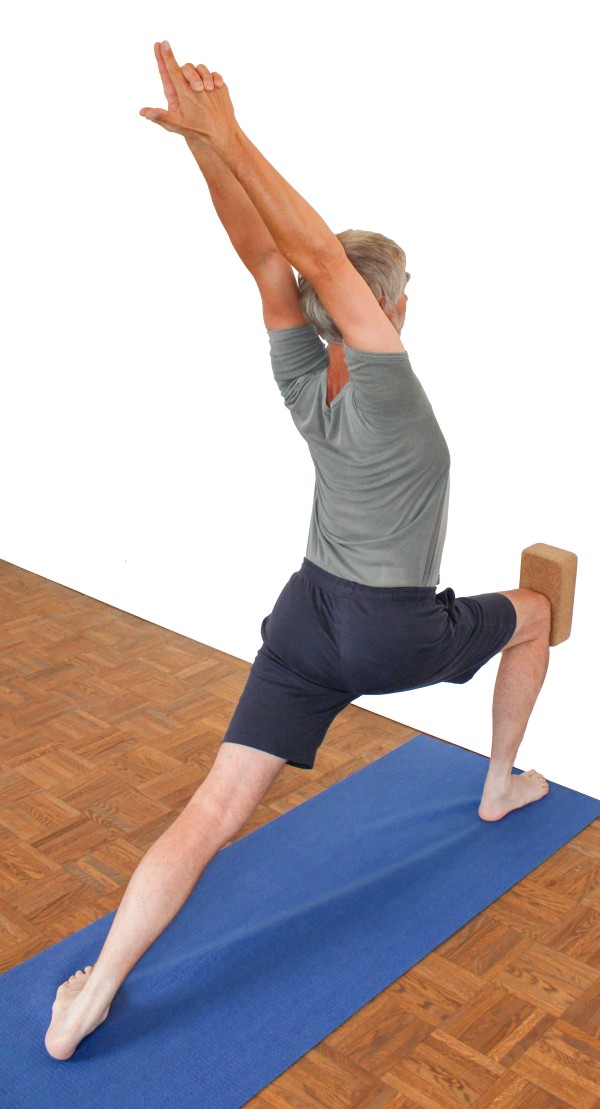
Focus on the pelvic posture
instructions
- Practise this pose so that you press a block against a wall with your front knee.
details
- Of course, make sure that the block does not fall on your foot due to carelessness. There is a particular risk of this when leaving the pose, but also when correcting the back foot or the pelvis. So move the hip belonging to the back leg forwards, not the hip belonging to the front leg backwards. This is the opposite work to the standard variant, in which the front leg pushes the associated hip backwards against the abutment, which is the back leg with the associated hip.
- This pose greatly relieves the quadriceps of the front leg in terms of the effort required, leaving more room for the other parameters.
- The front foot can be positioned in a way that the toes point upwards at the wall – this allows the front knee joint to be held at a more favourable (less sharp) angle than if the base joints of the toes were at a distance from the wall.
- As the front knee joint is bent relatively far in this pose, in many cases the hip belonging to the rear leg will only be able to move forwards the same amount if the rear foot is at a smaller angle to the front foot than it should be (at least 30°); then, it may no longer be possible to keep the rear heel on the ground.
- This option is not recommended for disorders of the knee joint such as PFPS, chondropathy patellae and retropatellararthrosis.
- This pose works slightly differently to the basic posture in that the hip belonging to the front leg is pushed backwards by the force of the front leg with the abutment of the back leg as a punctum fixum in order to maintain a pelvis that is aligned straight forwards. Here, the knee of the front leg and therefore also its hip is punctum fixum and the pelvis is rotated in and around its hip joint until it points straight forwards. Punctum fixum and punctum mobile are therefore interchanged here compared to the basic pose.
front foot against the wall

modification of the block against the wall variant
instructions
- Press the front knee directly against the wall without using a block.
details
- Depending on the nature of the wall and the block, this may be a more or less pleasant option than the one with the block.
- Here, the angle in the front knee joint is slightly shaprer than when using the block. So always keep your toes pointing upwards on the wall.
- This option is not recommended for diseases of the knee joint such as PFPS, chondropathy patellae and arthrosis.
rear foot against the wall

simplified form of the „rear foot in an angle against the wall“ variant.
instructions
- Take the pose as described above, but place the back foot – still turned 30° – 45° in relation to the front foot – with the heel against the wall.
details
- This is the simplified form of the „back foot diagonally against the wall“ variation, in which the mat has to be turned. The need of turning the mat can be avoided if you practise with a partner who positions his mat the other way round at a 45° angle to the vertical to the wall and hands it over to change sides. Alternatively, you can of course also work alone with two mats, which you change with the side of the pose. This variant should offer a large part of the benefits of the variant with the wall without the effort.
rear foot at an angle against the wall
Detailfotos
Fuß gegen Matte gegen Wand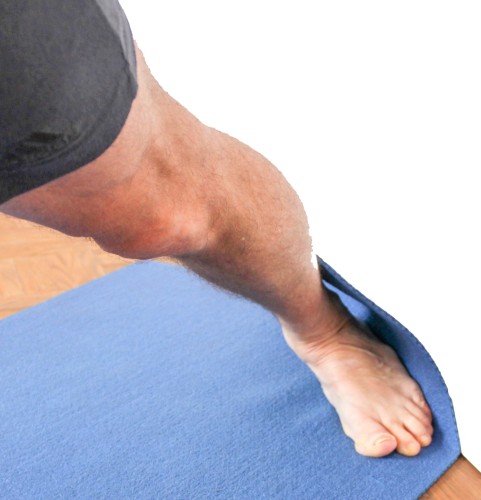 |
prevents the rear foot from moving and the heel from coming up
instructions
- Take the pose as described above, but place the mat against the wall at an angle of approx. 45° so that the rear outer foot can be pressed against the wall.
details
- If the shape of the outer foot raises the question of whether the forefoot or the heel should be on the wall, as it is not possible to achieve both at the same time, then opt for the heel. So then calcaneus and base of the Os metatarsale 5 are on the wall.
- Don’t be distracted by the mat lying at an angle to the wall, but build up the pose so that the front foot is parallel to the edge of the mat and points towards the back heel in its extension. The heels are equidistant from the long edge of the mat.
- In this variation, the mat must be rotated with the side change of the pose, which requires that you either practise with a supporter who positions his mat at 45° to the vertical to the wall and hands it over for the side change, or that you work with two mats yourself, which you change with the side of the pose. Of course, you can also practise on two different mats.
- This variation corresponds to the standard variation in that the front leg pushes the corresponding hip backwards and is therefore the opposite of the knee against block variation.
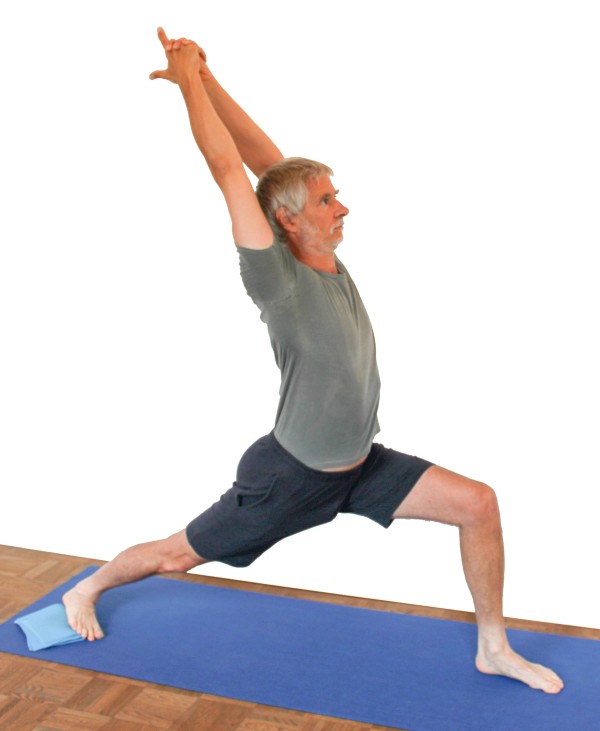
block in the hands
Gives more feeling for the movement of the arms
instructions
- Take the pose as described above, but hold a block between your hands.
details
- Due to the large lever arm, the block is noticeable despite its low weight. If the arms move backwards beyond the vertical with reasonably flexible shoulders, the block pulls the arms a little further in the desired direction.
- A small dumbbell can of course also be used instead of the block.
ball of foot on block

shifts the working range of the triceps surae of the front leg towards greater sarcomere length.
instructions
- Take the pose as described above, but place the forefoot of the front leg on an elevation.
details
- This variation modifies the pose only slightly, but shifts the working range of both parts of the triceps surae of the front leg towards greater sarcomere length. This is less relevant for the biarticular gastrocnemius than for the monoarticular soleus. As this muscle only plantarflexes the ankle, a block under the ball of the foot, for example, shifts its working range very clearly towards a greater sarcomere length, from which it benefits above all it its tone is high or its flexibility low. This variant is particularly useful in cases where squats can hardly be performed without the tendency to tip over backwards. It is possible that a block is already too much of an elevation, so that a flat shoulder stand plate may be used for some time first. If a soft shoulder stand plate or another, softer object is used, this results in more work for the tension belt of the ankle and therefore more training for it.
heel on block
instructions
- Take the pose as described above, but place the back heel on a block at an angle of 25° – 40° to the back foot.
details
- The use of the block significantly reduces the required flexibility of the calf muscles, especially the gastrocnemius of the back leg, and in turn defuses the controversy that some people find almost impossible to resolve between keeping the heel on the ground (which requires a rather larger angle between the feet) or turning the pelvis straight forwards (which requires a rather smaller angle).
- The angle of the block is not 90° to the rear foot as would perhaps be expected, but at a much smaller angle (in relation to the outer edge of the foot), so that the block also acts against the inclination of the rear foot and leg to lose the external rotation. With the rear block rotated 30° against the front foot, it is therefore at an angle of around 60° to the front foot.
rear outer foot on supporting mat
Detailfotos
reduced demand for supination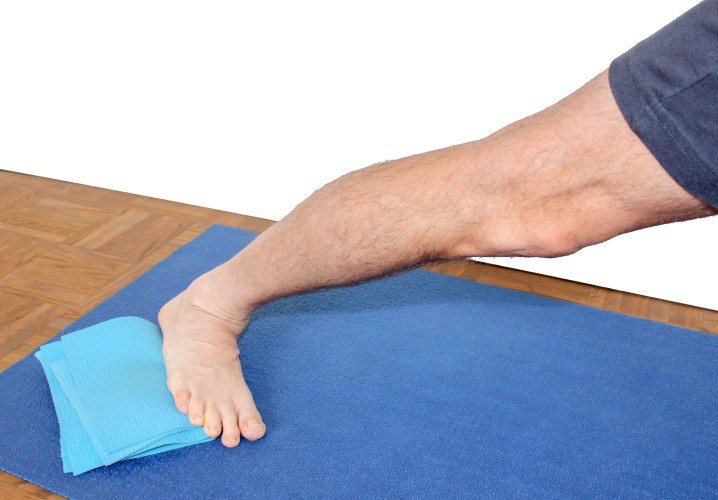 |
gives more support if the available supination of the rear foot is too low.
instructions
- Take the pose as described above, but support the outer foot with about 2-6 layers of mat that are parallel to the centre line of the foot and support the entire outer edge of the foot from the heel to the ball of the foot.
details
- Press the outer edge of the foot onto the supporting mat and at the same time turn in the back thigh.
- Like the previous variation, this also helps to minimise the conflict between pushing the heel down and moving the hip forwards, which occurs when the flexibility of the lower leg is restricted.
- This variant should not be used for kinkfoot. Instead, it is better to place the mat under the inner foot.
(S) turn the back leg in

support of the internal rotation of the rear leg in order to be able to move the hips equally far forwards.
instructions
- Take the pose as described above; the assistant grasps the performer’s back thigh with both hands and turns it in (inner knee forwards). He can pull the thigh backwards close to the knee and support the performer with his shoulder on the same-side buttock of the performer to help straighten this leg.
details
- This variation can help to perform the pose without pain in the inner knee. As always, start slowly and carefully with the application of support and continue to increase until the performer expresses the opposite.
- Due to the position of the assistant, the assistant can monitor and foster the extension of the rear leg very well. Sometimes it is also the lack of extension of the knee joint or its combination with insufficient internal rotation that leads to pain in the knee joint.
(S) stretch the back leg

Anleitung
- Take the pose as described above.
- The supporter stands behind the performer and grasps the outstretched leg close to the knee in order to stretch and twist it. To prevent the performer from being pulled backwards out of the exercise, the supporter supports the buttock of the outstretched leg with one shoulder.
Details
- This support offers very good support to counter one of the most important evasive movements, the bending of the extended leg as well as its tendency to extend instead of rotate. Both movements are caused directly by the pull of the iliopsoas, which attaches with both parts, psoas major and iliacus to the trochanter minor. The supporter now has the option of suppressing any flexion by pulling with sufficient force on the thigh above the knee. The lever arm to the hip joint is very large there and the lever arm is bony: the femur. If the supporter interlaces their hands, they can simultaneously rotate the leg, which enables even more precise work and therefore also stretching of the iliopsoas.
(S) bend the chest

instructions
- During normal execution of the pose, the supporter stands to the side of the performer, places one hand supporting the back at the level of the lower sternum, while pushing the upper torso backwards horizontally from the front at shoulder height with the other arm. The force applied from the front must not be greater than the supporting force applied from behind.
details
- This variation serves to straighten the thoracic spine and also to bend it in the direction of extension, i.e. to increase the backward bend of the upper body in the pose. Care must be taken to ensure that the arm pressing on the front of the body does not exert more force than on the back, otherwise beyond extension of the thoracic spine a hollow back would develop in the lumbar spine or an existing one would be enlarged.
- The performer must ensure that the extension of the thoracic spine does not lead to an inconvenient lumbar spine hyperlordosis. The pelvis must therefore be lifted very strongly with the help of the gluteal muscles.
- The position of the supporter must be chosen precisely so that he can press with a horizontal arm against the rib cage under the shoulder blades so that there is a maximum lever arm against the supported point in the back for good effectiveness and minimum fatigue of the supporter. It may be necessary to ensure that the height of the performer and supporter are reasonably compatible.
- Ventrally, the pressure should be applied to the area of the upper sterunm, avoid pressing on the throat.
(S) correct the pelvis

instructions
- Take the pose as described above. The supporter stands behind the performer and rotates and pushes the pelvis into the correct position with both hands.
- If it becomes apparent that the performer is not or not only straightening and erecting the pelvis, but also moving the upper body backwards – which would increase an existing hollow back – the supporter can press against the performer’s back with his head to prevent this.
details
- As already described in the pose itself, the pelvis deviates as expected in three dimensions of movement and does so in a very sustained, almost uncontrollable way – not least because more or less flexibility-restricted hip flexors are opposed to a very pronounced extension requirement in the hip joint. Furthermore, as the correction is made with the upper limb against the forces of the lower limb (or the muscles moving it), it is generally very strenuous for the supporter as expected.
- The corrections to be made in detail:
- the pelvis must be corrected in the horizontal plane: as the hip flexors limit the extension angle in the hip joint of the extended leg before the angle required by the pose is achiedved, they pull the corresponding hip backwards, so the hip of the rear leg must be pushed forwards and the hip of the front leg pulled backwards.
- the pelvis must be corrected in the frontal plane: also due to the limited flexibility of the hip flexors, the hip of the extended rear leg comes upwards: it must therefore be pulled downwards in relation to the other leg.
- the hip flexors have the greatest impact on the pelvic position in the sagittal plane, in the main direction of their force exertion, by preventing the pelvis from erecting and visibly pulling the hip bones (ASIS) downwards, because they tilt the entire pelvis from the required upright position (vertical) forwards and downwards in the direction of less extension in the hip joint of the rear leg.
- Of course, the total amount of evasion will always be the same for a given amount of force (totalled by the performer and supporter), it can just be distributed differently across the various dimensions of movement. The first requirement is usually the condition of the lumbar spine, so that most attention should generally be paid to straightening the pelvis. If the lumbar spine area becomes noticeable with discomfort on one side, the correction of the pelvis in the sense of rotation in the horizontal plane comes to the fore, whereby the elimination of the different heights of the two hips can also have an influence here, as the performer nevertheless strives with the rest of the body towards the vertical, i.e. a lateral flexion occurs in the lumbar spine due to the different heights of the hips, resulting in different conditions of the muscles on both sides of the lumbar spine.
(2P) Bend the chest and twist the leg

Instructions
- Perform the support described under „Bend chest“ and „Twist leg“ at the same time.
Details
- This variation requires some care, so that the cumulative effect of the more fully extended back leg and the bent back upper body does not result in an uncomfortable hyperlordosis of the lumbar spine.
transition to warrior III pose

instructions
- From warrior 1 pose, tilt the upper body forwards in the hip joints and keep the arms stretched in elongation of the trunk.
- Shift more and more body weight forwards onto the bent leg.
- Pull the back foot forwards by approx. 20-30 cm and, if lifted, place it heavily on the floor again.
- Slowly lift the back leg without momentum and bring it up as far as possible.
- Slowly stretch the standing leg further and further and finally fully.
- Make any necessary adjustments so that the back with the raised leg and arms are in a horizontal line and the warrior 3 pose is complete.
details
- When bending the upper body forwards, make sure to move the gravity perpendicular forwards exactly along the centre line of the foot. This will allow you – in conjunction with the equally heavy inner and outer foot – to keep the foot as still as possible and thus create the conditions for a safe transition.
- When shifting your weight, stretch your front leg as little as possible. Especially when lifting the back leg or before lifting the back leg, you tend to straighten the front knee to reduce the effort in the thigh.
- First lift the back leg to the maximum before you stretch and finally straighten the standing leg (the front leg). When lifting the back leg, many muscles work quite hard for a short time:
- the butt muscles of the front leg to stabilise the position of the pelvis
- the butt muscles and the hamstrings of the back leg for lifting it.
- the front quadriceps, which bears a significant proportion of the weight of the entire body (except for its standing leg)
- the lower leg muscles of the front leg – depending on the phase, not only the calves, but also for stabilisation the shin muscles depending on the position of the gravity perpendicular
- the back muscles, which stretch the upper body and in which its weight, including the weight of the arms and head, acts to create a particularly long lever arm and an even greater moment.
transition to parsvottanasana

effects: (552) strengthening of the quadratus lumborum
instructions
- From warrior 1 pose tilt the pelvis with the trunk forwards in the hip joints with the arms held in elongation of the back.
- Rest the upper body completely on the front thigh as far as possible without giving up trying to stretch the trunc.
- Slowly stretch the front leg, maintaining contact between the upper body and the thigh as long as possible.
- When the front leg is fully extended, place the hands on the back and bring them into namaste for the full parsvottanasana. Alternatively, the opposite elbows can be clasped with the hands and the forearms placed on the lower back.
details
- Make sure that you press the ball of the front foot firmly onto the floor during the entire transition so that you remain stable. To do this, the calf muscles must be working hard at all times.
- During the transition, move the gravity perpendicular exactly along the centre line of the front foot. Although the physical support base is very similar in both poses (and identical here at the transition), the pressure of the metatarsophalangeal joint area (MTP 1) on the floor is even more important in parsvottanasana, as the gravity perpendicular is shifted much further forwards.
- As you extend the front leg, make sure that the corresponding hip moves backwards and upwards accordingly so that the pelvis remains straight and one hip does not end up further forwards than the other.
- Stretching the front leg tends to cause it to turn out, often making the inner foot lighter too, which costs stability and reduces the stretching effect on the dorsiflexors.
- Turn the back leg in in both poses.
- In both postures, the pelvis tends to rotate away from the front leg in the horizontal plane, but for different reasons: in parsvottanasana to avoid the stretch in the hamstrings and the glutes, in Warrior 1 because of the pull of the iliopsoas on the trochanter minor.
transition to parivrtta ardha chandrasana

instructions
- Take warrior 1 pose with the right foot in front as described above.
- Bend your hip joints so far that your upper body almost rests on your front thigh.
- Turn your upper body to the right.
- Place the fingertips of your left hand on the outside of your right foot.
- Stretch your right arm upwards to the right at a 90° angle to your spine.
- Shift your body weight completely onto your right foot. To do this, pull your left foot towards you on the floor.
- Slowly lift your left foot off the floor and rotate your left leg back out of the outward rotation it had before.
- Raise your left leg to the maximum.
- Stretch the standing leg and foster the rotation of the upper body to the right to full parivrtta ardha chandrasana.
details
- On the way back to warrior pose 1, straighten the pelvis with the upper body. The extent to which the back leg can remain raised depends largely on the flexibility of the hip flexors. The more limited this is, the further the leg will sink and the smaller the distance between the back foot and the front foot will be once it is planted.
transition to parivrtta trikonasana

instructions
- Take warrior 1 pose with the right foot in front as described above.
- Bend your hip joints so far that your upper body almost rests on your front thigh.
- Turn your upper body to the right.
- Place the fingertips of your left hand on the outside of your right foot.
- Stretch your right arm upwards to the right at a 90° angle to your spine.
- If necessary, pull the rear foot a little closer without changing its rotation of 30 – 45°.
- Straighten the front right leg and foster the rotation of the upper body to the right into parivrtta trikonasana.
details
- The distance between the feet in parivrtta trikonasana is usually smaller than in warrior 1 pose, but the angle is essentially the same. The appropriate distance in parivrtta trikonasana depends very much on various flexibilities, especially the calf muscles of the back leg, which must allow a clear dorsiflexion with supination, but also the gluteal muscles, which belong to the front leg, so that the pelvis does not rotate away from the front leg in the extensive flexion in the hip joint.
- In parivrtta trikonasana, the calf muscles of the front leg need to be worked even more intensively to stabilise the pose than in warrior 1 pose. The reason for this is that the centre of gravity is shifted forwards. On the other hand, the back heel is often a little easier to keep on the ground than in the warrior 1 pose. It is also much easier to keep the back leg stretched in parivrtta trikonasana, as the hip flexors no longer pull the thigh downwards and thus cause a flexing moment in the related knee joint.
transition to parivrtta parsvakonasana

instructions
- Take warrior 1 pose with the right foot in front as described above.
- Bend the front leg at a right angle: thigh horizontal, lower leg vertical.
- Bend in the hip joints so far that the upper body almost comes to rest on the front thigh.
- Turn the upper body to the right, pull the clothing and the skin of the abdomen beyond the thigh to the right if necessary.
- Place the fingertips of the left hand as far back as possible in the right outer foot area or, if possible, place the palm of the hand so that the left arm is attached to the right outer thigh.
details
- What both poses have in common is the large distance between the feet, even if the 1st warrior pose is often performed with a smaller distance because the mobility restrictions of the iliopsoas make this seem reasonable. A large distance must be chosen here so that parivrtta parsvakonasana can be performed without increasing the distance in the transition and without having to bend the knee joint excessively to prevent the arm from slipping. Those who are used to the 1. Warrior pose with a smaller distance because otherwise the pelvis cannot be straightened sufficiently or the back leg wants to bend too much, the distance here must be measured according to parivrtta parsvakonasana, which requires the front lower leg to be vertical so that the arm does not slip. This is all the more important for sitting giants.
transition to hip opener 1st

effects: (552) strengthening of the quadratus lumborum
instructions
- Take warrior 1 pose with the right foot in front as described above.
- Bend in the hip joints so far that the upper body comes to rest on the front thigh.
- Turn the back leg from its outward rotation back into the neutral rotation position.
- Place both hands shoulder-wide apart beside to the front foot.
- Push the body backwards using the strength of the front leg.
- Lower the pelvis as far as possible towards the floor and, but maintain the stretch of the back leg through to the 1st hip opening.
details
- What both poses have in common is not only that the front leg is ideally bent quite far, but also that beyond the obvious the back leg is inclined to bent, which in both cases has to be compensated for by the quadriceps using a great deal of strength. In the 1st hip opening, it is created by a low and still erecting (relative to the back leg) pelvis, in warrior 1 pose by a higher, but ideally vertical pelvis. The requirement to stretch is even greater in warrior 1 pose.
transition to hip opener 5th

effects: (552) strenthening of the quadratus lumborum
instructions
- Take warrior 1 pose with the right foot in front as described above.
- Bend in the hip joints so far that the upper body comes to rest on the front thigh.
- Rotate the back leg from its outward rotation back to the neutral rotation position.
- Place both hands shoulder-wide apart next to the front foot.
- Hold the upper body as close as possible to the front leg and slowly stretch it all the way through to hip opener 5. Keep the metatarsophalangeal joint pressed to the floor.
details
- In both poses there is a pronounced tendency to rotate the pelvis away from the front leg, but this has different origins: while the rotatory torque in the hip joint in warrior 1 pose comes from the pull of the rotationally active hip flexors, which attach to the trochanter minor, in hip opener 5, it is the hamstrings that shows relief of its stretching sensation when the pelvis turnes away from the extended front leg.
transition to handstand

instructions
- Take the pose as described above facing a wall so that the front foot is approx. 40 cm away from the wall.
- Bend in the hip joints forwards to place the hands shoulder-wide apart and parallel to the wall at a distance of approx. 20 cm from the wall.
- Lift your back leg off the floor and come into handstand with plenty of momentum.
details
- The distance between the back foot and the hands is greater than in the normal handstand upswing, so a lot of momentum has to be taken here.
- Here, of course, the one-legged swing up into handstand is described. Ideally, it should take place without a previous swing, as is usually the case. In terminology of the normal handstand upswing, this is done „on 1“.
- For most people who are not already very experienced, the handstand swing with one leg as the straight swing leg is easier than with the other. This will become apparent when transitioning from the first warrior position to the handstand on both sides. It may therefore be worthwhile to practise the swing into the handstand with the unfamiliar leg beforehand.