Contents
namaste
„greeting“

 instructions and details with working links as PDF for download/print
Feedback: We’d love to hear what you think about this description, give us feedback at:
postmeister@yogabook.org
last update: 12/30/2018
Name: namaste
Trivial name: the greeting
Level: A
- Classification: A
- Contraindication
- effects
- Preparation
- follow-up
- derived asanas
- similar asanas
- diagnostics
- Instruction
- details
- Variants
Classification
classical: posture
psychomental:
physiological:
contraindication
Effects
- (226) Shoulder blade: stretching for retraction
- (351) Stretching the palmar flexors
If the hands are held low enough.
Preparation
Follow-up
derived asanas:
similar asanas:
Diagnostics (No.)
Variants:
Instructions
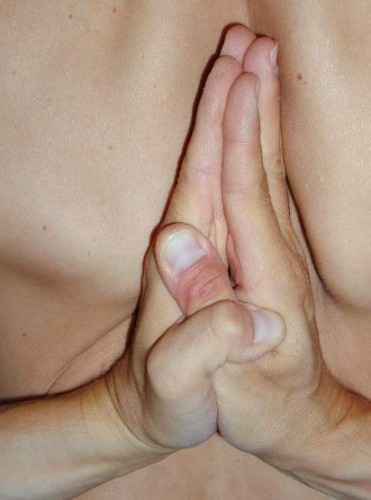
- Stand in tadasana.
- Fold the hands in front of the chest so that the palms are on top of each other. The fingers are closed and the thumbs are resting against the index fingers.
- Place the thumbs with their first phalanges on the lower end of the sternum.
- Let the elbows sink backwards and downwards without the thumbs coming away from the sternum. The shoulder blades also move backwards and downwards.
Details
- With the hands folded on the chest, the shoulder blades cannot move as far into retraction (towards the spine) as in tadasana itself and perhaps not quite as far into depression (towards the pelvis). Depending on how and for what purpose namaste is performed, they can be actively pulled inwards and downwards and held there or moved there once with minimal effort and then released.
- Namaste is the Indian greeting that is also used as a component of some yoga poses, such as the lotus position or hanumanasana.
- The head can be bent slightly to namaste.
- The requirement to move the elbows backwards and inwards should not cause the thumbs to lift away from the sternum, nor should the pressure of the forearms on the chest be increased to avoid this. Leave them loose as well.
- The position of the folded hands on the sternum encourages the shoulder blades to move forward. The weaker the retractors of the shoulder blades, the greater this effect will be. Shortening of the pectoralis major, for example, would also increase the effect.
Variants
on the back

Effects:
(246) Shoulder joint: stretch for retroversion
(276) Shoulder joint: stretch for endorotation
(511) Stretching the pectoralis major
Instructions
- Fold the hands behind the back so that the fingers are pointing downwards. As in the basic pose, the fingers are closed and the thumbs rest against the index fingers. Due to the unequal difficulty of the hand position on the back, the thumbs can overlap each other to make it easier to hold the palms and palms together. The fingers are initially at the level of the sacrum.
- Bend the elbow joints further to pull the hands further up.
- Using the friction of the fingertips on the back or clothing, tilt the hands into an upright position. In the meantime, the fingers point towards the back and later upwards.
- Keep the palms of the hands and palms facing each other.
- Move your elbows backwards and inwards and push your hands up as far as possible again.
- Make sure that your clothing does not interfere when you push your hands upwards.
- As long as the arm flexors, especially the biceps, are not cramping, you can try to use their strength to push the hands further upwards. Well-dosed momentum also often helps.
Details
- This position requires some flexibility in the forearm. Although the wrists are not in any particular dorsal flexion with good flexibility (unlike with low flexibility), the requirement for pronation in combination with radial abduction is a real and often unfulfillable demand. If there is a lack of flexibility, the palms move away from each other to such an extent that the radial metacarpophalangeal joints move away and the hands become hollow. A little help can be provided by overgripping the thumbs. This posture can be used particularly well for the ulnar-palmar parts of the forearm muscles. The hands can be pressed together with force. This is done by the lateral adductors of the shoulder joint. In contrast to the basic namaste posture, the pectoralis has significantly less tendency to spasm, as the hands behind the back increase its sarcomere length slightly compared to the hands lying on the sternum.
- The elbows move backwards and inwards, the shoulder blades downwards (in depression) and towards the spine (in retraction).
- The position of the upper arms represents an internally rotated retroversion that requires some flexibility from the anterior parts of the shoulder muscles (deltoideus pars clavicularis) and ultimately also the pectoralis major. Of course, it can also be used to stretch them.
- Clothing can present a challenge in that the little finger in particular likes to get caught in a fold and restrict the upward movement of the hands. It helps a little to pull the clothing taut at the beginning, but this is usually not enough, especially for people for whom the posture is difficult to assume anyway and for whom the pressure of the hands on the back is quite high due to a lack of flexibility. If a supporter is available, they can always pull the clothing taut if necessary. If not, however, it helps to pull the obstructive item of clothing taut before establishing the posture and then sit on it, preferably while arching your back. Many people will prefer to practise this pose with their back unclothed, whereby the hands generally slide upwards better on clothing than on the skin. If it is still quite difficult to bring the hands into the desired position, the following trick can help: fold the hands with the fingers pointing downwards on the lower back, which should be possible for almost everyone, then pull the hands upwards as far as possible using the strength of the arm flexors, tilt them over the fingertips so that the fingers point upwards and push them upwards again as far as possible.
(P) on the back
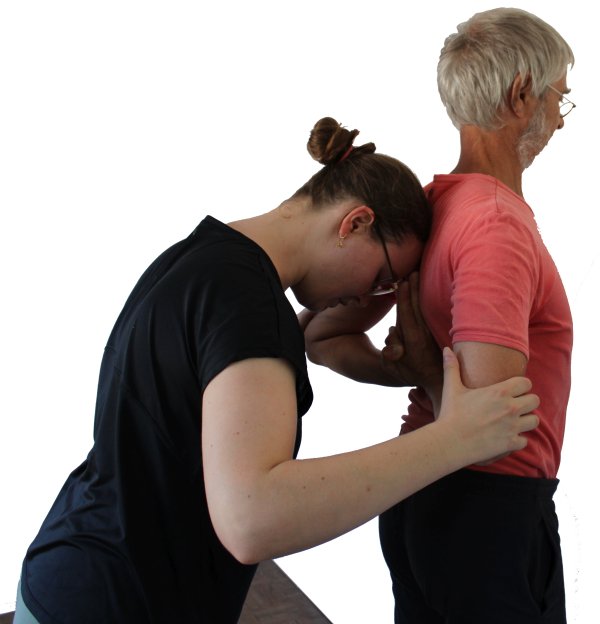
Instructions
- Adopt the hands on the back variation as described above.
- The supporter presses the elbows together and tends to press downwards and backwards, supporting the upper back with the head if necessary.
Details
- Due to flexibility restrictions in the forearm muscles, the inside hands often do not come together. The supporter can push them towards each other again by applying pressure to the elbows. In addition, a certain amount of downward pressure can help to push the hands further upwards, while backward pressure helps to press the hands more onto the back and move the elbows more backwards, thereby improving the stretching of the front shoulder. The back must be supported by the supporter with the head so that the performer does not tip backwards.
- If the elbows are pulled back, make sure that the edges of the hands are still pressing on the spine.
- Clothing is often a significant disturbing factor when lifting the hands behind the back. All too often the little finger gets caught in the clothing. It is now possible for the supporter to pull the clothing down with one hand so that it lies taut and smooth and makes it impossible for the little finger to get caught in the clothing or immediately removes it. Only one hand is then available to lift both hands. However, this usually works well if, with the palm facing upwards, one hand is lifted simultaneously with the area of the inner edge of the hand (i.e. on the index finger side) and the other hand is lifted with the fingertips.
- The supporter can also press the base joints of the index fingers together, which is often not possible for the performer. It must then be clarified whether the finger flexors or the palmar flexors of the wrist are more restrictive. Both palmar forearm stretching and the corresponding exploration, in which the relationship of the flexibility of the finger flexors to that of the palmar flexors can also be determined, are helpful here.
- The supporter can correct the position of the shoulder blades: backwards-downwards-inwards.