Contents
- 1 padmasana„lotus position“
- 2 Variants
- 2.1 Forward bend
- 2.2 baddha (with feet held firmly)
- 2.3 supta (lying down)
- 2.4 supta baddha (lying down with feet held firmly)
- 2.5 with hands in namaste
- 2.6 without namaste
- 2.7 Ankles not on thigh
- 2.8 Knees wide
- 2.9 With belt
- 2.10 Knees on blocks
- 2.11 on support (sitting elevated)
- 2.12 supta (lying down), with weight
- 2.13 (P) downface dog on SIAS
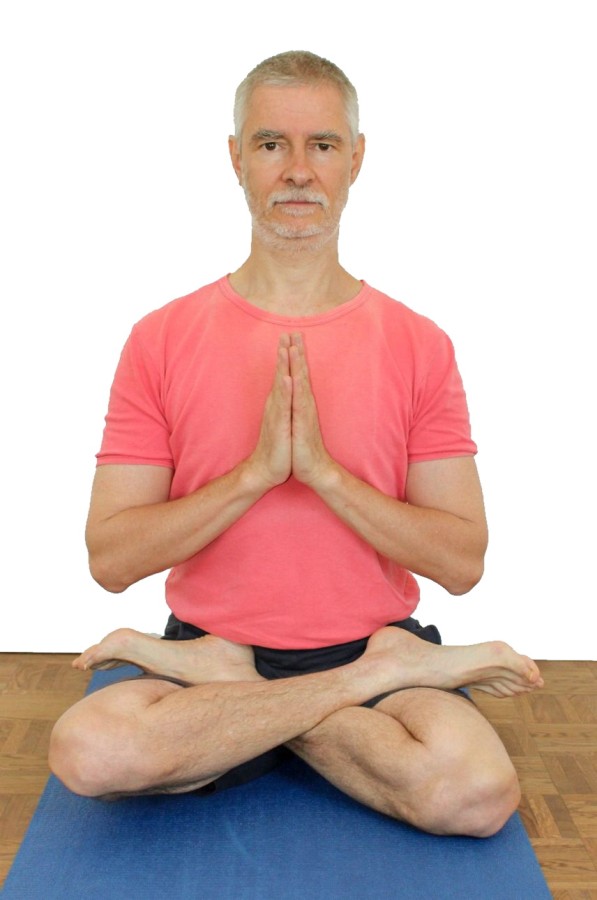
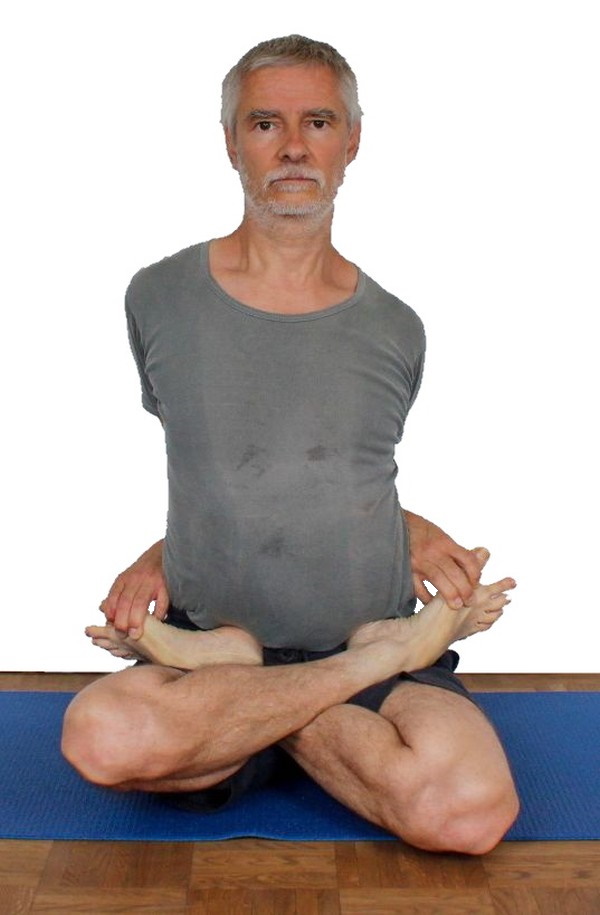
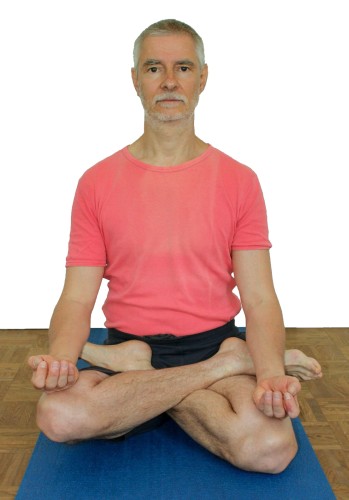
padmasana
„lotus position“
 instructions and details with working links as PDF for download/print
Do and dont
knees too far apart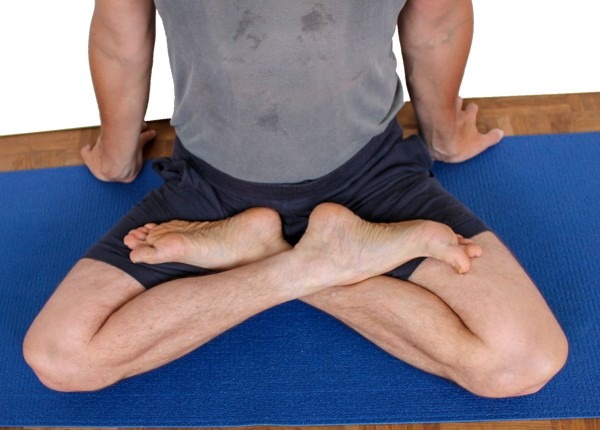 | as close as possible |
Detail photos
Turn out first leg… 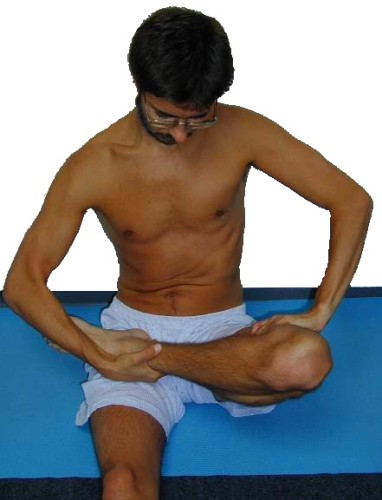 | … and turn out the second leg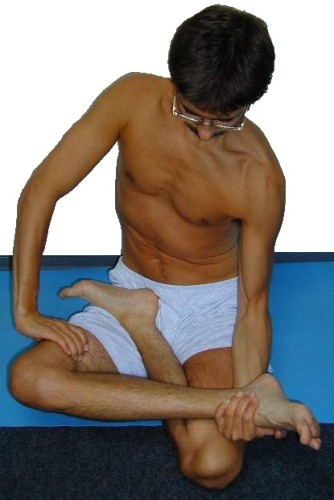 |
Feedback: We look forward to hearing what you think about this description, please give us feedback at:
postmeister@yogabook.org
last update: 30.12.2018
Name: padmasana
Trivial name: lotus position
Level: FA
- Classification: FA
- Contraindication
- Effects of
- Preparation
- follow-up
- derived asanas
- similar asanas
- diagnostics
- Instruction
- details
- Variants
Classification
classic: sitting posture for concentration and meditation
psychomental: best meditation posture
physiological: Seated hip opening
Contraindication
Various injuries to the knee joint contraindicate the pose, especially damage to the medial meniscus.
Effects
- (751) Stretching of the adductors
- (871) Stretching the pronators of the ankle joint
- (731) Stretching the exorotators of the hip joint
Preparation
A flexible extensor group ofthe hip joint (pomus muscles et al.) is necessary to prevent the pelvis from tilting backwards; practise this:
- half lotus forward bend
- hip opener at the edge of the mat
- Hip opening1
- hip opener 2
- hip opener 3
- parivrtta trikonasana
- parivrtta parsvakonasana
- parivrtta ardha chandrasana
A certain degree of flexibility, especially in the monoarticular quadriceps, is necessary so that the knee joints can be bent sufficiently and no increased extension moment in the knee joints pushes the feet out of the pose (the knee joints towards extension). Practice for this:
- virasana
- supta virasana
- Quadriceps stretch 1 on the wall
- Quadriceps stretch 2 on the wall
- supta krouncasana
- ardha supta krouncasana
Flexibility of the adductors is required so that the knees can sink unhindered and there is no excessively unhealthy pressure in the knee joint:
The exorotation in the hip joints is THE cardinal requirement of the posture, prepare it intensively with:
- baddha konasana, especially on blocks
- supta baddha konasana
- adho supta baddha konasana
- Half lotus forward bend
- hip opener at the edge of the mat
- Hip opening3 as the most important and usually very knee-friendly pose
- warrior 2 pose
- caturkonasana
- parsvakonasana
- counter
Anyone who has difficulty stretching the back should (apart from eliminating any stretch deficits in the thoracic spine, see below) strengthen the back and prepare it for work:
- „table“ variation of uttanasana
- right-angled uttanasana
- warrior 3 pose, especially the backwards variation against the wall
- upavistakonasana in the „pull on the feet“ variation
- upavistakonasana in the „with block“ variation
- salabhasana
In principle, most backbends are also suitable.
Passive postures to promote flexibility of the back in the direction of extension are also useful if the back is less able to stretch (apart from eliminating any strength deficits in the thoracic spine, see above):
- Lying on a roll
- Hyperbola
- Increasedback extension
- Right-angled handstand
- downface dog – „wide“ variation
The requirement to be able to stretch the ankles can also be prepared separately:
- baddha padasana is probably the most precise exercise for dorsal flexion in the ankle joint
- virasana achieves this if attention is paid to the extension of the ankle joint
- supta virasana also achieves this if attention is paid to the extension of the ankle, but has other, greater challenges
If there is too much tension in the back muscles, they should be loosened up first:
- karnapidasana
- balasana (virasana forward bend, child’s pose)
- parsva upavista konasana
- Half lotus forward bend, also the parsva variation
Follow-up
What was good for preparing a tense back is also suitable for stretching the back after a long period of work:
- karnapidasana
- balasana (virasana forward bend, child’s pose)
- parsva upavista konasana
- Half lotus forward bend, also the parsva variation
derived asanas:
ardha padmasana adho mukha supta padmasana
similar asanas:
Diagnostics (No.)
(650) Kyphosis and lordosis of the spine:
The deviations from the physiological double-S shape of the human spine are quite clearly visible in this posture. There should be a certain degree of lordosis (convex spine from the front) in the lumbar and cervical spine and a certain degree of kyphosis (convex spine from the back) in the thoracic spine. It must be taken into account that restrictions in the flexibility of the short hip extensors (pomuscles) tilt the pelvis backwards and straighten or even kyphosis the lumbar spine. See the FAQ. Depending on the strength of the back muscles, it should be possible to straighten the thoracic spine in this posture.
which is not necessarily the aim of the posture.
(611) Uneven shoulder height/scoliosis of the spine:
The lateral deviations of the spine from the median plane known as scolioses are also quite visible in this posture. See the FAQ
The main cause of the inability to bend the knee joint widely is flexibility restrictions of the monoarticular vastii of the quadriceps. If the leg threatens to slip out of the stance, the extensor moment in the knee joint from tension in the vastii is also responsible.
In this pose, flexibility is required from the adductors so that the legs can continue to exorotate and the knee joint can sink.
Exorotation and abduction are linked in this pose, although not quite as strictly as in
baddha konasana. If the legs cannot sink much, the tendency to knee pain is increased. Other damage to the adductors can also be detected here:
- Shortening
- Irritation of the tendons at the origins and insertions, which manifests as pulling pain with an elongated course. These are insertional tendinopathies, e.g. the so-called gracilis syndrome, although this term is misleading here, as it is not the gracilis that is affected due to the bent knee joint, but other adductor muscles originating from the pubic bone. The term footballer’s groin, which is also commonly used, would be less misleading here
- Tension that causes an agonizing sensation in the muscles that goes far beyond normal stretching
- Tears/partial tears/tears of adductor muscles, which make a loud noise when torn, followed by hematoma formation and swelling if necessary
- side discrepancies in flexibility, which can cause a pelvic obliquity and consecutive scoliosis, see the FAQ and the explanations on baddha konasana on the wall.
The widely exorotated, abducted postures and movements in particular trigger pain in the case of existing hip damage
- Arthrotic change (degenerative with cartilage atrophy) of the joint
- Arthritis (joint inflammation) of various kinds
- Perthes‘ disease in children or hip dysplasia in general can react to this posture
- Dislocation / subluxation, which would cause a significantly increased sensation of tension in various muscles covering the hip joint
- joint trauma suffered, which may cause pain in the joint even after many weeks or months
In this pose, knee problems associated with wide flexion and endorotation of the lower leg are very well revealed. These can be, for example: traumatic or degenerative meniscus damage, arthrosis, arthritis, subluxations, ligament damage, and others, see the FAQ. Damage to the knee can easily occur in the Lotus, but can also be caused by frequent practice without appropriate flexibility! See also the note in the details below.
In this pose, difficulties of the ankle can become apparent due to the sharp supination demands, starting with shortened pronators, extension deficits in the direction of plantar flexion, dislocations, damage from supination trauma and even damage to the ankle joints. The less the knees converge, the more this applies. Misalignments of the foot bones can also make themselves felt here through unusual sensations of tension.
(913) Musculature of the sole of the foot:
In this pose, muscles of the sole of the foot tend to be compressed. This can lead to a tendency to cramp. In addition to hypertonicity of the muscles, causes can be malpositioning of the foot or damage due to inadequate footwear, overloading or deformities of the foot, as well as electrolyte deficiencies, of course. Frequent sport involving running, frequent long periods of walking or standing promote hypertonus and cramp tendency.
In this pose, the strength endurance capacity of the back extensors is particularly evident in people who are less mobile in the short hip extensors (pomus muscles, dorsal hip muscles). Even if the Lotus has a spine that is easy to straighten, a certain amount of muscular work will still have to be done in the long term. The body’s internal resistance, especially in the thoracic spine, but also the consequences of the pelvis tilting backwards, increase the demands on the posture. Any tension, whether caused by posture, professional or other demands, scoliosis, hyperkyphosis of the thoracic spine or misaligned vertebrae, should become apparent here.
Shortening of the pectoralis major, which is primarily a transverse adductor that runs from the sternum to the humerus, among other things, can protract the shoulder blades and promote kyphosis of the thoracic spine, which requires more work in the back muscles.
(187) Neck:
Holding the head means work for the cervical spine muscles, strength endurance deficiencies and hypertonus can be discovered in this posture. The trapezius in particular can also become noticeable with increased tone. A head forward posture acquired at work and during leisure time will also tend to show itself here, which sooner or later pushes the neck muscles into overload.
Variants:
supta baddha (lying down with feet held firmly)
supta (lying down), with weight
Instruction
- Sit in dandasana and bend the left knee as for janu sirsasana.
- Bend the right knee, lift the right foot over the left leg lying on the floor and place it on the left thigh by rotating the right thigh to the maximum with the right hand. The right ankle should come to rest approximately in the middle of the thigh.
- Stretch the left knee joint a little and do the same with the left leg as you did with the right: grasp the left thigh with your left hand to turn the leg out and the outer left foot with your right hand to place it on the right thigh, also as far out as possible.
- There are various hand positions that can be recommended when practicing padmasana for meditation, standard ones include
- placing the backs of the hands on the thighs (not too) close to the knees with the hands loosely open.
- placing the back of the hands on the thighs (not too close) to the knees with the (concentration-promoting) mudra where the thumb and index finger touch.
- Placing the downturned hands (not too) close to the knees with the (concentration-promoting) mudra with the thumb and index finger touching.
- interlacing the palms facing upwards with the thumbs touching, hands placed in the middle of the body.
- namaste in front of the chest.
- the classic western „prayer posture“ with fingers and thumbs interlocked in front of the abdominal wall. Of course, other mudras can also be used, although the ones with the palms facing downwards are more introverted and should be used when outward closure rather than outward/upward openness is indicated.
Details
- Extend both thighs as far as possible before placing the corresponding feet on the other thigh. External rotation is probably the most important prerequisite for the posture (see below).
To do this, reach with the contralateral hand to the outer foot to lift it and with the lateral hand to the tendons of the inner hamstrings to pull them outwards and push the knee downwards. The use of both arms results in the best possible and gentle exorotation of the hip joint. - Pull both feet wide onto the other thigh to avoid excessive inversion of the ankle. The ankles should be approximately centered on the opposite thigh so that the feet are easy to move and so that there is no permanent pressure in the ankle joint, which could be disturbing during prolonged sitting and possibly painful for a short time after the posture is ended. Feet that are pulled far onto the thigh require a better ability to turn out the thighs in the hip joint than feet that are only pulled just onto the thigh, as the ankles have to be higher than the knee joints.
- The second main difficulty is the pressure between the lower legs, which is clearly present in the hip joints with a lower ability to turn out and forces the patient to leave or change position after a more or less long period of time. Feet that fall asleep can also be the result of too little ability to turn out and therefore too much compression of the tissue and arterial blood supply.
- Mainly depending on the flexibility in the pomus muscles (and other hip extensors) and the back of the leg, the pelvis will tend to tilt backwards. This tilt can be countered with permanent tension in the hip flexors. If this is not possible in the long term or is too strenuous, support should be provided for the „rear edge of the buttocks“, just so that you almost feel as if you are slipping forward. A wedge pillow may also be helpful. In any case, the ischial tuberosities should still be on the support. This tilts the pelvis further forward, depending on the height of the support, to such an extent that it is possible to sit upright without strain.
- If the ability of the thighs to turn out is not good, the ankles will probably not be centered on the other thigh, but rather the front feet, whereby the supination creates an uncomfortable feeling of pressure in the ankle joint („outer ankle“, i.e. the fibular part of the malleolar fork) in the long term. This can force you to change sides regularly, which is completely normal for long periods of time.
- For a very long time, one of the two knees, namely the one whose lower leg is on top of the other, will not reach the ground. It makes little sense to put weight on the knee, as this would primarily result in increased compression of the corresponding medial meniscus and increased pressure between the lower legs. This can only be improved by regularly practicing exorotation, e.g. with the 3rd hip opening, root tuber pose and baddha konasana with feet on a block.
- Sitting up straight in the posture over the long term requires not only various types of flexibility, but also autochthonous back muscles that do not tire. If the pelvis still tilts backwards and the buttocks are not supported, the work required of the back extensor becomes all the greater and is probably not sustainable in the long term. In the long term, however, the back extensor will adapt to the demands, at least if the pelvis is held upright.
- When sitting in meditation for long periods, most people have a tendency not only to slump in the back (causing the thoracic spine to bend further and further) but also to either let their head fall back into their neck or let it sink forward. Both tendencies, that of the back and that of the head, are, among other things, an expression of diminishing attention.
- It is not without reason that the lotus position is known as the best meditation posture, as it offers the best combination of stability of posture and easy straightening of the spine and therefore less effort and the best conditions for abstracting from physical events. This is why many people have spent a lot of time in lotus for centuries. However, the culture of movement in the East and West differs greatly and it can be assumed that for this reason, and not for genetic reasons, there are far more knee complaints/damage caused by practising the lotus position in the West. If you don’t have the flexibility, you should neither practice the lotus for longer (or at all) nor should you do without sufficient (!) preliminary exercises. Meditation also works well in other postures. Its success is much less dependent on the posture than on the lack of disturbing internal factors and mental discipline. How long the path to deep meditation is varies greatly from person to person and the path should not lead to the ruin of the knee joints, especially as damaging the knee joints is anything but a guarantee of achieving the goal.
- The shoulder blades should be depressed and largely, but not completely, retracted. It is helpful to exorotate the arms as far as possible, preferably with the forearm supinated, and to position the arms not too far forward, as this tends to protract the shoulder blades. On the other hand, the hands cannot be too far back because the feet are there. In addition, the further back the hands are, the greater the tendency of the shoulder blades to elevate.
- Placing the second foot on the first thigh is much more difficult than placing the first leg on the floor in an extended position and is hardly possible for some people. How useful it is to perform the lotus position will not be discussed again here, but there is a helpful approach for this difficulty: grasp the foot of the second leg lying on the floor in front of the lower leg of the first leg with the contralateral hand. Place the corresponding forearm near the elbow on the first lower leg, bend the elbow joint using the strength of the arm flexors, whereupon the foot lifts off the floor and pull the arm with the foot backwards until the foot comes to rest in the desired position.
Known problems that can occur even when performed correctly
Pressure between the lower legs
Depending on your flexibility, the pressure between the lower legs may become unbearable in the long term.
Knee pain
As mentioned above, simply practicing lotus without the appropriate flexibility tends to damage the knee joint.
Back pain
Sitting for long periods of time can overstrain the muscles of the middle/upper back.
Variants
Forward bend
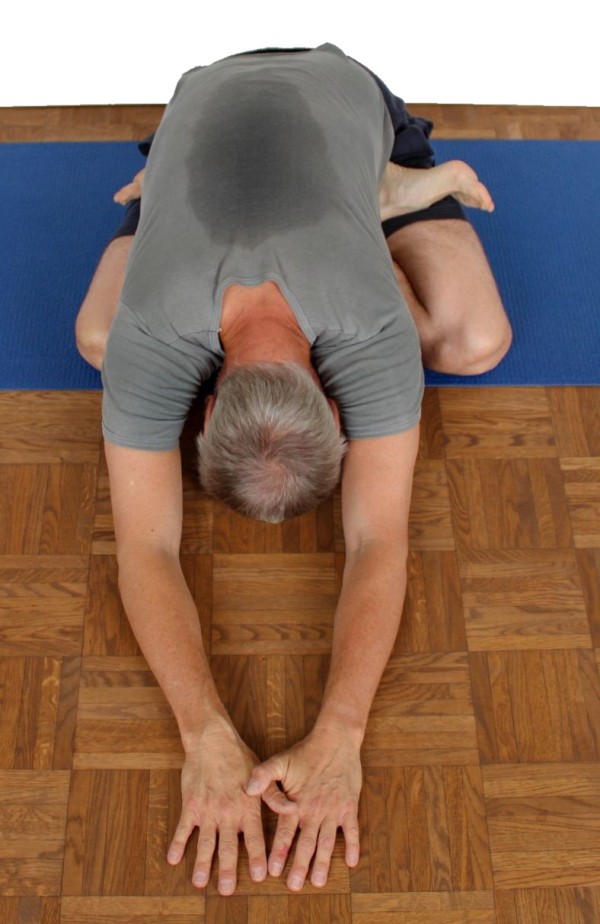
Effects: (726) Stretching the monoarticular hip extensors (especially the gluteus maximus).
Instructions
- Assume padmasana as described above.
- Pull the buttocks backwards and outwards once more and stretch the upper body well once more.
- Bend your hips into flexion as far as possible and place your arms loosely on the floor in front of you.
Details
- The forward bend further increases the tendency to knee stress! Only perform it if you have really good exorotation ability in the hip joints and flexible monoarticular hip extensors and pay attention to warning signs in the knee joint.
- For a useful stretching effect in the monoarticular hipextensors, the half lotus can also be performed as a forward bend without any significant loss of effectiveness. The benefits of the forward bend of the lotus position hardly go beyond this, but come at the cost of some possible side effects. In addition to the higher tendency to knee stress, this is mainly due to the unevenly higher pressure between the crossed lower legs.
baddha (with feet held firmly)
Instruction
- Take the lotus as described above.
- Reach behind the body with each hand to the opposite toes.
Details
- In addition to being a quite useful way to keep the feet from slipping off the thigh and to spread the knees apart, this pose contains an extensive retraction of the shoulder blades, which for some people is a challenging and enjoyable stretch of the front part of the shoulder muscles (pars clavicularis of the deltoid) and possibly slightly also of the pectoralis major.
- To take the pose, it is often necessary to turn the body to one side in order to grasp the contralateral foot located there. Tilting the pelvis further forward also makes this easier.
- Maximally depress the shoulder blades.
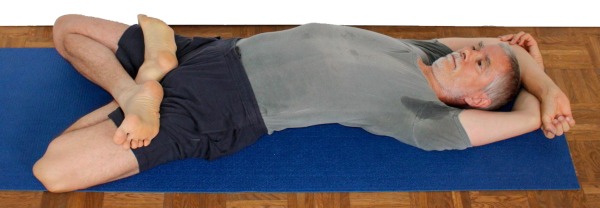
supta (lying down)
Instructions
- Take the pose as described above.
- Lower your back onto the floor, push your buttocks away from your back to counteract the hollow backand pull your feet into the groin again if necessary.
- Hold the feet with the contralateral hands: the left foot in the right groin with the right hand and vice versa. Otherwise lower your arms to the floor as far as possible.
Details
- Lowering the back backwards causes a significant hollow back tiltdue to the hip flexing effect of the stretched adductors and the laterally pulled attachment of the iliopsoas to the lesser trochanter on the one hand and the process itself, in which the pelvis is tilted against the friction of the buttocks on the floor, on the other. This usually makes it necessary to counteract this: on the one hand by using the hands to push the buttocks away from the back in the direction of the knee support (a movement similar to that in supta virasana ), and on the other hand by using the buttock muscles and, if necessary, the abdominal muscles during the pose to keep the hollow back within limits. It is also helpful to flex the hip joints to the maximum once after the back has been put down and then to put the legs down again.
- The hip extensors and the gluteal muscles are under less tension in this variation than in the standard pose, while the adductors, which act to flex the hips, are used more for flexibility than in the standard pose. As a result, the knees are significantly lighter in this variation and lift off the floor more. The pressure of the lower legs on each other is also lower, which means that the lower legs are pushed away from the pelvis more easily by the tension of the quadriceps and the feet slip out of the desired position more quickly. Using the knee flexor hamstrings to counteract this is not a good idea, as it can no longer exert much force in the area of active insufficiency and is clearly prone to cramps.
- This variation is one of the many ways to remedy a shortened pectineus.
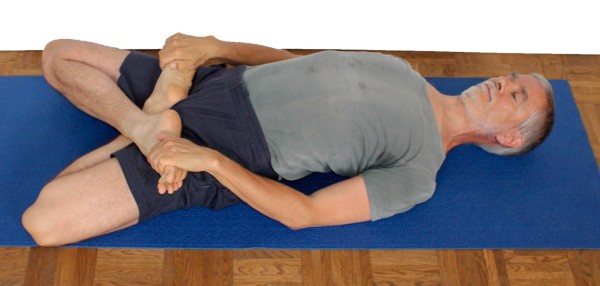
supta baddha (lying down with feet held firmly)
Instruction
- Take the pose as described above.
- Lie backwards on the floor, push your buttocks away from your back to counteract the hollow backand, if necessary, pull your feet back into the groin.
- Grasp the contralateral big toes with your hands.
Details
- The instructions for the non-held lying variation apply analogously here.
- This variation prevents the feet from slipping away by holding on as described above.
- Trying to roll up from the top helps to counteract the tendency to form a large hollow circle.
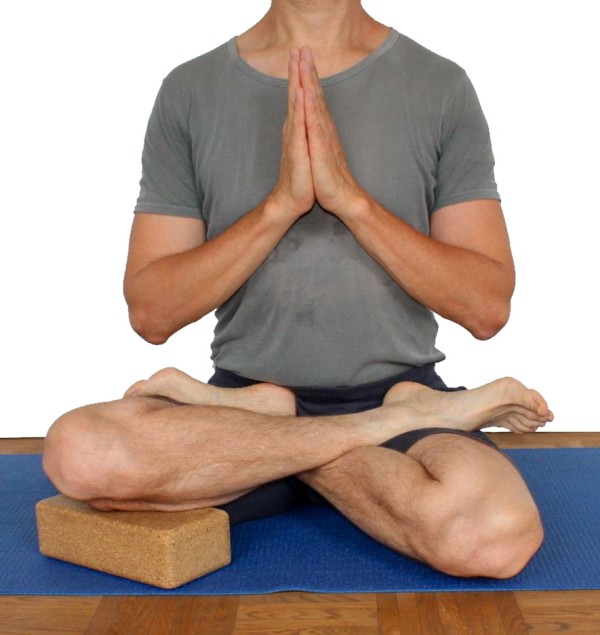
with hands in namaste

Instructions
Details
- This is a classic meditation pose for anyone who can do padmasana effortlessly.
- The typical details of namaste, such as the dropping elbows, can be found there.
without namaste
Instructions
- Take the pose as described above and place the backs of the loosely held hands on the thighs, not too close to the knees, so that the shoulder blades do not tend to protract.
Details
- This variation without namaste requires a hand position that prevents the shoulder blades from protracting. In the variation with namaste, a depression and extensive retraction of the shoulder blades occurs automatically, but great care must be taken here to ensure that the hands are not placed too far forward towards the knees so that there is no tendency to protract. If they are placed too close to the pelvis, the protraction is unlikely or at most only slightly pronounced, but there may be a slight elevation of the shoulder blades and the feet are in the way of the hands.
- Release the muscles of the forearm and hands completely so that the wrist and hand assume a position of minimal muscle tension.
Ankles not on thigh

Instructions
- Take the pose as described above, but do not place the ankles on the thighs, only the forefoot.
Details
- In the original pose, the ankles (more precisely: the outer maleoles) are placed on the thighs so that the ankles are free from any force other than their own gravity. However, this requires very good flexibility, which is not sufficient in many cases. If the required exorotation in the hip joints cannot be provided with ease, this generates not only clearly perceptible pressure of the malleoli on the thighs but also not necessarily perceptible unpleasant forces in the knee joint in the sense of varus stress and endorotation, which, as already described above, represent a significant strain on the inner meniscus in particular. In the case of existing meniscus damage, this effect can usually be clearly felt relatively quickly after assuming the posture, possibly immediately upon assuming it. This variation should provide relief in this respect, as it requires slightly less exorotation and reduces varus stress; after all, the height difference required between the ankle and knee is smaller.
- According to the design, the posture places slightly less strain on the knee joint, but demands more from the ankle joints, as they are continuously exposed to inverting, i.e. plantarflexing and, above all, adducting and supinating forces.
Knees wide

Simplification if the hip joints ‚ ability to exorotate is not sufficient for a full stance, therefore relieving knee problems, especially a damaged medial meniscus.
Instructions
- Take the pose as described above, but only just place the forefoot on the contralateral thigh so that it does not slip.
Details
- The full lotus position requires a high degree of exorotation abilityin the hip joints. As long as this is not yet ready, there is usually a need to simplify the posture so that, for example, the pressure of the lower legs on each other remains bearable. This is a frequently used option. At the same time, the tendency to discomfort in the area of the inner meniscus is reduced.
With belt
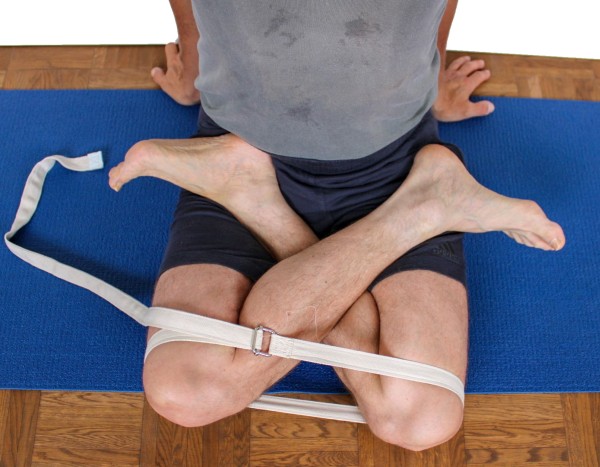
Instructions
- Take the pose as described above, but tie a belt around the thighs near the knees to keep them together. Push the feet and ankles as close as possible to the opposite thighs.
- Pull the belt as tight as you can.
Details
- The belt not only ensures the tight position of the knees, but also the necessary exorotation. If the ability ofthe hip joints to exorotateis still rather limited, this will naturally lead to corresponding pressure between the lower legs and possibly also discomfort in the knees. This variation should therefore be used with caution.
- When assuming the posture, the feet must be pulled as far as possible onto the opposite thighs one after the other, which improves the position of the knee and makes it easier to move medially.
Knees on blocks
Relieves knee problems, especially a damaged medial meniscus.
Instructions
- Adopt the position described above, but place blocks or another support under the thighs near the knees at a sufficient height so that you no longer feel any discomfort in the knee joint.
Details
- If the support has a hard edge that presses on the thigh and the iliotibial tract, use appropriate softeners such as blankets between the support and the thigh, or adjust the angle of the object accordingly.
- Depending on the height of the support, it may cause the pelvis to tilt backwards more, in which case it may be advisable to sit on an elevation.
on support (sitting elevated)

Instructions
- Take the pose as described above, but use a support under the buttocks so that they are less inclined to tilt backwards.
Details
- Even though padmasana is a pose in which it is relatively easy to sit with an upright pelvis – depending on your individual flexibility – in some cases a support under the buttocks will be helpful to enable you to sit upright for longer without constant strain on your back. The support is used correctly when you feel as if you are almost slipping forward from the support.
- Like any support, it should only be as high as necessary so that there is no need to create stability by pushing the knees down, which can lead to lasting tension in the pomus muscles or iliotibial tract.
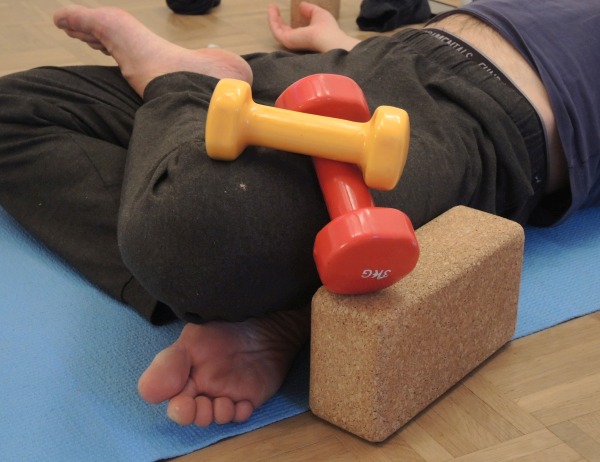
supta (lying down), with weight
Detailed photos
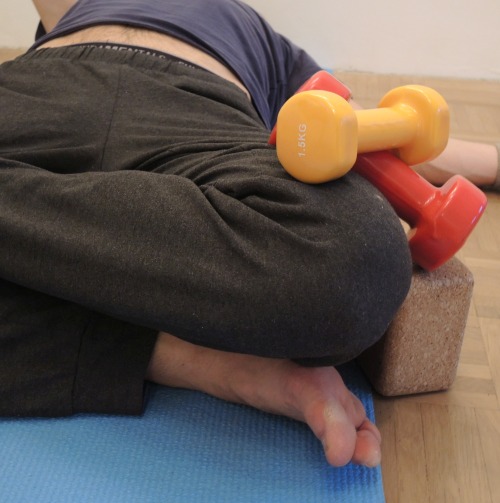
Instruction
- Assume supta padmasana as described above, but place an adequately heavy dumbbell or other object such as a sandbag on the thigh of the upper leg or on both legs, ideally with a limited tendency to slide outwards.
Details
- This pose is used to intensify supta padmasana if muscles such as the adductor pectineus or hip flexor iliopsoas are holding the legs in the air and the perceived stretching effect on these muscles is too small.
- The weight-bearing object can be moved on the thigh according to the law of leverage: towards the pelvis for less effect and towards the knee for a more intensive effect. It is helpful, especially for the medial meniscus, if the object has a limited tendency to slide outwards, as it then generates a certain knee-sparing exorotation moment in the hip joint. The external weight can increase the hollow back tendency, so it will be all the more important to initially push the buttocks away from the back. Only if unavoidable should the gluteus maximus and even less the rectus abdominis be used to reduce the hollow back. Of course, in these cases there is no reason why a supporter should not push the SIAS in a cranial and dorsal direction. Depending on the angle of the thighs to the floor and the nature of the clothing and weight-bearing object, it may be necessary to hold on to them during the exercise. However, if possible, it should be set up in such a way that this is avoided or at least only minimal force is required. See also the structure shown.
(P) downface dog on SIAS
Instructions
- Assume supta padmasana as described above. The supporter performs a head down dog pose with the hands on the performer’s
- SIAS of the performer to reduce the hollow back.
Details
- This variation corresponds to other variations in which pressure is also applied to the SIAS to reduce a slightly hollow back. This pressure causes the thighs and knees to lift a little further off the floor.