yogabook / asanas / hip opener 3
Contents
„hip opener 3“
 instructions and details with working links as PDF for download/print
Feedback: We’d love to hear what you think about this description, give us feedback at:
postmeister@yogabook.org
Last modified: 30.12.2018
Trivial name: hip opener 3
Level: FA
- classification
- contraindications
- effects
- preparation
- follow-up
- derived asanas
- similar asanas
- diagnostics
- instructions
- details
- variants
Classification
classic: hip opening
physiological: hip opening
Contraindication
In the case of herniated discs, it is possible that the slightly rounded back will cause the familiar symptoms again. However, it can usually be observed that the pull of the iliopsoas of the extended leg relieves the lumbar spine to such an extent that no discomfort occurs. In addition, there is little load on the lumbar spine due to support with the arms. Hallux valgus, hallux rigidus and hallux limitus can prohibit the foot posture of the extended leg, so that this pose must be performed with the ankle extended or the lower leg on a support instead. The same can apply to metatarsalgia.
Effects
- (812) Strengthening of the quadriceps
- (726) Stretching the short / monoarticular hip extensors (especially the gluteus maximus)
- (711) Stretching the hip flexors
- (831) Stretching the sartorius muscle
Preparation
One of the two most important preparations is for the gluteus maximus (representing the relevant extensors and external rotators of the hip joint), which should be stretched in this pose; preliminary exercises for this pose can facilitate the rotation of the pelvis around the thigh lying on the floor:
- half lotus forward bend
- hip opener at the edge of the mat with a significant stretch in the biceps femoris, also with larger angles in the knee joint
- parivrtta trikonasana, especially with the leg bent forwards and the hip falling contralaterally
The second important preparation is that of the hip flexors so that the back leg can be extended and the corresponding hip can be lowered. Suitable exercises for this are:
- hip opener 1
- hip opener 2
- dog head down backwards against the wall with one leg raised
- dog head up
- warrior pose 1
- setu bandha sarvangasana
- ustrasana
- urdhva dhanurasana (back arch)
and other backbends with hip extension.
Stretching the quadriceps in advance can help to extend the back leg; the rectus femoris in particular may get in the way of the pose, but must also work to extend the back leg. The following can be helpful :
It has been shown time and again that from the hamstrings, the biceps of the front leg in particular is subjected to significant stretching due to the sharp flexion in the hip joint and in many cases even represents the limiting factor. This can be tested by flexing the front leg less. If the stretching sensation in the biceps femoris is then more intense, its missing flexibility represents an important limitation for flexion in the hip joint. In addition to general forward bending:
- uttanasana as a generally effective and efficient stretch of the hamstrings to prepare for flexion in the hips in this pose
- prasarita padottanasana very similar to uttanasana
- parsvottanasana as a stretch that goes beyond uttanasana
- pascimottanasana
- janu sirsasana
- tryangamukhaikapada pascimottanasana
- downface dog as another good preparation for the hamstrings when the hip joints are flexed powerfully
- Hip opener 5 as a very effective stretch of the hamstrings that goes beyond uttanasana
- warrior 3 pose
- trikonasana
- parivrtta trikonasana
Follow-up
Derived asanas:
Similar asanas:
Diagnostics (No.)
Shortening and disorders of the biceps femoris muscle are particularly evident here, and those of the inner hamstrings are of secondary importance. Other disorders may also be present:
- Damage to the hamstrings, which causes pain or functional limitations, can also be easily recognised here, from simple tension to strains to muscle (attachment/detachment/tear).
- Irritation of the ischiadicus nerve, which innervates the leg and foot, can become symptomatic during forward bends in particular, even if they are otherwise rather calm. See the FAQ.
- Irritations of the origin of the hamstrings on the ischial tuberosity (also known as PHT: proximal hamstring tendinopathy) will become clearly evident in this pose and require protection from intensive stretching, as required by this posture, see the FAQ.
(886)(885) Knee joint:
In this pose, knee problems rarely become apparent in the anterior knee joint, but rather in the posterior knee joint (of the extended leg), as this knee joint is usually brought into extension under significant rotational moments due to restrictions in the flexibility of the glutes, which result in the pelvis not sinking to the horizontal. The knee of the bent leg, on the other hand, is largely free of damaging forces and moments on the floor when performed correctly, which is why discomfort is extremely rare here, even with a previously damaged knees. In this pose we receive hints of, for example: traumatic or degenerative meniscus damage, arthrosis/osteoarthritis, retropatellar events such as chondropathia patellae or retropatellar arthrosis/ostoarthritis, arthritis, subluxations, ligament damage, plica syndrome, Hoffa syndrome (of the extended leg) and others, see the FAQ.
In this pose, mobility restrictions and tension in the hip extensors are very clearly visible, especially in the gluteus maximus, such that the pelvis cannot be rotated well around the front thigh into a horizontal position or cannot be tilted well in the hip joint of the front leg towards the floor. Normal shortening causes very distinct stretching sensations, tension has an agonising flavour.
(960) Foot:
In this pose, misalignments (subluxations) of foot bones, usually tarsal bones or the metatarsal bones, can become noticeable directly or in the neighbouring joints. In addition, in the case of hallux valgus, the metatarsophalangeal joint area of the big toe will show increased pressure pain.
(971) Metatarsophalangeal joints:
Restrictions in mobility and possible damage to the metatarsophalangeal joints become visible here, such as metatarsalgia, for which there are various causes. The big toe is exposed to a strong force in the direction of flexion of the metatarsophalangeal joint, especially if the gluteus maximus is less flexible and the pelvis is consequently less able to rotate towards the ground. The better the flexibility, the more evenly the load is distributed over the toes. In addition to restrictions in flexibility, other damage may also become visible here, e.g. pain in hallux valgus, non-muscular restrictions in hallux rigidus, which may contraindicate the described movement and force the ankle joint to be extended or the lower leg to be put on an elevation.
Variants:
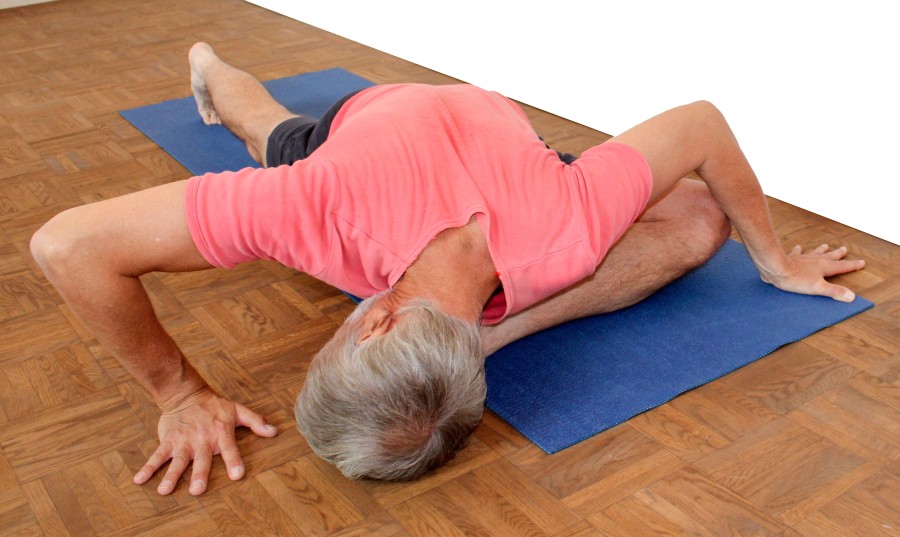
Instruction
- From a downface dog, bring the right outer foot to the floor to the left of the left hand with momentum, turning out the right leg, bending the right knee joint and bending the right hip joint.
- Sit heavily on the right buttock with the right leg at a right angle, orientated to the edges of the mat.
- Turn the right hand 90° so that the fingers are pointing outwards (to the right), push the upper body away from the right to the left with the right hand and push the left hip further towards the floor.
- With the left hand far to the left pull the upper body further to the lower left.
- Aim your forehead at the area beyond the sole of your right foot and place it there if possible.
- Stretch the left heel backward as far as possible so that the back left leg can stretch through and still keep the left hip as low as possible, lift the left inner knee opposite the outer knee.
Details
- Due to flexibility restrictions in the hip flexors (here mostly the iliopsoas), the movement of the left hip downwards contradicts the extension of the back leg. The undesired bending of the rear knee joint naturally reduces the stretching effect on the hip flexors. However, the main effect of this pose is the stretching of the gluteus maximus and the extending and internally rotating dorsal hip muscles, which occurs due to the rotation of the pelvis around the thigh lying on the floor in front. The pose should be performed in such a way that the maximum reasonable stretch is felt in the buttocks, even if the back knee cannot be kept fully extended.
- One difficulty with the pose is often the metatarsophalangeal joint area of the rear foot: make sure to place the foot of the extended leg as far as possible towards the pelvis, which minimises the angular demand in the metatarsophalangeal joints. Within the 5 metatarsophalangeal joint areas, the load is usually shifted strongly towards the big toe – more than just due to the length of the toe and metatarsal bones – which often leads to such intensely uncomfortable sensations that execution is restricted. The reason for this is the twisted position of the leg in relation to the floor due to insufficient external rotation in the hip joint of the bent leg, so that the knee does not point towards the floor but instead at an angle to the side (laterally) and downwards. The reason for this is easy: the pelvis is not yet horizontal due to the limited flexibility of the gluteus maximus while the left hip (belonging to the rear leg) is higher than the other. As the movement of the left hip towards the floor is limited not only by the glutes but also by the hip flexors, it should be considered whether the demand on the extended rear leg should be waived for the time being in favour of turning the rear leg optimally and thus the toes, which is particularly sensible, if this is the only way to achieve the maximum tolerable stretching of the gluteus maximus.
- The optimum position of the right hand and arm is one in which the hand is orientated 180° to the direction of the push with the arm from right to left with respect to the middle finger extensor tendon, with the hand rotated 90° from its original position on the wrist area. The arm is slightly bent and performs a powerful extension at the elbow joint to push the upper body to the left.
- The left hand is placed on the floor beyond the sole of the left foot, at an angle of 0 – 20° to the longitudinal axis of the foot, and the left arm makes a powerful flexing movement to pull the upper body to the left.
- In many cases, the maximum stretch is only achieved through the powerful use of both arms and not solely through the gravitational effect of the upper body including the head.
- Care must be taken to ensure that the right hip is not lifted, but rests as heavily as possible on the floor. Furthermore, the right hip is pushed to the right on the glutes surrounding it, which also counteracts the lack of external rotation of the thigh, which puts pressure on the inner knee. Performed in this way, the right leg lies largely still on the ground and is not subjected to any significant forces or moments that could damage the meniscus. All comparable poses to promote the external rotation of the thigh at the hip joint are considerably less intensive or have a much stronger effect on the menisci, which is often felt during the pose – especially in the case of previously damaged menisci – or can cause lasting damage to the menisci in the long term through frequent practice, as is usually necessary to achieve a pain-free lotus position in a rather stiff constitution. Due to its very low regenerative capacity, depending on the zone, this is an extremely important point that makes the hip opener 3 THE preliminary exercise for the lotus position!
- With very good flexibility, the head lies with the forehead on the floor in the area beyond the sole of the foot. Until then, the head remains in extension of the thoracic spine.
- In rather rare cases, discomfort occurs in the rear knee, which is usually due to a lack of extension of the knee in combination with the rotational situation in the knee joint (when the knee joint is extended, it has no physiological ability to rotate), which is caused by the foot being fixed on the floor with its longitudinal axis vertical and the sagittal plane of the pelvis not being parallel to it. Similar to warrior 1 pose, this complaint usually disappears with better extension of the rear knee and with a further sinking of the left hip. If necessary, a supporter can help stretch the back knee and turn in the leg. The effectiveness of passive rotation is based on the fact that it counteracts the external rotation in the hip joint caused by the hip flexors of the extended leg being under tension.
In some cases of less good flexibility of the hip flexors of the extended leg, performers tend not only to give up trying to extend the rear leg, but also to place the rear lower leg in an turned out position in the knee joint. The intended movement of the associated hip towards the ground then causes valgus stress in the knee joint, which can lead to corresponding symptoms: due to the compression of the outer knee to discomfort there, especially in the area of the lateral meniscus, but also in the knee joint area, especially at the proximal insertion of the medial collateral ligament. You should then avoid resting your inner foot on the ground and instead try to place the balls of your feet on the ground and extend the knee joint as far as possible, despite any restrictions. - If the pelvis is still very steep due to significant flexibility restrictions in the gluteal region, the external rotation promoting gravitational effect of the pelvis and upper body may still be too low to achieve a significant stretching sensation and effect in combination with the arm forces used. In this case, the variant on an inclined plane should be tried.
Known problems that can occur even when performed correctly
Pressure in the metatarsophalangeal joint
The pressure in the metatarsophalangeal joint of the rear foot described above can persist for a long time despite careful execution until the ability of the pelvis to rotate in relation to the front thigh (anatomically speaking, of course, it is the ability of the thigh to turn out in the hip joint) has become good enough.
Discomfort in the posterior knee
Complaints in the posterior, extended knee joint occur very rarely. Most of them improve simply by trying to extend the knee joint better, otherwise external use to extend the knee joint and turn in the leg helps. Only in very rare cases does the sum of these measures not lead to freedom from symptoms in the posterior knee joint in the pose, which in turn is mainly due to the fact that the two corrective movements cannot be carried out with sufficient strength using the patient’s own strength. If an appropriate external force is applied, the pain almost always disappears.
Variants
Upper body up
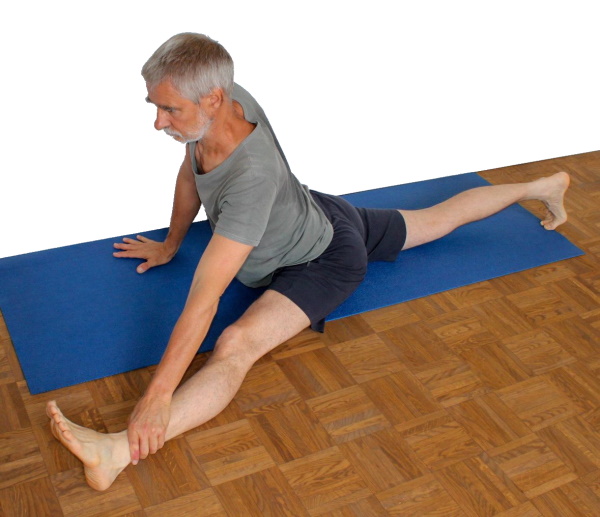
Possible amplification of the effect
Instructions
- Take the pose as described above, but support yourself with your hands so that instead of putting your upper body down, you upright the pelvis and the trunk best possible from the hip joints.
Details
- Depending on your individual constitution, this variation may be more effective than the pose itself, but the effect shifts: away from intensive stretching of the gluteus maximus towards more intensive stretching of the iliopsoas on the side of the extended leg. However, good flexibility of the hip flexors is important for success, as the rear leg must be extended with significantly more than slight extension in the corresponding hip joint.
- Use the hands with the elbow joints flexed or extended, with or without blocks, as the pose requires, but avoid hyperextending the elbow joints.
- Since uprighting the pelvis significantly reduces the sharp flexion in the hip joint belonging to the front leg, the effect shifts towards mere external rotation of the front leg and stretching the hip flexors of the back leg. If the hip extension is not particularly good, this means that the rear knee joint will bend or the pelvis will not be able to upright far. Nevertheless, the partial body weight from the upper body and head works better than in the standard version to promote external rotation in the hip joint.
- Avoid a hollow back feeling best possible when lifting the trunk by uprighting the pelvis in the hip joints as much as possible and using the arm muscles (especially the triceps) accordingly. Do not straighten the upper body to a vertical position if this is associated with an uncomfortable hollow back feeling.
On an incline

Instructions
- Take the pose as described above, but place the buttocks on a suitable elevation and the knee on a slightly lower elevation (see below).
Details
- In some cases, the method described for elevating the buttocks and knees makes the pose more effective, especially if the gluteal area to be stretched is still relatively immobile. This is because the upper body’s gravity is better utilised in the sense of the pose. Because the knee is lower than the pelvis, the pelvis tilts slightly better into flexion in the hip joint of the front leg, and the effective torque in the hip joint of the front leg is improved by raising both (knee and hip) in relation to the foot. It is important that the knee does not remain unsupported so that it hangs in the air. Equally, the support of the knee must not be too soft, i.e. too compressible, as in both cases a corresponding varus stress would occur in the knee joint, which is likely to cause discomfort or even damage in the area of the inner knee (meniscus) in the long term. Even too little support for the knee is still far better than no support, as even a lower level of support may limit the downward movement of the knee and therefore the lower leg into a varus position.
- By raising the buttocks, restrictions in the flexibility of the hip flexors on the side of the extending leg have less of a restrictive effect on the downward movement of the hip of the extended leg and therefore also less of a restrictive effect on the desired rotation of the pelvis (which anatomically corresponds to the target external rotation of the thigh in the hip joint) around the thigh of the flexed leg. It is not uncommon for the requirement to extend the posterior leg to be abandoned so that the pelvis can be lowered ipsilaterally to achieve adequate effectiveness in the contralateral gluteal region.
- As a rule, it is advisable to support the knee at about half the height of the buttock support.
- When supporting the knee, care should be taken to ensure that the edge of the corresponding object does not press on the fibula, the fibular head or any other anatomical structure. To completely eliminate this problem, the knee can be supported at an angle over a large area, as shown in the picture.
- If the pressure on the outer malleolus („ankle“) of the anteriorly placed foot is felt to be uncomfortable, this can also be relined.
Jumping side change

Instructions
- Take the position as described above.
- Place both hands on the floor as for downface dog.
- At the same time, bring the back foot into the position it is in on the other side and the front foot backwards, lifting the pelvis as far as necessary and keeping the hands firmly on the floor.
Details
- This is not a transition for beginners. Sufficient flexibility and, above all, good body awareness must have been acquired before this transition can be practised sensibly.
- If there are any doubts about the health of the knee joints, the transition should not be performed. After all, varus stress occurs in the knee joint from the moment the front foot is placed on the ground as long as the bottom is not yet heavy on the ground.
- The success of the transition depends not least on the clarity of awareness; if there is still doubt or insufficient concentration, these two factors should be raised to a sufficient level before the transition is attempted.
(P) Turning the pelvis

Support with the pelvic rotation
Instructions
- The performer takes the pose as described above.
- The supporter stands to the back of the performer and presses the pelvis towards the floor on the side of the extending leg at the outer iliac crest or just below it. The force applied is directed laterally and downwards according to the arc-shaped movement of the pelvis in the hip joint of the front leg.
Details
- The support may cause greater flexion of the knee joint of the extended leg and therefore a reduced stretching effect on the hip flexors, but this is usually more than compensated for by the increased stretching effect in the glutes. This shifts the overall effect more in the direction of the intended main effect.
- The pressure on one side of the pelvis clearly serves to achieve the desired rotation of the pelvis, which cannot be achieved so intensively using your own arm strength plus the gravitational effect of the upper body.