yogabuch / asanas / pascimottanasana
Contents
pascimottanasana
„Intensive stretching of the West (‚Pliers‘)“
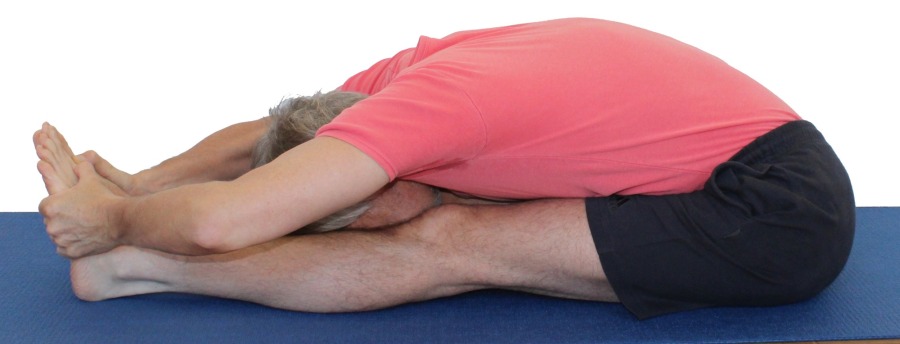
 instructions and details with working links as PDF for download/print
Detailfotos
Arm position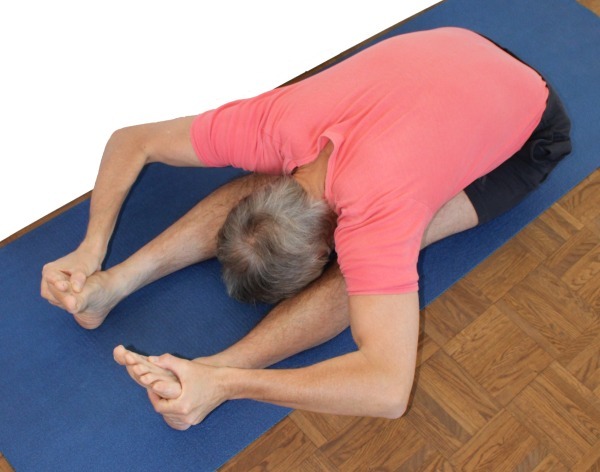 |
Feedback: We’d love to hear what you think about this description, give us feedback at:
postmeister@yogabook.org
last update: 30.12.2018
Name: pascimottanasana
Trivial name: intense stretch of the west (‚pincer‘)
Level: A
- Classification: A
- Contraindication
- effects
- Preparation
- follow-up
- derived asanas
- similar asanas
- diagnostics
- Instruction
- details
- Variants
Classification
classic: sitting posture
psychomental: calming, parasympathetic tone
physiological: stretches the hamstrings
Contraindication
This posture must not be performed in the case of acute intervertebral disc disease in the lumbar spine. There is also no sensible variation option. In this case, you must switch to standing forward bends (in the sense of hip flexion) with a straight back.
Effects
- (312) Strengthening the biceps
- (422) Strengthening the finger flexors (finger flexors)
- (641) Stretching the muscles of the lumbar spine
- (721) Stretching of the hamstrings
- (851) Stretching the monoarticular calf muscles (soleus)
Preparation
Due to the tendency to cause discomfort in the lumbar spine, the lower back can be prepared separately:
- parsva uttanasana
- virasana forward bend (child’s pose)
- parsva upavista konasana
- parivrtta trikonasana
- parsvottanasana
- Half lotus forward bend
- karnapidasana
Stretching the pomus muscles is not part of the usual preparations, but is useful if the monarticular hip extensors in addition to the ischiocrural ones hinder flexion in the hip joints:
- half lotus forward bend
- hip opener at the edge of the mat
- hip opener 3
- parivrtta trikonasana
- parivrtta ardha chandrasana
Of course, the preparation of the hamstrings in the back of the leg is the most important for this pose. It is well known that seated forward bends – especially for less flexible people – are much more likely to cause discomfort in the lumbar spine region than standing forward bends, which is why they should be prepared well with standing forward bends:
- uttanasana as a generally effective and efficient stretch of the hamstrings to prepare for flexion in the hip joints in this pose
- prasarita padottanasana very similar to uttanasana
- parsvottanasana as a stretch that goes beyond uttanasana
- Head down dog is also a good preparation for the hamstrings when the pelvis is tilted powerfully
- hip opener 5 as a very effective stretch for the hamstrings that goes beyond uttanasana
- warrior 3 pose
- trikonasana
- parivrtta trikonasana
If the forearm muscles are too toned, tire too quickly or cramp, a stretching preparation can be useful:
In this pose, the hands reach towards the respective outer foot and the elbow joint flexes to the maximum, resulting in a greater or lesser degree of palmar flexion in the wrist under load with good flexibility in the ischiocrural group, which can lead to a tendency to cramp. This will be all the more pronounced the more mobile the ischiocrural group is, because the elbow then moves further forwards and outwards and the palmar flexion becomes even greater. The following postures are suitable for relieving the tendency to spasm:
Follow-up
derived asanas:
similar asanas:
Diagnostics (No.)
(312) Biceps and other arm flexors:
Due to the task of pulling on the outer edges of the foot as strongly as tolerable, the arm flexors are strained here for strength(endurance), which is why problems of the arm flexors or their tendons become noticeable, due to the angle in the elbow joint with good flexibility of the hamstrings also a possible tendency to spasm of the arm flexors.
Due to the continuous strong pull on the outer edges of the foot in slight dorsiflexion, weaknesses of the wrists may become apparent:
- Ganglion, usually in the dorsal area between the hand and forearm, produces a sensation of pressure when the wrist is dorsiflexed
- Tendinitis of the tendons of the palmar flexors or finger flexors
- Carpal tunnel syndrome: worsening of symptoms in this position
- Fractures and fractures of carpal bones, especially the scaphoid bone
- Arthritic changes (degenerative with cartilage atrophy) of the joint
- Arthritis (joint inflammation) of various kinds
- Dislocation / subluxation, which would cause a significantly increased sensation of tension in various muscles covering the hip joint
- Joint trauma, which may cause pain in the joint even after many weeks or months
but also purely muscular symptoms such as
- Shortening/hypertonus of the dorsal flexors of the wrist, which then become noticeable in the dorsal side of the wrist like cramps (only with good flexibility).
- Shortening/hypertonus of the dorsal flex ors of the wrist, which can tend to spasm (only with good flexibility)
- Golf elbow: Strain pain at the point of origin of muscles of the ulnar side of the forearm in the transition to the upper arm
- Lack of strength endurance and tendency to cramp
(501) Shortening in the latissimus dorsi:
A certain amount of flexibility is required from the latissimus dorsi when reaching for the front outer foot. If the shortening is very pronounced, it becomes noticeable here.
A certain amount of flexibility is required from the pectoralis major when reaching towards the front outer foot. If the shortening is very pronounced, it will be noticeable here.
(650) Kyphosis and lordosis of the spine:
In this pose, the spine should round moderately if there is good flexibility, and necessarily more if there is less flexibility in flexion in the hip joints. Deviations from the expected regular curvature of the vertebral joints become quite visible in this posture, for example a remaining lumbar lordosis or a lack of flexion in the thoracic spine. See the FAQ for more information.
(611) Unequal shoulder height/scoliosis of the spine:
The lateral deviations of the spine from the sagittal plane known as scoliosis are also quite visible in this posture. It can be associated with a rotation in parts of the spine, which is also clearly visible here; often one side of the back is higher in sections due to a rotation of the spine or unevenly developed muscles. See the FAQ.
(644) LUMBAR SPINE:
This posture can reveal problems with the lumbar spine or its muscles FAQ.
(673) The rectus abdominis muscle:
In this pose, the rectus abdominis can spasm because it tries to perform the contraction of the upper body so that the muscles actually performing the posture/movement (here the hip flexors for flexion in the hip joints) have to work less intensively or so that less stretching occurs in the backs of the legs. On the one hand, this can be a statement about increased tension – and possibly not particularly great strength – in the abdominal muscles; on the other hand, it may be a statement about the muscles actually performing the movement.
Wide flexion can cause pain in the case of existing hip damage:
- Arthrotic change (degenerative with cartilage atrophy) of the joint
- Arthritis (joint inflammation) of various kinds
- Dislocation / subluxation, which would cause a significantly increased sensation of tension in various muscles covering the hip joint
- Joint trauma, which may cause pain in the joint even after many weeks or months
(721)(724) Ischiocrural group:
Various disorders can be found in intensive forward bending movements such as this:
- Shortening of the ischiocrural group, see FAQ.
- Damage to the hamstrings that causes pain or functional limitations can also be easily recognized here, from simple tension to strains to muscle (attachment/detachment/tear). Tears would lead to a slight reduction in strength when leaving the posture quickly and possibly to better flexibility in a side-to-side comparison
- Irritation of the sciatic nerve: irritation of the sciatic nerve, which innervates the leg and foot, can become symptomatic during forward bends in particular, even if they are otherwise rather calm. See the FAQ
- Irritations of the origin of the hamstrings at the ischial tuberosity (the ischial tuberosities, also known as PHT: proximal hamstring tendinopathy) will become clearly evident in this posture and require protection from the intensive stretching that this posture demands; see the FAQ.
- Baker’s cysts create a feeling of tension or foreign body in the back of the knee, see FAQ
(880) Hyperextension of the knee joint:
Overextension of the knee joint refers to the ability to or even the current state of an angle of more than 180° in the knee joint. To a certain extent, this is considered normal by anatomists and is on average more common and more pronounced in females. However, it can also indicate a weakness of the quadriceps. Furthermore, hyperextension often causes unphysiological sensations that are not caused by stretching or exertion of the muscles and should be avoided, see also the FAQ.
Variants:
Instruction
- Sit in dandasana. Pull the buttocks slightly backwards and outwards.
- Stretch the arms upwards in extension of the upper body.
- With this arm position, slowly tilt the pelvis forward as far as possible into flexion and reach the hands towards the outer edges of the feet.
- Bend the arms so that the elbows move to the side and use the strength of the arms to pull the upper body forwards as far as possible towards the feet.
Details
- Many forward bends in yoga that do not or not only use gravity (usually that of the upper body) work according to the principle: „arm biceps stretches leg biceps„, more precisely: arm flexor muscles (especially biceps and brachialis) stretch the hamstrings; therefore use the strength of the arms as much as the muscles on the back of the leg allow and consider it one of the more common ways in yoga to strengthen the arm flexors.
- Don’t let the knees come up, but keep working the quadriceps constantly so that the knee joints are always fully extended.
- Make sure that the legs do not turn out, i.e. that the inner knees do not come up in relation to the outer knees.
- Keep the inner feet stretched forward. This movement helps to prevent the thighs from turning out.
- Depending on the flexibility of the knee joints (possible hyperextension of the knees) and the volume and tone of the calf muscles, the heels may lift off the floor when you straighten the knee joints. This is generally not a cause for concern, unless it would bother you subjectively. In this case, place an appropriately folded mat under your heels.
- Stretch your heel away from your body instead of your forefoot. Of course, this movement is not intended to cause the muscles in the front of the lower leg (e.g. tibialis anterior) to cramp, but merely to allow better extension of the back of the leg.
- This posture clearly does not consist of rounding the upper body under all circumstances so that the feet can be reached, but rather of tilting the pelvis forwards(flexion) as far as possible so that the feet can be gripped with ease. If this is not possible, it is advisable to refrain from this exercise until the hamstrings has become more flexible. Standing forward bends such as uttanasana, prasarita padottanasana and parsvottanasana are much more suitable for beginners than pascimottanasana, as the gravity of the upper body, including the arms and head, can be used much more effectively, making the exercise much less strenuous than a comparatively intense pascimottanasana. This is due to the fact that the pelvis (and the upper body as a result) is approximately horizontal in the three poses mentioned, so that almost the entire effect of gravity can be converted into an optimal(flexing) torque in the hip joints, whereas in pascimottanasana the pelvis is approximately vertical, so that the gravitational force of the upper body is diverted into the floor via the ischial tuberosities and is no longer available for the exercise, if the pelvis does not even reach the vertical, which would result in its gravitational effect causing a flexion-reducing moment, which the performer would also have to compensate for. See also the FAQ.
- In this pose, the sternum clearly does not move downwards but forwards towards the feet, which reflects the above situation.
- Seated forward bends are less recommended than standing ones, especially for less agile beginners. It can be observed that prolonged practice of seated forward bends in one go often leads to (temporary) discomfort in the lumbar spine and its muscles. This is due to the distribution of force when the pelvis is more or less vertical, which causes a lot of force to be exerted on the lumbar spine. This requires the hip flexors to be used much more than in standing forward bends, which tones them and provides traction on the lumbar spine.
Variants
Place your head on the floor

Instructions
- Take the pose as described above, but leave space between your lower legs to place your head on the floor.
Details
- The lower legs should leave just enough space for the head and should not be positioned further apart. The forehead will usually reach the floor first.
- Placing the head down does not make the posture passive. The intensive work of the arm flexors to pull the upper body further towards the feet continues unabated. If the hamstrings gives way a little more during the pose, the position of the head may need to be adjusted.
- This variation is similar to uttanasana with heels, head and buttocks on the wall, except that gravity works better for the forward bend and the exact center of gravity of the body is not a critical factor as in the uttanasana variation, which often requires high-intensity work.
with block
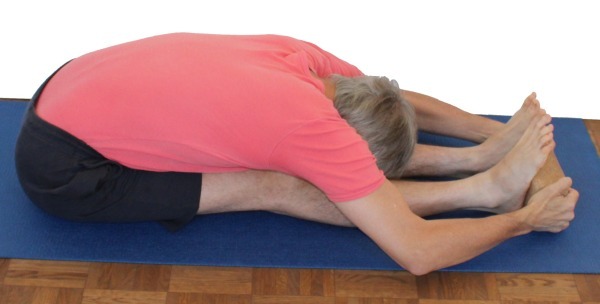
Detailed photos
Grip the block from both sides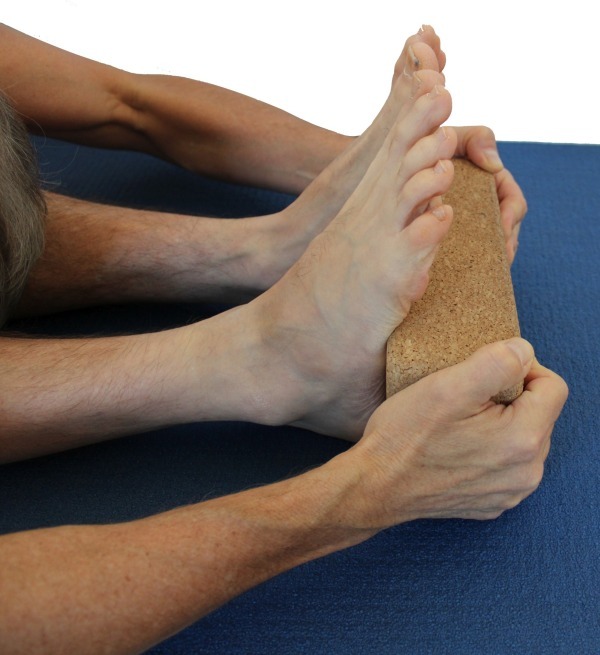 |
Instructions
- Take the pose as described above, but pull on the outer edges of a block placed lengthwise in front of both feet rather than on the outer feet with your hands.
Details
- This variation is well suited to flexible people who find the wrist bent into dorsiflexion uncomfortable in the normal version or who experience cramps in the palmar flexors of the wrist or the finger flexors.
- To take the pose, first bend the knee joints, then attach the block and finally straighten the knee joints. The heels will slide further away from the pelvis. It is helpful if your heels are not on a non-slip surface.
With belt
Instructions
- Take the pose as described above, but place a belt around the soles of the feet above the heels and pull the upper body forwards and downwards instead of at the outer edges of the feet.
Details
- This variation is suitable if you are not mobile enough to be able to grip the outer edges of the feet. As previously mentioned, the less mobile the hamstrings in particular is, the less suitable seated forward bends are. The need to use a belt should be an indicator that standing forward bends are indicated instead of seated ones.
- Be sure to pull evenly on both ends of the belt. The area directly above the heel is where the belt should be. The higher it is on the foot, the more traction is exerted on the gastrocnemius, which can then experience intense stretching in addition to the hamstrings and mask the actual work due to its intensity.
With belt and straight back

Instructions
- Take the pose as described above, but place a belt around the soles of the feet above the heels and instead of pulling at the outer edges of the feet, pull the upper body forwards and downwards with the belt keeping the back straight.
Details
- This variation is suitable for both intensive stretching of the hamstrings and strengthening of the autochthonous back muscles. In the latter, it differs from the last variant with a rounded back.
- Be very careful to keep your back stretched. A convex curve occurs very easily, especially in the lumbar spine, as this is where the mobility restrictions of the hamstrings are most noticeable.
on blocks

Instructions
- Take the pose as described above, but sit on shoulder stands while your feet are not supported.
Details
- Pascimottanasana is usually not yet a suitable pose for those who are less mobile in the hamstrings, as the gravitational effect ofthe partial body weight of the upper body and head is not yet effective in promoting flexion in the hip joints. The further the pelvis tilts towards flexion, the more favorable this pose becomes. The improved effect of gravitycan be simulated to a certain extent by raising the pelvis so that the position of the upper body in space moves more towards the horizontal.
- The maximum tolerable number of shoulder stands on which to sit must be determined experimentally. The performer must not have the feeling of slipping off the elevation.
(P)
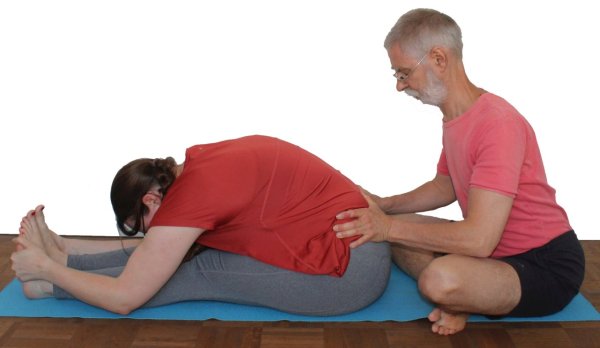
Instructions
- Take the pose as described above
- The supporter sits behind the performer and pushes them further into flexion in the hip joints with their hands or feet in the upper sacrum region or on the iliac crest.
Details
- The point at which pressure is applied can vary slightly depending on the flexibility of the performer, but the pressure should always be comfortable and equal to the side. With good flexibility, the pressure can be applied a little deeper, but the point or area where the pressure is applied should always be above the hip joints. If the person is quite stiff, the point where the pressure is applied should possibly also be above the sacrum in order to achieve sufficient effect via a better lever arm. The flexion-promoting pressure on the sacrum relieves the lumbar spine. However, it is worth considering whether standing forward bends should be practiced instead of pascimottanasana!
(P) Pressing the back down

Instructions
- Take the pose as described above.
- The supporter presses the thoracic spine towards the floor at approximately the highest point.
Details
- This variation is only suitable for those who are quite flexible. At the very least, you should be able to rest your forehead on your lower legs.
- The pressure must not be applied too far away from the pelvis, otherwise too much of the force will bend the spine instead of tilting the pelvis. If possible, press not only downwards but also towards the head.
(S) Pull on the hands
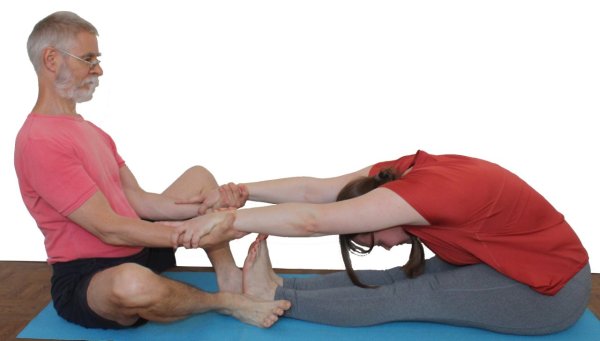
Instructions
- Take the pose described above.
- The supporter supports himself with his feet on the feet of the performer and pulls him by the hands further into the posture.
Details
(2P)

Instructions
- Take the pose as described above.
- The first supporter sits behind the performer and pushes them further into flexion at the hips with their hands or feet in the upper sacrum region.
- The second supporter sits in front of the performer and pulls them forward by their outstretched arms, using their feet or other parts of their legs to support themselves against the performer’s feet, depending on the proportions.
Details
- This version can, but does not necessarily have to, be a little easier on the lower back than the single pose. The pressure on the sacrum and the pull on the hands relieve the lumbar spine.
(3P)

Instructions
- Take the pose as described above.
- The first two supporters apply the supports described above, the third presses the thoracic spine towards the floor from above.
Details
- This variation only works if the performer already has good flexibility in the hamstrings, i.e. if the pelvis is already tilted enough to allow the upper body to be pushed downwards. If the thoracic spine is still far from horizontal, this variation is not yet suitable.
