yogabook / asanas / downface dog
Contents
- 1 adho mukha svanasana„downface dog“
- 2 Variants
- 2.1 wide
- 2.2 Hands on the wall
- 2.3 Feet on the wall
- 2.4 Raise one leg backwards and upwards (eka pada prasarita)
- 2.5 on fists
- 2.6 on fingertips
- 2.7 Press your hands more firmly on the floor
- 2.8 Push hands towards each other
- 2.9 Tighten your biceps
- 2.10 Head on the ground
- 2.11 Raise and lower wrists
- 2.12 one-handed
- 2.13 Heel on the ground
- 2.14 Knees bent
- 2.15 stretch from bent knees
- 2.16 Shrug
- 2.17 Chest to one leg
- 2.18 one leg bent
- 2.19 one leg stretched out in front (hip opener 5)
- 2.20 narrow
- 2.21 Hands turned out (ulnar abduction)
- 2.22 Hands turned in
- 2.23 eka pada parsva
- 2.24 from the outside hand to the inside hand
- 2.25 with upturned feet
- 2.26 Dips
- 2.27 Backwards against the wall with your leg raised
- 2.28 Hands on blocks
- 2.29 Heels on blocks
- 2.30 Hands on carpet / blanket
- 2.31 close with hands on the wall
- 2.32 (S) Partner exercise with 1 supporter
- 2.33 (S) Partner exercise with 2 supporters
- 2.34 (S) Partner exercise with 3 supporters
- 2.35 (S) Partner exercise with 4 supporters
- 2.36 (S) Pull on the thighs
- 2.37 (S) Shrug
- 2.38 (S) Shrugging with traction on the thighs
- 2.39 (S) Dips
- 2.40 (S) Turn out arms
- 2.41 (P) stretch from bent knees
- 2.42 (S) Pressure on the sacrum
- 2.43 (S) backwards against the wall with lifted leg: correct leg and pelvis
- 2.44 (P) backwards against the wall with lifted leg: pull on the outer groin
- 2.45 (P) backwards against the wall with lifted leg: turn out arms and press shoulder area
- 2.46 (2P) backwards against the wall with lifted leg: pull on the outer groin and correct the pelvis
- 2.47 (3P) backwards against the wall with lifted leg: pull on the outer groin, correct pelvis, press shoulder area
- 2.48 Transition to supta virasana
- 2.49 Detail photos
- 2.50 Transition to uttanasana
- 2.51 Transition to ardha vasisthasana and back
- 2.52 Transition to upface dog
- 2.53 Transition to upface dog with feet stretched out
- 2.54 Transition to parsvakonasana
- 2.55 Transition to staff pose
- 2.56 Transition to dog elbow stand
- 2.57 Transition to upface dog against own shoulder strength
- 2.58 (P) Transition to upface dog against resistance
- 2.59 Transition to uttanasana to the back
- 2.60 Transition to handstand, one-legged
- 2.61 Transition to handstand, two-legged
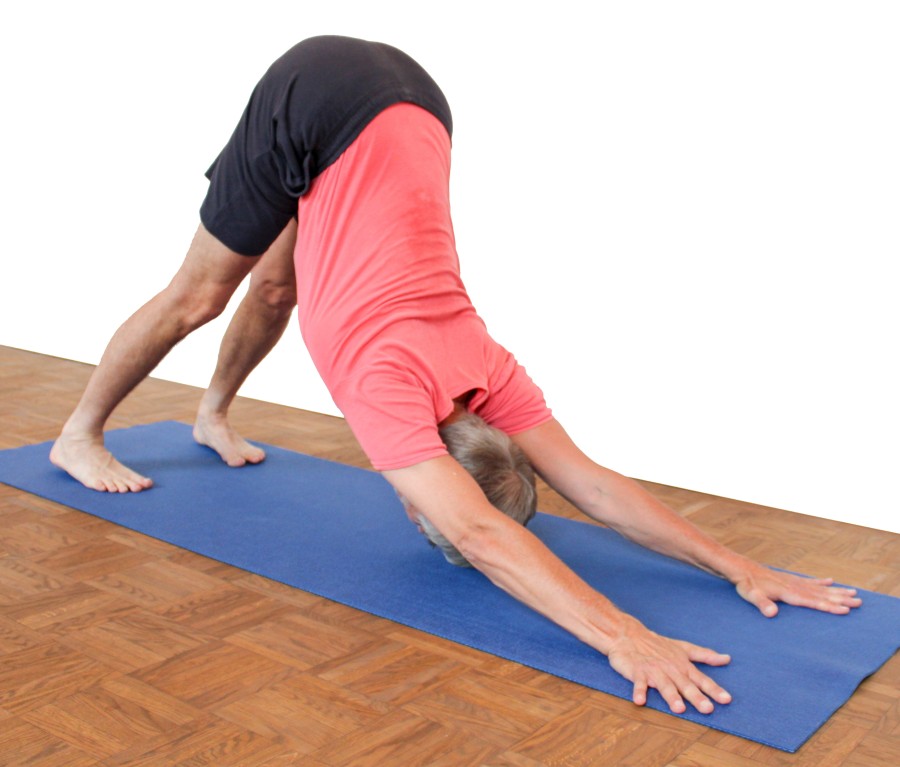
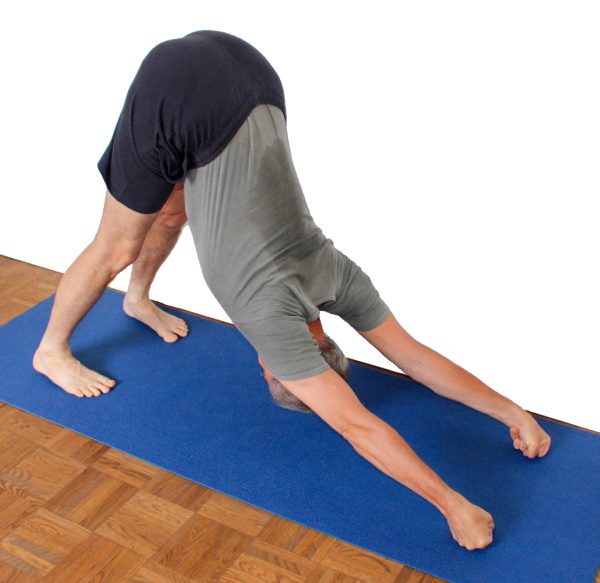
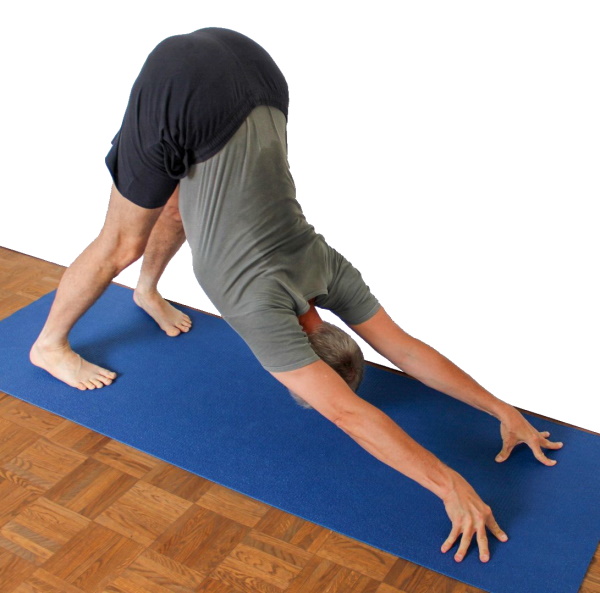
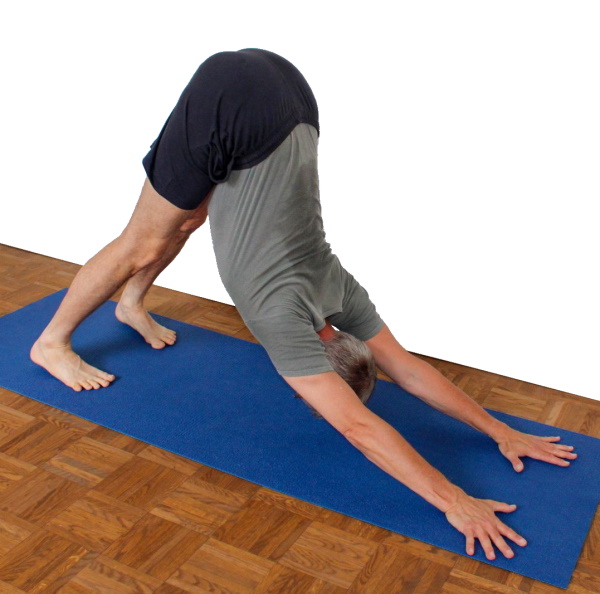
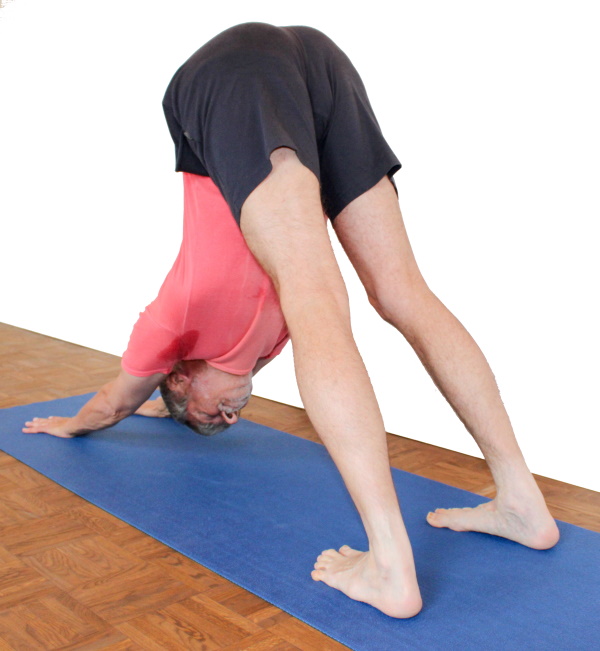
adho mukha svanasana
„downface dog“
 instructions and details with working links as PDF for download/print
Do and don’t
Turn in the arms, retract the shoulderblades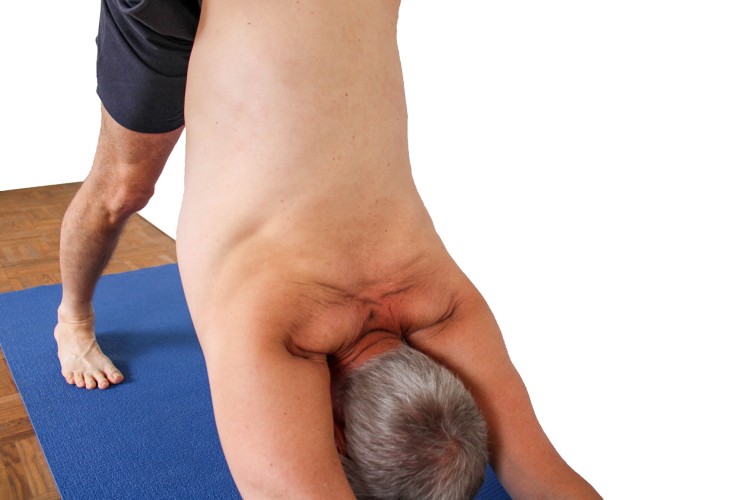 | turn out the arms, lateralize the shoulder blades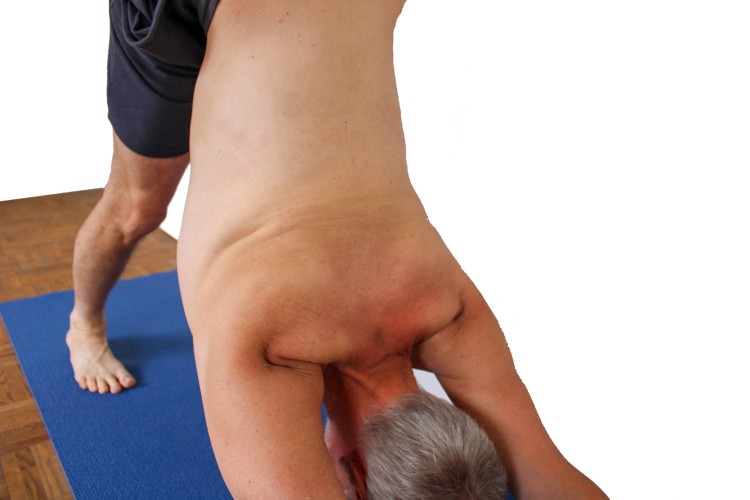 |
Feedback: We’d love to hear what you think about this description, give us feedback at:
postmeister@yogabook.org
last update: 30.12.2018
Name: adho mukha svanasana
Trivial name: downface dog / dog pose with the head down
Level: A
- Classification
- Contraindication
- Effects
- Preparation
- Follow-up
- derived asanas
- similar asanas
- Diagnostics
- Instructions
- Details
- Variants
Classification
classical:
psychomental: balancing, mood-lifting
physiological: hip flexion (therefore stretching the hamstrings), spine extension, shoulder opening (frontal abduction), forearm strengthening
Contraindication
In cases of acute intervertebral disc disease, the area of the lumbar spine can take a convex curvature in cases of a less flexible hamstrings, which causes or maintains the known pain/radiation of pain.
Effects
- (232) Force for frontal abduction
- (292) Strengthening the trapezius
only pars descendens - (332) Force for pronation of the forearm
- (232) Force for frontal abduction
with less mobile shoulders - (231) Shoulder joint: stretching for frontal abduction
- (321) Stretching the supinators of the forearm
- (721) Elongation of the hamstrings
- (851) Stretching the calf muscles
- (851) Elongation of the gastrocnemius
Preparation
An important preparation for all those who are not particularly flexible in the hamstrings is to warm them up so that hip flexion is easier in this position and the upper body moves more easily towards the thighs:
- uttanasana as a generally effective and efficient stretch of the hamstrings to prepare for flexion in the hip joints in this pose, so that insufficient flexion does not restrict the work in the shoulders
- prasarita padottanasana
- hip opener 5 as a very effective stretch of the hamstrings that goes beyond uttanasana
- warrior 3 pose due to flexion in the hip joint of the standing leg
- parsvottanasana as a very effective and efficient stretch of the hamstrings with additional significant stretching of the gastrocnemius
- parivrtta trikonasana is also a good stretch of the hamstrings with additional significant stretching of the gastrocnemius.
- uttanasana as a generally effective and efficient stretch of the hamstrings to prepare for flexion in the hip joints
Depending on the flexibility and resilience of the shoulder, it is advisable to warm it up well too:
- upface dog as a pose that prepares the shoulders for powerful work, especially through correctly executed transitions from and to downface dog
- rectangular handstand
- back stretching, especially the „elevated“ version as a general stretch of the shoulder and hamstrings
- dog elbow stand
- hyperbola as one of the most effective and efficient stretches in the direction of frontal abduction without external rotation of the arms
- Shoulder opening on the chair as one of the most effective and efficient stretches in the direction of frontal abduction with external rotation of the arms
- purvottanasana if the tone in the deltoid is too high or has become too high due to preparation
- gomukhasana if the tone in the deltoid is too high or has become too high due to preparation
The following poses can be used to prepare the calf muscles, especially the gastrocnemius, for dorsal flexion in the ankle:
- warrior 1 pose in which the respective rear leg is stretched
- parivrtta trikonasana in which the respective back leg is stretched
- parsvottanasana in which the respective back leg is stretched
- uttanasana with the ball of the foot on a block
- downface dog with one leg raised
- downface dog with one foot hooked behind the opposite knee
To counteract an existing tendency to cramp in the rectus femoris:
- supta virasana
- ardha supta krouncasana
- quadriceps stretch 1 on the wall
- quadriceps stretch 2 on the wall
Follow-up
If unpleasant tension remains in the deltoid after leaving the dog position, this can be reduced with:
- gomukhasana in which the deltoid of the lower arm is stretched
- uttanasana with hands behind the body for both arms simultaneously
- prasarita padottanasana for both arms simultaneously
If the rectus femoris has shown a tendency to cramp in the dog:
Derived asanas:
Similar asanas:
Geometry:
- rectangular handstand
- urdhva hastasana-variant of the dandasana
- supta dandasana
- rectangular uttanasana
- rectangular headstand
- navasana
- dvi-pada variant of handstand
Diagnostics (No.)
(712) Hip flexor: strength
A lack of strength in the hip flexors in this pose will mean that the attempt to tilt the pelvis into wide flexion in the hip joints will not result in any significant stretching of the hamstrings.
(293) Excessive tension in the trapezius:
It is rather rare for the trapezius to tense up despite stretching from the shoulder (elevation) and turning out (external rotation) of the arms, which then indicates significantly increased tension. The trapezius, which plays a key role in lifting and outwardly rotating the shoulder blades, is probably one of the most tense muscles in Western civilization. Internal and external posture, including today’s widespread VDU workstations, contribute significantly to this.
(880) Hyperextension of the knee:
Hyperextension of the knee joints refers to the ability to or the current state of an angle of more than 180° in the knee joint. To a certain extent, this is considered normal by anatomists and is on average more common and more pronounced in females. However, it can also indicate weakness of the quadriceps or hamstrings. Furthermore, it is not uncommon for unphysiological sensations to occur in the front of the knee below the patella or on the back of the knee during hyperextension, which are not caused by stretching or straining the muscles and should be avoided, see also FAQ.
In downface dog, the flexibility of the shoulder joints can be recognized, including side discrepancies, and there may be indications of diseases of the shoulder joint:
- Irritable hypertonus of the deltoid: especially ambitious beginners in yoga tend to develop irritation in the deltoid, which is localized in the area of the muscle origins, presumably due to an overstraining of the structures by frequently repeated demand in full frontal abduction and is also noticeable in such stress, see FAQ.
- Various pathological changes of the shoulder joint such as impingement syndrome, frozen shoulder, calcifications of the biceps tendon, which cannot all be discussed here and require clarification.
- side discrepancies in flexibility
The flexibility of the shoulder joint is recognizable in the form of the degree of evasion in the three dimensions of movement:
- Moving the upper arms outwards (laterally) with (as the hands are fixed) consecutive bending of the elbow joints, as the hands are fixed
- Loss of external rotation of the arms
- An angle of frontal abduction that does not reach 180° or not permanently
(650) Kyphosis and lordosis of the spine:
The deviations from the physiological double-S shape of the human spine are clearly visible in this pose. There should be a certain degree of lordosis (convex spine from the front) in the cervical spine and no kyphosis (convex spine from the back) in the thoracic spine. The physiological kyphosis should also be eliminated and this area of the back should be able to be fully extended. The extent to which the physiological lordosis of the lumbar spine can be restored is extremely dependent on the flexibility of the hamstrings and the focus of the pose. Depending on the focus of the pose, even flexible people may still have a „merely“ straight or slightly kyphotic lumbar spine. The decisive parameters here are above all the distance between the hands and the feet and the question of whether the heels are pressed to the floor at the expense of flexion in the hip joints. See the FAQ.
(611) Pelvic obliquity / scoliosis of the spine:
The lateral deviations of the spine from the sagittal plane known as scoliosis are also quite visible in this pose. It is also sometimes observed that the pelvis is not straight, but that one hip is higher than the other, which may also be due to different flexibility of the gastrocnemius (side comparision). See the FAQ.
Various disorders can be found in forward bending movements (flexion in the hip joints), but also under load in the muscles of the back of the leg:
- Shortening of the hamstrings, see FAQ.
- Damage to the hamstrings that causes pain or functional limitations can also be easily recognized here, from simple tension to strains to muscle (partial) tears. Tears can lead to greater unilateral flexibility in the direction of dorsiflexion in the ankle joint.
- Irritation of the ischiadicus nerve which innervates the leg and foot, can become symptomatic during forward bends in particular, even if they are otherwise rather calm. See the FAQ.
- Irritation of the origin of the hamstrings at the ischial tuberosity (also called PHT: Proximal Hamstring Tendinopathy) can become clearly evident in this pose, depending on the force with which the pelvis is tilted, and requires protection from intensive stretching, as required by this pose. See the FAQ.
- Baker’s cysts create a feeling of tension or a foreign body sensation in the back of the knee, see FAQ.
Although the wrist is far less in dorsiflexion than, for example, in upface dogwards, one or the other disturbance in the hand or wrist can still come to light under about a quarter of the body weight.
- Ganglion, usually in the dorsal area between the hand and forearm, produces a sensation of pressure when the wrist is flexed dorsally, if more pronounced. This occurs much less frequently in downface dog compared to the upface dog and usually only in the combination of a less mobile hamstrings and a less flexible shoulder joint.
- Tendinitis of the tendons of the palmar flexors or especially the finger flexors
- Carpal tunnel syndrome: worsening of symptoms in this pose, especially when the metacarpophalangeal joints of the fingers are pressed hard against the floor
- Fractures and fractures of carpal bones, especially the scaphoid bone
- Arthritic change in the joint
- Arthritis (inflammation of the joints) of various kinds
- Dislocation / subluxation, not only of the wrist (radiocarpal joint), but also misalignment of carpal bones, which would usually cause a significantly increased sensation of tension in various muscles covering the wrist.
- joint trauma, which may cause pain in the joint even after many weeks or months
but also mainly muscular symptoms such as:
- Golfer’s elbow: Strain pain at the point of origin of the muscles of the inner ulnar side of the forearm in the transition to the upper arm. See FAQ.
In this position, knee problems associated with stretching the knee joint under a certain load can become apparent. These can be, for example: traumatic or degenerative meniscus damage, arthrosis, arthritis, subluxations, ligament damage, plica syndromes, Hoffa syndromes (of the extended leg), retropatellar cartilage damage (chondropathia patellae, retropatellar arthrosis/osteoarthritis) and others, see the FAQ.
Variants:
Raise one leg backwards and upwards (eka pada prasarita)
Press your hands more firmly on the floor
one leg stretched out in front (hip opener 5)
Hands turned out (ulnar abduction)
from the outside hand to the inside hand
Backwards against the wall with your leg raised
(S) Partner exercise with 1 supporter
(S) Partner exercise with 2 supporters
(S) Partner exercise with 3 supporters
(S) Partner exercise with 4 supporters
Backwards against the wall with your leg lifted: correct your leg and pelvis
Backwards against the wall with your leg raised: pull on the outer rail
Backwards against the wall with your leg raised: pull on the outer rail
Backwards against the wall with your leg raised: pull on the outer rail
Backwards against the wall with your leg raised: pull on the outer rail
Transition to ardha vasisthasana and back
Transition to dog position head up
Transition to dog on top with feet stretched out
Transition to upface dog against own shoulder strength
(S) Transition to upface dog against resistance
Transition to uttanasana to the back
Transition to handstand, one-legged
Transition to handstand, two-legged
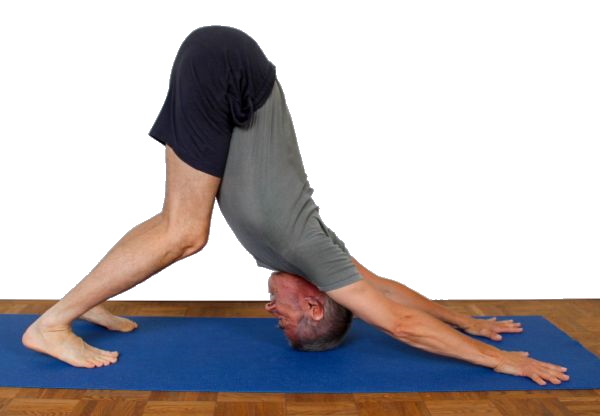
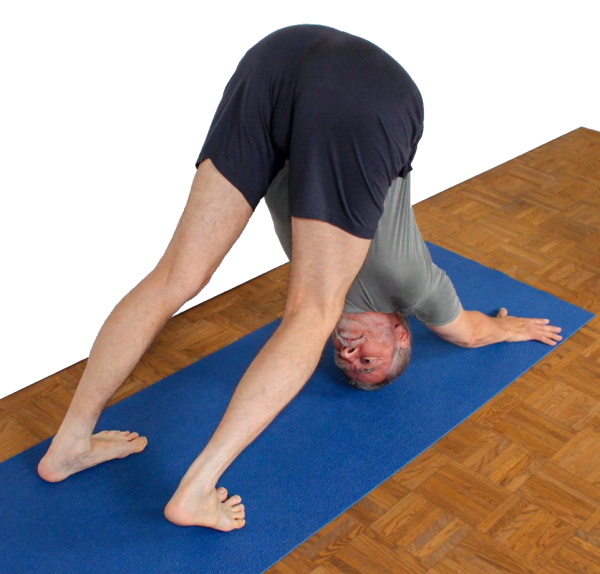
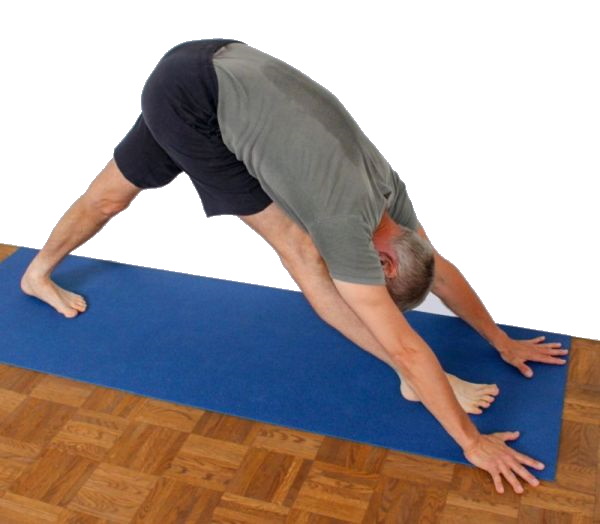
Instructions
- Sit upright on the lower legs of both feet.
- Bend your upper body forward and down and rest it on your thighs.
- Stretch your arms out in front of you and press your open palms shoulder-width apart on the floor.
- Raise your pelvis until your thighs are vertical.
- Turn your toes over so that the bottoms of your toes are on the floor.
- Put weight on your hands.
- Stretch your legs backwards and push your upper body towards your legs.
- Lower your heels.
- Tilt the pelvis forward and down to the maximum tolerable level of stretching sensation in the hamstrings.
- Let the shoulder sink into the line connecting the wrists and ischial tuberosities, but do not move it forwards and downwards towards the hands but upwards and backwards towards the pelvis.
- Press the inner base joints (metacarpophalangeal joint) of each finger (joints between fingers and palm) firmly onto the floor to distribute the pressure between the different parts of the hand and fingers as evenly as possible.
- Turn the upper arms out (i.e. the triceps towards the floor).
- Stretch from the shoulders backwards and upwards to the maximum, i.e. elevate the shoulder blades to the maximum.
Details
- Pay attention to the leg work: exact extension of the knee joints, unless the rectus femoris of the thigh would cramp (because it is short in both joints that it spans (knee joint and hip joint), and therefore very short in sarcomere length, close to active and passive insufficiency, hence prone to cramp). If a cramp occurs, then:
- If necessary, do not tilt the pelvis quite so far in downface dog.
- Practise stretching the quadriceps more frequently, e.g. supta virasana, quadriceps stretch 1, quadriceps stretch 2, ardha supta krouncasana.
- Bend the knee joints first and then tilt the pelvis further forwards and downwards instead of stretching the legs first and then tilting the pelvis into hip flexion, as is usual. Flexion in the hip joints should be performed mostly isolated by the iliopsoas and, as far as possible, not from the rectus femoris.
- Using the strength of the arms and shoulders, push the ischial tuberosities away from the hands, which means nothing other than stretching all the joints in between to the maximum including elevating the shoulder blades, see below.
- Leave the abdominal muscles soft. The shoulder area should not be moved towards the legs by means of the rectus abdominis, but by an adequately tilted pelvis (flexion in the hips), i.e. by the strength of the hip flexors.
- If there is a tendency to cramp in the shoulder muscles (deltoids), this can be avoided:
- if this significantly restricts the execution of the exercise, the downface dog with the hands on the wall can be practiced more often instead. Furthermore
- in between, or if the tendency to cramp hinders the execution of the pose too much, (half) gomukhasana can be practiced. If handstand with bent arms (dips variation) can be practiced, this is also highly recommended.
- Switch to the upface dog more often in between.
- Tonus-regulating strengthening exercises and strengthening of various kinds should be practiced, including the dips variation of dog pose.
- Turn the thighs in rather than out (which is not part of the pose anyway) and push them away from each other, this pulls the ischial tuberosities apart a little and promotes flexion in the hip joints a little.
- In some cases, the weight distribution between the inner and outer foot requires special attention. In cases of shortened calf muscles in particular, it can be useful to focus more often on pushing down on the inner heel. This is the case, for example, for athletes who regularly subject their lower leg muscles to greater strain, e.g. by jogging, endurance running or similar, as the gastrocnemius trained in this way also supinates the foot.
- Make sure that the inner hands do not become light when turning the arms out, but work constantly with the forearm muscles, esp. the palmar flexors and pronators, as pushing down the inner finger base joints, which tend to lift, is a combination of palmar flexion in the wrist and pronation of the hand or forearm. Nevertheless turn out your arms to the maximum.
- Difficulties with the wrists (usually dorsal) can occur after holding the position for a long time, especially if the hamstrings are not very flexible and the shoulder joints are not very flexible, and are almost invariably of a temporary nature. This can be remedied:
- in the pose: the more forceful pressing down of the m metacarpophalangeal joints
- after the pose: stretching the dorsiflexors and finger extensors
- When stretching from the shoulders (elevation of the shoulder blades) backwards and upwards, make sure that the external rotation of the arms is not lost. The well-known relationship between the three dimensions of movement (turn out, don’t laterally adduct, maximum frontally abduct) naturally applies here all the more. The force acting in the direction of frontal abduction is great enough to force the upper arm in the shoulder joint into the other two dimensions of movement in case of doubt, depending on which movement is easier or, conversely, which can be better controlled by awareness and strength. So be very careful not to let the arms deviate outwards and, even more importantly, not to let them rotate internally. People with instable shoulder joints in particular, especially those with a known tendency to shoulder dislocation/luxation, must carefully and maximally turn out their arms in any overhead movement, otherwise they may dislocate/luxate.
- Work with your hands in such a way that individual or several fingers do not turn sideways, which can be easily recognized, for example, by a nail leaning to the side. If this is the case, a sideways sliding movement of the whole hand or individual fingers can be used to bring the fingers into an upright position (against the frictional resistance of the fingers on the surface). This effect often does not affect all fingers equally. The specified correction is therefore only intended as a corrective for the unwilling fingers and accepts that the tendency of other fingers to rotate may be overcompensated in the meantime or that some fingers may even be rolled in the opposite direction. The degree of correction is based on the finger that rotates the most. Note that there is only two-dimensional mobility in the metacarpophalangeal joints: Abduction/adduction and flexion/extension, but not rotation. Any rotation of the finger is therefore not physiological and is limited by ligamentous structures that must not be loaded. This instruction naturally also applies to the thumb, although for anatomical reasons it cannot be expected to lie upright.
- There should be no tendency to cramp in the trapezius; if there is, you should first check whether this can be stopped by turning out the arms more forcefully yourself. If not, a supporter can turn out the arms with appropriate force. The causes of trapezius cramps are often habitual and can mostly be found in everyday postural behavior.
- As in various standing postures, spread the toes to create the basis for the metatarsophalangeal joints to rest on the floor as evenly as possible, as far as the transverse arch of the foot and its arched shape allow.
- In most cases, lowering or pushing down the heels counteracts flexion in the hip joints, as both movements are coupled via the limited flexibility of the muscles in the back of the leg. The gastrocnemius plays an important role here, as this plantar flexor of the ankle simultaneously flexes the knee joint. In downface dog, the opposite movement is undertaken in both joints, so that it is strongly stretched here and usually sets the limit in at least one of the two movements (flexion in the hip joints and plantar flexion). Unless otherwise indicated (therapeutically, e.g. for PHT), the movement in the hip joints is the more important one, i.e. place more emphasis on tilting the pelvis as far as possible than forcing the heels to the floor; however, this makes perfect sense as a temporary focus of the exercise. This is especially true if the gastrocnemius is quite stiff. Downface dog can then also be used to promote its flexiblity. After all, its shortening is a significant risk factor for some disorders in the kinetic chain of the lower limb. However, variations in which only one foot is on the floor are particularly suitable, such as the eka pada prasarita variation or the variation with one leg bent, the foot of which can also be hooked behind the opposite knee.
- The above instructions for taking the pose provide a clear measurement for the distance between hands and feet. If you change from downface dog to upface dog, the distance between hands and feet must be adjusted accordingly so that the wrists are no further forward – preferably one or two centimeters backward – than the perpendicular of the shoulders. If you switch between these two poses several times, the distance should be measured according to this criterion for upface dog and should not be changed each time you switch. Of course, there are exceptions to this rule, such as disc herniations, which require such a large distance in downface dog that the lumbar spine is at worst steeply positioned (if this is tolerable), but upface dog position must not be performed with a greater distance, so that regular changes between the distances must be made. For downface dog, this rule has the consequence that the pelvis tilts less or at least less easily forwards and downwards (flexion in the hip joints), but this is the lesser evil compared to too great a distance in the upface dog, which can lead to a nasty sag in the lower back. The advantages of the smaller distance for upface dog are described there, including the fact that the transitions are more intense and the deltoids are challenged more.
- In some people, the tendons of one or more fingers are shortened, usually the little finger. This peculiarity only affects the execution of the pose to the extent that the first finger joint cannot usually be pressed to the floor. If an assistant is available, they can usually continue to slowly press the affected joint down over the course of several minutes, which should be painless. Otherwise, a weight can be placed on the joint. Rapid success is not to be expected, especially if it is a tendon contracture, but a slow, steady improvement can be expected.
- If the palmar flexion is performed vigorously, the work of the associated muscles of the forearm should be clearly noticeable. In rare cases, this type of muscular work causes irritation at the origin of the muscles in the forearm near the elbow joint, such as golfer’s elbow, or an existing golfer’s elbow becomes more obvious. In this case, it is recommended that this work in downface dog be less forced and that the stretching of this muscle group be practiced more often with the palms of the hands placed on the floor. Therapeutic weight training with many repetitions with such a light weight that no pain occurs during the exercise is usually helpful. See also golfer’s elbow in pathology.
- A lack of strength in the forearm muscles in particular often puts a lot of uncomfortable pressure on the carpus. Less trained people often not only have little musculature to relieve pressure in this area, but also little protective musculature over the bones. Patches or shoulder stand plates with patches on top of them (for better friction) are recommended as softness mediators.
- Due to the unsupported heels and the possible longer time you can stand in downface dog, this pose is suitable for counteracting overtension in the longitudinal intrinsic foot muscles. As an active part of the tension belt of the foot, it is increased in quite a lot of people as a result of the demands placed on the feet, for example through prolonged standing or walking as well as various sporting activities.
- Sometimes an intense pressure sensation occurs at the hamulus, which makes it necessary to protect this area, e.g. by placing the rest of the hand on a support, but avoiding the hamulus.
Known problems that can occur even when executed correctly
Pain in the shoulder
Beginners who regularly or even ambitiously practise downface dog may develop a slight cramp-like pain in the ventral shoulder, which almost only occurs when the arms are overhead under at least a moderate load. This may also apply to handstand and rectangular handstand, for example, and is a result of the disproportion between the demand and the current capabilities of the muscles. It then makes sense to train the shoulder muscles (especially the frontal ones: the pars clavicularis of the deltoid) for strength and strength endurance in more moderate angles than approx. 180° frontal abduction. The dip variations of the poses with otherwise 180° frontal abduction are ideal for this, but above all the clean and intensively performed transition between downface dog and upface dog and back as well as front raises in a seated and supine position. See also the FAQ.
Variants
wide

This version allows a significantly improved „shoulder opening“ (promotion of frontal abduction capability) through the dog position as well as more powerful work in the lateral back muscles, which are stretched more intensively as adductors of the shoulder joint due to the greater force exerted here in the direction of frontal abduction.
Effects:
(231) Shoulder joint: stretching for frontal abduction
(501) Stretching the latissimus dorsi
Instructions
- Increase the distance between your hands and feet by at least one hand length, or up to two hand lengths (including fingers) if you are stiff in the shoulder joints.
- Stretch your body backwards even more forcefully. If you slip away with your hands, press them against the wall:

Details
- For people who are flexible in the shoulder joints, it is essential to ensure that they do not go into maximum frontal abduction of the shoulder joint if no stretch can be felt in the adductors of the shoulder joint. The less the body is stretched backwards away from the wrists (which anatomically corresponds to the elevation of the shoulder blades), the earlier this state is reached, as the latissimus dorsi, as an important shoulder joint adductor, is also an indirect depressor of the shoulder blade due to its attachment to the upper arm.
- This does not mean that the shoulder must not sink below the line connecting the pelvis to the hands, but rather that the extension of the body backwards must be maintained and developed through the strength of the shoulder blade elevators. If no stretch is felt in the shoulder joint adductors despite powerful and maximum elevation of the shoulder blades and maximum frontal abduction, you should switch to a variation in which the shoulder joint adductors are actively made to work instead of just being stretched, e.g. pressing hands on the floor or hands on carpet.
- As shoulder flexibility increases, you need to work more intensively to turn out the arms, which includes stretching the latissimus dorsi and the teres major, as these muscles are not only adductors but also internal rotators of the shoulder joint.
- For people who are stiff in the shoulder joint, the main task is to move the shoulders towards the thighs. Restricted flexibility of the shoulder joint limits both external rotation and frontal abduction as well as elevation of the shoulder blades.
- What was said above in the basic pose about the relationship between the three dimensions of movement (turning out, don’t move laterally, maximally frontally abduct) applies all the more here. The force acting in the direction of frontal abduction is great enough to force the shoulder joints into the other two dimensions of movement in case of doubt, depending on which movement is easier and which can be better controlled by awareness and strength. So be very careful not to let the arms deviate outwards and even more so not to let them turn in.
Known problems that can occur even when executed correctly
Slipping of the hands
As described above, hands can slip on the mat. This depends on the one hand on the typeof mat and how worn down it is, and on the other hand significantly on hand moisture. We always have some older patches (small pieces of mat) available in the yoga school to provide good reiction and slip resistance for participants who come with their own, less slip-resistant mat. Nevertheless, high hand moisture after intensive physical work or hyperhidrosis can cause the hands to slip. Placing your hands on a wooden floor is worth a try. If they are not too dry, the friction in a certain moisture range can be almost better than on a mat. Finally, as shown above, pushing the hands against a wall or gripping the edge of the mat, or having a supporter press the hands on the floor, can also help.
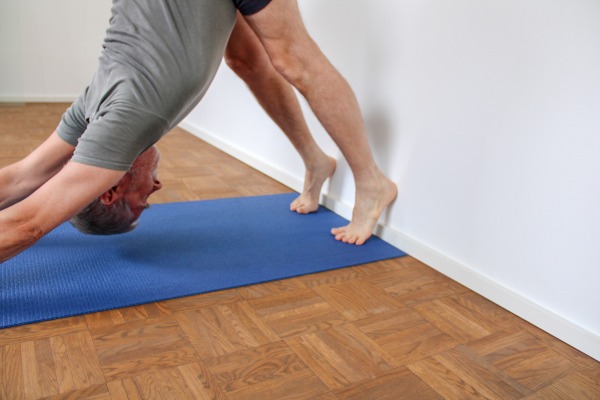
Hands on the wall
This version can reduce the tendency to cramp in the shoulder muscles (anterior parts of the deltoids) and help to turn out the arms. You may also be able to exert more force to push the upper body towards the thighs.
Instructions
- Press your hands against a wall so that your thumbs are pointing inwards and the rest of your fingers are pointing outwards, i.e. your index finger and thumb are in contact with the wall.
- Maintain the pressure, especially in the metacarpophalangeal joints, while holding the pose.
- Turn out your arms to the maximum while at the same time stretching backwards from the shoulder to the maximum, i.e. elevating the shoulder blades and finding the stretch in the latissimus dorsi that this allows.
Details
- Make sure that the metacarpophalangeal joints (especially the inner ones) do not lift but press firmly against the floor. This is the work of the palmar flexors and pronators in the forearm.
- This makes it easier to practise turning out the arms so that a certain intensity of stretching of the lateral back muscles (latissimus dorsi) can be experienced at the earliest possible stage.
- It should be noticeable that this variant reduces the tendency to cramp in the deltoids, if this exists.
- It is usually easier to push the upper body towards the thighs. This may be due to the fact that the strength for this is not limited by the fact that care must be taken to ensure that the hands do not slip forward, but it may also be due to the fact that in order to avoid this slipping away, the hands are often pressed onto the mat a little down from above in the normal version, which is equivalent to a frontal adduction movement (not exactly vectorial, but in the main direction for flexible people), which is diametrically opposed to the downward shoulder movement to be performed in downface dog, the frontal abduction. On the contrary, you may attempt to, subjectively, lift the hands upwards towards the front, which is equivalent to a further frontal abduction and at the same time pushes the shoulders and upper body towards the thighs.
- The stretch of the hamstrings should no longer be significant in this variant – which is not the aim of this variant – at best the calves are still noticeable in some cases, sometimes even more than in the standard variant.
Feet on the wall
This design allows:
- to shift the work a little away from the legs to the arms and shoulders
- to tilt the pelvis better forwards and downwards (flexion in the hip joints) and thus keep the back (especially the lower back) straighter (useful for some lower back injuries, especially disc herniations)
- to shift the work within the backs of the legs: away from the gastrocnemius towards the backs of the thighs (hamstrings).
Instructions
- Place your heels about 10-15 cm higher against the wall (depending on your flexibility in terms of dorsiflexion in the ankle joint: the better, the less height you need), place the balls of your feet on the floor in front of them so that your feet are at an angle of about 60° to the floor and take downface dog.
Details
- Make full use of the enlarged degree of freedom in the hip joints and tilt forwards and downwards into maximum flexion, defined by the maximum tolerable stretching sensation in the backs of the legs.
- Leave the lower back and the rectus femoris soft, i.e. get the movement from the strength of the iliopsoas. The pelvis may tilt much further here than usual and it becomes clearer where this movement comes from, as in the normal version there is no choice to change the position of the pelvis, especially for beginners with little flexibility, because the stiff back of the leg forces a certain position. This pose also shows the connection between the dorsal lower leg and dorsal thigh muscles: there is at least one knee flexor in both parts of the limb (thigh: hamstrings – lower leg: gastrocnemius) and depending on how far the pelvis is tilted, the heels can sink less towards the floor or vice versa, depending on how far the heels are moved towards the floor, the pelvis can be tilted less into flexion in the hip joints. If you want to put it this way, the total length of the back leg muscles is limited and you can choose between more flexion in the hip joints and more dorsal flexion in the ankles.
- Here, the strength of the arms can often be used better than in the normal pose to push the upper body towards the thighs, i.e. it is easier to push the shoulders below the line connecting the wrists to the pelvis, which primarily exercises the flexibility of the shoulders. This is because the pelvis tilts further and the upper body and therefore the shoulders can move further towards the thighs, which means that the force exerted with the hands in the direction of the shoulders forces the shoulders and upper body to move downwards rather than upwards. A comparable avoidance calculation can be found in the intensive transition between upface dog and head down without the use of force from the hip flexors in the instruction „lift the pelvis until the hip joints are above the line connecting the heels to the shoulders“ so that the pelvis deflects (is forced fo evade) upwards instead of downwards.
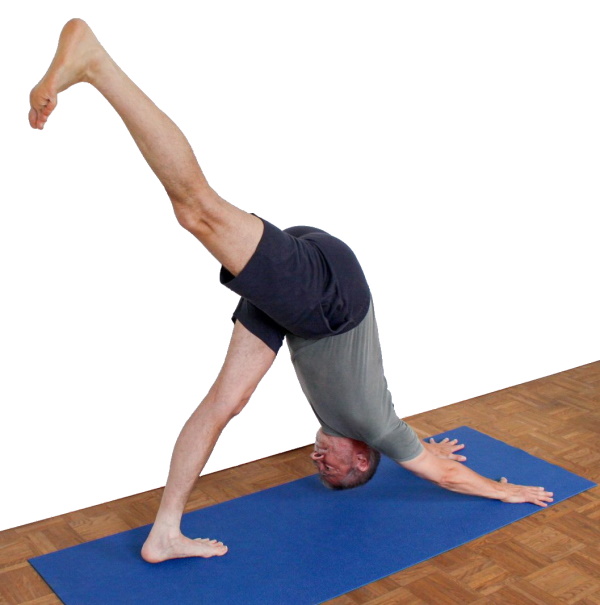
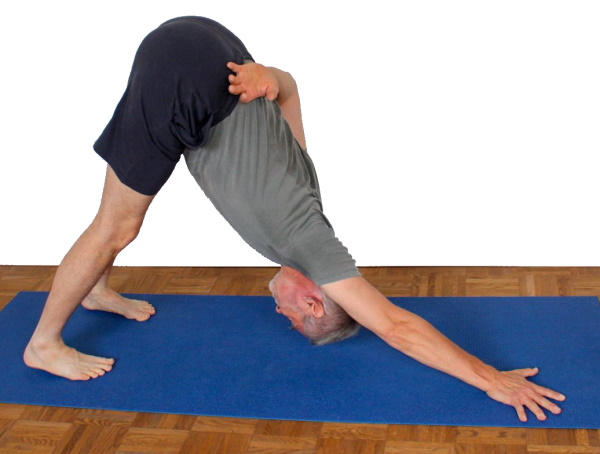
Raise one leg backwards and upwards (eka pada prasarita)
This pose strengthens the gluteus maximus and the biarticular hamstrings and increases the stretching and strengthening of the calf muscles (especially the gastrocnemius).
Effects:
(851) Stretching of the gastrocnemius
Instructions
- From the normal dog position, press your hands down firmly on the floor.
- Slowly lift one leg. Keep it stretched; lift it slowly to the maximum, whereby the work of the gluteus maximus of the lifted leg (free leg) and the stretching and strengthening demands on the gastrocnemius of the standing leg should be clearly noticeable.
Details
- Feel the quadriceps of the lifted leg working. If you cannot feel it, there is usually no full extension in the knee, after all, the hamstrings are heavily involved in lifting the leg and inevitably generate a significant flexion moment in the knee joint.
- Stop the tendency of the lifted leg to turn out. Instead, concentrate on moving the inner knee upwards first.
- The further the leg is lifted, the more stretching sensation occurs in the standing leg; lifting the leg wide promotes flexion in the hip joint of the standing leg.
- Also make sure that the pelvis remains straight. The hip of the leg to be lifted wants to move forwards and upwards, which is perceived as a reduction in stretching sensation in the standing leg.
- In the lifted leg, stretch the heel forwards backwards and upwards, which eases straightening the knee joint. Do not work with the intention of lifting the heel or the calf, but rather the back of the thigh and, in particular, the inside of the thigh using the strength of the back of the leg itself and the gluteus maximus muscle.
- If the heel of the standing leg does not touch the ground, you will feel a significantly increased stretching requirement in the gastrocnemius, which may be borderline or even too strong. In the latter case, the heel can remain slightly raised or a small support can be used under the heel. If the heel of the same leg rests firmly on the floor, the stretching requirement will probably not be significantly increased as long as the lifted leg does not clearly tilt the pelvis further into flexion. If this occurs, however, the stretching of the gastrocnemius will also be clearly noticeable in most cases. If there is still no adequate stretching, increase the distance between the hands and the foot. In this pose the physical base of support is a very narrow triangle at the back; this means that the rein system of the ankle joint of the standing leg has to perform a certain amount of balancing work, which should be clearly felt as work of these muscles beyond any stretching sensation occuring. The balance aspect of the pose is reinforced by the fact that the rear foot is not positioned in a straight line behind the center of gravity plumb line, or in other words, the gravity perpendicular is not centered in relation to the transverse axis of the physical support base.
on fists
This version sometimes makes it possible to perform downface dog if various injuries to the wrist or the hand itself would otherwise prevent it, e.g. in the case of a scaphoid fracture.
Instructions
- Clench your hands into a fist and place your fists so that your palms are facing each other. The thumbs enclose the fist from the outside.
- Press your fists firmly on the floor and take downface dog as usual.
Details
- In this version, less pressure can be applied backwards, as the knuckles are typically more sensitive to pressure than the palms, and also because the wrist is often working at the limit of available ulnar abduction and therefore does not want to tilt further due to painful restriction of movement .
- Do not experiment with hands turned backwards (palms facing backwards), as the wrist is very unstable and there is a risk of injury from twisting the wrist.
- Apply pressure as evenly as possible to all knuckles pressing on the floor.
- The further the shoulders are moved backwards (and therefore down), the greater the ulnar abduction of the wrist, which is quite an unusual movement, especially when force is applied, and may also be less pronounced than would be required according to the flexibility of the shoulder joints and the hamstrings.
- If the pressure is very uncomfortable, patches can be used under the knuckles. A blanket would be inappropriate as an aid, as both the fists tend to slip on the blanket and the different layers of a folded blanket tend to slide against each other. For the latter reason, the otherwise promising combination of blanket and patches on top is also not a good choice. This is simply due to the often flat angle of the force applied via the forearms to the floor, and becomes more pronounced with increasing flexibility of the shoulder joints and the hamstrings.
- Not only is less strength available for stretching from the shoulders (elevation of the shoulder blades) as described above, the „shoulder opening“ effect (promoting frontal abduction capability) also suffers a little in this variation, as the intensive palmar flexion that is usually performed pushes the shoulders a little towards the floor and therefore stretches them better. In addition, discomfort in the wrists may prevent maximum frontal abduction of the shoulder joints.
on fingertips
This version strengthens the fingers, especially the profound and superficial finger flexors. The transition to upface dog on fingertips, is very interesting from a psychomental point of view, as confidence, freedom from fear and steadfastness during (increasing) stress are practiced here. In any case, decisiveness and clarity are also required and encouraged.
Effects:
(422) Strength of the finger flexors
Instructions
- With your knees still on the floor, place your fingertips on the floor slightly turned outward compared to normal dog position.
- Press your fingers firmly onto the floor and push them towards your thumbs against the friction of the mat using the flexors of your fingers. Be aware that your fingers will carry you.
- As you stretch your knees, apply more and more pressure to your fingers until you have fully taken the position.
Details
- To make it easier, the hand can be turned out a little more (thumb inwards).
- This requires determination and confidence. I only saw very few people who have such weak fingers that they would not be able to perform this pose. For almost all people, the task lies more in overcoming and trusting. The latter applies all the more to the positions upface dog on fingertips and staff pose on fingertips, whereby these two variations actually require considerable strength in the fingers, which perhaps not everyone can muster.
- In this position, there is a lot of pressure in the finger joints, which causes them to hyperextend (or, in rare cases, bend strongly). Make sure that the fingers overstretch as little as possible (i.e. the finger joints should become as little concave when viewed from the back of the hand as possible). To do this, take the pose with a clear pretension in the fingers, i.e. use the strength of the finger flexor muscles to push the fingers together and towards the thumb against the resistance of the floor. This reduces the tendency of the fingers to hyperextend when performed with sufficient force. Executions with convex (bent) finger joints are not advisable as the position of the joints is much more difficult to control. A certain degree of hyperextension as the starting position is normal and tolerable, as the finger flexors, which are used most forcefully, try to bring the joints out of or minimise their hyperextension. In contrast to the finger extensors, the finger flexors in humans are much stronger, which is why it is highly likely that the harmful forces in the joint that would be caused by uncontrolled hyperextension under load are largely absorbed during this attempt.
- Executions with the inner metacarpophalangeal joints on the floor are not permitted, as weight has a destructive effect on these joints by wearing out the ligament structure (or even acting on the cartilage of the joint surfaces) and the desired strengthening of the fingers is not achieved. Instead, position the fingers quite steeply.
- It can be said that, as a rule, execution is possible if you know that it is, or if you are undoubtedly determined to do so. Very rare exceptions may confirm this rule.
- If you feel that the skin is being pulled away from under your fingernails, move your fingers closer together and towards your thumb to compensate for the forces causing this sensation.
- Of course, a few aspects of the normal dog pose remain underrepresented here, such as the powerful stretching from the shoulders (elevation of the shoulder blades) and the pressure with which more flexible people can push the upper body towards the thighs.
Press your hands more firmly on the floor

This is completely different work in dog pose. Instead of pushing the body backwards from the hands, emphasis is placed on pushing the hands down. This tends to pull the hands and feet towards each other, which involves strong work of the abdominal muscles (rectus abdominis), the iliopsoas, some leg muscles, the pectoralis major and possibly the latissimus dorsi.
Instructions
- From normal downface dog give up the pressure of the body backwards.
- Begin to press your hands onto the floor with all your strength, moving your hands towards your feet rather than forwards. This movement engages the abdominal muscles (rectus abdominis) and the hip flexors, especially the iliopsoas, but also the rectus femoris in the front of the thighs.
- Try to reduce flexion in the hip joints and frontal abduction in the shoulder joints as little as possible.
Details
- The pose can certainly only be held at full intensity for a few seconds at first, then reduce the intensity a little so that you can perform the pose for at least 10-15 seconds.
- There should be no tendency to cramp in the rectus femoris muscle. The abdominal muscles (rectus abdominis) may work significantly. However, a large part of the work in this pose comes from the hip flexor group, which moves the upper body and thighs towards each other. This movement feels like pulling the ischial tuberosities upwards and acts as flexion in the hip joints, which subjectively increases the pressure of the hands on the floor.
- The work of the arms slightly counteracts the desired frontal abduction in the shoulder joints. This is clear and normal, as the type of work here is completely different. However, the work in the hip joints remains the same and is even more intensive here.
- Since the movement of pushing the hands towards the feet is not accessible to everyone, especially in view of the apparent impossibility of a visible movement, you can firstly remember the „pull-overs“ from strength training (lifting the dumbbell corresponds to the movement to be performed) or also build up the pose from a downface dog, in which the hands are immediately pushed forcefully towards the feet, even while the knees are still resting on the floor when building up the pose, see the variants hands on carpet. Dorsiflexion of the ankles is also made more difficult. Nevertheless, keep the dorsiflexors inactive.
Push hands towards each other

The emphasis here is on working the pectoral muscles (pectoralis major) and the biceps brachii (arm biceps) as well as the deltoid, pars clavicularis. This is a very helpful variation for people with a tendency to overstretch their arms.
Instructions
- From normal downface dog, start to push the hands towards each other with increasing force. As this is done against the friction of the support, there will be little external movement, but there will be strong work on both sides in the pectoralis major, deltoideus pars clavicularis and biceps brachii muscles.
Details
- When a certain amount of force is used to push the hands towards each other, muscular work begins in the arm biceps which relieves the strain on the outside of the elbow joint when the arms are hyperextended. Such relief is definitely achieved by this movement if it is performed with sufficient force, even if it is not yet apparent that the elbow joint has reached 180 degrees again after initial hyperextension. This effect is based on the fact that the short head of the biceps (caput breve) is acquired in its transverse adducting action when sufficient force is applied.
- This is interesting and unusual work for the arm biceps, as the angle in the elbow is a stretched one. When performed strongly, you may be able to feel the biceps in the elbow area up to its attachment to the radius.
- The use of the biceps should not cause the arm to bend in the elbow joint (angle less than 180°), otherwise the triceps must be used to restore and maintain extension, which allows the upper arm muscles to work quite completely. You should also maintain the full external rotation of the arms. Particular attention must be paid to this, as the pectoralis major and deltoid muscles, pars clavicularis have an internally rotating effect in the shoulder joint.
- If a tendency to cramp in the pectoralis major is felt, the intensity with which the hands are pushed towards each other must be reduced.
- The transverse adduction performed may press the inside hands better onto the floor. However, this is not an adequate solution to the „mouse hole issue“.
Tighten your biceps

Learn to specifically avoid hyperextending your arms and any associated pain in the dorsal elbow.
Instructions
- Take the pose as described above
- Tense the biceps in both upper arms and, if the elbow joints are hyperextended, bend them using the strength of the biceps until the 180° angle is reached.
Details
- The ability to hyperextend the elbow joints is individual and some people experience pain in the dorsal elbow joint under load, which is why it makes sense to learn to specifically avoid hyperextending the elbow joints. There is often little voluntary control over the elbow joint in the overhead position of the arms and it is not easy to bring the elbow joint back to 180° from hyperextension in a permanent and stable manner. The best way to achieve this control is to use the arm flexors, for example the biceps, even if the brachialis is the stronger flexor in some cases. It has been observed that in the overhead position of the arms many people are unable to tense the arm flexors voluntarily or find it difficult to do so. The following procedure, which is also described in the functional exercise tensing the biceps, can be helpful in acquiring this ability:
- sit comfortably and extend the right arm sideways with the inner elbow pointing upwards, palm and biceps through.
- bend the arm to 90° at the elbow joint, tensing the biceps very forcefully, as bodybuilders do when posing, for example. Naturally, the biceps and triceps work equally as agonist and antagonist in a fixed angle position, otherwise a movement in the elbow joint would result. You should be able to feel the tension in both muscle groups.
- slowly extend the arm without losing the tension in the biceps. The further the arm is extended, the more difficult it will be to maintain the tension in the biceps.
- turn the forearm into pronation (palm down), again without losing the tension in the biceps. This step also requires a lot of attention and strength. Most people are completely unaccustomed to tensing the biceps and keeping them tensed when the elbow joint is extended, especially if the forearm is or will be pronated.
- suddenly release the tension in the biceps and restore it in a flash, interrupting it for as small a fraction of a second as possible.
Repeat this several times, gradually extending the time the biceps are not tensed, and continue to release and tense the biceps with the elbow joint extended and the forearm pronated, slowly bringing the arms into an overhead position.
- Practice this with each arm separately before practicing it with both arms at the same time. If you practise this several times, you should be able to tense the flexors in any overhead position of the arms. The effect of this tension is a change in the balance of forces in the elbow joint, which cancels out the effects of the hyperextension or the hyperextension itself. Of course, this tension is very unfamiliar and it takes some practice to develop the necessary control and strength, but then a safe and very effective tool is available to avoid hyperextension regardless of its extent and effect. This method of avoiding hyperextension is far superior to pushing the hands towards each other because it
- develops much more body awareness and control in the region concerned
- trains the muscles of the arm flexors
- is universally applicable and does not depend on the presence of a wall or floor on which the hands could be pushed towards each other
- also works in positions of the arms other than their overhead position, e.g. with an unloaded arm in second warrior pose, with a moderately loaded arm in trikonasana, woth a heavily loaded arm in vasisthasana and ardha vasisthasana.
It is therefore worth the effort to learn this technique.
- develops much more body awareness and control in the region concerned
Head on the ground
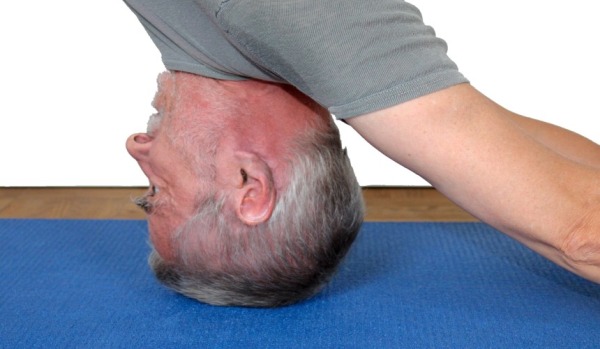
This variation is impossible for people who are immobile in the shoulder joint in the direction of frontal abduction, especially if the hamstrings are also less mobile. It allows greater work in the arms and back when the head is almost weightless on the floor or hovering just above the floor. At the same time, it is of course a clear „shoulder opening“, i.e. a pose that promotes flexibility of the shoulder joint. Perhaps the most interesting effect is the ability to roll your head a little further back after placing the head, to give your neck a gentle stretch. This exercise also serves as a preparation (recommended only for more advanced performers) for the complex of shoulderstand-related poses and the dog headstand.
Instructions
- Take downface dog with only a slightly greater distance between hands and feet (for people who are mobile in the shoulder joint) or a significantly greater distance (for less flexible people), depending on the flexibility of the shoulder joint.
- Stretch your trunk backwards strongly from the shoulders.
- Now – without releasing the pressure backwards – lower your shoulders further until your head has reached the desired position. Be sure to turn your arms out strongly and stretch out from the shoulders (elevation of the shoulder blades). If necessary, carefully transfer weight from your head to the floor. If you place your head on the floor, choose the same area as in headstand.
- If necessary, carefully roll backwards on your head, only a few millimetres at first. Observe the back of the neck and move carefully to just before the assumed limit of the neck.
Details
- This exercise should not be used by beginners and people with neck problems unless recommended by and under the supervision of a professional. Careless execution can lead to neck problems.
- If used correctly, this pose can possibly relieve tension in the neck muscles, but not the relatively common chronic cramps of the trapezius, which can hardly be treated effectively in any other way than with prolonged pressure on the muscle transversely to its longitudinal direction (see karnapidasana on rollers) and, of course, improvement of habitual factors.
- Make sure that your hands and feet are resting on a secure surface and that no sudden slipping can endanger your neck
- Keep your arms powerfully active to be able to dose the desired effect on your head and neck safely and sensitively.
- This variant is not recommended for those who have the shoulder flexibility but lack the strength to control and safely dose the pressure exerted on the head.
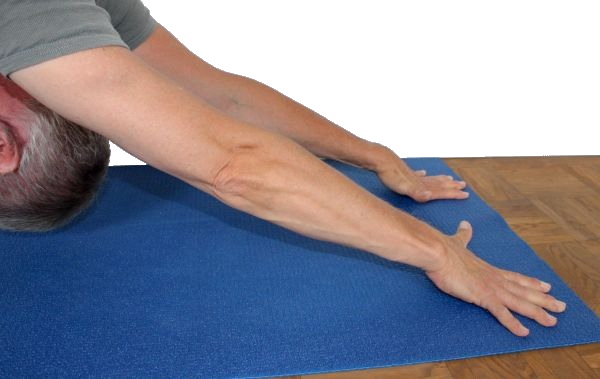
Raise and lower wrists
Switch between …

This pose is an effective exercise for strengthening the forearms. In many cases, it may be impossible for beginners to perform for some time
Instructions
- Take the downface dog.
- Shift the weight from the wrists to the area of the base joints of the fingers; the wrists should become noticeably lighter.
- Increase the pressure evenly until the wrists lift, both at the same time.
- In the final position, the base joints of the fingers are only moderately concave, the weight rests on the index and middle fingers and their base joints, fingers 4 and 5 and the thumb are raised. Whether the wrists are convex or concave from above (on the back of the hand) depends not least significantly on the flexibility of the shoulder joint and secondarily on that of the hamstrings and, of course, the distance of the hands to the feet.
Details
- Although it seems as if you are hanging in the metacarpophalangeal joints in an unhealthy way, this is not the case, as there is no significant flexion moment (and in no case an external moment, as in other comparable poses in this respect) in the direction of increasing the angle in the metacarpophalangeal joints, but this angle is maintained at all times by the body’s own muscle strength (except perhaps in people with extremely worn metacarpophalangeal joints, who can place the palm on a steep angle with the metacarpophalangeal joints upright). Furthermore, the backward pushing movement still takes place (the opposite would be necessary for a destructive external moment).
- Don’t fail to turn out the arms of the arms or to stretch the elbow joints.
- Make sure that the shoulders do not come forward or upwards during and after the attempt to lift the wrists. This would be an unacceptable relief.
- Raise your wrists simultaneously and evenly. Synchronize their movements. This may be impossible at first due to a lack of strength in some forearm muscles (palmar flexors). Then take the pose by lifting one wrist at a time and practise lowering your wrists at the same time in as controlled a manner as and as slowly as possible.
- If it is not yet possible to lift off at the same time, it is advisable for an assistant to provide the necessary strength so that a feel for this unusual movement can be developed. This is best done by pulling on the hips as described in the details of the variant with a supporter.
- Be careful not to roll onto the outside hand first before lifting the wrists, but lift the inside and outside simultaneously and evenly.
- Work without momentum, but from a slow, steady build-up of strength. Momentum is usually intended to replace strength in order to overcome obstacles or achieve results. This principle is not required here, but rather the repeated decision that
- more and possibly even more force can be made available and used and
- the result is possible now and for you.
In this sense, the exercise is very interesting from a psychological point of view.
- Often, if there is a lack of strength, first one wrist and then the other is lifted off the ground. This may be acceptable as a very first step. Initially, it can be useful to bring the wrists into the raised position however possible and then attempt to lower them synchronously; after all, muscles develop significantly more in the eccentric contraction (see force-length function).
- Slowly move from the outer hand towards the inner hand until the little finger and ring finger lift off. Then try to lift the thumb as well.
- The pose is also heavy because the forearms are usually in maximum pronation with additional slight dorsiflexion of the wrist. This makes the work of the flexor carpi radialis more difficult due to an unfavourably great sarcomere length.
one-handed
Instructions
- Take the pose as described above
- Increase the force exerted in one arm and lift the other hand off the floor to place it on the sacrum or pelvis.
Details
- Not only does one arm and the muscles in the torso that move it have to work much harder and be strengthened, the asymmetry also brings new aspects to this pose, for example the oblique abdominal muscles have to work or the pectoralis major is felt here for the first time as a stabilizing muscle. This is also the result of the fact that the gravity perpendicular is no longer centered in the physical support base.
- Do not allow the arm to turn in. The tendency to do so results from the use of the largely internally rotating frontal adductors of the shoulder joint, such as the pectoralis major, latissimus dorsi and teres major, whose effects on the position of the upper body no longer partially cancel each other out, as in symmetrical poses.
- The muscles moving the upper arm have to work much more than twice as hard here as in the two-armed version and some muscles may also have to work for the first time in a variation of downface dog.
Heel on the ground
This position brings more stretch to the back of the leg, esp. the gastrocnemius.
Instructions
- Take the pose as described above.
- From normal downface dog, slowly push your heels towards the floor.
Details
- Make sure that the inner heels move downwards just as forcefully as the outer heels. Pushing the inner heels down (and thus stretching the inner calf muscles) is particularly important for anyone who is prone to shin splints or does a lot of running.
- As the total length of the muscle systems between the ball of the foot and the ischial tuberosities (seen across all three joints) is naturally the same in this variation as in the normal version, there is an inevitable tendency to slacken a little in flexion in the hip joints as the heels are pushed down. Not that this can be avoided, you should just be aware of the effect when transitioning from one variation to the other and be aware of its extent in order to gain insight into other variations. It will usually be the case that the two movements (flexion in the hip joints and lowering of the heels) prove to be non-commutative (interchangeable in sequence), i.e. depending on the order in which the movements are performed, the result will differ slightly.
- The lateral position of the heels should be chosen so that it corresponds approximately to the middle of the forefoot, i.e. the imaginary midfoot lines are parallel. The tendency described above to stand more on the outer feet is often accompanied by the heels coming closer together. It is more correct to keep the heels further apart, as this corresponds to a minimal internal rotation in the hip joint, which makes hip flexion a little easier.
- Together with warrior 1 pose and parivrtta trikonasana, this pose is one of the most useful stretches for the gastrocnemius. Although only around a quarter of the body weight is effective here, this variation can be held for a relatively long time.
- Note that the knee joint must be fully extended for good stretching of the calf muscles due to the biarticularity of the gastrocnemius. As should be easy for anyone to see, the (loaded) ankle joint can be brought much further into dorsiflexion when the knee joint is flexed, because in this case only the muscular restriction of the soleus plays a role, but not that of the gastrocnemius. If the knee joint is then extended, the gastrocnemius pulls the foot a little out of dorsiflexion via the Achilles tendon. With this in mind, the exercise can also be practiced alternatively or better additionally in such a way that the heels are first placed firmly on the floor with the knee joints clearly bent and then an attempt is made to extend the knee joints, if possible without making the heels lighter, although this requires good flexibility of the gastrocnemius.
Knees bent
Instructions
- Take the pose as described above.
- Bend your knees clearly and try to press your upper body onto your thighs.
Details
- This variation relieves the hamstrings to such an extent that with good flexibility contact may be established between the abdomen and thighs. Due to the bent knee joints, the pelvis tilts much further into flexion in the hip joint, very noticeable esp. in those who are less flexible in the hamstrings, so that the back becomes straighter and can be positioned more steeply. This often gives a feeling for the work to be done in the shoulders and arms for the first time.
- This variation may enable less mobile people in the hamstrings to perform the exercise without any problems if they have a herniated disc in the lumbar spine. Painless execution can be expected if it is possible to keep the lumbar spine in physiological lordosis. It may be necessary to increase the distance between the hands and the feet. In many cases, a steep position of the lumbar spine is still tolerable. If, in addition to the shortening of the hamstrings, the shoulder joint is not very flexible in the direction of frontal abduction, the distance between the hands and the feet will have to be increased in any case.
stretch from bent knees

This variation allows you to achieve better flexion in the hip joints.
Instructions
- Take downface dog as described above.
- Bend the knee joints and keep tilting the pelvis forwards and downwards (into flexion in the hip joint) until the abdominal wall or the lower rib bones come to rest on the thighs. If possible, press these body parts firmly together.
- Build up strong backward pressure in the arms and begin to stretch the legs so that the position of the shoulders, upper body and pelvis is at least largely maintained.
- Repeat the last two points several times.
Details
- As already discussed elsewhere, the individual movements that make up a pose are not necessarily commutative (interchangeable in sequence). This fact is exploited here to achieve better flexion in the hip joint. The tendency for the inner heel to rise relative to the outer heel is likely to result primarily from the stretching of the gastrocnemius caused by the extensive plantar flexion, as this also generates a supinatory moment.
- This variant is a possible alternative if there is irritation of the origins of the hamstrings at the ischial tuberosities (PHT), often as a result of a weak constitution and frequent practicing of forward bends in beginners), as already discussed in the FAQ.
- Maintaining the position of the pelvis is powerful work in the hip flexor muscles. The rectus femoris is part of these. With the hip joints in almost maximum flexion, the rectus femoris being involved in extending the knee joint, it works in a very short sarcomere length and can therefore tend to cramp. Then try to work subjectively more with „pulling up“ the ischial tuberosities in order to keep the pelvis tilted forward as much as possible (maximum flexion in the hip joints). This often results in a shift of the forces flexing the hip joint shifting away from the rectus femoris towards the iliopsoas.
- Ideally, the position of your shoulders and upper body should not change as you straighten your legs, which is generally almost impossible. To get as close as possible to this ideal, focus on pushing your shoulders back as far as possible and – in contrast to the normal downface dog – downwards.
- Stretching the knee joints should be done slowly and carefully and will require some strength if the hip flexors and arms are used vigorously. As the extension of the knee joints increases, the stretch in the back of the leg (hamstrings) must also increase. If the exercise is performed well, fully extending the legs is almost impossible and requires a lot of strength and time.
- With only average flexibility of the hamstrings, this is a fairly safe method of protecting the knees from hyperextension and the associated pain.
Shrug

This variation makes the movement of stretching from the shoulders clearer.
Instructions
- Take the pose as described above and stretch backwards and upwards from the shoulders as far as possible.
- Keep the pose exactly as it is but give up stretching from of the shoulders (elevation of the shoulder blades) backwards and upwards so that the shoulder area and with it the upper body will slowly sink to a maximum in the direction of the wrists, i.e. to the maximum depression of the shoulder blades according to gravity.
- Now slowly stretch from the shoulders (elevation of the shoulder blades) backwards and upwards again to the maximum.
- Repeat the last two steps at least until the movement is completely clear and can be performed easily and at any speed.
Details
- In cases of significant flexibility restrictions in the shoulder joints, the two states described above (stretched from the shoulder, i.e. elevated, and sunken, i.e. depressed) may appear to be identical from the outside. In some cases, the performer may have made a voluntary effort to move to the other state, but the impulse may be completely absorbed by the resistance created by the antagonistic muscles. In other cases, the performer does not even realize what he is supposed to do, not least because he cannot recognize any of the described options for action. Before this attempt is prematurely abandoned, an assistant should first try to support the performer in the movement (elevation) by periodically applying and releasing tension on the pelvis or thighs. It makes less sense to support the depression, as experience has shown that the angle of frontal abduction in the shoulder joint deteriorates as a result. This is probably mainly due to the fact that in the cases described, the condition of the shoulder blades is consistently depressed, as they are held in this position by a less flexible antagonist of frontal abduction, the latissimus dorsi, which is also an indirect depressor of the shoulder blade.
- The sunken (depressed) state can be perceived as less pleasant than the extended (elevated) state, as there tends to be a greater tendency for the trapezius to cramp.
- Be careful not to confuse sinking (depressing) with bending the elbow joints, but to keep them constantly stretched using the strength of the triceps; the elbows are consciously moved towards each other – unless there is a risk of hyperextending the elbow joints.
- Make sure that you do not lose the external rotation of the arms, which can often be observed when the arms are fully extended (elevation) and is due to the resulting tension on the internally rotating latissimus dorsi.
- The movements should be able to be performed at any speed, especially not just jerky, but also slowly flowing – also for better control over the extension and external rotation of the arms.
- The shoulders often move forwards or forwards and upwards when sinking in, which will be the case in particular with limited flexibility in the shoulders. An assistant can then be brought in to prevent this. If you are able to bring arms and trunk in a commone plane in downface dog, neither trunk nor arms are to leave this plane. If there is even better flexibility and the angle of frontal abduction is greater than 180°, the arms and back should generally remain in their own planes during the movement undertaken here.
- Even if it is not primarily about the work in your hands, try to keep your hands completely still and do not relieve the inner finger joints in between.
Chest to one leg

Instructions
- Take the pose as described above.
- Move your chest towards your right leg.
Details
- This variation is deliberately asymmetrical, which increases the stretch in one shoulder joint and in the hamstrings and possibly the gastrocnemius of one leg.
one leg bent
Instructions
- Take the pose as described above.
- Bend one leg significantly or lift the foot off the floor and hook the leg or foot behind the counterlateral knee.
- Let the heel of the remaining standing leg on the floor sink further towards the floor and tilt the hip into maximum flexion.
Details
- Here the load is shifted to one of the two legs, which means increased stretching both in the hamstrings of the same leg and in the calf muscles, in particular the gastrocnemius due to the stretched knee. After all, the load of the body (or about half of it) is no longer carried by two calves but only by one and this must also carry the load of the other leg.
- In some cases, the heel of the standing leg comes to rest on the floor. A distinction must then be made: if the stretching sensation in the calf muscles is still very intense, the pose can be performed in this way; if it has decreased as a result, the distance between the hands and one foot on the floor should be increased until the heel is again hovering just above the floor and can move towards it.
- In rare cases, the resulting stretch in the calf is perceived as too severe, which is likely to be in relation to the muscular robustness of the calf. In this case, the pose must be varied and softened in such a way that there is no risk of cramp resulting from overstraining, either by only slightly (!) actively holding the heel up or, better still, by reducing the distance between the foot and the hands or by using a small pad under the heel. In cases where this necessity arises, poses that strengthen the calf muscles should be practiced more often, such as warrior 1 pose, parsvottanasana, parivrtta trikonasana, vrksasana (the tree) and also warrior 3 pose, including backwards against the wall. However, this phenomenon not only affects less robust calves but also very stiff ones.
Known problems that can occur even when executed correctly
Tendency to cramp with weak calf muscles
As already described in the details, a tendency to cramp can occur with rather weak calf muscles under intensive stretching with a high load. This should of course be avoided and any cramps that arise should be stopped immediately. To counteract this tendency, the calf muscles should be strengthened; various sporting activities are generally suitable for this, but especially the standing poses described above, as they provide more strength endurance while maintaining or even increasing flexibility. Sports or activities in which the strengthening is more peak-like, such as jogging and running, are less suitable for strengthening.
one leg stretched out in front (hip opener 5)
One-sided, intensive stretching of the hamstrings.
Instructions
- Take the pose as described above.
- Bring the right foot forward, approximately in the middle between the hands (i.e. the heel at wrist height).
- Press your upper body as much as possible onto the thigh of the front leg.
- Maintain the contact you have just made and now slowly extend the front leg so that contact is not lost or at least the distance remains as short as possible.
Details
- The front leg tends to turn out, prevent this by moving the inside knee and the inside foot downwards forcefully.
- Due to the course of the dorsiflexors, the front inner foot tends to become lighter or even lift off with supination in the subtalar joint, so consciously press it down firmly, which also facilitates the above correction.
- The back leg remains according to the downface dog, i.e. the foot points straight back, the heel moves towards the floor.
- It is possible for almost all people to establish more or less strong contact between the thigh and upper body after the leg has been pulled forward, but for beginners, especially those with little flexibility in the hamstrings, it is often not possible to maintain this contact when extending the front leg; it is often lost after the first 20° of further extension in the knee joint (compared to the starting position with the upper body on the thigh).
- The hip belonging to the front leg should be moved backwards and upwards so that the pelvis remains straight and does not turn away as an evasive movement of the front leg.
- This variation is easier to perform if forward bends such as uttanasana are performed beforehand.
- The forehead may be placed on the lower leg and remain there while the leg is extended.
- Even in this position, push both feet away from each other.
- This variation, performed correctly and with the feet well apart, is one of the best stretches for the foot lifts alongside baddha padasana. The stretch can be felt mostly in the muscle bellies of the tibialis anterior and extensor hallucis longus, but also in their insertion tendons on the back of the foot up to the dorsal big toe.
narrow

Emphasis on stretching the hamstrings.
Instructions
- Take the pose as described above, but keep your hands a full hand length (including the fingers) shorter than normal, or two hand lengths if the hamstrings are quite flexible.
Details
- In this variant, it is much more difficult to straighten the back so that it could become straight or even slightly concave (like a backbend). Instead, in most cases it remains clearly convex, i.e. in flexion. With the shorter distance, the legs are steeper and the pelvis is flatter in space or in relation to the arms, causing the back to curve more and the shoulders to stand higher.
- The heels may be able to reach the ground here, even if this is not possible in the normal dog position.
- The main work here is flexion in the hip joints, i.e. tilting the pelvis forward, which subjectively feels like pulling up the ischial tuberosities. This should not be done from the rectus femoris because of its tendency to cramp, but from the iliopsoas.
- The shoulders often no longer reach the line connecting the wrists and ischial tuberosities.
- Due to the limited overall length of the muscles in the back of the leg, the pelvis can often either be tilted into maximum flexion or the heels can be pressed to the ground, which generally applies to all variants of downface dog, but is particularly evident here.
- When working with the shoulders, the focus may shift from the usual stretching from the shoulders (elevation) to pushing backwards (in the direction of the toes, i.e. frontal abduction) or this possibility may be felt for the first time.
- Note that the movements of the shoulders and the pelvis are partly dependent on each other, i.e. if the shoulder moves forwards and upwards, the flexion in the hip joints often decreases and vice versa; if the pelvis is tilted further, it is easier to move the shoulders towards the legs.
Known problems that can occur even when executed correctly
Tendency to cramp in the rectus femoris
Shoulder flexibility plays a lesser role in this variation than with further distances, which is why the upper body can be moved more easily and closer to the thighs here, resulting in the rectus femoris having a greater tendency to cramp due to the smaller angle in (greater flexion) the hip joints. Try to work more with the hip flexors located in the pelvis, the iliopsoas, which feels like pulling up the buttocks and ischial tuberosities.
Hands turned out (ulnar abduction)
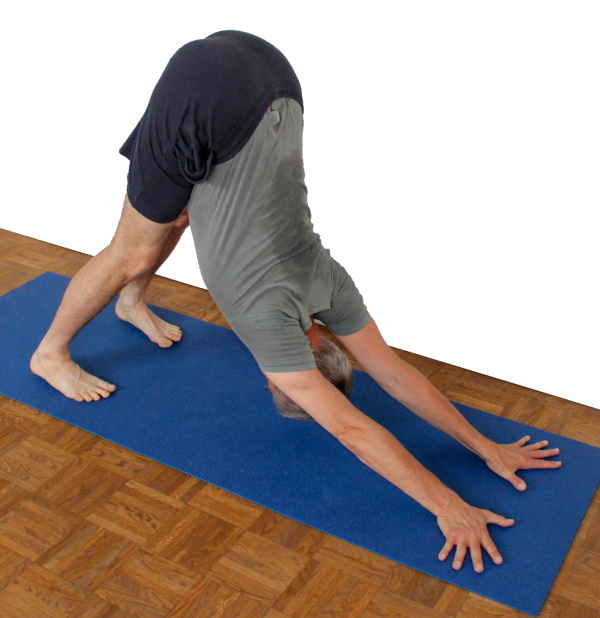
Facilitates exorotation of the arms
Instructions
- Take the pose as described above, but turn the hands (on the finger side) outwards as far as possible, which corresponds to ulnar abduction in the wrist.
Details
- The hands turned out into ulnar abduction give you a little extra room to turn your arms out. Make maximum use of this effect.
- Beginners who intensively practise the downface dog sometimes notice that the shoulder muscles, especially the deltoideus pars clavicularis, show a clear tendency to fatigue, cramps and burning. This is due to the emphasis on strengthening these muscles in the overhead position of the arms, i.e. with (ideally at least) a 180° angle of frontal abduction of the arms. In these cases, this variation can prove to be a small relief.
- The arms that are turned out further reduce the tendency of the trapezius to cramp in this pose.
- It is worth trying this option if you have various types of difficulties with your wrist or hand, e.g. after surgery or injuries.
Hands turned in
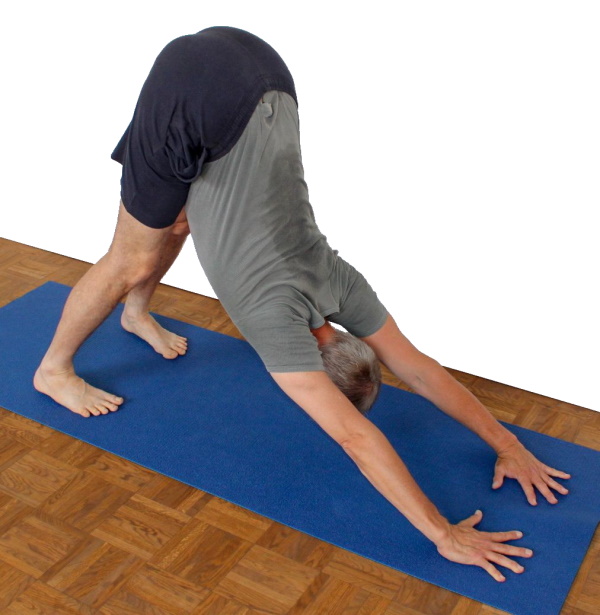
Instructions
- Take the pose as described above, but do not keep the tendons of the middle fingers on the back of the hands parallel, but turn the hands inwards as far as possible, i.e. in radial abduction.
Details
- The anatomical possibility of radial abduction, i.e. pivoting the hand towards the thumb in relation to the forearm, is relatively limited. In some cases, however, it can be used to counteract cramping or shortening of the ulnar abductors (i.e. the opposite movement) on the ulnar side of the forearm.
- The ability to eliminate the „mouse holes“, i.e. to press down the inner metacarpophalangeal joints (the index and middle fingers in particular), can be noticeably reduced here.
eka pada parsva

Instructions
- Take the pose as described above.
- Raise your right leg backwards and upwards into extension at the hip joint and bend it at a right angle.
- lower the right leg as far down to the left as possible without losing extension in the right hip joint or 90° flexion in the right knee joint.
Details
- As in the other variations with the leg raised:here too, the calf muscles of the standing leg are challenged considerably more in terms of strength and stretching. See the corresponding details there.
- Lowering the leg to the side (in line with gravity and actively encouraged as far as possible) not only results in an asymmetrical load distribution and effect of the arms, but also creates a slight lateral curve of the upper body. This stretches part of the oblique abdominal muscles as well as the lateral latissimus dorsi. It is possible that the stretching effect in the latissimus dorsi goes well beyond that in parsvakonasana and the sitting sidebend, not least because greater forces are at work. The ability to lower the leg further is not only limited by flexibility, but also by the fact that the center of gravity still has to lie in the physical base of support. To make the pose a little more stable, the back leg can be turned in a little so that the heel is placed further out. It also helps to keep your hands further apart.
- The position of the shoulder should be maintained as well as possible, i.e. both shoulders should remain at the same height as far as possible. The pelvis, on the other hand, rotates as far as possible away from the side on which the foot has no contact with the floor, so that the spine rotates as much as possible given the shoulder flexibility and strength in the relevant muscle groups.
from the outside hand to the inside hand

Switch between …
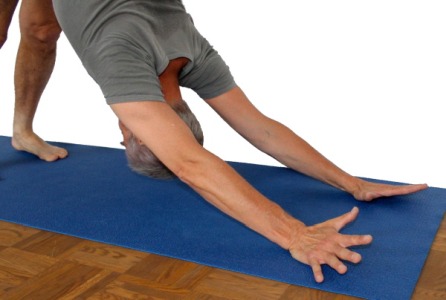
Conveys a feeling for the correct movement of the hand.
Instructions
- Take the pose as described above.
- Shift the weight from the palm to the outer hand and then from the base joints of the little finger to the wrist.
- Roll back as far as possible on the outer edge of the hand in the direction of the metacarpophalangeal joint of the little finger (palmar flexion) so that you put maximum weight on it.
- Then, while maintaining palmar flexion, roll the hand from the outside to the inside (pronation) until you have maximum weight on the palm – and especially on the index finger base joint area.
Details
- The two movements should first be practiced separately, first rolling on the edge of the outer hand, then rolling from the outer to the inner hand), then combined as a diagonal movement from the ulnar wrist side towards the base joint of the index finger. When the weight has been moved from the outer hand and away from the wrist, the fingers should press moderately and evenly on the floor, in particular the different finger joints should exert even pressure.
- Make sure you maintain the best possible external rotation the upper arm in the shoulder joint during pronation; these movements contradict each other to a certain extent.
- It is often observed that with the initial rolling onto the outer hand the arm is bent at the same time. Avoid this by ensuring that the arm is evenly stretched throughout the exercise.
- The weight should not be shifted away from the outer hand by turning in the arm, but despite maximum extension.
with upturned feet
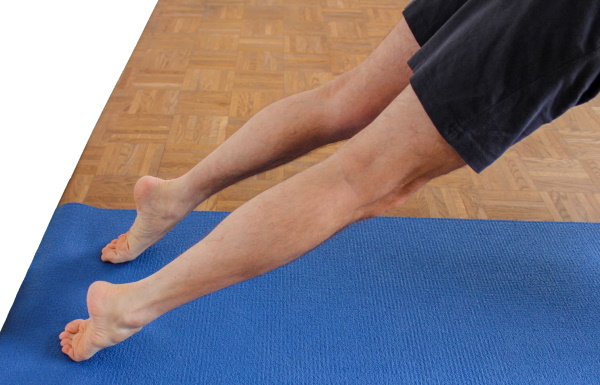
Instructions
- Take the pose as described above, but instead of standing on the underside of your toes and the balls of your feet, turn your feet over and stand on the backs of your feet.
- Do not push your hands forward as usual, but pull your hands towards your feet.
Details
- This pose is analogous to the upface dog variant with the feet turned upside down. As you would expect, other parameters also change with the change in foot position. The most important is the direction in which the hands push: this time towards the feet instead of away from them. This increases the flexion in the hip joints and the movement of the upper body towards the thighs, regardless of the flexibility of the shoulders and whether or not the shoulders sink below the line connecting the wrists to the pelvis. At the same time, the work of the hip flexors and the movement of the arms results in a possibly unexpectedly powerful work of the pectoralis major and rectus abdominis.
- The work of the palmar flexors of the forearm is far less important here than in the other variants, as they can no longer be used significantly for the movement of the upper body.
- A certain amount of trembling, especially in the abdominal muscles, can occur during the pose and is harmless.
- The forces acting on the ankle could pull it out of plantar flexion, see below, especially if the thighs are too steep, for example if the distance between the hands and feet is too small. Nevertheless, let the heels sink as much as possible (in direction of the wrists). It is unlikely that the arms will be able to work so hard that the partial body weight acting on the ankles will not outweigh them if the ankles would tend to flip, e.g. for reasons of to small a distance between hands and feet. Only use the calf muscles to stretch the feet so forcefully that they do not cramp.
- Do not choose the distance between feet and hands too small, so that the metatarsophalangeal joints are well flexed towards the plantar flexion and the tension of the dorsiflexors is clearly outweighed by the effect of gravity and the ankle easily falls into plantar flexion by itself, i.e. the sole of the foot must exceed the vertical sufficiently clearly.
Dips
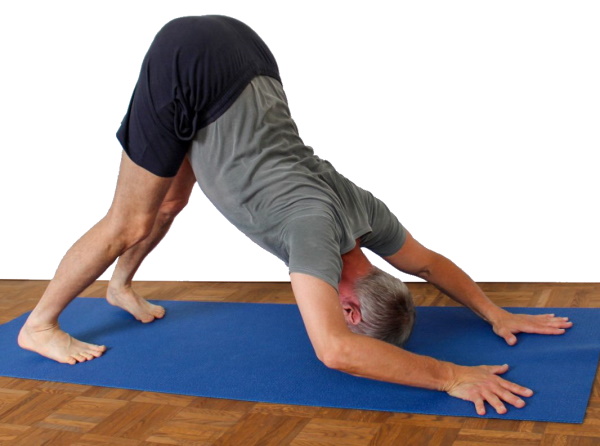
Effects:
(232) Frontal abduction: strength
(302) Triceps strength
Instructions
- Take the pose as described above.
- Bend your arms outwards in their own plane as far as your strength allows, i.e. move your shoulders towards your wrists.
- Slowly straighten your arms from the bent position and start the cycle again.
Details
- The arms should be bent precisely to the side so that the arms remain in the plane they span.
- The head can get in the way when bending very far. In this case, put it slightly on the back of the neck, as far as this is necessery and tolerable. In principle, the hands can also be placed on blocks so that the head only hits the floor when the arms are bent further. This reduces the gravitational effect of the upper body so that the feet must also be placed on blocks if the strengthening effect of bending is otherwise too small. To prevent the blocks from sliding across the floor, they should be placed against a wall.
- When the elbow joints are flexed, the wrists move into further ulnar abduction, which should be unproblematic to a certain extent, but can be uncomfortable in the wrists beyond that. In addition, the insides of the wrists will lift a little, but this is not detrimental to the pose. If necessary, perform this variation from a downface dog with the hands in a certain degree of radial abduction as the starting position, i.e. turn the hands slightly inwards in relation to the forearm.
Backwards against the wall with your leg raised
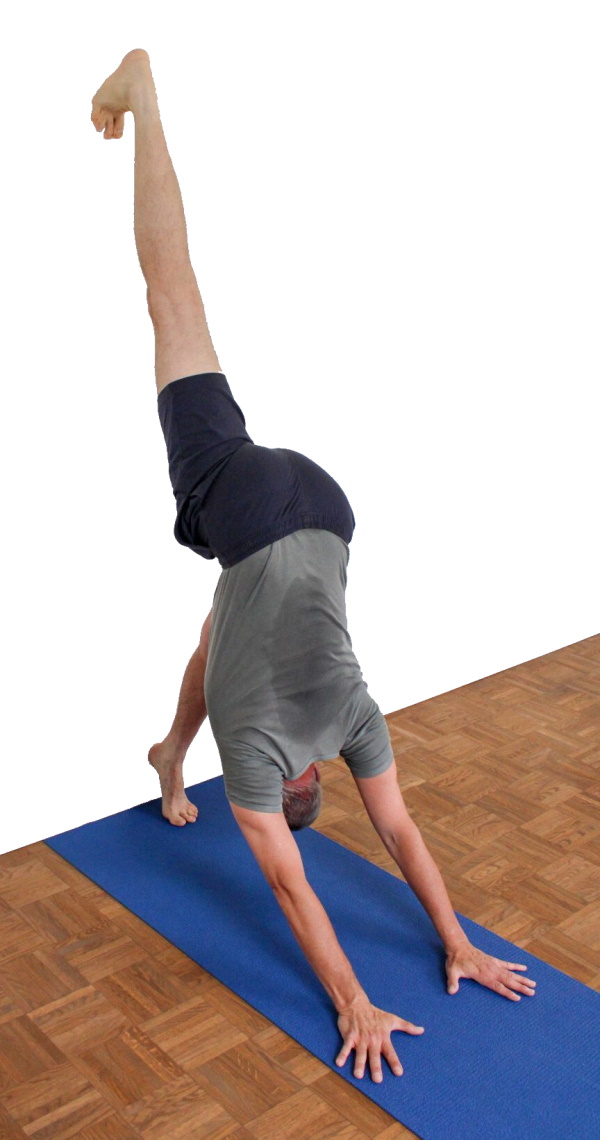
This is a beautiful and effective warm-up exercise that prepares the backs of the legs for upcoming stretches and strains, as well as warming up the shoulders for upcoming strains. Some call it the „favorite winter warm-up pose“.
Instructions
- Perform downface dog with heels elevated against the wall.
- Bend your right leg and take it out of the pose. Place your right foot as high as possible behind you with the balls of that foot against the wall.
- Straighten your right leg and lift your right heel as high as possible.
- Move your upper body as far back as possible, i.e. towards the wall.
- As far as possible stretch from the shoulders (elevate the shoulder blades), which should raise the heel of the lifted leg further.
Details
- When positioning the foot of the raised leg, it is of course necessary to largely release the pressure of the upper body backwards and upwards that is typical of downface dog. Then build it up again and involve the lifted leg by trying to move its heel, especially the inner heel, as far back and up as possible.
- In this pose, it can be difficult to keep the pelvis straight as the hip of the raised leg generally deviates forwards and upwards. This is due to the fact that there is often not enough flexibility in the hip flexor group to achieve the straight angle in the hip joint of the lifted leg. The tendency to bent the raised leg and to turn it out also result from the restricted flexibility of the hip flexors, i.e. for most performers, the hip of the lifted leg must be moved further backwards and downwards. Similarly, the hip of the standing leg (on the floor) must move backwards and upwards.
- If the foot of the raised leg is placed too low on the wall, extending of the leg pushes the pelvis away from the wall.
- As a rule, an angle of 60° of the foot with the heel on the wall is a good choice.
- This variant is particularly interesting for people with disc hernia in the lumbar spine. While in the standard version the flexibility restrictions of the hamstrings all too easily lead to the lumbar spine leaving its physiological lordosis in direction of kyphosis, which is generally well tolerated in the case of disc damages, and becoming convex beyond a steep position, the flexion moments in the vertebral segments responsible for this are nullified here by the pull of the contralateral iliopsoas if the lifted leg is fully extended in the knee joint and its foot is placed sufficiently high. The exact position of the lumbar spine is also determined by the distance between the hands and the wall, which must not be too small in the case of lumbar disc damages.
Hands on blocks

Increased downward pressure involves the abdominal muscles (especially the rectus abdominis) and hip flexors more.
Instructions
- Take the pose as described above, but do not place your hands on a mat but instead place each hand on a block (aligned lengthways).
- Press firmly on the block from above to prevent it from slipping.
Details
- This position is somewhat reminiscent of the „press your hands harder on the floor“ variation. As the block offers less friction than a (good) mat, the hands must be pressed more firmly (approximately vertically) onto the floor. This means that the available force of gravity is used to press less forwards and downwards than directly vertically downwards. How firmly you have to press down on the block and how much you can still push away from your hands depends largely on the moisture in your hands and the nature of the blocks. For example, dry or sweaty hands slip away quite quickly on wooden blocks, but cork blocks offer a good grip for medium-moist hands.
- Of course, patches on the blocks are not permitted in this variant.
Heels on blocks
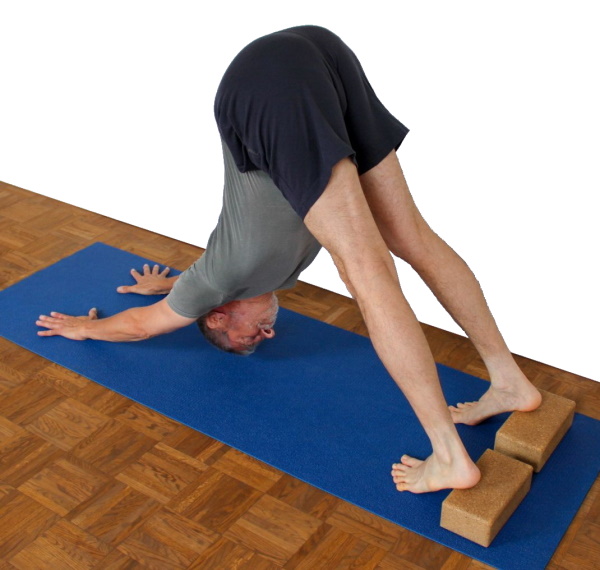
Relieves the strain in the gastrocnemius.
Instructions
- Take the pose as described above, but place your heels on blocks.
- Tilt the pelvis into maximum flexion.
Details
- As the block keeps the heels elevated, the extensibility of the gastrocnemius presumably no longer plays a role here and no longer restricts forward flexion, allowing the pelvis to tilt more freely. This in turn allows the upper body to move more in the direction of the legs and ultimately to go further into frontal abduction in the shoulder joints.
Hands on carpet / blanket
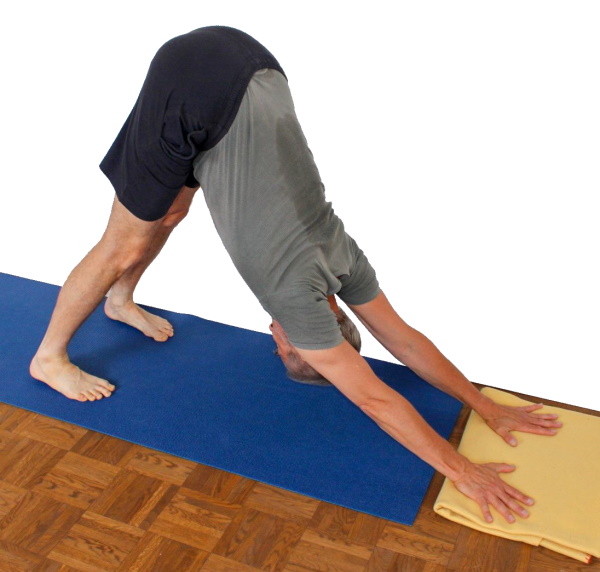
The reduced friction on the carpet or rug causes the hands to slip slowly but surely, which can only be prevented by a different action.
Effects: (512) Strength of the pectoralis major
Instructions
- Do not place your hands on the mat, but on a piece of carpet or blanket so that they slowly slide away when you take downface dog.
- Press your hands so firmly and in such a way on the floor that they stop slipping.
Details
- Slipping is prevented by using the strength of the hip flexors to move the upper body and thighs towards each other and transferring this force via the abdominal muscles (especially the rectus abdominis), the pectoralis major and other adductors of the shoulder joint such as the latissimus dorsi and teres major into the arms and hands. The hands arent pushed away from the feet as they normally are in downface dog but are pressed forcefully vertically down to the floor and a little towards the feet.
- If you exert considerable force, you may feel your abdominal muscles working, possibly with a more or less pronounced tremor.
- Possibly work in the shin muscles will be felt, such as the tibialis anterior.
close with hands on the wall
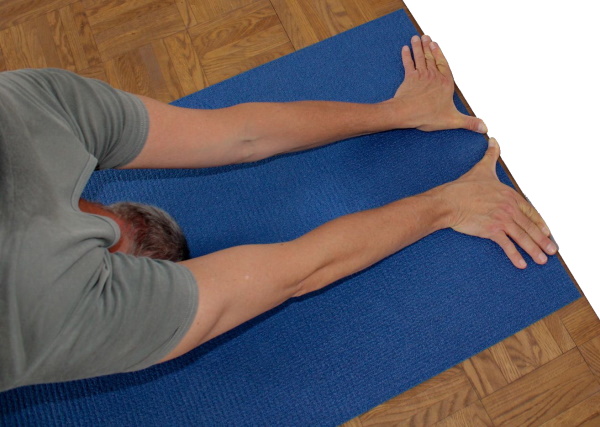
Supports pushing the shoulders downwards and thus tends to promote flexion in the hip joints.
Instructions
- Take a narrow dog pose as described above, but with your hands against the wall, thumbs pointing inwards and remaining fingers pointing outwards.
Details
- Here, the shoulders can be pushed backwards and downwards a little better, as the hands can not only be pressed against the wall but also tend to be lifted (i.e. made lighter by the strength of the shoulder muscles) without them tending to slide directly as a result of becoming lighter. This results in better movement of the upper body towards the legs and increased stretching of the hamstrings, possibly also of the gastrocnemius in the calves.
Known problems that can occur even when executed correctly
Sensation of pressure in the inner edges of the hand
Some people find the pressure on the wall, particularly in the area of the base joint of the index finger, unpleasant. An attempt can be made here to create a little more softness and thus better pressure distribution with a patch.
(S) Partner exercise with 1 supporter

Instructions
- There are several useful applications for an assistant, which respond quite precisely to the specific weaknesses of the performer, see under Details.
- It makes sense to apply these corrections from time to time so that the performer can find out to what extent he has already implemented the individual details of the pose affected by them.
Details
- The possible corrections in detail:
- Tilting the pelvis (further into flexion) by applying pressure with both hands (one on top of the other) to the cranial end of the sacrum.
- Turn out the arms; to do this, grip the middle of the upper arms of the performer with your hands so that the thumbs are on the inside and the fingers are on the outside. Slowly turn out the arms further. If flexion occurs in the elbows, the arms can be pushed towards each other in order to restore the extension in the elbow joints at the same time as they are turned out. Of course, the arms are not pushed into hyperextension if this is possible. The performer should inform the supporter in advance about the ability to hyperextend and the associated pain. See the corresponding variant.
- Pressure on the sacrum in a direction parallel to the legs to move the heels further towards the floor. See the corresponding variant.
- The pull on the hips by an assistant standing behind the performer, which makes it easier to reach out from the shoulders. This movement is often experienced for the first time with this assistance. If the pull is too strong, the performer’s hands may lose contact with the floor.
- The pull on the thighs, in which the assistant grips the front of the thighs from behind with arms crossed and pulls the legs towards them. This pull tends to cause some internal rotation in the hip joints, which counteracts the slight tendency to turn them out that is often observed as a result of using the hip flexors (the heels then move inwards). A belt can also be used in a similar way, the free end of which is passed backwards through the thighs. The tension on the belt also causes a certain endorotation moment due to the friction on the skin.
- The pressure on the shoulder area (in the middle of the spine between the shoulder blades) or on the shoulder blades with which the assistant pushes the shoulder in the direction of the line connecting the performer’s ankles. This can be combined with a twist of the arms when the pressure is applied to the shoulder area with the head. The pressure on the shoulder area should not be applied to people who are already very flexible in the shoulder joint in the direction of frontal abduction and who no longer feel any muscular stretching sensation.
- Straightening the fingers and the metacarpophalangeal joints of the fingers, the inner ones of which generally lift off or are at least too light. In people with shortened finger tendons, the prolonged pressing down of the raised joints.
- Pressing down the heels is best performed by the supporter gripping the upper heel area of the performer with the big toe and the other toes from both sides, i.e. with the Achilles tendon between the first and second toe, and slowly pressing the performer’s heel down further.
- Like all corrections, these should be carried out carefully, with slowly increasing intensity and considerately, but without false consideration, which usually stems from the performer’s own unrealistic ideas or fears, and instead with understanding and quick and intelligent reactions to any objections or complaints from the performer. It is also very important that the force used at the end of the correction is released slowly and not abruptly so that there is no reflexive tension in the muscles.
(S) Partner exercise with 2 supporters

Instructions
- The variant with 2 assistants is a combination of two of the above-mentioned corrections.
- Known and more frequently used combinations are those listed under Details.
Details
- Good combinations in detail:
- Pulling on the thighs plus turning out the arms
- Pressure on the sacrum to further tilt the pelvis plus turning out the arms with the head pushing down the shoulders
- Pressure on the sacrum to push the heel down plus pushing the heel down with the feet
- The details above (1 assistant) apply unchanged here.
(S) Partner exercise with 3 supporters

Instructions
- The variant with 3 assistants is a combination of three of the above-mentioned corrections.
- Known and more frequently used combinations are those listed under Details.
Details
- The combinations in detail:
- Pulling on the thighs plus turning out the arms (possibly using the head to push down the shoulder area) plus tilting pressure on the sacrum.
(S) Partner exercise with 4 supporters

Instructions
- The variant with 4 assistants is a combination of four of the above-mentioned corrections.
Details
- Pulling on the thighs plus turning out the arms plus pushing down on the heels plus the tilting pressure on the sacrum.
(S) Pull on the thighs
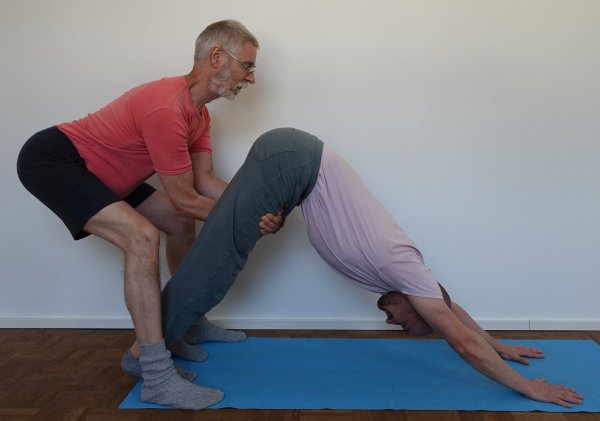
Instructions
- Take the pose described above.
- The supporter stands behind the performer, crosses his forearms and reaches between the performer’s thighs to improve the posture by pulling on the front of the thighs.
Details
- This pull tends to cause endorotation in the hip joints, which counteracts the slight exorotation tendency as a result of the use of the hip flexors, which is frequently observed (the heels then move inwards). In addition, this stretches the knee joints better and helps with the elevation of the shoulder blades. It is not uncommon for the improved extension of the knee joints to result not only in more intensive stretching of the hamstrings but also of the knee-flexing gastrocnemius.
(S) Shrug

This variation makes the movement of stretching from the shoulders (elevation of the shoulder blades) clearer. The support prevents the arms from bending and increases precision and body awareness.
Instructions
- Take the pose as described above and stretch out from the shoulders(elevate) backwards and upwards to the maximum.
- The supporter grips the upper arms in the middle, turns them out and pushes them towards each other without overstretching them, if this is possible. He also tries to prevent the shoulder from moving forwards and backwards
- Now isolate the stretching out of the shoulders (the elevation of the shoulder blades) backwards and upwards so that the shoulder area and with it the upper body slowly sinks to the maximum towards the wrists.
- Now slowly stretch out from the shoulders(elevate) backwards and upwards to the maximum.
- Repeat the last two steps at least until the movement is completely clear and can be performed easily and at any speed.
Details
- The supporter can prevent movements that are often difficult to perceive and even more difficult to stop.
(S) Shrugging with traction on the thighs
Instructions
- The supporter stands behind the performer and supports the elevation of the shoulder blades (stretching from the shoulders) with a symmetrical pull on both thighs.
Details
This support can be very helpful, particularly in the case of significant flexibility restrictions in the direction of frontal abduction in the shoulder joint, especially in the case of a stiff latissimus dorsi, which restricts elevation as an indirect depressor of the shoulder blade, and sometimes leads to the elevation to be undertaken being found for the first time.
(S) Dips

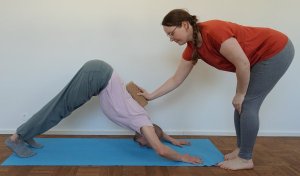 | 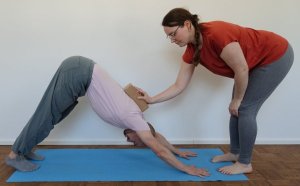 |
| arms bent | arms stretched |
Instructions
- Perform the dips described above with a supporter holding a straight object with poor friction such as a stick or a wodden plank against the back to help the performer see if they are moving the upper body too much forward and too little downward instead of diagonally forward and downward in line with the plane of the arms.
- The supporter should not give way with the object, but rather set the plane in which the upper body should move.
- The supporter also has a good view of the arms and can give the performer feedback on whether the arms are bending in their own plane or turning in too much, i.e. lifting the elbows too much when bent.
Details
- The object held against the back should be smooth and have low friction so that it does not hinder the performer. It must also not get caught in the clothing, which is also a requirement for the clothing.
- The supporter should make sure that the performer does not push him or the object away, and should not exert any pressure on the performer’s back.
(S) Turn out arms

Conveys the feeling for maximum external rotation of the arms.
Instructions
- The assistant sits or kneels headfirst in front of the performer.
- He grips the middle of the upper arms with his hands so that the fingers are on the outside and the thumbs on the inside.
- By slowly increasing the force applied, the upper arms are turned out further and further, i.e. the triceps towards the legs, until the performer gives the signal to stop.
Details
- Make sure that the upper arms are gripped evenly so that the formation of hematomas (bruises) is avoided as far as possible. In cases of very weak connective tissue, it may not be possible to avoid these completely.
- In cases of very voluminous upper arms (especially if very muscular), it may not be possible to grip the upper arms sufficiently. In this case, you can work with 2 assistants, each of whom grasps and turns one arm. Precise feedback from the person performing the pose is then necessary to ensure that the rotation is carried out evenly.
- When the arms are turned out, their tenedency to bend can be corrected at the same time, if necessary, by pushing the upper arms towards each other; after all, each correction of one movement dimension influences the other two dimensions of movement.
- This correction can easily be combined with pressing the shoulder area down (and towards the upper body) when the head is used for this purpose.
- Make sure that the inner edges of the hand/inner finger joints do not become lighter or lift off. One of the challenges of this variation lies in keeping them firmly pressed to the floor.
Known problems that can occur even when executed correctly
Hematoma formation with weak connective tissue
In cases of weak connective tissue and, of course, haemophilia, haematomas (bruising) can occur due to the pressure on the upper arms, but these are generally harmless and should disappear completely on their own.
(P) stretch from bent knees

Improving flexion in the hips (forward bend)
Instructions
- Take the variant „stretch from bent knees“ as described above.
- The assistant stands at the head of the performer.
- After the performers has bent the knee joints, the supporter promotes the tilting of the pelvis by pressing the sacrum forwards and downwards (i.e. towards the performer’s feet) and tries to maintain the position of the pelvis, in particular its tilt, while the performer slowly stretches the legs again with adequate force against the resistance of his own muscles on the back of the thighs (the hamstrings) and tries to keep the shoulder area and upper body as best as possible from moving forwards (towards the hands).
Details
- In most cases, stretching the legs will result in the angle of the pelvis to the floor increasing again. Only performers who are very flexible in the hamstrings are able to hold their pelvis in position and perhaps also maintain contact between the lower rib bones and the thighs, often only when the knees are initially bent, sometimes even when the legs are extended.
- It will be optimal for the supporter to press on the performer’s sacrum with both hands on top of each other (at an angle of approx. 30°-60°) or, for a better lever arm, slightly further cranially on the lumbar spine. The stance must be firm, as the forces exerted by the performer when stretching the legs and resulting in the evasive movement of the pelvis are high. The supporter probably has to use part of his body weight by shifting his center of gravity.
- The comments made above apply.
(S) Pressure on the sacrum

Instructions
- This variation corresponds to the static end position of the previously described variation, but here the pressure on the sacrum is slowly increased in an attempt to tilt the pelvis further into flexion in the hip joint, so the supporter presses the back end of the sacrum in the transition to the lumbar spine in the direction of the thighs in order to tilt the pelvis further.
Details
- Place both hands flat on top of each other and slowly increase the pressure until you feel enough stretch.
- Make sure you press on the correct area. Pressure on the leg-side end of the sacrum would not tilt the pelvis in the right direction but in the wrong direction.
(S) backwards against the wall with lifted leg: correct leg and pelvis

Instructions
- Take the variation backwards against the wall with one leg lifted. The supporter stands next to the performer facing the wall and pulls the inner thigh of the lifted leg away from the wall with one hand close to the knee while pushing the hip on the same side down with the other hand until it has reached the same height as the other.
Details
- The inability of the liefted leg to extend is mainly a result of restricted flexibility of the hip flexors. When the knee joint is extended, a counterforce is created that pushes the associated hip upwards and away from the wall. This tendency to deviate is already present due to the restricted flexibility of the hamstrings and is further increased by the correction of the lifted leg, which suggests an intervention at the pelvis.
- The traction on the inner leg not only helps to stretch the leg but also counteracts a tendency to turn out the leg. This is of course mainly due to the pull of the iliopsoas hip flexor, which attaches to the lesser trochanter on the inside of the proximal thigh.
(P) backwards against the wall with lifted leg: pull on the outer groin

Instructions
- Take the variation backwards against the wall with one leg raised. The supporter stands facing away from the wall next to the performer and uses both hands to pull the outer grion of the standing leg towards them, i.e. upwards and towards the wall.
Details
- A significant evasive tendency of this pose is the rotation of the pelvis (seemingly around its vertical axis, infact in the hip joint), which corresponds to an abduction of the standing leg in its hip joint. Typically, abduction would ease the sensation of stretching in the hamstrings. The supporters pulling with both hands, away from the standing foot of the performer, sufficient force can usually be applied to stop or lessen this deviation.
(P) backwards against the wall with lifted leg: turn out arms and press shoulder area

Instructions
- Take the variation backwards against the wall with one leg raised.
- The supporter sits in front of the performer, facing the performer’s back.
- He grips both of the performer’s upper arms in the middle to turn them out and, if necessary, push them towards each other if or as soon as the elbow joints show an inclination to bend. He also presses with his head on the area between the shoulder blades to move the shoulder area towards the wall.
Details
- This support corresponds to that in the rectangular handstand. In principle, however, the correction of the upper body is somewhat less relevant here than that of the pelvis, as its position not only suffers from the restricted flexibility of the hamstrings, but the hip of the lifted leg also tends to deviate significantly away from the standing foot due to the restricted flexibility of the hip flexors.
(2P) backwards against the wall with lifted leg: pull on the outer groin and correct the pelvis

Instructions
- This is the support with two supporters, one of whom performs the corrections described in „pulling on the outer groin“ and the other the corrections described in „correcting the leg and pelvis“.
Details
- The two supporters stand on the side of the pelvis on which they are intervening.
(3P) backwards against the wall with lifted leg: pull on the outer groin, correct pelvis, press shoulder area

Instructions
- This is the support with three supporters, one of which performs the corrections described in pulling on the outer groin, the second the corrections described in leg and pelvis and the third the corrections described in turning out the arms and pressing the shoulders.
Details
- ..
Transition to supta virasana
Detail photos

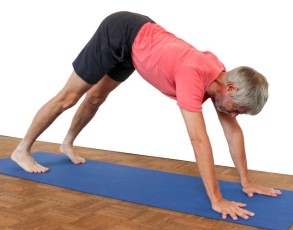
Beine entlasten.. | . Unterschenkel ablegen..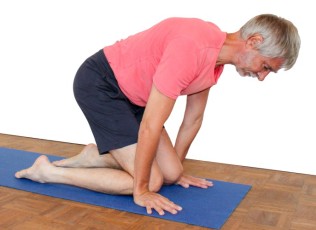 | ..Waden ausdrehen..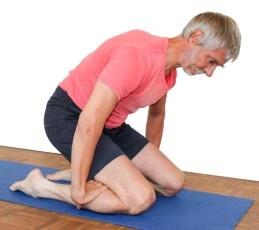 | .. setzen.. 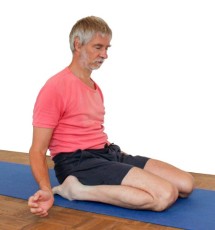 | .. nach hinten lehnen..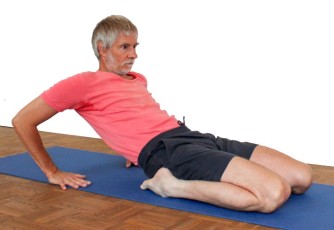 | .. zu supta virasana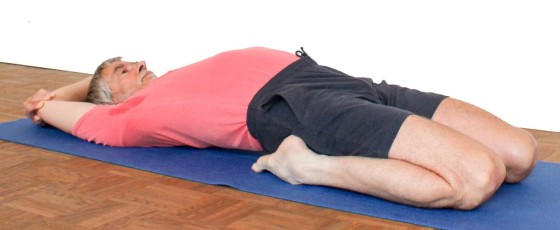 |
Part of the extended sun salutation
Instructions
- Take downface dog as described above.
- Bend the knee joints.
- Roll over the toes onto their upper sides.
- With your ankles straight, bring your knees close together to the floor.
- Turn your calves out with your hands as usual for supta virasana.
- Sit down slowly and carefully (pay attention to the condition of your knee joints) with your bottom between your feet on the floor until the ischial tuberosities give maximum weight to the floor.
- If necessary, use your hands to push your buttocks towards your knees (the part that lies on the floor) while you lower your upper body backwards, first resting on your elbows and later with your head and back on the floor.
- Using the strength of the glutes, flatten the pelvis as much as possible (hip bones (ASIS) down), move the pubic bones towards the ceiling and the buttocks away from the back.
Details
- The knee joints must be well prepared for this transition. If the quadriceps have not been sufficiently warmed up with poses such as supta virasana, virasana, tryangamukhaikapada pascimottanasana, krouncasana, 2nd quadriceps stretch on the wall, or if the knee joints „resist“ this transition according to subjective assessment, it should not be practiced. Particularly for people whose knees crack more or less clearly once during far flexion (i.e. not the „smacking“ that can be reproduced every time the knee joint is flexed), it is recommended to wait for the knee to crack or to provoke it, if a way of doing so is known, before practicing this transition, as the condition before the cracking probably represents a kind of slight subluxation in which the knee should not be loaded.
- If this transition is practiced as part of the extended sun salutation, supta virasana should be held significantly longer in the first few rounds so that the knees and thigh muscles can warm up and adapt.
- If you have already practiced and your muscles are stretched and warm, and your knees are in good condition, this transition takes less than three seconds. If one of these prerequisites is missing, take considerably more care and time for this transition!
- Gently bring the knees to the floor and tilt the pelvis using the hip extensors to prevent any discomfort in the lumbar spine. Support yourself with your arms accordingly.
Transition to uttanasana

Detail photos
in dog pose..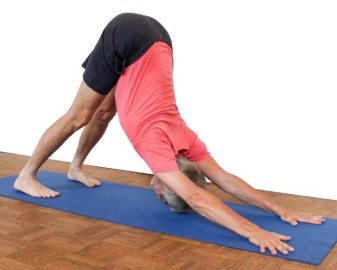 | ..make the feet lighter..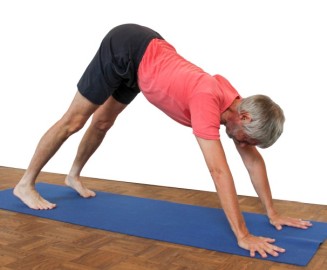 | ..jump forward..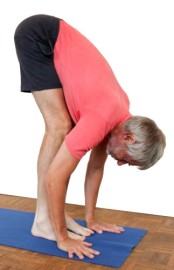 | ..stretch your knees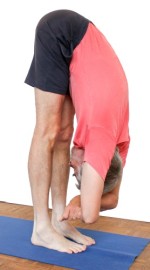 |
Elegant jump in uttanasana
Instructions
- Take the pose as described above.
- Bend the knee joints.
- Jump gently and quietly with your feet between your hands, using your arms to support yourself as much as possible to delay the landing.
- Align the body into uttanasana and straighten the legs.
Details
- Like many jumps, this one can also bear a „mind issue“, i.e. mental processes or circumstances may block the willingness to jump. This is also known from the reverse jump from uttanasana into downface dog. People often avoid real simultaneity and try to pull the second leg in as quickly as possible after jumping with the first leg. In any case, an asymmetrical movement of the legs and an asynchrony in the landing of the feet is then recognizable. For this jump, it is important to develop confidence in the strength of the arms so that they can control the movement of the upper body and thus also ensure the safety of the head. A variety of exercises are available to develop the strength of the arms and confidence in them and their capabilities. The more pronounced these two factors (confidence and strength) are, the more you can try to delay the landing, as if you wanted to stand in the air for a fraction of a second and resist the gravity-induced landing of your feet. The speed at which the feet land cannot, of course, be influenced by anything other than the arms (and the exact position of the feet); gravity inevitably acts on the body over time during the flight and creates a stable position. When experienced perrformers achieve a clearly visible delay in landing, this is the result of a well-coordinated jumping movement in which the landing is delayed using the strength of the forearms, triceps, deltoids and some back muscles. In a hypothetical limit of the jumping process, the jump could be executed in such a way that the gravity perpendicular gets under the hands, the forearms fix the angle of the arms to the ground through the strength of the palmar flexors, the triceps keep the arms stretched in the elbow joints, the deltoids together with the muscles of the upper back hold the position of the upper body, the back holds the upper body and the glutes hold the legs in position. Then, assuming sufficient strength in all the muscles involved and appropriate flexibility in the wrist for this significant dorsiflexion under heavy load, the jump would be frozen in mid-air. In every real execution, you try to get closer to this and work the corresponding muscle groups to the maximum and learn to shape the course of the body’s center of gravity more and more favorably. As the performer becomes more and more courageous, he or she will usually find themselves in a situation where they misjudge the jump a little and threaten to tip forward. This is a sign that the center of gravity was already relatively far forward, but the muscles have not yet worked sufficiently (or were not powerful enough) to deal with it. In addition to the strength of the palmar flexors, the flexibility for dorsal flexion in the wrist is also an important limitation, so that the maximum angle that can be achieved is easily reached or even exceeded with courageous execution.
- Land as gently and quietly as possible. This will require some practice and appropriate use of force (see above).
- Land on your whole feet, not on your heels or balls of your feet first; your feet do not roll when you touch down.
- During the landing, the muscles of the forearms, shoulders and upper back should be clearly felt working. Therefore, aim for maximum effort in these muscle groups.
- After landing the feet, you only need to lift the pelvis a little and straighten the legs; the center of gravity should already be correct and the shoulder area should be low. There are various options for using the arms in uttanasana.
Transition to ardha vasisthasana and back

Instructions
- Take the pose as described above.
- Lift your left hand off the floor.
- Turn your upper body to the left while leaning on your right arm, roll from the ball of your right foot onto its outer edge, place your left inner foot on top of your right inner foot, lower your pelvis and stretch your hips to 0° flexion and 0° abduction.
- Stretch your left arm towards the ceiling.
- Turn out both arms, the upper hand points into the field of vision.
- Bring the pelvis into the line between the ankles and the sternum.
- To return to downface dog, take the left arm out of the pose, release the left inner foot from the right, come back onto the ball of the right foot.
- Turn your upper body towards the floor and place your left hand on the floor shoulder-wide apart from your right.
- Flex the hip joints while moving the upper body towards the thighs and aligning it precisely for downface dog.
Details
- The distance between the right hand and the right foot should be such that in ardha vasisthasana the wrist is approximately one hand length (not counting the fingers) away from the perpendicular of the shoulder (vertical projection onto the floor). This defines the distance for the dog, when changing between these two poses.
- The transition requires some strength in the forearm muscles and the deltoid to be able to handle the changes in the center of gravity and occuring forces well. If you skimp on using these muscles, the transition is likely to be very wobbly, sometimes ending up on your own buttocks. If this is foreseeable, leave the supporting arm extended and try to place the buttocks on the floor gently and with a delay.
- The transition back into the downface dog is done with an elegant swing. The hand is placed firmly on top and the pelvis is moved backwards and upwards with a swing. As with the transition from upface dog to downface dog, the force can be shifted from the hip flexors to the deltoids.
Transition to upface dog

Effects:
(232) Strengthening frontal abductors
(352) Strengthening palmar flexors
Instructions
- Take the downface dog as described above.
- Continue to push the body backwards strongly, give up the work of the hip flexors and using the glutes, push the pelvis downwards against the resistance offered by pushing the body backwards.
- In upface dog make sure the shoulder blades are depressed and retracted and the knee joints are extended.
Details
- Press continuously and forcefully backwards. Both poses contain this as an important feature. The heels are maximally back-down at all times. There is to be no point at which the heels or the whole body can be pushed further backwards with little effort. During the transition, the aim is to keep the shoulders as far backward as possible while pushing the pelvis downwards. If you manage to push the shoulders backwards strongly, the force required in the pelvis for the transition increases until the hip joints are roughly straight, after which it becomes easier, but this should not tempt you to work less with the glutes on the extension in the hip joints, as the well-being of the lower back in upface dog depends largely on this. After the point at which the hip joints are exactly straight, the shoulders can be pushed slightly further back for geometric reasons. The transition is therefore driven by the hip extensors, which again push the pelvis downwards against the resistance of the shoulders. If it is performed intensively, the lumbar and thoracic spine rounds towards convexity very early on in the transition. Further into the transition, they are briefly stretched once and then maximally concave at the end.
- In downface dog, the upper body moves maximally away from the hands, which includes the movement of the shoulder blades cranially (towards the head, i.e. in elevation). In upface dog, the opposite is the case (depression). The transition is therefore also a transition in the movement of the shoulder blades.
- The hands press down on the floor with maximum force at all times to prevent the base joints of the fingers from becoming lighter. Furthermore, the palmar flexors work against the forward movement of the shoulders and thus offer the glutes additional resistance (to that applied by the deltoids). In all cases, however, the strength of the hip extensors is likely to be greater than the sum of the forces that can be applied from the forearms, deltoids and other frontal abductors of the shoulder joint, so that no matter how hard you push the shoulders backwards, the transition from the excessively strong pelvic muscles is guaranteed to be possible and will occur. However, it is also clear from the above that this is a pose or a transition that enables the front deltoids to be strengthened to any extent, provided that the hands and feet do not slip away. Moreover, this strengthening takes place over a very wide angular range, from approx. 180° frontal abduction towards (depending on the flexibility of the hip flexors) approx. 0° frontal abduction, i.e. over nearly the entire range, which makes this strengthening all the more valuable and explains its harmonious and harmonizing effect on the deltoids. If the transition is performed in both directions, the deltoid works both concentrically and eccentrically. Comprising these three items this transition is unique.
- The changed angle in the wrists has a direct influence on the ability to press down the base joints of the fingers, so that the unwanted „mouse holes“ in the dog’s head may become larger.
- People often find it helpful to imagine pushing the pubic bones forwards and downwards against all resistance while trying to push the body backwards as far as possible with the arms/shoulders.
- While the external rotation of the upper arms (turning them out) in the shoulder joints is significantly restricted in downface dog – as is the range of rotation – the possibility of external rotation is much greater in the upface dog. For the transition, this means increasingly turn out the upper arms further, i.e. realise maximum external rotation at all times, which does not necessarily increase the ability to press down the inner metacarpophalangeal joints in upface dog. On the contrary, pressing them down in upface dog becomes more difficult due to increased external rotation.
Transition to upface dog with feet stretched out

Instructions
- Take the downface dog as described above.
- Move your pelvis a little forwards and downwards and roll over your toes onto the back of your foot.
- When the pelvis is maximally lowered and the glutes are maximally engaged, push the hands towards the feet to push the pubic bones forwards and downwards. Increase the distance between the hands and the feet so that the wrists are just in front of the plumb of the shoulders.
- Keep your upper body raised, move your shoulder blades down (depression) and towards your spine (retraction) and push your hands towards your feet with maximum force.
Details
- Usually, when both dog positions (downface and upface) are practiced alternately, the distance between the hands and the feet is measured so that the wrists are slightly behind and not in front of the shoulders in upface dog. However, for the variant with the feet stretched out in upface dog, a greater distance is required (see there), with the wrists just in front of the shoulders, which means increasing the distance a little in the preceding downface dog. The greater distance between the hands and the feet does not detract from the downface dog, it merely shifts the focus slightly towards the wide variation.
Transition to parsvakonasana

Instructions
- Take the pose as described above.
- Place the right foot to the left of the right hand, stretching the left hip joint.
- Release your left hand from the floor.
- Turn your upper body to the left as far as possible and turn your back left foot 70° to the left so that your left heel and, if possible, the whole sole of your foot pushes onto the floor.
- Take the left arm in the elongation of the left side of the body, turn it out, stretch it with the shoulder blade away from the trunk (elevation).
- Press the right thigh against the right arm without reducing the rotation of the upper body.
Details
- This transition should not present any particular difficulty, assuming a little flexibility in the hip joints, and the body’s center of gravity does not change significantly. The distance between the foot placed next to the right hand and the rear foot should be such that the front lower leg is approximately vertical with the thigh horizontal.
- Make sure to keep the front thigh horizontal and use its strength to push backwards.
Transition to staff pose
Detail photos

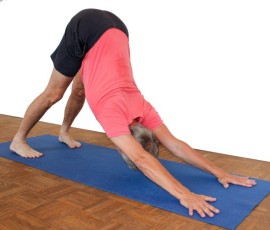
Effects:
(302) strengthening triceps
(512) strengthening pectoralis major
(242) strengthening the deltoid
Starting position.. | .. bend the arms..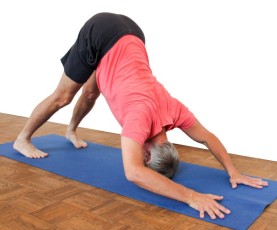 | .. bend further, turn them out..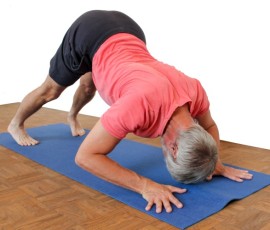 | .. take staff pose.. 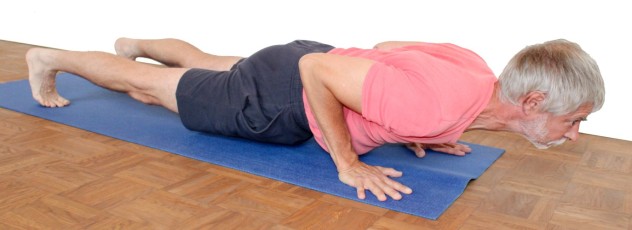 |
Instructions
- Take the pose as described above.
- Bend the arms outwards in their own plane, moving the elbows outwards and the shoulders towards the wrists to aim the head towards the floor.
- As you continue to bend your arms, place your head on the floor without weight as soon as possible and drag it forward over the floor or hover it one centimeter from the floor until you reach staff pose.
- For complete staff pose, place your upper arms at the side of your upper body.
Details
- The transition from downface dog to staff pose is one of the most powerful in yoga. Here, upface dog is neither taken nor implied.
- If the shoulders are flexible, the head can be placed upside down on the floor with a slight flexion of the cervical spine.
- The inactive glutes in downface dog must work in staff pose, moving the buttocks away from the back. The pelvis, shoulders, heels and head are level with the floor and the hip joints are straight. A raised pelvis, a hunched back or (often seen in conjunction with a hunched back) shoulders that are held too low are attempts to make the pose easier.
- Also push your body backwards during the transition and of course in the staff pose once it is taken, to keep your heels maximally back-down at all times, i.e. the ankles always in maximum dorsiflexion.
- From the point at which the head first reaches the floor on the way into staff pose, move the shoulders forward horizontally until the staff pose is fully taken. In the staff pose hold the head in elongation of the spine.
- Make sure to keep the center lines of the feet in vertical planes in the pole, i.e. do not let the heels come inwards.
- Note that in the downface dog the shoulder blades are elevated, but in the staff they are depressed.
Transition to dog elbow stand
Detail photos

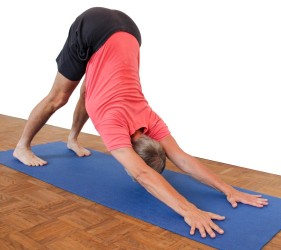
from dog pose.. | ..bend the arms..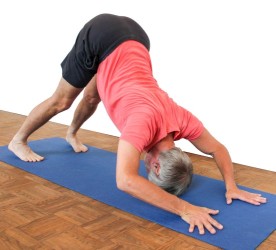 | ..turn them out..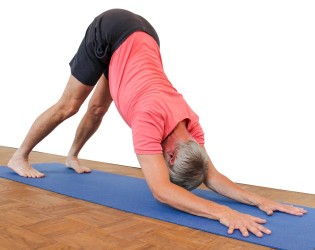 | ..drop them gently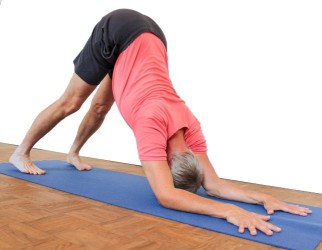 |
Effects:
(272) Shoulder joint: force for external rotation
Instructions
- Take downface dog as described above.
- Start to bend your elbows exactly sideways and aim your head at the floor or your shoulders at the line connecting your wrists.
- When (according to assessment and experience) the point is approached where the elbows can be placed almost on the floor by turning the arms out 90°, turn the arms out 90° and place the elbows gently and simultaneously on the floor so that the forearms are parallel.
Details
- This is a very powerful transition. During the initial bending of the elbow joints, they should not leave the plane they are in. The arms are only turned out at the point described above. This must be done forcefully until the arms are in parallel vertical planes. This will probably require a lot of strength from the pectoralis major, which is interesting work for this muscle because it has to adduct the upper arm, but at the same time turn it out contrary to its actual function.
- Once the forearms are in place, the pose must be developed further by pushing backward as far as possible and stretching from the shoulders (elevating the shoulder blades). Move your upper body and shoulders as far as possible towards your legs.
Transition to upface dog against own shoulder strength

Instructions
- Take downface dog as described above.
- Build up powerful backward pressure in the shoulders and forearms (palmar flexors of the wrist).
- Tilt the pelvis in the hip joints out of flexion as far as possible using the strength of the glutes so that the back is rounded as much as possible due to the counterpressure from the upper extremity.
- Maintain the counter pressure and force the hip joints further and further out of flexion towards extension until upface dog is taken. The shoulders and forearms remain maximally active, the shoulder blades are depressed in upface dog position.
Details
- This is an important basic exercise that should be repeated more often so that the transition can be performed effectively. You often see performers ‚falling into‘ upface dog because they are hardly active in the upper limb. This transition is ideal for strengthening the anterior deltoid and the palmar flexors of the forearm if you push backwards forcefully in each phase of the transition.
- The pressure from the shoulders and forearms should be maximum. The transition will still be successful because the lower limb (in these cases the glutes) can simply exert significantly more force than the upper limb.
- In the case of golfer’s elbow, this transition must not be performed as described if pain occurs in the forearm, as it then contributes to maintaining the irritation/inflammation.
(P) Transition to upface dog against resistance

Instructions
- The transition is performed in exactly the same way as described in the transition to upface dog against your own shoulder strength variation, but the supporter, sitting in front of the performer, pushes the performer backwards with increasing force on the proximal upper arms shortly after the start of the transition and only reduces the use of force when upface dog is almost taken in order not to actively push the performer into further hyperlordosis.
Details
- This corresponds to the variant transition to upface dog against your own shoulder force, but external force is added to your own shoulder force, which pushes the body backwards, so that even more force is required from the hip extensors. This transition with support may also help to better recognize the task of the transition.
Transition to uttanasana to the back

Instructions
- Take the pose as described above.
- Move one hand after the other further and further back until you finally reach uttanasana, with the hands pushing the pelvis further back each time until uttanasana is taken.
Details
- Depending on the flexibility of the hamstrings, it may not be possible to walk into uttanasana with the legs straight. Either the knee joints must be bent or the hands/fingers must be placed on blocks.
- During this transition, the weight is continuously shifted from the hands to the feet.
Transition to handstand, one-legged

Instructions
- Take downface dog with the head facing a wall, keep your fingertips about 20 cm away from the wall.
- Depending on your momentum, one of the two feet (the future jumping leg) may have to be moved slightly forward. This is particularly the case if the flexibility in the hip joints is not yet very advanced. Swing with the leg whose foot has remained in its original position and jump off to a handstand with the leg that has been moved forward.
Details
- The range of motion in the hip joint in the direction of flexion/extension is a decisive factor for the kinetic energy that can be achieved with the swinging, extended leg and therefore for the success of the upswing from downface dog. Only with really good flexibility can the leg generate enough kinetic energy to reach the handstand without the other foot being placed forward first. In addition, a smaller range of motion increases the risk of injury in the hamstrings of the swing leg, which is all the more important if the warm-up was inadequate. This can easily lead to a strain or, perhaps even more frequently, to irritation of the origin of the hamstrings on the ischium (PHT), see also the FAQ.
- With the greater swing (compared to the normal one-legged upswing), don’t forget to keep your shoulders moving away from the wall.
- For the handstand upswing, the shoulders must first be moved sufficiently far forward from the original position towards the wall.
- If the second leg is brought up too early or too quickly, this can, as described in the handstand upswing, cause the swing to be cut short and fail.
Transition to handstand, two-legged

Instructions
- Jump from the dog position with both legs synchronized into a handstand.
Details
- As described in the one-legged transition to handstand variation, a significantly greater amount of momentum is required from downface dog with normal distance. This applies to the two-legged upswing in a similar way, but here it is not momentum that is needed but bounce. It is advisable to reduce the distance between the feet and the hands before attempting the jump.
- The following applies even more than before: in addition to the greater use of force (compared to the normal one-legged upswing), you must not forget to keep your shoulders moving away from the wall.