yogabook / asanas / elbow downface dog
Contents
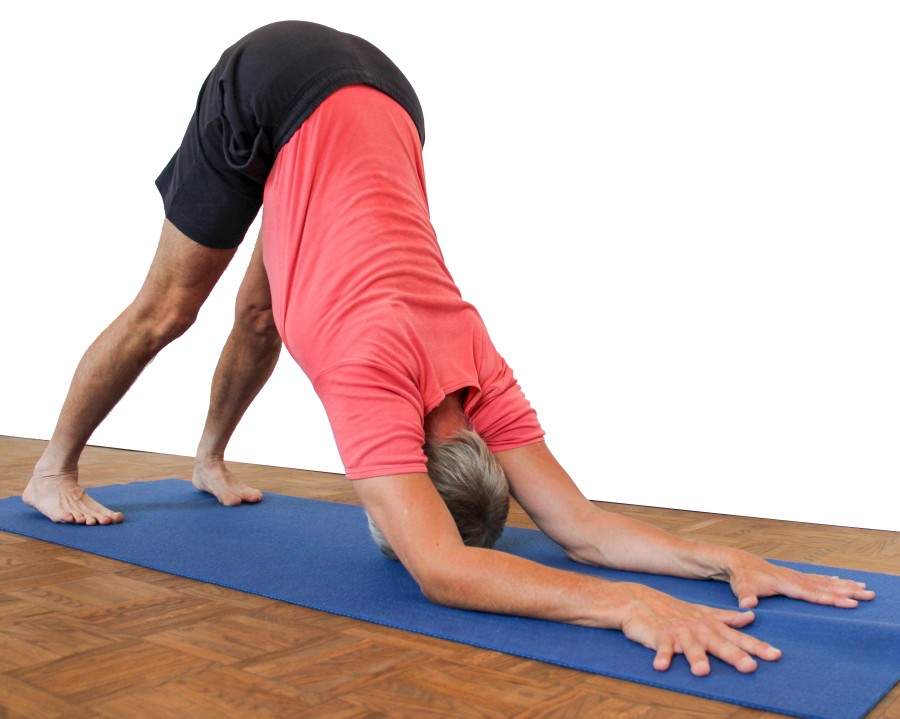
„elbow downface dog“
 instructions and details with working links as PDF for download/print
Feedback: We’d love to hear what you think about this description, give us feedback at:
postmeister@yogabook.org
Last modified: 30.12.2018
Trivial name: elbow downface dog
Level: A
- classification
- contraindications
- effects
- preparation
- follow-up
- derived asanas
- similar asanas
- diagnostics
- instructions
- details
- variants
Classification
classic: pose on the floor
physiological: shoulder stretching (frontal abduction) and strengthening (deltoid)
Contraindication
Effects
- (332) Force for pronation of the forearm
- (226) Shoulder blade: stretch for retractors
- (231) Shoulder joint: stretch for frontal abduction
- (271) Shoulder joint: stretch for external rotation
- (331) Stretch for pronation of the forearm
- (371) Stretch for elevation
- (501) Stretch of the latissimus dorsi
Preparation
Flexibility in direction of flexion in the hip joints should be as good as possible so that the hamstrings does not have a negative influence on the work in the shoulders via the pelvis and back:
- uttanasana as a generally effective and efficient stretch of the hamstrings to prepare for flexion in the hip joints in this pose so that insufficient flexion does not restrict the work in the shoulders
- prasarita padottanasana very similar to uttanasana
- parsvottanasana as a stretch that goes beyond uttanasana
- pascimottanasana
- janu sirsasana
- tryangamukhaikapada pascimottanasana
- hip opener 5 as a very effective stretch of the hamstrings that goes beyond uttanasana
- warrior 3 pose
- trikonasana
- parivrtta trikonasana
As a pose with arms fixed in a turned out position, dog elbow pose requires a lot of flexibility in the shoulder joints in direction of frontal abduction, prepare with:
- back stretching, especially the „elevated“ variation as a general stretch in the shoulder joints and the hamstrings
- rectangular handstand
- handstand
- elbowstand as a very related and highly synergistic pose
- rectangular elbowstand as a related pose, which generally only differs in the coordinate system in which it is performed and therefore also differs in the intensity of various demands due to the different effect of gravity
- hyperbola as one of the most effective and efficient stretches in the direction of frontal abduction without turned out arms
- shoulder opening on the chair as one of the most effective and efficient stretches in the direction of frontal abduction with turned out arms
As the deltoids need to be worked powerfully here, this can also be prepared, e.g. with
- „dips“ variation of downface dog
- transition drom downface dog to upface dog and back
- „dips“ variation of handstand
- repeatedly entering and exiting back arch (urdhva dhanurasana, variant „dips“)
If the rectus femoris is used despite the attempt to get the flexion in the hip joints from the hip flexors in the pelvis, the iliopsoas, and shows a tendency to cramp, it can be stretched in advance:
- supta virasana
- quadriceps stretch 1 on the wall
- quadriceps stretch 2 on the wall
- ardha supta krouncasana
- supta krouncasana
To get a better feel for the extension of the back and to perform it as well as possible despite the resistance from below (i.e. caudal: the hip joints that do not tilt easily into flexion) and above (i.e. cranial: the shoulder joints that do not abduct far frontally), you can also practise stretching the back beforehand:
- „table“ variation of uttanasana
- rectangular uttanasana
- warrior 3 pose
- upavista konasana in the „pull on the feet“ and „with block“ variants
If the calves report very strong stretching sensations, these can also be prepared separately:
- warrior 1 pose
- parsvottanasana
- parivrtta trikonasana
- squat 2 (soleus, less important)
- downface dog, variants with one leg detached from the floor
Follow-up:
Derived asanas:
Similar asanas:
Diagnostics (No.)
(880) Hyperextension of the knee joint:
Hyperextension of the knee joint refers to the ability to or the current state of an angle of more than 180° in the knee joint. To a certain extent, this is considered normal by anatomists and is on average more common and more pronounced in women. However, it can also indicate a weakness of the hamstrings or the quadriceps. It is also not uncommon for unphysiological sensations to occur during hyperextension that are not caused by stretching or straining the muscles and should be avoided, see also FAQ.
Due to the fixed external rotation of the arms, the elbow dog pose is an excellent way of recognising the flexibility of the shoulder in direction of frontal abduction, including side discrepancies, and there may be indications of shoulder disorders:
- Irritable hypertonus of the deltoid muscle: ambitious beginners in yoga in particular tend to develop irritation in the deltoid muscle, which is localised in the area of the muscle origins, presumably due to overstraining of the structures through frequent repetitive demands in full frontal abduction and is also noticeable under the same load, see FAQ.
- Various pathological changes of the shoulder joint such as impingement syndrome, frozen shoulder, calcifications of the long biceps tendon, bizeps tendinitis, subacromial syndrome, rotator cuff lesions, which cannot all be discussed here and require clarification.
- Side discrepancies in flexibility: one shoulder is then higher/further forwards.
As the external rotation of the upper arms remains largely guaranteed by the fixation of the elbows and, for the same reason, internal rotation cannot take place, there is no dimension of evasion and the restriction of flexibility in the direction of frontal abduction is only visible in this direction itself.
(650) Kyphosis and lordosis of the spine:
deviations from the physiological double-S shape of the human spine may become visible in this pose, especially the „lumbar spine hump“ and the thoracic spine hyperkyphosis. A remaining lumbar spine lordosis (or a steep position) with only average flexibility of the hamstrings would probably mean a shortening of the hip flexors and a consecutive hollow back or at least a pronounced habitual hollow back. See the FAQ.
(611) Pelvic obliquity / scoliosis of the spine:
the lateral deviations of the spine from the sagittal plane known as scoliosis are also quite visible in this pose. FAQ.
(721)(724) Hamstrings:
In forward bending movements (flexion in one/both hip joints), but also under load in the muscles of the back of the leg, various disorders can be found:
- Shortening of the hamstrings, see FAQ
- Damage to the hamstrings that causes pain or functional limitations can also be easily recognised here, from simple tension to strains to muscle (partial) tears.
- Irritation of the sciatic nerve, which innervates the leg and foot, can become symptomatic during forward bends in particular, even if they are otherwise rather calm. See the FAQ.
- Irritation of the origin of the hamstrings at the ischial tuberosity (also called PHT: Proximal Hamstring Tendinopathy) can become apparent in this pose. According to the design and instructions for this pose, however, the stretch in the hamstrings should neither be in the foreground nor clearly noticeable. In case of PHT, the hamstrings require rest before intensive stretching, which does affect the purpose of the pose anyway. On PHT, see also the FAQ.
- Baker’s cysts produce a feeling of tension or foreign body sensation, see FAQ.
(673) The rectus abdominis (straight abdominal muscle):
In this pose, the rectus abdominis can cramp because it tries to perform the contraction of the upper body so that the muscles actually performing the pose/movement, namely the deltoids, have to work less intensively. On the one hand, this can be a statement about increased tension – and possibly not particularly great strength – in the rectus abdominis; on the other hand, it is a statement about the strength of the muscles performing the movement, the deltoids.
Variants:
Inside hands against each other
Transition to downface dog and back
Instructions
- Here we describe the most commonly practised variation with a block on the wall: place a block lengthways on the wall, centred on the edge of the mat.
- Grasp the block with your hands so that your thumbs point inwards past the corners of the block (i.e. towards each other) and your fingers point slightly outwards at an angle towards the wall.
- Place your forearms parallel to the floor.
- The rest of the body is in a downface dog.
- Move the upper body, especially the shoulders, towards the legs and from the elbows backwards and upwards.
Details
- When taking the pose, the parallelism of the forearms is often lost, which is due to the fact that movement restrictions in the shoulder joint are translated into an evasive outward movement of the elbows or inward movements of the hands. To prevent this, test how far the forearms can roll sideways over their own muscles and take this into account when setting up the pose. In cases of less robust skin and with intensive practice, the lateral evasive movement of the forearms can be so strong that one or two layers of skin remain on the mat, which is generally mainly a cosmetic problem and can be reduced after more frequent practice over a longer period of time by developing more robust (not necessarily keratinised) skin. Improving flexibility in the shoulder joint in the direction of frontal abduction also helps to minimise this effect. To avoid this discomfort, it makes sense to attach a belt to the forearms directly below the elbow joint to absorb the torque from the shoulder joints. It is also possible to attach the belt directly above the elbow joint, but care must be taken to ensure that the head still fits through it. Wird ein Gürtel verwendet, so kann auch eine Decke darunter gelegt werden. Using a blanket without also using a belt often results in the elbows slipping.
- As in some other poses with flexion in the hip joints and an extended knee joint, a tendency to cramp in the rectus femoris can also occur here. Therefore, try to execute the flexion in the hip joints from the iliopsoas as exclusively as possible.
- If there is too much stretching sensation in the back of the thighs (hamstrings), this is a sign that the distance between the feet and elbows is too small in relation to the given flexibility. Then increase the distance so that a) the stretch felt in the legs does not distract from the movement of the upper body and shoulders to be performed or keep you from further intensifying the pose due to stretch pain and b) the muscles on the back of the legs do not restrict the movement of the trunk towards the legs by pulling on the autochthonous back muscles via the position of the pelvis and upper body.
- With good flexibility in the shoulder joints, the head may rest on the floor. Check whether this is the result of the elbows being too far apart; if not, lift the head slightly to allow further movement in the shoulder joints. If this is not enough, the arms can also be placed on shoulder stand plates, but patches should be placed on top of them to ensure good friction. Also, the length of the arms including the hand will usually be greater than the length of the shoulder stand plate, so that two of them need to be placed in a row per side.
- Of course, the aim of the pose cannot be to get the heels on the floor. Move them as far as possible towards the floor, together with straightening the knee joints.
- Press the hands firmly onto the floor, both as an extension movement in the elbow joint from the strength of the triceps and as a palmar flexion in the wrist. The extension in the elbow joint helps to move the shoulder area and therefore the upper body further back towards the legs for the purpose of the exercise and, together with the palmar flexion in the wrist, reduces the tendency of the hands to slide together.
- Move the radial sides (thumb side) of the hand and wrist as far as possible down towards the floor. This is only possible with a combination of palmar flexion in the wrist, pronation of the forearm and extension in the elbow joint.
- As far as possible, stretch the upper body from the shoulders towards the pelvis (elevation of the shoulder blades). This movement may be largely restricted at first, if the Latissimus dorsi is still not very mobile. But expand it as soon as it becomes possible.
- Sometimes the pressure of the hands against the side of the block is perceived as uncomfortably strong. This is, of course, an effect of the pressure resulting from the evasive torque in the shoulder joints, which originates from their restricted flexibility. Check which part of the hand is pressing laterally against the block: if it is the metacarpophalangeal joints, which are not very well padded with flesh and muscle, the pain is understandable and can be reduced by pressing the area proximal to them laterally against the block instead. This way the hands are then in a certain ulnar abduction.
- Sometimes performers complain about uncomfortable pressure of the fingers against the wall; this usually affects the middle finger as the longest of the fingers. Check whether the hands can be turned a little more outwards (ulnar abduction), which should improve the position of the fingers and often means that none of the fingers come into contact with the wall. If in doubt, a second block can be used as an additional spacer.
- In addition to the postural activities described above, also push the block towards the wall. This is part of the effort to move the shoulder area towards the thighs.
- The angle in the shoulder joint in terms of frontal abduction is necessarily smaller than in the downface dog, and even if it whould be the same angle, it is usually only as a result of significantly greater force being applied. This fact sometimes causes astonishment, but is easily explained by the forced external rotation of the upper arms in the shoulder joints due to the elbows being fixed to the floor and by observing the course of the muscles to be stretched, especially the latissimus dorsi.
- The dog elbow pose is similar to the shishumarasana seen here and there, which has convergent forearms with clasped hands as in headstand instead of parallel forearms. Therefore, shishumarasana requires noticeably less flexibility in the direction of frontal abduction of the shoulder joints. Another name that is sometimes used is ardha pinca mayurasana. There are several interpretations here, for example with interlaced hands as described for shishumarasana or with parallel forearms as in dog elbow pose. In terms of the differences described between elbow pose and pinca mayurasana, however, this term is probably less appropriate.
Variations
without block, without wall

without any aids, the requirement for arm control is maximised.
Instructions
- Place your hands on the floor pointing straight forwards. When placing the forearms on the floor, again take into account the tendency of the forearms to slide outwards over their own flesh in the elbow area.
- Before taking the pose, use the strength of the arm extensor triceps to press the hands firmly onto the floor so that sufficient pressure can be applied to the floor and sufficient friction will be reached when taking the pose to counteract the torques from the shoulder joints that want to push the hands towards each other.
- For the rest, take dog elbow pose as described above.
Details
- ..
Inside hands against each other

The evasive internal rotation of the arms is limited without aids.
Instructions
- Take the pose as described above, but press your thumbs and index fingers together.
Details
- The pressure of the inside hands against each other limits the evasive movement of the arms into the internal rotation at least to a certain extent by preventing the hands from moving further inwards. Here too, care must be taken to ensure that the elbows are positioned sufficiently close together. This does not prevent the elbows from deviating, but rather increases it, which suggests using a belt around the forearms near the elbows.
Hands turned in

Stretching the muscles on the ulnar side of the wrist.
Instructions
- Take the pose as described above without block and wall, with the hands tilted as far as possible radially (thumbwards).
Details
- Again, press your hands firmly onto the floor to prevent them from sliding together. Restricted flexibility in the shoulder joints in particular tends to move the forearms towards each other and also push the hands out of their radially tilted angle in the wrists. This should therefore also be seen as strengthening the radial abductors of the wrist.
Gripping the mat

Replaces the block if not available
Instructions
- Take the pose described above without block and wall and grasp the edge of the mat with the fingers of each hand.
Details
- The mat does little to prevent the hands from slipping towards each other. It is therefore also necessary to press the hands down strongly using the strength of the triceps.
without block, with wall

If you have good flexibility in the shoulder joints, the block can be omitted.
Instructions
- Press your hands against the wall so that your thumbs are pointing inwards against the wall and your index fingers are pointing outwards against the wall, that is, the wrists are a bit in ulnar abduction.
- Press your hands firmly against the floor to prevent them from sliding together.
- Take the pose as described above.
Details
- The tendency of the hands to move towards each other can generally only be prevented by increasing the stretching movement in the elbow joint, i.e. using the strength of the triceps. This is necessary both when taking the pose and in the pose; in particular, it will not be possible in the pose to move the hands further apart once they have slipped together, especially as in humans the external rotators of the shoulder joint are less powerful than the internal rotators.
(P)

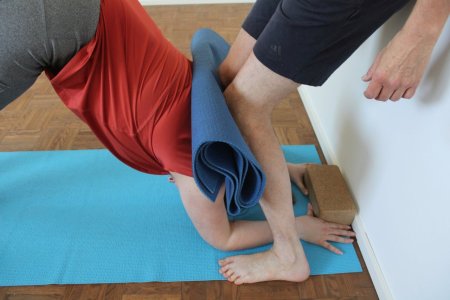
Supporting the movement of the chest towards the legs
Instructions
- As the supporter, stand with your back to the wall and your feet to the side of the performer’s forearms. Do not stand with your feet too close to the wall, rather about 15 – 30 cm depending on the performer’s flexibility.
- Place a mat folded in half three times across the performer’s upper back.
- Press the knees onto the mat gently at first, then gradually more firmly, but always carefully and in anticipation of the performer’s instructions, in order to push the performer further into the pose.
- To end the pose, slowly release the performer from the position.
Details
- It is generally felt to be comfortable when the knees are close together on the back, as then they can not press uncomfortably on the inner edge of the shoulder blade. In principle, this should be the aim, even if it makes it somewhat more difficult to achieve a balance between the pressure of the left and right knee. It therefore depends on the feedback from the person performing the pose. Alternatively, it is possible to position the knees more or less in the centre of the shoulder blades, which makes the balance between the sides much easier.
- As the supporter, lean your back and buttocks against the wall behind you so that you can stand calmly and firmly and avoid any disturbing factors. It must be accepted that the support can be very strenuous if the person performing the pose is very flexible in the shoulder joints and also has more or less long arms, as in this case your knee joints have to be bent far in order to reach the back and also be able to build up adequate pressure. Depending on the height and mobility of the performer, the supporter may even have to release his pelvis from the wall in order to exert sufficient pressure on the shoulders.
- The distance between the supporter’s feet and the wall against which the back is leaning deserves special attention. As a general rule, the greater the distance, the better; if the distance between the heels and the wall is too small, the lower legs will be at a relatively steep angle to the floor and the pressure against the supporter’s back will be more of a pressure downwards on the shoulders than a pressure away from the wall, which means an uncomfortable amount of pressure and usually insufficient support. If the distance between the feet and the wall is too great, the supporter’s knees can no longer be brought together which remains the best option.
- The person performing the pose should give instructions as loudly as possible on how the supporter can improve their job. In the case of side indications (left, right), the person performing the pose cannot be expected to perform them in mirror image so that they are executed correctly, as the sides are mirror-inverted for the supporter, but this is naturally expected of the supporter. In particular, this position requires the greatest possible silence in the room so that no important requests for corrections to the support are overheard or heard too late.
- The instructions for dealing with the stretching in the back of the legs that apply to the pose itself apply in principle unchanged here, but softened by the factor that the work of moving the upper body in the direction of the legs is largely performed by the supporter and only if the stretch in the back of the legs prohibits stronger pressure with the knees against the supporter’s back must the distance between the performer’s feet and his elbows be increased. Of course, the pressure of the knees on the back must be temporarily released, which must of always be done slowly and consensually.
- A small difference in the height of the two supporters is an advantage so that the position of the knees is not shifted too far towards the pelvis or too close to the back when viewed cranially.
- In cases where the supporter complains of discomfort in the knee area (especially the inner menisci) when the knees are as close together as possible, the variant of pressure on the shoulder blades is preferable.
- In addition to the support described above, the supporter can also use the hands on the sacrum or the iliac crests to push the performer’s pelvis towards further flexion in the hip joints, which often leads to a spontaneous improvement in the position of the upper body/shoulder area.
- The advice to use a belt to absorb the evasive torques from the shoulder joint still applies here too.
Transition to downface dog and back

Particularly intensive and interesting work in the shoulder muscles due to the angle
Instructions
- Take dog elbow position as described above, with or without a block, with or without a wall.
- Increase the pressure of the hands on the floor and the effort to turn out the upper arms. Increase both to such an extent that the elbows finally lift off the floor and with further extension of the elbow joints the transition to the downface dog takes place.
- To switch back to the dog elbow pose, slowly bend the elbow joints outwards, then stop and maintain the position of the shoulder to turn the arms out as far as possible in this position and, if possible, place them parallel to the floor.
- You can then use all your strength to push your shoulders back towards your legs.
Details
- During the transition from the elbow dog pose to downface dog the shoulder muscles (deltoids) in many people react to the intensity and type of demand with a tendency to cramp. If this is known, gomukhasana or purvottanasana can be practised as a preventative measure and also in between. This tendency to cramp is generally less noticeable in the reverse transition, see the FAQ. This transition back to downface dog should be performed with minimal outward deviation of the elbows (internal rotation of the upper arms). Do not lift the shoulders first to make the transition easier, but push the shoulders back towards the feet with all your strength.
- When transitioning from downface dog to dog elbow stand, first bend the arms exactly in their own plane, i.e. move the elbows exactly outwards without changing their rotation and without allowing the shoulders to come forwards more than downwards. If further bending of the arms is no longer possible due to lack of strength or the threat of the head touching the floor, hold the position of the shoulders and turn out the arms (mainly using the strength of the exorotators of the shoulder joint) so that they are in a vertical plane on each side, which means that when the elbows are gently placed on the floor, the forearms are parallel. Then press the shoulder area forcefully towards the feet and, if possible, stretch from the shoulders (i.e. elevation of the shoulder blades)