yogabook / asanas / gomukhasana
gomukhasana
„cow face“
Tue und lasse
Arm at an angle, partly behind the head | Arm straight up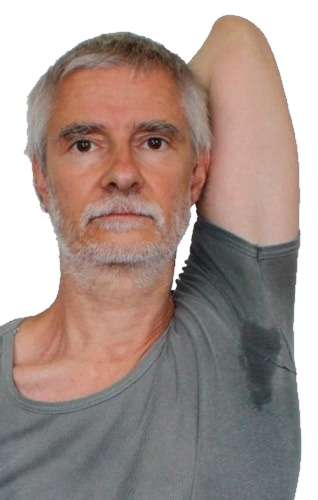 |
Detailfotos
Draw in your elbow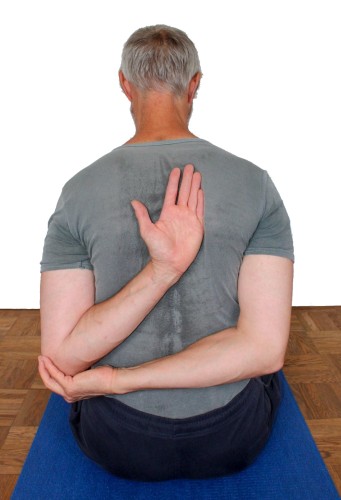 | Pull up forearm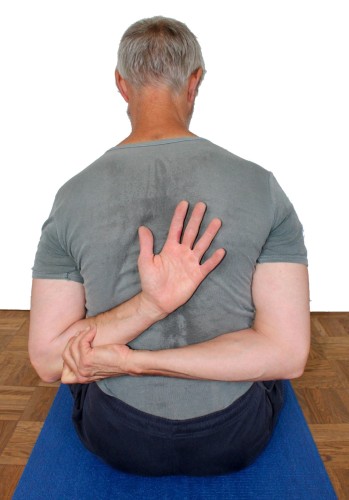 | Hand position: Back of the hand on the back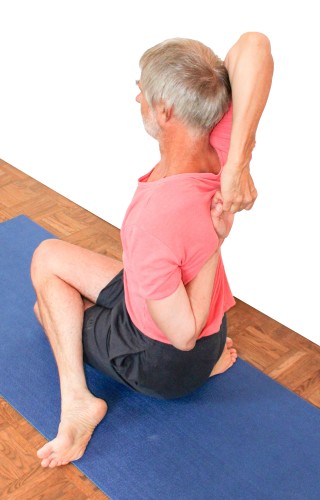 |
Feedback: We’d love to hear what you think about this description, give us feedback at:
postmeister@yogabook.org
Last modified: 30.12.2018
Name: gomukhasana
trivial name: cow face
Level: FA
- classification
- contraindications
- effects
- preparation
- follow-up
- derived asanas
- similar asanas
- diagnostics
- instructions
- details
- variants
Classification
classical: sitting pose
psychomental:
physiological: shoulder opening (frontal abduction and internally rotated retroversion)
Contraindications
Effects
- (226) shoulder blade: stretching for retraction
- (231) shoulder joint: stretching for frontal abduction
- (246) shoulder joint: stretching for retroversion
- (276) shoulder joint: stretching for internal rotation
- (301) stretching the triceps
- (306) stretching the biarticular middle triceps
- (501) stretching the latissimus dorsi
Preparation
Since one arm is in frontal abduction here, prepare it with :
- downface dog, especially the „wide“ variant as a general stretch of the shoulder
- back stretching, especially the „elevated“ version as a general stretch of the shoulder
- rectangular handstand
- handstand
- elbow stand
- rectangular elbow position
- dog elbow stand
- hyperbola as one of the most effective and efficient stretches in the direction of frontal abduction without turned out arms
- shoulder opening on the chair as one of the most effective and efficient stretches in the direction of frontal abduction with turned out arms
The other arm is slightly in retroversion and requires a completely different preparation:
- upface dog as a pose that warms up the deltoids, especially through correctly executed transitions
- purvottanasana if the tone in the deltoid is too high or has become too high due to preparation
- setu bandha sarvangasana promotes retroversion
- sarvangasana also promotes retroversion
Follow-up
Derived asanas:
Similar asanas:
Diagnostics (No.)
(230) Shoulder :
The flexibility of the shoulder can be recognised here, both in the sense of frontal abduction (upper arm) and – to a certain extent at least – in the sense of retroversion (lower arm), even if there are poses going much further for the latter. However, the rudimentary retroversion is combined here with a clear internal rotation of the arm. There may be indications of diseases of the shoulder:
- Irritable hypertonus of the deltoid: ambitious beginners in yoga in particular tend to develop irritation in the deltoid, which is localised in the area of the muscle origins, presumably due to overstraining of the structures through frequent repetitive demands in full frontal abduction and is also noticeable under such stress, FAQ.
- Various pathological changes of the shoulder joint such as impingement syndrome, frozen shoulder, calcifications of the biceps tendon, biceps tendinitis, subacromial syndrome, rotator cuff lesions, which cannot all be discussed here and require clarification.
- side discrepancies in flexibility
- Inadequate retroversion with simultaneous endorotation
The flexibility of the shoulder joint in terms of frontal abduction is recognisable in the form of the degree of deviation in the three dimensions of movement:
- Outward evasion of the upper arm
- Loss of external rotation, especially of the upper arm
- Incorrect angle of frontal abduction that does not reach 180° or does not reach it permanently
The flexibility in terms of retroversion is dependent on the internal and may already reach its limit here, but this can be significantly exceeded again when the internal rotation is cancelled. The anterior part of the deltoid (pars clavicularis) is the main limiting factor, in which corresponding stretching should also be felt.
(364) Elbow:
Disorders of the elbow joint can become visible in this pose.
Variants:
Instructions
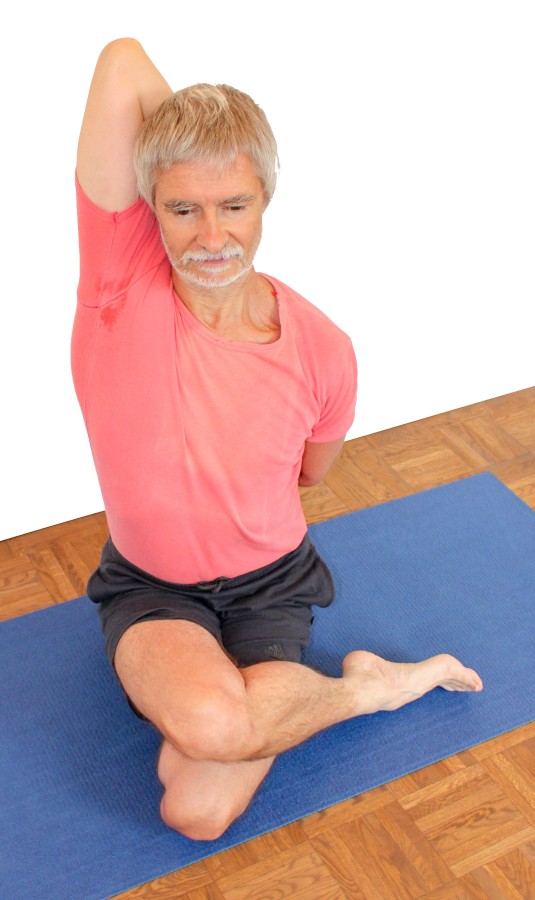
- Sit cross-legged on the floor; place your left leg a little way forwards; grasp your right foot and turn out your thigh as far as possible.
- Bend your right knee so far that you can sit on your right foot, with both ischial tuberosities pressing on the inner foot.
- Pull your left foot towards you and bend your left knee joint so that you can bring your left knee over your right knee.
- Extend your right arm horizontally to the right with the thumb of your right hand pointing downwards.
- Turn in your right arm wide and bend it down behind you so that you can place the back of your right hand on your back.
- Use your left hand to pull your right elbow or, alternatively, your right forearm to the left, while your right hand continues to slide upwards on your back.
- When the right hand is as far up as possible, stretch the left arm vertically upwards; turn it out as far as possible, bend the elbow as far as possible in order to grasp the lower right fingers or the right hand with the left hand or its fingers.
- Turn the left upper arm out as far as possible again, i.e. the biceps backwards.
- If you have not already done so, bring the left upper arm inwards towards the head in a vertical position and further backwards from there.
Details
- Make sure that the back of the right hand is flat on the back. If the inner edge of the hand lies on the back instead of the back of the hand, this restricts the movement because the wrist bends, which is a common mistake that often results in the fingers of the other hand not being able to be gripped.
- The left hand may not be able to grasp the right elbow to pull it towards medially. First pull the right forearm to the left and then push the right hand on the back upwards.
- Let the right shoulder blade sink and move backwards and inwards (depression and retraction). The right arm turns out, i.e. the biceps moves forwards.
- To turn out the left upper arm, the following trick may be possible: turn the head significantly (approx. 45°) to the right and press the back of the head to the left-back against the left upper arm. While maintaining counter-pressure, turn the head back, whereby the friction ensures further rotation of the upper arm.
- First grip with the fingertips together, then with the middle and proximal phalanges; later grip the palms of the hands; if there is still more flexibility available, grip the wrists. For the last two steps, the gripped hand must be turned round.
- There are basically two ways to perform the exercise for more flexible shoulders:
- allow the left elbow to move backwards and inwards as far as possible and reach as far as possible with the fingers or hands on top of each other; this maximises flexibility in the shoulder joint and scapulothoracic sliding bearing.
- Let the left upper arm become maximally vertical (in both directions); this stretches the middle, biarticular part of the triceps quite well.
The second option is the more advisable, as the potential additional benefit of the first is clearly less than that of the second.
- There are also two options for the shoulder blade of the upper arm: Depression and Elevation. The more interesting option is elevation, as this allows for greater stretching of the latissimus dorsi. Note that the elevation of an arm in an overhead position is only in the same order of magnitude as when the arm is lying against the body, i.e. not abducted, if the mobility is very good. Only very little movement may be recognisable here if there is little possibility, possibly the attempt at elevation even leads to a reduction in frontal abduction or a partial loss of external rotation.
- The position of the leg on which the pelvis rests is only tolerable if the knees are healthy and flexibility is good, otherwise pain and further damage to the inner knee can easily occur. If there is any doubt about the health of the knees or if there is discomfort in the inner knee, only the upper half of the pose should be performed, see below.
- This pose also stretches the triceps, namely the two monoarticular heads caput laterale and caput mediale through full flexion in the elbow joint, as well as the biarticular caput longum, which is the main retrovertor of the shoulder joint and also a frontal adductor, through additional frontal abduction. The sensation of stretching in the triceps can be particularly intense in strength athletes who repeatedly perform powerful pressing movements (bench press, neck press).
- Full pose requires good capability to turn out the thigh in the hip joint. The lower this is, the more the lower leg has to rotate internally in the knee joint, which can be intolerable, particularly in the case of a known pre-damaged knee joint (especially inner menisci), but also in knee joints that have remained asymptomatic up to now.
- In principle, flexion of the thoracic spine intensifies the stretching action in the upper arm.
- The upper elbow should move maximally upwards in the frontal plane, but no further inwards, so that the upper arm is vertical when viewed from the front or back. If possible, move the elbow further back from there.
Known problems that can occur even when executed correctly
Knee pain
As with other similar leg poses, it is not uncommon for pain to occur in the inner knee of one or both legs, which is why we do not practise the full pose with beginners and slightly advanced students and have them practise the upper half instead. If you want to practise the full pose, you can find tricks for dealing with this type of knee pain in the FAQ.
Variants
upper half

Restriction to the shoulder-relevant part of the pose. Reduces the tendency to knee pain compared to the original.
Instructions
- Sit comfortably cross-legged; if necessary, use a supportive folded mat under the rear edge of the buttocks so that the pelvis can straighten up better.
- Only adopt the pose in relation to the position of the arms, otherwise sit comfortably, e.g. cross-legged.
Details
- This variant avoids the demands on the knees and hip joints by being based on a comfortable and usually pain-free seat. The influence of the seat on what happens in the shoulder area is marginal anyway.
- In this variation, it is easier to work with the flexion of the thoracic spine to intensify the stretch in the upper arm.
Simplified leg position

Instructions
- ..
Details
- ..
Forward bend
Instructions
- Use the upper half variation as described above.
- If the perceived stretch is not sufficient, even though the hands reach as far as possible over each other, bend the thoracic spine as tolerated.
Details
- The forward bend in the thoracic spine causes the shoulder blade of the upper arm to tilt forwards with the upper arm, which increases the tension on the stretched muscles.
with a belt

For all those who cannot grip with their hands or fingers.
Instructions
- Drop a belt down from the top hand and grab it with the bottom hand. Grasp it shorter as far as possible.
- Pull the lower hand up as far as possible with the upper hand.
details
- In the version without the belt, the finger flexion is effective in both arms. Here, however, the effectiveness is deliberately limited to the lower arm, which is generally the more important work, as the anterior part of the deltoid (pars clavicularis) can be stretched well as a result.
- It is advisable to bend the pulling arm only slightly instead of widely, as this is much more comfortable for the elbow. Firstly, powerful extension of the elbow joint from the widest bend sometimes leads to discomfort and secondly, the tendon strength there is very low anyway according to the force-length function, which can cause the muscle to fatigue quickly.
- There are several gripping techniques for the lower hand: the loose end can be gripped or a loop. The hand or wrist can also be placed in a loop.
with a wall
Instructions
- Take the variation upper half as described above, but standing instead of sitting.
- If it is difficult to move the elbow of the lower arm to medial, lean your arm against a wall to push the elbow further inwards once you are comfortable.
Details
- By moving the elbow to medial, it is usually easier to move the hand to cranial.
(P) Side comparison
Instructions
- The supporter stands behind the performer and marks with one finger how far the fingertips of the lower arm can be moved upwards. Then perform the side comparison for the fingertips of the other arm.
- In the second step, the supporter measures how far the fingertips of the upper arm can be pushed caudally. Then carry out the side-to-side comparison.
Details
- The lateral comparison of the upper arm shows the possibility of frontal abduction of the upper arm in the shoulder joint. As the main restrictions usually originate from the latissimus dorsi, care must be taken to ensure that the shoulder blade is always in the same position, if possible, the maximum elevation, which can, however, be laterally different depending on the mobility of the latissimus dorsi on both sides. If this is known or observed, the shoulder blade must be kept in side comparison for the depression.
- The lateral comparison of the lower arm mainly shows the ability to retroversion the arm in the shoulder joint. In the low angles of the retroversion given here and due to the bent arm, this is mainly caused by the coracobrachialis and the pars clavicularis of the deltoid.