yogabuch / asanas / setu bandha sarvangasana
Contents
- 1 setu bandha sarvangasana„Construction of a bridge with all limbs“
- 2 Variations
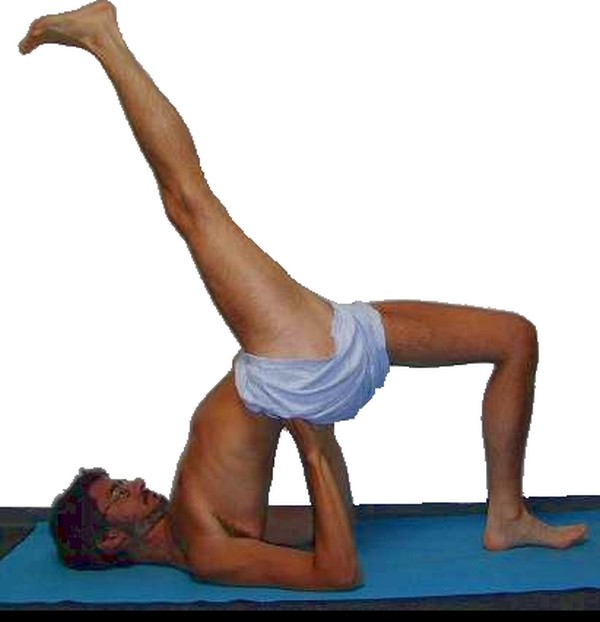
setu bandha sarvangasana
„Construction of a bridge with all limbs“

 instructions and details with working links as PDF for download/print
Feedback: We would love to hear what you think about this description, give us feedback at:
postmeister@yogabook.org
last update: 30.12.2018
Name: setu bandha sarvangasana
Trivial name: Construction of a bridge with all limbs
Level: A
- Classification: A
- Contraindication
- Effects of
- Preparation
- follow-up
- derived asanas
- similar asanas
- diagnostics
- Instruction
- details
- Variants
Classification
classic: posture
Contraindication
Facet syndrome, spondylolisthesis (spondylolisthesis), spinal canal stenosis and acute lumbago. Further disc disorders in the cervical spine
Effects of
- (312) Strengthening of the biceps
- (727) Strengthening of the monoarticular hip extensors (especially gluteus maximus)
- (732) Strengthening the end rotators of the hip joint
- (752) Strengthening the adductors
- (812) Strengthening the quadriceps
- (201) Stretching the neck / cervical spine in the direction of flexion
- (246) Shoulder joint: stretching for retroversion
- (511) Stretching the pectoralis major
- (621) Stretching of the neck / cervical spine
- (671) Stretching the long abdominal muscle rectus abdominis
- (681) Stretching the intercostal muscles
- (711) Stretching the hip flexors
- (971) Stretching the toe flexors
Preparation
The setu bandha sarvangasana combines an extension in the hip joint with lumbar and thoracic spine backbends with a strong cervical spine forward bend, the latter can be prepared with:
If the forearm muscles are too restricted in their flexibility or their tendency to spasm is too high, prepare them with:
Both arms are in retroversion, this can also be prepared:
- purvottanasana („8 treasures“)
- shoulder stand
- gomukhasana
- „Arms behind the body“ variation of uttanasana
- „Arms behind the back“ variation of prasarita padottanasana
- maricyasana 1
- maricyasana 3
- namaste on the back
To stretch therectus abdominis muscle and make it easier to bend backwards:
Preparation of the back for the BWS backbend:
If the lower back (lumbar spine) is known to be prone to discomfort in backbends, prepare it with:
- parsva uttanasana
- balasana (virasana forward bend, child’s pose)
- parsva upavista konasana
- parivrtta trikonasana
- parsvottanasana
- Half lotus forward bend
- karnapidasana
The gluteus maximus and other extensors must work hard for extension in the hip joints and to minimize hyperlordosis, prepare their work with :
- caturkonasana
- parsvakonasana
- counter
- warrior 2 pose
- purvottanasana
- urdhva dhanurasana
- eka pada variation of urdhva dhanurasana
- warrior 3 pose
- „Backwards against the wall“ variation of warrior 3 pose
and other various backbends. Shortened hip flexors limit (or prevent) extension in the hip joints and promote hyperlordosis of the lumbar spine. Stretch them extensively beforehand:
If the back is healthy, add:
and other backbends with extension in the hip joint.
Follow-up
derived asanas:
similar asanas:
Diagnostics (No.)
(312) Biceps and other arm flexors:
The arm flexors must constantly work to lift the pelvis. This can result in a lack of strength endurance or a tendency to cramp.
Extensive dorsiflexion under a heavy load may reveal weaknesses in the wrists.
- Ganglion, usually in the dorsal area between the hand and forearm, produces a sensation of pressure when the wrist is dorsiflexed
- Tendinitis of the tendons of the palmar flexors or finger flexors
- Carpal tunnel syndrome: worsening of symptoms in this position
- Fractures and fractures of carpal bones, especially the scaphoid bone
- Arthritic changes to the joint
- Arthritis (joint inflammation) of various kinds
- Dislocation / subluxation, which would cause a significantly increased sensation of tension in various muscles covering the wrist joint
- Joint trauma which may cause pain in the joint even after many weeks or months
but also purely muscular symptoms such as
- Shortening/hypertonus of the dorsiflexors of the wrist, which become noticeable as cramps during pressing
- Shortening/hypertonus of the palmar flexors of the wrist, which become noticeable during pressing through a sensation of stretching
The flexibility of the shoulder in the direction of retroversion can be easily recognized here, including side discrepancies. The pars clavicularis of the deltoid in particular requires good flexibility. There may be indications of diseases of the shoulder joint:
- Restrictions in flexibility of the shoulder joint in the direction of retroversion are evident here
- Various pathological changes in the shoulder joint such as frozen shoulder, calcification of the biceps tendon, which cannot all be discussed here and require clarification.
- side discrepancies in flexibility
Shortening of the pectoralis major possibly leads to limited retroversion or to the elbows becoming light and slipping apart
(644) LUMBAR SPINE:
Problems with the lumbar spine or its muscles may become apparent in this posture, see also the FAQ
If the pelvis does not clearlytilt into extension in relation to the legs in the hip joints, this indicates shortened hip flexors. Depending on the flexibility of the thoracic spine, the lumbar spine is then sharply hyperlordotic in the posture. If the thoracic spine is well mobile, the pelvis can perhaps still be lifted reasonably well, but the lumbar spine is severely hyperlordotic. If the thoracic spine is not very mobile, the pelvis can only be lifted slightly off the floor. A hollow back is likely to be found when standing upright. For the risks of a hollow back, see the FAQ.
Extension in the hip joint can cause pain in the case of existing hip damage:
- Arthritic changes to the joint
- Arthritis (joint inflammation) of various kinds
- Dislocation / subluxation, which would cause a significantly increased sensation of tension in various muscles covering the hip joint
- Joint trauma, which may cause pain in the joint even after many weeks or months
(722) Weakness of the abductors:
Significant difficulty in keeping the knees hip-width apart indicates, on the one hand, a massive evasive movement caused by the flexibility restrictions of the hip flexors and the intensive work of the gluteus maximus, which also has an exorotatory effect; on the other hand, the adductors are not strong or enduring enough to absorb this. A one-sided weakness of the adductors can be the cause of pelvic obliquity and consecutive scoliosis, see the FAQ.
The hamstrings works as a group of hip extensors on extension in the hip joints. Due to the significantly flexed knee joint, they are located in the area of already short sarcomere length not far from the active insufficiency and can therefore show a tendency to spasm here. It should then be investigated whether this is due to their excessive tone or shortening.
In this pose, knee problems associated with powerful extension movements of the knee joint in semi-flexion are evident. These can be, for example: traumatic or degenerative meniscus damage, arthrosis, retropatellar events such as chondropathia patellae or retropatellar arthrosis, arthritis, subluxations, ligament damage and others, see the FAQ.
Variants:
Instructions
- Lie on your back, bend your knees and pull your feet towards your pelvis if your hip flexors are flexible. Otherwise keep some distance from the pelvis. Place your feet hip-width apart.
- Using the pomus muscles, tilt the pelvis in the direction of extension in the hip joints and lift it as high as possible.
- Press with the thumbs from below on the tailbone(caudal) end of the sacrum (i.e. the lower end when standing upright) to tilt the pelvis further into extension and move it further upwards.
- Stretch into the knee joint to raise the pelvis even further.
Details
- Depending on the flexibility in terms of extension in the hip joints, the feet are pulled up to the pelvis completely or, if the flexibility is less good, only up to 10-20 cm. The distance is too small if the knee joints are significantly further forward than the heels in the posture.
- The movement of the pelvis mainly results from three efforts:
- The use of the arms over the thumbs. The exact position at which pressure is applied is important here: if pressure is applied to the cranial (upper in an upright standing position) end of the sacrum, the hands impart exactly the wrong movement in the hip joints, namely flexion, which leads to the lumbar spine being severely compressed instead of relieved by the use of the arms. Furthermore, pressure on the cranial end of the sacrum would lead to far less of the desired stretch in the hip flexors, esp. the iliopsoas, due to the reduced extension in the hip joints. Even pressure on the middle of the sacrum would still give away a lot of the opportunities that lie in the use of the arms. It is therefore important to press precisely on the lower(caudal) end of the sacrum. While the thumbs press there, the rest of the hand grips the buttocks so that the fingers point outwards.
- The use of the pomus muscles for the extension movementin the hip joints to stretch the hip flexor group and protect the lumbar spine area in this pose. The pomus muscles are used at the very beginning of the posture and continue until the very end.
- The use of the thigh muscles, which attempt a powerful stretching movement in the knee joint in order to push the pelvis further upwards.
- the extension of the spine from the strength of the autochthonous back muscles
- Particularly with good flexibility in the extension of the hip joints and depending on the force used in the extension of the knee joints and, above all, support from the arms, it can happen that the feet start to slide away from the pelvis despite the „non-slip“ mat. As this limits the strength that can be applied and therefore also the effect of the exercise, in this case the feet should be placed against the wall so that the toes are pointing upwards on the wall and the balls of the feet are in the space between the floor and the wall. The most serious factor that causes the feet to slide is the forceful use of the arms, which is usually only possible with good flexibility because the pelvis can be raised high.
- The elbows should be „as close as possible“ in this position, as long as they are not significantly narrower than shoulder width. However, they are often positioned much further out due to movement restrictions in the shoulder joint, which restricts the ability to push the pelvis upwards. On the other hand, they often have to stand much wider than shoulder width if the pelvis cannot be lifted far upwards due to significant movement restrictions in the hip flexors, as otherwise the hands would not be able to reach under the pelvis. Make sure that the pressure rests on the olecranon, not further medially on the ulnar sulcus or even the medial epicondyle of the humerus.
- If the neck (cervical spine) is sensitive or movement is severely restricted, it is advisable to position the shoulders on one to three mats folded in half twice so that the elbows also rest on them, but not the head. The head should lie lower than the shoulders to reduce the stretching requirement on the muscles of the cervical spine. Hair accessories that interfere with the symmetrical position of the head in this pose or cause the head to lie higher than absolutely necessary on the floor must be removed before starting the pose. It is sometimes pleasant to gently pull the head away from the shoulders with the hands before assuming the pose in order to stretch the neck (i.e. the dorsal cervical spine) slightly. Only do this moderately.
- It is important not to position the elbows lower than the shoulders, as otherwise they will exert little pressure on the floor due to the limited ability to retrovert the arms, even in comparatively flexible people, and therefore tend to slide slightly to the side. The flexibility requirement is particularly high here because the arms are largely exorotated.
- In a similar way to back arch, the feet also tend to deviate outwards from parallelism. The reason for this (see below) is both the pull of the tensed hip flexors and the gluteus maximus, which tries to extend the hip joint with all its strength, but at the same time also has an externally rotating and abducting effect. In addition, the biceps femoris, which acts as a hip extensor, can cause external rotation of the lower leg at the knee joint via its long head. Prevent this, especially when taking the pose, as otherwise the tendency to turn out the thighs and move the knees laterally is all the greater. Depending on the position of the thighs, external rotation also represents a potential external meniscus stress.
- In this pose, the shoulder blades should move maximally caudally (towards the pelvis, i.e. into depression) and inwards (into retraction), which means that this posture, in combination with the flexion of the cervical spine, represents a suitable stretching of the upper part of the trapezius.
- In isolated cases of severely restricted wrist movement, attempting to lift the pelvis in the manner described with the wrist bent dorsally is a challenge that can hardly be met. It is then necessary to look for a way of using the hands to provide support. If the flexibility of the pelvis is not too poor, this can be achieved by clenching the hand so that the proximal phalanges of the closed fists press on the pomus muscles instead of the thumbs on the sacrum. Again, great care must be taken to press on the lower(caudal) part of the pomus muscles so that the pelvis is supported in the correct movement and not in the wrong one.
- The movements of excellent body parts are as follows:
- The pubic tuberosities move upward.
- The coccyx and sacrum move away from the back towards the backs of the thighs.
- Push the caudal end of the sacrum upwards.
- Move the sternum towards the head.
- Move the knees towards the pelvis, away from the feet.
- Move the inner knees downwards and the outer knees upwards.
- It is not uncommon for there to be discomfort in the outer knee, especially in the „with wall“ variant, when working hard to extend the knee joints and at the same time limiting the outward movement of the knees. This will primarily be a consequence of two exorotation moments that add up:
- by the flexibility restrictions of the hip flexors, which attach to the lesser trochanter of the femur and, under tension, pull the thigh into exorotationby the powerful use of the gluteus maximus, which also performs abduction and exorotation at the same time
If you want to try to reduce the moments ofexorotation externally, you would have to turn both legs in close to the knees by hand with a lot of force, which may work in the short term, but experience has shown that it very quickly overtaxes the supporter. Alternatively, you can experiment with a dumbbell hanging from a belt that is placed around the thighs near the knees, the free end of which ends in the middle between the ventral side of the thighs, from which the dumbbell hangs. - Depending on the flexibility of the hip flexors, it may be difficult to press against the buttocks with the hands from below because the pelvis can only be lifted very slightly. In this case, you can also consider placing your feet on an elevation such as blocks or shoulder stands. This raises the pelvis further and makes it easier to press on the sacrum. It is a good idea not to elevate the heels, but only the rest of the foot. This makes it a little more difficult for the feet to slide away when the quadriceps are working hard, but depending on the material and height, it can put uncomfortable pressure on the sole of the foot.
- Depending on the distance between the feet and the shoulders, there may be a tendency to cramp in the hamstrings, similar to purvottanasana. Increasing the distance and focusing on the work of the quadriceps can then help.
Variations
Arms stretched

Effects: (311) Biceps: stretching
Instructions
- Take the pose as described above, but instead of pressing your thumbs on the tailboneend of the sacrum, extend your elbow joints outwards and press them onto the floor.
- The hands are clasped together with the palms facing the pelvis and the wrists moving apart.
Details
- The pressure of the arms on the floor helps to straighten the upper body away from the floor, ultimately lifting the pelvis and improving hip extension. This is a maximum retroversion of the exorotated arms, as in prasarita padottanasana, the arms behind the back variation. Although the forearms are in pronation due to the interlacing of the fingers, this should not restrict the exorotation of the upper arms to such an extent that the beneficial effect on the trapezius is reduced.
- A belt can be placed around the lower legs, which can then be pulled with the arms bent.
- The lack of support for the arms can increase the tendency of the hamstrings to spasm.
eka pada (one leg lifted)
Effects: (712) Strengthening the hip flexors
(817) Strengthening the rectus femoris
Instructions
- Take the pose as described above.
- Shift the weight onto one of the two feet and place the other foot where the middle between the feet was before.
- Place maximum weight on the „centered“ foot, lift the other foot slightly and extend the same knee joint close to the floor
- Without lowering the pelvis, slowly lift the leg that is extended close to the ground from a bend in the hip in a wide arc upwards and upside down until the restricted flexibility of the hamstrings of the leg sets a limit to the movement.
Details
- When the leg is lifted, the posture becomes much more intense: it is no longer two legs that lift the partial body weight, but one of the two previously active legs now counts as the partial body weight to be lifted and only one leg is available to lift it. This means that the force to be exerted in one leg must be more than twice as great in order to reach the same height of the pelvis. In most cases, the lifted leg pushes the pelvis noticeably towards the floor, especially the hip on the same side. Try to minimize this deflection as much as possible.
- Another evasive movement is the rotation of the pelvis in the plane. This is a massive stretching effect on the hip flexors of the standing leg. Due to the three-dimensional flexibility of the hip joint, the evasive dimension of the rotation of the pelvis in the horizontal plane is to be expected. It corresponds to abduction on the side of the hip joint in which the hip flexors are stretched and is manifested by visible outward deviation of the knee. This is exactly the same evasive movement as in the two-legged stance or the bridge.
- The hamstrings of the leg to be lifted limits the lifting of the leg or the movement towards the chest. At the same time, the flexion anglein the knee joint increases with further lifting. Attempts to extend the leg more forcefully or to pull it further towards the chest often lead to a tendency to spasm in the rectus femoris, as this works in a very short sarcomere length and is therefore close to active insufficiency. Very mobile people may be more affected because of the angle in the hip joint. However, this is not necessarily the case, as they often have a larger number of serial sarcomeres than less mobile people.
- The tendency of the feet to slip is significantly higher here, which is particularly noticeable in mobile hip flexors.
- The further the lifted leg moves beyond the vertical, the lighter the feet become, which increases their tendency to slip.
- The diagonal step to place the future standing foot in the centre is best done by first placing the heel inwards, which corresponds to an external rotation of the lower leg and is easier because the range of movement in this direction is greater.
Known problems that can occur even when performed correctly
Tendency to cramp in the rectus femoris
The rectus femoris can cramp if the leg is lifted a long way and at the same time stretched vigorously.
Grasping the ankles

Instructions
- Take the pose as described above, but do not press on the tailboneend of the sacrum with your thumbs. Instead, grasp the lateral ankles and stretch the knee joints to the maximum using the strength of the quadriceps.
Details
- This version, similar to the one on the wall, prevents the feet from slipping away from the shoulders due to the force exerted by the quadriceps, whereby the grip on the ankles may only be able to transfer limited forces due to their diameter and limited grip strength. Depending on body proportions, the ability to extend thethoracic spine and the flexibility of the hip flexors, it may not be possible to grip the ankles. In this case, a belt can be placed around the ankles and pulled.
- Keep your arms extended and grasp the ankles from the outside.
- Depending on your flexibility, it may not be possible to grasp the ankles. A belt that is placed around the restraints and pulled with an underhand grip may help. However, the pull is usually limited by the discomfort in the dorsal ankle area.
- If the belt is used, the grip from the bottom to the belt is the one that allows the arms to turn out better.
Feet elevated

Instructions
- Take the pose as described above, but place your feet on blocks aligned lengthwise.
Details
- If the flexibility of the hip flexors is restricted, it is often very difficult to press on the caudal end of the sacrum with the thumbs. Raising the feet can improve the situation because it also lifts the pelvis. Normally, you would not raise the feet if the hip flexors are very mobile, because raising the pelvis, which is already quite high, may also cause further flexion of the cervical spine, but this risk does not exist if the hip flexors are not very mobile. It should now be easier to keep the elbows tight in order to press on the sacrum.
- This variation can of course also be performed with the toes pointing upwards on the wall, which also ensures that the feet do not slip away when the quadriceps are used powerfully to extend the knee joint.
With belt

Prevents the knees from moving outwards
Instructions
- Attach a belt directly above(cranial) the knees and tighten it so that it leaves no more room for the knees to move outwards than hip width.
Details
- In some cases, the knee joints may become slightly painful, which was not the case without the belt attached.
- Check whether the knee joints are sufficiently prepared and try again with the same length of belt, then with a slightly longer length. One of the preparations that may prevent the occurrence of pain in the knee joints is to allow knee joints that tend to crack more or less loudly under wide flexion to crack once in order to eliminate any temporary dislocations.
- Of course, supta virasana is one of the good preparations.
- In some cases, there are also difficult to assess interactions between the muscles of the hamstrings in the back of the leg and the knee joint when the quadriceps in the front of the leg are stretched or at least the knee joint is flexed widely. Finally, the hamstrings is heavily involved in extension in the hip joints, but due to its rotational function on the lower leg, it could be involved in the development of knee pain in the event of an imbalance. To reduce this influence, it is advisable to perform a standing forward bend beforehand.
- Another way of trying to get to grips with knee pain is for an assistant to try to change the rotation of the thighs by performing a twisting movement in the thigh close to the knee. Experience has shown that endorotation is more successful than exorotation. However, this can quickly overtax the supporter’s strength. Another way to reduce discomfort in the outer knee is to use a dumbbell or other weight attached to the upper part of a belt around the thigh close to the knee. The belt is tied around the thighs when the buttocks are still on the floor. As the pelvis is lifted, the belt is pulled tight and the weight is at least partially lifted. The belt can also be attached in the same way, but instead of partially lifting the weight, a supporter places one foot on the free end of the belt. In this case too, the belt is pulled tight as the pelvis is lifted and the ventral thighs are pulled medially, i.e. the thighs are turned in a little.
- As the hips in this posture want to perform a clear evasive movement in the direction of exorotation of the thighs, the belt can be attached so that its buckle is at the top and a weight that does not touch the floor is attached to the hanging free end so that this causes a certain end rotation due to the friction of the belt on the thighs or their clothing.
- The belt attached around the thighs can increase the tendency of the hamstrings to spasm.
- Lateral differential tension of the rectus femoris leads to a shift of both knees towards the side of less flexibility when using the belt
with belt around the elbows
Instructions
- Stretch your arms back behind your body and place a belt shoulder-width apart around your upper arms right at the elbows.
- Sit on the floor, carefully lower your back and take the pose as described above.
- If the length of the belt matches the flexibility of the hip flexors, press on the tailbone end of the sacrum with your hands as usual. If the pelvis cannot be lifted sufficiently to apply pressure to this region, come out of the posture and loosen the belt a little until the pressure on the tailboneend of the sacrum is successful.
Details
If the hip flexors are less flexible, the belt should be wider so that the elbows are wider apart than shoulder-width apart.
with block

Instructions
- Take the pose as described above, but hold a block with your thighs close to your knees.
Details
- By working the gluteus maximus to tilt the pelvis into extension in the hip joints, forces are simultaneously generated that want to turn the legs out and abduct them away from each other. The block is used to control this evasive movement, which is otherwise often very uncontrolled and obvious.
- The block should be positioned relatively close to the knees because this is where the evasive movement is greatest. It goes without saying that you must work carefully so that the block does not fall on your feet. Another suitable object can of course be used instead of the block.
on block

Instructions
- Take the pose as described above, but place the sacrum on a vertical block and stretch the knee joints as much as possible. The heels should rest on the floor.
Details
- This variation is used to maintain the posture for a long time, but the effectiveness usually suffers considerably as a result: if the block fits well under the sacrum, the flexibility is so good that significant effectiveness would only be achieved if the pelvis were raised above it, but then the block would no longer help against the necessary effort. Because of this paradox, this variant is also less significant. Furthermore, the appropriate height is very individual, so that supports of different heights would be necessary. In addition, the pelvis can be tilted so far with good average flexibility that the sacrum rises away from the head. This variant does not do justice to this because it lies horizontally. The block only makes sense when the feet are lifted off the floor and the knee joints are stretched so that the long lever arm with the significant total mass of the legs can cause a stretch in the hip flexors by trying to stretch the legs more or less straight. But then it won’t be possible to hold it for very long and the pressure of the block on the sacrum can become uncomfortable. This can be remedied with a softness mediator. In this variation, an attempt is made to extend the knee joints in order to increase the effective lever arm on the one hand and to increase the effective force by reducing the contact force of the feet on the floor on the other, so that a significantly greater lever is created in total.
- If more than one block is required, the lower block or blocks should, as always, lie horizontally for the best possible stability and the top block should be on the second largest or the smallest side. This is then positioned lengthwise parallel to the longitudinal axis of the cross leg underneath it.
Elbows raised

Instructions
- take the pose as described above, but place the elbows on a sufficient elevation to be able to press on the sacrum with the thumbs.
Details
- If the hip flexors are very flexible, the arms may appear too short to be able to press on the sacrum because the pelvis lifts very high. In this case, a sufficient elevation of the elbows ensures that pressure is possible again. Of course, this elevation must be soft enough so that its edge does not press uncomfortably on the triceps or its tendon. A soft shoulder support plate or offset patches often prove to be beneficial.
With wall

prevents the feet from slipping
Instructions
- Take the pose as described above, but place the bottoms of your toes on the wall, so that the base joints are directly in the edge of the room and your feet are parallel to the wall.
Details
- Depending on how much strength is available in the legs, what angle can be achieved in the knee and hip joints and how non-slip the surface is, the feet can slip away in the standard version. This is prevented by this version. In this way, all the strength of the quadriceps can be used to extend the knee joint and force the pelvis to move upwards, resulting in improved hip extension.
- With good flexibility in the hip flexors, the buttocks can be pushed directly to the heels to assume the pose. It is then usually necessary to move the knees outwards briefly while assuming the posture, as otherwise they would hit the wall, which would block further assumption of the posture.
- As far as friction is concerned, the limit in this variation is set by the friction in the shoulder area, but in relation to the overall condition it is usually set by the lumbar spine area. Be careful not to overstrain this area, just like the cervical spine!
- The greater the force exerted by the legs, the more the knees and thighs move apart into abduction in order to control this, see the variation below with the block and wall.
- In this pose, misalignments(subluxations) of foot bones, usually tarsal bones or the metatarsal bones, can become noticeable directly or in the adjacent joints. In addition, in the case of hallux valgus, the metatarsophalangeal joint area of the big toe will show increased pressure pain. Metatarsalgia is pain due to pressure or movement in the area of the ball of the foot and can have various causes.
with block and wall

Maximum use of quadriceps strength plus control over the lateral deviation of the knees.
Instructions
- Hold a block with your thighs close to your knees.
- Assume the basic position as described above, but place the bottoms of your toes on the wall, i.e. the base joints are directly in the edge of the room, feet pointing parallel to the wall.
Details
- This variation allows maximum use of force in the thighs and at the same time good control of the outward evasive movement of the knees, which occurs as a result of the three-dimensional flexibility in the hip joint and reduces the stretching effect on the hip flexors.
- Theoretically, the thighs would make a twisting movement that pushes the block downwards, which opposes the massive exorotation moments of the evasive movements in the hip joints. However, this will rarely be recognizable as such.
(P)

Instructions
- Take the pose as described above.
- The supporter stands in front of the performer’s feet, facing him, and turns his thighs in close to his knees.
Details
- As the supporter intervenes with his upper limb on the performer’s lower limb and at the same time has to apply an opposite moment to the moments generated by such powerful muscles as the iliopsoas, rectus femoris and gluteus maximus, he will have to exert a lot of force and will at best be able to maintain an effective support for a short time. Therefore, the main purpose of this support is to narrow down the nature of the discomfort and determine whether it is dependent on rotation. If so, this suggests that the cause is the outer meniscus.
(P) Lifting the pelvis with a belt
Instructions
- As the supporter, stand symmetrically above the performer’s thighs, facing their upper body.
- Place a belt under the performer’s buttocks and use it to lift the pelvis as far as possible.
Details
- Greater force may be required when lifting the pelvis. A good way to hold the two ends of the belt so that they do not slip in the hands and do not cause too much pressure anywhere in the hand is to wrap the ends once around the hand so that the free end is on the outside. Make sure that the belt does not twist on the back of the hand.
- Lifting the pelvis at the buttock crease promotes hip extension on both sides as desired. If the lumbar region is not sensitive, this may lead to discomfort there. However, this mainly concerns cases in which the traction of the iliopsoas on the lumbar spine increases the symptoms of an existing injury. The traction must then be reduced.
- Other possible points for applying tension are the middle of the buttocks, as the belt could slide in one direction, which could lead to a jerky increase in tension towards the end of the slide, which could be very unpleasant in the lumbar region. If, on the other hand, the belt were pulled cranially in the area of the lumbar spine, this would counteract the desired and already difficult extension in the hip joints on the one hand and increase the hyperlordosis of the lumbar spine on the other.
(P) eka pada

Instructions
- Adopt the eka pada variation as described above.
- The supporter stands in front of the performer, facing their chest, and places the ankle of the lifted leg against their own shoulder while pressing on the thigh with the forearms to extend the leg through the knee joint. At the same time or afterwards, he moves his upper body in a leaning movement towards the upper body of the performer in order to increase the flexion in the hip joint.
Details
- This variation is a high-intensity exercise that also minimizes the tendency to cramp in the rectus femoris of the lifted leg. At the same time, the supporter has a good view of the execution and can correct evasive movements in the pelvis or the standing leg verbally if necessary.
- The pressure on the thigh should of course be comfortable.
- The pressure against the leg should not cause the standing leg to lift, so push the leg backwards and downwards, but not so much that the pelvis sinks.
- Here too, the supporter has a good view of the entire execution and can, for example, observe whether the standing leg moves outwards.