yogabuch / asanas / sarvangasana
Contents
- 1 sarvangasana„All limbs position (‚Shoulder stand‘)“
- 2 Variants
- 2.1 Two-legged lift
- 2.2 One-legged lift
- 2.3 with baddha konasana leg position
- 2.4 eka pada
- 2.5 eka pada salamba
- 2.6 padmasana
- 2.7 supta padmasana
- 2.8 parsva
- 2.9 parsva eka pada
- 2.10 Right-angled
- 2.11 Turned at right angles
- 2.12 hanumanasana
- 2.13 samakonasana
- 2.14 Switch between samakonasana in sarvangasana and right-angled sarvangasana
- 2.15 Instructions
- 2.16 Hip joints extended
- 2.17 supported
- 2.18 With belt
- 2.19 with a block between the legs
- 2.20 (P) Transition to setu bandha sarvangasana
- 2.21 (P) Pull on the legs and push the pelvis
- 2.22 (P) Raise the upper thoracic spine
- 2.23 (P) Raising the upper thoracic spine with feet on the wall
- 2.24 Transition to setu bandha sarvangasana
- 2.25 Transition to halasana
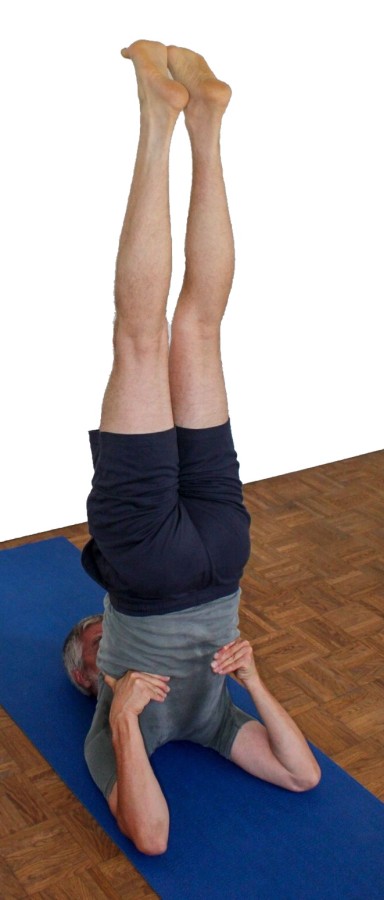
sarvangasana
„All limbs position (‚Shoulder stand‘)“
 instructions and details with working links as PDF for download/print
Feedback: We’d love to hear what you think about this description, give us feedback at:
postmeister@yogabook.org
last update: 12/30/2018
Name: sarvangasana
Trivial name: All-limbs pose (’shoulder stand‘)
Level: A
- Classification: A
- Contraindication
- Effects of
- Preparation
- follow-up
- derived asanas
- similar asanas
- diagnostics
- Instruction
- details
- Variants
Classification
classical: posture
psychomental: emotionally calming
Contraindication
This posture is absolutely contraindicated in the case of an acute disc problem in the cervical spine. In the case of an acute disc problem in the lumbar spine, the challenge is to take the pose without flexing the lumbar spine. The usual simple path via karnapidasana and halasana is therefore out of the question. However, the more advanced transition from setu bandha sarvangasana is possible, which in turn is strictly contraindicated in the case of facet syndrome, spondylolisthesis (spondylolisthesis) or spinal stenosis.
Effects
- (752) Strengthening of the adductors
- (312) Strengthening of the biceps
- (602) Strengthening the back extensors
- (642) Strengthening the muscles of the lumbar spine
- (722) Strengthening the hamstrings
- (727) Strengthening the monoarticular/short hip extensors (especially gluteus maximus)
- (201) Stretching the neck / cervical spine in the direction of flexion
- (246) Shoulder joint: stretching for retroversion
- (291) Stretching the trapezius
- (511) Stretch of the pectoralis major
- (621) Stretching the neck / cervical spine
Preparation
This posture requires the entire cervical spine to bend by approx. 90°. Prepare for this with postures with less strain and better control of the load on the cervical spine:
Both arms are in retroversion, this can also be prepared:
- purvottanasana („8 treasures“)
- shoulder stand
- gomukhasana
- „Arms behind the body“ variation of uttanasana
- „Arms behind the back“ variation of prasarita padottanasana
- maricyasana 1
- maricyasana 3
- namaste on the back
Due to flexibility restrictions in the cervical spine, it is usually difficult to stretch the back. Therefore prepare with:
- „Table“ variation of uttanasana
- right-angled uttanasana
- warrior 3 pose
- Warrior pose3 backwards against the wall
- Headstand in the „lower legs bent“ variation
- Right-angled headstand
- Right-angled shoulder stand
- Raised back extension
- halasana
- upavista konasana with block
The pomus muscles and other extensors must work intensively to move the legs away from the head and thus bring the hip joints to 0° flexion. Strengthening preparations for this:
- caturkonasana
- parsvakonasana
- counter
- warrior 2 pose
- purvottanasana
- urdhva dhanurasana
- eka pada variation of urdhva dhanurasana
- setu bandha sarvangasana
- eka pada variation of setu bandha sarvangasana
- warrior 3 pose
- ‚Backwards against the wall‘ variation of warrior 3 pose
and various other backbends. Stretching preparations to facilitate the movement of the legs away from the head, which is often made more difficult by limited flexibility of the hip flexors:
- hip opener 1
- hip opener 2
- Quadriceps stretch 2
- warrior 1 pose
- ardha supta krouncasana
- supta krouncasana
- upface dog
- urdhva dhanurasana (back arch)
- ustrasana (camel)
- setu bandha sarvangasana
and other backbends with extension in the hip joint. The hamstrings rarely shows a tendency to spasm; if this is known, practise in advance:
- uttanasana as a generally effective and efficient stretch of the hamstrings to prepare for flexion in the hip joints in this pose
- prasarita padottanasana very similar to uttanasana
- parsvottanasana as a stretch that goes beyond uttanasana
- pascimottanasana
- janu sirsasana
- tryangamukhaikapada pascimottanasana
- downface dog as another good preparation for the hamstrings when the pelvis is tilted powerfully
- hip opener 5 as a very effective stretch of the hamstrings that goes beyond uttanasana
- warrior 3 pose
- trikonasana
- parivrtta trikonasana
The adductors rarely show a tendency to spasm; if this is known, practise in advance:
Wrap-up
derived asanas:
similar asanas:
Diagnostics (No.)
(312) Biceps and other arm flexors:
In this pose, the arm flexors are used sustainably. Injuries and a lack of strength/stamina are evident here. The biceps may also tend to spasm, as they have to work both for supination of the forearm and flexion of the elbow joint in order to push the upper body further towards the head.
In marked palmar flexion and under greater load, weaknesses of the wrists may be evident:
- Ganglion, usually in the dorsal area between the hand and forearm, produces pressure sensation during dorsiflexion of the wrist
- Tendinitis of the tendons of the palmar flexors or finger flexors
- Carpal tunnel syndrome: worsening of symptoms in this position
- Fractures and fractures of carpal bones, especially the scaphoid bone
- Arthritic changes (degenerative with cartilage atrophy) of the joint
- Arthritis (joint inflammation) of various kinds
- Dislocation / subluxation, which would cause a significantly increased sensation of tension in various muscles covering the wrist joint
- joint trauma, which may cause pain in the joint even after many weeks or months
but also purely muscular symptoms such as
- Shortening/hypertonus of the dorsiflexors of the wrist, leading to a tendency to spasm
- Shortening/hypertonus of the palmar flexors of the wrist, which makes the dorsiflexion of the wrist in the performing muscles on the palmar side of the forearm painful due to stretching. These are not very common here due to the angle.
- Tennis elbow: Strain pain at the point of origin of muscles on the outer radial side of the forearm in the transition to the upper arm
- Disorders associated with sharp ulnar abduction
In principle, disorders of the cervical spine can occur during and after the shoulder stand, whether they are purely muscular or of other origin. If a tendency to this is known, the posture should be performed on a clear support: on several folded mats or on shoulder stand plates. Possible causes are shortening of the dorsal muscles of the cervical spine. If dizziness or neuroradicular symptoms occur, this should be clarified.
Here the flexibility of the shoulder in the direction of strongly exorotated retroversion can be recognized, including side discrepancies. There may be indications of diseases of the shoulder:
- Hypertonus/shortening of the anterior parts of the deltoid leads to stretching pain
- Various pathological changes in the shoulder joint such as frozen shoulder, calcification of the biceps tendon, which cannot all be discussed here and require clarification.
- side discrepancies in flexibility
Shortening of the pectoralis major leads to limited retroversion.
(650) Kyphosis and lordosis of the spine:
The deviations from the physiological double-S shape of the human spine become quite visible in this posture. There should be a certain degree of lordosis (convex spine from the front) in the lumbar and cervical spine and at most a small degree of kyphosis (convex spine from the back) in the thoracic spine. However, depending on the flexibility of the cervical spine and upper thoracic spine, the spine will not be able to stretch. It would be desirable for it to straighten beyond the physiological kyphosis. However, true extension is not desirable. See the FAQ.
(611) Pelvic obliquity/unequal shoulder height/scoliosis of the spine:
The lateral deviations of the spine from the sagittal plane known as scoliosis are also quite visible in this posture. See the FAQ.
In this pose, the strength endurance capacity of the back extensors is evident. In addition to good flexibility, the body’s internal resistance in the posture guarantees the need to stretch the back continuously and powerfully with the back muscles. Any tension, whether caused by posture, professional or other demands, scoliosis, hyperkyphosis of the thoracic spine or misaligned vertebrae, should become apparent here.
The flexibility of the hip flexors is visible here. Although a hollow back will not occur as a result of shortened hip flexors, as is often the case, the legs will not reach the extension of the upper body, i.e. the vertical and therefore the hip joints will not reach 0°. See also the FAQ on the risks of shortened hip flexors.
(752)(722)(812) Strength endurance of the leg and hip muscles
The shoulder stand is a very interesting construction in that it works all sides of the leg muscles. As soon as the hip flexors do not have very good flexibility, the extensors of the hip joint (especially the gluteus maximus) have to work hard to prevent the legs from sinking towards the head. As the head is also the exorotator of the hip joint, there is a tendency to turn the legs outwards, which must be compensated for with the help of the adductor magnus, among other things. Similarly, the hamstrings, together with the other extensors, must move the legs away from the head, but this creates a flexion tendency of the knee joint against which the quadriceps must work. Almost all of the groups relevant to the thighs are therefore visible here with their performance or also their weaknesses.
(901) Feet: Supply
Variants:
with baddha konasana leg position
right-angled with shifting of the legs
Switch between samakonasana in sarvangasana and right-angled sarvangasana
Transition to setu bandha sarvangasana
Instruction
- Take halasana or karnapidasana as described there.
- Give the pelvis some space to move backwards (away from the head).
- Use the hands to support the back at the sides close to the pelvis.
- Shift the pelvis far enough away from the head so that you can take the weight of the feet off the floor.
- Raise your legs and straighten them.
- Place the palms of the hands horizontally on the back with the fingers pointing towards the spine as low as possible (close to the floor, not close to the pelvis!) and use the hands to push the upper body into a vertical position.
- Move the legs away from the head and the upper body towards the head until both are vertical and the hip joints are extended.
Details
- Pushing the upper body down from the arms consists of two movements: the work of the arm flexors(biceps and brachialis), which push the back away from the floor and towards the head, and secondly the supination movementof the forearm, which lifts the inner edge of the hand and thus also the back supported by it. It is not uncommon for the strength endurance of the arm flexors or forearm muscles to be limited or for difficulties to arise in the wrist. In order to exert sufficient strength, the hands should be placed as low as possible (i.e. away from the pelvis).
- The arms should be and remain approximately shoulder-width apart. However, they are largely in retroversion. Restrictions in flexibility, e.g. in the anterior parts of the deltoid, restrict retroversion or force the elbows outwards. A support with good friction is essential here. A belt that holds the elbows together is also helpful. This is placed around the upper arms close to the elbows.
- Existing restrictions in the flexibility of the hip flexors prevent or make it difficult to bring the hip joints into an extended angle and set interesting muscle activities in motion: the muscle groups that move the legs away from the head and thus the hip joints towards an extended angle are the biarticular hamstrings, the gluteus maximus and other smaller extensors of the hip joint from the „dorsal hip musculature“. The ischiocrural group, as it is also a knee flexor, produces a flexion inclinationin the knee joint, which must be compensated for with the strength of the quadriceps. The strongest other extensor, the gluteus maximus, causes an exorotation moment in the hip joint, which must be compensated for primarily with the help of the adductor magnus, and at the same time an abduction, which all adductors must counteract. In this way, almost all thigh muscles come into action according to the flexibility restrictions of the hip flexors. Due to the extended knee joint, neither the rectus femoris nor the hamstrings have a tendency to spasm. Only the gluteus maximus, which works in a very short sarcomere length, and above all the adductors, as well as the monoarticular quadriceps parts, could develop a tendency to cramp. Use the gluteus maximus maximally in the direction of extension, but not for exorotation.
- The legs are as in tadasana, i.e. the heels and inner feet must be stretched upwards against the anatomical inclination to invert the foot. However, this should not be done so forcefully that the foot lifts start to cramp.
- Straightening the back and doing so in a vertical position requires good flexibility of the upper thoracic spine and the ability to at least decompress the rest of the thoracic spine. Restrictions in the flexibility of the cervical spine and thoracic spine increase the necessary work in the back muscles (mainly the erector spinae) to an extent that cannot be achieved, depending on the flexibility. Rather, in cases of maximum average flexibility, we often see the scenario that the flexibility restrictions of the cervical spine do not allow the upper thoracic spine close to the floor to become vertical and from the caudal side of the spine the flexibility restrictions of the hip flexors also pull the back into a curve via the pomus muscles and the pelvis because the legs are not vertical, The more restricted the flexibility of the cervical spine is, the more the legs are flatter to the floor and the more gravity acts to tilt the pelvis in the wrong direction.
- In contrast to the headstand, elevations of the shoulder area can also be performed to a greater extent if the flexibility restrictions or occurring cervical spine disorders require this. Of course, this also applies if the cervical spine is not always unproblematic, even if there is no contraindication in the strict sense. If larger supports under the head for the purpose of increased softness in the headstand lead to a deterioration in the feedback on the force used for balancing and to a partial loss of this force, the shoulder stand has no significant balancing character due to its large physical support base, which is extended in both dimensions, while the body mass is very compactly distributed at the top. However, it is advisable that the elbows are also supported along with the shoulders. Under no circumstances should they be lower than the shoulders, as the flexibility requirement for the shoulder joints(exorotated retroversion) increases with the height difference between the shoulder and elbow. In cases of very limited retroversion abilityof the arms, the elbows can and should also be supported so that a secure stance is possible and avoidable strain on the cervical spine due to movements that are difficult to control is avoided. The support under the shoulders should always include the acromion area of both shoulders. Narrower support as in chakrasana is not permitted here.
Pressure on the C7 (vertebra prominens, 7th cervical vertebra) is a recurring theme in sarvangasana. If used correctly, the shoulder support should provide sufficient relief. It is possible to work with smaller shoulder support plates that are placed a little distance apart so that the C7 is free. The shoulder support is used in such a way that there is still two fingers‘ width of space behind the shoulder on the surface (blanket or mat) before assuming the supine position. - The more limited the flexibility of the cervical spine, the more likely it is that the front of the body will feel compressed, particularly in the throat area. If this becomes too pronounced, the shoulder area should be supported accordingly.
- If the shoulder stand is performed with sweaty skin, it must be determined whether the bare skin or the clothed skin provides better friction for the hands. With dry skin, the friction is usually good, but with moist skin and moist hands, this can decrease considerably.
- The sensitivity of the cervical spine is the measure of use for all movements and corrections. Significant moments are exerted on its vertebral segments.
- The shoulder blades are in retraction as far as possible.
- If the spine and hip flexors are very mobile, the shoulder stand with a vertical spine and extension in the hip joints can be used to promote the strength endurance of the rectus abdominis while the pomus muscles are working well. The load on the legs is then held by the hip flexors and the tilting of the pelvis in the direction of lordosis of the lumbar spine is held by the rectus abdominis.
- The following rule applies: the height of the elbows must not exceed that of the shoulders and the height of the shoulders must not exceed that of the elbows.
- The shoulder area cannot tolerate any amount of elevation, as the greater the height, the greater the risk of the shoulders slipping off the elevation and endangering the cervical spine.
Variants
Two-legged lift

Instruction
- Assume halasana with your hands supporting your back.
- Bring more and more strength into the back and neck so that the feet become lighter and lighter on the floor.
- If necessary, allow the pelvis to move slightly away from the head and slowly lift the straight legs off the floor.
- Raise your legs to a vertical position and stretch your hips to 180°. If it was necessary to deviate a little with the pelvis, correct the position of the pelvis and upper body, keeping the legs in extension of the upper body, i.e. the hip joints extended.
Details
- The two-legged upswing is definitely not a beginner’s variation and is also not suitable for people with cervical spine damage. Strength is required in the neck muscles to absorb the not exactly small leverage of the legs.
- The prerequisite for this variation is that it is possible to reduce the weight of the feet on the floor to zero without bending the back. Only a slight deviation of the pelvis (with the upper body stretched out) away from the head is permitted, but this is corrected as soon as the legs have reached a vertical position. The stronger and more resilient the neck muscles are, the less the pelvis has to deviate.
- The upswing should be slow and based on strength alone, without any momentum.
- Of course, a good stretch in the hamstrings is a prerequisite for this variation, just as it is for the starting pose halasana.
- The strength to lift the legs comes from the gluteus maximus and the ischiocrural group. In some cases, these two groups may be too weak to lift the legs with combined strength given the large lever that the legs represent. However, it is often the autochthonous back muscles that are unable to absorb the resulting flexionin the spine.
- If necessary, the back can be supported with the hands.
- If the flexibility of the hamstrings is insufficient, i.e. if halasana cannot be performed with the back straight, legs straight and toes on the floor, the toes can be placed on an elevation so that it is possible to stretch the back and keep it stretched when the legs are raised.
- The inability to place the feet on the floor for halasana with the knee joint extended and the back stretched vertically shows a restriction in the flexibility of the hamstrings, very rarely only of the gluteus maximus, as this is a short hip extensor that usually sets a restriction in flexibility in the direction of flexion in the hip joint much later. The inability to raise the legs when the back is straight and vertical often indicates a lack of strength in the back and neck, less frequently in the hip extensors(gluteus maximus and ischiocrural).
One-legged lift

Instructions
- Assume halasana.
- Allow your back to move slightly backwards and support it with your hands.
- Bring one leg out of halasana into a vertical position, if possible without moving the upper body significantly away from the head.
- Let the second leg follow the first.
Details
- This variation is much easier than the two-legged lift. Although just as much flexibility is required in the hamstrings if it is to be performed from halasana, hardly any strength is required in the back when lifting one leg. The strength demand on the neck muscles is also much lower, so that this lift can also be performed with a weak neck.
- The pelvis often needs to be given a little space to move backwards so that the center of gravity is more favorable after the leg is lifted and the cervical spine does not have to support so much weight. Once the legs have been raised, the pelvis should be brought vertically over the shoulders again.
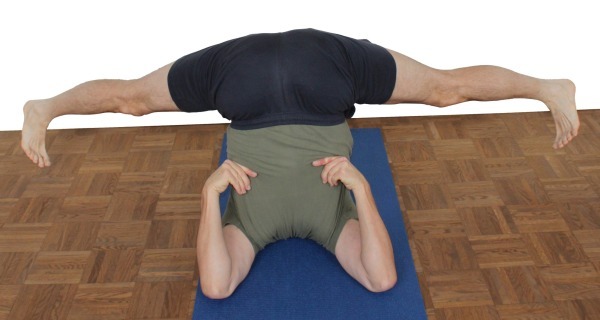
with baddha konasana leg position
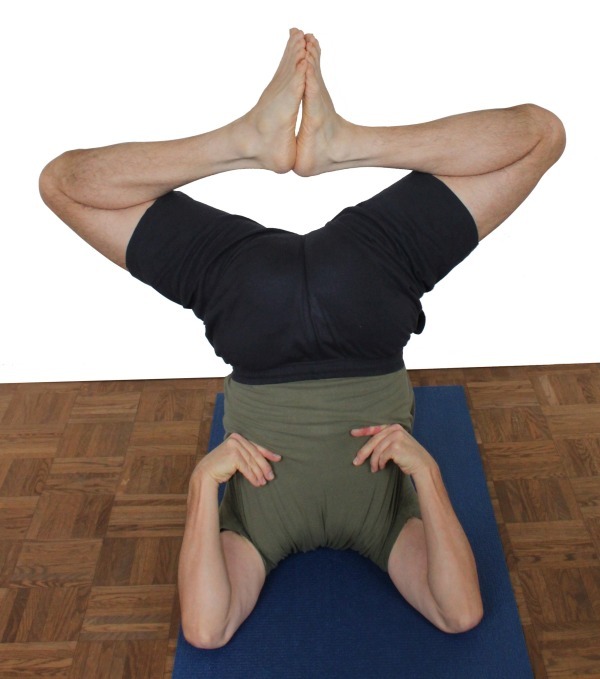
Instructions
- Assume the shoulderstand with one or two legs as described above.
- Hold the pelvis in position and bring both legs into baddha konasana at the same time.
Details
- This variation corresponds to the variations of handstand and headstand, see also the instructions and details there.
- As there is no floor to resist the feet and against which the knees could be moved, and no hands are available to perform this, the pomus muscles must pull the knees out of the field of vision. In some cases, this can lead to cramping of the pomus muscles after prolonged execution.
eka pada
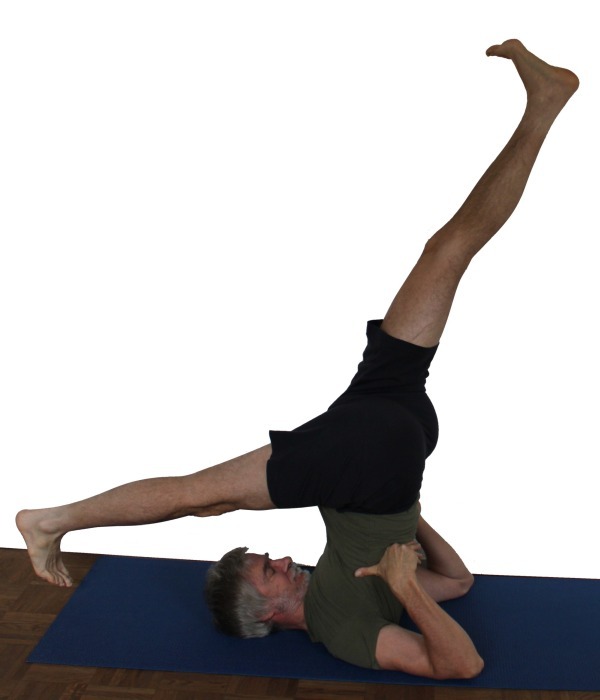
Instructions
- Assume the shoulder stand.
- Carefully move one leg out of the pose and support the neck accordingly, the further the leg is lowered, the more.
Details
- This variation corresponds to the headstand variation, see also the instructions and details there.
- In this variation, as in the corresponding variation of the head stand, lowering the leg causes a change in the center of gravity, so that the pelvis usually has to be moved away from the head, i.e. out of the field of vision, to correct it. Once the posture has been fully assumed, it must be carefully checked how far the pelvis can be moved back towards the field of vision without overstraining the neck. If the pelvis were not moved away from the head, the muscles of the cervical spine would have to provide more support. Avoid overstraining them.
- Here too, the lowered leg causes the pelvis to tilt away from the vertical, which results in a corresponding tilt of the back towards flexion. In contrast to the headstand, however, the tendencyof the back to flex is much greater in the shoulderstand, so that this variation significantly increases the necessary effort in the back and can therefore serve as a good strengthening of the autochthonous back muscles. This is all the more successful if the pelvis is not moved too far away from the head, so that the flexibility restrictions of the cervical spine or upper thoracic spine still have an effect on the extension of the back.
- In principle, the foot of the lowering leg can also be placed on a support instead of on the floor.
eka pada salamba

Instructions
- Adopt the eka_pada variation described above and place the foot of the lowered leg on the floor with the balls of the feet.
Details
- This variation relieves the cervical spine a little and allows better focus on stretching the back.
- Of course, the foot can also be placed on an elevation such as a block.
padmasana

Instructions
- Assume sarvangasana as described above.
- Bring the legs into lotus pose one after the other with momentum, as described in the corresponding handstand variation.
- Bring the legs into a horizontal position.
Details
- This variation corresponds to the corresponding variation of the headstand, see also instructions and details there.
supta padmasana
Instructions
- Assume sarvangasana as described above.
- Bring the legs into lotus pose one after the other with momentum, as described in the corresponding handstand variation.
Details
- This variation corresponds to the corresponding headstand variation, see also the instructions and details there.
- Crossing the legs is much easier if the hip joints are relatively straight. For the full pose, increase the flexion in the hip joints as much as possible; for the full variation, the legs must be brought into a horizontal position.
parsva

Effects: (672) Strengthening the long abdominal muscle rectus abdominis
Instruction
- Assume the shoulder stand as described above.
- Lower the pelvis and upper body slightly away from the head, i.e. dorsally, towards the floor.
- Support the pelvis strongly and move the legs sideways and downwards until the shoulder line threatens to become too light.
Details
- This variation is one of the advanced variations of the shoulder stand. It only works if a significant part of the body weight is supported by the arms, especially on the side to which the legs are moved. The gravity perpendicular moves very close to one elbow, which therefore carries a lot of weight. If the associated pressure sensation becomes uncomfortable, an appropriate pad may need to be used. If the legs are lowered too far, the center of gravity moves to the elbows and beyond. The shoulder line will then lift off first, shortly afterwards the head will also lift off the floor and the legs will sink a little further towards the floor.
- Pay attention to the wrists, do not put any undue strain on them. As far as possible, the forearm muscles should bear the weight.
- The legs tend to tilt excessively into extension at the hip joints due to gravity. Avoiding this is the more interesting interpretation. To do this, the angle in the hip joints is maintained with the strength of the hip flexors.
This causes increased activity in the rectus abdominis, which may be associated with trembling. To protect the lumbar spine, work intensively with the pomus muscles here too. - The hip joints tend to adduct (upper leg) or abduct (lower leg) due to gravity. This should also be avoided to achieve the full effect.
parsva eka pada

Instructions
- Take the eka pada variation of the shoulder stand described above.
- Lower the pelvis and upper body slightly away from the head towards the floor.
- Support the pelvis in the sacrum area, move the upper body with the pelvis and the previously vertical leg sideways and downwards as far as possible.
Details
- This variation is much easier than the two-legged parsva sarvangasana as the center of gravity is not so far away from the shoulder line.
- The more flexible the hamstrings, the more favorable the effect of gravity of the leg moving towards the chest when the other leg is lowered out of the field of vision, i.e. the gravity plumb line remains more favorable and the pressure on the elbow is less.
- Keep both legs extended. In the leg moving towards the chest, the hamstrings creates a bending tendencyin the knee joint, in the other leg due to the gravitational effect of the lower leg.
- Here too, the lowered leg tends to abduct.
Right-angled
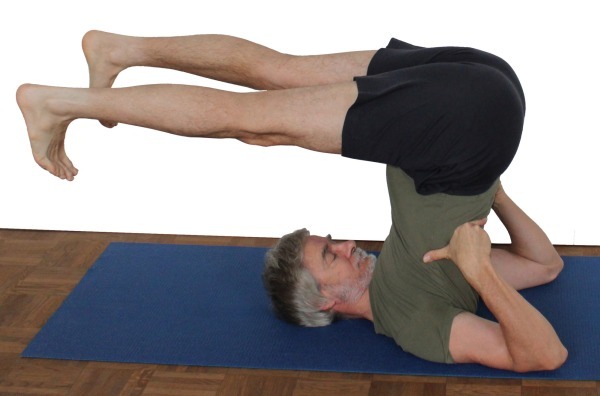
Effects: (207) Neck / cervical spine: Reclination force
(622) Force of the neck / cervical spine
Instruction
- Assume the shoulder stand as described above
- Bend at the hip joints and move the legs towards the horizontal. Allow the pelvis to move backwards (out of the field of vision) as far as necessary.
Details
- The right-angled shoulder pose is very similar to halasana (see also details there), but is less difficult as flexibility restrictions in the hamstrings are much less restrictive here. While in halasana the pelvis must tilt so far that at least the tips of the toes, but preferably the undersides of the toes, are on the floor with dorsiflexed metatarsophalangeal joints, which corresponds to an angle of well over 90° in the hip joints when the upper body is vertical, 90° flexion in the hip joints is sufficient here.
- As already described in halasana, but much more intensively there, existing flexibility restrictions in the hamstrings and the cervical spine/upper thoracic spine often force the back to round, so that a stretched back can only be achieved when the legs are raised well above horizontal.
- The horizontal legs generate a large tilting moment with their mass and lever arm, which acts on the pelvis and pushes the back into the curve. On the one hand, this forces the autochthonous back muscles to work intensively as described above; on the other hand, the tilting lever created in the shoulder area must be absorbed by the muscles of the cervical spine. This should only be expected of a healthy cervical spine. If the work of the cervical spine muscles becomes too intense, the pelvis can be moved slightly away from the head, which provides relief in two ways: the back moves out of the vertical and the necessary flexion of the cervical spine/upper thoracic spine is reduced, and on the other hand the gravity perpendicular moves further towards below the shoulder line, which also relieves the cervical spine muscles. Approach this variation carefully, do not practise for too long or too intensively at the beginning, but observe how your neck feels in the posture, after the posture and the day after before increasing the intensity or duration.
- Of course, restrictions in the flexibility of the hamstrings also create a bending tendencyin the knee joint, so actively stretch the knee joint with the quadriceps. The tendency of the rectus femoris to spasm, which is generally present when the hip joints are flexed and the knee joints are extended, is less pronounced here, as both the flexion in the hip joints and the extension in the knee joints are supported by gravity.
- In this pose, a careful attempt can be made to push the pelvis further into the field of vision. This must be done slowly and carefully because every millimeter puts additional load on the cervical spine! Note the steadily increasing inclination of the back to bend.
Turned at right angles
Instructions
- Perform the above variation at right angles as described.
- Rotate your upper body under your own power by moving your legs to the right as far as possible.
Details
- Unlike many other poses in which the strength of the arms helps to rotate the upper body, the rotation here comes only from the strength of the upper body itself. If an attempt is made to force the rotation and this is linked to the position of the legs, there is a tendency to bring the legs more into adduction or abduction in the respective hip joints. In the case of abduction, this is no problem, but with the adducted leg there is a tendency to cramp in the adductors as their sarcomere length is now very short.
Right-angled with leg displacement
Instructions
- Assume the right-angled shoulderstand as described above.
- Keeping your legs horizontal, move them alternately towards and away from your head.
Details
- This variation is not suitable for beginners. A sufficient degree of strength in the neck muscles, the autochthonous back muscles and the hip extensors as well as body awareness are required.
- Moving the legs further towards the head consists of two synchronized movements: changing the angle of the upper body, which means greater flexion of the upper parts of the thoracic spine, and a slight reduction in the angle of flexion in the hip joints, without which the legs would sink in relation to the horizontal. The movement of the pelvis away from the head then reverses these two movements. Experience has shown that the slight increase in the flexion angle in the hip joints is particularly unusual. In addition, it often takes place at the edge of the flexibility limit of the hamstrings and is therefore even more strenuous, if possible at all. It is possible that the gravitational effect of the legs is outweighed by the pull of the hamstrings, so that the hip flexors have to be used to keep the legs horizontal. On the one hand this often runs counter to expectation, on the other hand it increases the effort to keep the knee joint extended, after all the contraction force of the hamstrings, which holds the legs, also causes a flexion moment in the knee joint, which needs to be counterbalanced by using the quadriceps. This movement of the pelvis is then accompanied by greater use of the rectus femoris to further flex the hip joints.
- Moving the legs towards the feet causes further flexion of the upper thoracic spine. This is not available in all cases, which transfers the forces in the direction of the cervical spine or neck muscles. This defines a limit to the execution in such a way that it is not subjected to excessive tension.
hanumanasana

Instruction
- Assume the shoulderstand as described above.
- Simultaneously move one leg out of the field of vision in a straight line and the other leg further into the field of vision in a straight line.
- When both legs have reached the horizontal, you have reached hanumanasana in shoulderstand.
Details
- As the extension abilityin the hip joints is far less pronounced, the demands on them are significantly higher. Strictly speaking, an extension of 90° should be achieved in the hip joint of the leg moving out of the field of vision, which is not considered anatomically possible. This means that the pelvis must tilt backwards, i.e. into the hyperlordosis of the lumbar spine, which can lead to significant discomfort there. However, this often does not occur due to the contralateral countertraction. By tilting the pelvis, the lack of a 90° angle can be compensated for by increased flexion in the other hip joint, so that although both legs do not appear horizontal, they do appear at a 180° angle.
- A tendency to rotate can occur in both legs, which must be prevented. As often seen in hanumanasana, if there is not enough flexibility to achieve 180° in the sum of flexion in one hip joint and extension in the other, the pelvis will tilt, i.e. deviate from the 90° line to the line along the inside of both legs. This corresponds to adduction or abduction in the hip joints. This tilt is no less in shoulderstand and can also be corrected less, as the arms/hands are not available for this, nor is the friction of the heels on the floor.
- Due to the pull of the hamstrings, there is a bending tendencyin the knee joint of the front leg, although the gravitational force of the lower leg has a mitigating effect here. On the other hand, the force of gravity in the rear leg counteracts extension, so that the knee joint must be extended with the quadriceps, if possible without the tension of the rectus femoris pulling the pelvis out of extension.
- If both legs are moved equally, the gravity perpendicular hardly changes and, above all, the necessary tilting of the pelvis in the direction of the hyperlordosis of the lumbar spine means that only little body mass is displaced, so that this variant is very stable.
samakonasana
Instructions
- Take the pose as described above.
- Rotate both legs to the maximum at the hip joints.
- Move both legs sideways to the floor, if possible until they are horizontal.
- Use the strength of the pomus muscles to pull both legs back again, i.e. out of the field of vision.
Details
Samakonasana in sarvangasana is at least as stable a variation as hanumanasana in sarvangasana. However, as the flexibility of the adductors becomes increasingly limited, the angle between the legs becomes smaller and smaller, shifting the center of gravity further into the field of vision, so that the neck has to provide more and more support or, to avoid this necessity, the pelvis has to be shifted slightly out of the field of vision, which means tilting the pelvis towards hyperlordosis and changing the angle of the back to the floor. The latter creates a more or less pronounced hyperlordosis of the lumbar spine. The further the legs are still halfway forward instead of exactly to the side, the greater the tendency of the pelvis to tilt and the tendency to hyperlordosis of the lumbar spine. Limit both as much as possible!
Switch between samakonasana in sarvangasana and right-angled sarvangasana
Instructions
- Take the pose as described above.
- Slowly move into the right-angled version by gradually lifting the abduction in the hip joints and, if necessary, shifting the pelvis away from the head.
Details
- The challenge of this change lies in dealing with the change in the center of gravity that occurs during the transition from samakonasana to sarvangasana in the right-angled version due to the mass shift of the legs to the ventral side. This requires the pelvis to be shifted away from the head. This can be done with or, in the sense of this variation, without bending the actually straight part of the back.
Hip joints extended
Instructions
- Take the pose as described above.
- Slowly bring both hip joints into maximum extension, i.e. the legs further away from the head than their vertical position.
Details
- Depending on the flexibility restrictions of the hip flexors, there may be no hip extension available at all. The limiting factor here is not the
rectus femoris, but the iliopsoas. - If the legs are clearly brought into hip extension, this represents a displacement of mass, which may have to be compensated for by shifting the pelvis towards the head. Initially the force with which the elbows have to support the body increases, later the pelvis will have to be shifted. This not only creates a greater tendency towards an uncomfortable hollow back, which must be countered by using the hip extensors, but the mass shift can also put more strain on the neck, so that it must be handled very carefully.
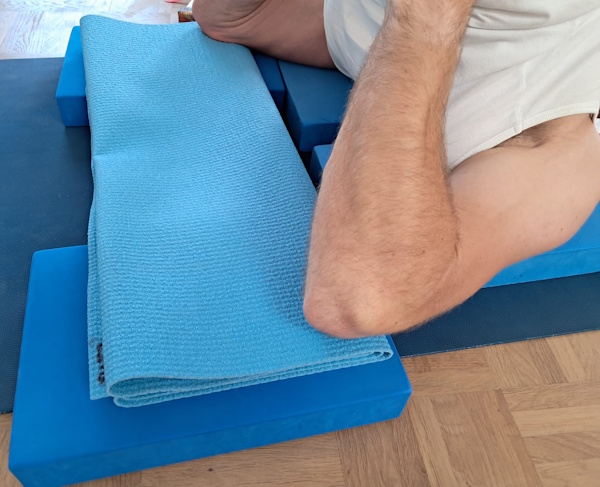
supported
Instructions
- Set up support for the shoulders and elbows so that the elbows are at least as high as the shoulders and the shoulders are at least as high as the head. If necessary to relieve pressure on C7, exclude the spinous processes from the support, for example by using two shoulder support plates with a gap between them.
Details
- A tried-and-tested setup involves two shoulder support pads with a small gap between them to accommodate the spinous processes. Depending on the size of the pads and the range of motion of the shoulder joints in the direction of retroversion, two further shoulder support boards are required, positioned further back, beneath the elbows. These may be higher than those beneath the shoulders, or they may be used in conjunction with one or more folded mats, so that the elbows are higher than the shoulders. These guidelines must not be disregarded: if the elbows are lower than the shoulders, greater retroversion capacity is required than is already the case; if the shoulders are lower than the head, even greater mobility in the upper thoracic spine is required. In any case, many people cannot achieve the required degree of extension without their back becoming noticeably rounded, or without experiencing discomfort in the cervical spine. Raising the elbows slightly above shoulder level makes it easier to keep the elbows close to the body.
With belt

Instructions
- Measure a belt to shoulder width.
- In a seated position, bring your arms behind your back and attach the belt to your upper arms near your elbows.
- Lower back and roll into karnapidasana.
- Take the pose as described above.
Details
- The forearms should be approximately parallel to the floor. However, depending on your flexibility, the pull of the deltoids, among other things, causes a more or less significant lateral abduction of the upper arms in the shoulder stand, which pushes the elbows outwards. The belt should be positioned as close to the elbows as possible, as this is where the lever arm is most favorable and thus both achieves the best effect and exerts the least pressure on the arms. In addition, the belt on the upper arms does not interfere with the work of the forearms, which try to push the back towards the head both with supination and by constantly reaching with the hands. If, as is often the case without the use of the belt, the elbows were to deviate significantly to the side, the hands would continue to lose height, which would worsen the lever arm when straightening the back in relation to the shoulder area. In addition, the forearms in the shoulder joint move in an arc, which means that the further they move outwards, the less they can press on the floor and may not touch it at all. For stability in shoulder stand, however, elbows pressed firmly against the floor and therefore a high and broad physical base of support are essential, if only for the benefit of the cervical spine.
- When resting the back on the belt, the arms and elbows are pulled slightly towards each other and are therefore halfway under the upper body. In practice, apart from a lack of pressure, this is usually not a problem. It is also possible that one elbow slips more than the other due to the pressure of the upper body on the belt.
with a block between the legs

Instructions
- Hold a block between your thighs and assume karnapidasana or halasana.
- Come into shoulderstand as described above.
- Counteract the tendency of the thighs to exorotate with the endorotation of the thighs, using the resulting movement of the block as additional control.
Details
- Of course, the rotation of the thighs can also be seen in the position of the knees and feet. There is a slight deviation in the feet due to the final rotation of the knee joint, so that when the midline of the foot is straight and the knee joint is extended, the latter points a little more towards the center of the body than exactly forwards. The feet are generally better suited as a reference than the knees, but only if the ankles are in neutral zero, i.e. in particular without any inversion to which they tend. The movement of the block now makes it clear whether or not a rotational action is taking place. The correct movement, which is the opposite of the natural evasive movement, is one in which the block moves out of the field of vision.
(P) Transition to setu bandha sarvangasana
Instruction
- Take the pose as described above to transition to setu bandha sarvangasana.
- The supporter places a belt in the performer’s butt crease.
- When it becomes apparent that the performer is reaching the limits of physics in lowering the pelvis and feet, as the pressure on the elbows increases and the shoulders become lighter and lighter, the supporter delays the transition by pulling the belt and therefore the pelvis towards them so that the performer can slowly place the feet on the floor.
Details
- Under no circumstances should the belt be positioned in the lumbar spine, as this would increase the hollow back that already occurs.
- Depending on the exact position of the pelvis and the hands of the supporter, i.e. the proportions of the two, the pull on the belt must go upwards towards the shoulders of the supporter so that the belt does not slip off.
- The pull on the belt should allow the performer to place the feet slowly and gently and can also help with the transition back to shoulderstand.
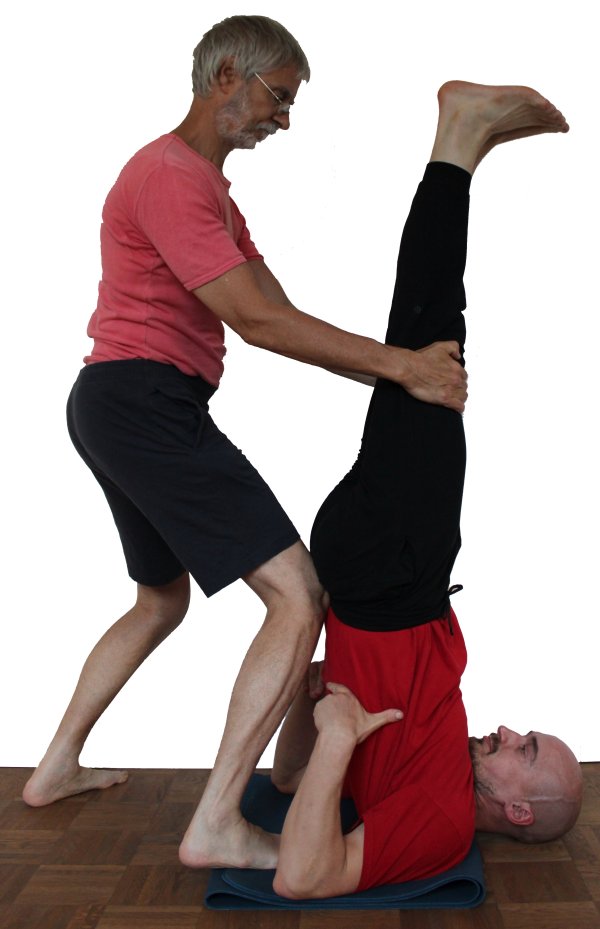
(P) Pull on the legs and push the pelvis
Instructions
- Take the pose as described above.
- The supporter stands on the side of the performer’s back and pulls the legs towards him/her while simultaneously pushing the performer’s pelvis away from him/her with the lower legs or the knee, depending on the proportions of the two.
Details
- The pressure against the pelvis must never lead to the performer’s cervical spine being overloaded. There are two approaches: on the one hand, the pelvis can be brought into position first, i.e. until the upper body is vertical in the cut or, if this occurs beforehand, until the cervical spine sets a limit; on the other hand, the legs can be pulled out of the field of vision first and then the position of the pelvis corrected. In practice, the first option should prove to be the more favorable if care is taken to ensure that the correction of the pelvic position does not lead to a significant movement of the legs towards the head or that this is limited.
- If the traction is applied to the legs first, a further deviation of the pelvis is observed quite regularly, so that significant correction will be necessary there.
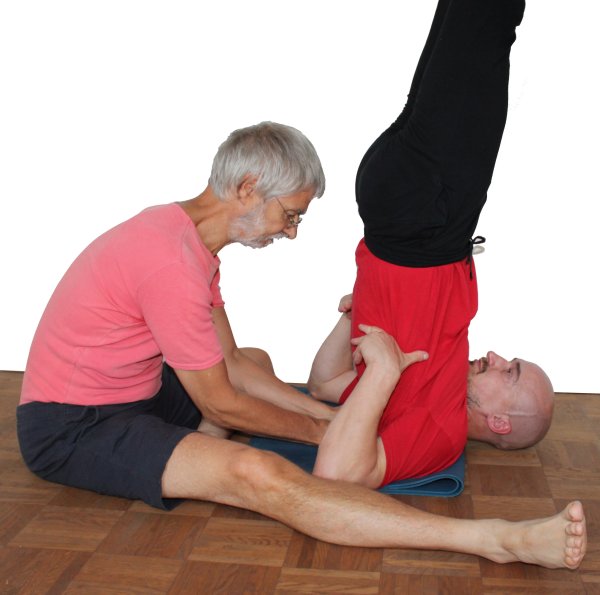
(P) Raise the upper thoracic spine
Instructions
- Take the pose as described above.
- The supporter sits behind the performer and carefully lifts the upper thoracic spine (close to the floor) towards the vertical with both hands, listening for feedback from the performer on the condition of the cervical spine.
Details
- Lifting the upper thoracic spine is an important and helpful support, but this will cause more tension in the cervical spine, as the entire caudal spine is pushed towards the head, which is equivalent to a shift in the mass of the upper body, which places more strain on the lever that represents the cervical spine with the head. The performer must therefore be well aware of the state of the cervical spine and give immediate feedback if the cervical spine becomes uncomfortable. The effect described above is aggravated by the fact that not only the upper body moves in the direction of the head, but also the legs with their large lever arm and their considerable total mass. Sometimes the performer also carelessly allows greater flexion in the hip joints when the upper thoracic spine is straightened, which also increases the moment to be supported.
(P) Raising the upper thoracic spine with feet on the wall
Instructions
- Take the pose as described above, but with your head pointing towards a wall and approx. 10-20 cm away from it.
- Adopt the best possible posture for the upper body and then place the feet as high as possible on the wall.
- The supporter now pushes the upper thoracic spine upwards and towards the wall. It may be necessary to place the feet higher on the wall so that the knee joints do not have to be bent.
Details
- By lifting the upper thoracic spine, the upper body straightens up more and the pelvis moves towards the wall and upwards. This means that the position of the feet may no longer be suitable if the flexibility in the OSG to adjust the position of the heels is exhausted. In this case, the feet must be moved slightly upwards on the wall so that the knee joints do not have to be bent. The feet are placed back on the wall at a medium angle of plantar flexion so that the feet do not need to be repositioned so quickly.
Transition to setu bandha sarvangasana

Instructions
- Take the pose as described above.
- Bend the knees, bring the hips into maximum extension and slowly lower the upper body towards the floor, gradually reducing the support on the back with the hands.
- Reach around with the hands so that the thumbs can later press on the sacrum-side end of the coccyx. The fingers then point outwards instead of towards the spine.
- Continue to lower your back and see how far your feet sink towards the floor.
- If possible, slowly place your toes on the floor and later the whole sole. If the toes cannot touch down, the rest of the transition must be done „on the hop“.
- Work with the pomus muscles on the extension in the hip joints, stretch in the knee joints, push the upper body further towards the head and continue to develop the posture.
Details
- The transition requires good flexibility in the hip flexors so that the plumb bob can be held close to the elbows and does not move beyond them away from the head, which would mean that the rest of the transition has to be done „in a jump“. Push the upper body so close to the head that the center of gravity remains favorable, but only so close that the feet can still sink to the ground. Depending on flexibility, this requirement cannot yet be met and the feet cannot be placed gently and reversibly.
- In the final phase of the transition, care must be taken to ensure that the (possibly unsustainable) sinking pelvis does not „break off“ the thumbs, forcing them suddenly and inevitably into an unavailable extension of the thumb joints.
- Depending on how good the flexibility of the hip flexors is, i.e. how far the center of gravity can be kept away from the elbows in the best case, it is possible to keep the shoulders on the floor throughout or they will inevitably lift off briefly before the feet touch down.
- In principle, this transition is also possible in the opposite direction, with good flexibility even without jumping off the floor.
- The transition to setu bandha sarvangasana and back should be one of the many ways to get into and out of shoulderstand without significantly rounding the lumbar spine – which is unacceptable if you have disc problems.
Transition to halasana

Instructions
- Take the pose as described above.
- Keep your back straight and slowly lower your legs until the balls of your feet touch the floor.
Details
- With increasing movement of the legs towards the floor, the pelvis must be moved a little further away from the head so that the gravity perpendicular remains in the favorable range and the cervical spine is not overstrained. The maximum of this movement is reached when the legs are horizontal; the pelvis can then be carefully moved in the opposite direction again.
- As the legs move towards the floor, the flexibility of the hamstrings for flexion in the hip joints becomes increasingly important. At a certain point, it will no longer be possible to keep the back straight. If there are known disc problems, this point should not be reached or exceeded. If there is no such suspicion, the point can be exceeded a little and an attempt made to fully straighten the back again. Whether the muscular work in the back in the autochthonous back musculature is greater in the area where the above point is slightly exceeded or just before it depends not least on the flexibility of the hamstrings and the resulting angle of the legs to the horizontal.