yogabuch / asanas / upface dog
Contents
- 1 urdhva mukha svanasana„upface dog“
- 2 variants
- 2.1 with inverted feet
- 2.2 on fists
- 2.3 on fingertips
- 2.4 shrugging
- 2.5 from the floor
- 2.6 transition between the foot postures
- 2.7 head in the neck
- 2.8 contraindication
- 2.9 pressing the heels against the wall
- 2.10 hands on the wall
- 2.11 Wrists on patches
- 2.12 Finger flexors released
- 2.13 Pushing the block away with the pubic bone
- 2.14 (P) with traction on the shoulders
- 2.15 (P) pressure on the thighs
- 2.16 transition to uttanasana
- 2.17 transition to staff pose
- 2.18 (P) transition to the staff pose with thumbs under the pelvis
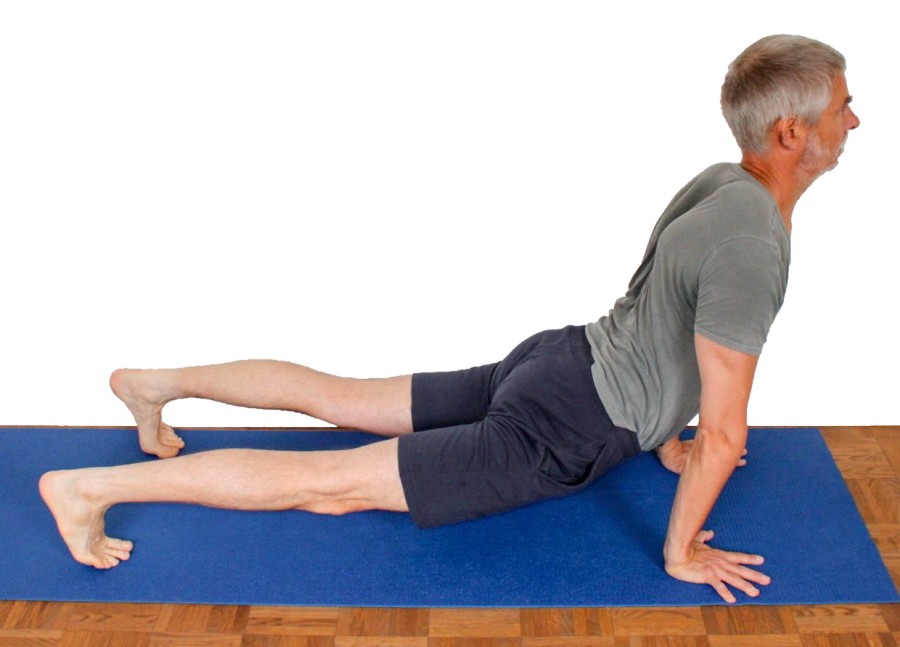
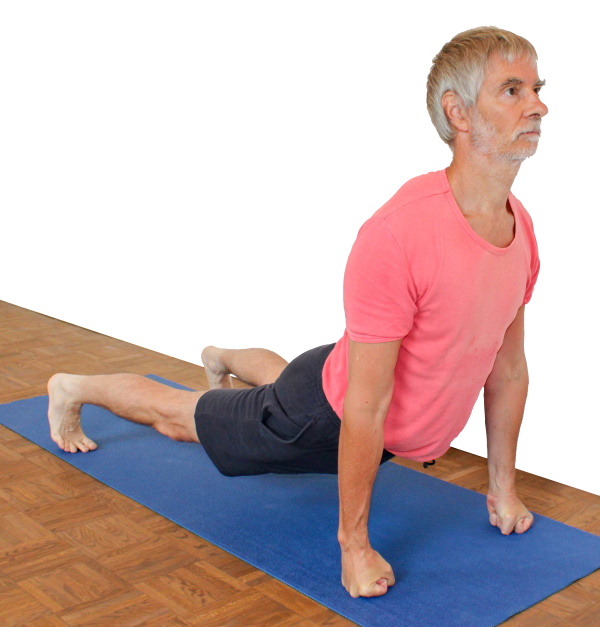
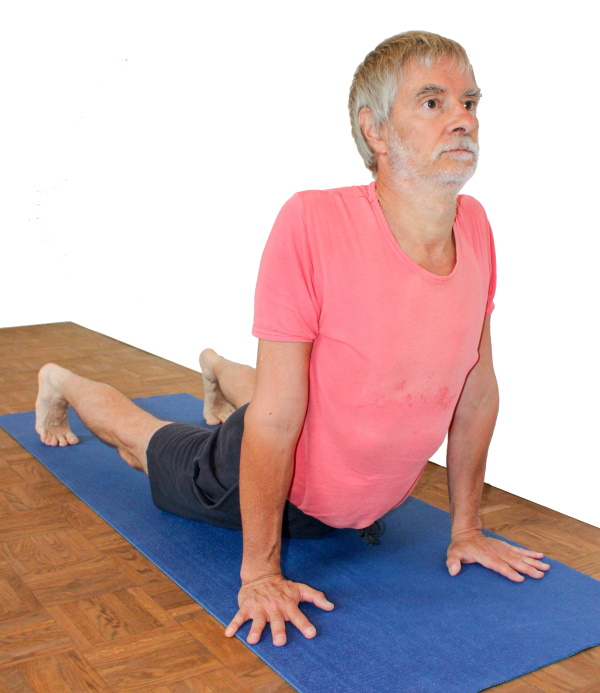
urdhva mukha svanasana
„upface dog“
 instructions and details with working links as PDF for download/print
Tue und lasse
Lower the upper body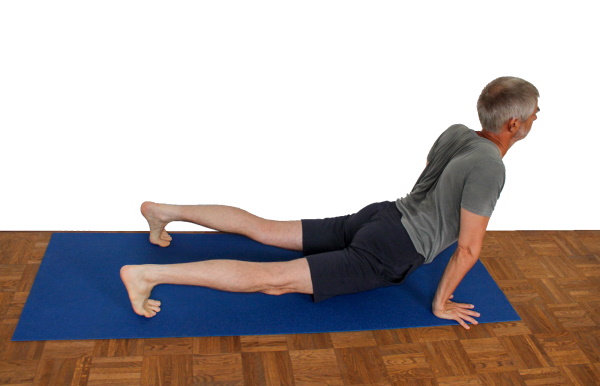 | Raise upper body to maximum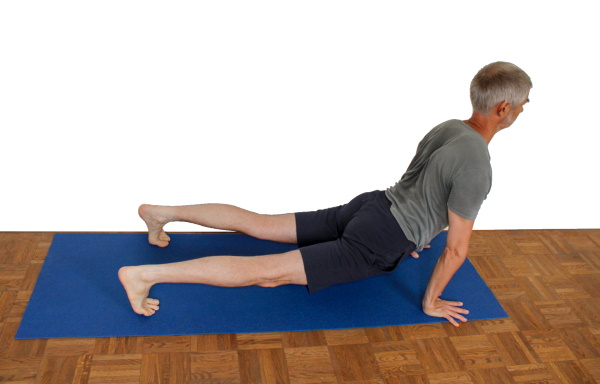 |
Feedback: We’d love to hear what you think about this description, give us feedback at:
postmeister@yogabook.org
last update: 30.12.2018
Name: urdhva mukha svanasana
Trivial name: upface dog
Level: A
- Classification: A
- Contraindication
- Effects of
- Preparation
- follow-up
- derived asanas
- similar asanas
- diagnostics
- Instruction
- details
- Variants
classification
classic: gentle backbend
psychomental: slightly stimulating, energizing
physiological: stretches the abdomen and hip flexors, strengthens the deltoid muscle
contraindications
Facet syndrome, spondylolisthesis, spinal canal stenosis and acute lumbago are contraindications because in all three cases the symptoms can worsen or the movements can contribute to maintaining or worsening the condition.
effects
- (423) Tone of the finger flexors (finger flexors)
- (292) Strengthening of the trapezius
- only pars ascendens
- (312) Strengthening of the biceps
- (352) Strengthening the palmar flexors
- (417) Strengthening for palmar flexion in the wrist
- (727) Strengthening the monoarticular hip extensors (especially gluteus maximus)
- (812) Strengthening the quadriceps
- (351) Stretching the palmar flexors
- (411) Stretching for dorsiflexion in the wrist
- (421) Stretching the finger flexors
- (671) Stretching the long abdominal muscle rectus abdominis
- (711) Stretching the hip flexors
preparations
One of the greatest difficulties in the upface dog is the lumbar spine with its tendency to stress or the high extension requirementin the hip joints responsible for this; the following preparations are suitable for this:
- hip opener 1
- hip opener 2
- warrior 1 pose with strong straightening of the pelvis
- purvottanasana all variations (the „eight treasures“, which only have a limited stretching effect on the hip flexors due to the work against gravity and the tension of the hip flexors, but which shake up the required pomus muscles – the extensors of the hip joint to be precise).
The following poses and all related poses go in the same direction, but are not necessarily suitable as preparation because they are more demanding, but are definitely synergistic:
and all backbends with hip extension.
If you have difficulties with the dorsal flexion of the wrists, which must be slightly more than 90°:
- forearms tretch for the palmar flexors to stretch the muscles in the wrist that are performing the stretch
- forearm stretch in upavista konasana for the palmar flexors Palmar flexors and finger flexors for further stretching of the wrist muscles
- forearm stretch for the dorsal flexors to reduce the tendency of the antagonists of the wrist muscles to spasm
With regard to lifting the upper body, preparatory and synergistic are:
- tolasana in all variants
follow-up
If there is still discomfort in the dorsal wrists after the head-up dog due to the limited ability to flex the dorsal wrists, it may be necessary to use the postures, which can also be used as a preparatory measure, as a cure:
- Unterarmdehnung für die palmaren Flexoren um die ausführende Muskulatur im Handgelenk zu dehnen
- Unterarmdehnung in upavista konasana für die palmaren Flexoren für weitergehende Dehnung der ausführenden Muskulatur im Handgelenk
- Unterarmdehnung für die dorsalen Flexoren um die Krampfneigung der Antagonisten der ausführenden Muskulatur im Handgelenk zu reduzieren
- forearm stretch for the palmar flexors to stretch the muscles in the wrist that perform the stretch
- forearm stretch in upavista konasana for the palmar flexors to further stretch the muscles in the wrist that perform the pose
- forearm stretch for the dorsal flexors to reduce the tendency of the antagonists of the executive muscles in the wrist to spasm
If an uncomfortable feeling in the lumbar spine remains after the posture due to the hollow back in the posture, this can be countered with the following postures:
- uttanasana, especially the „parsva“ version
- parsva upavista konasana
- parsvottanasana
- karnapidasana, also in the curl version
- Rolling up the back
derived asanas:
similar asanas:
diagnostics (no.)
A pelvis that sinks a little and is too flat and the resulting excessively sharp hollow back in this posture indicate shortened hip flexors, which is functionally related. The pelvis should sink low but straighten up as far as possible, i.e. raise the hip bones(SIAS) in relation to the buttocks. The lumbar spine should curve moderately and evenly concave. For the risks of a hollow back, see the FAQ.
(650) Kyphosis and lordosis of the spine:
The deviations from the physiological double-S shape of the human spine are clearly visible in this posture. The lumbar spine should curve evenly concave(extension of the lumbar spine), the thoracic spine should be able to lift the kyphosis and be straight or slightly bent backwards. See the FAQ.
(611) Pelvic obliquity/uneven shoulder height/scoliosis of the spine:
The lateral deviations of the spine from the sagittal plane known as scoliosis are also seen in this posture. See the FAQ. If one shoulder is higher than the other, the cause must be found. This can be a scoliosis, unevenly flexible iliopsoas, or unevenly depressed shoulder blades (rare).
Possibly the wide extension reveals difficulties with the hip joints such as:
- Arthritic changes in the joint
- Arthritis (joint inflammation) of various kinds
- Dislocation / subluxation, which would cause a significantly increased sensation of tension in various muscles covering the hip joint
- Joint trauma, which may cause pain in the joint even after many weeks or months
In extensive dorsal flexion and under greater load, weaknesses of the wrists are most likely to become apparent:
- Ganglion, usually in the dorsal region between the hand and forearm, produces a sensation of pressure during dorsal flexion of the wrist
- Tendinitis of the tendons of the palmar flexors or finger flexors
- Carpal tunnel syndrome: worsening of symptoms in this position
- Fractures and fractures of carpal bones, especially the scaphoid bone
- Arthritic changes to the joint
- Arthritis (joint inflammation) of various kinds
- Dislocation / subluxation, which would cause a significantly increased sensation of tension in various muscles covering the wrist joint
- Joint trauma which may cause pain in the joint even after many weeks or months
but also purely muscular symptoms such as
- Shortening/hypertonus of the palmar flexors of the wrist, which make the tendency of the dorsal side of the wrist to spasm noticeable.
- Shortening/hypertonus of the palmar flexors of the wrist, making the dorsal flexion of the wrist in the performing muscles on the palmar side of the forearm painful to stretch.
- Golfer’s elbow: Strain pain at the point of origin of muscles on the inner side of the forearm in the transition to the upper arm
(886) knee:
In this pose, knee problems associated with full extension under load are very well revealed: these can be, for example: traumatic or degenerative meniscus damage, arthroses, arthritides, subluxations, ligament damage, plica syndromes, Hoffa syndromes, retropatellar cartilage damage(chondropathia patellae, retropatellar arthrosis) and others, see the FAQ.
variants:
transition between the foot positions
push away a block with your pubic bone
(S) with pulling on the shoulders
(S) transition to bar pose with thumb under the pelvis
instructions
- Stand head down in dog position.
- Do not stop pushing backwards and move the pelvis forwards and downwards against the resistance of the shoulders pushing backwards.
- Use the pomus muscles as early and as strongly as possible to tilt the hips towards extension and move the pelvis forwards and downwards.
- Stretch the chest upwards between the arms as far as possible.
- Turn the upper arms out (inner elbows forward) and begin to push the body backwards with great force.
- If necessary, adjust the position of the hands or feet so that the wrists are no further forward than the shoulders, even when pushing backwards forcefully.
details
- Tensing the pomus muscles should not be done in the sense of „squeezing“, as this includes the twisting movement of the legs in the hip joints. This should be avoided. Instead, move the inner legs more upwards to counteract the tendency to exorotate. Only tilt the pelvis further towards extension in the hip joints using the strength of the pomus muscles. The work of the pomus muscles must be checked more frequently.
- Push the pelvis down but the backs of the legs up.
- Make sure that the knees remain fully extended. This requires the quadriceps to work. Lift the inner knees in particular. The more intensive the use of the pomus muscles for extension in the hip joints, the greater the bending moments in the knee joints.
- Lifting the rib cage requires constant attention, as it is easily lost. Measure this at the sternum or at the upper part of the trapezius between the neck and shoulder, the so-called trapezius line. This should rise as high as possible above the shoulders towards the neck. The movement of the shoulder blades is different to that of the head down dog: in the latter they move away from the pelvis (elevation), in the head up dog they move with all their strength towards the pelvis (depression), whereupon the upper body moves maximally upwards between the arms.
If the upper body is lifted powerfully between the arms, this is performed by the ascending pars of the trapezius and the pectoralis minor. However, the latter is also the protractor of the shoulder blade to a certain extent, which makes it very difficult to keep the shoulder blades maximally retracted when the upper body is lifted with force. - When the body is pushed backwards strongly from the shoulders, the wrists should not be further forward than the shoulders but just behind them.
- Keep the fingers spread apart, the tendons of the middle fingers parallel to the front in order to be able to press the base joints of the fingers down better.
- If the force ratios are so favorable that the feet slip away due to the backward pressure, press the feet backwards against a wall.
- If the arms are used correctly(rotated out and pushing forcefully backwards), there must be clear work in the biceps brachii muscle (arm biceps) and above all in the front shoulder muscles (deltoideus pars clavicularismuscle ). The need to fully rotate the arms arises on the one hand from the resulting possibility of optimally using the coracobrachialis and biceps as fontal abductors (anteverters) of the shoulder joint, and on the other hand this is the only way to avoid varus stress on the elbow joint due to the use of force in the direction of frontal abduction. An interesting aspect in addition to these important ones is that the forearms have to be maximally pronated in order to be able to press the base joints of the index fingers onto the floor, which provides an unusual opportunity to practise this and does good preparatory work with regard to the handstand and comparable postures.
- If the backward push is not strong enough, the arms may still be hyperextended, but this decreases with increasing backward pressure, as the biceps as frontal abductors of the shoulder joint also generate a flexion moment in the elbow joint during strong contraction, unless the deltoids together with the coracobrachialis are stronger than the biceps.
- The position clearly tends to cause the inner metacarpophalangeal joints of the fingers to come up. To prevent this, the forearm muscles (palmar flexors) and finger flexors may need to work very hard. If they lack strength and flexibility, this posture improves the situation.
- Inexperienced people may quickly notice the lower back. In most cases this is normal and not a cause for concern, unless there is a known or suspected contraindication (such as facet syndrome, spondylolisthesis or spinal canal stenosis). Any slight discomfort of a cramp-like nature should pass after a head-down dog position, but at the latest after the first hip opening. In cases of weak backs with shortened hip flexors, a person may not be able to stay in the exercise for more than about 5 to 10 seconds at first.
- The further back the wrists are, the more intensive the work in the biceps brachii muscle (arm flexors) and the deltoid muscles (shoulder muscles) and also the palmar flexors of the wrist becomes. As long as the wrists are not painful, the distance between the hands and the feet can be reduced, which makes the transitions from and to the dog’s head upwards more intense.
- Difficulties with the wrists can occur after holding the position for a long time and are almost invariably of a temporary nature. This can be remedied by
- in the position: pressing the base joints of the fingers down more forcefully:
- after the position: resting the wrist(stretching the dorsal flexors) and possibly also the palmar flexors.
variants
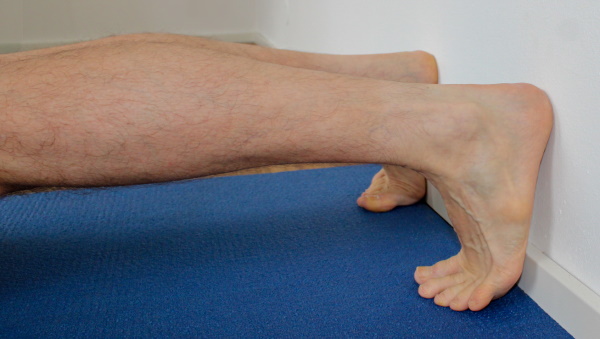
with inverted feet
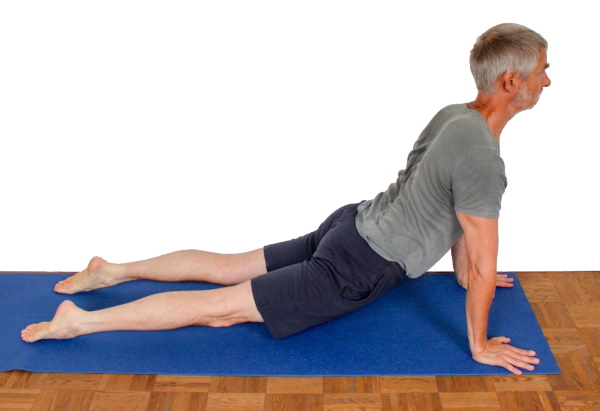
This variation has a significantly different effect on the shoulder/arm area. It does not strengthen the biceps and the front part of the deltoid but the triceps, in particular the biarticular middle part.
Effects:
(247) Shoulder joint: strength for retroversion
(302) Strength of the triceps
(307) Strengthening of the biarticular middle triceps
instructions
- Increase the distance from the „normal“ head-up dog position so that the wrists are slightly further forward than the shoulders.
- Turn the feet over so that the backs of the feet are resting on the floor.
- Continue to extend the arms well and start to pull the body forward with a lot of steady force. This stretches the skin on the back of the foot and puts effort into the back of the upper arm, the triceps.
details
- When performing this exercise intensively for the first few times (assuming correct rotation of the arms and very strong forward pull), an unfamiliar intense sensation may occur in the middle part of the triceps, possibly even a tendency to cramp. This is all the more true if the triceps are not trained or have a high tone. If this effort is not felt at all, there is usually still a lack of strength to push the arms backwards, complete exorotation of the arms or maximum depression of the shoulder blades.
- Keep your toes still on the floor or press them against the floor (especially if you are aware of a tendency to cramp in the sole of the foot).
- The tendency of the muscles in the sole of the foot to cramp when the foot is extended is well known; by pulling the foot forwards strongly, this should be limited.
- It is very easy to lose the height of the upper body, i.e. the upward extension of the shoulder ( depression of the shoulder blades). Keep pushing the upper body upwards with force and make sure that this is not lost when you start pushing backwards.
- Full extension of the arms is an essential movement in this pose. If the arms are turned out less than the maximum, the elbow joints will mechanically lock as a hinge joint in the direction of the force exerted (pushing backwards), which is undesirable for the joint because forces act unphysiologically on the joint structure that cannot be absorbed by muscles and, on the other hand, a valuable opportunity for muscular work is lost.
known problems that can occur even when executed correctly
Tendency to cramp in the middle, biarticular triceps
Even with reasonably developed and sufficiently mobile triceps, a tendency to cramp can occur when pushing backwards forcefully.
on fists
This variation largely neglects pushing the body backwards and therefore reduces the tension in the lower back. This allows for improved concentration on lifting the torso (corresponding to the depression of the shoulder blades). The arm muscles, especially the forearm muscles, are also used less and in a different way. This is often a possible execution if the head-up dog position would otherwise be impossible due to injury to the wrist or parts of the hand.
Effects:
(428) Tone of the finger extensors (finger extensors)
instructions
- Press the fists on the floor so that the palms are facing each other (inwards), approximately at the point corresponding to the normal dog position. The thumbs enclose the fists from the outside.
- Apply pressure to the fists and assume the dog position as usual, but with slightly less backward movement of the body. The resulting moment in the wrist, which pushes it into ulnar abduction (which also puts more strain on the index finger and its knuckles), should be controllable with forearm strength.
- In extremely rare cases, the upper body could be so much longer than the arms (the so-called „sitting giant„) and at the same time the flexibility in the hip flexors so good that in the normal execution of the upface dog the pubic tuberosities or more than these touch down on the ground. This variation could then be helpful, as the shoulders are higher by about the length of the palm.
details
- Due to the different lengths of the metacarpal bones, it is unlikely that all knuckles will touch the ground and if they do, at least not with equal pressure, which means that those pressing on the ground will be subjected to higher pressures that may exceed the limits of individual tolerance. Patches can help here.
- It goes without saying that the thumb lies on the outside of the fist on the fingers and not between them and the palm.
known problems that can occur even when executed correctly
Significant pressure sensation on the knuckles
Depending on individual sensitivity and, of course, body weight, the pressure sensitivity of the knuckles may be too high for this variant.
on fingertips
Effects:
(422) Strength of the finger flexors (finger flexors)
Contraindication
Hypermobility syndrome is a clear contraindication for this variation.
instructions
- Go into dog position head down on fingertips.
- If the pressure in the fingers allows it, slowly and carefully come up into the head-up dog position.
details
- The posture is described here from the downward dog position because the increase in pressure or effort in the fingers can be felt precisely in the transition to the upward dog position and until the upward dog position is reached, the attempt can be safely aborted if it is judged that the fingers may not be able to withstand the strain.
- As in the head down dog position, the base joints of the fingers are placed relatively high and the fingers relatively close to each other on the floor so that the base joints of the fingers are still some distance away from the 180° angle and the fingers are reasonably steep, which keeps the bending moments that occur smaller. Basically, these moments are relatively high in the posture and the steeper the fingers are, i.e. the closer the fingertips are to each other and to the thumb, the more favorable. Press the fingers towards the thumb with all your strength in order to absorb most of the forces/moments acting in the direction of hyperextension of the finger joints. Keep the hand turned out by 10° – 20°, i.e. the tendons of the middle fingers diverge slightly.
- If it becomes apparent on the way from dog head down to upface dog that the fingers may not be able to hold the load, return to the downface dog position. In practice, it has been shown that in all cases where the decision that the fingers should/would hold was possible, they did hold. Nevertheless, the strain and the force to be exerted by the fingers, hand and forearm is extremely high. In other words, this is a very high-level strengthening exercise that should be treated with respect!
- The hyperextension in the finger joints should remain moderate. In cases of great hyperextensionin the finger joints and especially the thumb joints, this posture should be avoided if the strength required to avoid great hyperextension is not available.
- A very intense sensation in the fingers may occur not only during the posture but also for a short time afterwards. However, persistent pain for a long time afterwards is neither normal nor tolerable.
- Compared to the downward dog position, the pressure in the fingers is perceived as much more intense here. In the order of training the fingers, the downface dog position would be the first, the second would be upface dog, then the pole would be tried, followed by the right-angled handstand, in which all of the body weight is already on both fingers. The ardha vasisthasana, in which more than 50% of the body weight rests on one hand, and then the handstand, in which again only 50% rests on each hand, but dynamic forces occur that are negligible when taking the aforementioned postures and negligible when building up slowly and carefully. Here is the recommended sequence again as a list:
known problems that can occur even when executed correctly
Intense sensation in the fingers
Intense sensation in the fingers is normal, depending on the strength in the finger flexors, this can be limited or occurs largely unrelated.
shrugging
instructions
- Take the dog’s head up as described above with the upper body raised to the maximum between the arms.
- Lower the upper body completely with the arms straight and then raise it again to the maximum, etc.
details
- The shrug should create awareness of the relative movement of the upper body to the arms. For many performers, it does not seem easy to raise the upper body between the arms and relative to them to the maximum in the head-up dog position. In contrast to the comparable movement in the downward dog position(shoulder blades towards the head, i.e. in elevation), the stretching out of the shoulders, i.e. also a relative movement of the upper body to the arms, this movement here(shoulder blades caudal, towards the pelvis, i.e. in depression) takes place in the opposite direction and is less restricted than in the downward dog position, as the strong latissimus dorsi does not oppose this movement. The shrug described here represents the more frequent alternation between raising the upper body between the arms and its passive, gravity-induced descent.
- Especially when the upper body is lowered, the arms develop a bending tendency and may also deviate sideways from the body. This posture is meant as an exclusive change between the raised and lowered position without any change in the arms, i.e. without bending the elbow joints, without lateral deviation of the arms or changing their rotation, they always remain in the same position, always in maximum exorotation.
- There is a connection between the lifting of the upper body and the ability to move the shoulder blades backwards from the sternum(retraction) in such a way that this is slightly restricted when the upper body is lifted (i.e. shoulder blades moved to the maximum towards the pelvis). The scapulothoracic pectoralis minor, the primary agonist in raising the upper body, i.e. the depression of the scapulae , immediately and simultaneously produces a protracoric force in the scapulothoracic joint, whilst the trunkohumeral pectoralis major indirectly produces a protractor force. Nevertheless, try to maximize this.
- Sometimes the movement of the upper body relative to the arms also influences the pushing of the body backwards; this factor should of course also be kept as constant as possible.
- Depending on your body proportions, it may make sense to practice this variation with your hands on flat blocks. Otherwise, the pelvis may rest on the floor and the reachable working range in the direction of the elevation of the shoulder blades may be restricted, particularly in the case of sitting giants with a mobile iliopsoas.
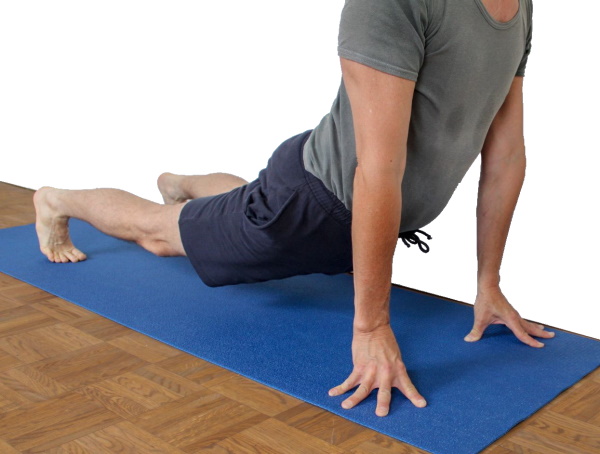
from the floor

instructions
- Lie on your stomach. Place the hands flat on the floor, fingers pointing forwards, fingertips approximately under the shoulders or, if you have good strength and good flexibility of the wrists in the direction of dorsiflexion, a little further back.
- Use the pomus muscles to tilt the pelvis into maximum extension, straighten the legs and lift the upper body with the strength of the arms until the head-up dog position is reached.
- Use the strength of your forearms and shoulders to push backwards powerfully.
details
- While the head up dog position is often assumed from head down dog, it is of course also possible to assume it from the floor. It is well known that the way in which you assume a posture has an influence on the posture. Here you need to work more consciously on pushing backwards, whereas the movement of lifting the upper body may become more conscious.
- The position to be chosen for the hands naturally depends largely on the flexibility of the hip flexors; the better the position, the smaller the distance between the hands and the feet can and must be. Other influencing factors are the given strength of the forearms, the dorsiflexion ability of the wrists, the strength of the shoulders in the direction of frontal abduction and, secondarily, the triceps.
- This variation sometimes gives you a better feel for the extension to be performed in the hips. In addition, the arms are often used more to work on the depression of the shoulder blades and this often results in a more favorable relationship between the work of the arms and that of the autochthonous back muscles.
transition between the foot postures

instructions
- Start with the normal head-up dog pose and switch to the version with the feet stretched out by giving up pushing the body backwards, placing one hand and then the other a little way forward and rolling over the tips of the toes onto the back of the feet.
- Then adjust the distance between the two hands and the feet so that the wrists are just in front of the shoulders in the version with straight feet and push the stretched, turned-out arms backwards with all your strength against the friction of the mat (while the hands remain stationary, of course) in order to be able to pull the pubic bones forwards and downwards.
- For the transition back, do the exact opposite: stop pulling forward, place one hand a little way back and roll over the tips of your toes back into the normal head-up dog position, in which you push your body back as far as possible.
- Then adjust the distance between both hands again so that the wrists are just behind the shoulders.
details
- One of the difficulties with this transition is dealing with the different distance: in the normal variation with dorsal flexion in the ankle and pushing the hands forwards or pushing the body backwards as a result, the distance between the wrists and the balls of the feet on the floor is significantly smaller than the distance for the variation with the feet turned over. This means that the distance must be adjusted at some point during the transition. In order to avoid the normal head-up dog position being performed with a distance that is significantly too large, which would cause the lumbar spine to hang uncomfortably and possibly cause damage, the distance should be adjusted in the transition or in the version with feet extended. In this case, however, too small a distance is also not problem-free, as this means an excessive angle of dorsal flexion in the wrists, so that the approach described appears to be the optimal solution to avoid both problems.
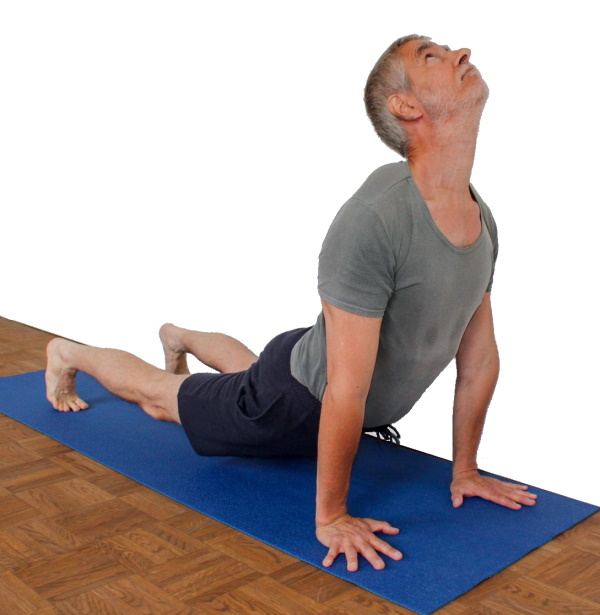
head in the neck
contraindication
Tendency to dizziness with reclination of the head
instructions
- Take the pose as described above and slowly tilt your head back as far as possible.
details
- This is a good way to keep the throat area flexible. In cases of significant tension in the neck muscles, you may need to be careful with this posture.
- Only use enough force to move the head backwards so that the neck does not start to cramp. The further the head moves backwards, the more gravity works for this movement and the less muscle strength is required, resulting in a lower tendency to cramp.
- Basically, the head in the neck supports the desired dekyphosis or stretching of the thoracic spine in this posture. However, make sure that other factors are not lost, such as the work of the pomus muscles or the extension of the knee joint.
- This variation favors extension in the entire spine and often leads to more extension in the lumbar spine, which can sometimes be perceived as an uncomfortable hollow back. Intensive work of the hip extensors is particularly important here.
pressing the heels against the wall
instructions
- Lie on your stomach with your heels a few centimeters away from a wall.
- Place your hands roughly next to your shoulders and come up as usual in the head up dog position. Press your heels forcefully against the wall.
details
- The pressure against the wall provides information about how hard you are pushing backwards. The front parts of the shoulders (deltoideus pars clavicularis), biceps, coracobrachialis and the plamar flexors of the forearm are used more intensively to push backwards, which should be clearly noticeable. This variation is best performed from a prone position and not from downface dog.
- Of course, the force exerted on the lumbar spine increases as you push backwards with increasing force, so that the pomus muscles must ensure maximum extension in the hip joints. But even then, it is advisable to be vigilant with the lumbar spine!
hands on the wall
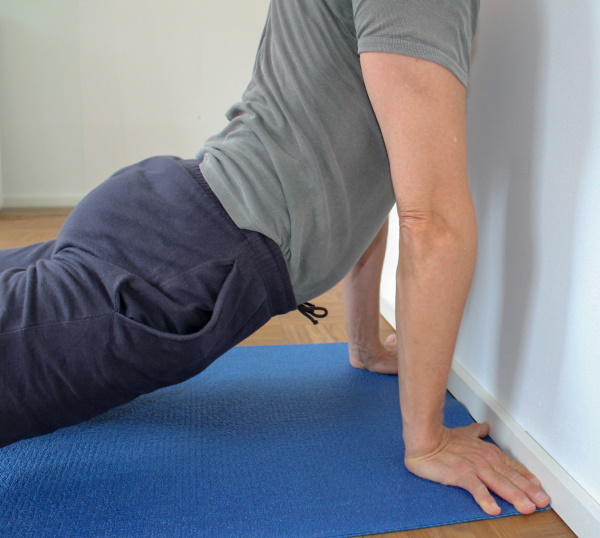
instructions
- Come into dog pose head down with your hands on the wall, fingers bent outwards on the wall, thumbs inwards.
- Push away from the wall with maximum force if you come up into the head up dog position without deviating from the straight line.
details
- This pose allows you to rotate your arms slightly better than normal. However, adopting the pose is particularly interesting because there is less space than required for the head and the shoulder area in particular. Instead of moving sideways to get out of downface dog with hands on the wall into upface dog, try to push your body away from the wall using all the strength you can muster to push backwards and move straight into downface dog.
Wrists on patches
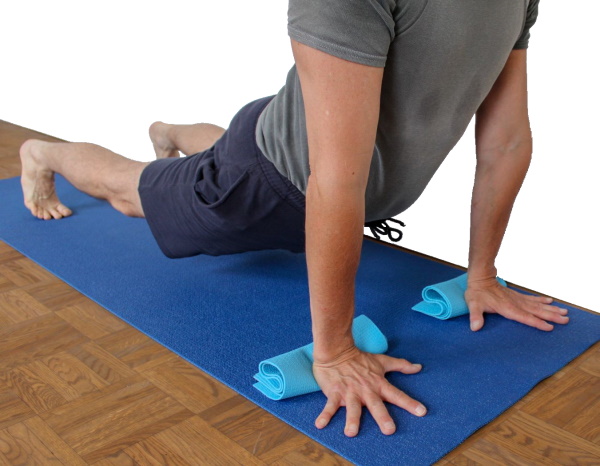
Enable the pose with severely restricted dorsal flexion in the wrist.
instructions
- Place several patches on top of each other under the wrists up to about 3, maximum 4 cm below the palm.
- Take the pose as described above.
details
- The patches under the wrists are sometimes the only way to take the pose correctly and without pain if the dorsiflexion in the wrists is severely restricted and 90° can only be achieved with pain under load. The patches tilt the palms and the angle remains significantly smaller.
The patches should be as close as possible to the carpus so that the rest of the palm can still be pressed to the ground with the finger metacarpophalangeal joints.
Instead of patches, other aids can also be used if they fulfill the most important conditions: low compressibility, soft edge and good slip resistance. - The pain caused by a lack of flexibility in the wrists in the direction of dorsal flexion during the transition between downface dog and upface dog is often the reason why the elbow joints are flexed during the transition, because the thereby possible ulnar abduction plus slightly greater pronation can reduce the pain. If this is the reason for flexing the arms, the use of patches is the method of choice so that precise work can be carried out in the arms. In a similar way to restricted flexibility of the palmar flexors, a dorsal ganglion in the wrist area can also lead to comparable pain and evasive behavior. Here too, the use of patches could lead to improvement.
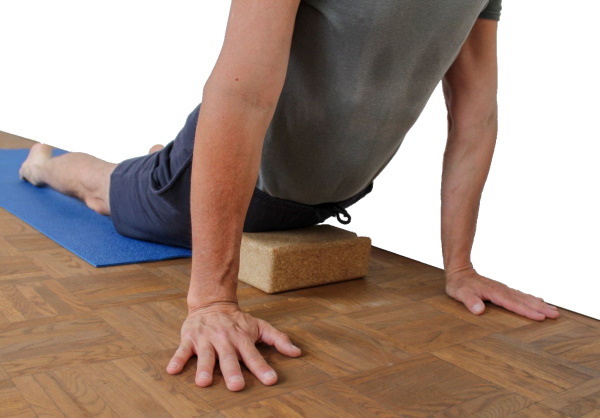
Finger flexors released

Zweck: allows the pose with significantly restricted dorsiflexion of the wrist due to lack of flexibility of the finger flexors.
Instructions
- Perform the pose as described above, but place the palms of the hands on a shoulder stand plate or a block. The fingers are unsupported so that they can bend according to the tension of the finger flexors.
Details
- With further dorsiflexion of the wrist, the flexibility of the superficial finger flexors and the profound finger flexors becomes increasingly relevant and can painfully restrict dorsiflexion with an excessive stretch sensation proximal to the palmar wrist. This version relieves the finger flexors to such an extent that this effect usually no longer occurs.
Pushing the block away with the pubic bone
instructions
- Take the upface dog with the feet upside down as described above, with a block positioned directly in front of the pubic bone.
- Press as hard as possible with the pubic bone against the block or even push it forward using the force of the movement.
details
- As a variation with inverted feet, the focus here is also on moving the pubic bone forwards and downwards as a result of extension in the hip joints and pushing the hands backwards or pulling the body forwards using the strength of the arms, i.e. a frontal adduction that goes in the direction of retroversion. The block provides resistance that makes the movement palpable and also visibly moves forward. Remember the distance between the hands and the feet, they must be just in front of the shoulders.
(P) with traction on the shoulders

instructions
- Take the pose as described above.
- The supporter stands behind the performer’s back and slowly (!) pulls the shoulders back towards the performer’s feet until the performer gives the stop signal, paying attention to the performer’s feedback.
details
- Pulling on the shoulders not only helps to reduce the thoracic spine kyphosis (or possibly to increase an already achieved thoracic spine lordosis), it also has a magnifying effect on the lumbar spine hyperlordosis. This must be done very carefully and with the greatest possible use of force from the performer’s pomus muscles so that no unpleasant sensations or harmful effects occur in the lumbar spine or its accompanying muscles. It is strongly advised that both the performer and the supporter are not beginners!
- From the perspective of the supporter, other parameters of the posture can also be observed, such as the extension of the knee joint and the work of the pomus muscles or the lifting of the upper body between the arms (the depression of the shoulder blades as a relative movement of the upper body to the arms fixed to the floor), which, if performed powerfully, usually leads to a trapezius line rising medially, the absence of which, on the other hand, would expose insufficient effort for the depression of the shoulder blades.
- As a supporter, remember to build up the pull slowly as well as slowly reduce it again.
- This variant promotes the difficult retraction of the shoulder blades in the upface dog.
(P) pressure on the thighs

Develop a feeling and proportionality for the use of the quadriceps.
instructions
- Take the pose as described above.
- The supporter presses slowly and with increasing pressure in the middle of the back of the thighs to encourage the performer to work the quadriceps with increasing force.
details
- A cardinal feature of the upfade dog is the simultaneous lowering and tilting of the pelvis into extension while keeping the knee joints extended. The stretching effect on the hip flexors depends directly on the angle of the thighs to the pelvis and therefore on the extension of the knee joints when the feet are fixed. Every degree of flexion of the knee joint changes the angle of the thighs to the pelvis and costs a considerable proportion of the effectiveness. As there is often little awareness of the strength ratios and the necessary intensity of the work of the quadriceps, this is a good way of helping to demonstrate and develop the possibilities of the quadriceps, i.e. the available strength.
- In contrast to the variation with traction on the shoulders, the supporter can use relatively great force without hesitation to attempt to bend the performer’s knees or to provoke greater use of the quadriceps.
- This support naturally also has a challenging effect on the relative movement of the upper body to the arms fixed to the floor, the lifting of the upper body between the arms(depression of the shoulder blades), so that greater strengthening is also provoked here. Depending on your constitution, one or other muscle group may reach its limit sooner.
- In this variation, too, it is important that the supporter slowly increases the pressure and slowly reduces it again.
transition to uttanasana

instructions
- Using the strength of the hip flexors and with the help of the abdominal muscles, jump from dog’s head upwards with the feet between the hands, raising the pelvis significantly.
- Bring the pelvis into the uttanasana position by stretching the legs and bend forward as far as possible from the hip joints(flexion). There are several options for using the arms in uttanasana.
Details
- The transition from upward dog to uttanasana is not for beginners. Before practicing it, you should have some experience with dynamic transitions and have stretched the hip flexors and warmed up the muscles of the lumbar spine well.
- The hip flexors are one of the strongest muscle groups in the human body. As the psoas major exerts a significant pulling effect on the lumbar spine, it should be well stretched. The actual jump with the feet between the hands is an explosive high-speed movement that lifts the pelvis. Here, the hip flexor area transitions from a state of full-length stretching of the muscles to a maximum concentric contraction, i.e. the state of maximum tight contraction – it is its strength, together with the iliacus, that drives the transition.
- As always with jumps, land in uttanasana with the knee joint (at least slightly) bent. The stronger the condition and the more problem-free the hip flexors and the muscles of the lumbar spine in particular are, the more the knee joints can be extended when landing, but never completely, so that the spring effect in the knee joint from the muscles of the thighs is maintained when landing. The spring effect consists of a permitted slight eccentric contraction and the corresponding subsequent concentric contraction. In contrast to the jump in uttanasana, the knee joints can and should be stretched when jumping into upface dog, which is harmless as the jump does not place an axial load on the leg but the impact on the foot comes from the ventral side, so that the inertia produces a flexion of the knee joint instead of a compression of the joint.
transition to staff pose

instructions
- Take the pose as described above.
- Bend your arms backwards until your stretched upper body is horizontal.
details
- Push the body backwards the whole time, the heels are maximally back-down at all times, i.e. the ankles are in maximum dorsal flexion; this requires the strength of the arms and shoulders(deltoids) to push the hands forward against the friction of the mat.
- When taking up the pole, the pelvis should not be allowed to come up, as is often seen as a relief, nor should the shoulders be held lower than the pelvis and heels are: everything is at the same height.
- The arms are placed loosely against the body in the bar, they should neither be spaced apart nor pressed against the body to provide relief through friction.
- The extension of the upper body is maintained, even if there is no longer a back bend in the thoracic spine as there was or would have been in the upward dog position.
- The glutes do not stop working. While their task in the dog position head up was to create maximum extension in the hip joints, here they are supposed to keep the hip joints away from flexion, which is all too often taken as a slight relief, when the pelvis is moved upwards for relief.
- The legs remain extended, in particular the inner knees lift. People with little flexibility in the hip flexors will not allow the pelvis to sink so far in the head-up dog position that the thighs become horizontal.
(P) transition to the staff pose with thumbs under the pelvis

instructions
- Perform the transition as described above.
- The supporter places a clenched fist with the outer hand area on the floor under the proximal thigh and presses lightly against the thigh from below with the thumb spread apart. The transition should now be made in such a way that the pressure of the thumb against the thigh remains approximately the same.
- Bend the arms backwards until the stretched upper body is horizontal as for bar pose.
Details
- All the comments made about the variation performed alone apply unchanged here.
- The weight with which the pelvis presses on the thumb should always be the same. If the weight becomes smaller, this usually indicates an attempt to make the pose easier. If the weight increases, it is a sign of a lack of strength without the aforementioned attempt being made.
- While it was still possible to keep the pressure approximately constant when taking the bar pose, this is much more difficult when leaving bar pose in direction of the upface dog. The main difference is that the bar pose is taken with instead of against gravity and in eccentric contraction of the most important muscle groups: deltoid , pectoralis major and triceps. When returning to upface dog, these muscle groups then work concentrically, which is heavier, and also against the gravity of a large part of the body weight , considering how large the lever arm is to the other supporting extremity, the feet.