Contents
- 1 ustrasana„camel“
- 2 Variants
- 2.1 Hands on the hips (or waist)
- 2.2 Hands on the soles of the feet
- 2.3 Hands on the ankles
- 2.4 Hands on the floor
- 2.5 lean back like a plank
- 2.6 Arms stretched overhead (urdhva hastasana)
- 2.7 with pubic bone against the wall
- 2.8 (p) with pubic bone on the wall
- 2.9 Block in front of the wall
- 2.10 Blocks in front of the wall
- 2.11 Transition to head down dog position
ustrasana
„camel“

 instructions and details with working links as PDF for download/print
Feedback: We’d love to hear what you think about this description, give us feedback at:
postmeister@yogabook.org
last update: 12/30/2018
Name: ustrasana
Trivial name: Camel
Level: FA
- Classification: FA
- Contraindication
- Effects of
- Preparation
- follow-up
- derived asanas
- similar asanas
- diagnostics
- Instruction
- details
- Variants
Classification
classic: backbend
psychomental: stimulating, opening
physiological: stretches the hip flexors in the pelvis and the thoracic spine. Can also be performed as an extreme strengthening exercise for the quadriceps, especially in the „with pubic bone against the wall“ variation
Contraindication
Facet syndrome, spondylolisthesis (spondylolisthesis) and spinal canal stenosis are absolute contraindications. Acute lumbago prohibits performing the pose until the symptoms have subsided and urdhva dhanurasana has been performed several times without pain.
Effects
- (202) Strengthening the neck / cervical spine for flexion
when the head is raised - (732) Strengthening the end rotators of the hip joint
- (812) Strengthening the quadriceps
- (671) Stretching the long abdominal muscle rectus abdominis
- (681) Stretching the intercostal muscles
- (711) Stretching the hip flexors
- (731) Stretching the endorotators of the hip joint
- (816) Stretching the rectus femoris
Preparation
The reclination of the head (extension of the cervical spine) can be prepared with:
Prepare for the retroversion of the arms:
- purvottanasana („8 treasures“)
- shoulderstand
- gomukhasana
- „Arms behind the body“ variation of uttanasana
- „Arms behind the back“ variation of prasarita padottanasana
- maricyasana 1
- maricyasana 3
- namaste on the back
Prepare the rectus abdominis by stretching it:
The backbend of the upper body is practiced in:
If there is increased tension in the lower back, this can be alleviated in advance with:
- parsva uttanasana
- virasana forward bend (child’s pose)
- parsva upavista konasana
- parivrtta trikonasana
- parsvottanasana
- Half lotus forward bend
- karnapidasana
- janu sirsasana
Powerful use of the pomus muscles is required for hip extension and to minimize lumbar hyperlordosis, preparations:
- caturkonasana
- parsvakonasana
- counter
- warrior 2 pose
- utkatasana
- uttanasana, variation „one leg raised“
- purvottanasana
- urdhva dhanurasana
- eka pada variation of urdhva dhanurasana
- setu bandha sarvangasana
- eka pada variation of setu bandha sarvangasana
- warrior 3 pose
- ‚Backwards against the wall‘ variation of warrior 3 pose
and other various backbends The most important movement of the pose is the hip extension, prepare with
- hip opener 1
- hip opener 2
- Quadriceps extension 2 at the wall
- warrior 1 pose
- ardha supta krouncasana
- supta krouncasana
- upface dog
- urdhva dhanurasana (back arch)
- setu bandha sarvangasana
and other backbends with hip extension. As the rectus femoris limits hip extension in addition to the iliopsoas, this can also be prepared:
- supta virasana
- Quadriceps stretch 1 on the wall
- Quadriceps stretch 2 at the wall
- ardha supta krouncasana
- supta krouncasana
One of the requirements of the „pubic bone against the wall“ variation is to press the pelvis against the wall with all the strength of the quadriceps. Strengthening preparations for the quadriceps:
- warrior 1 pose
- warrior 2 pose
- Theke
- utkatasana
- caturkonasana
- setu bandha sarvangasana
- urdhva dhanurasana
Prepares the ankle for extension:
- baddha padasana is probably the most precise exercise for plantar flexion in the ankle joint
- virasana does this if attention is paid to the extension of the ankle joint
- supta virasana also achieves this if attention is paid to the extension of the ankle, but has other, greater challenges
- 5. hip opening
Follow-up
derived asanas:
similar asanas:
Diagnostics (No.)
(206) Neck:
The head is clearly reclined here. On the one hand, this shows the flexibility of the cervical spine in this direction; on the other hand, depending on the constitution and damage to the cervical spine, associated symptoms such as dizziness or neuroradicular symptoms may occur. These need to be clarified.
(650) Kyphosis and lordosis of the spine:
The deviations from the physiological double-S shape of the human spine are only visible to a limited extent in this posture. Irregularities in the extension of the spine require further examination. See the FAQ.
(611) Pelvic obliquity/unequalshoulder height/scoliosis of the spine:
Lateral deviations of the spine from the median plane, known as scolioses, may be visible in this posture due to unequal positioning of the shoulders or a chest that appears asymmetrical. See the FAQ.
(644) Lumbar spine
In this pose, problems of the lumbar spine or its musculature may become apparent, see FAQ.
Here the back should round evenly concave. Deviations from an even curvature may indicate a hyperkyphosis of the thoracic spine or a hyperlordosis of the lumbar spine, the latter is not uncommon and is often the result of shortened hip flexors. For the risks of a hollow back, see the FAQ.
Extension in the hip joints may reveal damage to the hip joint.
- Arthrotic change (degenerative with cartilage atrophy) of the joint
- Arthritis (joint inflammation) of various kinds
- Dislocation / subluxation, which would cause a significantly increased sensation of tension in various muscles covering the hip joint
- Joint trauma, which may cause pain in the joint even after many weeks or months
Excessive tearing sensation in the rectus femoris indicates its shortening.
In this pose, the quadriceps are clearly required to press the pelvis powerfully and continuously against the wall. A certain degree of trembling in the muscles is physiological during great exertion. If it occurs with little or no exertion, this can be a symptom.
In this pose, knee problems associated with extension movements in the flexed knee joint under great strain are very well revealed. These can be, for example: traumatic or degenerative meniscus damage, arthrosis, retropatellar events such as chondropathia patellae or retropatellar arthrosis, arthritis, subluxations, ligament damage, plica syndromes and others, see the FAQ.
(950) Foot deformities:
Foot deformities may result in the inability to fully extend the ankle or increase the tendency to spasm.
Variants:
Hands on the soles of the feet
Arms stretched overhead (urdhva hastasana)
with pubic bone against the wall
(p) with pubic bone against the wall
Transition to dog position head down
Instructions
- Sit on your lower legs; straighten up and bring your pelvis over your knees, which are held just hip-width apart.
- Bring your feet slightly wider than hip-width apart. Press your feet firmly onto the floor so that your ankles are maximally extended.
- Reach your hands into the back of your thighs with your thumbs on the inside and your fingers pointing outwards; turn your thighs out strongly with your hands and maintain this position.
- Use the strength of the pomus muscles to tilt the pelvis into maximum extension. The upper body follows this movement and bends backwards as far as possible. The head also bends backwards as far as possible.
Details
- For a good position of the feet, they can be struck once or twice gently to moderately forcefully on the floor with the ankle extended as far as possible. Not only can this possibly stretch the ankle further, but if done a little more forcefully, it also gives you a feel for the force with which the feet are pressed against the floor, i.e. the muscles with which the angle in the knee joint is held against the gravity of the upper body, namely the quadriceps.
- Both the backbend itself via the pull of the stretched hip flexors and the work of the pomusculature, which is used to maximize the extension in the hip joints so that the lumbar spine rounds as little as necessary and evenly, tend to turn the thighs out. As a counterweight, the thighs are gripped from behind in the buttock crease and rotated out there, which of course corresponds to a twist in the front of the thighs. This should not be neglected, as it also tends to relieve the lower back of the undesirable component of lateral compression. The hands or arms can also be used to compensate for weakness in the thigh muscles, which have to support the weight of the pelvis, upper body and head.
- This pose is one of the constructions typical of Hatha yoga in which muscles, in this case the rectus femoris and psoas, are made to work hard in a rather long sarcomere length, this time because they hold a large partial body weight. The rectus femoris has a longer sarcomere length due to the extension in the hip joint, which makes it somewhat more difficult for it to work according to the force-length function.
- When assuming the backbend, stretch the lower ribs as far away from the front pelvis (e.g. the SIAS) as possible and let go of the abdominal muscles, i.e. do not try to hold the upper body with the abdominal muscles, but rely on the strength of the legs and arms. The rectus abdominis holds the chest anyway, but not through an arbitrary concentric contraction but through the seemingly isometric contraction that inevitably occurs, which, seen over the time in which the rectus abdominis stretches, proves to be an extremely slow eccentric contraction.
- The shoulder blades move inwards and caudally (towards the pelvis: retraction and depression).
- Allow the head to sink completely into the reclination, i.e. backward bend of the cervical spine, in accordance with gravity. As far as possible, remove the tension from the sternocleidomastoid and other muscles that could hold it in place before the maximum possible reclination. In analogy to the behavior of the rectus abdominis and the lumbar spine/spine described above, an involuntary, extremely slow eccentric contraction also takes place here due to the improving stretching ability.
- The position of the knees and feet forces the backbend to be performed with the thighs slightly endorotated, which, as with all other backbends, enables a better stretching of the hip flexors than in exorotation. Furthermore, this position of the thighs helps to reduce the lateral compression of the lower back, as does the rotation of the thighs using the hands (see above).
- If this exercise is performed freely (without a wall), the pelvis should be above the knees or, only if the hip flexors are quite flexible, further forward than the knees.
- The variation with the hands on the ankles is only suitable for a certain period of time if the flexibility of the trunk and the hip flexors are within a certain range. Before that, you will not be able to reach the ankles, and after that it is not interesting because the supporting hands prevent further extension in the hip joints or, if this does occur, force a submaximal backbend of the spine, which is not desirable because of the attachment of the psoas major to be stretched to the entire lumbar spine (plus BW 12). The variation with the hands on the soles of the feet is similar, but requires a little more flexibility. The variation in which the hands rotate on the backs of the thighs is almost always recommended. It is also recommended to use the wall against which the pubic bone is pressed in order to have good control over the position of the pelvis and its extension.
Known problems that can occur even when performed correctly
Discomfort in the lumbar spine
Even when performed correctly, this intensive backbend can place great demands on and tone the muscles of the lower back, possibly causing a tendency to cramp.
Variants
Hands on the hips (or waist)

Instructions
- Take the pose as described above, but do not support yourself with your hands in the crease of your bottom but place your hands on your hips.
Details
- This is a variation that does not use the arms to support a part of the partial body weight anywhere on the legs. Here, the entire partial body weight can be used for the extension in the hip joints.
- This variation has a more intensive effect and more attention must be paid to what is happening in the lumbar spine.
Hands on the soles of the feet

Instructions
- Take the pose as described above, but do not reach into the buttock crease with your hands, instead support yourself with your hands on the soles of your feet or heels
Details
- This is a frequently seen variation that supports a lot of body weight on the feet and therefore puts less strain on the back in the lumbar spine area. However, if the arms are not bent, it limits the backbend in the upper body and the extension in the hip joints. If the partial body weight is supported on the heel, this can promote plantar flexion in the ankle joint. In some cases, however, there is not enough flexibility available so that the hands are used to deliberately limit the weight transferred or the ankle joint needs to be supported to limit the angle.
- If the flexibility of the upper body, the extension capacityof the hip joints and the pressure on the foot allow it, bend the arms.
- If the pose does not seem intense enough, the palms can of course be placed on the floor next to the feet.
Hands on the ankles

Instructions
- Take the pose as described above, but do not reach into the butt crease with your hands, instead support yourself with your hands on the restraints.
Details
- This variation is very similar in structure and effect to the one described above with your hands on your feet.
Hands on the floor
Instructions
- Take the pose as described above, but place your hands on the floor on the outside of your feet with your palms facing backwards. Bend the elbow joints if necessary.
Details
- This variation only makes sense with very good mobility. If necessary, the hands can be placed on the floor as far dorsally as required or the elbow joints can be bent accordingly. The arms are then turned out and the elbow joints bend backwards.
lean back like a plank

Contraindications
Various types of damage to the knee joint, especially retropatellar conditions such as retropatellar arthrosis or chondropathia patellae, generally prohibit performing this variation, as high retropatellar pressures occur due to the large lever arm, the increasing effect of gravity as you lean further back and the large partial body weight acting on the knee joint. This variation should also not be performed with gonarthrosis. It is difficult to predict whether it is compatible with meniscus damage, but there is no strict contraindication in this case.
Effects: (672) Strengthening of the long abdominal muscle rectus abdominis
(231) Shoulder joint: stretching for frontal abduction
Instructions
- Kneel in front of the wall with your chest on the wall. From the knees, lean the whole stretched upper body backwards with the hip joints extended.
Details
- This variation is mainly used to strengthen the thighs. The hip extension of the standard variation is not used here. Although the quadriceps can be used and strengthened as much as required in the pubic bone against the wall variation in order to press the pelvis against the wall, this applies somewhat differently to the three monoarticular parts than to the biarticular rectus femoris. In addition to the work it does to extend the knee joint, it also has to (help) hold up the upper body. For most people, this variation represents an extraordinary strengthening exercise. Due to the great force used and the flexion angle of more than 90° in the knee joint, increased attention must be paid to the condition of the knee joint.
Arms stretched overhead (urdhva hastasana)

Effects: (672) Strengthening of the long abdominal muscle rectus abdominis
(231) Shoulder joint: stretching for frontal abduction
Instructions
- Take the pose as described above, but do not support yourself with your hands in the crease of your butt, instead stretch your arms out and parallel upwards and backwards in maximum frontal abduction.
Details
- This is also a very powerful variation. On the one hand, there is no need to support the partial body weight and, on the other, the effective lever is significantly increased.
- It is not uncommon for the abdominal muscles to tremble noticeably due to the intense exertion.
with pubic bone against the wall
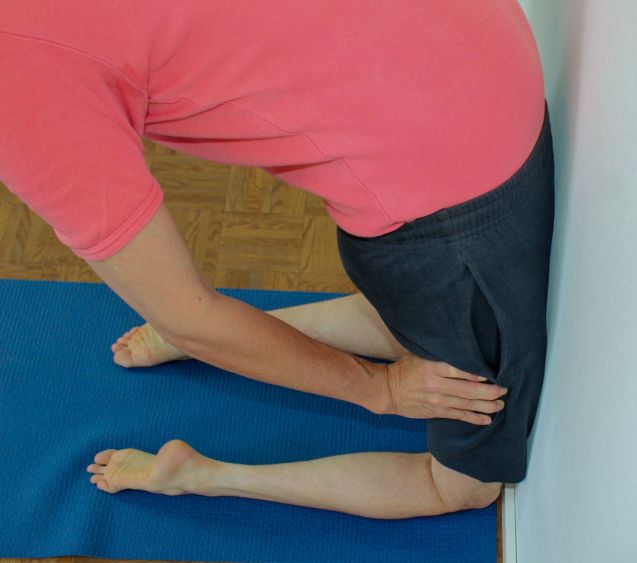
This variation gives inexperienced people in particular much better control over the position of the pelvis and the extension achieved. This variation also enables maximum strengthening of the quadriceps.
Instructions
- The set-up is exactly the same as before, but start by bringing your knees up to the wall.
- Use the strength of your thighs topress your pelvis against the wall and maintain this pressure throughout the exercise.
- Then bend the pelvis backwards with the upper body (see above). The pubic bones should press firmly against the wall the whole time.
Details
- The pressure of the pubic bones against the wall should be maintained throughout the entire backbend. It indicates at least a certain degree of force development in the quadriceps and a certain extension in the pelvis, without which the hip bones would rather be against the wall, as can often be observed in very immobile performers.
- By using the wall, this variation stands out among all postures that strengthen the quadriceps: in no other posture is unlimited use of the strength of the quadriceps possible. One foot would always slip or the posture would change geometrically if only enough force were applied. Apart from the sensitivities of the quadriceps and its tendons (or the lig. patellae) itself and the knee joint as well as the resulting pressure of the feet on the floor and the pubic bone on the wall, unlimited use of force is possible here. The wall and the floor represent immovable resistances against which any force can be exerted. The possibility of constructing postures for strengthening using these two aids is very limited.
(p) with pubic bone on the wall
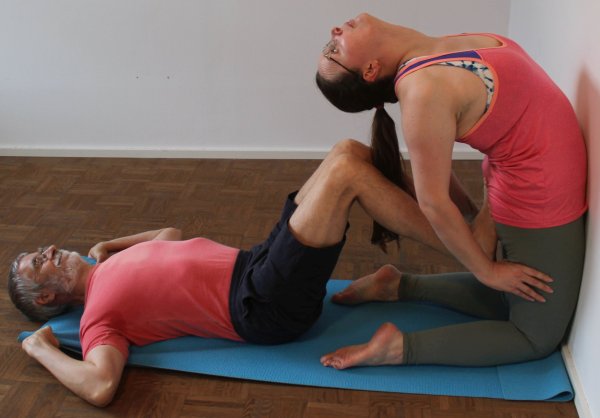
This variation gives inexperienced people in particular much better control over the position of the pelvis and the extension achieved.
Instructions
- The set-up is exactly the same as before, but start by bringing the knees to the wall.
- Press the pelvis against the wall using the strength of the thighs and maintain this pressure throughout the entire exercise.
- Thentilt the pelvis backwards with the upper body in the hip joints (see above). The pubic bones should press firmly against the wall the whole time.
- The supporter lies on the floor behind the performer and presses the performer’s bottom against the wall and downwards with the balls of their feet.
Details
- The position of the feet on the buttocks is important: pressure should be applied with the balls of the feet instead of the arch of the foot; this would mean that – especially if the distance between the supporter’s pelvis and the performer is rather small – it would not be possible to perform the movement using the strength of the palmar flexors of the ankle(triceps surae) and any downward pressure would have to come from the hip extensors and the knee flexors of the supporter, which is harder to perform and more difficult to control. Furthermore, this would possibly require more dorsiflexion in the ankle than is available. The force that pushes the buttocks downwards supports extension in the hip joints and relieves the lumbar spine. In addition, the buttocks push the pelvis forcefully in the opposite direction so that the pubic tuberosities are pressed against the wall and remain there during the exercise. From this safe position, the performer can fully expose the upper body to the effects of gravitywithout being disturbed.
Known problems that can occur even when performed correctly
Pressure in the pubic bone area
The pressure on the pubic bone may become uncomfortably intense due to the support, so that a softening agent such as patches may be necessary.
Block in front of the wall

Instructions
- Take the pose as described above, but clamp a block against the wall with your pubic bones and press against it. Keep your knees at an appropriate distance from the wall.
Details
- This variation is intended for those who cannot feel the pubic tuberosities on the wall due to their thigh volume and rather low extension abilityin the hip joints. Of course, the knees can also be held at a greater distance from the wall if necessary.
Blocks in front of the wall

Instructions
- Place one or two blocks against the wall in front of your knees and perform the pose as described above.
Details
- The blocks flatten the thighs towards the floor, which promotes increased extension in the hip joints.
Transition to head down dog position

Instructions
- Assume ustrasana as described above.
- Release the buttocks.
- Swing the upper body forward using the strength of the hip flexors.
- Place your hands on the floor with momentum, slightly in front of your knees.
- Jump backwards at the same time as you turn your toes over, moving your upper body backwards.
- Stretch the knee joints down through the head for dog position.
Details
- The blocks place the thighs flatter to the floor, which promotes increased extension in the hip joints.