yogabuch / asanas / parivrtta trikonasana
Contents
- 1 parivrtta trikonasana„rotated triangle“
- 2 Variants
- 2.1 Drop the hips
- 2.2 Do not drop your hips
- 2.3 Lateral pressure against the lower leg
- 2.4 Distance greater
- 2.5 With a block
- 2.6 Block in upper hand
- 2.7 Upper arm in retroversion – pressure against the pelvis
- 2.8 Heel against the wall
- 2.9 On the wall
- 2.10 against the wall with the leg turned in
- 2.11 Rotation-promoting with dumbbell
- 2.12 (P)
- 2.13 (P) on the wall
- 2.14 Transition to parivrtta ardha chandrasana
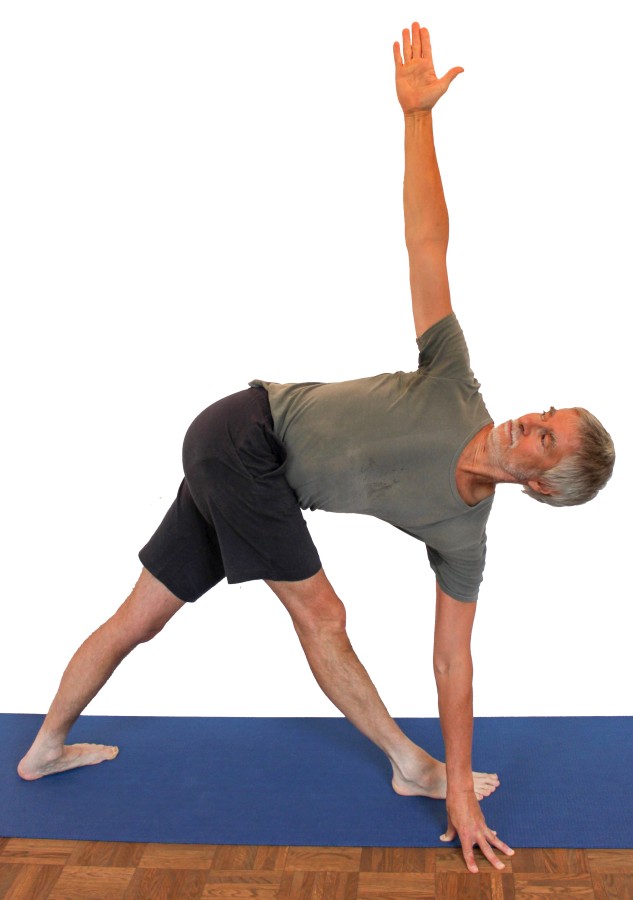
parivrtta trikonasana
„rotated triangle“
 instructions and details with working links as PDF for download/print
Feedback: We would love to hear what you think about this description, give us feedback at:
postmeister@yogabook.org
last update: 30.12.2018
Name: parivrtta trikonasana
Trivial name: twisted triangle
Level: A
- Classification: A
- Contraindication
- Effects of
- Preparation
- follow-up
- derived asanas
- similar asanas
- diagnostics
- Instruction
- details
- Variants
Classification
classic: standing posture
psychomental: _
physiological: hip-reflecting, rotating standing posture
Contraindication
In the case of disc disease in the lumbar spine, great care must be taken to ensure that the lumbar spine does not become convex; if necessary, it would be best to use enough support for the lower hand to maintain the physiological lordosis of the lumbar spine.
Effects
- (212) Neck: rotation force
- (247) Shoulder joint: retroversion force
- (257) Shoulder joint : Strengthening for lateral/transverse adduction
- (727) Strengthening of the short hip extensors (especially gluteus maximus)
- (862) Strengthening the supinators of the ankle joint
- (872) Strengthening the pronators of the ankle joint
- (852) Strengthening the calves
- (857) Strengthening the gastrocnemius
- (211) Neck: rotation stretching
- (601) Stretching for rotation of the spine
- (726) Stretching the monoarticular/short hip extensors (especially gluteus maximus)
- (721) Stretching the hamstrings
Increasing with the distance between the feet - (741) Stretching of the abductors
when lowering the hip of the rear leg - (841) Stretching of the foot lifts
only with a large distance between the feet - (851) Stretching the (biarticular) calf muscles (gastrocnemius)
Increasing with the distance between the feet - (851) Gastrocnemius
Preparation
Because of the extended front leg and the wide flexion in the hip joint, good flexibility is required in the hamstrings:
- uttanasana as a generally effective and efficient stretch of the ischiocrural group to prepare for flexion in the hip joint
- prasarita padottanasana very similar to uttanasana
- parsvottanasana as a stretch that goes beyond uttanasana
- pascimottanasana
- janu sirsasana
- tryangamukhaikapada pascimottanasana
- downface dog as another good preparation for the hamstrings when the pelvis is tilted powerfully
- hip opener 5 as a very effective stretch of the hamstrings that goes beyond uttanasana
- warrior 3 pose
- trikonasana
The rotation of the upper body is the same as in some other poses, prepare with:
- seated twisting as a very effective and efficient exercise for twisting
- parivrtta ardha chandrasana
- jathara parivartanasana
- maricyasana 3
The short extensors of the hip joint of the front leg work in extensive stretching, which may require stretching preparation:
Since the short extensors of the hip joint of the front leg have to hold a large part of the body weight, they may need a strengthening preparation:
- caturkonasana
- parsvakonasana
- counter
- warrior 2 pose
- purvottanasana
- urdhva dhanurasana
- eka-pada variation of urdhva dhanurasana
- setu bandha sarvangasana
- eka-pada variation of setu bandha sarvangasana
- warrior 3 pose
- backwards against the wall“ variation of warrior 3 pose
as well as various other backbends The load distribution and the narrow physical base of support give the pose a clear balancing character, prepare this aspect with:
- warrior 3 pose
- vrksasana
- hasta padangusthasana
- eka pada prasarita (one leg lifted) variation of uttanasana
- ardha chandrasana
- parivrtta ardha chandrasana
- eka pada prasarita tadasana
The lower arm makes a strong retroversion movement, which can also be practiced in other postures:
Follow-up
derived asanas:
similar asanas:
Very similar in geometry, effect and loads:
- parivrtta ardha chandrasana the same pose tilted 45°
Diagnostics (no.)
(880) Hyperextension of the knee joint:
Overextension of the knee joint refers to the ability to or the current state of an angle of more than 180° in the knee joint. To a certain extent, this is considered normal by anatomists and is on average more common and more pronounced in females. However, it can also indicate weakness of the quadriceps or hamstrings. Furthermore, hyperextension often causes unphysiological sensations that are not caused by stretching or exertion of the muscles and should be avoided, see also FAQ.
(852) Calves:
In this pose, the calf muscles are clearly strained, the further the load moves from the heel towards the balls of the feet (which is more favorable for balancing), the greater the strength endurance demand on the calf muscles (the m. triceps surae). However, the calf only has a moderate tendency to cramp in this position with the foot fully supported. If calf cramps occur quickly, this often indicates a lack of strength endurance or a supply problem such as a lack of magnesium in the blood or poor circulation. Cramps at rest, on the other hand, tend to indicate a Ca deficiency. This generally has nothing to do with nocturnal calf cramps, which are usually caused by prolonged stretching movements(plantar flexion) in the ankle due to the current dream event.
(721)(724) Hip extensors: Ischiocrural group and pomus muscles:
Several things can possibly be found here:
- Shortening and tightness of the gluteal muscles, which can both limit flexion in the hip joint of the front leg and force abduction, that is, turn the pelvis away from the front leg, causing corresponding extension pain. Gluteal strains are often the result of prolonged or frequent incorrect postures, such as a foot placed on the opposite thigh when sitting, or sleeping with the leg pulled to the side. The forward bend of the half lotus position and the gluteal stretch at the edge of the mat usually provide further information here.
- Damage to the hamstrings that causes pain or functional limitations can also be easily recognized here, from simple tension to strains to muscle (attachment/detachment/tear). Tears would lead to a lack of strength when leaving the posture.
- Irritation of the sciatic nerve: irritation of the sciatic nerve, which innervates the leg and foot, can become symptomatic in forward bends in particular, even if they are otherwise rather calm. See the FAQ.
- Tilting of a sacroiliac joint, usually described as moderate to sometimes significant transverse traction pain, can become apparent for the first time or more clearly in this posture. However, it is also possible that they are released by the tension of the pomus muscles.
- Irritations of the origin of the hamstrings at the ischial tuberosity (at the ischial tuberosities, also known as PHT: proximal hamstring tendinopathy) will become clearly evident in this posture and require protection from intensive stretching, as required by this posture; see the FAQ.
- Baker’s cysts create a feeling of tension or foreign body in the back of the knee, see FAQ:
(650) Kyphosis and lordosis of the spine:
The upper body should be stretched in its rotation, deviations in the form of hyperkyphosis, hyperlordosis may become apparent here. See the FAQ. The flexion inclinationof the lumbar spine from the extension moments in the hip joint and the kyphosis inclinationof the thoracic spine due to the rotation must be taken into account here.
Variants:
Lateral pressure against the lower leg
upper arm in retroversion – pressure against the pelvis
on the wall with leg turned in
Transition to parivrtta ardha chandrasana
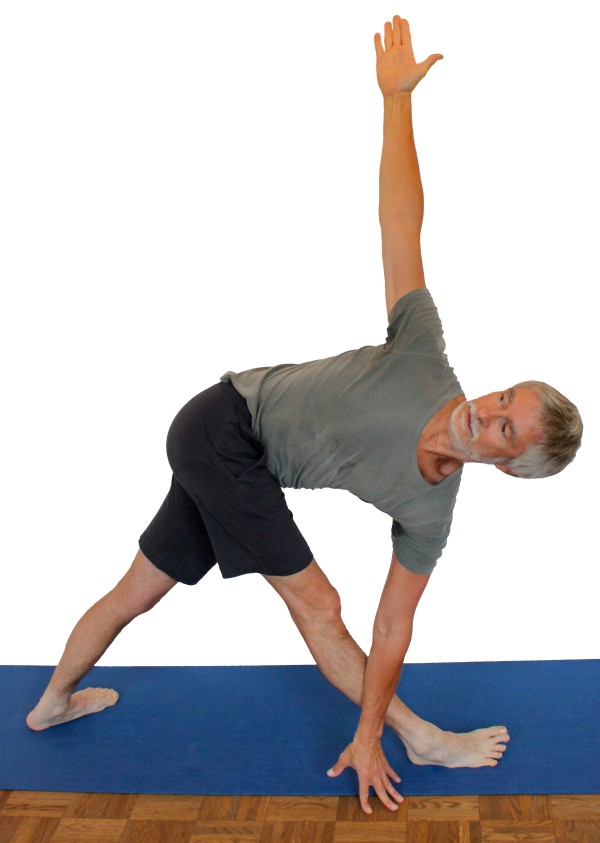
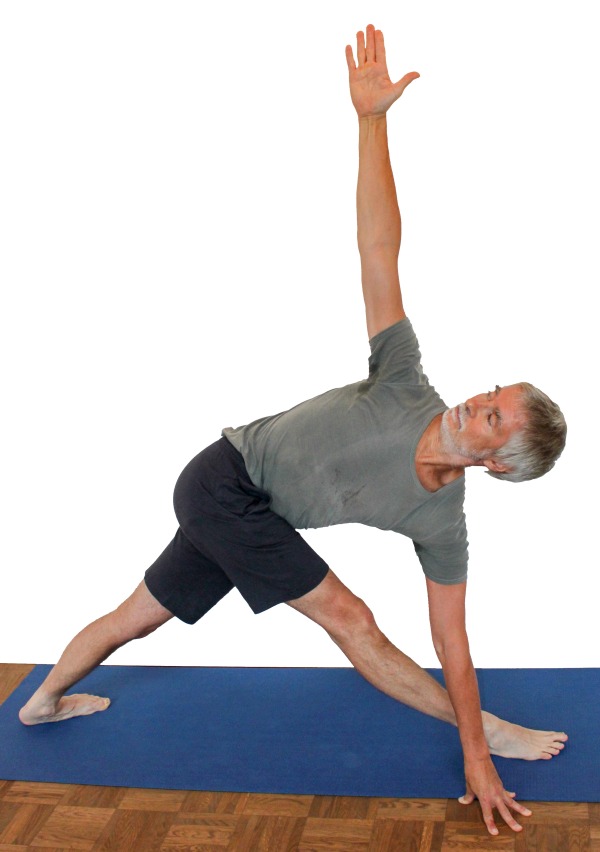
Instruction
- Adopt the same foot and leg position as you did to build up to parsvottanasana, but keep the upper body stretched as you tilt the pelvis forward(flexion in the hip joint). As the flexion increases, turn the upper body to the right.
- As soon as the upper body is horizontal, place the left hand on the outside of the right foot, 10 – 20 cm to the side of the foot depending on how flexible you are, and so far forward that the hand is approximately level with the shoulder. Place only the fingertips slightly apart, the fingers are steep, the tendon of the middle finger points towards the heel.
- Turn the upper body:
- from its own strength and
- from the force you can exert with your arm against the resistance of the floor in the sense of retroversion. The fingertips push towards the heel, but without leaving their position thanks to the friction on the surface.
- Extend the right arm away from the body at 90° to the spine in the plane of the back (or shoulder line), which is not always exactly „upwards“. Look into the right hand if this is comfortable for the neck muscles, otherwise look horizontally straight ahead or carefully get the neck muscles used to looking upwards.
Details
- The difficulty of maintaining balance is about the same as in parsvottanasana, except that in this pose you might be inclined to want to support yourself on the floor with your hands. This is not the intention of this pose. The hand on the floor should only be used to exert force to stretch and rotate the upper body more and not to support yourself, as this would interfere with the correct work in the front foot and lead to significant instability. So support as lightly as possible, with just a few grams. Yellow discoloration on parts of the fingers indicates too much pressure or weight. Any additional weight on the fingers can destabilize the posture. The arm should never be used to support any part of the body weight, but only to support the rotation and extension of the upper body:
- the force exerted backwards parallel to the midline of the foot supports the extension movement of the upper body. The adduction in the shoulder joint pulls the thoracic spine towards the floor via the shoulder blade and its retractors.
- The force exerted perpendicular to this in the direction of the foot supports the rotation of the upper body through the retroversion of the arm in the shoulder joint, whereby the extensor tendon of the middle finger on the back of the hand should point 180° to the direction of the force exerted, i.e. from the heel via the wrist to the metacarpophalangeal joint of the middle finger, so that no valgus stress or varus stress occurs in the finger joints, but the force exerted is transmitted purely by the finger flexors.
- The upper body should be stretched. To make this easier, do not place the palm of the right hand on the floor, but only the fingertips or, if necessary, use a block to place the fingertips on. In some cases, the available blocks are not high enough so that the performer has to support themselves on the lower leg or use several blocks on top of each other. Any support that is too low will spoil the posture. If several blocks slide against each other, friction mediators such as patches between them can help.
- See parsvottanasana for information on the problem of standing still in this pose, especially with regard to the position of the feet.
- The rotation of the upper body can go so far that the shoulders are on top of each other, possibly even further.
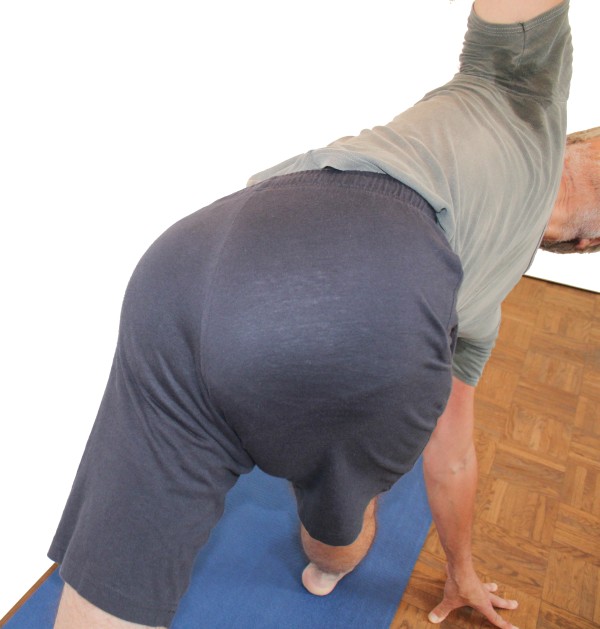
- The intense rotation of the upper body almost always leads to the hips of the back leg sinking. This is acceptable for beginners and slightly more advanced riders, as:
- they usually do not yet have sufficient stretching of the gluteus maximus as a result, so this is improved by lowering the hip of the back leg, which corresponds to an adduction of the leg.
- at the beginning there is hardly any chance of completely separating the movement of the pelvis from that of the upper body.
- There is an individual optimum angle between the midlines of the feet, which depends heavily on the flexibility of the calf muscles and is almost always between 30° and 45°. The heel of the rear leg should always rest heavily on the ground, as otherwise the physical support base is much narrower and stability is significantly lower, meaning that the necessary balancing work is correspondingly greater. Basically, the less flexible the calves are, the greater the angle should be, as the heel moves in an arc towards the ground by increasing the angle. On the other hand, a larger angle leads to restrictions in rotation in the hip joint, making it less easy to hold the hip in front. An individual optimum is usually found by weighing up the two competing target values. If this cannot be found, it is possible to consider reducing the distance between the feet, which alleviates the problem. Of course, this should not turn the pose into a parivrtta uttanasana. On the other hand, if there is a lot of room to maneuver, i.e. the angle interval in particular is very large and both the front hip and the heel can be kept stable on the floor, you can consider increasing the distance between the feet. This is another extreme value task under secondary conditions.
- Only support yourself minimally on the ground with your arm or fingertips; the fingertips should only have enough weight to prevent them from slipping when the fingertips are pressed towards the heel. Stronger support (more weight on the hand) dilutes the character of parivrtta trikonasana as a standing pose in the direction of a supporting pose and usually results in a much poorer stance, as there is a certain amount of swaying between the hand and feet. Use the arm whose hand is resting on the floor for two movements: push the hand against the friction of the mat (so that the hand does not move away but the arm exerts a resulting force on the upper body):
- „inwards“(retroversion of the arm), i.e. towards the outer edge of the foot, which supports the rotation of the upper body.
- to the „back“(lateral adduction of the arm), i.e. in the direction of the heel, which supports the extension of the upper body To avoid valgus stress and varus stress in the joints of the fingers as far as possible, hold the tendon of the middle finger on the back of the hand 180° to the direction of the force exerted, i.e. it is parallel to it. In this position, the finger flexors transmit the force exerted as far as possible and the finger joints are not strained. The arm must be maximally rotated because the direction of the force exerted by the arm is then approximately perpendicular to the axis of rotation of the elbow joint. Firstly, this ensures that the triceps can stabilize the elbow joint, which, in conjunction with the adduction performed in the shoulder joint, causes interesting work, particularly in the biarticular middle triceps, and secondly, the elbow joint is not subjected to varusor valgus stress.
- The stability of the posture itself must not depend on the lower arm or its fingertips on the ground. Only when the arm is used to support the rotation and extension of the upper body does a dependency arise. As soon as the force exerted by the lower arm is reduced to zero, the posture must be stable again even without the fingertips on the floor. This state must be achieved before leaving the posture.
- Both curves of the upper body are possible: those with great flexibility of the hamstrings may be able to tilt the pelvis in the hip joints so far into flexion that, given the fixed position of the shoulder area due to the length of the arms, physiological lordosis can be restored or even hyperlordosis is possible. With less flexibility, however, the hamstrings prevents the pelvis from tilting far enough, so that a convex position of the lumbar spine is inevitably forced, unless the hand on the floor is supported high enough. In view of the low load on the lumbar spine, both curves should not cause any damage unless one of the contraindicating back conditions is present (for the convex lumbar spine the intervertebral disc disease and for the hyperlordosis the facet syndrome, spondylolisthesis and spinal canal stenosis). Reduced flexibility, particularly of the gluteus maximus, also causes the pelvis to tend to rotate away from the front leg in the frontal plane (i.e. in a horizontal plane).
- It is a good idea to press against the leg from the outside with the arm whose fingertips were previously on the floor when leaving the posture, whereby the contact area on the leg naturally changes constantly. This works very well against a frequently observed tendency to turn the pelvis away from the front leg when leaving the posture, which significantly weakens the very interesting work of the hip extensors to lift a large partial body weight over a long sarcomere length.
Variants
Drop the hips
Instruction
- Take the pose as described above, but allow the hip belonging to the back leg to move further forward and down than corresponds to a horizontal pelvis.
Details
- As a classic evasive movement with a less mobile hamstrings or less mobile pomus muscles, the hip belonging to the back leg usually moves backwards and upwards instead of both hips being at the same height. If flexibility improves, it will eventually be possible to move this hip further forwards and downwards. As the forces of the rotation of the upper body and the arm supported by the hand on the floor are transmitted to the pelvis, it pushes the hip of the rear leg forwards and downwards, which corresponds to overcompensation of the evasive movement. For the time being, this can be regarded and permitted as problem-free, as it further improves the flexibility of the hamstrings and the abductors of the hip joint and the pomus muscles. However, if pain in the hip joint or a tendency to spasm occurs, the pelvis must be returned from the overcompensated position to the ideal posture with the hips at the same height.
Do not drop your hips

Instructions
- Take the pose as described above, but do not allow the hip belonging to the back leg to move further forward and down than corresponds to a horizontal pelvis.
Details
- This variation is particularly useful for those who have already acquired good flexibility in the gluteal muscles and the back of the leg. In this case, the force exerted with the lower arm in the direction of retroversion not only brings the upper body into maximum rotation, but also rotates the pelvis out of the horizontal position. If you no longer feel any stretch in the pomus muscles and the back of the leg in the posture, you can try to use the strength of the pomus muscles, especially in the front leg, to rotate the pelvis back into the horizontal position or keep it there, which of course causes the upper body to rotate less spatially from the pelvis with decreasing effect up to the shoulder area. This means that the muscles that perform the retroversion (e.g. the middle head of the triceps) can be made to work against the pomus muscles and strengthened. This will be less demanding for the pomus muscles themselves, but enough for them to do the work.
Lateral pressure against the lower leg
Instructions
- Take the pose as described above. If you do not have sufficient flexibility to place the fingertips on the floor in the outer foot area, instead of using a block, press against the lower leg from the outside with your hand in this variation in order to be able to turn the upper body with a strong supporting arm.
Details
- In the standard version, the fingertips placed next to the forefoot press diagonally (backwards and towards the foot) in the direction of the heel. This contains the vector components:
- in the direction of the foot(retroversion in the shoulder joint), which helps to rotate the upper body
- parallel to the foot (lateral adduction in the shoulder joint), which helps to stretch the upper body
- Make sure to keep the arm pressing against the leg fully extended so as not to block the elbow joint by accepting valgus stress, but to extend it with the strength of the triceps.
- The force of the lower arm is no longer restricted by limited friction, but can be applied as powerfully as the performing arm with its retroversion movement and the stretched oblique abdominal muscles(obliqui externi abdomini and obliqui externi abdomini) or the stretched pomus muscles allow, depending on which of these three reaches the limit first.
Distance greater
This variation is an excellent way of stretching the gastrocnemius of the back leg and working out the pelvic position more clearly. At the same time, the possibility of falling over and any wobbling is almost eliminated.
Instructions
- Take the pose as described above, but with a greater distance between the feet.
Details
- The description deliberately does not specify by how much the distance should be increased; this must be found out experimentally. If the distance is too large, the rear heel can no longer be kept on the ground or only if the angle between the feet is so large that the hip belonging to the rear leg can no longer be moved forward sufficiently, i.e. the pelvis cannot be brought into an exactly forward-pointing position.
- The greater distance not only increases the requirement to press the inner front edge of the foot onto the floor using the strength of the lower leg muscles, but is also intended to stretch the gastrocnemius in the back leg. Mobile people, especially those who are not on their feet much and do not engage in sports that involve a significant amount of running, may not feel any stretching sensation in the posterior calf with a moderate distance between the feet. However, there should be a distance for almost everyone at which a noticeable stretch occurs. Due to the extended rear leg, this posture mainly affects the gastrocnemius and has little or no effect on the soleus.
- As the distance between the feet increases, it becomes more difficult to keep the pelvis turned straight forwards; it then wants to turn horizontally away from the front leg.
With a block
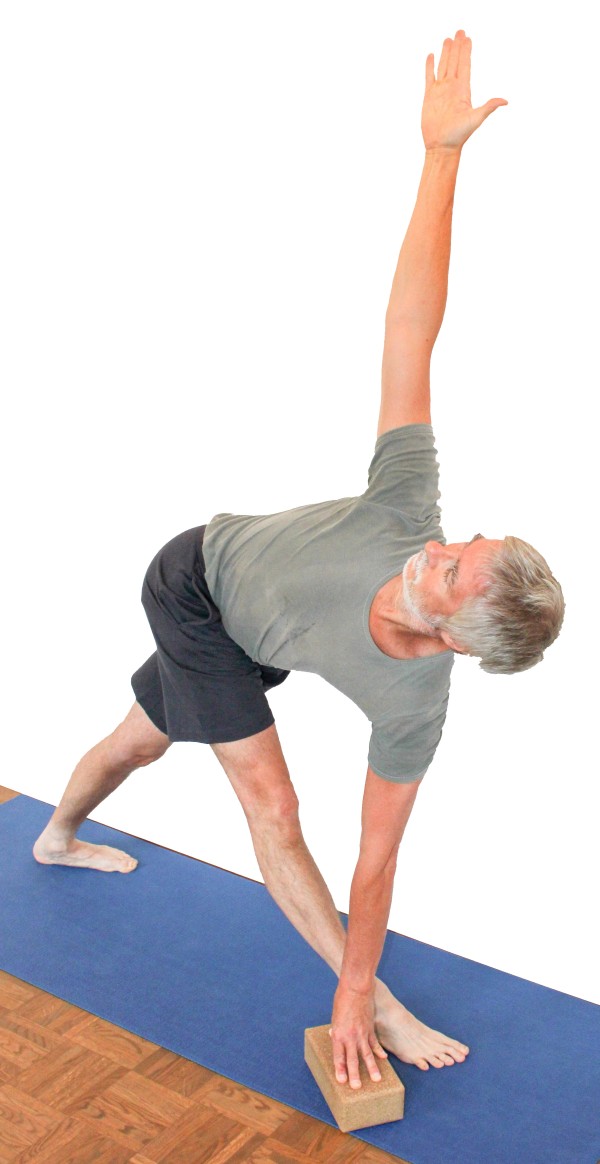
This variation is suitable for beginners who are unable to support themselves on the floor, become very wobbly or whose back becomes significantly crooked.
Instructions
- Take the pose as described above; if the fingertips do not reach the floor, use a block to „raise“ the floor or as an „extension of the arm“
Details
- The need to use a block or similar device and the way in which it is used depends largely on the flexibility of the hamstrings and, to a lesser extent, on other hip extensors such as the pomus muscles. The commonly used block has three different edge dimensions and can therefore be used for low, slightly greater and significant support, whereby the tilting moment of the block decreases with increasing height, i.e. the tilting stability decreases with greater height extension of the block. In any case, the block should be aligned with the longest side on the ground in the direction in which the hand is pushing, i.e. pointing diagonally backwards towards the heel. If more than one block (standing on its second largest surface) is required, additional blocks should be placed flat underneath. If the blocks tend to slip against each other, patches should be placed between them or the pressure of the fingers on the block should be increased.
Block in upper hand
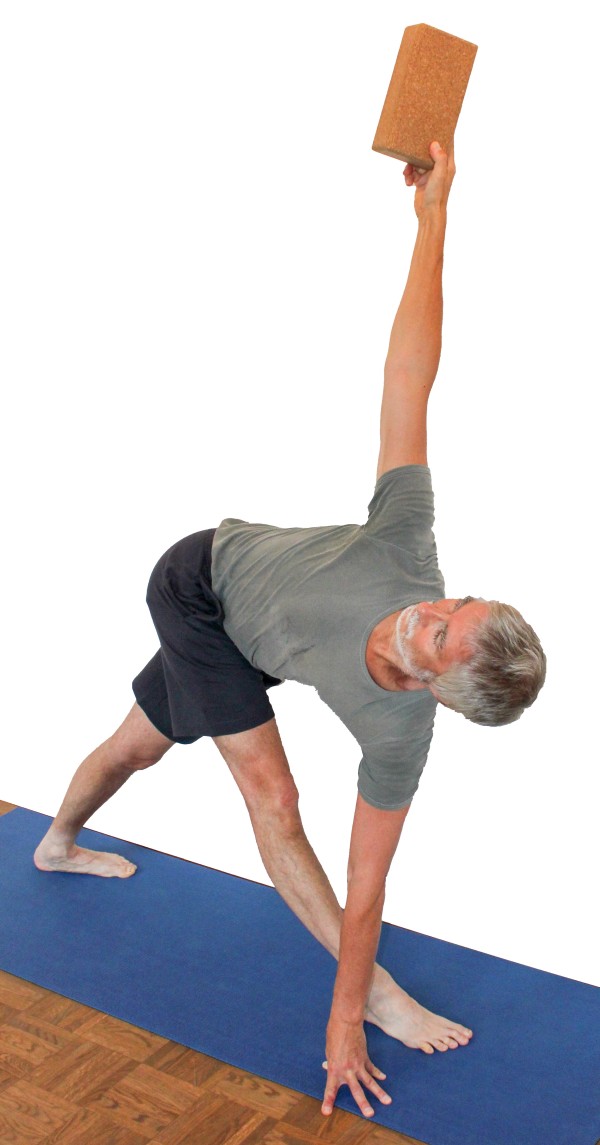
Instructions
- Take the pose as described above, but hold a block or another relatively compact object in the upper hand, such as a dumbbell of moderate weight.
Details
- Instead of the block, you can of course also use another suitable, possibly heavier object, such as a light dumbbell. In this case, particular care must be taken to ensure that the arm points vertically upwards and does not tilt backwards or forwards, as the long lever arm of the arm holding the dumbbell can generate a significant tilting moment of the body. If the rotation of the upper body and the flexibility of the pomus muscles are still very limited, the upper arm may not reach the vertical and the retroverters of the shoulder joint will have to work hard to hold the object. If, on the other hand, there is good flexibility so that the arm can clearly exceed the vertical, the object can be used to achieve a stretch primarily in the pectoralis major and secondarily in the deltoideus pars clavicularis by carefully moving the arm with the object backwards beyond the vertical to a point at which the perceived effect is sufficiently great. It should be noted that this retroversion has a significant effect on stability due to the large lever arm.
- Even with a relatively light block, the difference in alignment can be felt: if the block is held on edge, it has a stronger effect than a block held flat. This applies even more to other objects that have more mass, such as dumbbells.
Upper arm in retroversion – pressure against the pelvis

Instruction
- Take the pose as described above, but instead of stretching the upper arm upwards, bend it into a maximum retroversion so that you can press against the pelvis with the back of your hand.
Details
- This variation is somewhat analogous to trikonasana with the hand on the inner leg, although in the latter it is more the pressure of the fingertips against the inner thigh that promotes the rotation of the upper body, whereas here it is the frontal abductors of the shoulder joint, which push the arm forward against the pelvis and thus help to improve the rotation of the trunk on the one hand, but on the other hand also generate extensive retraction of the shoulder blades, which causes a pleasant to – if tense or shortened – intense stretch in the most important protractor, the serratus anterior. At the same time, the deltoid pars clavicularis works in retroversion over a long sarcomere length, which benefits its resting tone and can compensate for some of the demands of everyday life or sport that increase its tone.
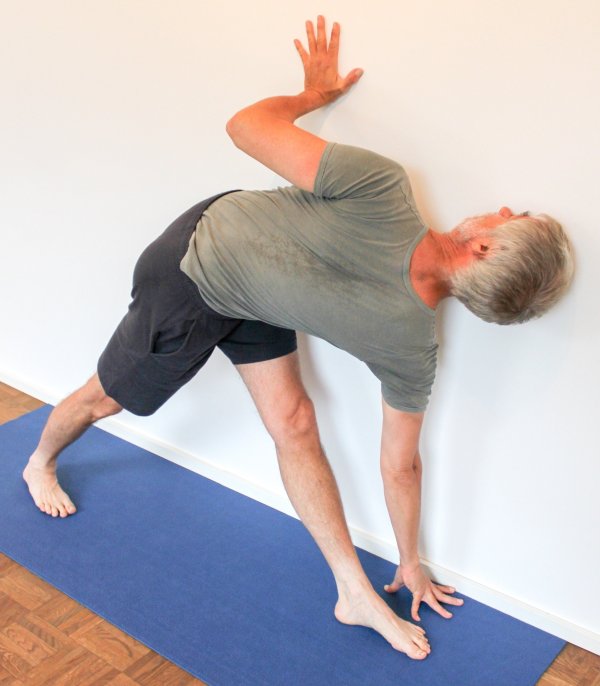
Heel against the wall
This variation takes away some of the problem of the rear heel wobbling and, in addition to the security of not being able to move, also gives a better feeling for the work in the legs.
Instructions
- Take the pose as described above, but place the mat against the wall at a 45° angle so that as much of the outer foot as possible can press forward against the wall from the heel.
Details
- This variation counteracts a frequently seen difficulty that can sometimes only be solved by reducing the distance between the feet excessively: if the m. triceps surae or one of the supinators of the rear leg is not sufficiently mobile, the corresponding heel cannot rest firmly on the floor, which would be important for stability. If the angle between the feet is increased, the heel can reach the ground better, but it becomes more difficult to rotate the pelvis forward or to prevent the pelvis from moving away from the front leg; when choosing the angle between the feet, the two target variables of weight on the heel and ease with which the pelvis can be rotated forward run counter to each other, as described above. A sufficient degree of both factors can sometimes only be achieved by reducing the distance between the feet excessively. This variant should provide additional stability in the rear foot so that the distance between the feet needs to be reduced slightly.
- Basically, there is a choice between a setup in which the line connecting the two heels is perpendicular to the wall, which should be the usual setup if the mat is at right angles to the wall. Alternatively, which is more favorable here, the angle of the mat to the wall can also be chosen so that a larger part of the outer foot is against the wall. If the outer foot is sensitive to pressure, it is advisable to place the mat in one or more layers up against the wall, as the base of the 5th metatarsal bone (on the small toe side) is clearly prominent laterally in the outer foot and can be quite sensitive to pressure.
On the wall
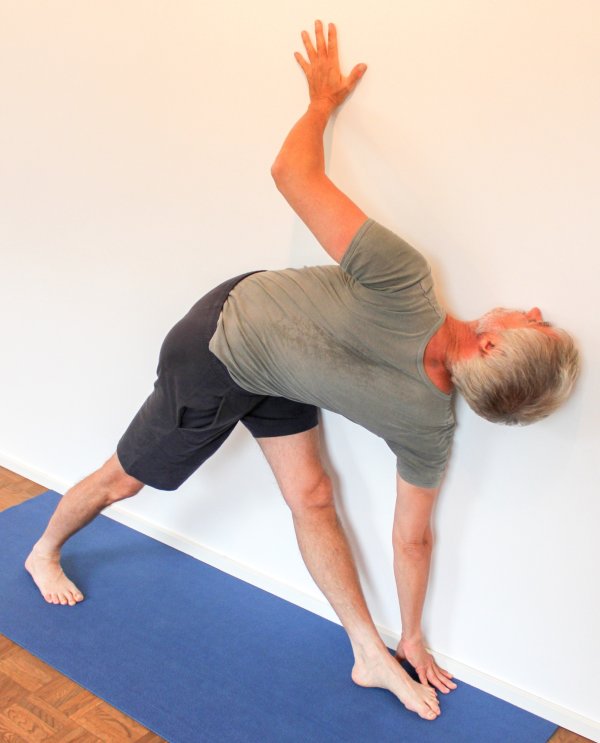
Do and leave
hand too low
 |
This variation is an excellent way to achieve a much more powerful rotation in the upper body without the help of a supporter and also to deal with the issue of keeping the pelvis horizontal. At the same time, the possibility of falling over and any wobbling is almost eliminated.
Instructions
- Place the mat lengthwise against the wall and set up the posture as described above with the heels about 10 – 15 cm from the wall.
- The contralateral hand in the outer foot area of the front leg continues to push powerfully diagonally backwards towards the heel.
- The other hand, however, is placed on the wall pointing upwards with the elbow joint bent well above the shoulders and pushes against the wall just as hard as the lower wall pushes away from the wall in the direction of the heel.
Details
- Make sure that the forces exerted by the two arms are in a favorable ratio. If the upper hand pushes harder because this movement is easier, the body is pushed away from the wall. If the lower hand worked harder than the upper hand, this would not cost stability, but the usable range of rotation would not be fully utilized, unless the sensation of stretching was at its limit anyway.
- Make sure that the upper hand is pointing upwards with the tendon of the middle finger. The fingers are slightly spread apart and the elbow, which is not raised too much, is clearly bent, as this allows you to press harder than with the arm largely or fully extended.
- Of course, a block can also be used for the lower hand if its fingertips cannot otherwise be placed on the floor.
- The pressure of the upper hand against the wall should not cause the corresponding shoulder blade to move out of the depression: pull it as well as the other one still in the direction of the pelvis.
- The pressure of the upper hand results in extensive retraction of the shoulder blade instead of the lateralization typical of the posture.
against the wall with the leg turned in
This posture is probably one of the best for stretching a tense/hypertonic piriformis that causes DGS (piriformis syndrome).
Instructions
- Perform the variation described above against the wall, but rotate the front leg 20° to 30° to build up.
- As the arms work to rotate the upper body, lower the hip associated with the back leg as far as possible.
Details
- This variation is a good way to stretch a tight or shortened piriformis. This muscle, which lies deeper than the gluteus maximus and belongs to the dorsal hip muscles, rotates the thigh in the hip joint and supports extension and abduction in the hip joint. In this variant, the opposite is done in all three dimensions of movement. By construction, parivrtta trikonasana has a wide flexion in the hip joint, plus endorotation of the front leg as the opposite of the movement performed by the piriformis and adduction in the hip joint due to the intensive dropping of the hip belonging to the back leg, so that the opposite occurs in all three dimensions of movement and a very good stretching effect is achieved.
- The ability to drop the hip of the rear leg, i.e. to adduct the hip joint of the front leg, depends on the flexibility of the gluteus maximus and other abducting muscles, while the ability to rotate the front leg depends on exorotating muscles such as those of the triceps coxae.
Rotation-promoting with dumbbell
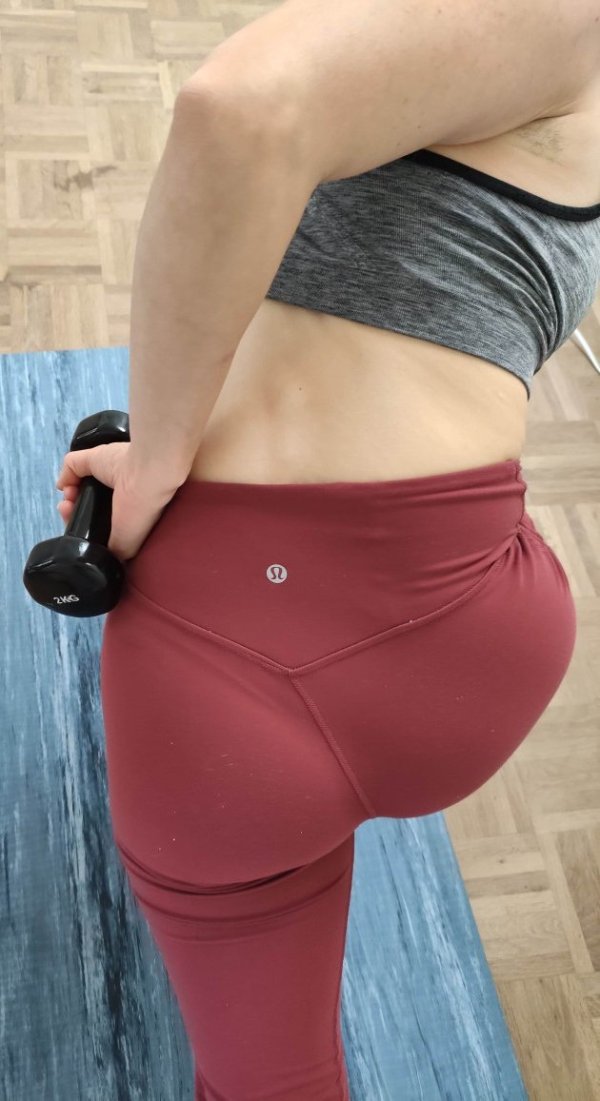
Anleitung
- Take the basic posture as described above, but do not stretch your upper arm towards the ceiling. Instead, hold a dumbbell that is not too heavy in your hand and lower it next to the contralateral side of your pelvis.
Details
- The effect of this variation is that the dumbbell pulls the upper body further into the desired rotation.
- A certain degree of retroversion capability of the arm must already be available. If this requirement is not met, the dumbbell must never be lowered onto the ipsilateral side of the pelvis (i.e. the side of the front leg) as a substitute, as this suppresses the desired rotation of the upper body.
- Pay attention to any tendency to cramp in the dorsal shoulder muscles, which is possible due to the lateral adduction of the arm in the agonist muscles, although these do not have to work actively in this variation. If this tendency to spasm occurs, check whether the upper body is already maximally rotated, as a lack of rotation can favour the tendency to spasm.
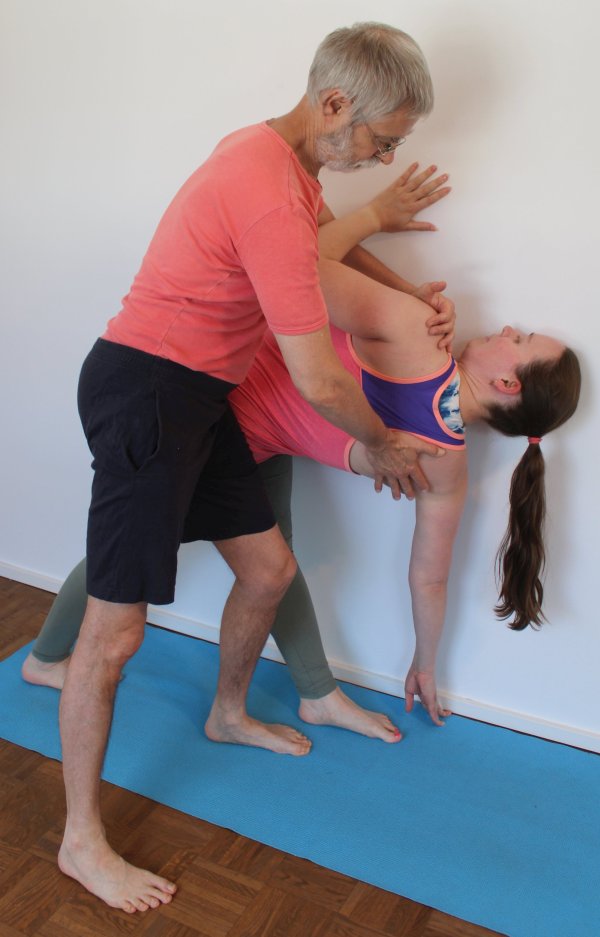
(P)

Instructions
- Take the pose as described above
- The supporter stands behind the performer’s back and turns the upper body by pulling on the upper shoulder head with one hand and pressing against the lower shoulder blade with the other.
Details
- This support enables an excellent rotation of the upper body that is almost impossible to achieve on your own. However, care must also be taken here to ensure that the upper body curve is not all the more powerful.
- The leverage exerted by both arms must be equal. As the lever arm is slightly larger when pulling on the upper shoulder head than when pushing on the lower shoulder blade, the work of the arms must be adjusted accordingly so that the performer’s upper body is neither pushed forwards nor pulled backwards. If the performer exhibits this tendency of their own accord, this can be easily corrected here.
- Increase the support slowly and carefully and reduce it slowly at the end so that the posture remains stable.
- If there is a risk of the performer tipping over, the pelvis can be supported from behind with the hips of the supporter.
- If the support is very powerful, the pelvis will tend to rotate in the transverse plane so that the hip of the rear leg sinks in relation to that of the front leg. If the force applied is great enough, this could also lead to a change in adduction in the hip joints as part of a lateral shift.
(P) on the wall
Instructions
- Take the variation on the wall as described there.
- The supporter pulls the upper shoulder away from the wall with one hand, reaching between the arm and upper body to grasp the shoulder head (the acromion), and pushes the lower shoulder blade towards the wall with the other hand.
Details
- In analogy to the variation performed alone against the wall, the sum of the forces(active and passive, i.e. applied by the performer and the supporter) that move the shoulder away from the wall must not be greater than the sum of the forces that push the lower shoulder towards the wall so that the performer is not destabilized or even toppled over. The supporter must bear in mind that a pulling movement is easier for him than a pushing movement, all the more so if the lever arm of the pull is significantly greater than that of the push.
- In addition to the specified support, the supporter can also correct the position of the pelvis by making sure that the hip belonging to the front leg is not further forward or lower than the hip belonging to the back leg. The supporter also checks that both legs are fully extended and that the metatarsophalangeal joint is pressing on the floor.
- The supporter can push sideways against the performer’s pelvis with one hip to ensure a stable stance.
Transition to parivrtta ardha chandrasana

Detailed photos
from parivrtta trikonasana.. | .. bend the knee, place the foot..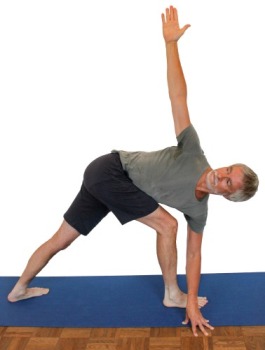 | .. hand and foot forward..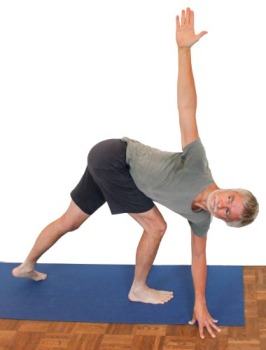 | .. release the foot, lift the leg..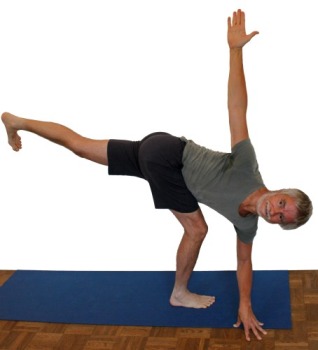 | .. extend the standing leg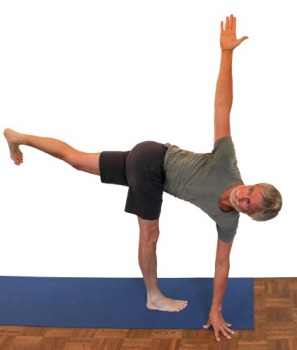 |
Instructions
- Take the pose as described above and bend the front knee joint wide.
- Push your hand further forward in the outer foot area, only place your fingertips on the ground and only very lightly.
- Shift all body weight onto the future (front) foot so that there is no weight on the back foot and only minimal weight on the fingertips.
- Slowly raise the back leg to the maximum without momentum.
- When the back leg is raised to the maximum, straighten the standing leg and the lower arm.
- Turn the upper body as far as possible over the standing leg.
Details
- This transition is not easy for many people. The reasons for this are, firstly, balance and, secondly, dealing with the stretching and exertion that occurs in the hamstrings and pomus muscles, as well as the necessary concentration and use of strength in the lower leg muscles.
- Similar to the transition from trikonasana to ardha chandrasana, careful shifting of the body weight is eminently important for stability in the pose. Bend the standing leg widely before shifting the weight onto it. Make sure to move the weight plumb line along the midline of the foot. Use the required calf, thigh and gluteal muscles with sufficient strength to generate powerful stability. Shift the weight slowly and very carefully onto the supporting foot. This should not wobble during and after this. If it wobbles when the weight is shifted, there is a lack of mindfulness or use of strength and it is likely that this will also be lacking further on, so that the posture will not be particularly stable and may also end with a clear lack of stability. If there is a lack of effort when shifting the body weight onto the foot, the necessary presence is missing when standing in the posture, which can be understood as a combination of the ability to perceive what is happening and the ability to react to the emerging needs.
- Make sure that the center line of the foot is and remains parallel to the long edge of the mat and does not turn in at a careless moment.
- In neither phase of the transition or either of the two postures are the toes of the standing foot pressed to the floor or lifted; both would disturb the full, even weight distribution on the balls of the feet, especially if it is not maintained.
- The inner foot should be continuously pressed to the ground with the same force as the outer foot rests heavily on the ground. As explained elsewhere (see the FAQ and the exploration of the topic), the minimal tension of the lower leg muscles corresponds to an inversion position of the foot, from which it follows that without appropriate conscious use of the appropriate lower leg muscles, the inner foot may be gravitationally close to the ground and may appear to be on the ground, but certainly will not press on the ground with sufficient pressure so that the inner foot (the metatarsophalangeal joint area) can be counted as the physical base of support. As a result, this is much narrower at the front than it could be, which leads to a corresponding loss of stability. When weight is shifted to the foot, the foot may (and to a certain extent must) undergo a small, recognizable shift in its skin in the longitudinal direction of the foot, but the weight distribution between the inner and outer edges of the foot should remain unaffected.
- If a block was necessary in the outer foot area in parivrtta trikonasana, it is likely that this will also be needed in parivrtta ardha chandrasana. However, it is used a little further forward there, so that it has to be moved during the transition so that the arm can stand approximately vertically, which is a necessary requirement so that the shoulder area is not lower than it needs to be, which would make the posture more difficult in terms of the stretch demand on the hamstrings.
- The upper body remains rotated beyond the leg throughout the transition. If the rotation decreases during the transition, it must be increased again later when the standing leg is fully extended. Depending on how much the rotation needs to be extended and how much the pelvis still needs to or can rotate, there will be a noticeable shift of the center of gravity across the longitudinal axis of the foot, which is critical as the physical support base is very narrow in this direction.
- As described in parivrtta ardha chandrasana, the lifted leg is fully extended, the heel extends slightly away, the inner foot extends no less than the outer foot and, in contrast to parivrtta trikonasana, it can be turned in; however, a twist, as induced by the hip joint’s force tensor, the gluteus maximus exorotating simultaneously in the hip joint, must be avoided at all costs.
- As in all postures with an outstretched leg on which a load rests, hyperextension of the knee joint must be avoided if it exceeds a certain degree, and in any case if there is discomfort on the front or back of the knee joint that appears to have nothing to do with stretching or exertion.