yogabuch / asanas / trikonasana
Contents
- 1 trikonasana„Triangle position“
- 2 variants
- 2.1 Hand on the inner leg
- 2.2 Hand on the hip
- 2.3 Turn more upper body with bent arm
- 2.4 unsupported
- 2.5 Hand on the inner foot
- 2.6 Turn head
- 2.7 Maximum upper body backbend
- 2.8 Lateral pressure against the lower leg
- 2.9 Press the ball of the foot
- 2.10 stretch from bent leg
- 2.11 Hand on block
- 2.12 Hand on the ground
- 2.13 Belt around the thighs
- 2.14 Outer foot on the wall
- 2.15 Outer foot at an angle to the wall
- 2.16 Back against the wall
- 2.17 Foot on block
- 2.18 Block in the hand
- 2.19 Standing against the wall
- 2.20 (P) Straighten upper body
- 2.21 (P) Rotate chest
- 2.22 (P) on the wall
- 2.23 (P) Pull lower arm long
- 2.24 (P) push upper arm back and forth
- 2.25 (P) Push upper arm cranially
- 2.26 (P) turn out with belt
- 2.27 (P) Pressure against the fingertips
- 2.28 (P) Turn out thighs
- 2.29 (P) Turn leg out vigorously
- 2.30 (S) turn let out for taking the pose
- 2.31 (P) Test lower buttock
- 2.32 (P) Pressure on SIAS
- 2.33 (P) Turn plus pressure on SIAS
- 2.34 (2P) with 2 supporters
- 2.35 (3P) with 3 supporters
- 2.36 Transition to parsvakonasana
- 2.37 Transition to parsvakonasana and back
- 2.38 Transition to ardha chandrasana
- 2.39 Transition to 2nd warrior position
trikonasana
„Triangle position“
 instructions and details with working links as PDF for download/print
Tue und lasse
| Oberkörper krümmen, Kopf hängen lassen |
 |
Feedback: We’d love to hear what you think about this description, give us feedback at:
postmeister@yogabook.org
last update: 30.12.2018
Name: trikonasana
Trivial name: triangle pose
Level: A
- Classification
- Contraindication
- Effects
- Preparation
- Follow-up
- derived asanas
- similar asanas
- Diagnostics
- Instructions
- Details
- Variants
Table of contents [show]
Classification
classical: standing posture
psychomental:
physiological: stretching of the hamstrings and the adductors, especially the gracilis, strengthening of the lateral flexor portion of the autochthonous back and neck muscles
contraindications
A PHT prohibits the deep execution of the posture because of the intense stretching of the hamstrings that then occurs. Gracilis syndrome can, depending on how intensively the pelvis is rotated away from the 90° rotated leg, trigger the corresponding pain, which must of course be avoided. In the case of pes anserinus syndrome, a distinction must be made as to which insertion of the four muscles attached there is affected. In the unlikely event that it is not the gracilis or the muscles of the inner hamstrings, but the sartorius, execution may be largely unrestricted.
effects
- (212) Neck: strengthening in its rotatory function
- (217) Neck: strengthening in its lateral flexor function
- (322) Force for supination of the forearm
- (342) Strengthening for dorsiflexion of the wrist
- (502) Strengthening the latissimus dorsi
as lateral flexor and when using the lower arm for adduction - (552) Strengthening the quadratus lumborum
- (602) Strengthening the back extensors
- (662) Strengthening the rotatory muscles of the trunk
- (677) Strengthening the oblique abdominal muscles obliqui abdomini
- (211) Neck: rotation stretching
- (216) Neck: lateral flexion extension
with gravity-induced lowering of the head - (246) Shoulder joint: slight extension in the direction of retroversion
- (721) Elongation of the hamstrings
- (751) Stretching the adductors
- (756) Elongation of the gracilis
Preparations
LateralizationShoulderblade In order tomove the arms better sideways away from the spine, i.e. to be able to lateralize the shoulder blades, practice:
The thoracic spine tends to kyphosis in this posture; active postures that promote the strength to extend help to prepare for this:
- „Table“ variation of the uttanasana
- right-angled uttanasana
- Warrior stance 3
- salabhasana
- upavista konasana in the „pull on the feet“ variation
- upavista konasana in the „with block“ variation
- urdhva dhanurasana
To counteract the kyphosis of the thoracic spine, also practise passive postures that promote flexibility in the direction of extension:
One element of the posture is the lateral stretching (not sideways bending, i.e. not lateral flexion) of the back. Preparatory or synergistic are:
This posture tends to put the muscles of the lumbar spine region under tension. If you know that this can become uncomfortable, prepare them by stretching them:
- parsva uttanasana
- balasana (virasana forward bend, child’s pose)
- parsva upavista konasana
- parivrtta trikonasana
- parsvottanasana
- Half lotus forward bend
- karnapidasana
- Torso side bend sitting
- parsva janu sirsasana
- parsva upavista konasana
The extensors of the hip joint must be used against the pull of the adductors and possibly also the hip flexors to prevent the lumbar spine from falling into a hollow back:
- caturkonasana
- parsvakonasana
- Counter
- warrior 2 pose
- utkatasana
- purvottanasana
- urdhva dhanurasana
- eka pada variation of urdhva dhanurasana
- setu bandha sarvangasana
- eka pada variation of setu bandha sarvangasana
- Warrior stance 3
- backwards against the wall variant of the warrior stance 3
as well as with various other backbends. The leg to which the upper body is moving must turn out as far as possible in the hip joint so that the pelvis can tilt to the side as best as possible. Prepare with:
- baddha konasana
- baddha konasana Forward bend
- supta baddha konasana
- adho mukha supta baddha konasana
- Half lotus forward bend
- hip opener at the edge of the mat
- hip opener 3
- warrior 2 pose
- caturkonasana
- parsvakonasana
- Counter
- janu sirasana
- parivrtta janu sirasana
Also on the side to which the upper body is moving, the hip joint is in b.a.w. maximum flexion, which requires a lot of flexibility of the hamstrings. Preparations for this:
- uttanasana
- prasarita padottanasana
- parsvottanasana
- pascimottanasana
- janu sirsasana
- tryangamukhaikapada pascimottanasana
- downface dog as another good preparation for the hamstrings when the pelvis is tilted forcefully
- hip opener 5 as a very effective stretch of the hamstrings that goes beyond uttanasana
- Warrior stance 3
- trikonasana
- parivrtta trikonasana
To prepare the biarticular adductor Gracilis
The required plantar flexion of the ankle can also be prepared:
- baddha padasana is probably the most precise exercise for plantar flexion in the ankle joint
- virasana does this if attention is paid to the extension of the ankle
- supta virasana also achieves this if attention is paid to the extension of the ankle, but has other, greater challenges
- 5. hip opening
follow-up
derived asanas:
parivrtta trikonasana
ardha chandrasana
similar asanas:
diagnostics (no.)
Various disorders can be found in forward bending movements(flexion in one/both hip joints), but also under load in the muscles of the back of the leg:
- Shortening of the hamstrings, see FAQ.
- Damage to the hamstrings that causes pain or functional limitations can also be easily detected here, from simple tension to strains to muscle (partial) tears. Tears would lead to a reduction in strength when leaving the posture quickly.
- Irritation of the ischiadicus nerve: irritation of the ischiadicus nerve, which innervates the leg and foot, can become symptomatic during forward bends in particular, even if they are otherwise rather calm. See the FAQ.
- Irritations of the origin of the hamstrings at the ischial tuberosity (at the ischial tuberosities, also known as PHT: proximal hamstring tendinopathy) will be clearly visible in this posture and require protection from intensive stretching, as this posture demands.
- Baker’s cysts create a feeling of tension or a foreign body in the back of the knee, see FAQ.
(293) Excessive tension in the trapezius:
If the trapezius shows a tendency to spasm even though the upper arm is stretched forcefully towards the ceiling and the shoulder blade is thus lateralized, this indicates excessive tone. It is probably one of the most tense muscles in Western civilization. Internal and external posture, including today’s widespread VDU workstations, contribute significantly to this. See the posture details for further information.
(217) Neck:
Holding the head means work for the cervical spine muscles in their lateral flexor aspect, strength endurance deficiencies and hypertonus can be detected in this posture, e.g. through a tendency to spasm.
(221) Elongation to lateralization/protraction
Since lateralization is the lifting of retraction without true protraction, the retracting muscles must be stretched, i.e. primarily the rhomboids.(501) Stretching the latissimus dorsi for lateralization.
Significant restrictions in the flexibility of the latissimus dorsi can limit not only the elevation of the shoulder blades or the frontal abduction and lateral abduction of the arm, but also the lateralization of the shoulder blades.
(227) Scapula: lack of lateralization
The cause of a lack of lateralization of the shoulder blade is an overtension of its retractors, i.e. mainly the rhomboids or the (mainly lateral) adductors of the shoulder joint that attach to the trunk, i.e. the latissimus dorsi.
A shortened pectoralis major may lead to a reduced ability to extend the arms sideways away from the body or to move them backwards far enough out of the field of vision or to adopt the slight retroversion in the „hand on the inside leg“ variant.
(644) LWS
This posture can reveal problems with the lumbar spine or its muscles, see also the FAQ.
The adductors are stretched in this position. Among other things, this allows damage to be detected:
- Shortenings
- Irritation of the tendons of the origins and insertions, which manifests itself in pulling pain with an elongated course. These are insertional tendinopathies, e.g. Gracilis syndrome
- Tension that causes an agonizing feeling in the muscles that goes far beyond normal stretching
- Tears/partial tears/tears of adductor muscles which, in the event of a tear, make a loud noise and may be followed by hematoma formation and swelling
- side discrepancies in flexibility that can cause pelvic obliquity and consecutive scoliosis, see FAQ
Various disorders can be found in the extensive flexion in a hip joint and under a certain load in the muscles of the back of the leg(hamstrings):
- Shortening of the hamstrings, see FAQ
- Damage to the hamstrings that causes pain or functional limitations can also be easily recognized here, from simple tension to strains to muscle (attachment/detachment/tear). Tears would lead to a reduction in strength when leaving the posture quickly.
- Irritation of the sciatic nerve: irritation of the sciatic nerve, which innervates the leg and foot, can become symptomatic during forward bends in particular, even if they are otherwise rather calm. See the FAQ.
- Irritations of the origin of the hamstrings at the ischial tuberosity (at the ischial tuberosities, also known as PHT: proximal hamstring tendinopathy) will become clearly evident in this posture and require protection from intensive stretching, as this posture demands; see the FAQ.
- Baker’s cysts create a feeling of tension or a foreign body in the back of the knee, see FAQ.
In this position, knee problems associated with long stretches under load become apparent. These can be, for example: traumatic or degenerative meniscus damage, arthrosis, arthritis, subluxations, ligament damage, plica syndrome, Hoffa syndrome, retropatellar cartilage damage(chondropathia patellae, retropatellar arthrosis) and others, see the FAQ. X-legs or bow legs can cause meniscus problems, particularly in the leg away from the upper body, due to varus stress or valgus stress.(880) Overextension of the knee joint
Overextension of the knee joint refers to the ability to or the current state of an angle of more than 180° in the knee joint. To a certain extent, this is considered normal by anatomists and is on average more common and more pronounced in females. However, it can also indicate weakness of the quadriceps or hamstrings. Furthermore, hyperextension often causes unphysiological sensations that are not caused by stretching or straining the muscles and should be avoided, see also the FAQ. In trikonasana, a tendency to hyperextend should be particularly evident in the leg close to the upper body.
variants:
Turn more upper body with bent arm
Lateral pressure against the lower leg
Outer foot at an angle to the wall
(P) turn out leg for taking the pose
(P) push upper arm back and forth
(P) Pressure against the fingertips
(P) Turn plus pressure on SIAS
Transition to parsvakonasana and back
Transition to ardha chandrasana
Transition to 2nd warrior position
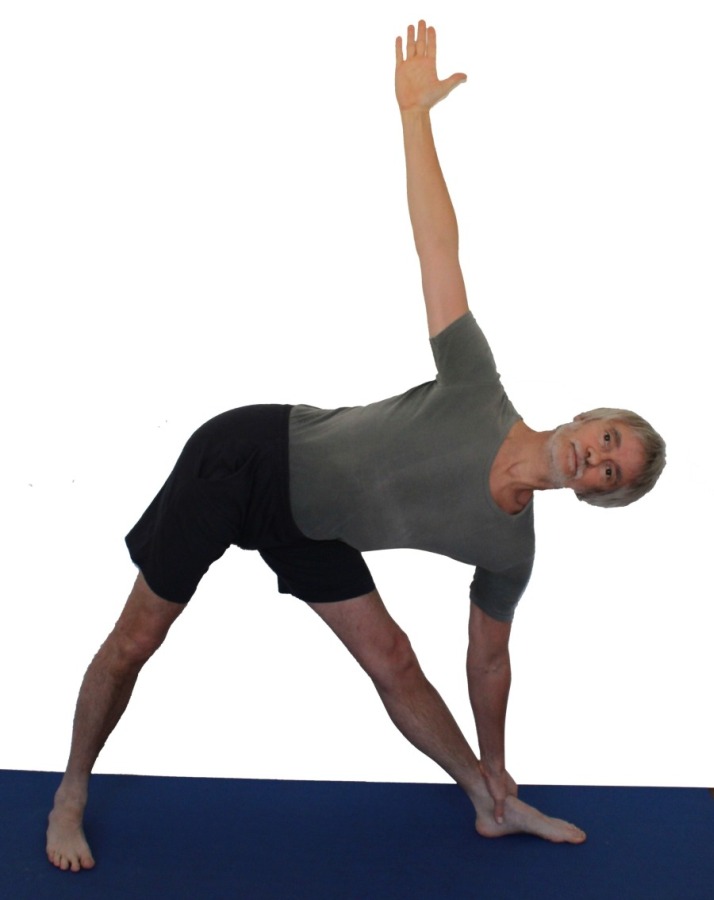
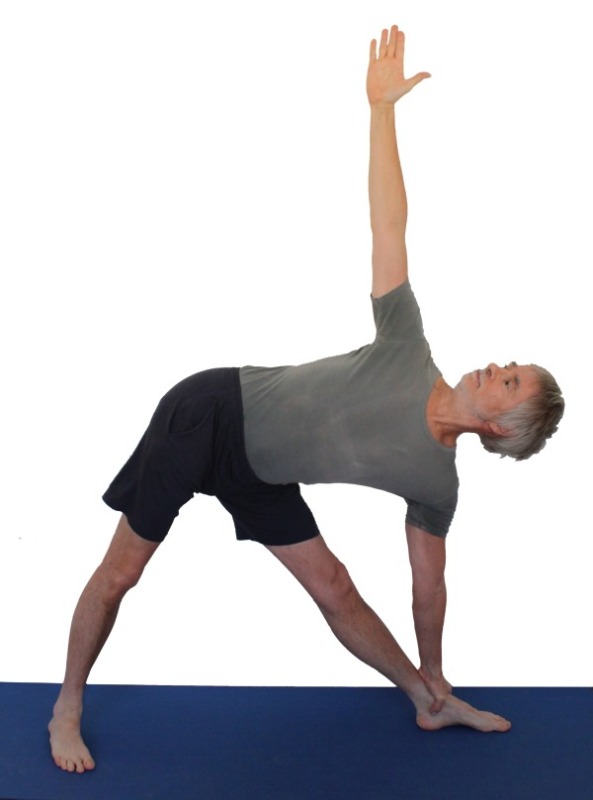
instructions
- From a straddle that is approximately leg-width apart with parallel midfoot lines, turn the left leg inwards by about 20° at the hip joint (visible at the midfoot line) and the entire right leg (from the hip on the heel) by 90°.
- Make sure that you are standing securely on both feet with equal pressure distribution on the parts of the sole of the foot (front/back, inside/outside). Turn the right leg out as far as possible at the hip joint without losing pressure on the metatarsophalangeal joint.
- Extend both knee joints, activate the quadriceps on both sides and hold the kneecaps up.
- Stretch the upper body vertically away from the pelvis (i.e. upwards at the moment) and maintain this stretch.
- Bend your hips to the right so that your pelvis and torso tilt to the side. Keep the spine straight. If no further bending in the right hip joint is possible, i.e. the pelvis cannot be tilted any further to the side, support yourself with the right arm on the lower leg( „lateralization of the shoulder blades“) and stretch the left arm towards the ceiling. Both arms move away from the body as far as possible, both arms turn out, both inner elbows point away from the body towards the head. The palms of the hands point into the field of vision and the forearms pronate.
- Stretch your upper body vigorously, also sideways, so that the lower side of your body is as stretched as the upper side. Keep your back over your right leg.
- Turn the torso away from the right leg as far as possible, i.e. the upper half of the torso backwards, the lower half forwards, keeping the spine centered over the leg.
Details
- This exercise is not a trunk side bend but a lateral hip opening. It is therefore essential to rotate the right leg sufficiently far (90°) in the hip joint. Less rotation of the foot and thigh would otherwise result in a reduced ability to tilt the pelvis sideways (this is an exorotated abduction in the hip joint) with the same amount of support on the lower leg and thus a lateral flexion of at least the lumbar spine, but usually also the thoracic spine. So turn the right leg out as far as possible. The following rule applies to the foot: turn it out 90°; if you are not sure: better 2° further (92°) than too little (88°). There are cases in which it is advisable to turn the foot out further than 90°. This consideration is based on the nature of the human hip joint, i.e. that the abduction capacityin the hip joint is a (non-linear) function of exorotation: the abduction capacityincreases with exorotation.
- Extend both legs vigorously, keep the quadriceps active and the kneecaps high, especially in the right leg. If there is a tendency to hyperextend, proceed as usual in such cases: try to consciously control the knee joint with more use of the leg muscles (the back of the thigh), push the feet away from each other more forcefully on the floor or perform the variation in which you stretch from a widely flexed knee joint.
- Pay attention to the pressure distribution in the feet (equally between the heel and the balls of the feet and – as far as possible – within the balls of the feet):
- In the right foot, it is sometimes difficult to put as much weight on the inner foot as the outer foot, so more weight almost always has to be shifted to the inner foot. Furthermore, some people stand too much on the heel, in which case more pressure must be applied to the ball of the foot. Both corrections help to stop the foot rocking around its longitudinal axis. Pushing down on the metatarsophalangeal joint seems to contradict the turning out of the leg in the hip joint and vice versa, which is all the more important if the feet are further apart. The greater the distance, the greater the demand on plantar flexion in the ankle joint. If the given plantar flexion capacity(in relation to the distance between the feet) is too low, the foot increasingly deviates into supination.
- In the left foot, some people tend to stand more on the inner foot, which generally makes them stand unsteadily and does not put the required work into the outer lower leg. The left leg should by no means turn in at the hip joint, but should also turn out, but without the outer foot being loaded more than the inner foot.
- As in all comparable standing postures, push your feet away from each other against the resistance of the mat. This helps to correct the pressure ratios as described above. It also allows the left, abducting gluteus maximus and the lesser glutes to do useful work.
- First of all, it is more important to stretch the trunk more than to support yourself more deeply. Stretch the upper body exactly away from the pelvis so that the spine is bent as little sideways as possible. To do this, the right hand can be pressed a little horizontally (or towards the contralateral heel) against the right lower leg. The resulting lateraladduction moment in the ipsilateral glenohumeral joint helps to straighten the upper body. At the same time, this is a good way to strengthen the adductors of the shoulder joint due to the large forces opposing the movement.
- Always turn the right thigh out as far as possible. This facilitates buckling in the hip(abduction or adduction in the contralateral hip joint) and thus reduces the – initially unavoidable – curvature of the back; also rotate the left thigh outwards, but only to such an extent that the rotation of the right thigh is not affected or the left inner foot becomes lighter. The left hip bone usually protrudes slightly further than the right, in some cases significantly. This is a natural consequence of limited flexibility of the adductors and does not disappear completely even if the side splits (samakonasana) are mastered.
- Avoid hyperextending the knee joint, especially the right knee joint. This helps:
- Move your feet away from each other.
- pull up the kneecaps.
- from a bent knee joint with the feet pushed strongly away from each other and with the balls of the right feet pressed down strongly, bring the right knee joint up to a 180° angle, concentrating on using the quadriceps.
- the variation „stretching from a bent leg (knee joint)“.
- The distance between the legs is significantly smaller than in virabhadrasana 2(2nd warrior pose) or parsvakonasana. In some cases, there is a slight stabbing or pressing pain in the area of the Achilles tendon above the heel when the leg is turned 90°, which may be due to a less flexible ankle but also due to a posterior ankle impingement (PAIS). Reducing the distance between the feet by 5 or 10 cm usually helps here, rarely even more. Very rarely, it is necessary to raise the ball of the foot to reduce plantar flexion, but this must be hard enough so that stability does not suffer.
- Rotate the chest to the maximum (upper side backwards), even if the vertical of the sternum is exceeded. Typically, the body deviates forwards, often with the pelvis pointing clearly forwards. Instead, keep the pelvis in line with the right thigh and the back over the right leg. Avoid moving the upper arm further back out of the field of vision than into the shoulder axis. This happens very quickly as the movement of the arm is much easier than the rotation of the upper body and is one of the classic surrogate movements.
- Be careful not to let your head hang down, but to stretch it in line with your spine, which means in particular stretching your neck to standard anatomical position instead of tilting your head back. This usually means moving the chin more towards the sternum.
- Depending on your level of practice and tolerance, turn your head upwards around its longitudinal axis. Make sure you avoid tilting your head back or sideways. As a simple rule, the chin should almost always be brought closer to the sternum. If the stretch or the work is unusually vigorous, the sternocleidomastoid can easily develop significant muscle soreness due to the unaccustomed work, which can be quite unpleasantly reminiscent of an infection due to its location close to the cervical lymph nodes.
- Turn both arms out; in the lower arm this means turning the inner elbow away from the body. This is easier in the right (lower) arm against the resistance of the hand holding on to the lower leg than in the left (upper) arm if the direction of the palm is not to be changed. This always points in the same direction as the sternum, i.e. ventrally. The rotation of the upper arm – if it was lost when assuming the posture – should therefore be synchronized with the pronation of the forearm. This requires a little body awareness and can be practiced in Rotate arms. Stretch the upper arm away from the body at 90° to the spine, keeping it in the shoulder line and the plane of the back, i.e. do not move it as far back as possible. Only in cases where stretching of the pectoralis is desired, take the arm further back. Stretch both arms with the shoulder blades away from the spine in maximum lateralization. Otherwise a lack of stretching could lead to a cramp in the trapezius.
- The point on the lower leg where the right hand is supported is chosen so that
- the lower arm is approximately vertical and, above all
- there is as little or no lateral curvature in the trunk as possible
- To stand securely, spread the toes of the right foot as wide as possible, possibly straightening them with the help of your fingers. This also widens the balls of the feet, which broadens the physical support base, but above all it allows a more even distribution of pressure on the balls of the feet and a much more secure stance.
- Leave the toes soft. Any use of the toes is likely to disturb the calm pressure of the balls of the feet.
- The angle in the left foot, more precisely the angle of the thigh in the hip joint, should be approx. 20° from the starting position, especially for beginners. Less rotation is possible for the more experienced, but reduces the feeling for the work of the leg. Greater twisting reduces the base of support (the convex envelope of all parts of the body on the ground and bearing the load), making it more difficult to compensate for wobbling in the forward/backward direction. Note that the ability to compensate for wobbling is not linearly (proportionally) dependent on the angle!
- Adopting such a posture often reveals how you will stand; coming out of it usually shows even more how you have stood.
- In rare cases, trikonasana causes cramping of the muscles in the lower back, which behaves like lumbago. See the FAQ for more information.
- If the tendency to spasm in the trapezius of the upper arm cannot be controlled by maximally rotating the arm and maximally lateralizing the shoulder blade by stretching the arm, the hand on the inner leg variation should be practiced, in which the tendency to spasm usually disappears immediately by lateralizing the shoulder blade and avoiding any activity of the trapezius. To reduce the tension on the trapezius in general and reduce the tendency to cramp, practise „lying on rollers in karnapidasana“ frequently, for example.
- The variation „pull the lower arm long“ is very reminiscent of a way taught in some schools to take the pose (not performed as a partner exercise) by first stretching the lower arm upwards in extension of the body side before tilting the pelvis with the upper body to the side of the 90° turned leg. An attempt is made to maintain the extension of the upper body as best as possible by stretching the arm in the extension of the side of the body before the arm is dropped to rest on the lower leg. However, both students trained in this way and their teachers and their publications regularly show a more or less pronounced lateral curve of the upper body, which makes the maneuver described, however impressive and intelligent it may appear, absurd in its result. For all its suggestive value for the audience, this procedure is no substitute for body awareness and the work of ensuring the straightness of the spine when taking up and, above all, maintaining the posture from the responsible lateral flexor muscles against the anything but slight resistance and the effect of gravity. It is possible that the design flaw in this maneuver lies in the fact that dropping the arm to support the upper body on the lower leg inevitably represents a break and changes the entire force structure in such a way that the work for the straightness of the upper body is perceived as already done and is henceforth omitted. Apparently, in some schools the lateral curve of the upper body (including the lumbar spine) is seen as part of the posture, which is argued to stretch the psoas major. Although this muscle does indeed have a lateral flexor function of the lumbar spine when innervated on one side, there is no differentiation between fibers or innervation for lateral flexion (i.e. movement in the frontal plane) and for movement in the sagittal plane (in the case of the psoas major, flexion of the hip joint and spine) in contrast to the autochthonous back muscles, which also have a significant lateral flexor effect, in the case of the autochthonous back muscles, the extension of the spine), so that the value of this aspect of the posture may be doubted in view of far more efficient postures for stretching the psoas major, such as the class of hip extensions in the context of upper body backbends. Furthermore, if one wanted to follow this side-bending interpretation, a clear maxim would have to be given as to how much of the weight of the upper body should be converted into lateral flexion of the spine or into abducted exorotated flexion of the hip joint. If this clear and practicable maxim is missing, the student would forever be dependent on the judgment of some teacher and their subjective opinion when assessing their asana. This would be the opposite of what we are aiming for.
- The inclination of the pelvis in the hip joint to fall into flexion in relation to the 20° rotated leg is in direct proportion to the adduction in this hip joint, which occurs when the pelvis is tilted to the side of the 90° rotated leg. The anatomically standard pose known hip flexion effect of the adductors cannot be held responsible for this, as they are not subjected to any stretching due to adduction. The psoas major is more likely to be the cause, as its attachment to the trochanter minor is pulled further medially and the distance between the origin and attachment is therefore longer. However, the most important reason is probably the tensor fasciae latae, which, as the abductor, is lengthened by the adduction and is converted into knee joint due to extension and in the hip joint due to the attempt to avoid flexion. The extent to which the tensor fasciae latae has a restrictive effect on the pose or flexing effect on the hip joint can be determined using the Ober’s test.
Therefore, an attempt must usually be made, the hip joint of the 20° rotated leg less to reflect to be able to hold the upper body above the 90° turned out leg without a hollow back. So move your bottom away from your back.
variants
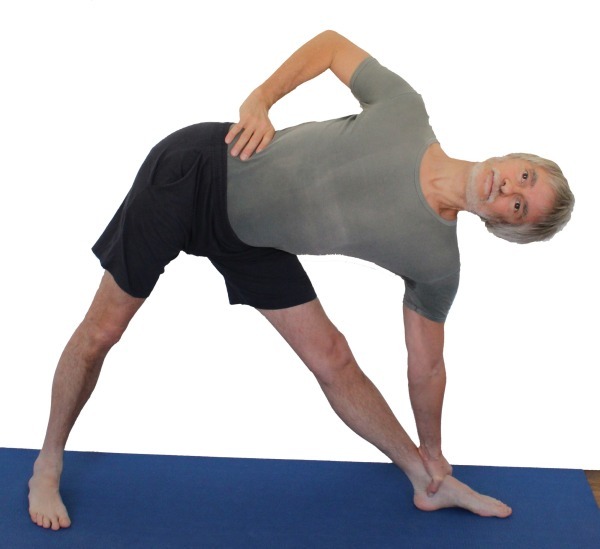
Hand on the inner leg
avoids the tendency to spasm in the trapezius of the upper arm
Effects:
(226) Shoulder blade: stretching for retraction
(276) Shoulder joint: stretching for endorotation
(511) Stretching of the pectoralis major
instructions
- Take the pose as described above, but do not stretch the upper arm upwards, but reach behind the back with the arm bent and, if possible, try to press against the contralateral inner thigh with the fingertips.
details
- This variant almost certainly eliminates the otherwise frequently occurring tendency to spasm in the trapezius of the upper arm. Depending on the flexibility of, for example, the pars clavicularis of the deltoid and the pectoralis major of the upper arm, it may not initially be possible to bring the arm sufficiently far into retroversion and adduction to reach the thigh with the hand. Over time, however, it should become possible to press against the inner hamstrings with the fingertips and thereby support the rotation of the upper body. Regardless of how far the arm or hand can be moved into the desired position, any attempt should already lateralize the shoulder blade to such an extent that any tendency to spasm that has occurred is ended immediately. A glance at the insertion area of the trapezius makes the mechanism immediately clear. In addition, the trapezius is no longer needed to maintain the position of the scapula at the start of the necessary external rotation.
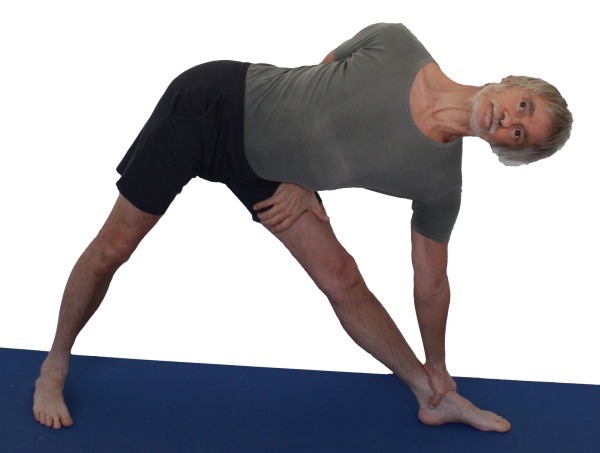
Hand on the hip
instructions
- Take the pose as described above, but do not stretch the upper arm towards the ceiling, instead place the inner hand on the hip with the arm bent. The elbow moves backwards, so the shoulder blade largely goes into retraction and the arm makes more of a twisting movement.
details
- In some cases, there is excessive tone or a clear cramp in the trapezius that does not allow the upper arm to be extended towards the ceiling without increasing the cramp. This variation can then be tried. If it does not provide significant relief, the hand on the inside leg variation should be practiced instead.
Turn more upper body with bent arm

instructions
- Take the pose as described above, but tilt the pelvis to the side so that the supporting arm can be bent and use this arm to push the upper body into the rotation with maximum force.
details
- Depending on your flexibility, it may not be possible to bend the arm without dropping the upper body into a side bend. For the purposes of this variation, however, the exact straightness of the upper body is less important than the maximum rotation. Up to a certain degree of flexion, the more the arm bends, the better the strength of the upper body can be used, which presumably causes the upper body to bend more or less to the side. The effect of this posture is based, among other things, on the reduction of the lever arm.
- Make sure that your upper body moves forward as little as possible.
unsupported
Effects: (722) Strengthening the hamstrings
(741) Strengthening the abductors
instructions
- However, do not support yourself with the lower arm on the lower leg, but hold the arm pointing vertically downwards in the inner lower leg area, if necessary with pressure from the front against the inner lower leg.
details
- Depending on the constitution of the back muscles, this variation places great demands on the lateral flexor muscles of the lower back due to the large partial body weight and consequently the lever.
- In principle, it is somewhat easier to convert the partial body weight into a tilt of the pelvis to the side than with a supporting arm.
- While the lower arm was able to support the rotation and extension of the upper body together with other lateral flexors in the supported standard version, these options are completely absent here. Instead, the back muscles have to hold the entire partial body weight, which places significantly greater demands on the autochthonous back muscles in their function as lateral flexors than when supported. In addition, the corresponding autochthonous back muscles are also partly responsible for rotation, so that they are active in all three dimensions of movement. This is therefore not a variant for people with weak autochthonous back muscles, as these may be overstrained after a short time. Depending on the case, this can lead to a lumbago-like cramp.
- Of course, in the event of irritation of the origin of the ischiocrural group ( PHT, see also the FAQ), great care must be taken with this variant. Although the possible strengthening that results from the fact that the ischiocrural group has to hold a large partial body weight that is favorable to the direction of gravity is desirable, experience has shown that the known pain must not be triggered to any extent, but must be strictly avoided. As this depends primarily on the length of the sarcomere and then on the load, it should be possible to perform this variation with less flexion in the hip joint despite a significant load.
Hand on the inner foot

instructions
- Take the pose as described above, but do not place your hand on your lower leg, but on the floor in the inner foot area and parallel to it.
- Press the hand as hard as possible towards the foot to intensify the rotation.
details
- the variation with the hand on the inside of the foot on the floor intensifies the rotation compared to the hand on the outside of the foot. It only works with good flexibility and tends to increase the sideways bend of the upper body.
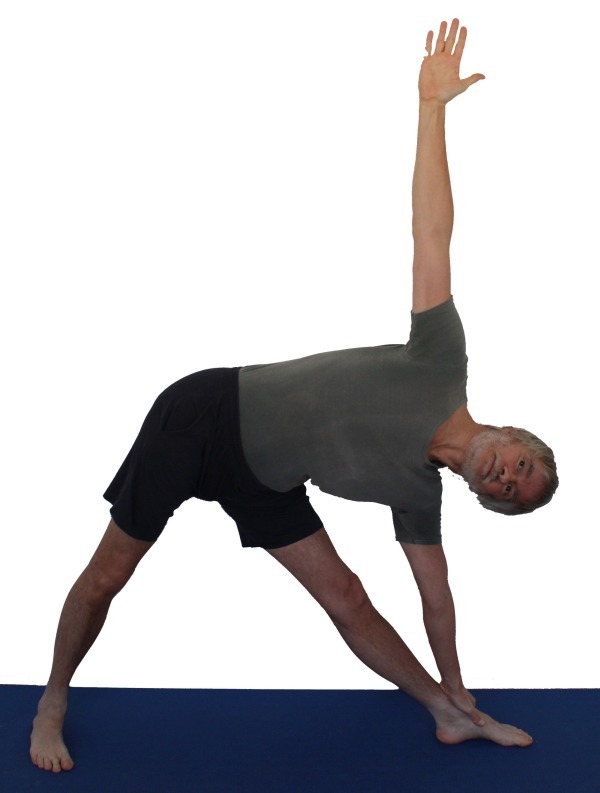
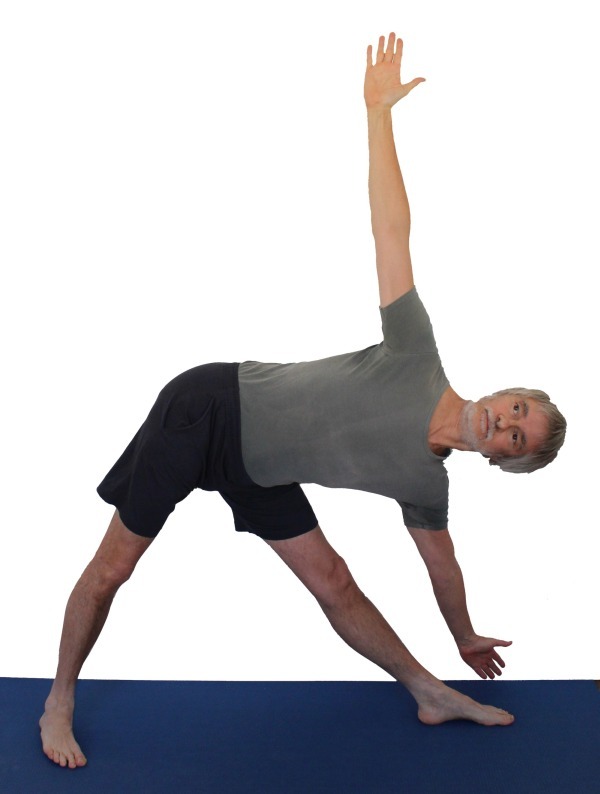
Turn head
instructions
- Take the pose as described above, but turn your head as far as possible towards the ceiling.
details
- This is the actual standard trikonasana. However, turning the head towards the ceiling is such an unfamiliar muscular effort for the inexperienced beginner that it is not uncommon for intensive attempts to turn the head to cause severe muscle soreness in the sternocleidomastoid muscle, which reminds some people of a viral infection they have suffered with regard to the cervical lymph nodes located next to this muscle, so that they may not even know whether they are ill or simply have sore muscles there. It is therefore advisable to approach the issue of turning the head(rotation of the cervical spine) rather defensively and gradually.
- When the head is turned, a reclination or lateral tilt of the cervical spine often occurs as an associated movement, which is also understandable due to the traits of the muscles involved. However, the head should be rotated exactly in the axis of the spine without deviating into one of the other movement dimensions, i.e. without tilting to one side and without the cervical spine falling into reclination (backwards) or flexion(bending forwards).
- If this rotation is too strenuous to hold or if you notice a tendency for the sternocleidomastoid to cramp, turn your head back a little and alternate between these positions if necessary.
Maximum upper body backbend

instructions
- Take the pose as described above.
- Bring the pelvis into the correct position and from there bend the upper body into maximum extension.
details
- While the standard version of trikonasana ideally has an upper body as in Anatomical Zero with a twist, only tilted almost horizontally, the range of movement is explored here in the direction of a backbend of the upper body. Attention must be paid to the condition of the muscles in the lumbar spine, which must not be overstrained, which would result in a tendency to cramp. The backbend should therefore be performed primarily in the thoracic spine, which represents a clear flexibility requirement. It is not uncommon for the thoracic spine not to be stretched straight at all, but to remain in a slight kyphosis. The upper body backbend can be combined well with reaching the upper hand behind the back towards the inner leg. The arm then determines which part of the upper body should be moved backwards, namely the cranial part of the arm.
Lateral pressure against the lower leg

instructions
- ..
details
- ..
Press the ball of the foot

instructions
- Take the pose as described above and then press the balls of the feet of the 90° turned leg onto the floor as much as possible.
details
- The pressure of the balls of the feet on the ground not only strengthens the stance, after all, the physical support base on this side of the body is very narrow (width of the balls of the feet) and the center of gravity is shifted towards this foot. It also tends to help with extension in the ankle joint(plantar flexion) and thus, if the distance between the feet is large enough, both with stretching the foot lifter muscles and with pushing down the inner foot(pronation), which otherwise quickly becomes too light, which can cost stability.
- Care must be taken to ensure that neither the muscles of the sole of the foot nor the calves go into a cramp-like state. If a tendency to cramp occurs in one of the two muscle areas, the forefoot can be placed on a sufficiently firm moderate elevation, which allows the muscles concerned to work at a more favorable sarcomere length and reduces the tendency to cramp.
stretch from bent leg

instructions
- Do trikonasana as described above, but first bend the 90° turned leg significantly and press the corresponding side of the body onto the thigh by tilting the pelvis (in the hip joints) to the side as far as possible.
- Stretch your leg slowly and with force, but keep the side of your body in contact with your thigh.
- If flexibility is so good that the knee joint can be extended, the hand that normally supports the lower leg should be placed on the ground in the area beyond the outer foot, which makes it impossible to extend the leg except in cases of very good flexibility and thus protects against overstretching.
details
- Except in cases of very good flexibility, it should not be possible to extend the knee joint again without losing contact between the side of the body and the thigh. This variation is really about maintaining contact and therefore not being able to extend the knee joint through and therefore not hyperextending it. This is the purpose of this variation. This results in a very intensive variant for stretching the inner hamstrings, a little less for the gracilis, which puts less strain on the origins of the muscles at the ischial tuberosities and is often used in the case of corresponding irritations (such as insertion tendinopathy PHT) in order to protect the area, see the FAQ.
- As the knee joint is bent and the lower leg is therefore steeper to the ground, it is easier to press the inner foot onto the ground. If this is difficult in the standard version due to foot deformities or pronounced flexibility restrictions, this may be an option.
Hand on block
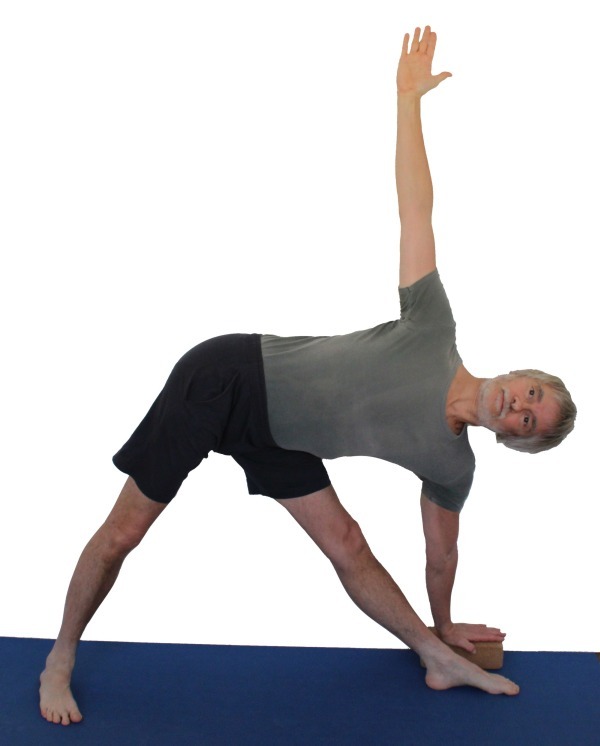
instructions
- Take the pose as described above, but do not lean on your lower leg, but place your hand parallel to your foot on a block and lean on it with moderate weight.
details
- In trikonasana, the supporting hand is used to support the rotation of the upper body. The hand on the block worsens the ergonomics a little, as the thumb on the inside of the grip on the lower leg prevents it from slipping away, even if a lot of force is applied. On the block, it is only the friction of the hand that prevents this, and the friction of the block on its base is also limited. Therefore, always place the block on the mat (or on a patch) instead of next to it on a possibly more slippery surface. If the friction of the hand on the block is not sufficient because the hand is very dry, use a patch on the block. If necessary, the thumb can also be placed around the block, i.e. on the vertical surface of the block facing the foot.
- Of course, this is essentially the same as the hand on the ground variant, but with a slightly less stringent flexibility requirement. The details given there also apply here.
- The hand on the block pushes in a direction parallel to the outer foot and towards the opposite heel and out of the field of vision.
Hand on the ground

instructions
- Take the pose as described above, but do not place your lower hand on your lower leg but place it parallel to your foot on the outside of your foot.
- Support the stretchingand rotating movement of the upper body by pushing the hand away from the foot and at the same time parallel to the foot in the direction of the other foot.
- Slide your hand on the floor parallel to the outside foot in the direction of the other foot.
details
- Supporting yourself on the floor requires good flexibility in the hamstrings, especially if care is taken to ensure that the upper body does not go into lateral flexion, bending sideways. This is very similar to the standing against the wall variation. The greater the distance between the feet, the more flexibility is required. If flexibility is less good, it is usually not possible to place the hand on the floor on the outside of the foot. If flexibility is already much better, this may be possible, but a more or less significant sideways bend of the upper body is then usually unavoidable. Only with very good flexibility is it possible to place the hand on the outside of the foot without bending the upper body. In addition, the low supported position makes it difficult to turn the upper body. Due to the greater need for flexibility and the increased tendency to evade, it will also be more difficult to keep the inner foot pressed to the ground and the foot will tend to supinate more. In addition, the contralateral hip is pulled further forward by the adductors via their origin at the pubic bone area.
- As already described in the basic posture, there are associated movements that need to be resolved. Due to the more intense effort required to prevent the upper body from falling into a sideways curve, the tendency to lift the head, i.e. to bend the cervical spine away from the floor, will be increased; the urge of the upper arm towards the pelvis may also be increased.
- The force with which the hand is pressed in the direction of the opposite foot helps to reduce the lateral curve of the upper body. Using the arm as a punctum fixum, the corresponding shoulder blade and, via its retractors, the spine are pulled downwards, i.e. straightened.
Belt around the thighs

instructions
- Place a belt tightly around the middle of each thigh and take the pose described above.
details
- The belts provide feedback on whether and when the leg muscles are working fully. In the 90° turned leg, it is mainly the quadriceps whose work can be felt, in the other leg it is more the hamstrings that is involved in preventing the pelvis from tilting into flexion in the corresponding hip joint.
Outer foot on the wall

instructions
- Take the pose as described above, but press the heel of the leg that the upper body is moving away from against a wall.
details
- This variant is mainly used to better perceive the pressure with which the feet are pushed away from each other.
- In contrast to the following variant, the mat here is at a 90° angle to the wall and does not need to be changed to switch sides.
- In addition to the heel, as much of the outer foot as possible lies on the wall, this is usually the base of the 5th metatarsal bone.
- If the pressure is felt to be uncomfortable, use softening agents such as patches.
Outer foot at an angle to the wall

instructions
- To practice the right side of trikonasana, place the mat against a wall, turned 20° counterclockwise from the wall, i.e. to the left.
- Set up trikonasana as described above, but keep the outer edge of the left foot pressed against the wall.
details
- Even if the tendency of the foot, or rather the whole leg, to turn out in the hip joint is much less than in the 2nd warrior position, this variation gives a better feeling for the position of the foot and the turning out of the thigh.
- The pressure of the outer edge of the foot against the wall may be perceived as uncomfortable, as the tarsal or metatarsal bones press hard against the wall. This can be alleviated with appropriate means such as a mat, patch or blanket. It is usually necessary to decide whether the heel area with the tarsal bones or the metatarsal bones press more against the wall; the heel is probably the more sensible choice.
- Changing sides requires changing the position of the mat. If practicing in a group, it is therefore advisable to have one half of the group start with the left side and the other half with the right, and to switch to a different mat on a suitable side each time. If practising alone, two mats can also be placed next to each other or on top of each other at different angles; on top of each other, of course, only if the resulting surface does not prove to be too soft and costly in terms of stability.
- This variant is ideal for focusing on the movement of the feet away from each other, as the pressure generated is felt on the wall.
Back against the wall

instructions
- Place a mat lengthwise against the wall and take the pose described above so that both heels are only a few centimeters away from the wall and your back is resting on the wall as far as it can.
details
- This variation improves your perception of this:
- whether the upper body is above the leg
- whether the pelvis is moving out of excessive flexion in the hip joints and back into the correct posture, i.e. the extent of the hollow back.
One of the evasive movements of trikonasana is the deviation of the pelvis so that the flexion in the hip joints becomes excessive, i.e. the pelvis points forward too much. This evasive movement leads to a hollow back, i.e. an increased lordosis of the lumbar spine beyond the anatomically appropriate zero. Since the muscles of the lumbar spine are already challenged depending on the weight with which the arm is supported, the condition for their work should not be made even more difficult by hyperlordosis in the direction of shorter sarcomere length and a tendency to spasm. The wall offers resistance against which the buttocks can be perceptibly moved away from the back into the correct position. The second of the above two points is a consequence of the first: if the pelvis is held in the correct position, the back rests on the wall in the area of the thoracic spine. However, the conclusion that a supine back must be in a correct position is incorrect: if there is too much flexion in the hip joints and hyperlordosis, the back can also be supine, but the point or area where it is supine would not necessarily be the same, but possibly a little further cranially.
- Move the upper shoulder towards the wall, if possible press it firmly against the wall, while moving the lower shoulder away from the wall.
Foot on block

In some cases, elevating the forefoot avoids discomfort in the Achilles tendon area.
instructions
- Take the pose as described above, but place the forefoot on a block or shoulder plate lying across the foot so that all the balls of the feet are resting on it.
details
- In some cases, there is discomfort in the area of the Achilles tendon, which becomes more pronounced as the distance between the feet increases. These seem to depend to a certain extent on the flexibility of the foot lifting muscles, but not strictly, so that in some cases a remedy must be sought to avoid having to reduce the distance between the feet to such an extent that the trikonasana can only be performed with insufficient distance between the feet and loses its character and effects.
- Instead of a block, other supports that are sufficiently firm are of course also suitable, such as shoulder support plates, depending on their composition. The lower the support can be selected without causing discomfort in the Achilles tendon, the better. A gradual reduction may also be advisable.
Block in the hand
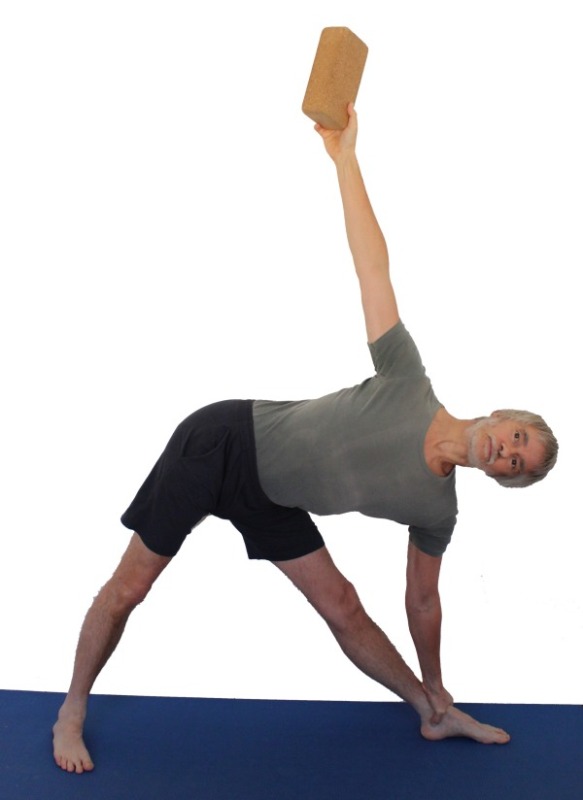
Effects: (226) Shoulder blade: stretching for retraction
(511) Stretching the pectoralis major
instructions
- Take the pose described above, but hold a block in your upper hand.
details
- The block in the upper hand does not have a great weight, but its weight on the corresponding lever arm, which the arm represents, works well enough to get a little more feeling for the work and the position of the arm: the arm should rotate out to the maximum, is in the frontal plane and at a 90° angle of lateral abduction and extends away from the spine to the maximum, the shoulder blades therefore lateralize to the maximum.
- If the block is held lengthwise instead of crosswise, the effective lever arm is more favorable and the effect of the block is somewhat more noticeable. If a heavier weight such as a small dumbbell is used, care must be taken to ensure that the arm does not go so far back that a moment is created over the length of the lever arm that is so great that it jeopardizes the stability of the pose and the performer threatens to tip over backwards. If this becomes apparent, the pelvis must be moved forwards a little.
- A light dumbbell can of course also be used instead of the block.
- This position can be varied in the case of a shortened pectoralis major so that the arm is deliberately moved backwards beyond the vertical in order to stretch the pectoralis major. A light dumbbell would also be suitable here, but the increasing leverage effect with increasing deviation from the vertical must be taken into account: the further the arm is moved backwards in the direction of the horizontal, the more forcefully it pulls the upper body into rotation and backwards, thus shifting the center of gravity. This variation can also be used to stretch the biceps.
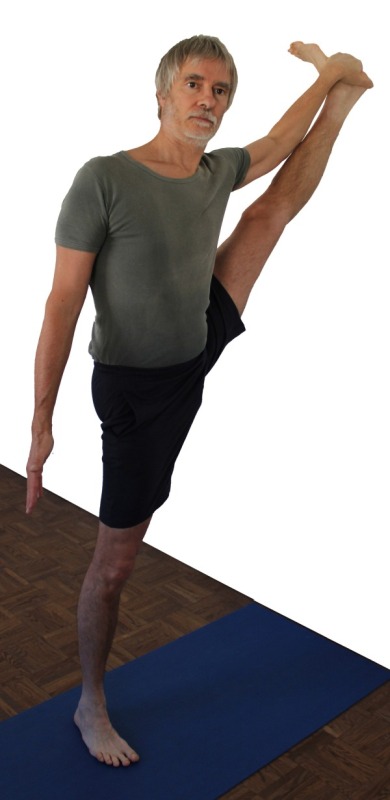
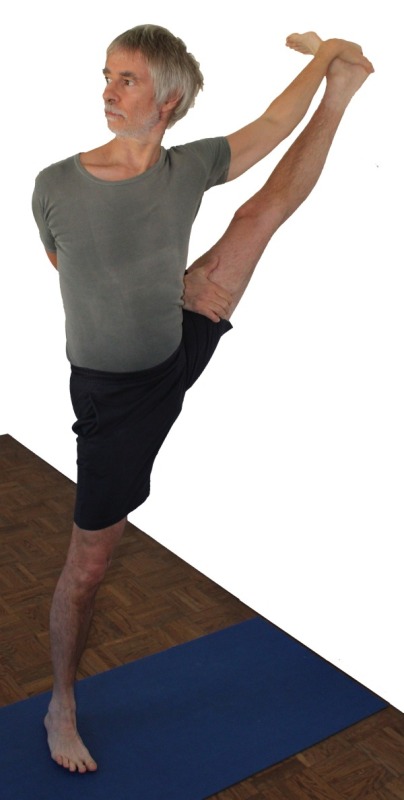
Standing against the wall
Detail photos
instructions
- Stand with the right side of your body facing the wall about one meter (depending on your flexibility and leg length) away from the wall.
- Shift your body weight onto your left foot and lift your right leg off the floor.
- Turn the right leg out at the hip joint, bend the right knee joint and place the right foot as high as possible next to the body on the wall.
- Extend the right knee joint, turn out the right thigh in the hip joint to the maximum, align the pelvis straight up and upright, stretch the upper body straight up and keep both knee joints extended.
- Grasp the right inner foot with your right hand and turn your right leg out to the maximum at the hip joint.
- Reach behind your back with your left hand to your right inner thigh and turn your upper body to the left, also using the strength of your left arm.
details
- This variation corresponds to a sideways hasta padangusthasana against the wall. Everything said there also applies here.
- Due to the rather small physical support base, it already has the character of a balancing posture.
- The foot should be placed so high on the wall that the right leg can just be stretched through.
- The right leg turns out as far as possible. Restrictions in the flexibility of the adductors and, to a lesser extent, the abductors counteract this, so that the right arm on the lower leg or, if possible, the foot must be used to counteract this and the leg must be turned out further. The exorotation of the leg has a direct influence on the ability to straighten the pelvis: the less the leg turns out, the more difficult it is to straighten the pelvis.
- The pelvis must be straightened. Hip flexors with limited flexibility may pull it into flexion in relation to the standing leg, causing it to tilt upwards and forwards and downwards. The hip extensors, i.e. the hamstrings and often also the gluteus maximus of the standing leg, have to work against this, which in turn creates a flexion anglein the knee joint of the standing leg via the hip flexors, so that intensive work by the quadriceps may also be required to keep the knee joint extended.
- Due to the pronounced flexibility requirement in the right hip joint, all possible evasive movements are clearly evident: the pelvis tilts forward because the stretched adductors have a hip-flexing effect and sideways away from the lifted leg due to the pull of the hamstrings. Work against this in both cases and keep an eye on the increased flexion ofthe standing leg due to the straightening of the pelvis!
- The foot of the lifted leg has a clear tendency to slip off the wall. On the one hand, this depends on the distance: if it is too small, the inclination is increased; on the other hand, this is of course mainly the result of the restricted flexibility of the hamstrings of the lifted leg and the corresponding extension moment in the corresponding hip joint, which pulls the leg down and at the same time causes the pelvis to tilt sideways to the contralateral side. The foot on the wall should no longer be placed with the whole sole but only with the heel from an angle of the lifted leg of about 20° to the horizontal. Below this angle, the increased friction with the sole of the foot fully planted is still a significant advantage. Above this angle, it should no longer be necessary and the effect that the back of the leg can be stretched better with the heel on and the foot in slight dorsiflexion can be used, which is probably largely due to the biarticularity of the gastrocnemius.
- As soon as possible, the hand should grasp the lifted inner foot in order to turn the leg out as forcefully as possible with a supination movement using the force of the forearm, which should noticeably support the straightening of the pelvis.
- The standing leg not only has a bending tendencyin the knee joint, but may also have a tendency to rotate out. Although exorotation tends to be the correct movement, this must not lead to the inner foot becoming lighter than the outer foot.
(P) Straighten upper body
instructions
- Take the pose as described above.
- The supporter stands to the back of the performer. To reduce any lateral flexion of the spine, he places one hand on the upper shoulder head (acromion).
- The other hand is then placed so that the carpus is caudal and the fingers are cranial to the maximum lateral curvature of the upper body.
- The supporter pulls with one hand on the acromion towards the equilateral hip while pushing the other hand towards the spine and simultaneously flexing the hand to bring the fingers and carpus closer together.
- To reduce any hyperkyhosis of the thoracic spine, he also pulls on the upper acromion and presses with the other hand against the spine caudal to the maximum of the kyphosis.
Details
- The lateral bend of the upper body is a detail that often escapes not only the performer’s attention or even observation, but also their ability to intervene. This is usually less or only partially due to a lack of strength, but rather a lack of control of the executing muscles. This variation attempts to make both accessible and to convey where (only) the spine is free of lateral flexion.
- The method in which the described intervention is carried out in a jerking movement alternating between more and less forceful action achieves good results. The performer often succeeds at some point in clearly perceiving the difference between the two states and, a short time later, usually also proactively contributes to the elimination of the lateral flexion, however pronounced and sufficient his or her use of force may be at the beginning.
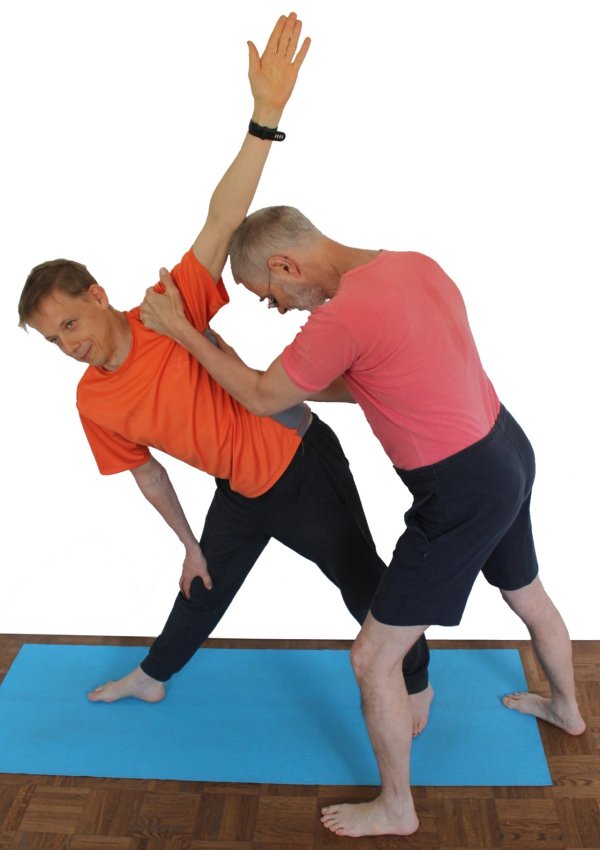
(P) Rotate chest

instructions
- Take the pose as described above.
- The supporter stands on the performer’s back and pulls on the upper shoulder head(acromion) with one hand while the other presses on the lower shoulder blade from behind to support the performer’s rotation. Pull and push must correspond in such a way that the performer is not tilted or their stance impaired.
details
- Note that as the rotation increases, the upper body falls more into the side bend.
- As with all partner exercises, it is important to slowly increase the force applied up to the maximum point that the performer considers tolerable and, at the end, to slowly (!) reduce the force applied again when adjusting the support so that no reflex tensions occur when the performer attempts to hold the position using their own strength.
- The pull on the upper shoulder head (acromion) and the pressure on the contralateral lower shoulder blade must correspond in the force they exert on the performer’s body so that the body is not tilted forwards or backwards! If you take the lever arm into account, the force that presses on the shoulder blade is twice as high as the force that pulls on the shoulder head(acromion). This is often overlooked by the supporter, and pushing is usually more strenuous than pulling, so that it can often be seen that the performer is pulled slightly backwards and has the (justified) feeling of almost tipping over backwards.
(P) on the wall

instructions
- This variation largely corresponds to the variation (P) chest twist, but here the performer stands lengthways against a wall so that their buttocks and parts of their back are resting on the wall. In contrast to the corresponding partner exercise without a wall, the supporter stands not behind but in front of the performer, pulls the lower shoulder head, which he grasps from behind, towards him and pushes the upper shoulder head towards the wall with the other hand.
details
- As already described in the back against the wall variation, the bottom against the wall provides better control over the movement of the pelvis and therefore helps to avoid a hollow back in this pose. As a rule, only the lower buttock is in contact with the wall. In order to touch the wall with the upper buttock, you need some flexibility in the adductors.
- Due to the passively forced rotation of the upper body, if flexibility is not too poor, it is clear that only the upper shoulder comes against the wall and the lower shoulder is pulled away from the wall. This means that the distance between the heels and the wall must not be too small so that the rotation of the upper body not only pulls the lower shoulder forwards but can also push the lower shoulder backwards and, on the other hand, the maximum rotation can take place without the upper thoracic spine having to be pulled forwards.
(P) Pull lower arm long

instructions
- Take the pose as described above, but do not support the lower arm on the lower leg, instead the supporter pulls this arm sideways horizontally away from the pelvis. The supporter presses with one foot against the 90° rotated thigh in such a way that it further promotes external rotation.
details
- Pulling on the arm is intended to straighten the upper body, i.e. to reduce an existing lateral curve, but also to encourage the pelvis to tilt in the hip joint, which should lead to increased stretching in the back of the leg. As the lower arm can no longer support the rotational movement of the upper body, this will be reduced, which cannot be compensated for by the pull on the arm. If the arm were pulled forward to support the rotation, a counterforce would be needed to pull or push the upper side of the upper body backwards in order to maintain stability, which leads to the variant with two supporters.
- Depending on where the arm is gripped, this can lead to uncomfortable pulling on the skin. Pulling on the hand gripped with both hands or on the wrist is reasonably comfortable even with a higher pulling force. It is also possible and comfortable to bend the elbow joint and pull on the upper arm.
(P) push upper arm back and forth

Anleitung
- Take the pose as described above.
- The supporter stands in front of or behind the performer and presses against the performer’s upper hand from the front in the first attempt and from behind in the second. In both cases, the performer should withstand the pressure of the supporter as well as possible and also maintain the rotation of the upper body.
Details
- This support is dedicated to the upper arm, which is all too often held far back in trikonasana. There is no compelling reason for this in terms of the physiology of movement; it is more likely to be a lack of attention or a surrogate movement. The pressure from behind and in front against the arm focusses on this arm and creates a clearer proprioceptive perception of the arm and its position. Withstanding the pressure from the front is much easier for the performer in terms of the muscles that hold the position of the arm relative to the trunk, including such powerful muscles as the pectoralis major. If these muscles can withstand the force of the support, the support can improve the rotation of the upper body. After the support is released, the performer will then have to exert more force to maintain the position of the upper body, if this is possible at all. Conversely, the pressure against the hand from behind immediately demands increased force from the trunk muscles in order to maintain the rotation as best as possible. It can also be seen that the strength of the muscles that move the arm backwards (transverse abductors) is considerably less than that which secures it against pressure from the front.
(P) Push upper arm cranially

Instructions
- Take the pose described above.
- The supporter stands in front of or behind the performer and pushes the upper hand towards the head, against which the performer should defend himself.
Details
- This support enables many people to use the latissimus dorsi in this posture for the first time. Although this muscle is only a subordinate and indirect lateral flexor of the spine, as it attaches to the arm as a trunkohumeral muscle, However, it should be used together with the other lateral flexors to straighten the spine sideways, i.e. to eliminate the almost regular lateral curve of the upper body caused by gravity. If the supporter now presses caudally against the arm with the request to hold the position of the arm, the performer will inevitably use the scapulohumeral adductors as well as the trunkohumeral latissimus dorsi. Then there is the difficulty of maintaining the work of this muscle after the support has been reduced, without worsening the position of the arm, i.e. without moving it caudally.
(P) turn out with belt

instructions
- Take the pose as described above.
- The supporter stands to the back of the performer, places a belt around the center of the performer’s thigh of the 90° turned leg so that the free end on the outside of the thigh is pointing downwards, and pulls on this free end with downward force to encourage exorotation of the leg.
details
- It is important to pay attention to how the belt is attached. It should be positioned approximately in the middle of the thigh. The buckle must lie on the outer thigh and the free end of the belt must point downwards. This end is pulled towards the floor so that the leg can turn out better. This also supports the extension of the knee joint a little.
- In cases where the knee joint can hyperextend and in particular if it is known that this leads to unphysiological discomfort on the back or front of the knee joint, care must be taken to ensure that the performer prevents hyperextension through muscular control or by using an aid such as a block wedged against the lower leg.
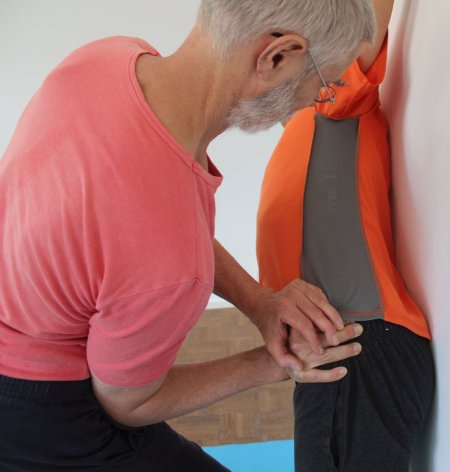
(P) Pressure against the fingertips

instructions
- Take the pose as described above.
- The supporter presses with one palm against the fingertips of the upward reaching arm to provide resistance and therefore good feedback on the force exerted to move the arm and shoulder blade away from the spine and stretch it towards the ceiling.
details
- The fingers must be extended with a certain amount of force so that they do not suddenly and possibly painfully buckle, because they are then suddenly and uncontrollably bent to their final degree with the force of the supporter, which can lead to joint trauma or ligament damage.
- As far as the supporter is able, the pressure should be applied vertically to the fingers from above; short fingernails are obligatory here.
- If the length of the supporter’s arms is not sufficient, it is also possible to press against the performer’s fist.
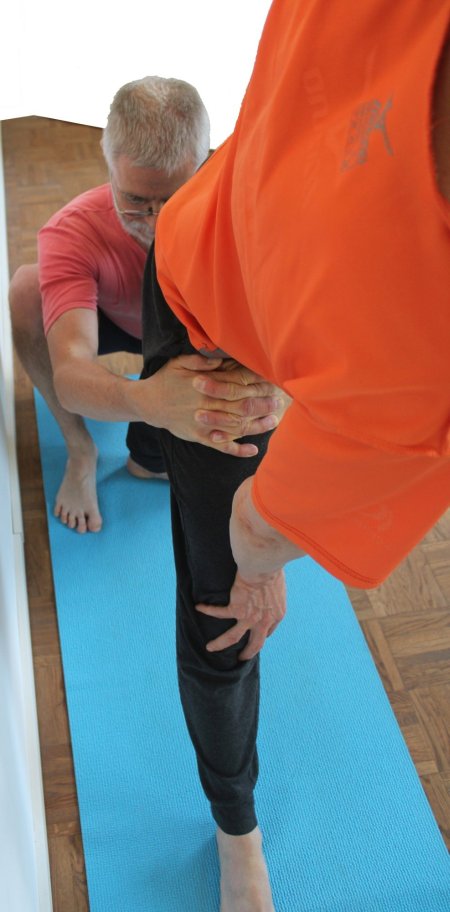
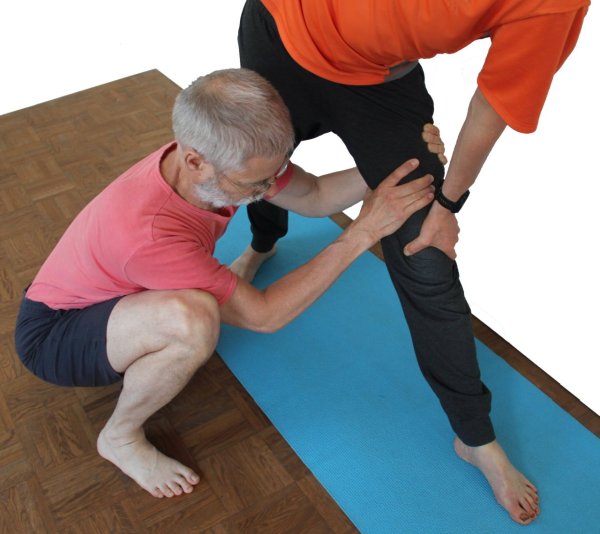
(P) Turn out thighs

instructions
- Take the pose as described above.
- The supporter squats on the side of the 20° turned leg/foot, grasps the opposite thigh with both hands approximately in the middle, turns it out as forcefully as possible and pulls it towards him and downwards. One hand grips from the dorsal and the other from the ventral side, the fingers are interlaced and the supporter leans backwards and downwards as far as possible.
details
- Similar to the support in the variant twisting out with a belt, care must be taken here to ensure that the knee joint is not pulled into hyperextension. If this is possible, the lower leg can be supported with a block placed at an angle to prevent this. As the upper limb of the supporter works against the lower limb of the performer, the former may have to exert an unexpected amount of force.
- If you pull very hard, the 90° turned foot may slip towards the other foot, which must be avoided.
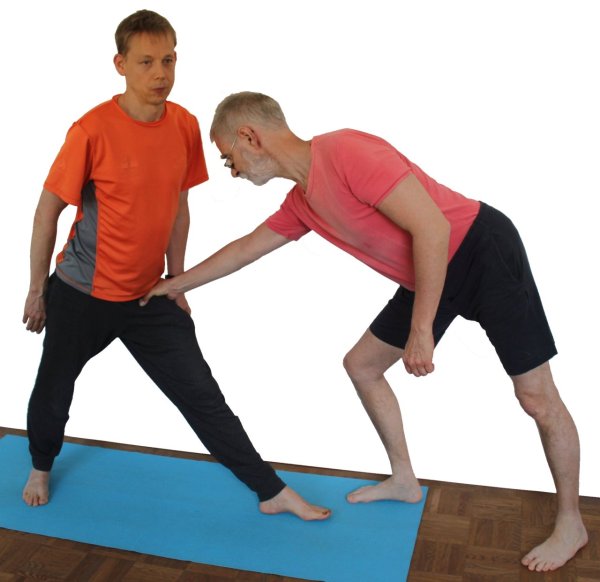
(P) Turn leg out vigorously
Anleitung
- Take the pose described above.
- The supporter squats on the side of the 90° turned out leg and grasps it with both hands approximately in the centre of the thigh to grasp it firmly and rotate it forcefully to the maximum external rotation.
Details
(S) turn let out for taking the pose
Instructions
- Nimm die Haltung wie oben beschrieben ein.
- Der Supporter steht auf der Seite des 90° ausgedrehten Beins und greift mit einer Hand hüftnah den Oberschenkels um ihn mit dem daumen nach vorn und den Fingern nach hinten zeigend fest zu fassen, in Richtung der gegenüberliegenden Ferse zu drücken und dabei nach Kräften auszudrehen.
- Nach diesem Manöver nimmt der Ausführende die trikonasana ein.
Details
- This manoeuvre has two advantages. Firstly, it requires a maximum external rotation of the 90° rotated leg so that the pelvis can tilt to the side as much as possible in the relevant hip joint. This is because, as already described elsewhere, maximum abduction is a function of rotation. The thigh can be extended as far as it is still possible to keep the metatarsophalangeal joint on the ground. The second part of the support, the pressure against the thigh in the direction of the opposite heel, initiates the abduction in the relevant hip joint and shows the performer, what should happen in the hip joint so that he can continue to perform it to the best of his ability and tolerance.
(P) Test lower buttock

instructions
- Do trikonasana as described above.
- The supporter palpates with one finger whether the lower gluteus maximus (belonging to the 20° turned leg) feels contracted, i.e. is working.
details
- The gluteus maximus of the 20° rotated leg must work recognizably, especially in the case of greater flexibility restrictions, to prevent the ipsilateral hip joint from moving into flexion. This can be tested visually and by palpation.
(P) Pressure on SIAS

instructions
- Take the pose as described above with your back against the wall.
- The supporter slowly presses harder and harder on the SIAS on the side of the leg from which the upper body is moving away.
details
- The pressure on the SIAS causes a stronger abduction in the opposite hip joint, which leads to an increase in the stretch sensation in the adductors of the 90° rotated leg, especially in the gracilis. Start the support carefully, as the effect can quickly exceed a tolerable level, after all, the lever arm on which the leg is abducted is quite favorable.
(P) Turn plus pressure on SIAS

instructions
- Assemble the pose with your bottom against the wall as described above.
- In addition to turning the upper body with his hands, the supporter presses with the crown of his head on the SIAS of the performer’s leg, from which his upper body moves away.
details
- The supporter must take care to keep the cervical spine in approximately its physiological lordosis
(2P) with 2 supporters

instructions
- Take the pose as described above.
- The first supporter stands behind the performer as described in the „chest rotation“ variation and rotates the chest.
- The second supporter stands on the side of the 90° turned leg and pulls the lower arm towards him as described in the „pull lower arm long“ variation.
details
- The first support outweighs the disadvantage of the second support, which is performed alone, in that the rotation of the upper body can no longer be supported strongly enough.
(3P) with 3 supporters

instructions
- Set up the variant with two supporters.
- The third supporter grasps the thigh of the 90° rotated leg with both clasped hands, extends the knee joint and rotates the thigh with both hands.
details
- ..
Transition to parsvakonasana

instructions
- For the transition to parsvakonasana, the distance between the feet must be greater than is typical for trikonasana.
- Take trikonasana with a wide stance.
- If possible, place the right hand parallel to the foot in the right outer foot area.
- Then bend the right leg until the right angle is reached, otherwise perform the two steps in reverse order.
- For the parsvakonasana-typical arm position, take the left arm outstretched to the extension of the left side of the body.
details
- If the distance between the feet in trikonasana is too small, this will cause the knee joint to fall into an acute angle in parsvakonasana when the thigh is horizontal. The lower leg should therefore be vertical when the thigh is horizontal. A more acute angle is less physiological than a right angle and encourages you not to push the feet away from each other.
- Depending on your flexibility, it may be impossible to place your right hand on the ground on the outside of your foot with your right leg extended. In this case, the knee joint must be bent at least a little beforehand for this purpose.
- The pressure of the feet on the floor from the quadriceps of the bent leg does not exist in this form in trikonasana. There, only the gravitational effect of a partial body weight and the abductors of the hip joint of the 20° bent leg push the feet away from each other. In parsvakonasana, this activity should be strongly developed.
- Depending on your flexibility, you may need to use a block in trikonasana and the following parsvakonasana.
- Make sure to always extend the upper arm to the maximum during the transition. The lateralization of the shoulder blade in trikonasana transitions into an elevation in parsvakonasana.
Transition to parsvakonasana and back

instructions
- Move into parsvakonasana as described above.
- From parsvakonasana, raise the left arm vertically (90°) to the upper body.
- Straighten your right leg and place your right hand on your lower right leg, straightening your pelvis as little as possible.
- Extend and rotate the upper body.
details
- As a slight bend in the upper body is tolerated in parsvakonasana, the upper body must be consciously released from the side bend in trikonasana.
- In most cases, the pelvis can tilt further to the side in parsvakonasana than in trikonasana due to the relevant flexibility restrictions of the hamstrings. Therefore, keep the pelvis tilted as far as possible when you return to trikonasana. This may result in a more intense trikonasana than usual (unsteadiness of the pose, see FAQ).
Transition to ardha chandrasana

instructions
- The transition to ardha chandrasana is described as the standard method of assuming the posture.
details
- ..
Transition to 2nd warrior position

instructions
- Assume trikonasana with the pelvis and upper body tilted towards the right leg with a significantly greater distance between the feet.
- In a synchronized movement, bend the right leg until it is horizontal, straighten the pelvis with the upper body in a vertical position and turn the pelvis straight forwards, i.e. the left hip backwards.
details
- This transition changes some of the parameters that characterize the respective postures.
- The distance between the feet in trikonasana is usually noticeably smaller than in 2nd warrior pose. If trikonasana is taken with a distance suitable for the 2nd warrior pose, as is necessary here in order to avoid having to increase the distance at a certain point, this has an effect on trikonasana:
- the stretch in the hamstrings and the gracilis on the side of the 90° turned out leg will be significantly greater than usual.
- the inclination of the upper body towards lateral flexion will also be noticeably increased.
- the area of the Achilles tendon of the 90° rotated leg will become tender.
- The movement of the pelvis with the upper body in its extension is largely the work of the gluteus maximus and other hip extensors such as the hamstrings; after all, the flexion in both hip joints must be significantly reduced against gravity. On the side of the 20° turned leg, the hip joint was in a clear adduction in trikonasana and must be abducted far for the 2nd warrior pose, so that the gluteus maximus is clearly required in 2 of its 3 dimensions of movement.
- The amount of strength required in trikonasana to limit the flexion in the hip joints so that the pelvis does not move forward with the upper body is significantly less than the amount of strength required in the 2nd warrior pose. In the latter, all available strength often has to be used to compensate for the hip-flexing moments generated by both the iliopsoas and the hip-flexing adductors. The 2nd warrior position is ideal for strengthening the gluteus maximus. If it is performed in alternation with trikonasana, the latter can be used as a „resting pose“ for the gluteus maximus.
- The position of the pelvis in trikonasana is fundamentally different from that in 2nd warrior pose. Not only does the pelvis tilt far to the side in trikonasana, but the pelvis must also be allowed to move slightly forward on the side of the 20° turned leg. Even those who have mastered the side splits(samakonasana) will be familiar with this tilt. This tilt is no less in the 2nd warrior pose, but this movement should be prevented with sufficient force.
- The upper body is subject to significantly different influences in both poses, both within the body and with regard to the force of gravity. Whereas in trikonasana it was a major challenge, at least for less experienced performers, to prevent a lateral flexion of the upper body from occurring or to eliminate any that did occur, this tilt does not occur at all in the 2nd warrior pose if the pelvis is positioned correctly. Instead, the pelvis has a strong tendency to tilt forward (see above), which very easily leads to hyperlordosis. There is no rotation of the spine at all in 2nd Warrior pose, which should occur in trikonasana, but there is a tendency to turn the upper body slightly in the direction of the bending leg when looking along the arm on this side.