yogabook / asanas / ardha vasisthasana
Contents
ardha vasisthasana
„side plank / lateral plank“
 instructions and details with working links for download/print
Feedback: We’d love to hear what you think about this description, give us feedback at:
postmeister@yogabook.org
Last modified: 30.12.2018
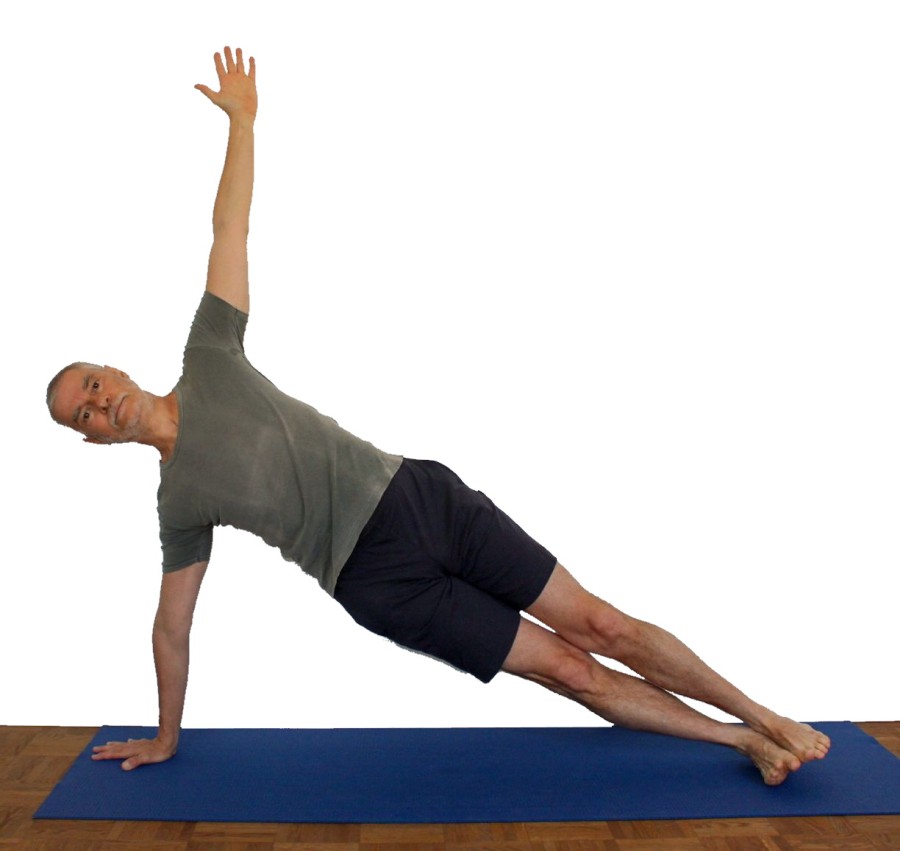
Name: ardha vasisthasana
Trivial name: side plank
Level: FA
- classification
- contraindications
- effects
- preparation
- follow-up
- derived asanas
- similar asanas
- diagnostics
- instructions
- details
- variants
Classification
classic: supporting posture
Contraindication
A pronounced cubitus valgus can represent a contraindication, as can various injuries to the wrist area or of the shoulder joint.
Effects
- (423) Tone of the finger flexors (finger flexors)
- (212) Neck: rotation force
- (217) Neck: lateral flexion force
- (222) Shoulder blade: force for protraction
- (252) Shoulder joint: force for lateral abduction
when the supporting hand is pushed away from the feet - (417) Strengthening for palmar flexion in the wrist
- (422) Strengthening the finger flexors (finger flexors)
- (552) Strengthening the quadratus lumborum
- (602) Strengthening the back extensors
- (742) Strengthening the abductors
- (211) Neck: rotation stretching
- (216) Neck: lateral flexion stretching
with gravity-induced lowering of the head - (341) Stretching for dorsiflexion in the wrist
- (421) Stretching the finger flexors (finger flexors)
Preparation
The shoulder should be warmed up, e.g. with
- downface dog as a general stretching of the shoulder and the hamstrings.
- upface dog as a pose that prepares the shoulders for powerful work, especially through correctly executed transitions from and to downface dog.
- rectangular handstand
- back stretching, especially the „elevated“ version as a general stretching of the shoulders.
- elbow downface dog as a good warm-up exercise for the shoulder.
- purvottanasana if the tone in the deltoid is too high or has become too high due to preparation.
To achieve the extension in the hip joints from the strength of the hip extensors and against the resistance of the hip flexors, prepare with:
- hip opener 1
- hip opener 2
- warrior 1 pose
- upface dog
- urdhva dhanurasana (back arch)
- ustrasana (camel)
and other backbends with extension in the hip joint.
The lateral extension of the back can be prepared with:
The glutes and other abductors and extensors as lateral and sagittal stabilisers of the pelvic position can be prepared if their tension appears increased or there is a tendency to cramp:
- half lotus forward bend
- hip opener at the edge of the mat
- hip opener 3
- parivrtta trikonasana
- parivrtta ardha chandrasana
To create a certain awareness of the use of the glutes: and for the pre-activation
- caturkonasana
- parsvakonasana
- counter
- warrior 2 pose
- purvottanasana
- urdhva dhanurasana
- eka pada variation of urdhva dhanurasana
- setu bandha sarvangasana
- eka pada variation of setu bandha sarvangasana
- warrior 3 pose
- „backwards against the wall“ variant of warrior 3 pose
- utkatasana
- upface dog
- salabhasana
The forearms can be stretched before working hard (palmar flexion) to avoid irritation in the palmar flexors and cramping in the dorsal flexors:
To prepare the forearms for the application of force, the following can be done first:
Follow-up
Derived asanas:
Similar asanas:
Diagnostics (No.)
(360) Hyperextension of the elbow:
Hyperextension of the elbow joint refers to the ability to or the current state of an angle of more than 180° in the elbow joint. To a certain extent, hyperextension is considered normal by anatomists and is on average more common and more pronounced in women. However, it can also indicate a weakness of the musculature, particularly the flexor group of the arm (especially the biceps and brachialis). Furthermore, hyperextension often causes unphysiological sensations that are not caused by stretching or straining the muscles and should be avoided.
Wrist weaknesses are most likely to occur in extensive dorsiflexion and under greater load:
- Ganglion, usually in the dorsal area between the hand and forearm, produces a sensation of pressure when the wrist is dorsiflexed.
- Tendinitis of the tendons of the palmar flexion or finger flexors
- Carpal tunnel syndrome: worsening of symptoms in this position, e.g. paresthesia occurring.
- Fractures and fractures of carpal bones, especially the scaphoid bone
- Arthrotic/osteoarthritic change (degenerative with cartilage atrophy) of the joint.
- Arthritis (joint inflammation) of various kinds.
- Dislocation / subluxation, which would cause a significantly increased sensation of tension in various muscles covering the joint.
- Joint trauma, which may cause pain in the joint even after many weeks or months.
but also purely muscular symptoms such as
- Shortening/hypertonus of the dorsal flexors of the wrist or the finger extensors, which then become noticeable in the dorsal side of the wrist or the back of the hand in the form of cramps.
- Shortening/hypertonus of the palmar flexors of the wrist, which causes pain in the dorsiflexion of the wrist of the posture-stabilising muscles on the palmar side of the forearm due to stretching.
- Golfer’s elbow: pain at the point of origin (medial epicondyle of the upper arm in the elbow joint) of muscles on the inner (ulnar) side of the forearm in the transition to the upper arm.
In this pose, the abductors are required to hold the pelvis in position; if this is not successful, it indicates a weakness in these muscles. If it is one-sided, it should be checked whether this could be the cause of a pelvic obliquity and consecutive scoliosis, see also the FAQ.
(217) Neck muscles:
Here the lateral neck muscles are strained for strength endurance in order to keep the head in elongation of the thoracic spine. If this is not successful or leads to cramping, the muscles are too weak and may be too toned.
Variants:
Transition to 3rd warrior stance
Instruction
- Stand in downface dog.
- Shift your body weight to the right hand and apply pressure to all parts of the right hand and its fingers.
- Turn the upper body away from the right hand to the left and slowly extend the hip joints to 180°. Turn the right foot with the outer edge and heel towards the floor.
- Stretch your left hand towards the ceiling.
- Place the left inner foot on top of the right inner foot.
- Bring the pelvis exactly between the feet and the sternum, no higher, no lower and above all no further back. Keep the head exactly in line with the thoracic spine.
- Engage the gluteal muscles and push the pelvis, especially the pubic tuberosities, forwards so that the buttocks do not protrude backwards.
- Together with the tendency of the pelvis to move backwards and thereby flex the hip joints, you can recognise the tendency of the upper body not to stretch through but to form a rounded back. Therefore, use the strength of the erector spinae to move the sternum away from the pubic bone in order to straighten the torso.
- As in similar poses, turn both arms out (inner elbow and biceps towards the head) and stretch the upper arm away from the spine as far as possible towards the ceiling.
Details
- This pose relies on strong use of the forearm muscles, which make a constant effort to stabilise the pose in terms of palmar flexion and pronation. The success of this effort can be seen on the one hand in a calm, stable pose and on the other hand in the inner finger base joint areas not becoming lighter or lifting.
- The supporting hand can be a hand’s breadth further away from the feet than the perpendicular of the right shoulder, but not significantly further, best would be, place the wrist one hand length away from the plumb line of the shoulder, excluding the fingers. If the distance were too small, the wrist would possibly be in an almost impossible dorsiflexion. Experienced users can position the wrist as close as possible, i.e. as close as the wrist allows, and push the hand away from the feet with force, which is nothing more than a lateral abduction in the shoulder joint in terms of movement physiology. If, on the other hand, the wrist is too far away, it is difficult to push the hand away from the feet using shoulder strength. Turn out the corresponding arm so that the biceps and inner elbow point towards the head. Less experienced performers should push the supporting hand firmly towards the feet.
- Stretch both arms away from the body as far as possible, i.e. lateralise the shoulder blades. Especially in the upper upper arm, this – in combination with the external rotation of the arm – helps to avoid uncomfortable tension in the trapezius.
- To strengthen the sides of the torso and the hip abductors, keep the pelvis exactly between the feet and the sternum. Both too high and too low a position of the pelvis is an unacceptable ease.
- Pay close attention to the best possible use of the gluteal muscles in order to eliminate the flexion that is likely to occur in the hip joints as much as possible. Depending on the flexibility of the hip flexor muscles, there may be some residual flexion in the hip. Extension in the hip joint is also not desirable.
- Spread the fingers as wide as possible to optimise the conditions for working with the hand. After all, a large part of the body weight rests on this hand.
- The hand supporting the floor can make two movements: push away from the feet or push towards them. Of course, the effects are very different: in the first case, the deltoid works on the lateral abduction, which allows a very nice and intense strengthening but care must be taken not to lift the pelvis out of the optimal position. To intensify this work, the wrist can be moved a little closer to the foot, but not so close that it would cause pain in the dorsal wrist. In the second case, it is primarily the latissimus dorsi that works and even more care must be taken to ensure that the pelvis does not sink, as the latissimus dorsi is an (indirect) lateral flexor of the spine. In this case, the specified distance is recommended.
- If the stance is stable enough, the head can be turned upwards so that the neck muscles do not cramp.
- In contrast to postures with both hands on the floor, a pronounced cubitus valgus cannot be compensated for here. The tricks described for these postures do not work here. Depending on the extent of the cubitus valgus and in particular if symptoms occur, the described version should be avoided and the forearm should instead be placed at right angles to the longitudinal axis of the body. After all, thia maintains the strengthening effect on the shoulder area, the trunk and the hip muscles remains largely.
- If you have a hollow foot and weaknesses in the fibularis group, you should train it in this posture, by not giving in to the tendency to gravity-induced rearfoot valgus, but working against it, i.e. trying to pronate the foot to some extent.
- Information on dealing with cubitus valgus can be found in movement physiology under axial misalignment.
Known problems that can occur even when performed correctly
Pressure on the outer edge of the foot
Depending on the shape of the outer edge of the foot, idiopathic pressure sensitivity or previous damage, the pressure on the ground can be perceived as clearly unpleasant and may lead to the use of patches under the outer edge of the foot or to distributing the pressure on both outer edges of the foot by placing the feet on the ground one behind the other.
Variants
on fingertips

Instructions
- Take the pose as described above, but do not place the palm of the hand on the floor, but the fingertips with the hand slightly turned out by approx. 15°-20° (i.e. forearm further supinated ). Push the fingertips forcefully towards the thumb against the resistance of the floor.
Details
- This variation requires a lot of strength in the finger flexors. The fingers are stretched out and are pushed into hyperextension by the force of gravity. The finger flexors must be used in all finger joints to counteract these overstretching forces so that the finger joints are not damaged by intensive passive overstretching. Geometrically speaking, the finger joints may still be slightly overstretched, but the destructive forces or moments are neutralised by using the finger flexors, which are intensively strengthened in the process.
- Performing this variation is reserved for more advanced performers. Posts such as downface dog and upface dog, staff pose and rectangular handstand must first be mastered on the fingertips before this variation can be performed with any degree of confidence. After all, more than half the body weight is in the fingers of one hand due to the centre of gravity, which is shifted towards the supporting hand.
- The supporting hand should be closer to the plumb line of the lower shoulder than in the normal version, even just below it. In contrast to the normal version, the hand should not be pushed in any direction! With this recommended position of the hand and fingers, there is hardly any valgus– or varus stress on the finger joints.
Known problems that can occur even when performed correctly
Intense sensation in the fingers
Depending on your constitution and level of training, the tension in the finger tendons can be perceived as very intense or even excessive and can persist for a short time after the pose.
Feet slightly offset

More stable than the standard version with feet placed on top of each other, requires less strength and control from the shoulders.
Instructions
- Take the pose as described above, but place the top foot slightly offset on the bottom foot so that the big toe of the top foot can also rest on the floor. The tarsal bones of the upper foot lie approximately in the hollow of the lower inner foot.
Details
- This variation is usually more stable than the standard variation with the feet resting on top of each other, as the physical support base is slightly wider and therefore requires slightly less strength and control from the shoulders, after all, the foot side of the base of support is about twice as long: from the calcaneus to the contralateral MTP 1 instead of to the ipsilateral base of the Os metatarsale 5.
Feet one behind another

Further simplification
Instructions
- Take the pose as described above, but place your feet directly behind each other.
Details
- The physical base of support is significantly wider here, which makes balancing much easier.
On forearm
Instructions
- Take the position as described above, but not standing on the hand, but on a forearm pointing ventrally, i.e. perpendicular to the longitudinal axis of the body.
Details
- It completely relieves the forearm muscles, which otherwise perform a significant part of the balancing work. The position of the forearm transverse to the longitudinal axis of the body is roughly centred between the maximum internal rotation and external rotation of the upper arm, so that there is no tendency to cramp in the rotators.
- If the elbow presses uncomfortably hard on the floor, a softness mediator can be used. This may also be particularly recommended if you have a known tendency to sulcus ulnaris syndrome (cubital tunnel syndrome).
- The shoulder should be held a little further forwards (towards the hand) than the elbow to create a good balance. If the shoulder is held exactly above the elbow, there is a tendency to tip backwards and there is no way to support yourself.
- In contrast to the standard variation, no consideration needs to be given to the wrist, so that the position of the elbow on the longitudinal axis of the body can be varied more. To strengthen the deltoid, place the elbow a little closer to the feet than the shoulder and push the arm away from the feet. To strengthen the adductor muscles of the shoulder joint, place the elbow a little further away and push it forcefully towards the feet against the friction of the surface.
- The variation with raising and lowering the pelvis is no longer as easy to perform here because the pelvis is closer to the floor anyway. However, this can be remedied by raising the arm.
- In principle, both positions of the forearm are possible: supinated and pronated. If the hand is pressed to the floor in the pronated position, this can feel a little more stable.
Pelvic dips
Instructions
- Adopt the posture as described above.
- Raise and lower the pelvis from the intended position to the maximum. Hold it there a little at a time.
Details
- This variant is helpful for a rough orientation of the force and flexibility of the abductors of the hip joint such as the small glutes. If the pelvis cannot be lifted very far or if it is difficult to keep the pelvis in the line connecting the heels and thigh, this is usually due to a weakness in the abductors. On the other hand, if it is not possible to lower the pelvis far, these muscles are probably not particularly flexible. In addition to the small glutei, the tensor fasciae latae can also be considered as a limit setter. This variant trains these muscles for strength and flexibility. Even better than ardha vasisthasana is of course vasisthasana, in which the upper leg must also be lifted.
Dips
Instructions
- Take the pose as described above.
- Bend the arm whose hand is resting on the floor just to the limit of your strength and then straighten it again.
Details
- In this variation, the rotation of the arm is an interesting question. In order to keep the bent arm in the plane of the body, a very large exorotation capability would be required in the shoulder joint, so this requirement must be mitigated. In addition, the exorotators would have to work so hard for this that a tendency to spasm would be more likely than not. On the other hand, the arm should also not be rotated excessively out of exorotation, only as far as necessary, as with further rotation, the flexion of the elbow joint caused by the ulnar abduction in the wrist becomes increasingly difficult and uncomfortable.
- This pose is primarily an intensive strengthening of the triceps.
Transition to warrior 3 pose

Detailed photos
Instructions
- Take the pose as described above.
- Take the left arm out of the pose, turn it out and bring it into the overhead position typical of urdhva hastasana.
- Bend your right knee and swap the foot you are standing on for the left.
- With the knee clearly bent, place the right foot to the left of the right hand on the floor and turn the upper body 90° to the right. Shift your weight onto your right foot.
- Raise the back leg while keeping it straight.
- Bring the upper body into the position for the 3rd warrior pose and straighten the standing leg.
Details
- ..
Transition to uttanasana

further simplification
Instruction
- Take the pose as described above.
- Bend the knees and jump with both feet to the left of the right hand on the floor while turning the body 90° to the right.
- Straighten the legs and take both arms into the uttanasana pose.
Details
- The jump requires significant bending of the knee joints and a certain amount of jumping power. The feet must rotate 90° so that they can come into the uttanasana position next to the right hand. The upper body must also turn 90° to the right from the plane in which it is in ardha vasisthasana.
- Land on the feet at the same time with the knee joints clearly bent.
- A transition to parivrtta uttanasana is also possible.
Transition to staff pose

Effects:
(512) Strength of the pectoralis major
(232) Strength for
frontal abduction of the shoulder joint
Contraindications
All disorders in the frontal adductors and Transverse adductors of the shoulder joint make it necessary to decide to what extent the transition may be practised.
Instruction
- Take the pose as described above.
- Bend the supporting arm as far as the force reaches.
- Tilt the chest towards the floor and let the body fall. Remove the upper arm from the original position and prepare it to rest on the floor.
- With your upper body still straight and your hips extended, catch yourself on the floor with your second hand to take the staff pose.
CAVE: the more aggressively the transition is practised, the more the physiological elasticity of the tendons of only 4% is exceeded. There is also a high load on the biceps anchor, which is particularly true for those without a bony origin at the supraglenoidal tubercle. - Push yourself backwards, check whether the glutes are stretching the hip joints and complete the staff pose.
Details
- The transition to ardha vasisthasana is a very powerful one and requires a healthy upper limb. If there are any restrictions, particularly in the wrist, elbow or shoulder joint, this transition should be avoided. In particular, instabilities or damage to the shoulder joint that become relevant during frontal abduction, such as SLAP lesions represent a contraindication as the biceps as a frontal abductor of the shoulder joint is involved here in a flash with great force and also in eccentric contraction to absorb the kinetic energy of the falling body. The wrist is also exposed to a significant impact load. It is not uncommon for pressure sensitivity to occur in the area of the carpus after repeated execution.
- This transition is not intended to be performed regularly, as the impact loads in the three joints mentioned are not in any healthy proportion to the expected benefits in terms of strengthening. Nevertheless, this transition can be practised by advanced athletes at sufficient intervals. Its mental component and its ability to document a large, spontaneous application of strength give it an exceptional status. The jump from uttanasana into staff pose is somewhat comparable, except that here the force exerted by the frontal abductors of the shoulder joint is less abrupt and the hands remain in place rather than one hand having to stop the body’s movement abruptly on the floor. In addition, both arms are affected equally and not one arm significantly more, as in the transition described here.
- The second hand should be placed in such a way that it is supported at shoulder width, as is typical in staff pose.
- If it is known that sufficient strength is available, the body is dropped until a horizontal position of the body is achieved by sudden, powerful interception with the previously upper hand. Ideally, the tip of the nose is then about 1-2 cm from the floor.
- The position of the toes is changed during the transition: in ardha vasisthasana they are stretched, in staff pose they are in dorsiflexion. Roll from the outer edge of the foot onto dorsiflexed toes.