yogabook / asanas / staff pose
Contents
- 1 caturanga dandasana„staff pose“
- 2 Variations
- 2.1 from downface dog
- 2.2 from upface dog
- 2.3 on fists
- 2.4 on fingertips
- 2.5 eka pada
- 2.6 Hands further back
- 2.7 with feet upside down
- 2.8 From the floor
- 2.9 Knees on the floor
- 2.10 Dips
- 2.11 with heels on the wall
- 2.12 (S) Pull on the shoulder
- 2.13 (S) Thumb under the pelvis
- 2.14 (S) Keep the elbows tight in the transition to dog position head up
- 2.15 (S) Push elbows back for transition to upface dog
- 2.16 (S) Transition to downface dog
- 2.17 Transition to downface dog
- 2.18 Transition to upface dog
- 2.19 Transition to dog position head up with support under the thighs
- 2.20 (P) Transition to upface dog with support at the hips
- 2.21 Transition to ardha vasisthasana
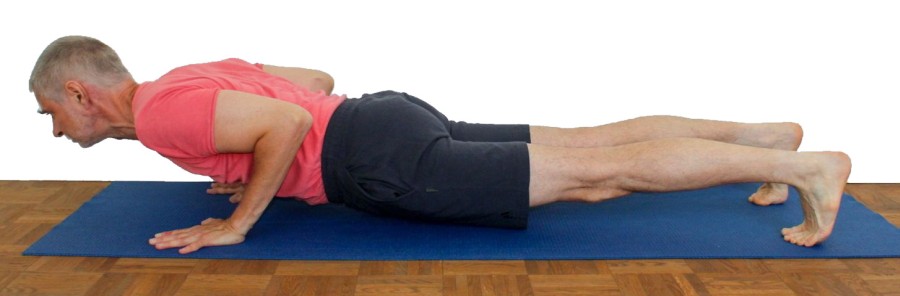
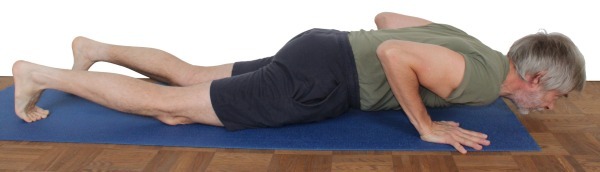
caturanga dandasana
„staff pose“
 instructions and details with working links as PDF for download/print
Feedback: We’d love to hear what you think about this description, give us feedback at:
postmeister@yogabook.org
last update: 30.12.2018
Name: caturanga dandasana
Trivial name: staff pose
Level: FA
- Classification: FA
- Contraindication
- Effects of
- Preparation
- follow-up
- derived asanas
- similar asanas
- diagnostics
- Instruction
- details
- Variants
Classification
classic: exercise on the floor
psychomental: strengthening
physiological: strengthens the pectoralis major and triceps as well as the anterior deltoid muscle
Contraindication
Effects
- (222) Shoulder blade: force for protraction
- (232) Force for frontal abduction
- (302) Force of the triceps
- (422) Force of the finger flexors
- (512) Strength of the pectoralis major
- (226) Shoulder blade: stretch for Retraction
Preparation
As the staff pose largely corresponds to neutral zero apart from the effect of gravity, the retroversion of the arms, their flexion, the pronation of the forearms and the dorsiflexion in the wrists as well as the dorsiflexion in the ankles, there are few requirements in terms of flexibility and therefore few such preparatory exercises make sense. Instead, preparations in the energetic sense can be helpful to promote the willingness to develop strength:
- downface dog and its variant „dips“
- upface dog due to the already higher weight on the hands
- rectangular handstand
- handstand and its „dips“ variant
- ardha vasisthasana as a pose in which one arm carries more than half of the body weight
If you have difficulties with the dorsiflexion of the wrists, which can be more than 90° for advanced performers depending on the distance between the wrists and the feet, prepare with:
- Forearm stretch for the palmar flexors to stretch the muscles that act in the wrist
- Forearm stretch for the dorsal flexors to prevent the antagonists of the muscles which exert force for the movement in the wrist from cramping
- Forearm stretch in upavista konasana for the palmar flexors for further stretching of the executing muscles in the wrist
In cases of very limited flexibility in the hip joints in direction of extension, especially if the 0° angle and any extension are not possible, which will lead to a more or less pronounced hollow back in the staff pose, practice:
- hip opener 1 as the first cardinal pre-exercise for stretching the hip flexors
- hip opener 2
- warrior 1 pose as a pose that makes you aware of the powerful pelvic work
- ardha supta krouncasana
Almost all backbends are helpful, even if they are less clearly elementary than the staff pose. e.g.
as well as other backbends with hip extension: In cases of rather low awareness of the use of the glutes:
- utkatasana as a pose in which the glutes inevitably work
- warrior 2 pose, in which the buttocks are challenged to straighten the pelvis and pull the bending leg backwards
- parsvakonasana, in which the buttocks are required to press the bending leg against the raised arm, the pressure sensation of which also serves as control
- 3. warrior pose as one of the most important poses for the glutes, because the glutes of the standing leg hold the rest of the body and those of the other leg raise the lifted leg.
Some of the following poses may be felt less challenging for stretching in the thoracic spine than the staff pose and are therefore less preparatory than helpful in a general sense:
- upface dog
- urdhva dhanurasana
- ustrasana
- back stretching, especially the „elevated“ version
- hyperbola
- „desk“ variation of uttanasana
- salabhasana
- bhujangasana
and almost all other backbends.
Follow-up
Derived asanas:
Similar asanas:
Diagnostics (No.)
(302)(232)(502) Triceps, pectoralis major, shoulder muscles (especially deltoideus pars clavicularis):
This pose relies on the strength of three muscle groups:
- Triceps: as the elbow extensor, the triceps is responsible for preventing the arm from collapsing in the elbow but for maintaining the desired angle and extending the arm again with concentric contraction when the posture is released.
- Pectoralis: the pectoralis pushes the arms towards each other and is involved in the forward pushing movement, unless the hands (to be precise: the elbows) are pushed away from each other.
- Shoulder: the anterior parts of the deltoid push the upper arm into frontal abduction and the trunk backward.
Lack of strength or strength endurance of these muscle groups quickly becomes apparent in that the staff pose cannot be held or cannot be held for long, or the flexion angle in the elbow joint that can be maximally held is smaller than required in staff pose or the flexion inevitably becomes maximal, so that part of the gravitational effect is carried by the joint structure instead of the triceps:
Wrist weaknesses are most likely to occur in extensive dorsal flexion (more than 90° in advanced athletes with hands close to the pelvis) and under heavy load:
- Ganglion, usually in the dorsal area between the hand and forearm, produces a sensation of pressure during dorsal flexion of the wrist.
- Tendinitis of the tendons of the palmar flexors or finger flexors.
- Carpal tunnel syndrome: worsening of symptoms in this position.
- Fractures and fractures of carpal bones, especially the scaphoid bone.
- Arthritic/osteoarthritic changes (degenerative with cartilage atrophy) of the joint.
- Arthritis (joint inflammation) of various kinds.
- Dislocation / subluxation, which would cause a significantly increased sensation of tension in various muscles covering the wrist joint.
- joint trauma, which may cause pain in the joint even after many weeks or months.
but also purely muscular symptoms such as
- Shortening/hypertonus of the dorsiflexors of the wrist, which then become noticeable in the dorsal side of the elbow joint in the form of cramps
- Shortening/hypertonus of the palmar flexors of the wrist, which makes the dorsiflexion of the wrist painful in the performing muscles on the palmar side of the forearm.
- Golfer’s elbow: Strain pain at the point of origin of muscles of the inner ulnar side of the forearm in the transition to the upper arm (medial epicondyle)
(650) Kyphosis and lordosis of the spine:
The deviations from the physiological double-S shape of the human spine become quite visible in this pose. There should be a certain degree of lordosis (convex spine from the front) in the lumbar and cervical spine and at most a small degree of kyphosis (convex spine from the back) in the thoracic spine. If possible, the thoracic spine may be extended; significant extension is not in the interests of pose. See the FAQ.
(611) Pelvic obliquity / unequal shoulder height / scoliosis of the spine:
The lateral deviations of the spine from the sagittal plane known as scoliosis are also quite visible in this pose. See the FAQ.
Variants:
(S) keep elbows close in transition to dog position head up
(S) transition to downface dog
transition to dog position head up with support under the thighs
(S) transition to dog position head up with support at the hips
transition to ardha vasisthasana
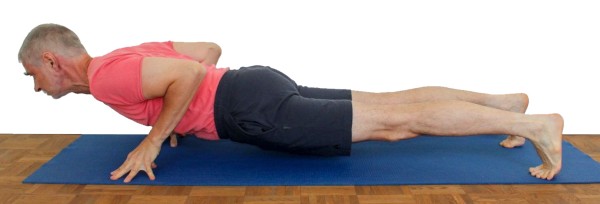
Instruction
- Lie on your stomach on the floor. Place the feet so that the undersides of the toes are on the floor.
- Place your palms on the floor next to your upper body and parallel to it (fingers face the head); your fingertips are at shoulder height.
- Lift your knees off the floor and straighten your legs with a little strength.
- Using the strength of the glutes, avoid flexion in the hips, i.e. move the buttocks away from the back.
- Stretch the sternum forward.
- Build up increasing strength in the arms (triceps) and the pectoralis major of the chest muscles until the upper body and pelvis lift off the floor.
- Align yourself so that your shoulders, head, pelvis and heels are at the same height.
- Keep your head in line with your thoracic spine and breathe calmly.
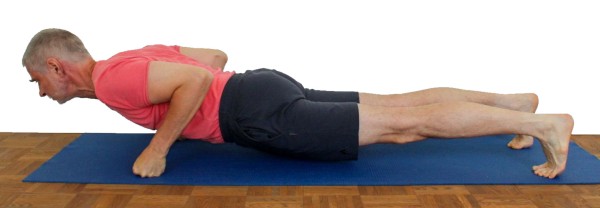
Details
- The upper body and pelvis should lift off the floor at the same time.
- As you build up strength in your arms to lift your upper body, only move your elbows backwards and not outwards. They are also not pressed against the upper body, but lie loosely against it.
- Keep your head, shoulders and pelvis exactly level with your heels. Many deviations from this line are evasive movements.
- Make sure that the gluteal muscles remain active to prevent the buttocks from leaving the line between the head, chest and heels, i.e. the buttocks protrude upwards out of the line. Depending on the flexibility of the hip flexors, a residual flexion may remain in the hip joints. Keep it as low as possible by working the hip extensors.
- Stretch the sternum forward and do not let the shoulders hang down but keep them at the same height as the rest of the body, i.e. the shoulder blades are retracted and depressed.
- Make sure that the head does not hang down, but remains in line with the pelvis and heels, as the lowering of the head is associated with the curvature of the upper body.
- The position of the hands in terms of the distance of the hands from the feet is an essential parameter of the pose. Normally, the fingertips are under the shoulders; however, if the hands are moved towards the pelvis, the strength requirement of the posture increases. If the staff pose is performed alternately with upface dog, the distance of upface dog should be maintained, as the upface dog reacts more sensitively to an inappropriate distance than the staff pose.
- Push the body backwards as far as possible at all times, i.e. the heels beyond the balls of the feet. The feet should not be tilted to one side so that the legs are not moved into exorotation or endorotation. Pushing backwards is an interesting aspect of additional strengthening.
- Let your arms rest loosely against your upper body without pressing them against it.
Variations
from downface dog

very powerful, strengthening transition
Instruction
- From downface dog, bend the elbow joints sideways in their own plane as far as possible, moving the shoulder area towards the wrists. Place the head on the floor as early as possible, but try not to put any weight on the floor with the head.
- When the elbow joints are bent as far as possible, push the shoulder area further forward parallel to the floor, increasing the angle in the hip joints between the upper body and legs until the staff pose is reached. The arms, which were initially bent to the side, are brought increasingly closer to the side of the upper body.
- To transition back to the downface dog, bend in the hips and push the body backwards before stretching the elbow joints to move the trunk backwards and upwards. Keep the head and the shoulder as deep as possible all the time.The shoulder section moves horizontally backwards for as long as possible.
Details
- Both the bending of the elbow joints and the subsequent forward movement of the upper body are relatively strenuous. In the first case, the arm extensors (triceps) are required, in the second case the chest muscles (pectoralis major) are involved.
- When transitioning back to the downface dog, try to keep your head and shoulders as close to the floor as possible for as long as possible, as if your chin and then your forehead were dragging across the floor.
- After the transition to the staff pose, place the arms loosely at the sides of the body again (lateral adduction in the shoulder joint).
- As this transition is very strenuous – depending on your strength – some details of the staff pose may be forgotten or are almost impossible to realize: do not let the shoulders sink further than the pelvis, so keep them at the height of the heels, keep the buttocks working so as not to bring the lumbar spine into a hollow back, do not lift the pelvis and do not lose the backward push.
- Make sure that all relevant parameters of the staff pose are implemented, especially that the heels are pressed backwards and the shoulder blades are remain depressed.
- If possible, do not use the hip flexors or abdominal muscles to any significant extent.
- This transition requires a lot of strength, which is why it often cannot be performed for long periods of time, depending on the available arm strength. Therefore, any approximation to the above description is welcome, as every attempt strengthens. In practice, this will mean, among other things, that the shoulders must be held far higher above the ground than in the description. Naturally, the transition into the staff pose – although heavy – is perceived as easier than the transition back into the downface dog. This is mainly due to two differences:
- The path into the staff pose is performed in eccentric contraction in both the triceps and the deltoids, in which the muscles develope significantly more strength than in concentric contraction. In the pectoralis, the two phases are not so different during this transition.The body loses potential energy during the transition to the staff pose, which has to be supplied again on the way back – by the force of the upper extremity or the migrated trunk muscles that move it.
from upface dog

one of the two standard methods of taking the pose
Instruction
- In upface dog, make sure that you extend your knee joints well and work your glutes well; extend your arms to the maximum as usual and push back strongly.
- Bend your strictly arms backwards until your upper body is horizontal, with your arms resting loosely against your body.
Details
- Do not bend your arms to the side but straight backwards.
- Let your arms lie loosely against your body without pressing them against it.
- In upface dog, the upper body is well stretched and the back is concave, even in the thoracic spine, which corresponds to a backbend of the upper body. Maintain a good extension of the upper body, stretch it horizontally so that, if possible, the thoracic spine does not round at all.
- Remain active in pushing the whole body backwards; in particular, the heels go backwards beyond the balls of the feet; this also means that the shoulder blades are also retracted and depressed (moved towards the back and pelvis).
- If upface dog was performed intensively beforehand by lifting the upper body intensively, it hardly requires much more strength (only different strength) to keep the upper body horizontal.
- Keep the midline of the feet in a vertical plane, i.e. the heels should not deviate inwards or outwards; lift the inner knees in particular.
- For more advanced performers, the hands can be placed further towards the pelvis for more intensive strengthening, possibly up to the hip bones, however, the dorsal flexion ability of the wrists in the upface dog reaches its limit much sooner.
- Make sure that the back does not arch in a transverse direction, i.e. keep the shoulder blades in retraction.
- If you have good flexibility in the hip flexors, the legs are horizontal in upface dog, so the pelvis is already at the height it should be in staff pose. It only changes its alignment. While it is straightened as far as possible into extension in upface dog position, it should be horizontal in the staff pose, but without the tension in the glutes being released.
on fists
Possible alternative if the hand or its bones are injured.
Instructions
- This variation can be performed from the floor or from the downface dog position:
- From the floor: place your fists next to your chest (or a little further back if you have enough strength), tense your glutes and stabilizing core muscles and lift your body horizontally.
- From the dog poses: perform the downface dog on fists and upface dog on fists and then bend your arms as usual to take staff pose.
Details
- The pressure on the fists can be quite pronounced and uncomfortable; it usually helps to use some patches under the fists. Shoulderstand plates are also helpful.
- Lifting from a prone position can be more difficult than lowering the upper body from upface dog. This is also due to the fact that lowering from upface dog corresponds to eccentric contraction and lifting frmo the floor to the heavier concentric contraction. Sometimes there is a lack of backward pressure or correct pelvic pose.
- As the palmar flexors cannot be used for pushing backwards, it is somewhat more difficult to push the heels backwards beyond the balls of the feet to the maximum extent. The frontal abductors such as the biceps, the Coracobrachialis and the deltoids now have to do this on their own.
- Very rarely this variant is uncomfortable in the elbow joint, as the remaining angle is even smaller than in the normal staff pose because the wrists are higher by the length of the palm. Largely passive hanging in the maximally flexed elbow joints must be avoided at all costs: not only does the strengthening effect on the triceps largely disappear, it also may damage the elbow joint.
- In the case of some injuries to the hand or its bones (e.g. a scaphoid fracture), this variant can still make it possible to perform staff pose.
Known problems that can occur even when performed correctly
Intense reversible pressure sensation in the finger joints.
This position can cause very intense sensations in the „knuckles“, especially in the base joints, which usually subside after leaving the position, but may limit the duration of execution.
on fingertips
Pronounced strengthening of the fingers
Instructions
- Like the variant on fists, this variation can be performed from the floor or from the upface dog. The fingertips are placed rather close together so that the base joints of the fingers cannot hyperextend. The other finger joints should overstretch as little as possible. As overstretching can hardly be avoided completely, the fingers must always be pushed with force in the direction of the thumb, which means very strong work of the forearm muscles (especially finger flexors). It is advisable to turn the hands out by 10°-15°, i.e. the tendons of the middle fingers deviate from parallelism (to each other and to the long edge of the mat) by this angle.
To minimise the remaining hyperextension moments despite the use of force of the finger flexors, position the fingers quite steeply, i.e. not too far away from the thumb. - From the floor: place your fingertips next to your chest (or a little further back if you have enough strength), tense your buttocks and stabilizing core muscles and lift your body horizontally.
- From the dogs: perform downface dog and upface dog on your fingertips each and then bend your elbow joints as usual to take staff pose.
Details
- The „from the floor“ variation requires that the fingers are known to be holding the load. In the other variation „from the dogs“, you can observe how the load in the fingers gradually increases and, if necessary, break off in time, i.e. return to downface dog, where the load is still at its lowest. The „from the ground“ variant should therefore only be practiced if you know from the other variants that the fingers are holding. In principle, however, the knees can be put down in both variants to make it easier.
- The fingers must be pushed towards the thumb with all your strength in order to minimize the flexing moments in the finger joints! The fingers are placed so close together that they are at an angle of at least 60° to the floor. Under no circumstances should the base joints come close to the floor or even reach it, let alone exert pressure on the floor! This means that the wrists should almost be as high as possible.
- Instrumentalists should not take this pose in the days leading up to a concert, as playing the instrument may be somewhat less sensitive. In principle, this pose should be suitable for increasing the power of touch when playing the piano, but you can temporarily expect a certain feeling of „coarse motor skills“, a temporary reduction of sensitivity.
- What was said about the reduction in the ability to push the body backwards when playing on fists applies all the more here. You are usually busy enough supporting your body weight with your fingertips to be able to push backwards forcefully. Since much less backward pressure is built up, considerations of valgus stress or varus stress on the finger joints are not quite so significant, so that the slight twisting of the hand appears acceptable.
Known problems that can occur even when performed correctly
Sensation of pressure in the finger joints
Due to the immense force required on the finger joints (especially the proximal and distal ones), a more or less intense sensation in the finger joints may still be present within a good minute of leaving the pose. However, this should subside completely within the next few minutes!
Temporary reduction in sensitivity
As already described, this pose can temporarily impair sensitivity, e.g. when playing an instrument. Some other professional groups such as surgeons and opticians are also advised to exercise caution.
eka pada
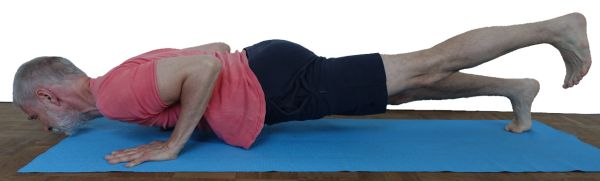
Instructions
- Take staff pose as described above.
- Maintain the position of the pelvis and the work of the glutes and lift one of the legs straight from the floor dorsally without turning it out or changing the position of the pelvis.
Details
- Depending on the flexibility of the hip flexors, it may not be possible to perform this pose correctly or at all. The hip joints must be able to extend in order to lift the leg without changing the position of the pelvis. If this is not the case and the leg is nevertheless lifted above the level of the back, this usually results in the pelvis being lifted and tilted into flexion with respect to the leg remaining on the floor. The resulting tilt in relation to the horizontal is then used to visibly lift the leg to the point where the flexibility of the hip flexors is restricted.
- Similar to warrior 3 pose or back stretching with the leg lifted, the knee joint of the lifted leg tends to bend. This is a consequence of the tension of the hamstrings, which are involved in lifting the leg as hip extensors. It therefore takes some work by the quadriceps of this leg to limit or completely suppress this flexion.
- The gravity perpendicular is no longer symmetrical under the body in the pose, which is why a slight feeling of instability and increased work of one arm and one side of the back muscles in relation to the other can be felt. The smaller the distance between the feet in staff pose, the smaller this effect will be here.
Known problems that can occur even when performed correctly
Hands further back

Possibility of greater strengthening
Instructions
- Depending on your strength, place your hands on the floor a little further back towards your hip bones and hold staff pose as described above.
Details
- Due to the leverage effect, every centimeter that the hands are moved further back towards the hip bones is perceived as a greater strength requirement. As this also changes the angle in the wrist towards ever greater dorsiflexion (and therefore generally dorsal wrist stress), there is a limit for almost everyone with regard to both parameters, which of the two is more likely to come into play: force to be applied or discomfort in the dorsal wrist. To relieve pain in the wrists, patches can be placed under the wrists to allow a more favorable angle of dorsiflexion.
- As the distance between the wrists and the shoulders increases, the ability to push the body backwards also decreases, so that this variation tends to become a purely vertical lift. In addition, the greater the distance, the greater the demand on the autochthonous back muscles of the lumbar spine.
with feet upside down

Different work by reversing some parameters
Instruction
- Lie in prone position and stretch your ankles.
- Place your hands flat on the floor with your fingertips at about shoulder height.
- Raise your stretched body and push your hands back towards your feet.
Details
- Staff pose with inverted feet is in a row with the upface dog with inverted feet: here too, the body is pulled forward by the strength of the arms and back muscles because the hands are not pushed forward against the friction of the mat as usual, but are pulled backwards. Of course, the hands remain stationary in both cases, but the force causes a resulting movement of the body.
- The change in the direction of the push must not lead to other parameters being lost, in particular the tension of the buttocks and the 180° angle in the hip joints.
- In contrast to upface dog with inverted feet, the thighs may have partial contact with the floor here. The pelvis should therefore not be lifted by a flexion in the hip joints so far that this contact is lost.
- While the focus in up face dog with inverted feet was to push the pubic tuberosities forwards and downwards, this cannot be the focus here as the hip joints are not in maximum extension but in standard anatomical position, i.e. 0° flexion. The focus here should rather be on trying to drag the feet forward against the friction of the mat. To ensure that no movement takes place (but that the feet remain stationary), the top layer that is in contact with the back of the foot should always be a piece of mat, i.e. a patch, even when using a blanket that provides softness under the back of the foot.
- In contrast to normal staff pose, it is easier to keep the elbows at the upper body, as this corresponds to the movement of the muscles that try to pull the body forward (latissimus dorsi and triceps as adductors).
From the floor

Powerful, determined overcoming of gravity from a state of minimal potential energy
Instructions
- Lie in prone position.
- Place your wrists at nipple level or, depending on your strength, a little further back towards your pelvis, place your arms against your body but do not press them against it.
- Tighten the glutes and the required core muscles and use the strength of the arms to lift the body into a horizontal position., with the elbows moving mainly backwards and downwards.
Details
- Lifting from a prone position can feel more difficult than lowering the upper body upwards from upface dog. As described above, this is due to the fact that
- potential energy must be added instead of being reduced and
- the relevant muscles contract concentrically and no more eccentrically, which would be easier.
- the relevant muscles contract concentrically and no more eccentrically, which would be easier.
- potential energy must be added instead of being reduced and
- Make sure that the pelvis and shoulder area are lifted to the same height.
- Pay attention to the work of the glutes and the 0° angle in the hip joints and the extension of the thoracic spine.
- Push the body backwards forcefully until you feel the limit of dorsal flexion in the ankles and possibly stretch in the gastrocnemius.
- Keep the arms close to the body without pressing them against it.
Knees on the floor
Ease that requires significantly less strength.
Instructions
- In the upface dog, place your head up by bending your knees on the floor and go into the staff pose in this way.
Details
- It is well known that the staff pose requires a lot of strength in triceps and pectoralis. If you are lack this, eases are required. In addition to reducing the bending of the elbow joints, bent knees are a tried and tested method. This shortens the effective lever and also reduces the mass to be moved, i.e. the partial body weight.
- Be careful not to bend too much in the hip joints and to avoid a hollow back. Ideally, the hip joints should remain extended and the hip extensors, especially the gluteus maximus, should be working.
Dips

Instructions
- Take staff pose from upface dog.
- Push yourself back up into upface dog and repeat the procedure as long as you have enough strength.
Details
- A recurring problem when performing the transitions between the upface dog position and the staff pose is the loss of tension in the hip extensors, especially the glutes. When taking staff pose, make sure to move the pelvis out of extension in the hip joints into standard anatomical position compliant 0° flexion, but reduce the tension of the hip extensors only as little as required. Especially during the subsequent transition back to upface dog, the pelvis must erect using the strength of the hip extensors, which makes it easier to lift the upper body and avoids an excessive hollow back. Under no circumstances should the autochthonous back muscles pull the pelvis into extension and lift the upper body proportionally, as this can lead to a hollow back.
- This transition should not be performed with swing. It is well known that the load on the joints increases more than proportionally with the swing. This primarily affects the pressure-absorbing cartilage surfaces of the boones as well as the tendons and their bony insertion areas.
with heels on the wall

Maximum backward pressure without the risk of slipping as a result
Instructions
- Practice staff pose so that the heels press against a wall in this position.
Details
- This allows you to press backwards with maximum force, regardless of the surface, without the ball of the feet slipping.
- In order to maintain the possibility of dorsiflexion in the ankle, the ball of the feet must be placed at a small distance from the wall. Even if no powerful stretching effect on the gastrocnemius can be expected from the strength of the shoulders in the standard version anyway, this is not necessary nor preset here at all.
- The work of the shoulder muscles (the deltoids and other frontal abductors) and the palmar flexors should be felt one-to-one in the pressure of the heels on the wall.
- Make sure that the pelvis does not come up and that the tension in the buttocks does not decrease to maintain the 180° angle in the hips.
- In the case of disorders of the MTPs (metatarsophalangeal joints), such as hallux valgus or metatarsalgia, it may be necessary to completely relieve the MTPs by placing the front of the lower leg (the ventral edge of the tibia) on shoulder stand plates stands so that the toes do not touch the floor. The number required depends on the length of the foot. It is helpful to use a soft shoulder stand plate or a few patches or a blanket on top.
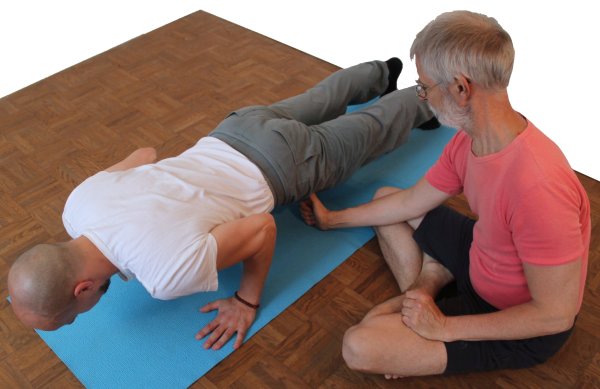
(S) Pull on the shoulder

Gives a feeling for pushing backwards and its range of motion.
Instructions
- Hold staff pose as described above.
- The supporter stands over the performer’s back and slowly pulls on both shoulders until the ankles are in maximum dorsal flexion.
Details
- Often one of the important parameters of the pose, for example pushing backwards, breaks down due to the effort felt in staff pose. This support passively restores this item and gives the performer a feeling for the maximum possible dorsal flexion in the ankle joint in the staff pose.
- By pulling the shoulders backwards, the supporter can also correct their height. In the staff pose, there is often a tendency to keep the shoulders too low and the pelvis too high to make things easier. If the supporter pulls the shoulders to the correct height, i.e. the same height as the heels, the performer can use proprioception to memorize how this feels in the pectoralis, deltoid and especially the elbow joint and triceps in order to reproduce this later on their own.
(S) Thumb under the pelvis
Enables control of the pelvic movement
Instructions
- Take upface dog.
- The supporter sits next to the performer and places a fist with the thumb extended upwards in the hip area under the pelvis so that the tip of the thumb lightly touches the pelvis.
- The performer now bends their arms to take staff pose and tries to keep the perceived pressure of the thumb constant.
- If the transition to upface dog is performed afterwards, the pressure should also be kept constant.
Details
- This support offers a good opportunity to control the movement of the pelvis. This is because the pelvis is often lifted slightly when taking staff pose from upface dog in order to make staff pose easier and, conversely, the pelvis is lowered again when leaving staff pose, which in this case would be perceived as noticeably increased pressure on and in the tip of the thumb. The prerequisite for this method to work is sufficient flexibility in the hip joints in terms of extension. If this is insufficient, the pelvis in upface dog will not be able to sink upwards to the extent that the legs become horizontal, as they are in the staff pose. If the hip flexors are not flexible enough, it is inevitable that the pelvis is further away from the floor in upface dog than in staff pose. Then this factor must be taken into account. A finger spread downwards towards the floor can then make it easier to keep the fist at the same height so that the performer has a constant orientation. It is accepted that the pelvis in staff pose may be higher than it should be. The focus here is on the precise execution of the arm movement. In this sense, this variation can also be seen as a (rather rough) indicator of hip flexibility in terms of extension.
- This method is often used to detect inaccuracies in the transition and in the staff pose itself, which are caused by a lack of strength or saving some.
- Make sure that, while concentrating on the pressure, none of the other parameters of staff pose are lost, especially the tension and work of the buttocks as well as the backward push.
(S) Keep the elbows tight in the transition to dog position head up

Limit the movement of the elbows
Instruction
- Take the pose as described above.
- The supporter stands above the performer’s pelvis facing the performer’s head and holds the performer’s elbows against the body without pressing them firmly to keep the contact in the transition between the staff pose and upface dog.
Details
- A common difficulty in the transition between staff pose and upface dog is the tendency of the elbows to move outwards, which for many is difficult to suppress. This is probably not least due to the fact that a certain distance of the elbows from the upper body and thus a certain degree of abduction and less external rotation of the arms allows the pectoralis to work in a more favorable sarcomere length, which gives more strength for the transition. It is also regularly found that the transition is more difficult or no longer possible with this support. Ideally, the supporter would hold the performer’s elbows loosely against the body without the arms exerting pressure on the upper body, which would make it easier to hold the pole due to the friction that would be created, but perhaps even make the transition more difficult. If it becomes apparent that the performer does not have enough strength in this position to manage the transition, the supporter can of course allow a limited amount of evasion.
- This support serves on the one hand to develop the strength of the muscles performing the transition, but on the other hand also to raise awareness of this issue.
(S) Push elbows back for transition to upface dog
Support when leaving the pose in the direction of the upface dog
Instructions
- Take the pose as described above.
- The supporter stands bent forward in front of the performer’s head or over his pelvis, looking at his back. If it becomes apparent that the performer cannot leave the pose in direction of upface dog due to lack of strength, the supporter pushes both elbows backwards and downwards with equal force, i.e. caudal-ventral, initially mainly caudal, later more ventral.
Details
- The force applied to the elbows relieves the performer of a little effort to push the body backwards and creates a rotational movement around the hands as a punctum fixum. This pulls the shoulder area in a dorsal-caudal direction, making it easier to lift the upper body. With this support, the caudal thrust of the body may be greater than the performer can apply alone, so that the question of how to prevent the feet from slipping backwards becomes more important. In quite a few cases it will be necessary to use a non-slip mat and not wear socks.
- This support maintains the position of the feet in maximum dorsiflexion much better than any other and also does not affect the work to be done in the hip area during the transition, i.e. the best possible development of hip extension in upface dog and – assuming sufficient flexibility of the hip flexors – the unchanged height of the pelvis. The classic support described below with support of the pelvis or thighs, on the other hand, usually impairs the position of the pelvis and the angle in the hip joints quite significantly. It can also often be seen that the performer removes the dorsiflexion of the ankles for reasons of strength and economy.
(S) Transition to downface dog

Support during the demanding transition
Instruction
- The performer prepares for the transition between prone position or taken staff pose and downface dog. The supporter stands in a straddle over the performer with his feet slightly behind the performer’s pelvis.
- If it becomes apparent that the performer cannot muster enough strength for the transition, the supporter slowly and only with the necessary amount of force supports the performer’s transition back to the downface dog by pulling on the performer’s hips.
Details
- It may not be easy for the supporter to find the right amount of force to support the transition. If too much force is used, the performer is deprived of the opportunity to learn to assess their own strength and develop confidence in it. If too little force is used, the performer may give up and abort the transition by lying down on the floor or lifting the shoulder area. Finding the right balance often requires several passes and communication about the mode.
- A challenge for the performer is not only the physical application of force and trust in their own strength, but also trust in the strength of the supporter and their control of the situation. For this reason, it is helpful if the performer has also provided this support before in order to be able to assess the strength that may be required. The supporter can also reassure the performer of their strength at the beginning by slowly pulling harder and harder on the performer’s hips until their hands lift off. This can help to gain confidence in the supporter’s strength and get involved in the intensive common work for the successful transition.
- Depending on how far the supporter has to pull the performer out of the pose, they may have to take a step with one of their two feet. The choice of the position of the feet is not insignificant in order to be sufficiently stable.
- At the beginning of the transition, the supporter stands with clearly flexed hips and a straight back. The back should also remain straight during the rest of the transition. The supporter therefore draws the strength to pull the performer out of the staff pose from the hip extensors and the arm flexors in conjunction with the adductors of the shoulder joint.
- The supporter must not be too short compared to the performer, otherwise he may not be able to stand with his legs straddling the performer’s thighs towards the end of the support, or he may have to take several steps back.
Transition to downface dog

Strengthening transition (shoulder, triceps)
Instruction
- From staff pose, place your chin on the floor or hold it one centimeter from the floor.
- Flex the hips and push yourself into downface dog using the strength of your arms (triceps and shoulders).
- At some point during the transition, it will be necessary to replace the chin on the floor with the forehead on the floor or to hold the forehead one centimeter from the floor instead of the chin.
Details
- While the triceps and pectoralis muscles in particular are challenged and strengthened in the staff pose, the front deltoids (shoulder muscles) are required for the transition to the downface dog, not only to overcome the inertia of the trunk and set it in motion, but above all to supply the body with the extra potential energy it has in the downface dog. It is also interesting to note that in both poses, the two frontal abductor muscles, the biceps and coracobrachialis, which pull into the arm, are also active, pushing the body backwards in both cases, once with the arm bent and once with the arm extended.
- If sufficient strength is available, the transition should be performed in such a way that shoulder and head remain parallel to the floor for as long as possible, i.e. move horizontally backwards in the direction of the feet, and only lift in the direction of the frontal abduction at the very end and only for reasons of restricted flexibility of the shoulder joints. Consequently, performers with very flexible shoulder joints and hamstrings, who can perform downface dog at a normal distance with the head on the floor, may be able to move the shoulder section only backwards without the need to lift them, if they are strong enough. The shoulder describes a curve that is horizontal for as long as possible and concave at the end (seen from above). In practice, however, it can be seen time and again that the shoulder is often lifted almost vertically shortly after the transition is initiated due to a lack of strength. The horizontal movement is then often continued at a higher level (distance from the floor) and at the very end the arc is described again, which results from the restriction of flexibility of the shoulder joints. The described curve then contains a convex section (seen from above) at the beginning. This should become superfluous over time.
- During the transition, the arms move out of their position against the body, which they have in staff pose. The further the transition progresses, the further the arms move outwards and finally into the stretched overhead position.
- Throughout the transition, the heels are maximally back and down.
- Try not to bend excessively from the hip flexors in the hip joints and thus pull the upper body backwards, possibly together with the dorsiflexors of the ankle. Ideally, the hip flexors and abdominal muscles remain as soft as possible.
- The transition can be understood analogously to the intensive transition between upface dog and downface dog, like the difference between rear drive (the hips pull the upper body backwards through flexion from the strength of the hip flexors) and front drive (the shoulder muscles (deltoids) push the upper body „from the front“ backwards into the downface dog) in a car.
Transition to upface dog

Instructions
- Use the strength of the arms (triceps and pectoralis) to push the shoulder area away from the floor until if has reached its maximum height. Use the strength of the extensors (especially the gluteus maximus) to bring the pelvis from the standard anatomical position of the staff pose into the maximum extension of the head upface dog.
- Complete upface dog by moving the shoulder blades (relative to the upper body) as far back and down (depression and retraction) as possible, pushing the body back again more forcefully and creating maximum extension in the hip joints while simultaneously extending the knee joints.
Details
- Ensure that the heels remain pushed backwards. Maintain the extension of the upper body and build on this as the transition progresses.
- The position of the shoulder blades relative to the pelvis does not change, in both poses and in the transition they are in depression (moving towards the pelvis).
While the depression of the shoulder blades could still be achieved without great effort in staff pose, it happens in the dog head upwards against gravity. - When the upper body is lifted, the arms should not move significantly outwards; after all, they are also stretched close to the body for upface dog.
- While the hip joints are in standard anatomical position in staff pose, that is, without extension or flexion, they move more and more into extension in the hip joints as the transition progresses.
- As the transition progresses, i.e. the extension in the hip joints also increases, the tendency ot flex the knee joint grows, since the iliopsoas pulls the thighs ventrally, thus towards the floor. Suppress that by the power of the quadriceps.
- Of course, the transition from staff pose to downface dog is more difficult than the staff pose itself due to the concentric contraction in the triceps and deltoids and the potential energy to be increased. This means that a successful transition to staff pose does not guarantee that the transition back into the upface dog will also be successful.
- Be careful not to try to lift the upper body with the autochthonous back muscles; the strength should come exclusively from the pectoralis major, frontal deltoids and triceps.
Transition to dog position head up with support under the thighs

Instructions
- Take the staff pose as described above, but with a shoulder stand plate placed under the proximal thighs.
Details
- This variation is similar to the support with the thumb under the pelvis. As there, the aim here is to maintain as constant a pressure as possible on the object (thumb there, shoulder support plate here, for example) and not to exert more or less pronounced pressure depending on the situation. Depending on the phase of the transition, there is often a tendency to press the thighs onto the object for support or to lift them off the object. The aim of practicing here is therefore to keep the pressure as constant as possible. On the other hand, if there is a lack of strength, the object can also be used as a support for the time being: all the weight that the object absorbs corresponds to force that does not have to be exerted by the muscles performing the transition. This transition is then more similar to the knee on the floor variation.
- The optimum height of the object used clearly depends on the flexibility of the hip flexors and only slightly on the body proportions: if the hip flexors are not very mobile, the pelvis will remain higher in upface dog than corresponds to horizontal thighs. It can then be lowered further for staff pose and will inevitably rise again when transitioning back to uoface dog. In addition, the optimal thickness of the object also depends on the volume of the thigh muscles. If the hip flexors are flexible and the thighs are rather muscular, a flat shoulder stand is usually sufficient. If neither is the case, a block placed on its second largest surface may be required, which no longer allows the pelvis to be lowered so far in staff pose that the thighs are horizontal. In this case, even pressure on the object is more important than the correct position of the pelvis. An unavoidable side effect of this is that it is likely to be much more difficult to keep the glutes active, as the remaining flexion in the hip joints means that they can generally no longer be made to work against restrictions in the flexibility of the hip flexors, as is only possible in many other cases with average flexibility of the hip flexors.
(P) Transition to upface dog with support at the hips

Instructions
- Hold staff pose as described above. The supporter supports under the proximal thighs exactly as much as is needed.
Details
- This variation provides the performer with relief from the effort in a similar way to the variation with the knee on the floor or with support under the thigh by taking the load off the arms by support on the proximal thigh, reminding of the variant thumb under the pelvis.
- The supporter holds the hands still under the proximal thighs and gives the performer the opportunity to press the pelvis as hard as needed onto the hands to ease the transition. Under no circumstances should the supporter pull excessively on the hips. This procedure requires a relaxed, fearless approach from both parties. The performer must not be afraid of not being supported enough and therefore abort the transition out of a feeling of hopelessness, nor must the supporter underestimate the sustainability of the performer’s efforts and offer too much support in order to prevent the performer from giving up.
- The support should be provided under the proximal thigh and not under the pelvis at the level of the ASIS, as during the transition to upface dog the hip joints move from neutral position (neither flexion nor extension) into extension, thus lifting the cranial pelvis or moving it dorsally.
Transition to ardha vasisthasana

Instructions
- Push away from the floor with your hands, tilt the right foot to the right onto its outer edge and place the left inner foot on top of the right inner foot. Turn your upper body to the left and stretch your left arm towards the ceiling.
- When the upper body and pelvis are in a vertical plane with the right arm extended and the left arm reaches towards the ceiling, ardha vasisthasana has been taken.
Details
- For a long time, this transition will look like both arms lifting the upper body before it is tilted to the side. Otherwise this transition would be the equivalent of a one-armed side push-up, which is very heavy. Over time, try to tilt the upper body earlier and earlier.
- Keep the hip joints permanently stretched by use of the glutes.
- Tilt the upper body evenly with the rotation of the feet.
- Be careful not to flex the hip joints and lift the buttocks, as this is one of the most common ways of easing the transition from
staff pose. This is also prone to create an excessive curve in the back, which also serves to make the ransition easier. So try to keep both the upper body and hip joints stretched.