yogabuch / asanas / salabhasana
salabhasana
„grasshopper“
 instructions and details with working links as PDF for download/print
Feedback: We would love to hear what you think about this description, give us feedback at:
postmeister@yogabook.org
last update: 12/30/2018
Name: salabhasana
Trivial name: grasshopper
Level: A
- Classification: A
- Contraindication
- Effects of
- Preparation
- follow-up
- derived asanas
- similar asanas
- diagnostics
- Instruction
- details
- Variants
Classification
classic: lying posture
Physiological: Strengthening of the back muscles
Contraindication
This posture is contraindicated for facet syndrome, spondylolisthesis (spondylolisthesis) and spinal canal stenosis and can lead to the occurrence of the respective complaints.
Effects
- (602) Strengthening of the back extensors
- (552) Strengthening of the quadratus lumborum
- (642) Strengthening the muscles of the lumbar spine
- (722) Strengthening the hamstrings
Preparation
Follow-up
derived asanas:
similar asanas:
Diagnostics (No.)
Variants:
(P) Right-angled handstand on the buttocks
Instructions
- There are several variations of salabhasana, which differ in the position of the arms and are numbered below. The basic instructions for assuming the pose are as follows:
- Lie on your stomach with your legs stretched out and your arms stretched back next to your pelvis.
- Tense the gluteal muscles and press the pubic bones onto the floor.
- At the same time, slowly raise your upper body and straight legs as far as possible. The head remains in line with the spine.
- The arms are just beside the upper body, upper arms turned out, elbow joints extended, palms facing the pelvis, shoulder blades in depression and retraction (moving towards the pelvis and spine ).
Details
- The pomus muscles, like the muscles of the hamstrings (with the exception of the biceps femoris caput breve), work for maximum extension in the hip joints so that the lower back does not tense up in the posture. The limit of lifting the legs in relation to the pelvis is determined by the hip flexors. In contrast to other postures in which the legs or upper body or pelvis are fixed, no stretching effect on the hip flexors is to be expected here, especially as the legs also have to be lifted against gravity.
- The upper body should only be lifted so far that the lower back does not feel cramped during and after the pose. Even if the pomus muscles are put to good use, there is still the possibility that the lower back will take on too much tension due to a strong active extension, which needs to be balanced out with appropriate postures. The limit of lifting the back is therefore determined by
- the strength of the autochthonous back muscles in their extension functionand, to a lesser extent, the synergists such as the latissimus dorsi
- the flexibility of the spine in the direction of extension
- hip extension, i.e. primarily the strength of the hip extensors in relation to the tone and flexibility restrictions of the hip flexors
- the condition of the autochthonous muscles of the lumbar spine region in particular
- the tension of the psoas major as the most important flexor of the lumbar spine to mid thoracic spine region
- In variations 1 and 2, the shoulder blades are in depression (moved towards the pelvis) and retraction (moved towards the spine ); in variation 3, the arms are in elevation as in urdhva hastasana, i.e. the shoulder blades are in elevation.
- In contrast to the lumbar spine, the thoracic spine can perform any amount of backbends until further notice. However, it cannot be ruled out that the backbend of the thoracic spine also places the lumbar spine region under uncomfortably increased tension.
- If, with good extension in the hip joints and a flexible and strong back, it is possible to lift the upper body and legs significantly, there may be noticeable unpleasant pressure on the pubic tuberosities. This should be remedied with the help of appropriate softness mediators such as blankets, mats and shoulder stands.
- When lifting the legs, the focus is on lifting the thighs off the floor and not on lifting the heel or calf. The latter would tend to neglect the extension of the knee joints.
- Salabhasana can generally be performed with the ankles extended(plantar flexion) or neutral (as in Anatomical Zero), but extended ankles can easily lead to cramps in the sole of the foot or calf muscles, which is why this is not the preferred variation, see the FAQ.
- Since the hamstrings, as a group of hip extensors, lifts the legs in relation to the pelvis, there is a more or less clear flexion inclination in the knee joint, against which the knee must be extended with work from the quadriceps. Due to the extended knee joint, however, no tendency to cramp of the hamstrings is to be expected.
- In variant 1, a higher basic tone in the biarticular middle head of the triceps can lead to a tendency to cramp, even more so if its antagonists are in both relevant joints:
- Elbow joint: the brachialis, but above all the biarticular biceps, often resist the extension of the elbow joint, especially when the arm is not frontally abducted as in salabhasana
- Shoulder joint: the deltoids (primarily pars clavicularis, secondarily pars acromialis), the coracobrachialis and the biceps often resist the retroversion of the arm, the biceps even more so when the arm is extended.
The triceps must perform the retroversion of the shoulder joint and the extension of the elbow joint against this higher tension.
- Shoulder joint: the deltoids (primarily pars clavicularis, secondarily pars acromialis), the coracobrachialis and the biceps often resist the retroversion of the arm, the biceps even more so when the arm is extended.
- Elbow joint: the brachialis, but above all the biarticular biceps, often resist the extension of the elbow joint, especially when the arm is not frontally abducted as in salabhasana
- The knee joints should be fully extended. Due to the work of the biarticular hamstrings for hip extension, there is a flexion inclinationof the knee joint, which must be compensated for with the strength of the quadriceps. As a rule, if the person performing the exercise does not feel that they are using quadriceps strength to extend the knee joints, they will remain flexed. Incidentally, the reverse is not true.
- Make sure that the thighs do not turn out due to the intensive work of the gluteus maximus and the pull of the iliopsoas, but keep them neutral with regard to the rotation.
Variants
Hands next to the body

Instructions
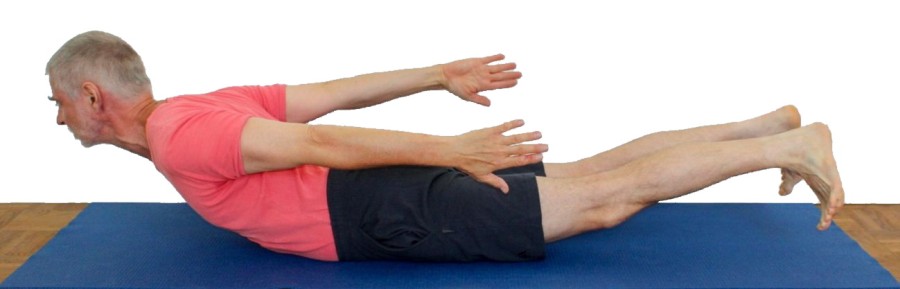
- In this variation, the arms are held stretched out in the air next to the upper body. The palms face the pelvis.
Details
- The arms are turned out wide and the forearms are pronated.
- Only raise your arms so forcefully that the middle section of the triceps does not cramp. As it extends the elbow joint and is significantly involved in retroversion, it is at a very short sarcomere length and therefore close to active insufficiency and tends to have a tendency to cramp.
Hands pressed to the floor
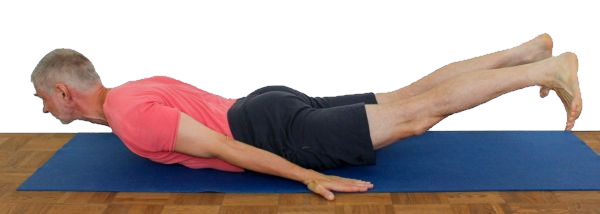
Instructions
- Here, the palms are pressed to the floor next to the pelvis, which helps to raise the upper body further.
Details
- The elbow joints can either be extended or slightly flexed. If the biceps are untrained or heavily toned, the stretched position of the arm can be borderline, as the biceps are involved in the frontal abduction of the arm and therefore in lifting the upper body. However, this is a challenging situation for the biceps because, on the one hand, they have to work with the elbow joint extended without significant frontal abduction, i.e. with a very long sarcomere length, and, on the other hand, their lever arm in the elbow joint is very poor due to the close course of its tendon to the center of rotation in the elbow joint and, in addition, the lever arm on which it exerts the force on the resistance (the floor) is very long. The load arm and force arm are therefore as unfavorable as they can be and the tendon strength is also quite limited due to the length of the sarcomere. Because of all this, you cannot expect the pressure of the hands on the ground to have a visible effect on the shoulder area, in the sense that it would noticeably increase. If this position is perceived as too uncomfortable in the area of the tendon insertion, it is better to bend the arm slightly, which makes all three factors (both sarcomere length and lever arm in the elbow joint and load arm to the hand on the floor) more favorable. The criterion is therefore the sensation of the biceps attachment. The biceps is not the only muscle that performs frontal abduction, the coracobrachialis and the anterior part of the deltoid have a snergistic effect, but the biceps is usually felt most intensely.
Arms stretched forward
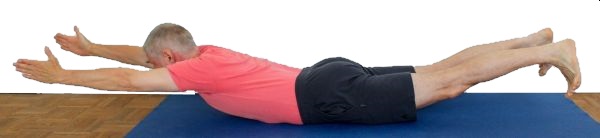
Instructions
- Stretch your arms forward as in urdhva hastasana.
Details
- Keep the arms well extended so that the trapezius does not cramp. If it still tends to cramp, turn the palms inwards and upwards (towards the ceiling or dorsally). Increased supination facilitates exorotation, while pronation would suppress it, as it is not uncommon for even the middle position between pronation and supination (as in neutral zero) to have a negative influence on the exorotation abilityof the upper arm in the shoulder joint and on the tendency of the trapezius to spasm.
- Of course, the position of the arms above the effective middle lever arm makes it more difficult to lift the upper body and is the interesting aspect of this execution.
(P) Right-angled handstand on the buttocks
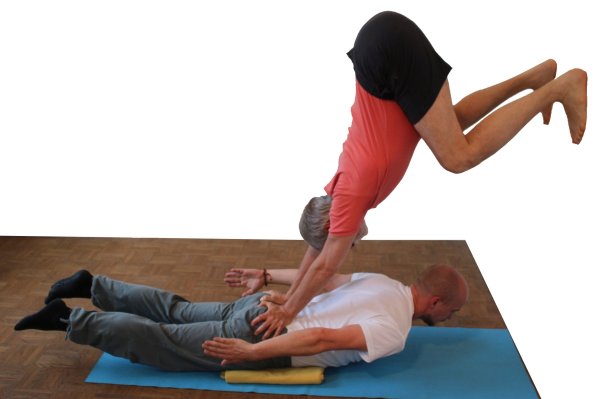
Instructions
- The performer assumes the position in front of a wall with their head facing the wall.
- The supporter assumes a right-angled handstand with their hands resting on both sides of the performer’s maximally contracted gluteus maximus and pushing them away from the wall.
Details
- The exact positioning of the supporter’s hands is important so that there is no unphysiological angle in their wrists and the pelvis can be pushed out of the remaining flexion. The balls of the hands should therefore not be placed too far towards the back, but rather at the highest point of the glutes.
- The supporter can use their hands to check the contraction of the performer’s glutes and provide feedback.
- When performing this exercise, it may be advisable to place a blanket under the pubic tuberosities.