yogabuch / asanas / rectangular handstand
Contents
- 1 „rectangular handstand“
- 2 Variants
- 2.1 Stretching from bent knees
- 2.2 Pushing your heels up the wall
- 2.3 Lifting the ball of the foot
- 2.4 Wrist joints on patches
- 2.5 Jumping on the wall
- 2.6 on fists
- 2.7 on fingertips
- 2.8 (P) Pressing the shoulders towards the wall and tilting the pelvis
- 2.9 (P) Rotate and extend the arms
- 2.10 (P) Pressure against the shoulders
- 2.11 (P) Pull on the shoulders
- 2.12 (P) Pressure on the sacrum
- 2.13 (P) Complete: Turn out and stretch arms and press head against shoulder
- 2.14 (P) Stretching from bent knees
- 2.15 (2P)
„rectangular handstand“

 instructions and details with working links as PDF for download/print
Feedback: We’d love to hear what you think about this description, give us feedback at:
postmeister@yogabook.org
last update: 12/30/2018
Trivia name: Right-angled handstand
Level: A
- Classification: A
- Contraindication
- Effects of
- Preparation
- follow-up
- derived asanas
- similar asanas
- diagnostics
- Instruction
- details
- Variants
Classification
classic: inversion posture
physiological: shoulder stretching and strengthening of all muscles for frontal abduction
Contraindication
effects
- (423) Tone of the finger flexors (finger flexors)
- (428) Tonus of the fingerextensors (finger extensors)
- (292) Strengthening of the trapezius
- (332) Strength for pronation of the forearm
- (352) Strengthening of the palmar flexors
- (352) Strengthening for palmar flexion in the wrist
- (231) Shoulder joint: stretching for frontal abduction
- (321) Stretching for supination of the forearm
- (351) Stretching the palmar flexors
- (341) Stretch for dorsiflexion in the wrist joint
- (421) Stretching the finger flexors (finger flexors)
- (501) Stretching the latissimus dorsi
- (721) Stretching the hamstrings
Preparation
The following postures can be performed in preparation so that flexibility restrictions in the hamstrings do not lead to restricted work and stretching in the shoulder area, or lead to less restricted work and stretching:
- uttanasana as a generally effective and efficient stretch of the hamstrings to prepare for flexion in the hip joints in this pose
- prasarita padottanasana very similar to uttanasana
- parsvottanasana as a stretch that goes beyond uttanasana
- pascimottanasana
- janu sirsasana
- tryangamukhaikapada pascimottanasana
- downface dog as another good preparation for the hamstrings when the pelvis is tilted powerfully
- hip opener 5 as a very effective stretch of the hamstrings that goes beyond uttanasana
- warrior 3 pose
- trikonasana
- parivrtta trikonasana
Depending on the flexibility and resilience of the shoulder, it is advisable to warm it up well too:
- Downward facing dog as a general stretch of the shoulder
- Head up dog as a pose that prepares the shoulders for powerful work, especially through correctly executed transitions from and to head down dog
- Back extension, especially the „elevated“ variant
- Dog elbow stand as a related and synergistic posture
- Handstand as a related and synergistic posture
- Elbow stand as a related and synergistic posture
- Hyperbola as one of the most effective and efficient stretches in the direction of frontal abduction without exorotation of the arms
- shoulder opening on the chair as one of the most effective and efficient stretches in the direction of frontal abduction with exorotation of the arms
- purvottanasana if the tone in the deltoid is too high or has become too high due to preparation
- gomukhasana upper half
If there are difficulties with the dorsal flexion of the wrists, which should be approx. 90° depending on the distance and flexibility:
- Forearmstretch for the palmar flexors to stretch the performing muscles in the wrist
- Forearm stretchfor the dorsal flexors to prevent the antagonists of the performing muscles in the wrist from cramping
- Forearm stretch in upavista konasana for the palmar flexors for further stretching of the executive muscles in the wrist
To prepare for work in the shoulders with a similar movement without fixed hands:
- upavista konasana with block makes you aware of the type and intensity of work in the shoulders
- dandasana with block between raised arms like upavista konasana with block
The stretching out of the shoulders (elevation of the shoulder blades) can also be prepared:
- „with block“ variation of upavista konasana
- urdhva hastasana
- Shrug in downface dog
- Shrug in handstand
Follow-up
derived asanas:
similar asanas:
General:
Geometry:
- Back extension
- downface dog
- urdhva hastasana variation of dandasana
- supta dandasana
- right-angled uttanasana
- right-angled headstand
- navasana
- dvi-pada variation of the handstand
Diagnostics (No.)
The flexibility of the shoulder joint can be clearly seen here, and the angle of frontal abduction can be easily assessed from the side. side discrepancies are also visible. Very good flexibility of the hamstrings but low flexibility of the shoulder joint may result in a hollow back. There may be indications of diseases of the shoulder joint:
- irritable hypertonus of the deltoid: ambitious beginners in yoga in particular tend to develop irritation in the deltoid, which is localized in the area of the muscle origins, presumably resulting from an overstrain of the structures due to frequent repeated demands in full frontal abduction and is also noticeable in the same kind of strain, see FAQ.
- Various pathological changes in the shoulder joint such as impingement syndrome, frozen shoulder, calcification of the biceps tendon, which cannot all be discussed here and require clarification.
- side discrepancies in flexibility
The flexibility of the shoulder joint can be recognized by the degree of deviation in the three dimensions of movement:
- Outward deviation of the upper arms with consecutive flexion of the elbow joints
- Loss of rotation of the arms
- Incorrect angle of frontal abduction that does not reach 180° or not permanently
The triceps is an important muscle in this posture as it must limit the deflection that results from restricted flexibility of the shoulder joint in the form of flexion of the elbow joints. The better the strength endurance of the triceps, the less stretching effect on the shoulder area is lost through evasive movement. An inability to keep the elbow joint extended does not directly indicate a lack of strength in the triceps, but rather, given the intensity of the frontal abduction demand, a disproportion of its strength/stamina to the flexibility in the shoulder joints; a tendency to spasm and spasm can mean increased tone and also a lack of strength.
Wrist weakness is most likely to occur in extensive dorsal flexion and under greater load
- Ganglion, usually in the dorsal area between the hand and forearm, produces a sensation of pressure during dorsal flexion of the wrist
- Tendinitis of the tendons of the palmar flexors or finger flexors
- Carpal tunnel syndrome: worsening of symptoms in this position
- Fractures and fractures of carpal bones, especially the scaphoid bone
- Arthritic changes (degenerative with cartilage atrophy) of the joint
- Arthritis (joint inflammation) of various kinds
- Dislocation / subluxation, which would cause a significantly increased sensation of tension in various overlying muscles
- joint trauma, which may cause pain in the joint even after many weeks or months
but also purely muscular symptoms such as
- Shortening/hypertonus of the dorsal flexors of the wrist, which then become noticeable in the dorsal side of the wrist like cramps.
- Shortening/hypertonus of the palmar flexors of the wrist, which makes the dorsal flexion of the wrist in the executing muscles on the palmar side of the forearm painful to stretch.
- Golfer’s elbow: Strain pain at the point of origin of muscles of the inner ulnar side of the forearm in the transition to the upper arm
(650) Kyphosis and lordosis of the spine:
The deviations from the physiological double-S shape of the human spine become quite visible in this posture. There should be a certain degree of lordosis (convex spine from the front) in the lumbar and cervical spine and at most a small degree of kyphosis (convex spine from the back) in the thoracic spine; the thoracic spine is stretched or even extended when the posture is performed intensively. See also the FAQ.
(611) Pelvic obliquity/uneven shoulder position/scoliosis of the spine:
The lateral deviations of the spine from the median plane known as scoliosis are also quite visible in this posture. See the FAQ.
(721)(724) Ischiocrural group:
Various disorders can be found in forward bending movements(flexion in one/both hip joint(s), but also under load in the muscles of the back of the leg:
- Shortening of the hamstrings, see FAQ
- Damage to the hamstrings that causes pain or functional limitations can also be easily recognized here, from simple tension to strains to muscle (partial) tears.
- Irritation of the sciatic nerve: irritation of the sciatic nerve, which innervates the leg and foot, can become symptomatic during forward bends in particular, even if they are otherwise rather calm. See the FAQ.
- Irritation of the origin of the hamstrings at the ischial tuberosity (at the ischial tuberosities, also known as PHT: proximal hamstring tendinopathy) will be clearly evident in this posture and require protection from intensive stretching, as this posture demands; see the FAQ.
- Baker’s cysts create a feeling of tension or foreign body in the back of the knee, see FAQ.
(880) Hyperextension of the knee joint:
Overextension of the knee joint refers to the ability to, or the current state of, an angle of more than 180° in the knee joint. To a certain extent, this is considered normal by anatomists and is on average more common and more pronounced in females. However, it can also indicate a weakness of the quadriceps. Furthermore, hyperextension often causes unphysiological sensations that are not caused by stretching or exertion of the muscles and should be avoided, see also the FAQ.
Variants:
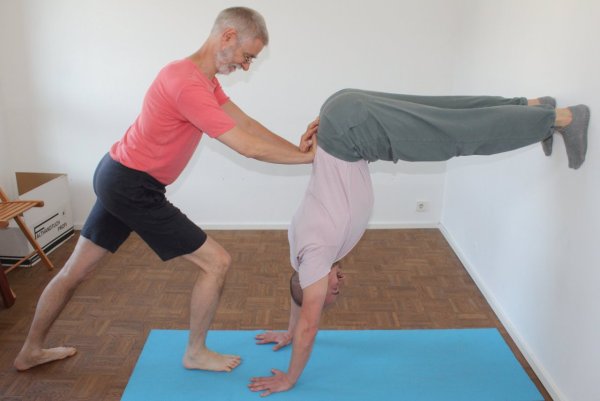
(P) Press shoulders towards the wall and tilt pelvis
(P) Push against the shoulders
(P) completely: Turn out and stretch your arms and press your head against your shoulder
Instruction
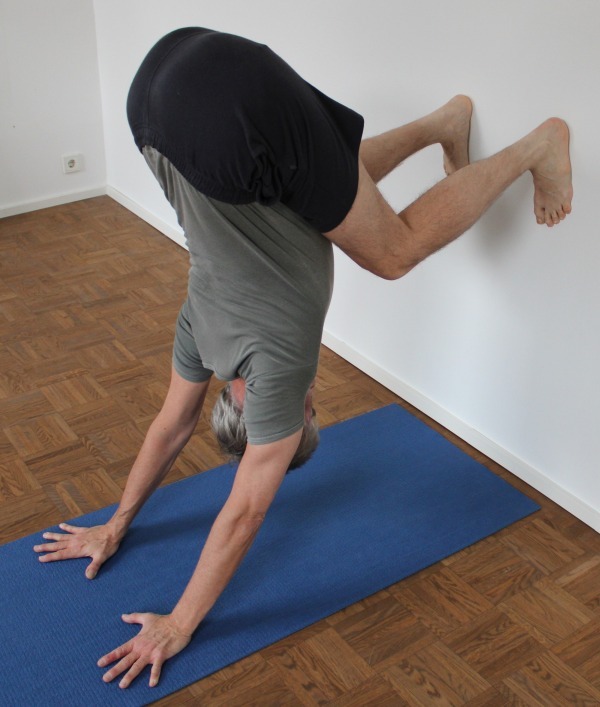
- Sit in front of a wall so that the feet of the legs stretched out against the wall are resting on the wall with the toes pointing upwards. Lift one buttock and place a finger or thumb on the floor where the ischialtuberosity (ischial tuberosity) used to be. Stand up halfway by turning around and coming to stand on your feet. Place both hands on the floor shoulder-width apart so that the wrists are at the distance from the wall previously marked with the finger.
- Spread the fingers with the extensor tendons of the middle fingers parallel, stretch the arms, apply even pressure to all parts of the hands and move the shoulders and chest towards the wall behind you.
- Lift one foot and place it on the wall at about the height of your pelvis, using only the bottom of your toes and the balls of your feet if necessary.
- Shift your body weight more towards your hands until the foot that remains on the floor becomes light and can be lifted off the floor easily and without momentum. Strengthen the movement of the chest and shoulders towards the wall behind you.
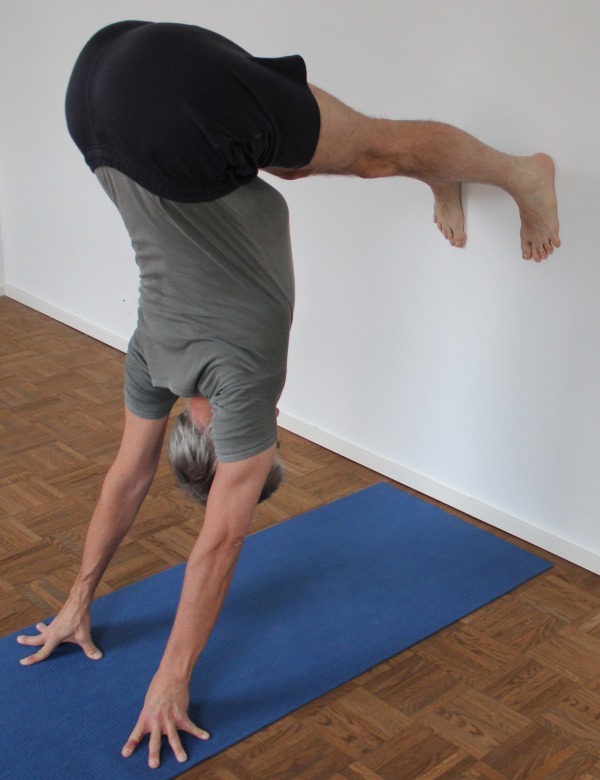
- Lift the foot that has remained on the floor and place it hip-width apart next to the foot that is already on the wall.
- Slowly extend the knee joints against the resistance offered by the muscles on the back of the leg, trying to keep the chest and shoulders as close to the wall as possible.
- Check the extension of the arms and fully extend them again if necessary.
- Stretch out from the shoulders to move the upper body away from the floor as far as possible.
- Extend the arms to the maximum, i.e. turn the biceps away from the wall without the palms, the radial metacarpophalangeal joints or the proximal joints of the fingers lifting off the floor or losing pressure.
Details
- The ability to further exorotate the arms is naturally very limited at an angle of around 180° frontal abduction. Furthermore, there is a correlation between exorotation or even the attempt to exorotate and the loss of pressure in the radial metacarpophalangeal joints, radial proximal finger joints and the entire inner edge of the hand. See the corresponding preliminary exercises.
- A lack of ability to press the (particularly radial) metacarpophalangeal joints (especially the index finger and middle finger) firmly onto the floor, whether due to pain in the palmar flexors of the wrist, which are already sufficiently stressed by stretching, or due to a lack of strength or body awareness, can easily lead to dorsal wrist dysfunctions. With only a few exceptions, these are a consequence of the first-mentioned causes. In contrast to the downward dog position, in which the problem hardly ever occurs, and the upward dog position, in which it can certainly occur because the external wrist angle is considerably smaller and not far from the physiological limit, the problem is more pronounced here because the entire body weight rests on the hands.
- If the focus of the work is on the hands, many participants tend to work by shifting their weight, i.e. by moving the shoulder away from the wall, or by rotating the arm(end rotation, which increases the pressure in the radial wrist area). Both should be strictly avoided. The radial metacarpophalangeal joints of the fingers may only be pressed down using the strength of the palmar flexors in combination with the pronators of the hand and the finger flexors
- The movement of the shoulders and chest towards the wall, provided that the hands are at a sufficiently small distance from the wall, is the only but at the same time sufficient guarantee that the feet do not lose their grip on the wall and sink or slide to the floor. The more force with which the chest is moved towards the wall, the more stable the posture becomes. External assistance from a second person can initially be of great importance so that the performer gets the necessary feeling for the posture and the activity in it (see corresponding partner exercise).
- The movement of the shoulders towards the wall naturally increases the restriction in the ability to exorotate the arms. On the other hand, the ability to press the base of the fingers to the floor does not increase to the expected extent as the movement of the chest towards the wall increases the dorsal outer angle of the wrist and thus relieves the structures involved in the movement in the wrist. The effect of increasing the angle of dorsiflexion in the wrist by shifting the shoulder away from the wall (insofar as this is possible without the feet falling down) and being able to pull the metacarpophalangeal joints to the floor via the palmar flexors, which usually work at the edge of flexibility, i.e. via the tensile load on the attachment points, tends to decrease, which does not correspond to the purpose of the posture anyway.
- If there is a tendency to cramp in the cranial trapezius region, it can be helpful to have another person support the exorotation of the arms from the outside by gripping the upper arms in the middle and rotating them out, see the variation as a partner exercise.
- The distance of the wrists from the wall is probably the most important parameter of this posture – alongside the force with which the chest is moved towards the wall. It determines both whether the posture can be assumed and how long it can be held, as well as the intensity of the stretching of the muscles in the shoulder joint. If the distance is too small, the posture can hardly be assumed or can only be held for a few seconds. If the shoulders are further away from the wall than the wrists in the posture, the distance must be considered too small except in cases of very strong deltoid muscles, which can keep the angle in the shoulder joint stable for a sufficiently long time. If the distance between the wrists and the wall is too great, too little meaningful activity can be developed in the posture. In cases where the shoulder joints are already sufficiently mobile, this poses a risk with regard to frontal abduction in that the ligament structures of the shoulder joint may be strained if there is no more muscular stretching and – if the distance is clearly too great – the weight of the entire upper body, head and legs is converted into moments in the shoulder joint that have a destructive effect on the ligaments instead of stretching the muscles. However, as long as the shoulders are at least as far away from the wall as the wrists, this risk cannot occur. If the shoulders are significantly closer than the wrists and the arms are therefore significantly tilted towards the floor, this risk increases and more attention must be paid to extending the shoulders(elevation of the shoulder blades) and exorotation of the arms. The latter in particular is very important, as can be seen from the exact course of the main muscles to be stretched.
- Of course, as with similar postures, the relationship between endorotation of the upper arms, lack of extension in the elbow joints and lateral adduction of the arms in the shoulder joints also applies here as regularly occurring evasive movements. They occur as a result of reduced flexibility in the shoulder joints, all the more so as the frontal abduction approaches 180°; they can only be prevented with great effort and must be balanced against each other.
- Keep your feet hip-width apart on the wall and parallel (in relation to its center line) pointing downwards. Ideally, the heels and ischial tuberosities should be at the same height so that the back of the legs are approximately horizontal. The feet can be positioned lower for people with significantly greater flexibility in the hamstrings or higher for less mobile people without significantly compromising the posture. In the case of reduced flexibility, the feet can also be positioned further than hip-width apart if the distance between the feet and the floor required to perform the posture appropriately would mean that the heels would no longer come to rest on the wall.
- In this pose, move the inner knees in particular upwards and push the entire legs up towards the ceiling (see corresponding variation with the front feet lifted).
- As far as the feet are concerned, the focus is on the pressure on the heels, not the balls of the feet.
- In this pose, stretch out as far as possible from the shoulders. Compared to postures such as dog pose head down or urdhva hastasana, this is much more challenging due to the significantly greater weight to be moved and may lead to noticeable fatigue in the muscles.
- In general, perform the maximum possible flexion in the hip joints in order to facilitate the movement of the ribcage towards the wall or at least not to make it any more difficult. Reduced flexion can have a restrictive effect on the range of movement in the shoulders via the back muscles. It can often be observed that when flexion in the hip joints is supported by a supporter, this results in further movement in the shoulder towards the wall. The ischial tuberosities move outwards in the posture (as do the legs) and away from the wall, and of course also towards the ceiling due to the elevation of the shoulder blades.
- People with good shoulder flexibility can sometimes position their hands much closer to the wall than the ischial tuberosities are away from the wall. This may lead to the upper body bending backwards. This can generally be considered uncritical, except in the few cases in which lower back problems occur. If this is the case, move the hip joints slightly out of maximum flexion again without moving the upper body out of the good position (close to the wall) that this makes possible or lower the feet.
- Normally, the backs of the legs should be horizontal. However, there are reasons to deviate from this rule:
- if the hamstrings is very immobile, the normal height of the feet would result in a very noticeably hunched back and excessive strength demand on the shoulders(deltoideuspalmarflexors of the forearms, so a higher position of the feet is indicated.
- If the hamstrings is very flexible, the feet can be positioned lower than horizontal thighs. At the normal height, they would otherwise hardly be included in the posture.
- There are not very frequent cases in which relatively immobile shoulder joints meet a rather mobile hamstrings and the muscles of the lumbar spine are also rather weak or sensitive, see below. This may indicate that the feet should be placed low enough so that there is no discomfort in the lower back during the exercise.
- The more mobile the shoulder joints are and the more the upper body can be moved towards the wall, the more important it is to pay attention to maximum exorotation or to improve it so that the ligament structures of the shoulder joint are not strained after the muscular stretch has come to an end.
- Hyperextension of the arms must be avoided at all costs if it a) exceeds a degree of approx. 3° or b) leads to pain in the extensor joint space of the elbow joint. The method of choice is usually the use of the arm biceps or the flexor group, which is the only one that can safely neutralize the hyperextensive moments in the elbow joint. As a rule, the arm biceps will be found to be inactive in almost all participants if this focus is not specifically used, which is perfectly acceptable as the flexion moment in the elbow joint induced by the flexibility restrictions in the shoulder joint is usually high enough anyway and any force applied by the biceps in the elbow joint would also have to be neutralized by the m. triceps brachii, which is often all too clearly required anyway. However, if there is a tendency to hyperextend the elbow joints, the use of the biceps or the flexors in general should be trained in order to set the angle as precisely as possible to 180° from a conscious balance of strength, so that the force of gravity is directed through the elbow joint as optimally as possible and without side effects. Working with the arm biceps in the extended position of the elbow joint is often not easy, so appropriate preliminary exercises are recommended for the individual requirements of the right-angled handstand, which are not small anyway.
- As you would expect, the position of the head is stretched towards the floor. Looking towards the hands is not advisable for two reasons: firstly, because it could lead to cramps in the neck, which is already cramped in many people, and secondly, because this movement is associated with the opposite movement of the arms (towards frontal adduction, i.e. reducing the angle in the shoulder joint) than is desirable. Instead, the head can be moved towards the upper body with the gaze turned towards the feet if this is experienced as supportive of the movement in the shoulder joints. Sometimes, in cases of tight neck muscles, repeated alternation between moderate flexion and reclination of the head can be experienced as soothing.
- If possible, do not use the rectus femoris for flexion in the hip joints, as otherwise it may develop a tendency to spasm due to the extended knee joint, which means a very short sarcomere length when the hip joint is flexed, even if this should be less than in postures in which the hip joint has to be flexed against gravity, such as in navasana. The flexion in the hip joints should come from the hip flexors(iliopsoas) located in the pelvis.
- In rather rare cases, an uncomfortable hollow back sensation occurs in the posture. This is usually the case with less mobile shoulder joints but quite mobile hamstringss in the backs of the legs. The hands cannot then be positioned far enough towards the wall to achieve an even curvature of the back from the lumbar spine to the upper thoracic spine, but a clear hyperlordosis occurs in the lumbar spine. This can usually be remedied by positioning the feet lower on the wall, which brings the hip joints closer to the limit of flexibility of the hamstrings and thus brings the lumbar spine closer to the vertical or physiological lordosis. Only very rarely is it necessary not to tilt the hip joints into maximum flexion.
- The right-angled handstand is one of the interesting and usually quite intense postures with significant (or maximum) flexion in the hip joints and a backbend of the upper body (total concavity or avoiding the cervical spine). These include upavista konasana with block, right-angled handstand, the urdhva hastasana variation of dandasana, the dvi pada variationof handstand , right-angled elbow stand, table variation of uttanasana, hands up variation of prasarita padottanasana.
- Information on dealing with cubitus valgus can be found in movement physiology under axial misalignment.
Known problems that can occur even when performed correctly
Stress in the lumbar spine
In rare cases of a very mobile hamstrings and very immobile shoulder joints, this constellation can result in a significant hyperlordosis of the lumbar spine with corresponding discomfort.
Variants
Stretching from bent knees
Instruction
- Bend the knee joints significantly.
- Move the chest as far as possible towards the wall, which should be possible much further than before with the knee joint bent.
- Increase the strength in the muscles that move the chest towards the wall and slowly stretch the legs with the strength of the quadriceps against the stretch that occurs in the hamstrings in the muscles at the back of the legs, trying to maintain the good position of the shoulders.
Details
- Depending on how practiced you are in forward bends, you can achieve intensive stretching of the hamstrings here.
Pushing your heels up the wall

Improving awareness and the ability to flex the hip joints as a prerequisite for improved work in the shoulders.
Instructions
- Lift the balls of the feet and toes off the wall without tensing the muscles in the front of the lower leg.
- Move the upper body even further towards the wall than it already is and translate this movement via the pelvis into an upward movement of the legs (towards the ceiling), resulting in a small movement of the heel bones in the surrounding skin, which remains fixed in the same place on the wall due to friction and pressure. The outward movement of the heel bone(calcaneus) becomes visible to the observer.
- Release the tension back to the starting point.
- Repeat this several times until the connection between the two movements has become independent.
Details
- Keep thedorsal flexor muscles as soft as possible so that they do not cramp.
- If possible, do not use the rectus femoris for flexion in the hip joints, as it may otherwise develop a tendency to cramp due to the stretched knee joint and very short sarcomere length.
- The force is exerted via the back of the body, in particular the back muscles and the mono-and biarticular hip extensors(gluteus maximus and hamstrings).
Lifting the ball of the foot

Detailed photos

This variation promotes a feeling for the extension of the legs, flexion in the hip joints and the pressure of the feet on the wall.
Instructions
- Lift the balls of the feet off the wall at the same time and maximize the pressure of the heels on the wall.
Details
- Keep the foot lifting muscles(dorsal flexors) as soft as possible so that they do not cramp.
- If possible, do not use the rectus femoris for flexion in the hip joints, otherwise it may develop a tendency to cramp due to the extended knee joint and very short sarcomere length.
Wrist joints on patches

Enable posture with severely restricted dorsiflexion in the wrist.
Instructions
- Place several patches on top of each other under the wrists up to about 3 cm thick.
- Take the pose as described above.
Details
- The patches under the wrists are sometimes the only way to assume the correct posture without pain if the dorsiflexion in the wrists is severely restricted and 90° can only be achieved with pain under load. The patches cause the palms to tilt and the angle remains significantly smaller. Other aids can also be used instead of patches if they fulfill the most important conditions: low compressibility, soft edge and good slip resistance.
Jumping on the wall

Instructions
- Take the pose as described above. Build up strong pressure against the wall.
- Without bending your knees, jump off the wall with a powerful jumping movement that stretches the ankle ( plantar) and then land on the wall again shortly afterwards using the pressure that your arms have built up and maintained towards the wall. Land on the balls of your feet first and always on the same spot on the wall.
Details
- This is one of the exceptions to the rule „never land with your knees straight“! Landing with the knee joints extended should be safe here because the achievable „jump height“, i.e. the distance between the heels and the wall that can be reached when jumping, is very small and, secondly, the full force of gravityof the whole body does not act on the extended knee joints, but only a very small weight that corresponds to the force with which the body is pressed against the wall. Thirdly, when landing on the balls of the feet, the triceps surae absorb almost the entire force with an eccentric contraction before the heels touch down on the wall a fraction of a second later. Depending on various factors, the knee joints should only reach a few grams in the longitudinal direction. Jump heights of more than a few centimetres are rarely achieved.
- Adjust the distance of the hands from the wall so that jumping is possible without the feet sinking a little on the wall during the jump (if the distance is too great) and without the risk of tipping over forwards towards the wall despite strong pressure from the arms (if the distance is extremely small). The smaller the distance between the feet and the wall, the more jumping force the calves have to exert and the more intensively the shoulder muscles(deltoids) have to work.
- In the case of existing knee damage, it is of course also possible to jump with the knee joint slightly bent, but here too, great care must be taken to make the jumping movement solely from the ankle and not by stretching in the knee joint and also to land on the balls of the feet again. See also the corresponding variation of the right-angled elbow stand.
- This variation is a good preparatory exercise for the two-legged jump, as the strength of the arms is experienced and developed to move the upper body towards the wall, which is essential for landing synchronously with both feet on the wall so that they cannot slide downwards.
on fists

This variation can be practiced in the event of various hand or wrist injuries as a substitute for the normal right-angled handstand that may not be possible.
Instructions
- Place your fists where your wrists would otherwise be, press them firmly to the floor and stabilize the angle in your wrist with the strength of your forearms(palmar flexors and dorsiflexors of the wrist).
- Assume a right-angled handstand.
Details
- The remarks made for the handstand on fingertips apply analogously. In a certain analogy to the upface dog on fists, there is no possibility here of pressing the shoulder area and upper body towards the wall using the strength of the palmar flexors. On the contrary, stretching the legs exerts a force on the upper body and also on the shoulder area, pushing it away from the wall, which can only be absorbed to a much lesser extent with the arms, as the palmar flexors are not available for this.
on fingertips
Effects: (422) Force of the finger flexors (finger flexors)
Instructions
- Place the fingertips on the floor with the fingers extended, the fingers form a quarter circle with the thumb, the fingers are only slightly spread, the hand is slightly turned out.
- Keep your fingers powerfully extended, apply maximum weight to your fingers and take the pose described above.
Details
- All the remarks made for the handstand on fingertips apply analogously, in particular upface dog and pole on fingertips should be mastered before the fingers are given the full weight of the body, see the sequence of preparatory exercises given there. Furthermore, the fingers must be pressed forcefully towards the thumb as described there.
- The finger joints should not be bent, as this costs stability, but should be stretched or, in the slight hyperextension that is likely to result, relieved by applying massive force to the finger flexors, i.e. the fingers are pressed with all their strength in the direction of the thumb and vice versa. The hands are only slightly turned out so that the difference in the direction in which force is exerted with the arms to push the upper body towards the wall does not differ significantly from the direction in which the fingers point and the finger flexors exert force. Under these conditions, there is hardly any valgus stress or varus stress in the joints of the fingers and thumbs that could not be absorbed by the muscles that move the fingers, simply because there are no muscles in the hand that could stabilize in this direction.
(P) Pressing the shoulders towards the wall and tilting the pelvis
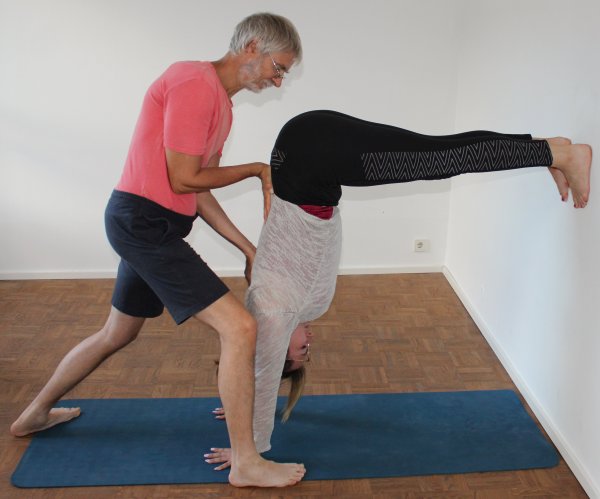
Instructions
- Take the pose as described above.
- The supporter sits in front of the performer’s back (as for the other supports) and presses the performer’s shoulder area towards the wall with their hands. To test whether there is sufficient flexion in the hip joints, the supporter uses their head to take over the force previously exerted with the arms so that they can tilt the performer’s pelvis into further flexion with both hands.
Details
- This support is one of the many where 2 hands are not enough and the teacher needs a certain amount of creativity. This time, the head takes over from the two hands that were previously pushing the shoulders towards the wall. The change between the pressure with the hands and the pressure with the head should be as gentle as possible. As always when applying pressure with the head, the supporter should make sure that his cervical spine is roughly straight, i.e. not flexed or extended.
- It goes without saying that both the pressure with the hands and the pressure with the head must be applied symmetrically – unless otherwise indicated due to known side discrepancies in shoulder flexibility. For pressure with the head, this means pressing on the spinous processes. The pressure on the back (or previously on the shoulders) can reach a considerable level in less flexible, muscularly robust performers, so that it may be uncomfortable for the performer to withstand equally powerful pressure on the spinous processes.
(P) Rotate and extend the arms

Instructions
- Take the pose as described above.
- The supporter sits on the floor in front of the performer’s back, turns out the upper arms, which are gripped approximately in the middle, and pushes them towards each other at the same time, thus stretching them better. At the same time, the arms can be pushed towards the wall, thus countering all three dimensions of evasion. In another variation, the head is also pressed against the upper back, see below.
Details
- The grip is centered on the upper arm and should be firm enough but still comfortable for the performer. Care must be taken to ensure that the arms are stretched but not overstretched.
(P) Pressure against the shoulders
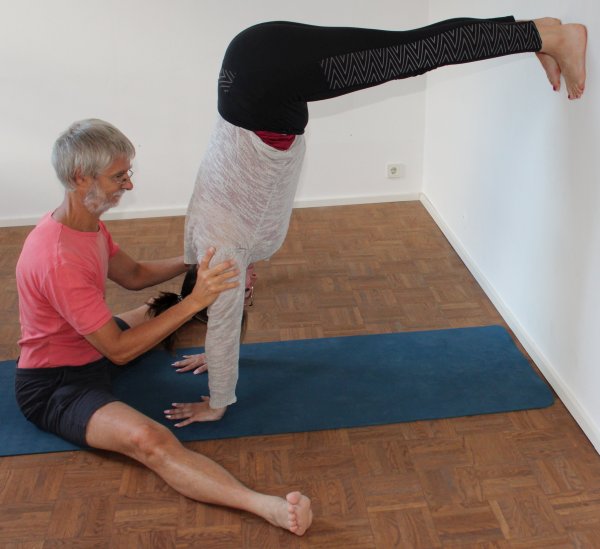
Instructions
- Take the pose as described above.
- The supporter sits on the floor in front of the performer’s back and carefully pushes the shoulders further towards the wall.
Details
- Only one dimension of evasion is encountered here, to which the performer’s arms will probably react by bending and twisting.
- As the supporter, make sure to keep the cervical spine stretched, i.e. to push with the crown of the head.
(P) Pull on the shoulders
Instructions
- Take the posture as described above.
- The supporter sits on the floor in front of the performer’s back and carefully pulls the upper arms away from the wall below the shoulders until the performer feels strong work in the deltoids.
Details
- The pull on the arms pulls the shoulders away from the wall, so that the mass distribution of the upper body changes unfavourably for the posture and the force with which the feet press on the wall decreases, so that the risk of slipping off the wall increases. The performer senses this and begins to work against it by increasing the force exerted by the deltoid (and secondarily other frontal abductors) to prevent slipping. In cases of very good mobility in the direction of frontal abduction, the frontal abductors no longer have to work at all to maintain posture if the hands are not too close to the wall, because the shoulder joints have exceeded 180° of frontal abduction and the gravity of the body supported by the arms is no longer a problem. partial body weight instead of a frontal adducting moment induces a frontal abducting moment in the shoulder joints. The traction on the upper arms now forces this frontal abduction moment to be countered by an opposing force of the deltoid, so that the position of the shoulder and thus a sufficiently favourable mass distribution for maintaining the posture is maintained.
- With very good mobility in the direction of frontal abduction, the elbow joint may also fall into overextension with ease, which is unlikely to happen with a low capacity for frontal abduction. The supporter can cancel out the overextension, or at least its effects on the non-muscular structures of the elbow joint, by pulling the upper arms slightly outwards after the elbow.
- In the right-angled elbow stance, the risk or possibility of easily and effortlessly falling into over 180° of frontal abduction is noticeably lower, as the incomparably greater exorotation of the upper arm in the shoulder joint places even greater demands on flexibility, especially in the latissimus dorsi and the phenomenon described in the right-angled handstand, which is not very common in the right-angled elbow stand, is unlikely to occur in practice.
(P) Pressure on the sacrum
Instructions
- Take the pose as described above.
- The supporter stands in front of the performer’s back and presses on the back end of the sacrum to encourage flexion.
Details
- The pressure on the sacrum promotes flexion, but usually also moves the whole upper body a little further towards the wall, which can lead not only to more stretching sensations in the hamstrings in the back of the legs, but possibly also in the muscles of the shoulder joints or to more deflection of the arms.
(P) Complete: Turn out and stretch arms and press head against shoulder
Instructions
- Take the pose as described above.
- The supporter sits on the floor in front of the performer’s back, turns the upper arms out and pushes them towards each other at the same time, which makes them stretch better. At the same time, the arms can be pushed towards the wall, which would then counter all three dimensions of evasion.
- In addition, the supporter presses the head against the shoulder area to push the upper body further towards the wall, which may even cause the hip joints to move further into flexion. This achieves a high level of intensity and effectiveness.
Details
- This is the most complete correction possible with a single supporter. All three dimensions of evasion are addressed. This makes this variant very intense, so be careful with it.
(P) Stretching from bent knees
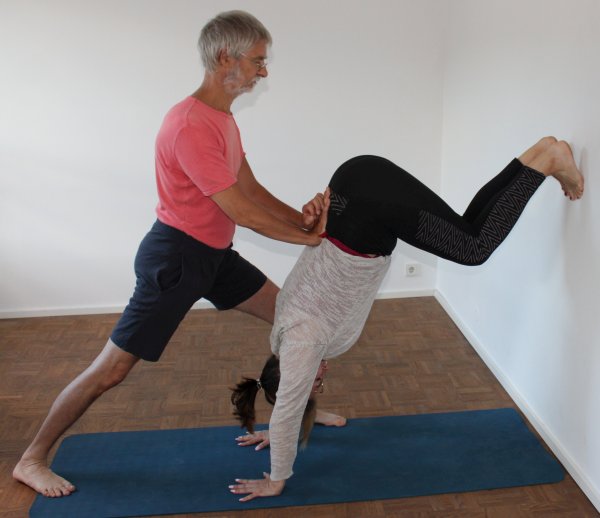
Instructions
- Take the pose as described above.
- Bend the knees significantly, moving the shoulders further towards the wall.
- The supporter now fixes the shoulder position with both hands and tries to hold it while the performer slowly stretches the legs again.
Details
- On the one hand, this variation conveys a greater sense of what needs to be done in the right-angled handstand, namely moving the upper body towards the wall, and on the other hand, how far this might be possible and the stretch sensation in the hamstrings associated with an intensive movement of this kind. In addition, the connection between the hamstrings and the position of the shoulders or the work of the frontal abductors of the shoulder joint and the palmar flexors of the wrist becomes clearer.
- Of course, it cannot be expected that the performer can maintain the position of the shoulder that can be achieved with the supporter’s strength when the knee joint is flexed, but it is important to get as close to this as possible.
(2P)

Instruction
- Take the pose as described above
- One supporter squeezes the arms gripped in the middle of the upper arms with further exorotation while pressing the head against the area between the shoulders to move the upper body from cranial towards the wall, the other supporter tilts the pelvis at the cranial end of the sacrum further into flexion in the hip joints.
Details
- This is the complete support of the most important movements in the posture. In addition, the second supporter can look at the legs to see whether the legs are extended and how well the finger joints are pressed to the floor.