Contents
- 1 sirsasana„headstand“
- 2 Variants
- 2.1 supta baddha konasana in headstand
- 2.2 baddha konasana in headstand
- 2.3 two-legged upswing
- 2.4 Three-point
- 2.5 one-legged upswing
- 2.6 eka pada
- 2.7 parsva
- 2.8 Push your elbow outwards
- 2.9 Push your elbow inwards
- 2.10 free
- 2.11 Learn to stand freely
- 2.12 Detail photos
- 2.13 hanumanasana in headstand
- 2.14 wag your legs
- 2.15 padmasana in headstand
- 2.16 supta padmasana in headstand
- 2.17 padmasana Forward bend in headstand
- 2.18 samakonasana in headstand
- 2.19 Twist
- 2.20 Twist leaned on the wall
- 2.21 supta virasana in headstand
- 2.22 vrksasana in headstand
- 2.23 krouncasana in headstand
- 2.24 Head raised
- 2.25 Elbow raised
- 2.26 with bound feet
- 2.27 Rectangular headstand with wall
- 2.28 Lower bent legs (curls)
- 2.29 (S) Support during the upswing
- 2.30 (S) Learn to stand freely
- 2.31 (S) krouncasana in headstand
- 2.32 Transition to elbow stand
- 2.33 Transition to uttanasana
sirsasana
„headstand“
 instructions and details with working links as PDF for download/print
Feedback: We’d love to hear what you think about this description, give us feedback at:
postmeister@yogabook.org
last update: 30.12.2018
Name: sirsasana
Trivial name: headstand
Level: FA
- Classification
- Contraindication
- Effects
- Preparation
- Follow-up
- derived asanas
- similar asanas
- Diagnostics
- Instructions
- Details
- Variants
Classification
classical: inversion pose
psychomental: mentally stimulating
physiological: strengthens the neck/shoulders and back
contraindications
In principle, damage and disorders of the back such as facet syndrome, spondylolisthesis, spinal canal stenosis, lumbar disc disease and acute lumbago are not necessarily contraindications, but in the case of lumbar disc herniations, the pose must be taken with both legs and a straight back. In the other cases mentioned above, care must be taken to avoid a hollow back by making adequate use of the glutes. In the case of cervical disc herniation, headstand represents a risk that is difficult to assess and should be avoided.
Aneurysms of the cerebral arteries are a clear contraindication.
effects
- (602) Strengthening the erector spinae
- (231) Shoulder joint: stretching for frontal abduction
- (331) Stretching to pronate the forearm
- (421) Stretching the finger flexors
(variant tripod headstand)
Preparations
The inability to extend the hip joints or an excessive hollow back in this pose indicate shortened hip flexors. For the risks of a hollow back, see the FAQ. The following preparations are then helpful:
If your back is in good health, you can add to this:
and other backbends with extension in the hip joint.
Headstand requires slightly less flexibility than handstand and other 180°+ frontal abduction arm poses. Although the arms are turned out to a considerable extent, the frontal abduction angle is significantly smaller. Nevertheless, in some cases it can be helpful to improve the flexibility of the shoulder joints so that the pressure of the elbows on the floor falls more easily and can be maintained for longer without interruption – which is particularly important for beginners in headstand! Preparations:
- downface dog, especially the „wide“ variation
- Back stretching, especially the „elevated“ version
- Rectangular handstand
- Handstand
- Elbow stand
- Rectangular elbow position
- Dog elbow stand
- Hyperbola as one of the most effective and efficient stretches in the direction of frontal abduction without external rotation of the arms
- Shoulder opening on the chair as one of the most effective and efficient stretches in the direction of frontal abduction with external rotation of the arms
In order to awaken the strength of the deltoids and triceps, with which the elbows are pressed to the floor in the headstand, practise:
- Dips variant of the downface dog
- The transition from the downface dog to staff pose and back
- Dips variant of the handstand
- Repeatedly taking and leaving the back arch (urdhva dhanurasana dips)
- hip opener 2
If a high tone of shortened adductors is known, these should also be stretched beforehand so that they do not develop a tendency to cramp in the pose:
Stretching the back can also be prepared:
- „desk“ variation of the uttanasana
- rectangular uttanasana
- warrior 3 pose
- upavista konasana in the „pull on the feet“ variation
- upavista konasana in the „with block“ variation
If the muscles of the lumbar spine are weak or strained due to a hollow back, prepare the lower back as well:
- parsva uttanasana
- balasana (child’s pose)
- parsva upavista konasana
- parivrtta trikonasana
- parsvottanasana
- half lotus forward bend
- karnapidasana
Restricted flexibility of the wrists due to shortened muscles of the forearms can lead to pain in the dorsal wrist, to intense stretching sensations in the palmar flexors of the wrist or to a tendency to cramp in the dorsal flexors and finger extensors. If necessary, prepare with:
follow-up
Depending on the constitution of the lower back and any hollow back tendency, the tone in the lower back can increase uncomfortably during the headstand. This can help:
- parsva uttanasana
- balasana (child’s pose)
- parsva upavista konasana
- parivrtta trikonasana
- parsvottanasana
- half lotus forward bend
- karnapidasana
The tone of the neck muscles may also increase in an unpleasant way. This can help:
derived asanas:
Similar asanas:
Diagnostics (no.)
Low flexibility in the shoulder joint in the direction of frontal abduction can be seen here in terms of difficulty to press the elbows firmly and continuously onto the floor. Side discrepancies also become apparent and there may be indications of disorders of the shoulder joint:
- Irritable hypertonus of the deltoid: especially ambitious beginners in yoga tend to develop irritation in the deltoid, which is localized in the area of the muscle origins, presumably due to an overstraining of the structures by frequently repeated pratice of full frontal abduction and is also noticeable in such stress, see FAQ.
- Various pathological changes of the shoulder joint such as impingement syndrome, frozen shoulder, calcifications of the biceps tendon, which cannot all be discussed here and require clarification.
- Side discrepancies in flexibility can be due to activities or posts such as side sleeping or can result from other imbalances.
The flexibility of the shoulder joint is recognizable in the form of the degree of deviation in the three given movement dimensions.
(711) Hip flexors: flexibility
An excessive hollow back and the inability to bring the hip joints to 0° (neither flexion nor extension) indicates shortened hip flexors. For the risks of a hollow back, see the FAQ. See above for helpful poses.
(753) Adductors: tendency to cramp
A tendency to cramp in the adductors indicates high tone, low strength endurance or significant external rotation moments, which are usually caused by restricted flexibility of the hip flexors.
(203) Neck: tendency to cramp
A tendency to cramp or excessive tension in the neck can indicate weakness or misalignment.
Pain in the head can increase significantly when standing on your head.
- An unfamiliar feeling of pressure in the head is normal at the beginning of your headstand career, but should improve as you continue practicing. If there is no improvement, you should look for factors that are causing the pressure, e.g. increased blood pressure.
- Latent headache can be significantly intensified under increased pressure. As the differential diagnosis of headache is very extensive and headache must be differentiated from migraine, it is not possible to go into this in detail. Sometimes a prolonged headstand, in which the pain worsens slightly during the first 3-4 minutes and then subsides, or running can help against headaches of varying origin and intensity.
- Pressure on the eyes: increased intraocular pressure requires clarification.
- Latent or manifest colds can cause an increased sensation of pressure in the head.
- Dizziness is also an intolerable symptom that can have a variety of causes and should be clarified.
(680) Esophagus/stomach/intestine:
A disturbed closure function of the stomach or esophagus can be particularly noticeable here, as can an overfilled stomach or intestine, which can exert pressure on the heart and lungs and even cause pectanginal complaints like Roemheld symdrone.
variants:
supta baddha konasana in headstand
padmasana Forward bend in headstand
rectangular headstand with wall
(S) support during the upswing
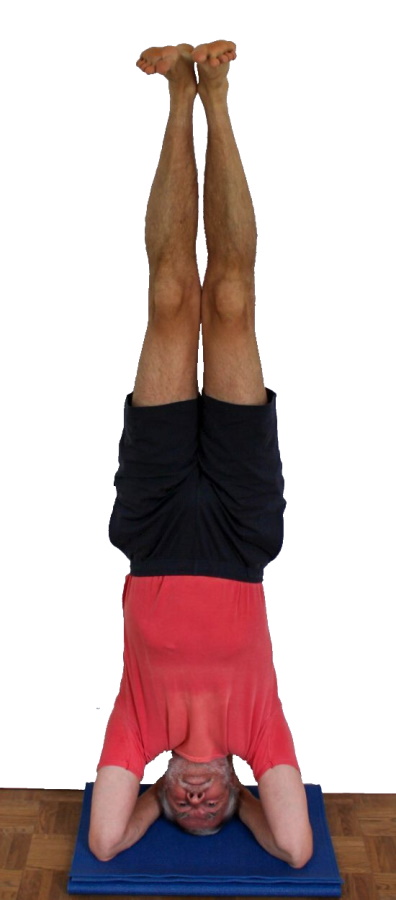
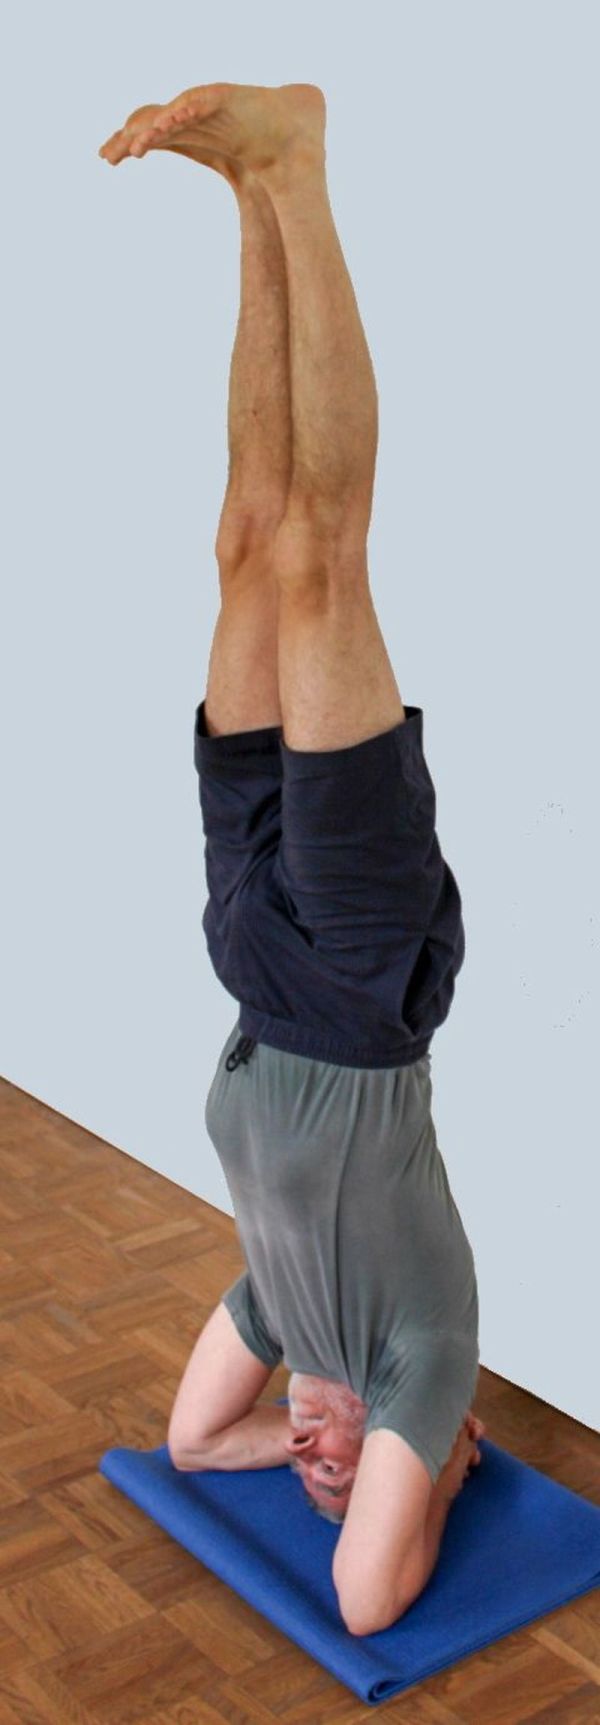
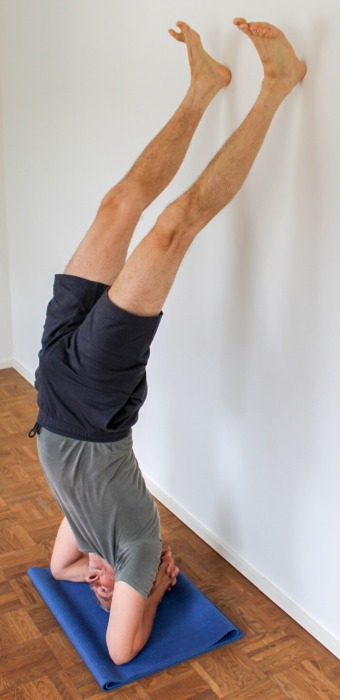
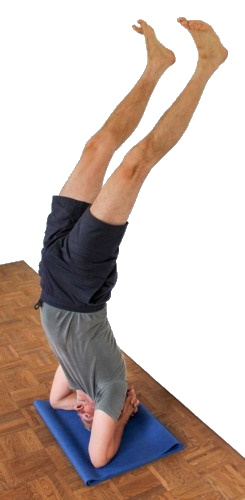
instructions
- Sit upright, stretch your head towards the ceiling and touch the top of your head with your bent inner hand to find the highest point of your head (the „crown“ of the head). From this point forward is the flat area on which you should stand. For most people, the highest point of the head is around the beginning of the last third of the head (seen from the front), but for some it is further forward.
- Interlock the fingers firmly into each other. Place the bottom little finger on the inside of your hand in front of the other little finger so that it is not squeezed.
- Move your wrists as far apart as possible.
- Use a yoga mat folded twice (i.e. 4 layers of a 3 mm mat on top of each other) as a base.
- Place your hands on the mat with your forearms so that your elbows are shoulder-width apart.
- Walk your feet forward towards your head so that your pelvis is approximately above your shoulders, keeping your back as straight as possible and taking care not to change the area where your head rests on the floor.
- Put maximum weight on your hands and elbows.
- Lift an outstretched leg and swing it up and down to estimate the possible swing like for handstand.
- On the third strong swing up, jump off with the other leg. When the first leg touches the wall, pull the second leg completely up to the wall.
- Stretch the knee joints, turn the legs in slightly and hold the pelvis upright with a little work of the glutes.
details
- Headstand is a much more advanced exercise than the handstand. Handstand (on the wall) should be mastered to some extent before practicing headstand for the first time. The focus here is on the ability to lift the upper body using the strength of the shoulders and arms, as well as being able to control the swaying that occurs.
- The double-folded yoga mat is a good measure of the maximum thickness and softness of the mat. Each additional layer of mat or softer material is likely to make the headstand more unstable and generally requires considerably more strength due to the more complex balancing work. On soft surfaces such as (thin) carpeting, two layers of mat can be optimal. Fluffy blankets and thick carpets are not recommended, as the lateral movement of the elbows can hardly be prevented by the beginner, and the feedback from the mat on the balancing work is very poor.
- When positioning the elbows, make sure that they slide about 3 – 5 cm apart over the muscles of the forearms. The elbows should then be slightly wider than shoulder width. In some cases of very stiff shoulder joints, this requirement may need to be reduced. However, it should be noted that, from a purely geometric point of view, the arms also move away from the floor in an arching movement as they move outwards, which reduces the pressure on the elbows.
- For practice purposes, the elbows can also be positioned closer than shoulder width for more advanced users.
- There are two ways to move the arms in the posture: outwards
- outwards: the simpler option, more work with the shoulder muscles possible, safe stance
- inwards: completely different work with the arms, slightly less secure stance
- As balancing mainly takes place in a forward/backward direction, the safety of the stance depends largely on the trapeze, which is formed by the two wrists and the two elbows. This means that elbows that are much wider than shoulder width make the trapeze less high and the stance less secure.
- Getting used to headstand typically takes place in several phases:
- Beginning of headstand practice: it is generally not possible to stand on the head for much longer than 2-3 minutes, after which the pressure on the skullcap becomes subjectively „too high“. Pressure felt in the head (intracranially) can also force you out of headstand quickly at first. However, the vascular system should learn to adapt to this through frequent practice.
- Getting used to the pressure on the skull plate, up to approx. 5 minutes, the neck muscles appear as the next topic.
- The problems of the neck are also slowly resolved, the area between the shoulder blades becomes interesting: up to approx. 10 minutes.
- The sensation for the area between the shoulder blades gradually gives way to the sensation of the tone of the muscles in the lumbar spine area, up to approx. 15-20 minutes
- With the correct tendency to turn in and a neutral position with regard to flexion/extension in the hip joints, the leg adductors can come into play. The adductor magnus is particularly noticeable here as, in addition to adduction, it also contributes to reducing flexion in the hip joints with its dorsal part, which attaches to the ischial tuberosity and also turns in the leg.
- The area of the dorsiflexors of the feet comes into play when the heels are raised. Of course, there are many deviations from the sequence described due to the respective constitution.
- After a longer (or shorter for beginners) headstand, resting your forehead on the floor is quite relaxing. Initially, there is often a more pronounced unpleasant sensation in the muscles between the upper part of the area between the shoulder blades, but this subsides after 2-3 minutes at the latest.
- The pose can be changed for more therapeutic purposes. When shifting
- forward: a larger hollow in the neck occurs, which places greater demands on these muscles, and also often requires more extensive follow-up treatment of the muscles due to the angular range of the affected joints. This is not recommended if the neck is already tense before headstand is performed.
- backward: there is less hollowing of the neck, which places less strain on the muscles as the angular range in the joints is shifted to more favorable areas. Not recommended if the neck is already tense before performing the headstand. Caution: the pressure on the top of the skull increases because the contact surface becomes smaller. In addition, the further the contact surface is shifted towards the crown of the head, the less stable this pose is.
- Headstand can be very effective against headaches in many cases. Be careful when assessing the symptom. We are not talking about a migraine-like headache. For many people, the term migraine still stands for a much more severe headache, but this is a separate disorder. While headaches tend to (but not always) occur when there is a lack of tension, blood supply or warmth in the head, migraines rather tend to be an expression of the opposite. Under no circumstances should migraines be treated with the usual headache remedies, not even with the (positive polar) headstand, but rather with the (negative polar) shoulder stand. Assuming that it is not a migraine but a headache, it may have the following causes and manifestations, among others:
- Pressure or throbbing in the head as a result of a cold, hypothermia or draught, occurring when motionless, but especially when (starting to) move.
- Throbbing, especially during movement after alcohol or drug consumption.
- Sensation of tension in the neck, spreading to the lower and middle back of the head (where the affected muscles are located) In all of the above cases, the headstand can generally provide relief or eliminate the symptoms by significantly increasing blood flow to the head (due to the inverted posture) or prolonged, calm use of the tense muscles. In most cases, a significant initial aggravation occurs after taking headstand, but this usually subsides from around the 3rd to 4th minute and is outweighed by the onset of relief.
- As a complete inversion pose that can to be held for a long time, headstand naturally places interesting demands on the cardiovascular system. For every beginner and advanced performer (later on), a prolonged headstand naturally leads to a lack of blood in the feet and possibly in the lower legs, which is noticeable as „falling asleep“ or tingling in the affected parts of the body, as well as paler skin due to largely drained blood vessels. This is generally less of a health risk than a disturbance of well-being. After the end of headstand, the feet often glow in an intense red-orange color when the blood circulation returns, combined with a very intense feeling of warmth. If you want to prevent your feet from falling asleep, you can bring your feet into the same position as in baddha konasana, for example, as soon as you notice the onset of this. This is usually enough to prevent the feet from falling asleep and to stand in a normal headstand for a few more minutes.
- The question of the weight with which the head should press on the floor comes up time and again. The answer is simple: for advanced performers, it can be maximum, unless you want to achieve a certain powerful effect on some back muscles (shoulder blade depressors) and shoulder muscles (mainly the parts of the deltoid that perform frontal abduction in the shoulder joint). For beginners, choose the weight according to your level of practice and tolerance, up to almost complete relief of the head.
- When swinging one leg up and down before assuming taking headstand, make sure that this leg remains stretched so that you do not immediately push yourself off the wall again.
- For more advanced performers, we recommend the slow two-legged upswing into headstand.
- The tendency to turn in the legs with the pelvis upright is the same work as in backbends and shoulder stand. This work can lead to signs of muscular fatigue in the adductor region after a while. The adductor magnus plays a key role in turning in and at the same time in preventing the legs from falling apart; it also works with its origin on the ischial tuberosity to reduce flexion in the hip joints.
- The stretching of the heels does not mean that the balls of the feet should be pulled with force, which would quickly lead to fatigue of the dorsiflexors in the shin muscles. This movement serves to improve awareness of the movement of the whole leg when balancing. If the calf muscles are clearly immobile, it may be necessary to cut back on stretching the the heel away.
- After headstand, the neck and muscles between the shoulder blades can feel quite tense. There are two ways to relieve this:
- sit on your lower legs and rest your forehead on the floor (balasana or child’s pose)
- uttanasana from headstand (preferably synchronized with outstretched legs). In both cases, the muscles in the neck and upper back are more or less clearly noticeable, in the latter case usually also other parts of the back muscles such as the erector spinae, but both are harmless and usually disappear within the first 1 to 3 minutes.
- It is not uncommon for a woman to find that headstand performed during menses does her no good ex post. Once this experience has been made, headstand should be avoided during this time. The long-held theory that headstand during menses could lead to endometriosis and would therefore be dangerous does not stand up to the current state of medical research.
Variants
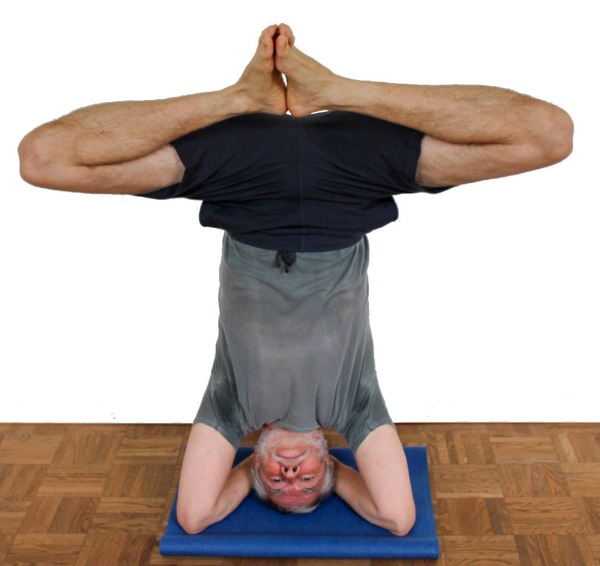
supta baddha konasana in headstand
Instructions
- Do headstand as described above.
- Bend slightly at the hip joints, turn out the thighs at the hip joints, bend the knee joints, then turn the legs out as far as possible and place the outer edges of the feet together as soon as possible.
- Complete the supta baddha konasana-like leg pose and draw the heels towards the pelvis.
Details
- The initial bending of the knee joints and flexion in the hip joints results in a slight change in the gravity perpendicular towards the elbow. Be aware of this and react accordingly. This should not be a problem in standard headstand as the physical support base is large enough. When the legs are turned out, the gravity perpendicular moves from the elbows back towards the head or wall.
- Do not pull the heels so forcefully towards the pelvis that parts of the hamstrings begin to cramp. If a cramp develops, straighten the legs again towards the ceiling; it is not so important to stop the external rotation in the hip joints to break the cramp. If this does not relieve the cramp, it can most likely be stopped by the rectangular version of headstand.
- As mainly the weight of the lower legs and merly a minimumof traction of the hamstrings (greater traction would most likely lead to a cramp) have a flexing effect on the knee joint, the likelihood of baddha konasana-type knee pain is significantly lower here.
- Of course, there is no way to turn out your thighs with your hands to relieve the strain on your inner knees. However, the effect described above usually outweighs this. Conditions with pathological changes to the knee joint can of course be an exception.
- In contrast to the standard variations of baddha konasana or supta baddha konasana, in which gravity pulls the legs towards the floor until the tension of the adductors outweighs this force, here no gravity-induced forces pull the knees out of the field of vision. However, this can be done to the limit of flexibility with the extensors of the hip joint, whereby the gravity perpendicular changes slightly. Sometimes there is a tendency to cramp or tension in the muscles performing the movement.
- In contrast to poses with baddha konasana feet or feet on the floor, there is no counter-pressure from the floor here, which reduces or eliminates the slight internal rotation of the lower leg in relation to the thigh in the knee joint that is typical of baddha konasana and can also have a positive effect on the condition of the knee joint.
- As in all headstand variations, pay attention to changes in the center of gravity when taking the pose and during all corrective movements. A slight change in the pressure of the elbows on the floor is generally sufficient for correction.
- Move the knees apart, out of the field of vision and towards the floor. Move the feet towards the pelvis, also out of the field of vision and towards each other for the best possible support of the soles of the feet or, depending on flexibility, at least the outer edges of the feet.
- To further reduce discomfort in the inner knee, the lower legs can be turned out using the biceps femoris, which moves the heels away from the wall and presses the forefoot more forcefully against the wall.
- This variant can be designed with or without a wall.
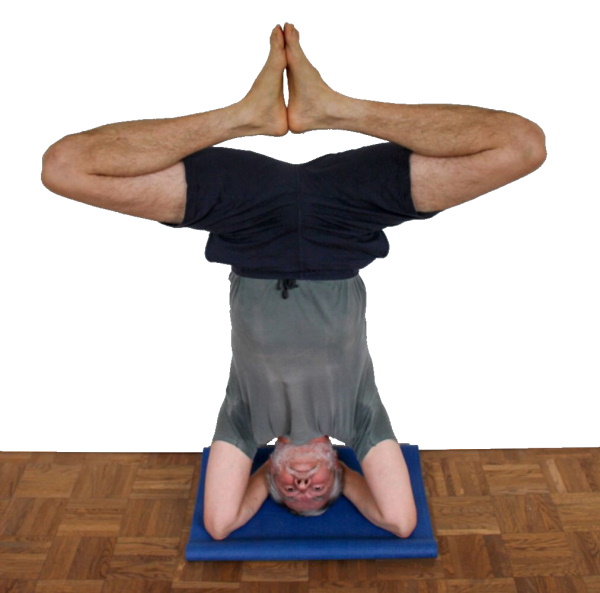
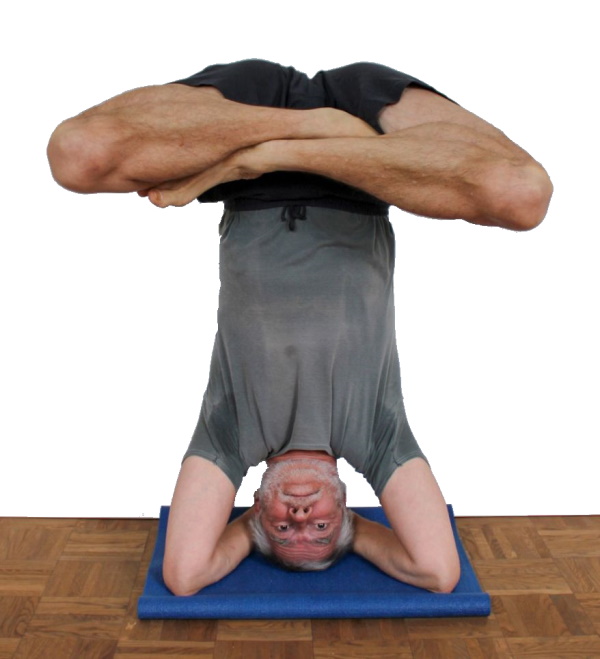
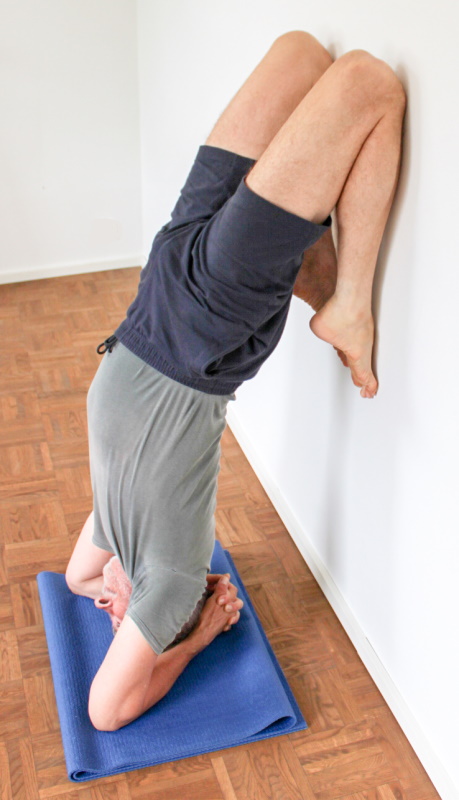
baddha konasana in headstand
Instructions
- Do headstand as described above.
- Bend slightly at the hip joints, turn out the thighs at the hip joints, bend the knee joints and bring the outer edges of the feet together as soon as possible.
- Bend the hips to 90° and complete the baddha konasana-like leg position. Draw the heels towards the pelvis and keep the legs moving upwards away from the head at a 90° angle to the pelvis.
Details
- The 90° flexion in the hip joints results in a clear change in the gravity perpendicular towards the elbow. Be aware of this and react accordingly. This should not be a problem in standard headstand as the physical support base is large enough. A slight shift of the pelvis and upper body backwards (out of the field of vision) should be sufficient.
- Draw the heels towards the pelvis. In contrast to the supta baddha konasana variation, a tendency to cramp in the hamstrings could be caused by the intensive attempt to bend the knees further. However, if a cramp develops, the knee joints cannot simply be stretched as in the supta baddha konasana variation because this is associated with a significant change in the gravity perpendicular towards the elbow and could lead to a loss of stability. Instead, the legs should be stretched upwards. This also changes the gravity perpendicular, but this time out of the field of vision. Make sure that the elbows do not become too light.
- The weight of the lower legs does not act flexing the knee joints, so they probably do not bend quite as far as in the supta baddha konasana variation. Trying to bend them further using the strength of the hamstrings could (see above) cause them to cramp.
- Here, too, the tendency to knee stress is lower due to the reduced flexion in the knee joint, which is performed without much force. To further reduce this, the lower legs can be turned outwards using the biceps femoris.
- In contrast to the standard variations of baddha konasana, there are no gravitational forces pulling the legs in the right direction, so the hip extensors have to be used to move the knees towards the ceiling. The feet, on the other hand, move towards the pelvis.
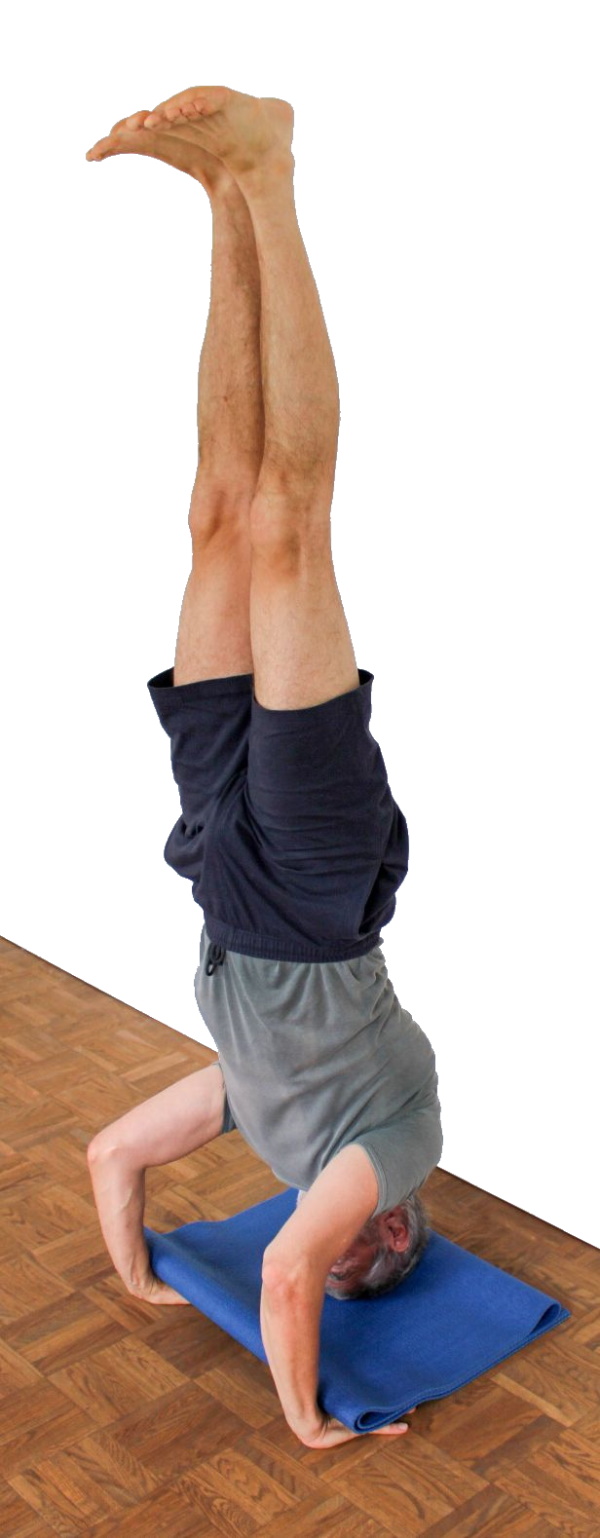
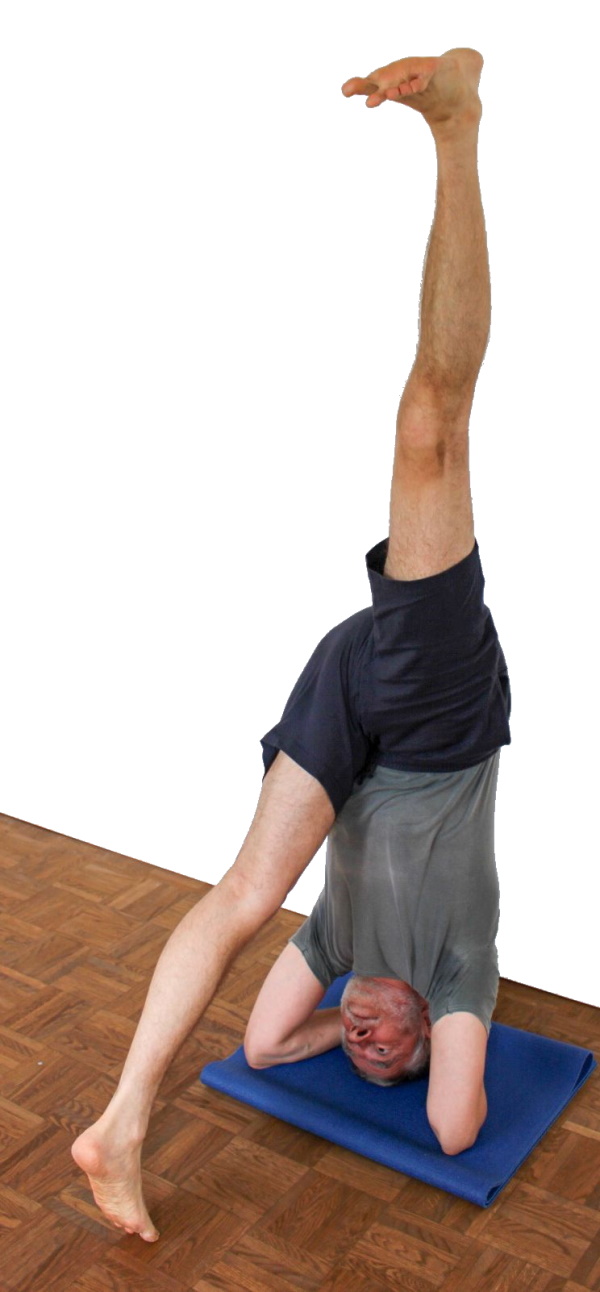
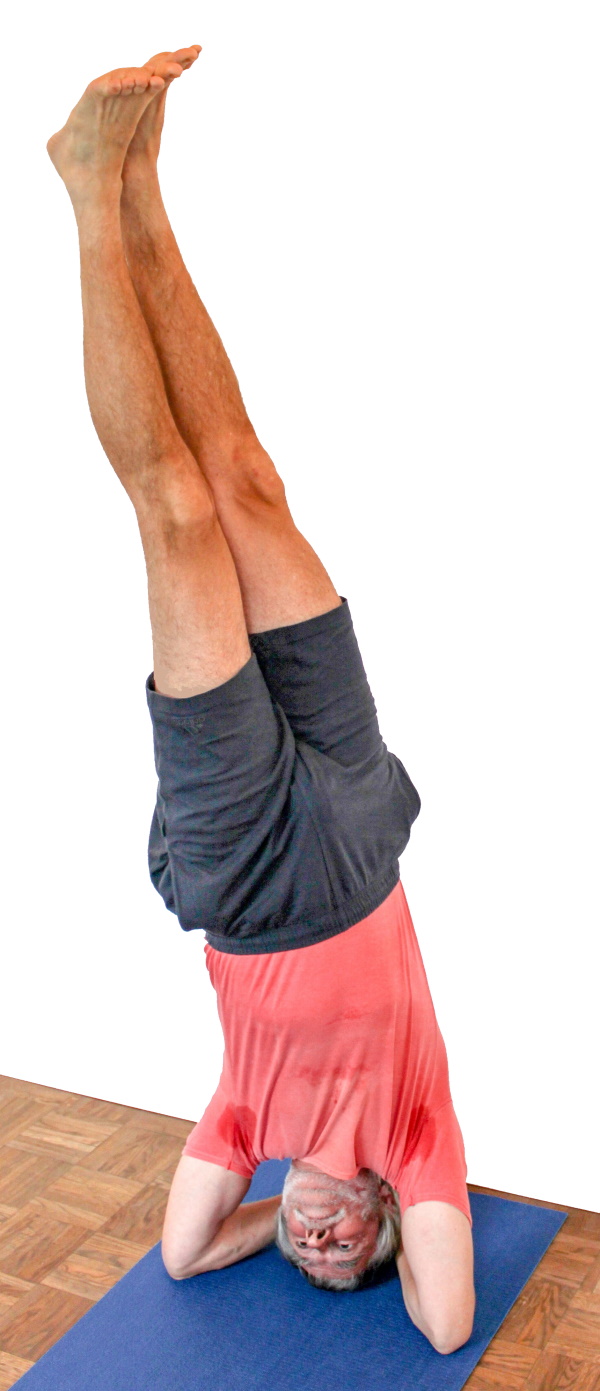
two-legged upswing
Detail photos
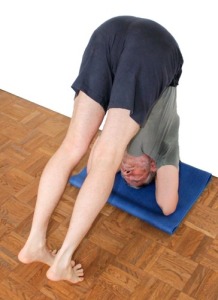
Instructions
- Place your hands as described above for the headstand and come into the dog headstand with your head towards the wall and the distance between your hands (for standing leaning against the wall) only 10 cm from the wall. For free standing, the wall or the distance from it is of course almost irrelevant.
- With your knee joints straight, walk your feet closer and closer to your head, lifting your pelvis higher and higher and straightening and extending your upper body more and more.
- Walk so close to the head that the weight of the feet on the floor is zero, moving the pelvis slightly over the head towards the wall.
- When the feet no longer stand on the floor with any weight, use the strength of the back of the legs and other hip extensors to lift the straight legs up to a vertical position, maintaining the extension of the upper body.
- Align the body for a precise headstand.
Details
- The two-legged lift differs in many parameters from the usual one-legged jump. In contrast to this, headstand is performed using only strength and flexibility and completely without momentum. This has its prerequisites:
- very flexible hamstrings: the point at which the mass distribution of the body is so favorable that the feet no longer have any weight on the floor, i.e. the gravity perpendicular is in the physical support base of elbows and hands, corresponds to a very good uttanasana or pascimottanasana. However, you would not normally demand a straight back in these poses – except for some special variations with an attempt at a spinal backbend during the hip forward bend, which are very suitable as preparation for the two-legged lift. These include the desk variation of uttanasana, upavista konasana with a block and the dvi pada variation of handstand.
- Strength of the autochthonous back muscles and the hip extensors, especially the hamstrings and, to a lesser extent, the glutes. The first is required because the large lever of the legs exerts a tilting effect on the pelvis away from the vertical and thus a flexing effect on the back. The extensors of the hip joint are those that lift the legs against gravity, whereby both their mass and their lever arm contribute to this being perceived as difficult or initially impossible for some less trained people.
- Force of the shoulders (deltoids) in the direction of frontal abduction: the shoulders press the elbows against the floor and thus stabilize against the leverage of the raised legs, the closer the gravity perpendicular is to the line connecting the elbows, the more force the shoulders have to use. To save strength, you could consider moving the gravity perpendicular further towards the hands, but this requires even greater flexibility in the hamstrings or, alternatively, curves the back more. The flexibility of the shoulder joints is not unimportant here. Although the arms are not in 180°+ frontal abduction as in many other poses, they are strongly turned out, which tends to increase the flexibility requirement. In addition, there is a much greater risk of caving the neck if, as is often the case, the pelvis is moved significantly towards the wall to relieve a lack of strength in the shoulders.
- Triceps strength: the triceps are required when the gravity perpendicular moves towards the head or beyond the head towards the hands. The hands must then be pressed to the floor using the strength of the triceps in order to stabilize the upper body via the arms and shoulders, which also differs from the one-legged lift in that the forces are static and must be maintained. The normal lift is a kinetic process that reaches a point where many variables are eliminated by the impact of the heels on the wall. Only the effects of inertia still have to be dealt with, with which the swinging upper body including the legs (the further away from the feet the more) still swings towards the wall, i.e. the legs, pelvis and upper body still have to be „absorbed“, mainly through the power of the hip extensors. In contrast, hardly any kinetic forces are involved in the two-legged upswing, as the requirement is that the upswing should be able to be performed as slowly as desired and even reversibly; although this does not necessarily have to be done in practice, the ability to do so should be developed.
- Before the upswing, the feet must be relieved to such an extent that no weight rests on them at all, not even part of the weight of the legs. To do this, the gravity perpendicular must be moved into the physical support base, the trapeze consisting of the two elbows and the wrists. This condition is not yet fulfilled as long as you can still see a push-off with the big toes. The upswing is mastered when it can be performed as slowly and reversibly as desired, i.e. the legs can be raised a little further or lowered again in between, as well as remaining in a certain position for a while.
- Under practically no circumstances should the elbows be placed lower than the head. Normally, a mat would be placed under the head AND elbows so that these three are sufficiently soft but not too soft and are at the same level. In general, the elbows could also be higher than the head, which can compensate to some extent for restrictions in the flexibility of the shoulder joint in the direction of frontal abduction. Note, however, that the softer the elbows are positioned, the more the applied force dissipates in the surface and the feedback from the surface regarding the applied force, i.e. the pressure exerted, deteriorates.
- The lifting of the legs creates a further large force that wants to curve the back in addition to the inclination of the back caused by the approach with the feet. As you lift your feet, prepare yourself to work even harder on your back and notice whether and, if so, how far it bends. The load on the elbows and the demand on the shoulder muscles to stabilize through even stronger frontal abduction also increases significantly at the moment the feet are lifted.
- The upswing becomes much easier if the pelvis is shifted a little behind the head, i.e. the plumb line of the pelvis is behind the point or area of the head that rests on the floor. This shift must be reversed during the upswing, otherwise the gravity perpendicular would still be behind the head and balancing from shoulder strength would not be possible; if the pelvis remained too far away from the wall, the gravity perpendicular would move too far towards the elbows and the ability to stabilize and balance from the strength of the triceps and deltoids would be lost to some extent: the further the pelvis is held away from the wall, the more forcefully the deltoids have to press the elbows to the floor.
At a certain point, refering to the pelvis, the point of no return is reached at which the pose can no longer be maintained, regardless of how the triceps and deltoids are used. - The exact center of gravity of the body plays a major role in the upswing and, as soon as the upswing has been mastered to some extent, is a free parameter that can be worked with: if the gravity perpendicular is moved as far as possible towards the head and possibly even further towards the wall, the upswing becomes relatively easy, but an unpleasant hollow in the neck quickly occurs. It is much more interesting and largely free of this side effect to keep the gravity perpendicular as close as possible to the line connecting the elbows so that the muscles involved can be strengthened, which includes large parts of the erector spinae and of course the deltoids.
- The abdominal muscles (rectus abdominis) should remain as soft as possible during the upswing, the arm biceps are also soft. If the arm flexor group (including the biceps) is used, this is usually the result of an attempt to contribute to balancing by lightening the load on the forearms and hands, which is not in the sense of the pose and usually an expression of a lack of sense for balancing: instead of using the strength of the arm flexors to lighten the hands, the deltoids have to press the elbows more forcefully onto the floor.
- Stretch the knees through and the heels away as you swing up, the swinging legs are as in tadasana. Due to the work of the gluteus maximus as a hip extensor when lifting the legs, there may be a certain tendency for the legs to turn out, compensate for this by focusing on lifting the inner knees in particular.
- The hands and fingers are soft. Sometimes the fingers are pressed against each other with force or the hands are closed too tightly as an expression of the general tension of the effort. Similarly, it is no in the sense of the pose to press the hands against the back of the head from the palmar flexors of the wrists.
- Of course, the intensive work of the hamstrings to lift the legs creates a certain amount of flexion in the knee joint, even if this is somewhat smaller due to the gravitational effect of the lower legs, which wants to stretch the knee joint. Nevertheless, stretch the knee joints with the strength of the quadriceps. If there is a brief tendency to cramp in the rectus femoris at the beginning, this should soon disappear as the legs continue to swing upwards.
- As in a normal headstand, it is easier and above all more stable to push the elbows away from each other than towards each other. The elbows are pushed apart anyway, especially during the upswing without great kinetic forces, when the upper arms are slightly slanted outwards. Support this movement with the lateral abductors of the shoulder joint.
- Of course, it is even more important here than in the one-legged upswing to ensure that the elbows cannot slip sideways by choosing a suitable non-slip surface.
- The elbows must not be relieved at any time, on the one hand to ensure a stable stance at all times, but above all because the weight that the elbows do not transfer to the floor rests on the head and – with a slight hyperlordosis of the neck in headstand anyway, increased by the shift of the pelvis towards the wall – on the neck.
- If the slow and controlled two-legged upswing is perceived as difficult or hard, the pose can first be taken by jumping with one leg, in a certain analogy to handstand, after which both legs are slowly lowered towards the floor with the back stretched. Sooner or later, one of the parameters will become borderline. Either the strength of the back and shoulder muscles is no longer sufficient to lower the legs further, in which case you can try to push the gravity perpendicular a little further away from the elbows. Or the flexibility of the hamstrings sets the limit for further movement of the legs. In this case, you can first try to increase the flexion angle of the hip joints beyond the gravitational effect of the legs by applying force to the hip flexors. If this is also exhausted, further movement of the legs towards the floor would force the lumbar spine out of the physiological lordosis, first into a steep position and then into a kyphosis. This is a good way of approaching the two-legged up and down swing, both in terms of the necessary body awareness and the strength to be developed. The analogy to handstand is limited by the fact that it is usually performed in a swinging, jumping manner, i.e. almost in the opposite way. The downswing also serves to facilitate the following two-legged upswing – at least psychommentally – whereas in the headstand, both the upswing and the exit from the pose should take place without momentum.
- The two-legged upswing can also be performed in a straddle position, for example from a prasarita padottanasana. This is easier because the change in centre of gravity is smaller and less strength is required from the hip extensors and the autochthonous back muscles. As the abduction capacity of the hip joints without flexion is lower than in wide flexion, the legs will come a little closer to each other on the way up, but without the abduction no longer being easily recognisable as such. It must then be cancelled in order to assume a complete headstand.
Three-point
Effects:
(423) Tone of the finger flexors
(232) Strength for frontal abduction
(352) Strengthening of the palmar flexors
(411) Stretching for dorsiflexion in the wrist
(421) Stretching of the finger flexors
Instructions
- Fold one mat in half twice so that you have four layers of the same size on top of each other.
- Kneel on the floor. Place your head in the middle of the rear long edge of the mat and slide your hands under the front edge on the left and right.
- Use a lot of strength in your arms (triceps) and shoulders (deltoids) to press your hands to the floor and take a kind of downface dog.
- Walk your feet closer to your head, if possible until the gravity perpendicular is in a triangle between your hands and your head, stretching your upper body as far as possible.
- Swing up into a headstand with one leg as described in the basic headstand or with both legs synchronously, powerfully and slowly as described in the two-legged upswing.
Details
- Here, too, the arms are very important for stabilization and, once again, the triceps and deltoids must be used to exert significant force, although the upper arms are at a different angle in the shoulder joint, which many people find more comfortable and in which the deltoids are less prone to cramping. External rotation of the upper arms is slightly increased, but the angle in the elbow joint is more favorable for the development of strength in the triceps. If the flexibility of the shoulder joint is significantly restricted in the direction of frontal abduction, this variation may be perceived as less strenuous than the standard headstand, which means that the relief provided by the reduced frontal abduction outweighs the aggravation caused by the greater external rotation of the arms.
- The pose becomes more stable if the hands are pushed away from the head in the direction of the field of vision rather than in the opposite direction. The triceps will usually have to work noticeably for a long time. In contrast to the normal headstand, the arms are not pushed outwards significantly here. This can optionally be integrated as additional work.
- Since, in contrast to the basic pose, the head is not clearly within the physical support base but on the edge of it, and only three instead of four points bear the load, one of which is the head itself, this pose places much greater demands on the cervical spine. If you have any doubts about your health, this variant should not be practiced until further notice. By design, almost 100% of the body weight rests on the head. There is hardly any possibility of relieving the weight with the arms to any significant extent, as is possible in the basic pose with infinitely variable relief between 0 and 100%. For example, to relieve the weight, the body would have to be tilted with the legs, or the legs alone would have to be tilted away from the vertical in the direction of the hands, which would result in greater force being required on the arms and a significant additional load on the neck due to moments that push the shoulder area and head away from the hands.
- The hands should press flat on the floor with even pressure distribution. Restrictions in the flexibility of the palmar flexors of the wrist and especially the finger flexors can have a significant disruptive effect here. Wrist support for angular relief in the dorsal wrist, such as that used in handstand or upface dog, must be handled much more carefully here. After all, the well-being of the cervical spine depends on uniformly strong pressure on the floor, especially from the wrists, as they or the carpus bear by far the greatest proportion of the weight with which the hands press on the floor. This is all the more true if the palmar flexors of the wrist and the finger flexors do not have particularly great strength endurance. If the surface is too thick and too soft, balancing becomes less safe with a significantly increased risk to the cervical spine!
- Adjust your pose by slowly changing the amount of force applied so that you can react sensitively and in good time to the changing force ratios and avoid putting your cervical spine at risk.
- The shoulder blades should remain stable in depression (moving towards the pelvis), which is usually achieved automatically by pressing the elbows (in this case the hands) against the floor. To keep this as constant as possible, the shoulder blades must be permanently depressed with a certain amount of force.
- Signs of fatigue in the deltoids, triceps, finger flexors or the palmar flexors of the forearms can force you to abandon the pose or suggest that you do so. Before control becomes too poor due to lack of strength and the cervical spine is endangered, the pose should be left in an orderly fashion. If the pose is left exactly as it was taken, a lot of strength is required again for a short time. Alternatively, one leg can be swung towards the floor and at the same time the head can be relieved using the strength of the arms and shoulders so that the cervical spine is not endangered when the legs hit the floor.
- This variation allows you to stand as lightly as possible as far as the upper body is concerned. When standing calmly, there are hardly any forces and moments coming from either limb that affect the upper body, so that very little work is required from the trunk muscles. The situation is of course completely different when standing unsteadily, as the legs not only have a large mass but also represent a long lever arm. When taking this pose, always bear in mind that the legs and torso represent a lever that is tens or hundreds of times greater in mass and length than the cervical spine in the product and that, if it is not controlled, will act on the cervical spine!
- Restricted flexibility of the hip flexors may make it impossible to maintain an extended angle in the hip joints and therefore a simultaneous vertical position of the legs and upper body. If the trunk is vertical and the legs are at an angle, the pose becomes significantly more strenuous in the arms and shoulders. Furthermore, the demands on the cervical spine are greater. If an attempt is made to keep the legs vertical, the upper body must tilt accordingly, resulting in an undesirable, inadvisable hyperlordosis of the cervical spine.
- Balancing from the upper extremity has significantly different parameters to the normal headstand. Although the external rotation of the upper arms in the shoulder joints is even greater, there is significantly less frontal abduction, which in total noticeably reduces the flexibility required in this area. If there is also sufficient strength in the upper extremity, the three-point headstand can therefore be perceived as easier; In less strong people, the opposite is likely to be the case. In terms of support with the upper limb, the hands and not the elbows press on the floor here, which involves the elbow joint and the muscles that work there. If these are less strong, the three-point headstand will be perceived as significantly more strenuous. On the other hand, in one case the pressure is exerted with the olecranon, in the other case mainly with the carpus, so the radiocarpal joint (wrist) is also involved. In tripod headstand, the hand is on the floor instead of on the mat like the elbow in the standard headstand. These differences can have different effects on the individual.
- There is no way to relieve the head and neck, as there is in the standard headstand with the shifting of the gravity perpendicular towards the connecting line of the elbows, in the tripod headstand by design.
- To make it clear once again: this is not a variation for beginners. If you have not learned how to handle your body weight with upper limb (arm) strength in the dog poses and simpler inversion poses, you should learn this first before entrusting your cervical spine to your arms. First learn downface dog, upface dog and staff pose, handstand and rectangular handstand, then the standard headstand and only then the tripod headstand.
one-legged upswing

instructions
- The one-legged upswing is described in the basic position. However, this should also be practiced with the other leg as a swinging or jumping leg and be successful.
details
- Even more pronounced in the handstand than in the headstand, the differences between the control of the two sides of the body often mean that the upswing is successful with one leg as the swinging leg, but not with the other. However, this is even more pronounced in the handstand than in the headstand, as there the body mass has to be accelerated further upwards, i.e. more force has to be exerted. This should be practiced in both poses until the other, unfamiliar side is also familiar and without internal (psychological) resistance.
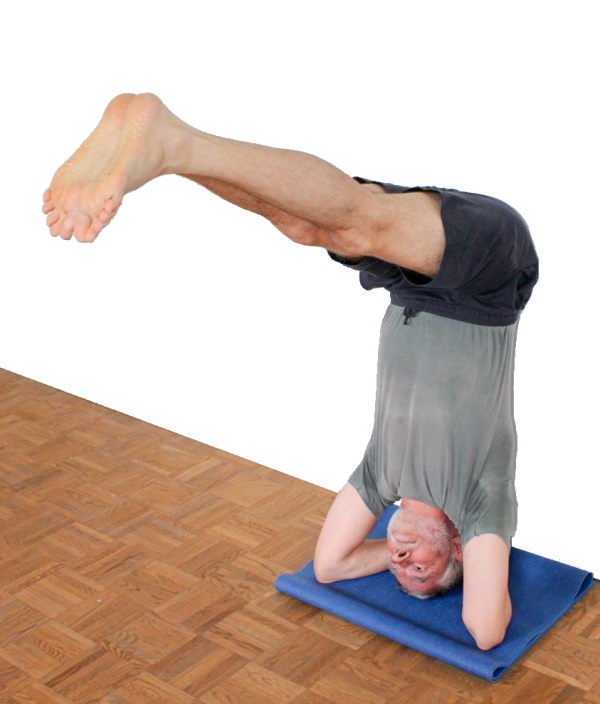
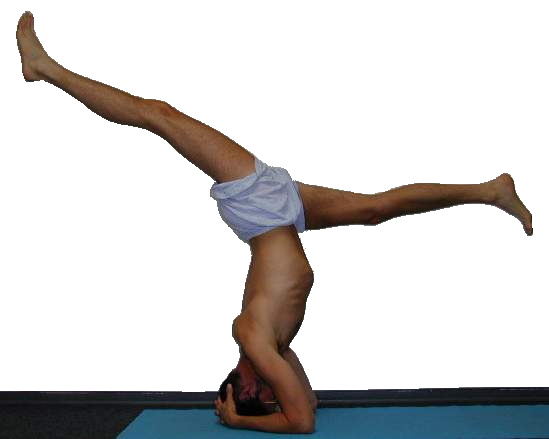
eka pada
Effects: (721) Stretching of the hamstrings
instructions
- Come into a one-legged or two-legged headstand.
- Begin to move the right leg out of the vertical and into the field of vision.
- To keep the gravity perpendicular in a favorable position, only move your pelvis backwards as far as necessary and lower your leg as far as possible.
details
- In the eka pada variation a similar effect occurs as in the upswing: the pelvis must be shifted slightly away from the elbows out of the field of vision so that the center of gravity remains favorable. This shift must increase, approximately to the extent required when the legs are horizontal. Of course, there is a certain amount of leeway here and it is more a question of how strenuous the pose may, can or should be. If the leg moves beyond the horizontal towards the floor, the need to shift the pelvis decreases again with each degree.
- As the leg sinks further towards the horizontal, the work of the deltoids may have to increase. The increase depends on the extent to which the pelvis is moved backwards: the more the one, the less the other. If powerful work is desired, i.e. a strengthening effect on the muscles involved, particularly in the back and shoulder (deltoids), the backward movement of the pelvis should be kept to a minimum.
- With very good flexibility of the hamstrings and sufficient flexibility of the monoarticular hip extensors, the quadriceps rests on the lower ribs.
- Due to the traction of the hamstrings (the more restricted the flexibility, the earlier and more), the lowered leg has a tendency to bend in the knee joint. If the lowered leg is forcefully extended to prevent the knee joint from bending, there is naturally a certain tendency to cramp in the rectus femoris as the hip joint is also flexed or is actively flexed further.
- This pose can be performed in two different ways: by simply letting the leg sink from its gravitational effect until the state of equilibrium between gravity and traction of the hamstrings is reached and, on the other hand, as active flexion in the hip joint that goes beyond this, in which the tendency to cramp in the rectus femoris described above can occur more or less clearly.
- The sinking leg exerts a tilting effect on the pelvis, which tends to arch the back. However, as long as the heel of the upper straight leg rests on the wall, the flexibility restrictions of the hip flexors mostly will mean that no significant flexion of the lumbar spine occurs, especially if these are still quite pronounced. Nevertheless, the autochthonous back muscles will need to work harder to keep the back straight.
- For lowering or letting the leg sink, there may be a point of no return, depending heavily on the exact position of the pelvis, from which the gravity perpendicular no longer rests in the physical support base of the elbows and wrists and the pose is inevitably left in the direction from which it was taken. However, thanks to the incomparably larger (here: deeper, in the sense of the distance between the line connecting the wrists and the elbows) base of support, this effect is significantly less pronounced than in the eka pada version of handstand.
- This variation is also excellent for strengthening the shoulder muscles if the pelvis is moved only slightly backwards to compensate, i.e. the gravity perpendicular is moved significantly further towards the elbows by lowering the leg.
- The eka-pada variant can be performed leaning or free. In the leaning case, the weight of the heel on the wall when the leg is lowered shows how far away the pose is from the point of no return.
parsva
instructions
- Take the pose as described above, but then turn the upper body in relation to the fixed head and arms and tilt the hip joints into extension with a simultaneous slight backbend in the upper body, as long as the pose remains statically stable.
details
- This is somewhat analogous to the parsva variation of the shoulder stand. As there, the tilt of the upper body is limited by the requirement that the gravity perpendicular must lie in the physical base of support so that the pose remains statically stable. As in the according variant of shoulder stand, the pressure on one elbow is also very high here. Nevertheless, the compressibility of the base must not be increased arbitrarily so that stability is not compromised. This variant goes significantly further than the twist variant by shifting the gravity perpendicular as far as possible in the direction of an elbow.
- The use of the glutes is also important here so that the lumbar spine region is not exposed to inadequate forces. The strength to hold the upper body must come from the side of the body due to the rotation of the upper body, not so much from the rectus abdominis as in the free backbend or in the parsva variation of shoulder stand, but from the oblique abdominal muscles. The movement of the upper body is not lateral-dorsal, as in the parsva variant of shoulder stand, but lateral-ventral. A dorsal movement would relieve the elbows to such an extent that the pose would hardly be stable, with the result that the cervical spine could be put at risk.
- Be careful not to take too much weight off the contralateral elbow, especially not so much that it can slip due to lack of friction.
- As the twist is created without using a limb, parivrtta tadasana is a good preliminary exercise in which this is the same.
Push your elbow outwards

instructions
- Take the pose as described above, but additionally press your elbows outwards with force against the friction of the mat.
details
- As described above, the elbows are pushed slightly apart in accordance with the design of the pose. This naturally stabilizes the pose. This can also be forced in order to strengthen the abductors of the shoulder joint more.
- Of course, the quality of the mat plays a major role here. Standard yoga mats should offer sufficient friction to prevent the elbows from slipping. Materials with less friction are not recommended, at least if no belt is used around the forearms near the elbows.
Push your elbow inwards

instructions
- Take headstand as described above, but press your elbows inwards, towards each other.
details
- After building up headstand with elbows on the floor and slightly slanted upper arms, the elbows would be pressed slightly apart. The opposite is done here. This results in work on the external rotators and adductors of the shoulder joint. This is generally best felt in the pectoralis major and the deltoideus pars clavicularis. The stability of the pose appears to be slightly reduced in terms of lateral balancing. So pay even more attention to working with both arms evenly. This variation emphasizes the aspect of stretching upwards.
free
Instructions
- Once again, there are two important ways to take headstand: slowly and powerfully on both legs or with momentum on one leg. For the first, see the corresponding instructions above. The second is also possible without touching the wall if you have sufficient body awareness and sense of balance, or as a leaning headstand that is detached from the wall. Again, there are two options: to release both legs from the wall at the same time or one after the other. The second option seems easier because it is less strenuous. However, it makes sense to release both legs simultaneously from the wall, as described below. The remaining „one after the other“ option will now be explained:
- Take the leaning headstand.
- Move your upper body and pelvis into a vertical position and move one leg a little away from the wall so that the two legs are at approximately the same angle to the vertical and form a symmetrical Y with your upper body when viewed from the side.
- If the legs are at the same angle to the vertical, the weight of the heel on the wall is minimal.
- Quickly move both legs simultaneously from their current position to a vertical position.
Details
- The leaning headstand requires far fewer muscles to remain stable. For free standing, it is therefore necessary to be prepared for the work required and to release the necessary strength immediately.
- The free standing method described here is not the most promising model, as it does not convey any additional sense of balancing and the necessary use of strength and does not train the muscles in question. Not only does it make you more aware of the muscles to be used, especially in the front of the body, which is rarely used and trained in everyday movements and is therefore less strong and aware of movement, it is also suitable for strengthening these muscles. In addition to the hip flexors, this is primarily the rectus abdominis.
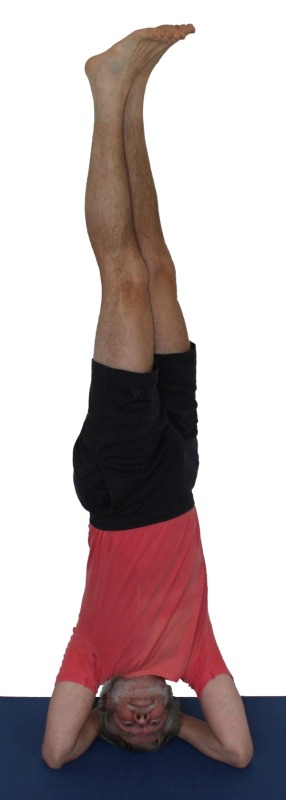
Learn to stand freely
Detail photos
instructions
- Do headstand leaning against the wall as described above.
- During the following stretch your legs without fail, i.e. do not bend either knee joint even slightly; keep your legs completely closed, i.e. do not move one leg without moving the other to the same extent at the same time.
- Move the pelvis away from the wall as far as possible, in any case further than over the shoulders. Continue to pay attention to the extension of the knee joints.
- Bring strength into the hip flexors and rectus abdominis to move the legs slowly and closed away from the wall without any momentum, using only strength.
- If the legs move in a vertical direction, steer the pelvis in the opposite direction so that the gravity perpendicular remains in the base of support and close to the head.
details
- This variation makes it clear which muscles are needed for the more unusual direction of balancing. In countless everyday movements, people bend forwards, but extremely rarely backwards. This is why the autochthonous back muscles and the hip extensors (hamstrings, glutes) are generally strong enough for balancing and, above all, conscious enough of their use, but the front of the body is very poorly equipped for this. This means that the work of balancing, which pulls the legs out of the field of vision, is usually quite easy, but the counter-movement is rather difficult. This variant attempts to convey precisely this. If the corresponding musculature is not well developed, it is or seems impossible at first to detach the legs from the wall closed and without momentum and attempts are made to move the legs individually or the knees are bent to reduce the load in the front of the body.
- Anyone trying this variation for the first time may feel that they cannot find the muscles that are supposed to perform the movement or that they do not have enough strength for the movement. Although this variation is not primarily intended to develop this strength and is only suitable for this to a limited extent, it should clearly show what needs to be found and possibly how difficult or heavy the movement still is. It is often observed how the attempt to pull the feet off the wall results in the feet leaving the wall for only a fraction of a second, which is then immediately nullified by the prevailing forces. It then becomes clear that some strength is still required from the hip flexors, abdominal muscles or the muscles stabilizing the trunk and arms.
- Any deviation from closed, simultaneously and evenly moving legs with fully extended knee joints is a form of evasion. If necessary, the feet should be tied together at the ankles with a belt, which requires the two-legged swing up into headstand.
- To avoid discomfort or the build-up of too much tension in the muscles of the lower back, the glutes must of course also ensure maximum extension in the hip joints. The work of the glutes should only be reduced to the extent that it is necessary to pull the legs away from the wall using the strength of the hip flexors.
- To support the extension of the knee joint, the heels are stretched away. Physiologically, this is illogical according to the function of the gastrocnemius and would be expected the other way around, but subjectively in practice it behaves as described, possibly because the position of the foot is much closer to standard anatomical position and thus to minimal tension of the relevant muscles, which draws attention away from the foot.
- Arms and shoulders have to work hard all the time to ensure stability and protect the neck.
- A strong sensation of effort in the rectus abdominis is a sign that the work to be done has been found (at least partially), but that the level of training of the muscles is not yet sufficient.
- With the initial movement of the pelvis away from the wall, the upper body naturally also moves away from the vertical.
hanumanasana in headstand
Instructions
- Take the free headstand at an appropriate distance from the wall as described above.
- Simultaneously lower one leg forwards into the field of vision and the other backwards, out of the field of vision, without turning the legs or bending them at the knee joint.
- Once the legs are horizontal, hanumanasana in sirsasana is taken.
Details
- In contrast to samakonasana in headstand, hanumanasana requires a fairly large distance from the wall, which means standing freely anyway. This is therefore a prerequisite for this variation.
- In this variation, the legs sink almost exclusively under their own gravity. The hipflexors can still be used to bend the hip joint of the leg moving forwards in order to move it further downwards beyond the effect of gravity, but the hip extensors can no longer do much for the other leg. As a result, it is more difficult to reach the exact 180° angle than when the large partial body weight of the upper body, head and arms pushes the legs into the position as in hanumanasana itself. Even more than for the normal forward splits, intensive preparation is required here, on the one hand for the hamstrings, e.g:
- uttanasana with its many variations
- downface dog in the close variation
- hip opener 5
- parsva upavista konasana
- parsvottanasana
- krouncasana
- supta krouncasana
- hasta padangusthasana forward bend
- tryangamukhaikapada pascimottanasana
- downface dog backwards against the wall with one leg lifted and on the other side the hip flexors, among others:
- In the front leg, the pull of the hamstrings easily causes the knee to bend, although the weight of the lower leg causes an extension moment in the knee joint, while in the back leg it has to be extended against gravity. In the same way, rotational inclinations of the legs can easily occur, which must be compensated for. These are caused by the medially located lesser trochanter as the attachment point of the hip flexors in the rear leg and the external rotation moment in the hip joint, which is caused by the outer hamstrings (i.e. the biceps femoris), which is usually stronger than the inner hamstrings, plus the tension of the gluteus maximus.
- Due to the favorable mass distribution, this headstand variant is quite stable.
- Since hip extension is available to a much lesser extent than hip flexion, the pelvis tends to tilt backwards. The sum of hip flexion and hip extension must result in 180°, but these cannot be equally distributed between hip flexion and hip extension, hip flexion will always contribute the far greater part to the sum of 180°. Stabilize the pelvis accordingly and avoid an uncomfortable hollow back as much as possible.
- In addition to flexion of both knee joints, external rotation and abduction in the hip joint are the main evasive movements that need to be limited. It is also not uncommon to see rotation in the lumbar spine.
wag your legs

Instructions
- Perform the variation described above to learn how to stand freely.
- Keep your legs strictly straight and your feet closed. Move your legs alternately forwards and backwards so that the gravity perpendicular remains favorable, and steer in the opposite direction with your pelvis to compensate.
Details
- The waggle must be stabilized by applying good pressure from the elbows to the ground so that the shoulder area and consequently the cervical spine and head move as little as possible.
- If the wagging is mastered, a pronounced wagging movement can develop, which leaves the gravity perpendicular roughly unchanged despite all the movement with its clear kinetic forces and is therefore very stable. The pelvis does not remain completely rigid but follows the inclination of the legs in the opposite direction, changing position slightly to the opposite side: if the legs move forwards, the pelvis must move backwards, if the legs move backwards, the pelvis must move forwards. This movement is limited to a certain extent by restrictions in the flexibility of the hip flexors.
- Mastering the waggle shows that both directions of balancing can be achieved with confidence (forwards and backwards), including the more difficult one: pulling the legs forwards again from a position that is too far back.
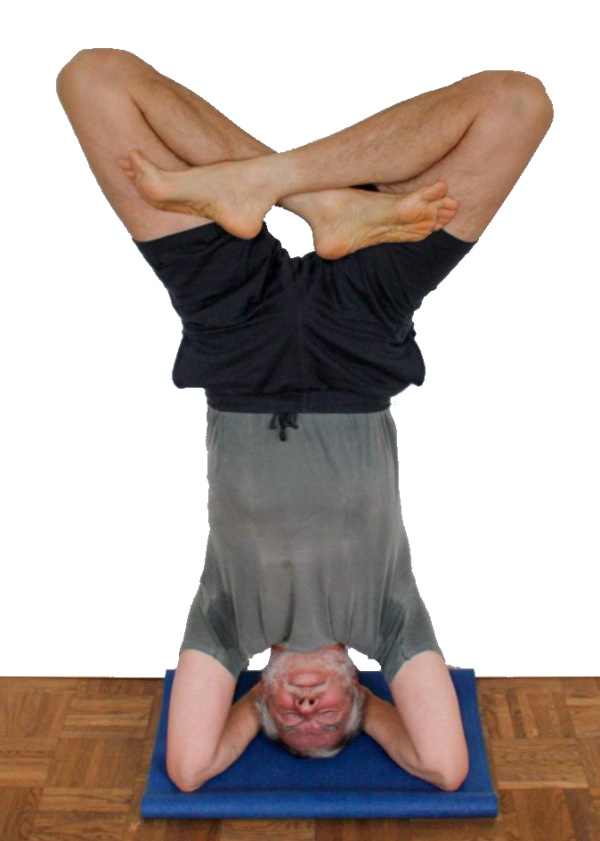
padmasana in headstand
Instructions
- Padmasana in sirsasana can be performed in both free and leaning headstand. The easier version, analogous to the leaning handstand, is described here:
- Do headstand leaning as usual.
- Press one heel more firmly onto the wall and lift the other off the wall.
- Start to bend the leg that has been released from the wall, abduct it a little, bend it at the hip joint and turn it out, aiming for the opposite groin with the back of the foot and then take this position with momentum.
- Place your bottom on the wall and perform the same movement with the second leg as with the first, with the second lower leg crossing the first.
- Bring both legs into a horizontal position.
Details
- Most of the instructions and details are analogous to padmasana in handstand and have already been described there. Here again:
- This pose is not entirely elementary. The prerequisite is not only that padmasana is possible, but also that it is easy to take, as the two hands are not available to bring the legs into the corresponding position. Instead, the combination of the effect of gravity (in this pose, unlike in normal lotus, the force of gravity eases taking the pose) and the swinging movement must be sufficient. It is helpful to perform the swinging movement of the two legs not in 90° flexion in the hip joints but at a significantly lower flexion angle, i.e. when the legs are still slightly closer to the wall. Of course, the sartorius is the muscle that performs precisely this movement, which is where its name „sartorius muscle“ comes from, but it is supported by synergistic muscles for all movement components, some of which – if we think of knee flexion, for example – work with a very short sarcomere length and therefore active insufficiency, i.e. close to a tendency to cramp, which is why the movement should be performed with momentum.
- As always with lotus-like postures, pain can occur in the knee joint. It is difficult to predict whether it will be greater or less than in normal lotus. On the one hand, there is no gravitational effect of the leg on the inner knee, and on the other hand, the hands are not available to turn out each leg vigorously.
- In most headstand variations with the buttocks resting on the wall, there is a hollow back. However, this is less pronounced here because the gravity of the legs creates a moment in the hip joints that counteracts this.
- The easiest way to exit the pose is to abduct one of the two legs further, which releases the foot from the interlock and allows both legs to move freely again. After one leg has been stretched upwards, the corresponding heel is pressed onto the wall (leaned variant) and stretched in the corresponding hip joint to release the buttocks from the wall. It is IMPERATIVE to release the interlocking of the legs before leaving the pose. A rough landing on the crossed knees would result in injury!
- If not enough momentum is taken and therefore an attempt is made to bend the knee joint further with the strength of the hamstrings in order to get the foot in position, a tendency to cramp easily occurs in the hamstrings in the back of the leg, which works in a very short sarcomere length.
- In contrast to leaning handstand, in which the buttocks are first brought up onto the wall before the padmasana leg position is built up from this, it is much easier to build this up freely in headstand. Nevertheless, the swinging movements of the legs must not cause headstand to become unstable.
supta padmasana in headstand
Instructions
- Do padmasana in headstand as described above.
- Stretch your hips and move your legs away from your upper body until they come to rest on the wall as best as possible.
- Press your knees so hard against the wall that your bottom lifts off the wall and your hips are stretched as far as possible with the flexibility you have.
Details
- This variation can be performed free or with knees or buttocks on the wall. If the hip flexors are not particularly flexible, it will generally not be possible to place only the knees, but not the buttocks, on the wall. On the contrary, the buttocks will touch down on the wall first and then the knees as mobility improves. Later, it will then be possible to place only the knees on the wall.
- Most of the instructions and details are analogous to supta padmasana in handstand and have already been described there. Here again:
- If the pose is maintained for a longer period of time and a certain amount of force is used to press the knees against the wall and keep the pelvis away from the wall, the glutes or other parts of the muscular abduction apparatus may become tense. The tractus iliotibialis with the tensor fasciae latae are likely to be particularly affected.
- The easiest way to exit the pose is to abduct one of the two legs further, which releases the foot from the interlock and allows both legs to move freely again. After one leg has been stretched upwards, the corresponding heel is pressed onto the wall and stretched in the corresponding hip joint to release the buttocks from the wall. It is IMPERATIVE to release the interlocking of the legs before leaving the pose. A rough landing on the crossed knees would result in injury.
padmasana Forward bend in headstand
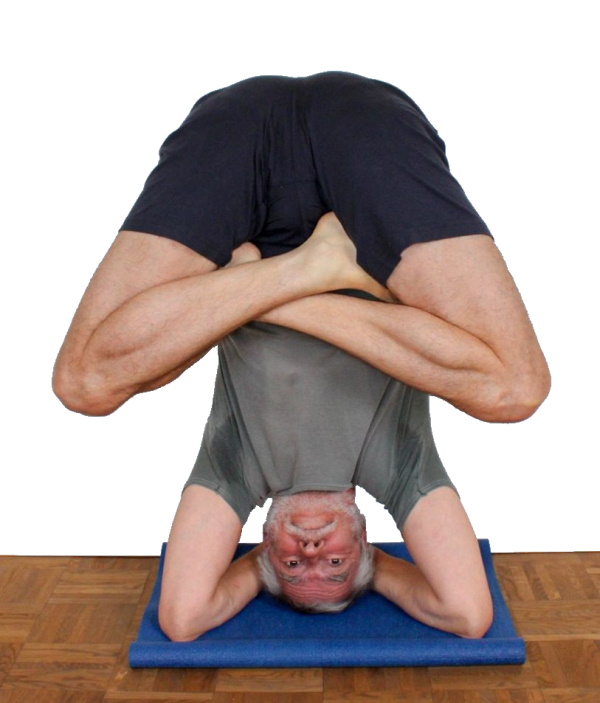
instructions
- Do padmasana in headstand as described above.
- Move both thighs as far as possible towards your chest.
details
- Most of the instructions and details are analogous to padmasana forward bend in handstand and have already been described there. Here again:
- When performing the forward bend, the bottom may slide up a little on the wall and the lumbar spine will start to become convex. However, this is generally not a problem.
- As the legs move towards the upper body under gravity, there is no tendency to cramp, which could otherwise occur, especially in the Sartorius. The main limiting factor for the movement of the legs towards the upper body is probably the flexibility of the glutes.
- All comments on knee problems in lotus-like poses also apply here, but the pain may be slightly less severe.
- The easiest way to exit the pose is to abduct one of the two legs further, which releases the foot from the interlock and allows both legs to move freely again. After one leg has been stretched upwards, the corresponding heel is pressed onto the wall and stretched in the corresponding hip joint to release the buttocks from the wall. It is IMPERATIVE to release the interlocking of the legs before leaving the pose. A rough landing on the crossed knees would result in injury.
samakonasana in headstand
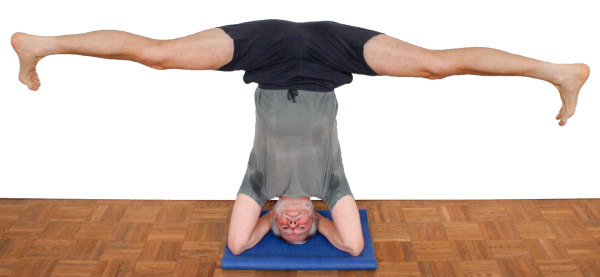
instructions
- This variant can also be leaned on or performed freely. The free variant is described here:
- Take the free headstand as described above.
- Turn both thighs out as far as possible at the hip joints.
- Bend at the hips joints to lower the legs beside the body. Pull them backwards out of the field of vision.
details
- In principle, samakonasana can also be taken differently in sirsasana, e.g. from the rectangular headstand by slowly increasing the angle between the legs from 0° to 180°. However, the gravity perpendicular of the body changes significantly towards the back (out of the field of vision), so that significant adjustments are required. In addition, significantly more strength is required in the shoulders (deltoids) and back to be able to take and maintain the rectangular headstand with a straight back. In addition, the gravity perpendicular shifts sideways if the legs are not moved outwards synchronously. The variation described attempts to reduce the requirements.
- If the legs are moved in the horizontal direction, they will move more or less clearly into the field of vision due to restrictions in the flexibility of the adductors, so certain adjustments are also necessary here, primarily a temporary increase in pressure on the elbows and then a small movement of the pelvis backwards, out of the field of vision.
- The legs should sink to a horizontal position. Depending on the flexibility of the hamstrings, it may not be possible to reach the horizontal position or it may be possible to fall below it. As the hamstrings determines the limit to which the legs can sink, this results in a certain amount of flexion of the knee joint, especially with less flexibility. If the knee joints are extended with the help of the quadriceps, the tendency to cramp in the rectus femoris, which is otherwise so common with simultaneous flexion in the hip joint, is not so pronounced here, as the extension of the knee joints is supported by the gravity of the lower legs and the hip flexion does not occur against gravity.
- Make sure to turn your legs so that the midlines of your feet are pointing downwards.
Twist
Instructions
- Take free headstand as described above.
- Keep the legs closed and stretched and in particular the hip joints stretched. Turn your upper body with your pelvis and legs as far to the right as possible.
Details
- The twisting movement often causes unwanted flexion in the hip joints. Keep the extensors of the hip joint (especially the back of the leg and the glutes) working so that the hip joints remain extended. Also make sure that the legs do not tilt to the side.
- The feet remain closed, so the stretched, closed legs are turned with the entire pelvis, the legs themselves are not turned at all.
- Most of the rotation comes from the lumbar spine and thoracic spine. The shoulders, neck and head should remain still. Nevertheless, you will still feel a change in the balance of forces, especially in the shoulders.
- Make sure to keep the upper body vertical. There may be a tendency to lower the upper body slightly from the vertical, i.e. to lower the upper body in relation to the arms due to a perceived change in the force ratios in the shoulders or reaching the limit of flexibility in a shoulder joint in terms of frontal abduction. Therefore, continue to move the lower ribs upwards and backwards (out of the field of vision).
- The muscles involved are mainly the oblique abdominal muscles Mm. obliqui externi abdomini / Mm. obliqui interni abdomini and parts of the autochthonous back muscles.
- Keep enough weight on both elbows, the rotation usually makes one elbow lighter and can therefore slip away.
Twist leaned on the wall
Instructions
- Do the free headstand as described above.
- Keep your legs closed and stretched and in particular your hip joints stretched.
- Extend the right leg by approx. 90° in the hip joint to place the outer edge of the foot on the wall. The position of the heel remains roughly unchanged.
- Turn your upper body with your pelvis and left leg as far to the right as possible.
- Place the inside edge of the left foot on the inside edge of the right foot.
Details
- This variation achieves roughly the same position as the free twist, but with the feet leaning against the wall, which provides a little more security for the less experienced. With the instructions described, contact with the wall is never lost, so that the performer can feel safe at all times. Nevertheless, care must be taken to ensure that the first foot does not slip on the wall. In particular, it must not slip dorsally.
supta virasana in headstand
Effects: (811) Stretching the quadriceps
Instructions
- Take free headstand as described above with some distance to the wall.
- Fold the legs under one after the other as for supta virasana.
Details
- The legs must be bent with a little momentum so that the hamstrings does not cramp. The legs are turned in a little to turn under.
- The distance from the wall is an important parameter; if it is too small, cramps often occur in the hamstrings, either when taking the pose or when trying to bend the knee joint further in the pose so that the pelvis can be moved closer to the wall, maybe also when pushing the knees more firmly onto the wall..
- It is not actually a supta virasana in headstand, but rather a very narrow ustrasana, as the knee joints do not bend to the maximum, but instead perform an extension movement from a very wide bend as far as the statics and hip flexibility allow.
- It is essential that the knees, not the feet, are pressed against the wall. If only the feet press on the wall instead of the knees, the pose is much less stable: not only are the supporting points much lower, but this is also much less stable due to the possible movements in the ankle joint. In addition, there is still a lot of unsupported body mass above the supporting points, namely the thighs and lower legs.
vrksasana in headstand
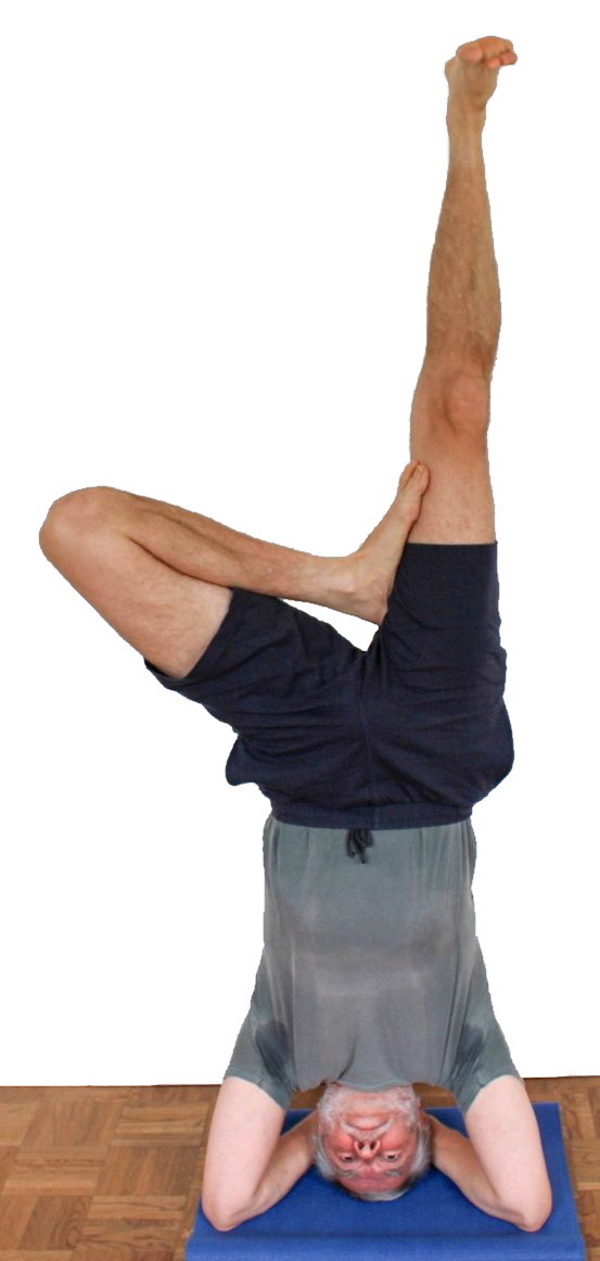
Instructions
- Like some other variations, vrksasana in sirsasana can be practiced both free and leaning. The free variation is described here:
- Take free headstand as described above.
- Bend in the right hip joint and in the right knee joint to bring the corresponding foot closer to the pelvis, turning the leg out (as far as possible) at the hip joint.
- As soon as it reaches it, move the sole of the foot on the inner thigh towards the pelvis. If it reaches the pelvis or the flexibility restrictions of the quadriceps do not allow any further flexion in the knee joint, move the knee joint of the flexed leg backwards again.
- Check the alignment of the pelvis again.
Details
- Flexion of the knee joint is usually limited by the tension of the quadriceps. For this reason, the knee cannot usually be fully bent. While a hand is available in vrksasana to bring the foot into position, it is not available here. Instead, gravity at least works to bend the knee joint, which is a much smaller effect than can be exerted by the upper limb. If an attempt is made to use the knee-flexing hamstrings to achieve a flexion of the knee joint that goes beyond the effect of gravity, this can lead to cramping.
- The movement of the knee backwards out of the field of vision is limited by the pull of the adductors. As a rule, it cannot be expected that the bent leg can be brought into the same plane as the upper body. The abductors of the hip joint, i.e. mainly the glutes, are responsible for this movement. In most cases, however, although they work at a very short sarcomere length, i.e. close to active insufficiency, a cramp does not necessarily occur quickly. Make sure that the movement of the leg does not move the pelvis in the same direction, but keep it motionless.
- Bending the leg sideways involves a slight shift in the center of gravity, but this is not critical for stability as the physical support base is quite wide.
- The manual external rotation of the leg that typically is undertaken when taking baddha konasana-like poses must be omitted here, as must the manual positioning of the foot. The strength of the external rotators is exhausted at this angle of rotation, certainly partly due to very short sarcomere length caused by almost active insufficiency, so that the antagonists opposing further rotation become overpowering in this respect. As a result, in terms of rotation the pose must lag well behind the poses in which manual intervention is possible. Fortunately, this is not quite so important for the protection of the medial menisci here because the forces with which the knee joint is flexed are also significantly lower.
krouncasana in headstand
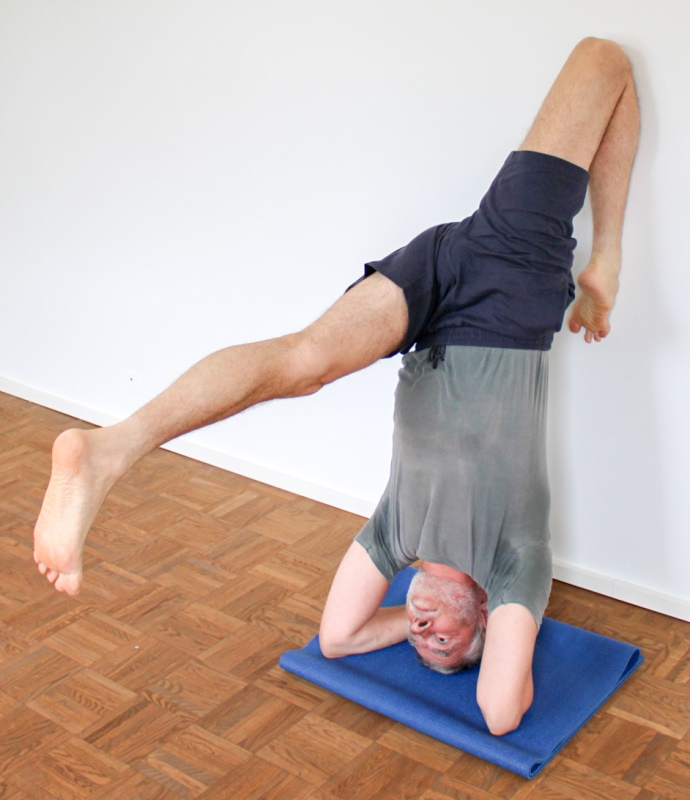
Effects:
(811) Stretching the quadriceps
(816) Stretching the rectus femoris
Instructions
- Choose a greater distance from the wall than usual for the leaning headstand and adopt it as described above.
- Take the right heel off the wall, turn the leg in slightly, bend the hip joint and knee joint and place the leg on the wall as for supta virasana.
- Press the knee of the lower leg onto the wall and work with the hip extensors (especially the glutes) to avoid falling into a hollow back.
- Release the other heel from the wall and move the outstretched leg as far as possible towards the floor or your upper body.
Details
- The distance from the wall is an important parameter: if it is too small, it is very easy for a cramp to occur in the hamstrings when trying to actively bend the leg in order to be able to fold it under. If the distance is set too large, the hip extension is often no longer sufficient to be able to press the knee onto the wall with the pelvis vertical, or it only just works when the other leg is still leaning, but is lost as soon as it is lowered. The pose would then become much more unstable.
- Depending on how you look at it, this variation corresponds to a krouncasana or supta krouncasana leg pose, only with a much more favorable gravitational effect on the leg whose hamstrings is being stretched. It is well known that this stretch is not the only interesting aspect of the pose; there is also a sometimes very intense stretch in the rectus femoris of the folded leg.
- When the flexed knee joint rests on the wall, it often tends to detach slightly from the wall due to flexibility restrictions of the hip flexors and the tension of its quadriceps, and it also tends to move outwards, especially if it rests on the wall with very little pressure. Finally, since the hip flexors located in the pelvis attach to the inner thigh, the same leg tends to turn out. It is therefore important to use the hip extensors (mainly the glutes here, the hamstrings would quickly cramp) to press the knee of the lower leg onto the wall in order to limit the deviation through friction.
- Depending on the distance chosen, there is a point of no return at which you fall out of the pose because the gravitational effect of the lowered leg shifts the gravity perpendicular beyond the elbows as seen from the wall. If the stretching effect of the back of the outstretched leg and the rectus femoris of the leg on the wall is still too small, you should practise at a slightly greater distance.
- This pose is not a beginner’s variation. Depending on your flexibility, you may not yet be able to take it, mainly because the bending of the leg to be placed on the wall is not yet sufficient and therefore the knee does not reach the wall.
- Depending on individual flexibility, the stretch is felt more in the back of the lowered leg (hamstrings) or in the front of the thigh of the lowered leg, or even somewhat equally in both, as is known from supta krouncasana.
- An uncomfortable hollow back should not occur. Although one leg is a supta virasana leg and therefore tends to create a hollow back, the other leg pulls the pelvis in the opposite direction with a remarkably large lever. The further the lowered leg moves towards the horizontal and beyond, the more the hollow back sensation should disappear, if it was briefly present when the pose was taken.
- The asymmetrical structure naturally creates uneven loads in the upper body, shoulders and arms and tends to twist the shoulders a little horizontally, which should mean more effort for one shoulder and more stretching sensation for the other.
- The lower leg tends to abduct as an evasive movement. However, the muscle tension acts on both joint partners (leg and pelvis), so that when the knee is pressed firmly against the wall and therefore has good friction against the wall, the pelvis tends to move out in the frontal plane. This means that the hip associated with the lowered leg is pressed down. However, the gravity of the lowered leg also has the same lowering effect, so that the two effects add up here. Counteract this with the lateral flexors of the lumbar spine.
- Because of the great tendency of the knee to detach from the wall, depending on its flexibility, a supporter can press it onto the wall, see the corresponding variant below.
- The lowered leg generates a force via the associated hip and back that pushes the shoulders towards the wall, so that work must be done against it. As already discussed above, the load in the shoulders is unequal due to the rotational moment in the torso. The forces caused by the lowered leg simultaneously tilt the pelvis in the direction in which it becomes more difficult to keep the knee of the lowered leg on the wall. Moving the shoulders towards the wall would make this even more difficult due to the resulting effect on the upper body.
- If the force with which the knee of the lower leg presses on the wall is too low, the tendency of the ipsilateral sole of the foot to cramp increases and, due to the friction of the foot on the wall and the evasion of the leg into lateral abduction, an unintentional internal rotation of the lower leg occurs, which may be painful when the knee joint is flexed.
Head raised
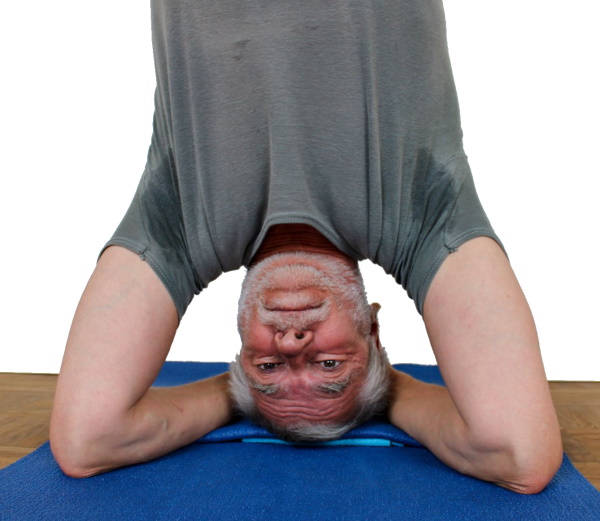
This variation should only be practiced to explore the influence of the height difference between the head and elbow.
Instructions
- Place your head on a not too soft elevation of only a few centimeters and come into a headstand as described above.
Details
- Contrary to all the usual recommendations, the influence of the height of the elbows in relation to the head can be explored by placing the head higher than the elbows. Depending on the flexibility restrictions in the shoulder joint in the direction of frontal abduction, it becomes more difficult to press the elbows to the floor and the maximum achievable pressure may be lower. For the same stability, more flexibility in the shoulder joints in the direction of frontal abduction is therefore required or this shows the loss of stability due to the given flexibility restrictions in the shoulder joints. Finally, when moving outwards, the elbows arc away from the floor in an inclined plane when the shoulders and wrists are fixed. This variation is not suitable for beginners.
Elbow raised
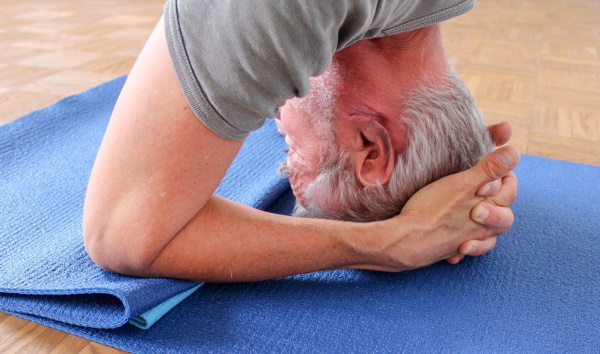
Compensation for significant restrictions in flexibility of the shoulder joint in the direction of frontal abduction.
Instructions
- Place the elbows on an elevation of a few centimeters corresponding to the flexibility restriction of the shoulder: the more restricted, the more elevation. Make sure that the elevation does not have an edge that would press uncomfortably on the ulna.
- Do the headstand as described above.
Details
- Patches are quite suitable as an increase, as their low thickness allows for good dosage and they are not too soft. Depending on how they are used, an uncomfortable edge can also be completely avoided. Flat shoulder support plates are also worth a try.
- The elevation should not be too high, as with increasing support of the elbows their bending angle becomes increasingly unphysiological for a clear exertion of force.
with bound feet
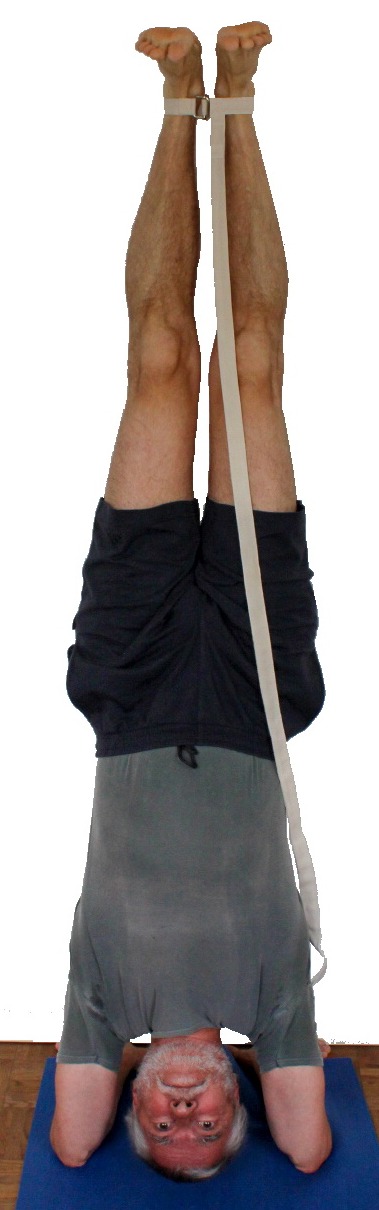
Detail photos
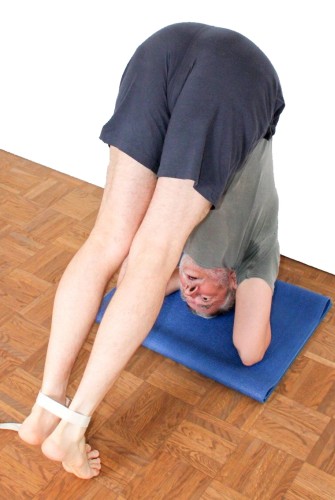
Instructions
- Tie your feet tightly together at the ankles and swing up slowly and powerfully on both legs into headstand as described above with the back straight.
Details
- The tied feet help to avoid a popular mistake and to gain an understanding of the two-legged upswing: it is not uncommon in the upswings to handstand and headstand to try to jump off or swing up with one leg first and then pull the other leg up as quickly as possible instead of jumping off or swinging up exactly synchronously, so that it might look like a two-legged jump/upswing to the unwary observer. The belt around the ankles takes away this possibility and forces not only synchronized movement but above all the correct action of the musculoskeletal system.
- The initial walking-in with the feet is made a little more difficult as the possible „steps“ become smaller because they can only be taken from the ankles and toes.
- If the loop of the belt is attached ventrally approximately in the middle between the lower legs, the free end hangs down along the middle of the body, making it possible to assess how straight you are standing.
Rectangular headstand with wall

Instructions
- Take the dog headstand with your head pointing away from the wall and your head at a distance from the wall that roughly corresponds to the length of your own legs.
- Press your elbows firmly on the floor using the power of your deltoids.
- Place your feet on the wall one after the other so that the backs of your legs are horizontal.
- Straighten your back and legs and use the strength of your shoulders and upper back to press your heels against the wall.
Details
- This variant call the rectangular headstand to mind, but lacks the strengthening effect on the back muscles and therefore does not serve as a substitute for it. The pressure of the elbows on the floor can be used to increase the pressure of the heels on the wall.
- If the distance is too small, there will be an excessive hollow in the neck, whereas if it is too large, the back will round or the cervical spine will bend, which should also be avoided.
- In contrast to the rectangular handstand, the force with which the feet can be pressed against the wall is quite limited. Neither the palmar flexors of the wrist can work for this nor can the shoulder muscles (deltoid) move the body significantly without the cervical spine getting into an undesirable inclination.
Lower bent legs (curls)
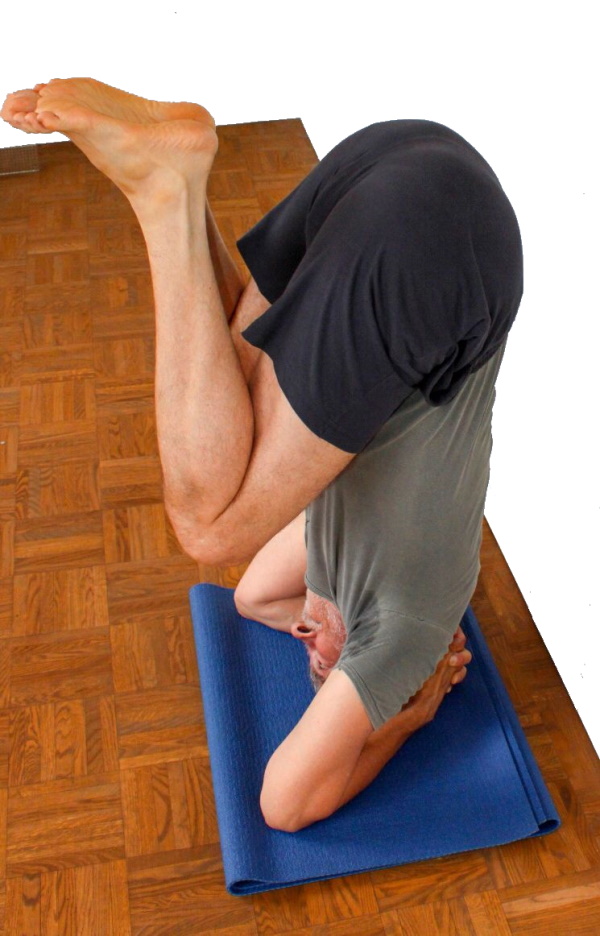
Detail photos
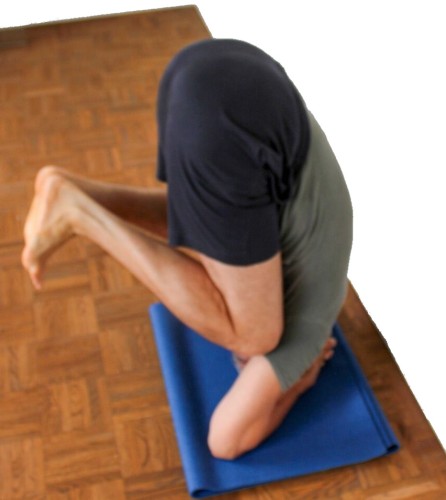
Instructions
- Do headstand as described above.
- Bend the knee joints wide and bend the hips wide to bring the thighs (with good flexibility in the hip joints) close to the upper body.
- By bending the spine under the effect of gravity, allow the legs to sink further and thus bend the back in order to maximally straighten the spine again after maximum bending and repeat this bending and straightening of the spine as long as there is strength.
Details
- This variation enables good strengthening of the autochthonous back muscles of the thoracic spine and lumbar spine.
- Support yourself strongly with your arms, this is mainly the work of the deltoids. Changing the position of the upper body could otherwise put an uncomfortable amount of load on the neck. It is also possible that the trunk changes the position as the upper body bends and stretches and becomes a little overly concave or too steep in between.
- How far the knee joints can be flexed depends on the flexibility of the monoarticular quadriceps parts. The extent to which the thighs can be placed against the body is likely to depend mainly on the short hip extensors, less on the hamstrings, as the hamstrings do not set a limit here due to the complete flexion in the knee joint.
- The further the legs can be lowered and the spine flexed and, in addition, the greater the remaining angle in the knee joints in the case of restricted quadriceps flexibility, the more the gravity perpendicular changes towards the elbows and the more the shoulders (deltoids) have to work to ensure stability of the pose by pushing the elbows down forcefully, and the more the pelvis has to move towards the wall. If the achievable strengthening in the back does not appear to be sufficient, the knee joints can be deliberately bent a little less.
- The less the knee joints are bent, the further the pelvis must be shifted towards the wall so that the gravity perpendicular remains favorable enough.
- As it is much easier to bend your back in this position than to stretch it, exhale as you stretch your back.
- This variation is the equivalent of the curl variation of karnapidasana.
- In principle, the curls variant can also be performed in a three-point headstand. For muscular people with not too pronounced mobility in the direction of frontal abduction in the shoulder joint, this can feel easier. Nevertheless, it must be noted that this is more demanding: in the three-point headstand, the cervical spine can move freely in both directions with almost no resistance and, from a physics point of view, is virtually at an unstable point because on both sides (flexion and extension of the cervical spine) the potential energy of the body decreases. To make matters worse, for many people the normal headstand is already at the limit of exorotated frontal abduction in the shoulder joints, but the frontal abduction would become even greater with bending of the back and the resulting movement of the upper body mass towards the dorsal side. These people only have to work against this mobility limit, but not to stabilise against movement beyond the vertical position. If they had to, it would mean that the accompanying musculature of the ventral side of the cervical spine, which is much weaker than the dorsal side, would have to work.
(S) Support during the upswing

Instructions
- The support for the upswing is exactly the same as the support for the handstand upswing, except that slightly less momentum and support is required.
Details
- The possible evasive movement of the shoulder area towards the wall is of course much less than in handstand when the head is placed on the floor. However, as the cervical spine is involved, it must be prevented just as carefully, as it could result in the head being lifted off the floor, possibly leading to an awkward setting it on the floor again or the wrong area being placed. The cervical spine could end up in an undesirable flexion or extension. Compared to handstand, however, the energy used to accelerate the body upwards and towards the wall is significantly lower and the lever arm between the expected gravity perpendicular and the part of the body closest to the wall that can still exert significant pressure (here: the hands) is much greater and therefore more favorable. For this reason, controlling the movement of the shoulder area is generally not a problem.
(S) Learn to stand freely

Instructions
- Practice the variant described above to learn free headstand. In addition, a supporter holds one arm horizontally as a barrier a little further away from the wall than the distance between the head and the ankles, so that the performer does not fall directly back to the floor if the force is used carelessly.
Details
- The arm must of course be held parallel to the wall and should only provide a slightly springy barrier.
(S) krouncasana in headstand

Instructions
- Do krouncasana in sirsasana as described above.
- The supporter tries to straighten the pelvis and presses the knee of the folded leg onto the wall so that the performer can lower the other leg without the knee lifting off the wall. The supporter can also carefully push the lowered leg towards the floor.
Details
- It may be difficult to manually compensate for all powerful evasive movements in the hip joint of the lowered leg from the outside; however, if the knee is pressed against the wall, this provides significant additional safety in the pose and the extended leg can possibly be lowered significantly further, either actively or passively, which should lead to a significantly improved stretching effect in one or both legs.
Transition to elbow stand
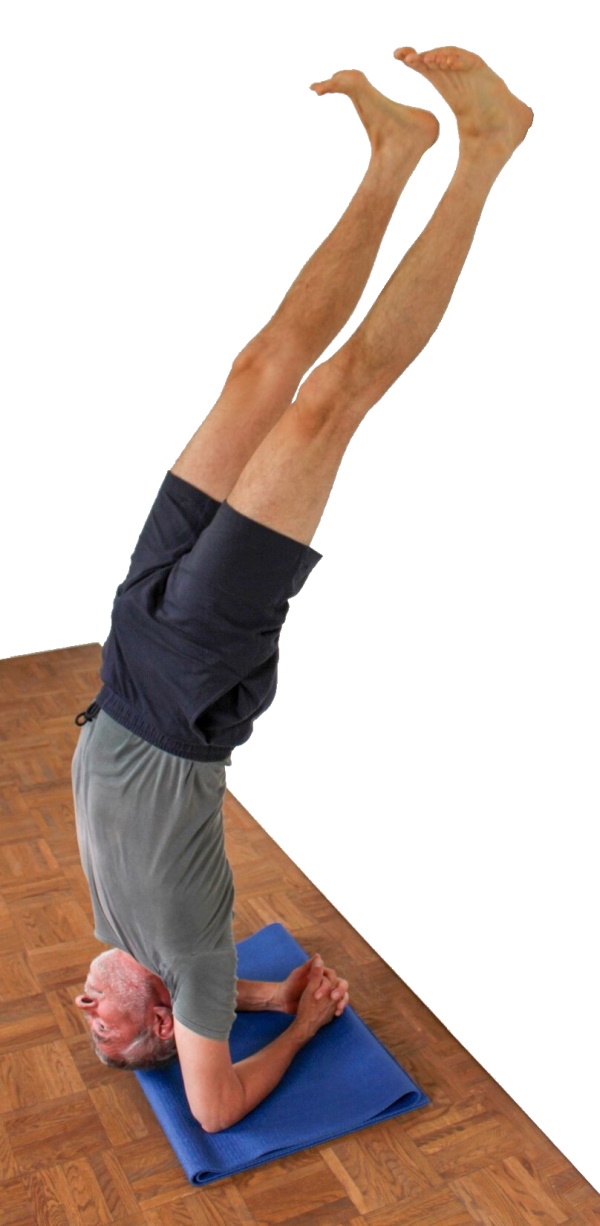
Do and leave
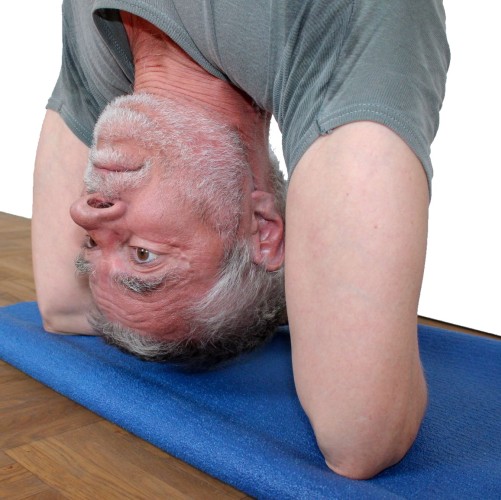
Instructions
- Take the leaning headstand as described above.
- Press your heels firmly against the wall.
- Take the weight off your hands. Carefully take your arms out of the headstand position without changing the position of your elbows, making sure to maintain the pressure of your elbows on the floor.
- Place your forearms parallel to the floor and press your palms firmly against the floor.
- Press your elbows on the floor with increasing force to lift your head off the floor.
- Move your shoulders away from the wall as far as possible.
Details
- It takes a certain amount of strength in the shoulder muscles(deltoid) to lift the head off the floor. If it becomes clear that there is not enough strength, stop the attempt so as not to endanger the cervical spine. The reverse transition from elbowstand to headstand should only be practiced by experienced performers: a very gentle, controlled touchdown is essential!
- The shoulder area does not lift vertically upwards from the floor, but the shoulders describe an arc-shaped movement with the radius of the upper arms. The lift is therefore directly related to the movement of the shoulders away from the wall. While it is perceived more as a lift on the first stretch, later on it is more of a movement away from the wall. The position of the shoulders with the two movements away from the floor and away from the wall obeys the angle functions sine and cosine.
- In the elbow stand, the forearms should be parallel and shoulder-width apart, in the headstand we build up slightly more than shoulder-width apart, so the distances fit well together.
- In contrast to headstand, in elbowstand the shoulder blades move into elevation, i.e. away from the pelvis. In headstand, the work of the shoulders is therefore still quite easy because the weight rests mainly on the head, whereas in elbowstand it takes some strength to lift the body (to be precise: the partial body weight that comprises the whole body minus the arms) relative to the arms that are fixed on the floor. Towards the end of the movement, the need for strength increases because the movement increasingly takes place against the tension of the adductors of the shoulder joint, especially the latissimus dorsi.
- The transition from the convergent position of the forearms in headstand to the parallel position in elbowstand is very difficult and in many cases barely possible at all. With low flexibility of the shoulder joints in the direction of frontal abduction, the internally rotating adductors of the shoulder joint such as the latissimus dorsi are already under a large stretching load anyway. If the shoulder blades are now elevated to lift the head off the floor, the tension in these muscles is significantly higher again and the moments that want to turn the upper arm out of external rotation are even greater. Although the upper arms cannot turn in in headstand due to the interlocked fingers, it is usually impossible to turn out the arms even further under these conditions. The arms can therefore simply be left in the typical headstand position, which only has a positive effect on the elevation of the shoulder blades and also on frontal abduction.
Transition to uttanasana
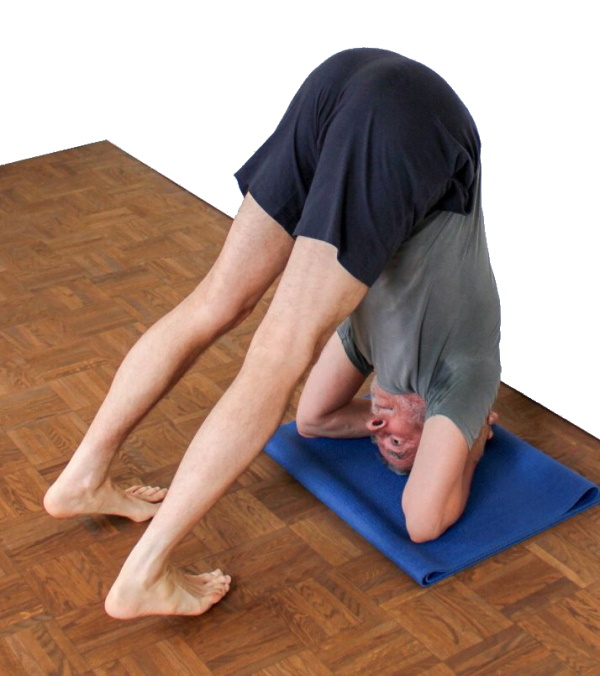
Detail photos
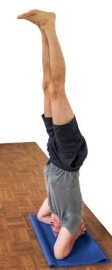
Instructions
- The elegant, powerful two-legged transition from headstand to uttanasana is described here:
- Take the free headstand as described above.
- Stretch your back strongly and flex at the hips.
- Move the legs further and further towards the floor to the limit of the strength of the back and the flexibility of the legs, moving the pelvis slightly towards the wall so that the gravity perpendicular remains in the physical base of support.
- Place your feet on the floor.
- Turn the hands to place the palms on the floor and straighten the arms to bring the pelvis into the correct position for uttanasana.
- Take the hands from the floor, stretch your legs and cross your arms.
Details
- Whether the feet can be placed on the floor with the back straight is of course not only a question of body proportions but above all of the flexibility of the hamstrings. The feet on the floor correspond to a flexion in the hip joints as in a very good pascimottanasana or uttanasana. Good preparation of the hamstrings with intensive forward bends is therefore very helpful for this variant.
- The large lever of the legs exerts a strong force that wants to tilt the pelvis out of the vertical and bend the back. This requires corresponding use of the back muscles to keep the back straight.
- As described in the two-legged upswing, the movement of the outstretched legs towards the floor results in a significant shift in mass, which can move the gravity perpendicular out of the physical support base (in this case the trapezoid of elbows and wrists), depending on where the pelvis and upper body are held. Corresponding adjustments are therefore necessary: the elbows must be pressed more firmly to the floor and the pelvis and, to a corresponding extent, the upper body must be moved backwards, out of the field of vision. Depending on how this is handled, the transition can be made easier or used to strengthen the back (autochthonous back muscles) and shoulders (deltoids) in particular. The transition to uttanasana should be performed just as slowly, confidently, powerfully and reversibly as described above for the two-legged lift.
- Work vigorously and persistently in the deltoids according to the requirements of the transition.
- Because of the need to use the triceps to stretch the arms, this variation is a good preparation for chakrasana. A good preparation for this transition itself is the dog headstand.