yogabook / asanas / free backbend
Contents
„free backbend“
Feedback: We’d love to hear what you think about this description, give us feedback at:
postmeister@yogabook.org
Last modified: 30.12.2018
Name:
trivial name: free backbend
Level: FA
- classification
- contraindications
- effects
- preparation
- follow-up
- derived asanas
- similar asanas
- diagnostics
- instructions
- details
- variants
Classification
klassisch: Rückbeuge
psychomental:
physiologisch:
Contraindications
Effects
Preparations
Follow-up
Derived asanas:
Similar asanas:
Diagnostics (No.)
Variants:
transition to urdhva dhanurasana
(S) transition to urdhva dhanurasana
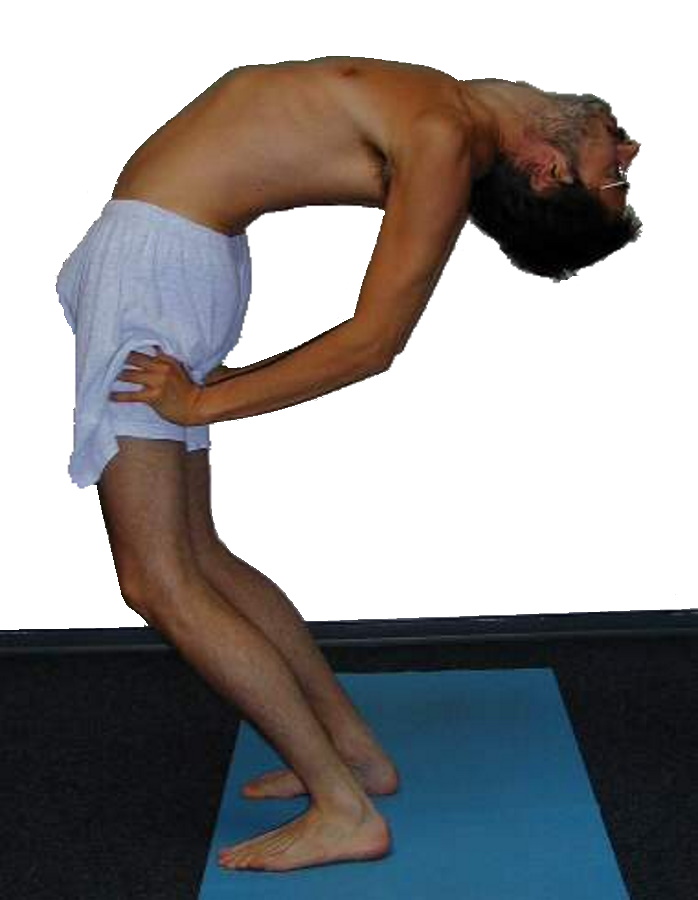
Instructions
- Stand in tadasana.
- Use your hands to grasp the natal cleft (battycrease) under the buttocks on both sides and turn the back of your thighs vigorously outwards.
- Tilt the pelvis into extension in the hip joints, using the glutes vigorously, and take the upper body into a maximum backbend.
details
- The arm work in this pose is the same as in ustrasana. Support yourself with as much weight as necessary with the arms and forcefully pull the backs of the thighs apart. In terms of the physiology of movement, this corresponds to the inward rotation of the thighs, which counteracts the tendency of the thighs to turn out due to backbending, which results from the tension of the hip flexors uplling ventraly at the lesser trochanter and the work of the gluteus maximus pulling drsally at the greater trochanter.
- The work of the gluteus maximus minimises the hyperlordosis of the lumbar spine, which is good for the condition of the lower back, but also maximises the stretching effect on all hip flexors, both the monoarticular iliacus and the polyarticular psoas major. In the rectus femoris, too, the yoga-specific intensive, powerful work in a long sarcomere length should be easy to perceive as a sensation qualitatively categorised between stretching and exertion or as both at the same time.
- Depending on the tension of the rectus abdominis, an intense combination of stretching and exertion can also be felt there, often also trembling, especially with the unsupported version.
- To do this, the pelvis must be pushed forwards a little so that the gravity perpendicular is under the feet.
- The knees should be slightly bent, as otherwise the lumbar spine area would be put under even greater strain. If the knee joints were to remain extended, the hip joints might not extend sufficiently due to the restricted flexibility of the hip flexors and the lumbar spine would be forced to curve concave even more pronoucedly, which would overtax many performers. For the same reason, the knee joints should not be extended further than approx. 150° in back arch.
- Apart from the position of the legs, the pose is very similar to ustrasana.
Known problems that can occur even with correct execution
Discomfort in hyperlordosis
Particularly with shortened hip flexors and rather weak autochthonous back muscles, care should be taken not to overstrain the back, i.e. start with shorter intervals and lower intensity.
Hyperkyphosis of the thoracic spine
Hyperkyphosis of the thoracic spine (humpback) does not allow good distribution of the required curving, which leads to excessive curvature in other areas, which can be perceived as uncomfortable. This can be remedied by poses that restore the capability of the thoracic spine to extend.
Variants
with outstretched arms

Instructions
- Take the pose as described above, but hold the arms in the urdhva-hastasana position, i.e. turned out in elongation of the flanks and 180+° frontal abduction with the shoulder blades elevated.
details
- This variation is much more intense than the basic pose, which is why it places significantly greater demands on the strength of the hip flexors and, in particular, the rectus abdominis, as they have to hold the significant partial body weight of the arms (on a very long lever arm ) as well as the head and upper body. This also places a certain demand on the ventral muscles of the throat area.
(P)
Instructions
- Take the pose as described above.
- The supporter stands next to the performer and holds one hand under the upper back to prevent the performer from tipping over backwards if necessary.
details
- For the time being, the hand should be at about the height of the upper sternum in the back for a good lever arm.
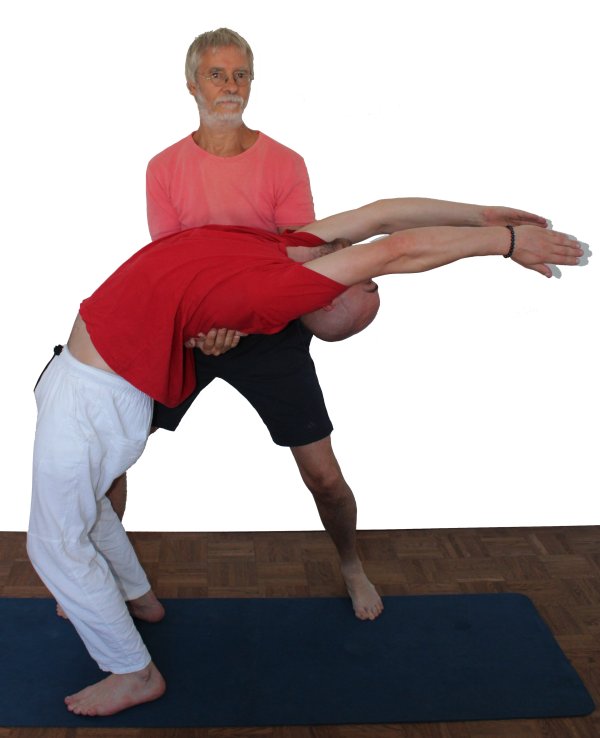
(P) Transition to urdhva dhanurasana
Instructions
- Take the pose as described above.
- The supporter stands in front of the performer and places a taut belt around the natal cleft (battycrease) to allow the performer to transition slowly and safely into urdhva dhanurasana by pulling the belt appropriately.
details
- The belt is pulled ventrally and cranially, so the supporter pulls it towards their own shoulders. It is favourable if the performer is not taller than the supporter.
- In principle, a belt positioned further cranially would offer a more favourable lever arm, but with a belt positioned in the upper back there is a clear risk that although the direction of pull may be favourable enough at the beginning, it becomes increasingly unsuitable further into the transition. On the other hand, a belt attached further towards the lumbar spine promotes hyperlordosis of the lumbar spine, which is probably already borderline for many people, and reduces extension in the hip joints. In contrast, the belt attached to the natal cleft promotes extension and thus fundamentally tends to reduce the hollow back. In addition, the direction of pull on the belt remains favourable enough during the entire transition, unlike with a belt attached further cranially.
Transition to urdhva dhanurasana
Instructions
- Take the pose as described above, but hold the arms in the urdhva-hastasana position, i.e. turned out in elongation of the flanks and 180+° frontal abduction with the shoulder blades elevated.
- Keep the extension maximally upright with the strength of the glutes and begin to bend the knee joints and lean the upper body backwards according to the changing inclination of the thighs.
- Bend the elbow joints and when the floor comes within reach, place the hands pointing towards the feet.
- Extend the elbow joints and check whether you can further increase the hip extension with the strength of the hip extensors and the extension of the spine with the strength of the autochthonous back muscles.
details
- This transition is very demanding in terms of flexibility and, to a certain extent, strength and can only be performed cleanly by a few people. The demands on the flexibility of the hip flexors and the lumbar spine are enormous. The less flexibility there is, the greater the distance between the hands and the floor will have to be, in order for a gentle placement of the hands to be possible. A stable elevation can then be used for the hands, which will not slip if the hands are not placed vertically on it with precisely downward directed force. Once the pose has been adopted, this elevation must also be able to withstand the force of the hands away from the feet.
- The hands must not be positioned in such a way that the wrists are in more than 90° dorsiflexion. This specifies a maximum distance, which depends not least on the flexibility of the shoulder joints in the direction of frontal abduction in the shoulder joint. The lower the flexibility is, the further away the hands (in projection onto the floor) are from the feet in relation to the shoulders and the flatter the forearm is, the more difficult the angle of dorsiflexion in the wrist becomes. Therefore, in addition to the expected demands on the flexibility of the upper body and the hip joints, the flexibility of the shoulder joints is also decisive for whether and how well the transition is successful. However, a greater distance between the hands (in the projection on the floor) and the feet also means a much poorer gravity perpendicular, so that the transition can be performed less slowly and less in a controlled manner and increasingly turns into a „fall on the hands“. This effect is of course independent of how the backbend is distributed over the body and its various joints (including the spine) and is simply due to the fact that the gravity perpendicular moving further and further away from the initial physical base of support.
- The flexibility of the hip joints in the direction of extension is extremely important for the success of this transition. Any lack of this must be compensated for by the lumbar spine, the shoulder joints or by further flexion of the knee joints. Extension in the hip joints is predominantly limited by the iliopsoas because the knee joints are only moderately flexed. As this muscle attaches to the lesser trochanter of the femur, it pulls it ventrally and causes a significant torque in the direction of external rotation in view of the large partial body weight held, which very often leads to visibly dislocated knees (falling otuwards); after all, external rotation of the thighs is only possible with simultaneous abduction due to the feet as a punctum fixum. This externally rotating moment naturally also has an effect on the feet as their tendency to turn out. In the interests of knee health, the knees and feet should be brought into an appropriate position before starting the pose in the case of known flexibility restrictions that would force the knees to fall apart – i.e. almost always in practice – so that the menisci are not exposed to a large shearing force when taking the pose due to the internal rotation of the lower leg in the knee joint relative to the outwardly deviating and exteernally rotating thigh, as would be the case if the feet remained fixed in parallel but the knees moved apart as the knee joints flex. For this reason, support in which the feet are fixed but the knees are not is not permitted. Conversely, provided there is sufficient flexibility, the knee joints can be prevented from moving apart, as then the lower legs do not turn out in the knee joints and the feet remain straight.
- If, due to insufficient flexibility in the hip joints, lumbar spine and thoracic spine, the knees are bent further so that the gravity perpendicular remains more favourable so that the hands do not fall to the floor, still the flexibility of the soleus can set a limit.
- The arms must be bent sufficiently in the elbow joints so that the impact does not damage the affected joints, especially the shoulder and elbow joints if the hands are not placed completely gently, but the triceps can absorb the kinetic energy.