yogabuch / asanas / urdhva dhanurasana
Contents
- 1 urdhva dhanurasana„upward arch (back arch)“
- 2 variants
- 2.1 Dips
- 2.2 Maximum running-in
- 2.3 eka pada
- 2.4 from handstand
- 2.5 Feet fixed
- 2.6 Press the sternum against the wall
- 2.7 Hands on blocks
- 2.8 Hands on the bench
- 2.9 Feet on the bench
- 2.10 Belt around the arms
- 2.11 Belt around the legs
- 2.12 Belt around the feet
- 2.13 with block
- 2.14 Hands turned over
- 2.15 (P) Hands turned over
- 2.16 Take slowly and precisely
- 2.17 (P)
- 2.18 (P) Feet fixed
- 2.19 (P) Keep your knees together
- 2.20 (P) Turn out arms
- 2.21 (P) pull on the arms
- 2.22 (P) Keep elbows tight
- 2.23 Support for hands on the bench
- 2.24 Support for feet on the bench
- 2.25 Transition to karnapidasana
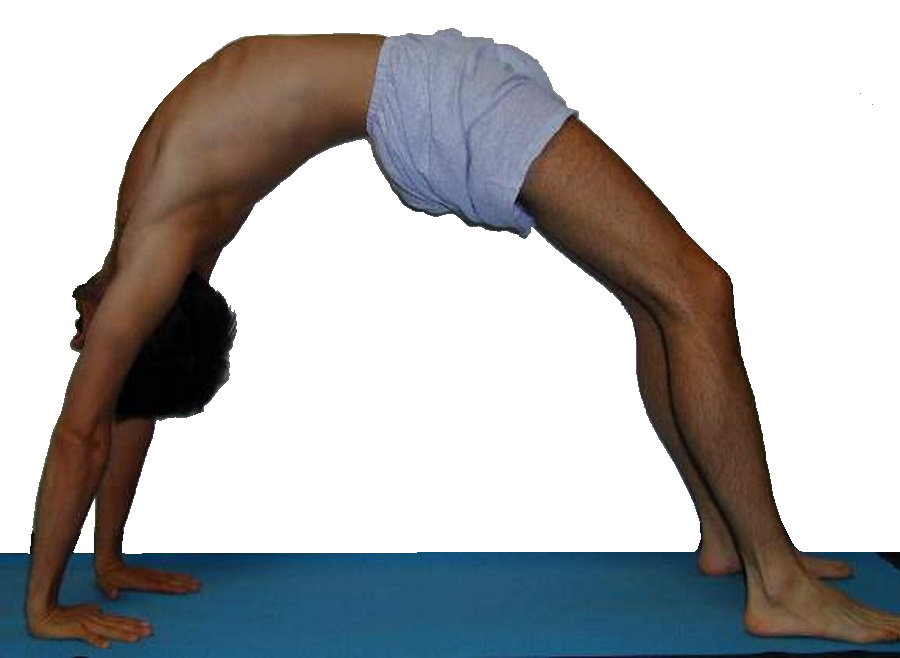
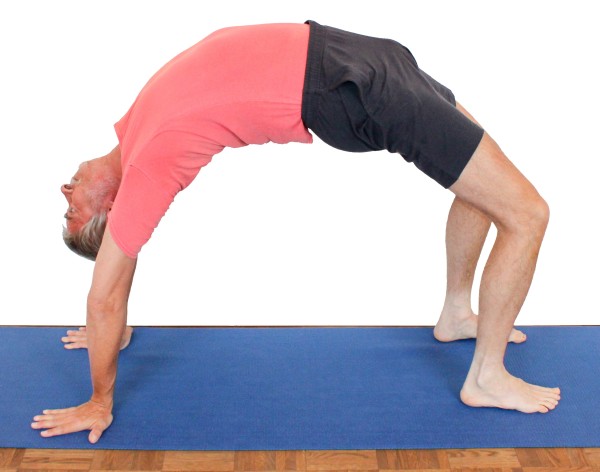
urdhva dhanurasana
„upward arch (back arch)“
 instructions and details with working links as PDF for download/print
Feedback: We’d love to hear what you think about this description, give us feedback at:
postmeister@yogabook.org
last update: 30.12.2018
Name: urdhva dhanurasana
Trivial name: upward bow (also called bridge)
Level: FA
- Classification
- Contraindication
- Effects
- Preparation
- Follow-up
- derived asanas
- similar asanas
- Diagnostics
- Instructions
- Details
- Variants
Table of contents [show]
Classification
classical: backbend
psychomental: energizing, vitalizing
physiological: stretches the shoulder, hip flexors and abdominal muscles
contraindications
Facet syndrome, spondylolisthesis (spondylolisthesis) and spinal canal stenosis are absolute contraindications. In the case of recent acute lumbago, the posture is contraindicated in the first few days, but thereafter it has its place in stabilizing and improving the condition.
effects
- (423) Tone of the finger flexors (finger flexors)
- (202) Strengthening the neck / cervical spine for flexion
when the head is raised - (232) Shoulder joint: force for frontal abduction
- (417) Strengthening for palmar flexion in the wrist
- (552) Strengthening the quadratus lumborum
- (602) Strengthening the back extensors
- (732) Strengthening the end rotators of the hip joint
- (752) Strengthening the adductors
- (812) Strengthening the quadriceps
- (727) Strengthening the monoarticular hip extensors (especially gluteus maximus)
- (206) Neck/spine stretching in the direction of reclination
only weakly effective with good flexibility - (231) Shoulder joint: stretching for frontal abduction
- (411) Stretching for dorsiflexion in the wrist
- (421) Stretching the finger flexors (finger flexors)
- (501) Stretching the latissimus dorsi
- (671) Stretching of the rectus abdominis
- (681) Stretching the intercostal muscles
- (711) Stretching the hip flexors
- (731) Stretching the end rotators of the hip joint
- (831) Elongation of the Sartorius
Preparations
The less flexibility the shoulder joints have in terms of frontal abduction, the flatter the forearms will be in relation to the floor, which requires an even greater ability to stretch the palmar flexors. In principle, cramp-like sensations in the dorsal flexors would also be possible. Preparations for this:
One of the important preparations is for maximum frontal abduction in the shoulder joints, even beyond 180°:
- downface dog, especially the „wide“ variation as a general stretch of the adductor muscles of the shoulder joint
- Back extension, especially the „elevated“ version as a general stretching of the frontal adductor muscles of the shoulder joint
- Right-angled handstand as a related posture
- Handstand as a related and synergistic posture
- Elbow stand as a synergistic posture
- Right-angled elbow position as a synergistic posture that differs in the rotation of the arms
- Dog elbow stand as a synergistic posture
- Hyperbola as one of the most effective and efficient stretches in the direction of frontal abduction without exorotation of the arms
- Shoulder opening on the chair as one of the most effective and efficient stretches in the direction of frontal abduction with exorotation of the arms
Difficulty lifting the shoulder area off the floor is usually due to a lack of strength in the deltoids for frontal abduction at this angle and under exorotation. Exercise for deltoid strength:
- Dips variation of the downface dog
- the transition from downface dog and back
- Dips variation of the handstand
- Repeatedly taking and leaving the bridge (dips)
- hip opener 2
The necessary stretching out of the shoulder ( elevation of the shoulder blade) can also be practiced separately:
- „with block“ variation of upavista konasana
- urdhva hastasana
- Shrug in the dog Head down
- Shrug in the dog Head up
- Shrugging in a handstand
- right-angled handstand
The often felt tearing in the abdominal wall is due to a lack of elasticity in the rectus abdominis. Prepare this by stretching it:
Prepare the BWS backbend with:
If you notice a lot of tension in your lower back, you can stretch the muscles there first:
- parsva uttanasana
- balasana (virasana forward bend, child’s pose)
- parsva upavista konasana
- parivrtta trikonasana
- parsvottanasana
- Half lotus forward bend
- karnapidasana
The pomus muscles are needed for a powerful extension in the hip joints so that the lumbar spine is hyperlordosed as little as possible and the stretching effect on the hip flexors is maximized. Preparatory are:
- caturkonasana
- parsvakonasana
- Counter
- warrior 2 pose
- purvottanasana
- urdhva dhanurasana
- eka pada variation of urdhva dhanurasana
- setu bandha sarvangasana
- eka pada variation of setu bandha sarvangasana
- Warrior stance 3
- „Backwards against the wall“ variation of the warrior stance 3
and other various backbends In addition to frontal abduction in the shoulder joints, hip extension is the most important requirement in this pose. Stretch the hip flexors in advance to avoid an excessive hollow back:
- hip opener 1
- hip opener 2
- Warrior stance 1
- ardha supta krouncasana
- supta krouncasana
- upface dog
- ustrasana (camel)
- setu bandha sarvangasana
and further backbends with hip extension. It is possible that not only the iliopsoas is shortened, but also the rectus femoris:
- supta virasana
- Quadriceps stretch 1 on the wall
- Quadriceps stretch 2 on the wall
- ardha supta krouncasana
- supta krouncasana
Sometimes it is difficult to take the bridge because the body is not yet properly warmed up and the energy flow is not yet optimal, then practise in advance:
- surya namaskar (the sun salutation) stimulates the flow of energy and clears the mind a little
- right-angled handstand
follow-up
derived asanas:
similar asanas:
diagnostics (no.)
In this pose, with limited flexibility of the shoulder joints, the triceps will have to work hard as an extensor of the elbow joints to limit the evasive movements. An inability to keep the elbow joint extended indicates a lack of strength in the triceps or a disproportionately large evasive movement of the upper arm in the shoulder joint, which in turn indicates a corresponding restriction of flexibility, usually of the pectoralis major and especially the latissimus dorsi. A tendency to cramp and cramp in the triceps can mean increased tone and also a lack of strength.
In extensive dorsiflexion and under greater load, weaknesses in the wrists are most likely to become apparent:
- Ganglion, usually in the dorsal area between the hand and forearm, produces a sensation of pressure during dorsal flexion of the wrist
- Tendinitis of the tendons of the palmar flexors or finger flexors
- Carpal tunnel syndrome: worsening of symptoms in this position
- Fractures and fractures of carpal bones, especially the scaphoid bone
- Arthrotic change (degenerative with cartilage atrophy) of the joint
- Arthritis (inflammation of the joints) of various kinds
- Dislocation / subluxation, which would cause a significantly increased sensation of tension in various muscles covering the wrist
- joint trauma, which may cause pain in the joint even after many weeks or months
but also purely muscular symptoms such as
- Shortening/hypertonus of the dorsiflexors of the wrist, which then becomes noticeable as cramps in the dorsal side of the elbow joint
- Shortening/hypertonus of the palmar flexors of the wrist, which makes the dorsiflexion of the wrist in the executing muscles on the palmar side of the forearm painful to stretch
- Golfer’s elbow: Strain pain at the point of origin of muscles of the ulnar side of the forearm in the transition to the upper arm
The flexibility of the shoulder joint can be easily recognized here, including side discrepancies. There may also be indications of diseases of the shoulder joint:
- Irritable hypertonus of the deltoid: especially ambitious beginners in yoga tend to develop irritation in the deltoid, which is localized in the area of the muscle origins, presumably due to an overstraining of the structures by frequently repeated demand in full frontal abduction and is also noticeable in such stress, see FAQ.
- Various pathological changes of the shoulder joint such as impingement syndrome, frozen shoulder, calcifications of the biceps tendon, which cannot all be discussed here and require clarification.
- side discrepancies in flexibility
The flexibility of the shoulder is recognizable in the form of the degree of deflection in the three dimensions of movement:
- Outward deflection of the upper arms with consecutive flexion of the elbow joints
- Loss of rotation of the arms
- Angle of frontal abduction that does not reach 180° or does not reach it permanently
(651) Pelvic obliquity/unequal shoulder height/scoliosis of the spine:
These deviations in the shape of the spine can be particularly visible from below. The lateral deviation of the spine from the median plane, known as scoliosis, is often visible in this posture in the form of ribs at different heights on the left and right, as the lateral displacement of some vertebrae in scoliosis is usually associated with their rotation in the transverse plane, so that one area of the thorax is further ventral than its contralateral counterpart. See the FAQ.
(644) LWS:
This posture can reveal problems with the lumbar spine or its muscles FAQ.
The flexibility of the rectus abdominis can be seen in the clear backbend of the thoracic spine: the straight abdominal muscle pulls from the sternum towards the pubic bone and is stretched here. This can be felt in the event of restricted flexibility. This muscle is important for posture (straightening the pelvis), but if shortened, it also hinders inhalation.
(681) Intercostal muscles: stretching
If there is a sensation of stretching in the intercostal muscles when the hip flexors are not very mobile and the back is clearly concave (seen from behind), other postures such as
check whether it is sufficiently mobile to allow easy inhalation.(695) Chest in general
Other injuries or diseases of the chest can also be revealed here:
- Fractures and fractures of ribs
- Pleurisy (inflammation of the pleura)
- Abdominal discomfort may indicate diseases of the intestines or mesentery
Shortened hip flex ors cause the pelvis to tilt too little into extension, resulting in too much lordosis of the lumbar spine. An excessive hollow back in this posture often indicates shortened hip flexors. For the risks of a hollow back, see the FAQ.
The required wide extension can cause pain in the case of existing hip damage:
- Arthrotic change (degenerative with cartilage atrophy) of the joint
- Arthritis (inflammation of the joints) of various kinds
- Dislocation / subluxation, which would cause a significantly increased sensation of tension in various muscles covering the hip joint
- joint trauma, which may cause pain in the joint even after many weeks or months
Alongside the triceps, the quadriceps is one of the main muscles that hold body weight and backbends. This can lead to a tendency to cramp, which can have various causes such as a lack of blood supply to the muscles, electrolyte deficiency or neurological causes. If you stand in a deeply bent posture for a longer period of time, you may reach the limits of your muscles‘ strength endurance, in which case you should feel a burning sensation, which will subside once you leave the posture. A certain amount of trembling in the muscles is physiological during great exertion. If it occurs with little or no exertion, this can be a symptom. Accordingly, the following postures are mainly suitable for improving flexibility:
(885) Knee:
The load in the knee joint can reveal existing knee problems associated with extension movements when the knee joint is flexed under load: These can be, for example: traumatic or degenerative meniscus damage, arthrosis, retropatellar events such as chondropathia patellae or retropatellar arthrosis, arthritis, subluxations, ligament damage, plica syndromes and others, see the FAQ.
variants:
Press thesternum against the wall
(P) Support for hands on the bench
(P) Support with feet on the bench
instructions
- Lie on your back with your knees bent and, if possible, pull your heels up to your buttocks.
- Place your hands fully on the floor so that your fingers are pointing caudally (towards your feet) and your fingertips are approximately at shoulder height. Keep your elbows as close together as possible. Press the balls of your feet onto the floor.
- Use the strength of the pomus muscles to bring the pelvis into maximum extension, i.e. move the tailbone away from the back.
- Use your arms and legs to slowly and evenly raise your upper body with your pelvis. If possible, use little or no momentum.
- If possible, stretch your arms first before you perform any further stretching movements in the knee joint.
- Press the pubic bones upwards to the maximum.
- Turn your arms out and press your entire palms firmly on the floor.
- Stretch out from the shoulders, i.e. elevate the shoulder blades to the maximum.
details
- When assuming the posture, make sure that the front feet do not move outwards, i.e. that the foot does not turn out. This often observed twisting is partly an exorotation of the lower leg in the knee joint, but partly also the separation of the thighs and knees in abduction and exorotation in the hip joints. To prevent the feet from turning out, it is necessary to press the balls of the feet firmly onto the floor when assuming the posture. Once the posture has been adopted, the tendency to turn the feet out is significantly reduced.
- Make sure that your knees do not move too far apart; they should remain at hip width at most. If necessary, you can attach a belt above the knees to ensure this. In some cases, however, the belt will cause increased pressure in the knee joint; in this case, leave it wider than hip-width.
- If the shoulder joints are significantly stiff, they may force a very unfavorable angle in the wrist, i.e. the external angle(dorsal) remains significantly less than 90°. This can cause pain in the dorsal wrist. This can be avoided by placing the hands on blocks, approximately 2/5 of the palm on the wrist side, i.e. from the wrist to slightly further than the ball of the thumb, which is essentially the carpus. The blocks are so far apart that the head has enough space between them, i.e. generally shoulder width. This allows the palm to stand at an angle and the outer angle of the wrist remains tolerable. It is advisable to position the blocks directly against the wall so that they cannot slip away due to the pressure of the hands. In the case of stiff shoulder joints, there is usually a choice between a smaller distance of the shoulders from the floor with an extension of the elbow joints but a less favorable angle in the wrist and more required shoulder strength(deltoid) and a higher position of the shoulders with a poorer extension of the elbow joints with more required arm strength(triceps). This problem is alleviated by using the blocks.
- In this position, try to rotate your arms to the maximum, i.e. rotate your biceps backwards away from your ears. This rotational movement is quite limited in the overhead position of the arms and should not cause the shoulders to come closer to the floor.
- If there is sufficient flexibility in the shoulders, it is possible to choose how far back the shoulders move away from the feet. In general, except for training purposes, the outer angle of the wrists should not exceed 90°, i.e. the shoulders should not move beyond the wrists so that interesting work remains possible in the forearms. If the shoulders reach this position effortlessly, more work should be done on the position of the pelvis (maximum extension) and the distance between the feet (maximum shrinkage), see below.
- Working on maximum extension in the hip joints is at least as important as the position of the shoulder. As the gluteus maximus is used for this and because the iliopsoas to be stretched for this purpose is located on the inside of the thigh at the lesser trochanter, the legs always want to turn out, which must be prevented by using the adductors. The strong use of the adductors generally brings the pelvis slightly out of maximum extension. This counter-rotation must be overcome by improving flexibility. When using the gluteus maximus, the aim is not to squeeze the buttocks sideways, but only to use them for maximum extension, i.e. to contract them in a longitudinal direction. The instruction to „tense the gluteal muscles“ would therefore only be partially correct. Another reason for not allowing the legs to twist out at will is that this also tends to compress the lower back in a transverse direction, which would be perceived as an unnecessary additional strain in view of the hyperlordosis of the spine caused by the backbend.
- The distance between the feet and hands should be reduced further and further if there is sufficient flexibility. To do this, run in with your feet several times if necessary: Lift your heels and walk first with one foot and then with the other a little way towards your hands. The heels remain lifted. Push the pubic bones up as far as possible and then try to maintain their position while slowly bringing the heels down to the ground. In principle, you can also run in with your hands, but this is generally perceived as more difficult.
- The knee joints should always perform a powerful extension movement, but should never be able to be stretched even approximately; around 150° can be considered the maximum for most people. To ensure this, further running-in may be necessary.
- The bridge strengthens many muscle groups:
- Elevators of the scapula, especially levator scapulae and trapezius, but also rhomboids, which pull the shoulder blades into elevation (but at great sarcomere length), i.e. „stretching the arms out from the shoulders“
- palmar flexors of the wrist to push down the metacarpophalangeal joints and avoid discomfort in the dorsal wrists, but also to contribute to the correct movement of the shoulders away from the feet
- Extensors of the hip joint: the hamstrings, which, together with the gluteus maximus in particular, pushes the hip joints maximally into extension and thus causes the hip flexors to stretch
- Quadriceps, which causes an extension movement in the knee joints, which pushes the pelvis (from a minimum height) upwards, i.e. further into the bridge
- Autochthonous back muscles, i.e. the erector spinae with its parts that cause the spine to extend
- Triceps, which extends the elbow joints
- Deltoideus, which attempts to create as large an angle of frontal abduction as possible so that the shoulder area moves upwards with the upper body relative to the hands on the floor.
- Of course, the ratios between the uses of these sections can be changed in the bridge. If an attempt is made to keep the bridge as long as possible, some of these parts will reach the limit earlier than others and the load will be shifted from the former to the latter as far as possible. This may seem dubious in terms of the most precise execution possible, but in terms of time this is exactly right because it brings all the relevant parts closer to their limits and, in addition to more comprehensive strengthening, also exerts a stretching or strengthening effect on the relevant parts for much longer. This should once again encourage you not to neglect the focus on time, which is sometimes able to uncover previously unknown weak points and drive them forward.
- Do not practice urdhva dhanurasana intensively every day. This could lead to a cumulation of the tone of the muscles in the lumbar spine up to the thoracic spine, which can feel uncomfortable but can also have an effect, including an increased tendency to lumbago.
- When exiting the bridge, try to put your shoulders back on your fingertips where they were when setting up. Under no circumstances should the bridge be exited with an extension movement of the elbow joints, as on the one hand this usually pushes the force required to exit the posture in an orderly manner to an unachievable level due to the larger lever arm, and on the other hand the wrists are brought into ever greater dorsiflexion, which is also unachievable, both in terms of the necessary force of the palmar flexors of the wrist and also simply in terms of the required angle.
- After urdhva dhanurasana and any subsequent backbends, the tone of the autochthonous back muscles in the lumbar and thoracic spine will have increased. Exercises should therefore be performed afterwards to lower the tone again. Asymmetrical forward bends such as parsva uttanasana, janu sirsasana and upavista konasana have proven effective here.
known problems that can occur even when executed correctly
LUMBAR SPINE
Even with intensive work with the hip extensors and correct execution, hypertonus of the muscles of the lumbar spine can occur depending on the disposition. This may or may not be associated with limited flexibility of the hip flexors. If this is not the case, the autochthonous muscles in the area of the lumbar spine are probably not sufficiently „robust“, i.e. resilient enough, and need further strengthening, for the time being mainly with more neutral angles (in terms of sarcomere length) or from flexion, the latter being contraindicated in the case of intervertebral disc disorders.
variants
Dips

Effects:
(232) Frontal abductionstrength
(302) Tricepsstrength
instructions
- Adopt the position described above, if possible without blocks
- When in urdhva dhanurasana, bend the head towards the chest, bend the elbow joints until the shoulders almost or very slightly reach the floor and then straighten the elbow joints almost all the way through again.
- Continue bending until you gently touch the floor and stretching until just before the elbow joints are fully extended as long as you have strength in your arms(triceps) and shoulders(deltoids) and the condition of your lower back remains good.
details
- In this position, several limits can prevent further progress, usually these are
- the strength of the triceps
- the strength of the deltoids
- the strength of the quadriceps
- the sensitivity of the lower back
- the sensitivity of the wrists
- in rare cases, a tendency to cramp in the hamstrings
- in rare cases, a tendency to cramp in the neck
- the intensive stretching of the rectus abdominis
- The more the arms are bent, the more variable the position of the shoulders. Above all, make sure that they do not move too far in the direction of the feet but always remain close to the limit of frontal abduction given by the shoulder flexibility. If the shoulders are allowed to move too far in the direction of the feet, they will not only have to exert significantly more force, which may be desirable, but the stretching effect in the direction of frontal abduction will be worse or even absent and, above all, the wrists will end up in angles of dorsal flexion that they may no longer be able to achieve, which would result in significant discomfort there, both compression-related pain in the dorsal wrist and stretching pain in the palmar flexors and finger flexors. A further disadvantage would be that the backbend would become tighter and the lower back would reach its limit more quickly due to the greater flexion requirement; the hamstrings could also go into spasm more quickly.
Maximum running-in

instructions
- Take the pose as described above.
- If your lower back and shoulders can tolerate it, reduce the distance between your feet and hands by placing one foot after the other closer to your hands. After the first step of both legs, return to the full posture and try to see whether it is possible to reduce the distance further. Continue until the smallest possible distance is reached.
details
- Before leaving the bridge, you have to run out again, i.e. gradually increase the distance between your feet and hands again so that the knee joints are not forced into an extreme bending angle under load when leaving the bridge, which is not good for the knee joints.
- If the distance is reduced, all relevant angles are changed: the frontal abduction in the shoulders must increase, the extension in the hip joints and the back bend and lumbar and thoracic spine, the angle in the knee joint is usually the least relevant. The sensation in all the muscles involved changes accordingly.
eka pada

Effects:
(712) Strengthening the hip flexors
(727) Strengthening the monoarticular/short hip extensors, especially gluteus maximus
(817) Strengthening the rectus femoris
instructions
- Take the bridge as described above.
- Place your left foot where the middle between your feet used to be.
- Release the right foot from the floor.
- Straighten your right leg on the floor.
- Raise your right leg straight and continue to stretch it as far as possible towards your chest.
details
- In principle, the second step of adjusting the position of the stand can also be omitted, but the load is then distributed even more unevenly between the two shoulders and arms and the posture can feel a little unstable.
- Ideally, the right leg can be extended and the heel can be placed on the floor with the pelvis maximally raised and the leg extended in order to describe the longest possible arc with the leg extended towards the chest.
- The lifted leg means that the standing leg that remains on the ground has to work more than twice as hard: not only does the second leg no longer lift, which doubles the load, it also has to be lifted as well. In practice, this means that the pelvis cannot usually be held as high or as long at the maximum height. On the other hand, this version allows for greater strengthening.
- If the lifted leg can be raised far, i.e. the hip joint can be flexed far, the lifted leg has a tendency to spasm in the rectus femoris. This is due to the extended knee joint and the actively flexed hip joint, which means that this muscle is in a very short sarcomere length and therefore close to active and passive insufficiency, where all muscles of the musculoskeletal system have a significantly increased tendency to spasm.
- The lifted leg not only pushes the pelvis down overall due to its weight, but also tends to push it down on one side. Try to absorb this as well as possible.
- The hard work that has to be done to hold the pelvis up creates more evasive movement in the standing leg. Since the hip joint is a three-dimensionally mobile joint, the evasive movements will occur in all three dimensions, unless this is prevented. The first evasive movement is the rotation of the pelvis in the (generally horizontal) plane, the second is the exorotation of the leg and the third is the abduction of the leg, which visibly pushes the knee of the standing leg outwards together with the abduction. The forces and moments in the supporting leg and the joints can also lead to increased stress in the knee joint, particularly in the outer knee.
- A tendency for the hamstrings of the standing leg to spasm can occur much less frequently in bridge than in purvottanasana. This tends to occur in less mobile people who cannot lift their pelvis very high and is due to the hamstrings working towards extension in the hip joint while the standing leg is clearly flexed in the knee joint, which means that the hamstrings is not very far away from active insufficiency and therefore a tendency to spasm due to the very short sarcomere length. This effect decreases as flexibility improves.
- The lifted leg not only pushes the relevant hip but also the shoulders down a little via the upper body, so that you may notice a little more work or a drop in the shoulder there too.
- Typical evasive movements of the lifted leg are primarily bending in the knee joint and exorotation of the thigh in the hip joint.
from handstand

instructions
- This describes the relatively simple and safe variation of moving from a leaning handstand into a bridge by repeatedly increasing the distance from the wall.
- In quick succession, assume the handstand only slightly, come out again and increase the distance between your hands and the wall by 10 – 15 cm.
- When the distance is large enough, take your right leg out of the pose, bend it and let it hang down towards the floor.
- Bend your left leg as far as your strength allows, lowering your pelvis and upper body.
- When your right foot touches the floor, put your full weight on it and take the weight off your left foot on the wall.
- Remove your left foot from the wall and place it next to your right foot.
- Continue building the bridge.
details
- This variation is a very safe way to go from a handstand to a bridge and does not require a lot of strength.
- The flexibility restrictions in the shoulder joint(frontal abduction) and hip joint(extension) largely determine whether the transition works and at what minimum distance of the hands from the wall. Of course, the distance cannot be arbitrarily large.
- When one foot is taken off the wall, a lot of body weight rests on the other foot, which has to be held with the strength of the hip extensors, among other things, and this may feel a little unfamiliar. By decreasing the use of the hip extensors, lower the pelvis and upper body further and further until the toe of the foot touches the floor. Shortly afterwards, it will be possible to place the whole foot on the floor with weight. During this process, the frontal abduction in the shoulder joints and the backbend in the upper body will necessarily become more intense. If it is not possible to place the foot on the wall with weight because the shoulder or lumbar spine are reporting too much discomfort, put weight back on the foot that is still on top of the wall, increase the use of the equilateral hip extensors to lift the pelvis again and finally bring the right foot back into handstand next to the left foot. Due to the large distance from the wall, it now takes a lot of momentum from one of the two legs to get safely out of the handstand and back onto your feet!
- Of course, the bridge can be left in the direction of the handstand in exactly the same way as it was taken. When you finish the handstand, note the large distance between your hands and the wall and the resulting need to leave the handstand with a lot of momentum, i.e. to swing one leg vehemently towards the floor. If too little momentum is taken, there may be a phase in which you briefly stand free in the handstand, which would not be bad in itself, but the movement of the leg away from the wall causes a moment of rotation that makes the posture in the shoulder joints and arms more difficult and unstable.
Feet fixed

instructions
- Secure the feet with suitable aids such as furniture, weight plates padded with blankets or similar or a supporter standing on the front of the feet to prevent the feet from turning out and take the pose as described above.
details
- The tension of the stretched hip flexors on the one hand and the exorotationand abduction moments in the hip joint caused by the inserted gluteus maximus on the other result not only in the tendency of the knees to move apart but also the tendency of the feet to turn out. A supporter can try to passively absorb this, but the shape of the foot and any pressure sensitivity in the area of the proximal os metatarsale 5 ( metatarsal bone on the small toe side) must be taken into account. Normally, only the forefoot turns outwards and the heels remain in place because they press on the ground with the main load (on the leg side). If the heels also turn inwards, a block can be used to mechanically block the movement, possibly slightly padded so that it is not uncomfortably hard on the inner heel. The blocks used for the forefoot can, if tolerated, press the forefoot down with sufficient weight to increase friction on the ground or mechanically block the outward movement of the forefoot.
- If a supporter is available, the (P) feet fixed variant is recommended.
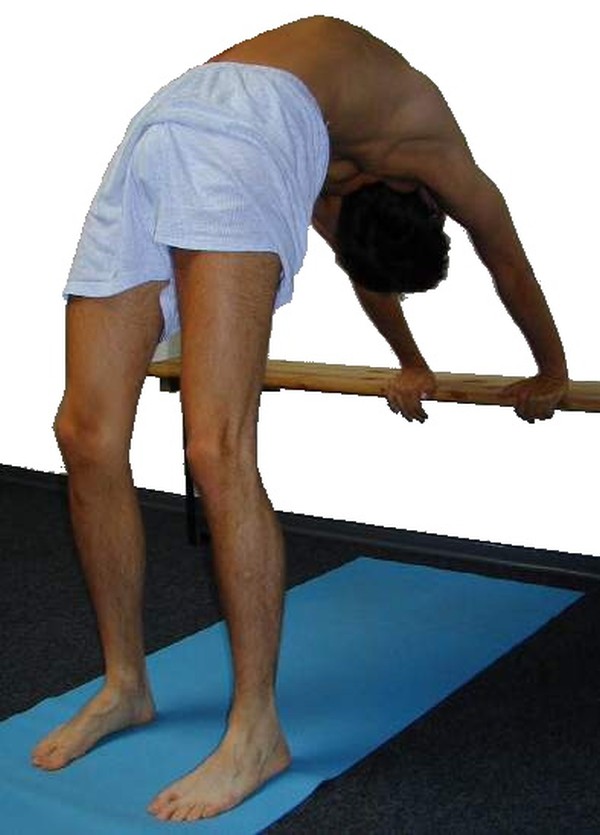
Press the sternum against the wall

Improves frontal abduction in the shoulder joints
instructions
- Place your wrists against the wall, fingers and body facing away from the wall.
- Take the bridge as described above.
- stretch from the knee joint to press the sternum against the wall.
details
- Being able to press the sternum against the wall requires a lot of flexibility of the shoulder joint in terms of frontal abduction. The first requirement is to be able to extend the arms. Then, as long as the elbow joints can remain extended, the sternum can be pressed further towards the wall. If the elbow joints start to bend, it no longer makes sense to push the sternum further towards the wall. Stretching the elbow joints better would be of greater value.
- Moving the sternum towards the wall not only places greater demands on the frontal abduction abilityin the shoulder joints, but also stretches the lumbar spine a little. On the one hand, this provides welcome relief, but on the other hand, it is important to check whether the stretching effect on the hip flexors is not being neglected and whether the distance between the feet and hands needs to be reduced for this purpose.
- Depending on the ability ofthe cervical spine to recline, the head may interfere. Keep your hands at a greater distance from the wall and use a block as a spacer between your wrists and the wall if necessary.
Hands on blocks

Relief of the wrists in cases of restricted flexibility of the shoulder joints or palmar flexors.
instructions
- Place two blocks lengthwise against a wall at such a distance from each other that the head fits well between them.
- From a supine position with your body facing away from the wall, place the two-fifths of the palm of your hand onthe blocks.
details
- Two fifths of the palm of the hand correspond to a good two finger widths. This dimension is chosen so that the hand only rests on the block in the area of the carpus, which usually transmits the greatest force anyway, and the rest of the hand can therefore tilt downwards well so that the wrist no longer has to assume such a sharp angle of dorsal flexion as it would with horizontal hands, i.e. hands resting on the floor. Angle relief is particularly important for people who are less mobile in the shoulder joints in terms of frontal abduction, which typically means that the shoulders are not as high and the arms are flatter to the floor. Otherwise, this situation often forces angles in the wrist that cannot be achieved, and certainly not without pain. The arms are pressed backwards and downwards against the block in the direction of the edge of the room so that the block cannot fall over, as might be the case if the block were pressed vertically.
- This use of aids often avoids painful movement restrictions and the strength of the arms and shoulders can be used unhindered, which can significantly improve the execution of the bridge.
- To get rid of the need to perform the bridge with blocks, both factors should be improved: shoulder flexibility in terms of frontal abduction and the flexibility of the palmar flexors of the forearm, which determine the pain-free angle that can be achieved in the wrist.
- The usual version of the bridge requires that the fingertips are under the shoulders at the beginning and after leaving the posture. Of course, this requirement cannot be met here. Nevertheless, the shoulders should move in the direction of the wall as much as possible, which comes close to the requirement.
- It is possible to extend the fingers pointing away from the block instead of flexing the fingers. However, this has the disadvantage that flexibility restrictions in the finger flexors (superficial and profound) can restrict dorsiflexion in the wrist. Flexed or „curled“ fingers regularly prove to be much more favorable in practice.
Hands on the bench
instructions
- Lie on your back in front of a low bench with your head turned towards it.
- Place your hands on the bench with only about the third of your palm on the wrist side.
- Inhale and lift the upper body into the bridge using the combined strength of the shoulders, arms, legs, autochthonous back muscles and the extension in the hip joints.
details
- The hands are initially placed on (or rather: against) the bench at a significantly different angle than they will later have in the bridge. It must be ensured that the hands cannot slip, which requires a minimum contact surface to be maintained. During the build-up to the bridge, the hands are placed more to the side of the bench and roll around the edge of the bench during the upswing. It goes without saying that aids with a sharp, hard edge can therefore be ruled out as a bench, but the edge must not be too soft either. It is also advantageous if the head can be pushed a little under the bench at the beginning, as the distance between the feet can then be chosen more favorably (smaller). Otherwise, it would be necessary to run in, which is more difficult due to the significantly greater load on the feet (see below) and jeopardizes safety when standing more than with a bridge on the floor. The bench must be secured against tipping over, either by standing against a wall or by having a person sitting on each end. This is important because during the initial swinging movement, it is almost impossible to prevent pressure from being exerted sideways against the bench. Once the bridge is in place, there is no lateral pressure, but it will reappear when you leave the bridge.
- The load distribution is significantly altered by the raised position of the hands: there is a noticeably greater load on the feet than on the hands, which makes it a little easier for people with less strong arms and shoulders to stand in the bridge once it has been taken up; on the other hand, taking up the bridge will be significantly more difficult. On the other hand, the greater load on the feet means that it is much more difficult to get into the bridge: the foot is harder to lift off the ground and the feeling of insecurity is much greater. It is not possible to run in with your hands instead of your feet due to the design of the posture. As is typical for the bridge, it is possible to take it up with momentum instead of force – although it is more difficult here – but the shoulder and head must be put down gently. Because the lift from the arms is significantly greater than in the variant on the floor, it is also correspondingly more difficult to leave: the shoulder area has to be lowered towards the floor over a much longer distance, and the last part of the path is also very unusual because it leads significantly further away from the maximum frontal abduction in the shoulder joints.
- Of course, the bench must not wobble or tip over! If the bench is placed with its long side against a wall, it must be checked whether its feet protrude beyond the seat, as this could cause it to tip over. It is far better if one supporter sits on each end of the bench and holds it in place without putting too much weight on the floor with their feet.
- This variation bends the lower back more than the usual version, so work the pomus muscles more vigorously.
- Lifting the body into the bridge is a very unusual movement for the arms, as the arm flexors are used first to lift the shoulder area and then the elbow joint is extended for further lifting.
Feet on the bench
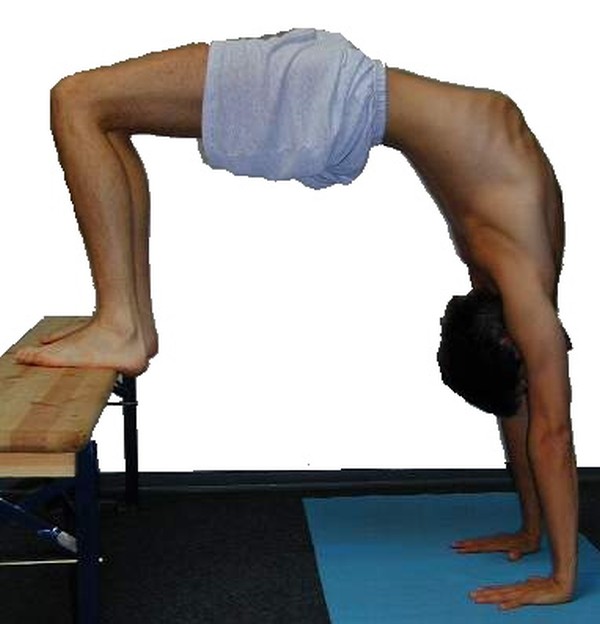
instructions
- Lie on your back in front of a low bench with your head turned away from the bench.
- Place your feet on the bench so that the front edges of your heels are not on the seat but on the side edge.
- Place your fingertips under your shoulders.
- Tilt the feet slightly towards dorsiflexion and lift the body into the bridge with a strong exhalation using the strength of the legs and arms.
details
- the feet on the bench are the reverse of the above variation with the hands on the bench and require significantly more strength in the arms. If the strength of the arms and shoulders is not sufficient, this pose cannot and should not be performed. The majority of the body weight rests on the hands, which is why the triceps and deltoids in particular have to work much harder than in the normal bridge on the floor. For many people, lifting the upper body is considerably more difficult. Once the arms are largely stretched, it becomes easier and easier and standing itself is no longer very difficult, especially as less flexibility is required in the shoulders. The main curvature of the body here is more in the form of extension in the hip joints and extension of the spine.
- As the posture is assumed, i.e. as the upper body is raised and the legs move accordingly, the feet roll more and more onto the bench until finally, when the posture is assumed, the soles of the feet are on the bench without the heels. At the beginning, the hamstrings is clearly involved in lifting the upper body. If there is a tendency to cramp in this group, the distance between the hands and the bench can be increased slightly.
- Special attention must be paid to exiting the posture, firstly this is quite strenuous, after all the shoulder and head must be placed slowly and gently on the floor, and this requires a little more strength than when exiting the normal bridge, and secondly the shoulder must be guided at the correct angle of frontal abduction. If the shoulder is pushed very strongly into frontal abduction, it is very easy to feel that the feet are becoming too light and there is a risk of losing control; on the other hand, if it is not stretched enough, leaving the bridge is all the more strenuous and you may not know whether you have enough strength.
- It is highly recommended to undertake the first execution with support as described below.
known problems that can occur even when executed correctly
Tendency to cramp in the back of the leg
As described above, the hamstrings can show a certain tendency to spasm when the body is lifted
Belt around the arms

instructions
- Place a belt around the upper arms near the elbows and take the pose described above.
details
- This variation can be helpful for people with limited flexibility of the shoulder joint and little strength in the triceps, as the limited flexibility of the shoulder joint forces the arms into lateral adduction (compared to 180°). The belt can largely prevent this, especially as it has a very good lever arm near the elbows. However, the friction of the belt on the skin or clothing also limits the ability to rotate the arms further in the stance – insofar as this is still possible at all.
- The belt should be directly on the elbow, on the one hand for maximum effectiveness in terms of the lever arm to the shoulder, in which lateral evasion occurs, and on the other hand the belt should not collide with the head or restrict its movement. In contrast to the elbow position, there is no freedom of choice as to whether the belt is positioned above(proximal) or below(distal) the elbow joint: Attach the belt to the upper arms and not the forearms, as the latter usually converge due to the bending tendencyof the elbow joints, which usually occurs with less mobile shoulder joints, and the belt then often slips towards the floor. If the belt is attached to the upper arms close to the elbows, this effect is reversed and bending the elbow joints would prevent slipping even more.
- As the belt prevents lateral adduction and endorotation is prevented to a certain extent by the friction of the belt, the shoulder can be stretched strongly in the direction of frontal abduction almost without evasion.
- As the forearms are usually convergent towards the floor due to the bending angleof the elbow joints as a result of flexibility restrictions in the shoulder joint, a belt placed around the forearms would slip off quite regularly.
- This variation is perceived as easier, especially in the triceps, which are far less involved in stretching the elbow joint.
Belt around the legs

instructions
- Place a belt hip-width apart around your thighs near your knees and take the pose described above.
details
- The belt counteracts the greatest tendency to deflect when stretching the hip flexors: in this posture, the iliacus and psoas major hip flexors cause forces that turn the leg out; in addition, the gluteus maximus muscle used for maximum extension in the hip joints and thus minimization of hyperlordosis of the lumbar spine also causes abduction with exorotation. Even if the belt can only reduce exorotation via friction, abduction is completely prevented so that the hip flexors can be stretched without the otherwise necessary strength endurance of the adductors.
Belt around the feet

instructions
- Place a belt around the forefoot so that it is held hip-width apart. Optionally, a block can also be placed between the heels to block their inward movement.
details
- The feet also want to move apart at the front following the exorotationand abduction inclinationof the entire legs. This is prevented by the belt. The belt must not be attached to the little toe, but should be as far forward as possible for an optimal lever arm, i.e. it should lie on the metatarsophalangeal joint area.
- Of course, this use of the belt can be perfectly combined with the belt around the legs described above.
with block

instructions
- Take the pose as described above, but hold a block with your thighs close to your knees.
details
- Holding the block with the thighs ensures that the adductors are used so strongly that the knees do not fall so far apart that it falls down. The block often makes it clear how much the knees fall apart without the powerful use of the adductors. This can also be illustrated by a supporter slowly pushing the knees back together to hip width from a normal bridge. The performer can usually perceive the distance traveled quite well and is often amazed at how great it is.
- The block should be as close to the knees as possible, but should not touch the femoral condyles.
Hands turned over
More advanced version, which can also be used for more severe wrist problems
Effects:
(331) Stretching to pronate the forearm
instructions
- Take the pose as described above, but do not turn your hands towards your feet but 180° away from your feet, so that the tendons of your middle fingers point parallel away from your feet.
details
- This posture places greater demands on strength and flexibility, not least in the forearm muscles. On the other hand, if the distance between the hands and feet is large enough, it avoids pain in the dorsal sides of the wrists.
- Due to the approximate final degree of supination in the forearms, the situation in the shoulder joints changes with easier and usually increased exorotation, which makes frontal abduction somewhat more difficult. The approximate final degree of supination makes it difficult to keep the palm on the ground, which results in reduced friction of the hand on the ground, further exacerbated by the lateral deviation of the arms and elbows. This is further aggravated by the working range of the palmar flexors and finger flexors in the long sarcomere length with reduced force according to the force-length function, so that the muscles mentioned cannot guarantee that the palm does not turn outwards due to a lack of pressure in relation to the wrist. This is why there is a corresponding support.
(P) Hands turned over

instructions
- Take the hands upside down variation as described above. The supporter presses the backs of the hands to the floor with their own hands or feet placed crosswise to prevent the palms from turning outwards in relation to the wrist.
details
- The force applied should be sufficient, but the pressure felt should be comfortable. To achieve this, pressure should be applied with the muscular part of the hand or foot, i.e. in the case of the foot, mainly with the inner foot placed at an angle of 30 – 50°.
- The supporter standing on the performer’s hands can support the lifting of the shoulders at the same time. The supporter also has a good view of how far the elbows move outwards and can push them towards each other if this does not exceed the strength of the performer. The position is also ideal for pulling the shoulders away from the feet into further frontal abduction when the bridge is in place.
Take slowly and precisely
instructions
- Take the pose as described above, but do not take any momentum and try to keep the speed very low, possibly even pausing briefly repeatedly when assuming the posture. If possible, keep your elbows shoulder-width apart and your arms in parallel vertical planes.
Details
- As already described in the basic posture, momentum is often required to take up the bridge. The momentum replaces non-existent strength. The aim here is to apply the force required to get into the bridge without swinging. If possible, the elbows should also be prevented from moving outwards. This shifts the working range of the performing muscles to less favorable areas, which requires more strength.
(P)
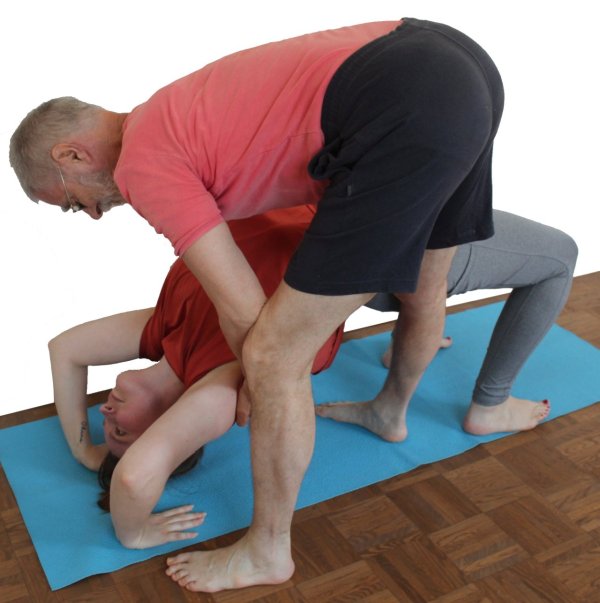
Assistance in adopting the posture
instructions
- There are two different ways of supporting the bridge from the outside; the more favorable one will be described here first. If this is not possible, the other, which is described in the details, must be used.
- The performer lies on the floor and tries to take the bridge.
- The supporter stands above the performer at about the level of the lower ribcage, one leg to the left and one to the right of the performer’s upper body.
- If the elbow joints cannot be extended, the supporter grabs both shoulders with their hands from the back of the shoulders facing the floor and lifts them up. The pull is upwards and tends to be away from the feet in order to improve frontal abduction.
details
- There are some difficulties in assuming the bridge, as only the sum of some cardinal flexibility requirements makes this posture possible: hip flexors should allow a real extension in the hip joints and this should be as large as possible and secondly, the shoulders should reach at least 180° in the direction of frontal abduction without deviating into lateral adduction or endorotation of the arms. There is also a requirement for flexibility of the wrists, which is all the greater the less mobile the shoulder joints are. In addition, the lumbar spine and thoracic spine also require flexibility in the direction of extension. However, a completely different type of requirement is the necessary strength of the shoulders(deltoids) for frontal abduction, which must be performed with a large exorotation of the arms. With regard to difficulties with the shoulders, we mainly observe two body types: those who do not have the strength for frontal abduction and cannot lift their shoulders off the ground and those who can lift them but cannot extend their arms. In the latter case, it must be assumed that the antagonists for frontal abduction, i.e. the adductors of the shoulder joint such as the latissimus dorsi and especially the teres major, offer too much resistance. The teres minor plays a lesser role as it exorotates in the shoulder joint. The support described is helpful for both types.
- If the proportions of the two, performer and supporter, are too unfavorable, i.e. the performer is too tall and the supporter too short, there will not be enough space for the performer under the supporter’s pelvis to fully occupy the bridge and the upward movement of the upper body will be blocked. In this case, the second type of support should be used instead of the first.
- In the first variation, the supporter stands above the performer with slightly bent knees, a straight back and significant flexion in the hip joints in order to lift the shoulders as much as necessary. In cases where only lifting the upper body was difficult due to a lack of strength, it is often possible, once a certain angle in the elbow joints has been exceeded, to extend further under your own power and remain standing in the bridge without outside help. However, support may then be needed again to get off the bridge, even more so than to get on the bridge, as momentum can be used for this; putting the shoulders and head down, on the other hand, should be done without any momentum, using only strength. Even if the lowering is performed with all relevant muscle groups in eccentric contraction and the body loses potential energy, the more strength-requiring factor of swing-free, controlled lowering may outweigh the other two factors, especially as the current resources may have been reduced after the posture. For this reason, the supporter must always anticipate the need for support when leaving the bridge. The support is somewhat similar to the deadlift exercise known from weight training. The supporter follows the movement of the upper body for as long as support is required. If the supporter senses that the performer can extend the elbow joints further under their own power or remain in the bridge, they do not move away from the performer because, as described above, it is possible that the performer will need support to leave the position.
- In the second variation, the supporter stands with both legs on one side of the upper body, still with the knee joint slightly bent and the back stretched, and also provides the required support from the strength of the hip extensors by reducing the flexion in the hip joints. Here it is less easy to pull evenly on the shoulders and the supporter is also tilted further forward, so that the leverage ratios become less favorable and the limits of the strength of the back must be taken into account. The asymmetry of the support puts more strain on one side of the supporter’s back than the other!
- It is not uncommon to see less experienced people trying to help others into the bridge by lifting on the lower back. If this pull is on the head side of the hip joints, this is wrong because the hip joints are pulled out of extension and the lumbar spine is more lordoticized, which increases the tendency to discomfort in the lower back. If support at the shoulders is contraindicated for any reason, the lift must be performed in the area on either side of the hip joints, for example in the buttock crease between the buttocks and the back of the thigh. It should also be noted that the greater difficulty usually lies in the shoulders, i.e. the weaker upper limb, from which the support is now significantly further away and only has a weak effect on a long lever arm; however, lifting the shoulders has a direct effect where it is needed most.
- Pay attention to the direction of the pull: upwards and away from the feet, never towards the feet!
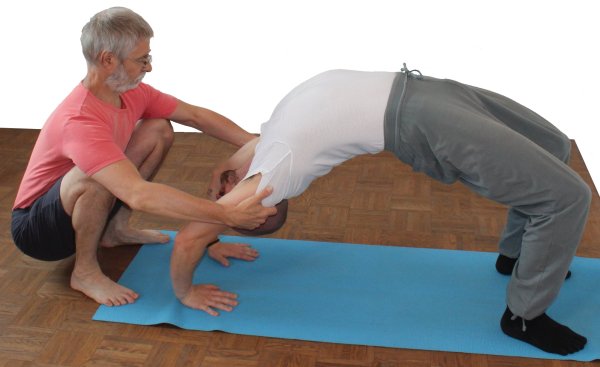
(P) Feet fixed

instructions
- Prepare for the bridge. The supporter stands on their front feet at an angle, their heels remain on the floor and the arches of their feet fix the performer’s front feet so that they do not turn out.
- Take the bridge as described above.
details
- As described above, the thighs tend to exorotate and abduct. These forces continue to act on the lower leg and foot. As the knees spread apart, the inner feet are lifted as the lateral angle of the lower legs to the floor is reduced. If the feet are fixed, the inner feet remain on the floor, but the knees continue to have the same tendency to move out of the way. It therefore makes sense to combine this support with squeezing the knees together or with a belt around the thighs, as described above.
(P) Keep your knees together

instructions
- Take the bridge as described above.
- The supporter uses his own thighs close to his knees to press the thighs close to his knees together at hip width.
details
- This counteracts the tendency of the thighs to abduct in combination with exorotation described above very well and relieves the performer of the necessary work of the adductors. At the same time, the more precise execution results in better stretching of the hip flexors and the performer can focus more on important details such as the work of the extensors of the hip joint (especially the gluteus maximus pomus muscles) and greater use of force by the quadriceps and the avoidance of the resulting evasive movements in the form of lateral adduction in the shoulder joints and flexion of the elbow joints.
- To avoid the pressure of the joint areas against each other, pressure is applied to the femur near the condyles, which may be perceived as uncomfortable pressure. A blanket on both outer sides of the thigh can alleviate this.
- This support also largely prevents the feet from turning out as described above.
(P) Turn out arms
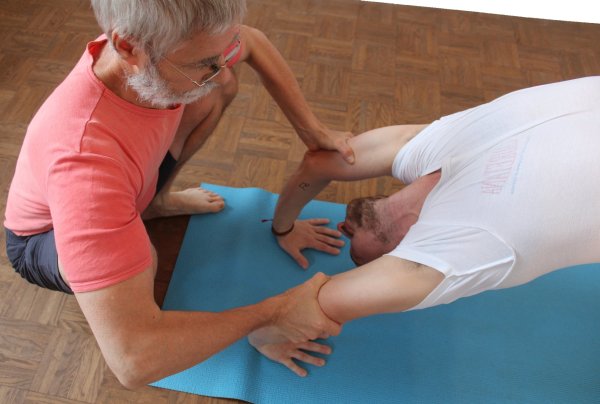
Helps to untwist the upper arms, reduces the tendency to cramp.
instructions
- Take the bridge as described above.
- The supporter sits or kneels at the side of the head and rotates the two upper arms of the performer with the hands approximately at their center, pushing them towards each other to support the extension of the elbow joints.
details
- By stretching the elbow joints and improving exorotation, the shoulders may be forced to deviate slightly from the previous degree of frontal abduction. In this case, the performer is required to extend the legs more powerfully in the direction of the hands.
- This support can help to reduce the uncomfortably high, cramp-like tension in the posture if the anterior shoulder muscles(deltoideus pars clavicularis) or trapezii are overstretched. The pars clavicularis is particularly prone to cramping as it performs lateral abduction in the shoulder joint in the direction of 180° and beyond and is therefore involved in limiting the outward deviation of the arms.
(P) pull on the arms
Improves frontal abduction, reduces stress in the dorsal wrists.
instructions
- Take the bridge as described above.
- The supporter sits at the side of the head and pulls the upper arms towards them in the middle with a twisting movement while supporting the performer’s wrists with their feet so that they cannot slide towards them.
details
- The pull on the upper arms achieves two desirable things at the same time. On the one hand, frontal abduction in the shoulder joints is improved, but the performer must be careful to keep both dimensions of the dodge in view and under control. On the other hand, the forearms are positioned more steeply towards the floor, which makes the angle of dorsiflexion in the wrist more favorable and reduces the tendency to dorsiflexion in the dorsal wrist.
- The pull does not go exactly horizontally away from the feet but also a little upwards, i.e. corresponding to the arc that the upper arms describe with the shoulders around the wrists, so the pull goes away from the feet orthogonally to the upper arms.
(P) Keep elbows tight
instructions
Details
- This variation is not suitable for beginners. It should only be practiced when the bridge can be performed without momentum, i.e. when there is sufficient strength in the muscles of the upper extremities, especially the triceps and deltoids.
- If the elbows are held at shoulder width by the supporter, the working range of the deltoid, for example, shifts towards less favorable sarcomere lengths, in which less force is available according to the force-length function. This often means that the bridge cannot be taken in this way, although this would otherwise not be a problem. The supporter may then have to release the elbows a little (allow them to move out of the way) so that the bridge can still be taken.
Support for hands on the bench
instructions
- The supporter stands to the side of the performer and, if necessary, reaches under the performer’s shoulders with both hands to help them through the difficult area between the final bend of the arms and the initial stretch. If necessary, he provides the same support again at the end of the posture.
Details
- This transition not only includes a transition from flexion of the elbow joint to extension as described above, but the distance between the shoulder area and the bench must also be increased when assuming the posture so that the lever arm and thus the force to be applied is not too great. The supporter therefore supplements the required force where and insofar as necessary.
Support for feet on the bench
instructions
- The supporter stands facing away from the bench to the side of the performer and, if necessary, reaches under the performer’s shoulders with both hands to help them lift the shoulder area. When ending the posture, the supporter may provide the same support again
Details
- Due to the height difference, this version is much more difficult to perform, so that support is often required. In addition, many performers are initially unclear where to move the shoulders. If they are moved too far towards the wall, the horizontal lever will be too unfavorable for the deltoid and the force exerted will be even less than with a favorable lever arm. The support therefore relates both to applying the missing force and, if necessary, to guiding the shoulder area with regard to the distance from the wall.
Transition to karnapidasana

instructions
- From the bridge, place your upper body with your head and pelvis on the floor and keep your feet up.
- Pull your legs up towards your upper body and round your back from the pelvis.
- Roll with the swinging movement in karnapidasana.
details
- The transition to karnapidasana is not a direct one but consists of two parts: the lowering of the back and the transition into karnapidasana, but in the extended sun salutation, for example, this transition is relatively smooth.
- Since the upper body is lowered from the shoulders and the pelvis has to be lifted for karnapidasana anyway, there is of course no need to put it down heavily in the first place.
- The legs can be pulled towards the upper body with a lot of momentum because they are already in this position close to the upper body in karnapidasana and this results in a very dynamic movement in karnapidasana. If there are significant flexibility restrictions, the swinging movement must be handled with appropriate care so that the cervical spine is not overstrained. The swinging movement is largely stopped by the feet touching the floor, but the swing still pushes the pelvis and upper body a little further due to the inertia. Only use enough momentum to allow the cervical spine to tolerate the required degree of flexion and extension!
- Of course, this transition must not be carried out if events in the cervical spine, such as an intervertebral disc event, prohibit it!
- The hip flexors are crucial for creating the swinging movement, the abdominal muscles are also involved by flexing the spine. Allow both groups to soften again in karnapidasana.