yogabook / asanas / hip opener 1
Contents
„hip opener 1“
 instructions and details with working links as PDF for download/print
Feedback: We’d love to hear what you think about this description, give us feedback at:
postmeister@yogabook.org
Last modified: 30.12.2018
trivial name: hip opener 1
Level: FA
- classification
- contraindications
- effects
- preparation
- follow-up
- derived asanas
- similar asanas
- diagnostics
- instructions
- details
- variants
Classification
classic: hip opening
physiological: hip opening
Contraindication
In the case of a herniated disc, it is possible that the slightly rounded back will cause the familiar symptoms again. However, it can usually be observed that the pull of the iliopsoas of the extended leg relieves the lumbar spine to such an extent that no discomfort occurs. In addition, there is little load on the intervertebral discs due to the support with the hands.
Hallux valgus, hallux rigidus and hallux limitus can prohibit the foot posture of the extended leg, so that this pose must be performed with the ankle extended instead. The same can apply to metatarsalgia.
Effects
- (812) Strengthening of the quadriceps
- (712) Stretching the short hip extensors (especially the gluteus maximus)
- (711) Stretching the hip flexors
- (831) Stretching the sartorius muscle
Preparation
An important preparation is that of the quadriceps, which have to work hard in this pose to keep the knee of the back leg extended. This is particularly interesting and demanding for its biarticular part, the rectus femoris. Both areas (rectus femoris and the three monoarticular parts of the quadriceps) can benefit if increased tension is reduced beforehand. So stretch them too:
The cardinal item of this pose is the stretching of the hip flexors, for which the 1st hip opening is the most uncomplicated basic exercise, and the least prone to side effects. In this sense, hardly any poses can be specified as preparatory, but the following are synergistic with regard to the stretching effect on the hip flexors:
- downface dog backwards against the wall with one leg lifted
- upface dog
- hip opener 2
- hip opener 3: hip flexibility in the direction of extension is only one of two major tasks in this pose
- warrior 1 pose
- urdhva dhanurasana (back arch)
- ustrasana (camel)
- setu bandha sarvangasana
and other backbends with extension in the hip joint.
If there are clear stretching sensations in the adductors in the case of less good flexibility, this is because they also have a hip-flexing effect. They are not actually the target group for this pose, but they can also restrict extension in the hip joint. If they become noticeable due to intense stretching sensations, prepare with:
- baddha konasana
- supta baddha konasana
- adho mukha supta baddha konasana
- warrior 2 pose
- parsvakonasana
- counter
- caturkonasana
If you are less flexible, you may feel a clear stretch in the biceps of the front leg, less often in the inner hamstrings. In addition to the above general forward bends, the leg biceps can be prepared:
- hip opener at the edge of the mat with larger angles in the knee joint
- hip opener 3 with a larger angle in the front knee joint
Low flexibility of the monoarticular extensors of the hip (glutes) may get in the way of lowering the pelvis and therefore stretching preparation may be helpful:
- half lotus forward bend
- hip opener at the edge of the mat
- hip opener 3
- parivrtta trikonasana
- parivrtta ardha chandrasana
- malasana
- maricyasana 1
- maricyasana 3
Wrap-up
Derived asanas:
Similar asanas:
Diagnostics (No.)
This is not a pose in which, as is so often the case, reduced flexibility of the hip flexors causes a hollow back, but with less flexibility the pelvis cannot sink far, the flexion angle of the extended rear leg is then very high.
(886) Knee:
In this pose, knee problems, both those associated with wide flexion under load (front leg) and those associated with extension under load (back leg), may become apparent. These can be, for example: traumatic or degenerative meniscus damage, arthrosis/osteoarthritis, arthritis, subluxations, ligament damage, plica syndromes, Hoffa syndromes (of the extended leg), retropatellar cartilage damage (chondropathia patellae, retropatellar arthrosis/osteoarthritis) and others, see the FAQ.
(960) Foot:
In this pose, misalignments (subluxations) of foot bones, usually tarsal bones or the metatarsal bones, can become noticeable directly or in the neighbouring joints. In addition, in the case of hallux valgus, the metatarsophalangeal joint area of the big toe will show increased pressure pain. Metatarsalgia is pain due to pressure or movement in the area of the ball of the foot and can have various causes.
Variants:
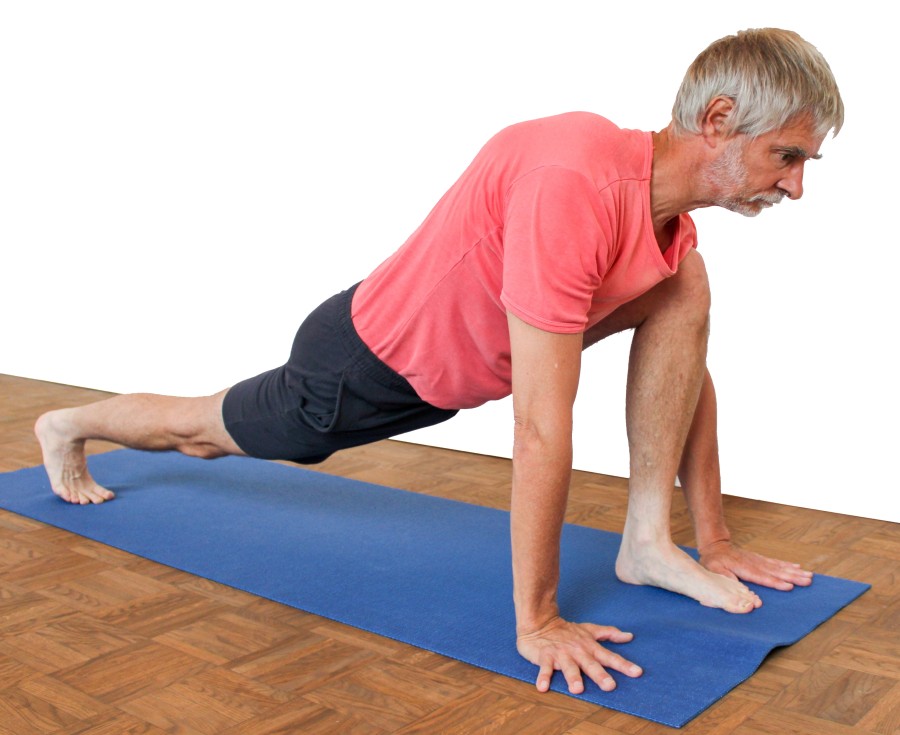
Instruction
- Take head down dog position.
- With momentum, bring your right foot to the floor between your hands so that your lower leg is vertical.
- Lower the pelvis as far as possible towards the floor, but extend the back left leg fully.
- Use the strength of the front leg to push the body backwards without lifting the pelvis and look upwards as far as is comfortable for the neck.
Details
- This pose is also known as Utthita Ashva Sanchalanasana (the sprinter).
- The hip opener 1 is one of the most important stretches for the hip flexors, especially the iliopsoas, which is located in the pelvis. Due to its origin in the lumbar spine (psoas major and 12th thoracic spine) or the ala of ilium (iliacus) and its attachment to the upper inner thigh (trochanter minor), it is stretched when the pelvis sinks and the angle of the thigh to the pelvis moves further and further from flexion towards extension in the hip joint. As these are very strong muscles, the force and duration required to stretch them is not exactly low. In addition, the iliopsoas is potentially actively shortened by many activities that involve walking or running movements, as well as passively by prolonged sitting. This shortening leads to a hollow back when standing upright with the knee joint extended and jeopardises back health in the long term. The hip flexor flexibility test in a prone position provides less information about the presence and degree of shortening, as it tends to assess the flexibility of the rectus femoris. Tests focussing on the iliopsoas are more helpful here.
- Due to the pull of the hip flexors, which pull the proximal thigh towards the floor, the posterior left knee joint has a large flexion tendency, so that it must be repeatedly tested for extension and usually extended again. The stretching effect on the hip flexors depends directly on the extension of the posterior knee!
- The question is sometimes asked whether the front knee should be at a right angle. This is not the case. Although the lower leg is vertical, the pelvis will sink further and further as flexibility improves and thus the thigh will move further and further away from the horizontal, so the angle should be as small as possible.
- As in downface dog and upface dog and in staff pose, push the body backwards here too, i.e. the heel should extend as far as possible beyond the ball of the foot in dorsiflexion of the ankle. In this position, the backward pressure comes from the quadriceps of the front leg. As this stretches the knee, care must be taken not to lift the pelvis by pushing backwards, as this should be maximised!
- Depending on individual flexibility, the pelvis can become laterally tilted in this position. This is not detrimental to the effect as long as the hip joint of the rear extended leg is not higher than the other. Which of the two hips is higher in the pose is determined by the relationship between the flexibility of the iliopsoas (rear leg) and usually the short hip extensors (front leg). If the latter are, relatively speaking, less mobile than the iliopsoas, the hip of the extended leg will be lower.
- The arms are maximally turned out so that the inner elbows point approximately forwards.
- In some cases, depending on body proportions and flexibility, there may not be enough arm length to place the palm of the hand on the floor, in which case place the hands on blocks or place the fists on the floor.
- Depending on your flexibility, it may be very difficult to place your foot between your hands. Use all the tools at your disposal to do this: swing, lift your pelvis slightly in between and, if necessary, even briefly lift your right hand off the floor while leaning on your left hand so that you can swing your foot forwards over the outside. Another option is to „crawl“ forwards with your toes.
- It is not uncommon for a rotational movement of the rear leg to occur in the form of an external rotation in the hip joint as an evasive movement, in which case the rear heel moves inwards versus the ball of the foot, since the strongly pulling iliopsoas attaches to the inner thigh (lesser trochanter). Then consciously lift the inner knee more as you straighten the leg.
- The knee of the front leg goes forwards through the armpit, the better the flexibility, the less pressure the body structures there will put on the leg. Initially, however, you may feel as if you are hanging heavily on your thigh.
- Because the front lower leg is vertical, the whole sole of the foot can rest on the floor with a reasonably even distribution of pressure.
- Position the head in line with the thoracic spine. If it is not uncomfortable in the neck, the head can also be slightly reclined (backwards), which tends to be in favour of the pose and the sinking pelvis, as the effective lever with which the head lifts the pelvis over the back is reduced.
- Depending on the flexibility of the gluteus maximus, it pushes the front knee outwards. This may be a hindrance when swinging the leg forwards into its position. Once the leg is in position, this tendency to deviate becomes noticeable as outward pressure against the arm. This is due to the required sharp flexion to which the hip extensor gluteus maximus, which also turns out and abducts, respond with corresponding external rotation and abduction in the hip joint.
- Sometimes stretching is felt not only in the glutes, but also in the hamstrings of the front leg if flexibility is less good, especially in the biceps femoris muscle, see also the preparations above.
- If there are significant restrictions in flexibility, stretching sensations may also be felt in the adductors of the front leg; preparations can be made as described above. Rarely, adductors of the rear leg may also be affected. However, this effect is usually outweighed by the hamstrings of the front leg, which are usually no less restricted in flexibility.
- With good flexibility of the hip flexors, the rear leg becomes approximately horizontal and corresponds to that in the staff pose.
- discomfort in the metatarsophalangeal joint area of the rear foot may be metatarsalgia, for which various causes are possible. It is also possible that the body is simply not being pushed backwards hard enough, because if this were to happen, the metatarsophalangeal joints would be brought into a more moderate dorsal flexion requirement. As already mentioned in the contraindications, hallux valgus, hallux rigidus and hallux limitus as well as metatarsalgia may make it necessary to extend the ankle joint of the rear leg and to rest your lower legs on an elevation.
Variants
Side change jumping

Instructions
- Take the pose as described above.
- To change sides, simultaneously pull the back foot forwards and jump backwards with the front foot to switch the position of the feet.
- Once the side change has been completed, correct the pose again.
- Continue changing sides as you wish.
Details
- Changing sides when jumping requires a certain degree of flexibility so that the foot can be pulled far enough forwards, especially in the hip extensors: the short glutes and the biarticular hamstrings. A lack of flexibility here means that the thigh of the leg to be pulled forwards does not come close enough to the upper body (in the case of the glutes), or the leg to be pulled forwards cannot be extended far enough at the knee (in the case of the hamstrings), as a result of which the foot does not reach far enough forwards to set it on its entire sole or the tips of the toes touch the ground. This can be remedied by keeping the pelvis higher when jumping, either by consciously lifting the pelvis more, i.e. jumping a little more off the ground, or by placing the hands on an elevation, e.g. on blocks (see above).
Blocks can be particularly helpful for learning to jump, but be very careful not to hit the blocks with your toes, so place them at a sufficient distance from each other and aim for the position you want to take with your current back foot. - Place the foot far enough forwards and immediately place the entire sole of the foot on the floor. Pulling the back foot forwards requires a little „aiming“.
- Both feet should land on the floor at the same time.
- Ideally, the arms should be still and motionless.
- As soon as the back foot has landed on the floor, straighten the back knee joint quickly and completely.
On blocks

Instructions
- Take the pose as described above, but place the palms of each hand on a block.
Details
- Depending on body proportions and flexibility, it may be impossible to place the palms on the floor and therefore require some form of support. The hands can be placed on blocks or placed on the floor as a fist if this is sufficient. If there is uncomfortable pressure on the knuckles, use a softener underneath, such as some patches. When the fists are placed on the floor, their palms should face each other.
knee dopped
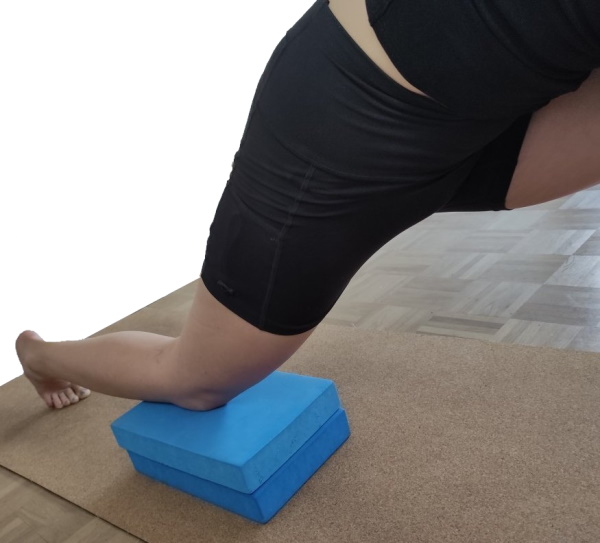
Instructions
- Take the pose as described above, place the knee of the back leg bent on a support.
Details
- This variation dispenses with the extension of the back leg, freeing the quadriceps from their hard work. This can be particularly helpful if the strength or endurance of the quadriceps is rather low, as the stretching effect on the iliopsoas no longer depends on the extent of the extension of the back leg. As a rule, the pelvis can then sink recognisably further towards the floor. However, there is then a greater risk that limitations in the flexibility of the hip extensors of the flexed front leg will restrict the movement of the pelvis towards the floor: on the one hand the gluteus maximus, but on the other hand also the hamstrings. Since the hip joint is extremely flexed, the degree of flexion of the front leg may not be able to compensate for the flexion in the hip joint, resulting in stretch discomfort in the hamstrings and a restriction of the movement of the pelvis towards the floor.
- This variant is also very suitable for relieving painful MTP, for example in the case of metatarsalgia. If necessary, the rear foot can also be stretched.
(P)

Instructions
- Try to assume the stance as described above. If you realise that this is impossible without assistance, support yourself with the contralateral hand of the leg to be pulled forwards on the shoulder of a supporter who will help you to move the foot far enough forwards.
Details
- The weight transferred to the shoulder of the supporter serves to relieve the foot sufficiently so that the supporter can pull it forwards with both hands.