Contents
- 1 malasana„garland“
- 2 Variants
- 2.1 half
- 2.2 Forward bend
- 2.3 Forward bend with holding on
- 2.4 Alternate between forehead and buttocks on the floor
- 2.5 Forward bend with buttocks on the floor
- 2.6 Hands behind the back
- 2.7 urdhva hastasana
- 2.8 urdhva hastasana with raised heels
- 2.9 (P) urdhva hastasana
- 2.10 (P) Forward bend
- 2.11 (S) Hands behind the back
malasana
„garland“
 instructions and details with working links as PDF for download/print
Feedback: We’d love to hear what you think about this description, give us feedback at:
postmeister@yogabook.org
last update: 12/30/2018
Name: malasana
Trivial name: Garland
Level: A
- Classification: A
- Contraindication
- Effects of
- Preparation
- follow-up
- derived asanas
- similar asanas
- diagnostics
- Instruction
- details
- Variants
Classification
classic: sitting pose
Physiological: excellent pose for pronation of the ankle with simultaneous significant or maximum dorsiflexion
Contraindication
In the case of herniated lumbar disc, this pose may only be performed if the back can be kept straight. The variant with a passive back and the forward bend are therefore prohibited. The same applies to the posture of the head in the case of an intervertebral disc problem in the cervical spine. Anyone who has a bent foot, bilateral or unilateral, with or without a clear manifestation of fallen arches or flat feet, should also refrain from malasana, as the hindfoot valgus present in these disorders is usually due to a weakness of the supinating and plantarflexing posterior tibialis or its executing tendon, which are stretched in this pose with further dorsiflexion and pronation, which would be likely to exacerbate the disorder, which is not easy to treat anyway.
Effects
- (842) Strengthening of the dorsiflexors
- (852) Strengthening of the monoarticular calf muscles (soleus)
- (872) Strengthening the pronators of the ankle joint
- (726) Stretching the short / monoarticular hip extensors
- (871) Stretching the pronators of the ankle joint
- (851) Stretching the monoarticular calf muscles (soleus)
- (861) Stretching the supinators of the ankle
Preparation
Follow-up
Derived asanas:
Similar asanas:
Diagnostics (No.)
Variants:
alternate between forehead and buttocks on the floor
forward bend with buttocks on the floor
urdhva hastasana with elevated heels
Instruction
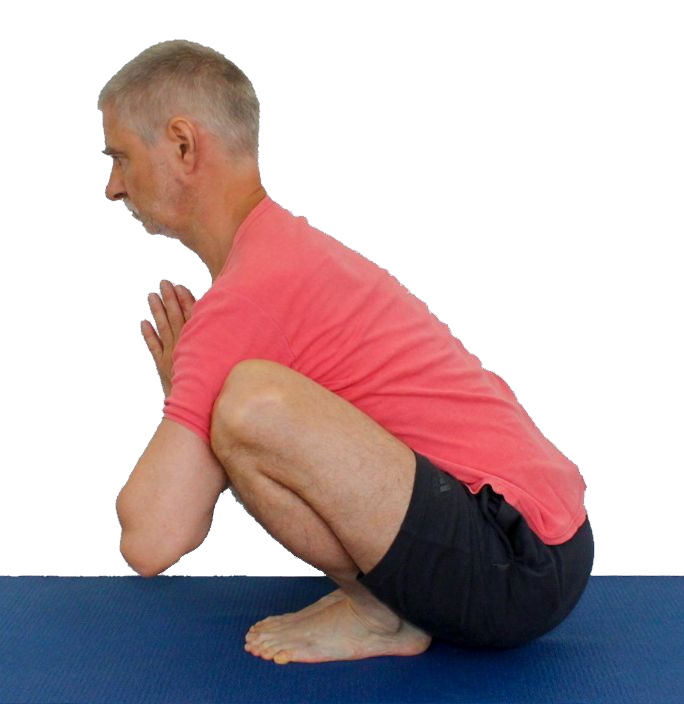
- Place the feet parallel or slightly open but with the heels closed and squat down with maximum flexion in the knee joints.
- Straighten your upper body and hold your hands in front of your chest as in namaste.
Details
- In order to perform the pose as physiologically as possible, the legs should be maximally bent at the knee joint without rotation of the lower legs in the knee joint, i.e. neither external rotation nor internal rotation. The angle of the feet should therefore correspond to that of the thighs and lower legs, i.e. the legs should be in planes that diverge forwards and upwards. At the same time, the upper body must fit between the legs for good flexibility, which is not compatible with closed feet. In the forward bend, it must even be able to move forward through them. It is therefore important to determine once the angle of the feet in relation to each other at which the posture can be performed correctly. The heels should touch each other for the best possible pronation of the ankles, after all, this opportunity must not be wasted, no other exercise can train pronation and also eversion of the ankle so intensively.
- In the event of knee damage, this pose may have to be avoided. A good test is virasana. If virasana cannot be performed without pain, there is a high probability that malasana will also cause discomfort. Conversely, malasana cannot always be performed without pain if virasana was problem-free because the load on the knees is not identical. Although the knees must be bent to the maximum in both poses, the weight of the upper body in malasana pushes the tibia forward (anteriorly), which should be absorbed by an intact anterior cruciate ligament. If there is any doubt about the health of the ligaments of the knee joint, especially the anterior cruciate ligament, malasana should be avoided until clarification has been obtained. The anterior drawer test and the gravity sign/Godfrey test provide indications. It also cannot be completely ruled out that extremely long or frequent lingering in the pose stretches the anterior cruciate ligaments in an undesirable way or changes the capsular tension. This is controversial among anatomists and orthopaedists, but there are known cases in which very frequent and prolonged application of force to the anterior cruciate ligament has led to its overstretching. Even if the anterior drawer test was not necessarily positive, a positive gravity sign/Godfrey test showed this.
- The upper body has a clear tendency to bend in this pose. Stretching the upper body may not be possible for many people at first. An attempt should then be made to achieve an even curve. Depending on the flexibility of the monoarticular/short hip extensors and the dorsiflexion capacity of the ankles, the upper body may even have to be bent (flexed) so that the gravity perpendicular does not move behind the heels.
- The head should be in line with the thoracic spine and not bent into the neck.
- In many poses with widely bent hip joints, in which the weight of the upper body acts on the legs to further bend the hip joints, there can be a tendency to cramp in the hip area; the rectus femoris, maybe also the tensor fasciae latae, is usually particularly affected, as it stabilizes the position of the upper body via the pelvis.
- Similar to namaste in tadasana, the elbows sink backwards and inwards and the shoulder blades are also in depression (moved towards the pelvis) and retraction (moved towards the spine ).
- The dorsiflexors of the ankle and the toe extensors can be used to shift the body’s center of gravity further forward, but they should remain as soft as possible as they tend to cramp easily. On the other hand, this pose can also be used to promote the strength endurance of the dorsiflexors if the upper body is stretched. If this is not enough, the urdhva hastasana variant is a good option.
- For the risks and side effects of the long squat in terms of tibial plateau syndrome and overstretching of the anterior cruciate ligament, see also the details on the squat 1 position.
- This is an outstanding pose for pronation of the ankle with simultaneous significant or maximum dorsiflexion and possibly the only one with eversion of the foot. In both dimensions of flexibility, the exact opposite of what the minimal muscle tension of the lower leg would dictate at rest is practiced to a greater or lesser extent, namely inversion of the foot (with supination and plantar flexion). Anyone who observes the position of the feet in savasana can easily understand this. There are many poses with more or less, sometimes very strong supination, but very few with pronounced pronation. This pose is therefore very valuable for the health of the ankle and lower leg muscles.
- As described in the contraindications, malasana should not be practiced in the case of a kinked foot, with or without fallen arches or a flat foot, or in general in all disorders with hindfoot valgus, so as not to exacerbate the underlying weakness/overstretching of the supinating and plantarflexing posterior tibialis in these disorders by further stretching in this pose with wide dorsiflexion and pronation. Malasana is a pose that is easy to perform with very wide dorsiflexion of the ankle (a movement primarily of the talocrural joint), which can also be held for longer and contains a complete release of the gastrocnemius, so that every dorsiflexing moment stretches the soleus without restriction. If malasana is praticed for this reason, the pronation that arises in this pose can be voided with an appropriate aid that eliminates the pronation – and if not yet contracted – also the hindfoot valgus. The inner foot must be supported accordingly. Ideally, a beveled surface with appropriate friction is used under both feet.
- In contrast to the frequent disorders with hindfoot valgus, malasana is ideal for disorders with hindfoot varus.
Known problems that can occur even when performed correctly
Knee problems with frequent long-term execution
See under Details.
Lower back
The lower back is rarely overstrained by the posture.
Variants
half

Instructions
- Take the pose as described above, but do not fold your hands in namaste but fold them in front of your chest and do not stretch your upper body straight but hold it in minimal tension, which will result in a certain roundness.
Details
- This slimmed-down version may be more beneficial for people with a strained lower back than the one described above, as no part of the autochthonous or other back muscles has to work significantly. The maxim here is not to stretch the back straight, but to keep the back as relaxed and problem-free as possible. However, this variant is contraindicated for acute disc problems.
- In addition, the center of gravity is more favorable, which can be of great importance in the case of significantly restricted flexibility of the monoarticular / short hip extensors and restricted dorsiflexion of the ankle joint.
- The head can be bent forward to relax the neck muscles.
Forward bend
Effects:
(872) Strengthening the pronators of the ankle
(601) Stretching the trapezius muscles
Instructions
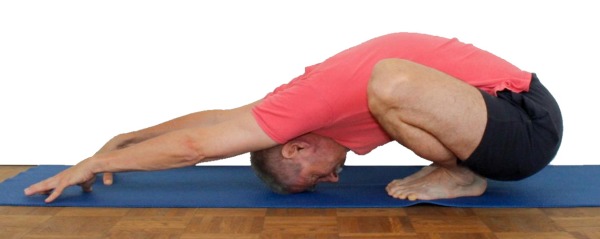
- Take the pose as described above, but stretch the arms forward and instead of straightening the upper body, bend it forward as far as possible to rest the forehead on the floor.
Details
- In order to be able to place the forehead on the floor, a significant degree of flexibility of the extensors of the hip joint is required as well as a certain ability to flex the spine and quite pronounced dorsiflexion in the ankles. The ability to reach the floor with the forehead results from the simultaneous presence of the aforementioned prerequisites to a variable degree. It is not uncommon for this forward bend in the lower back to be perceived as comfortable, but rarely does it overtax a weak back due to the necessary holding work. As a rule, the version with a straight back is perceived as significantly more demanding and strenuous but easier on the lower back.
- The heels remain on the floor. In some cases, however, the normally bilateral stretching sensation and therefore presumably also the stretching effect in the soleus can be more pronounced if the heels are not resting on the floor but still have a few millimeters of air between them and the floor. None of the plantar flexors of the ankle should be used to keep the heels raised, but they must be allowed to sink as far as possible towards the floor. A lower leg that is slightly flatter in space results in exactly this configuration. You may need to grasp an object with your hands to hold on to, see variation of forward bend with holding on. Alternatively, the arms can also be stretched horizontally forwards, which will produce the required change in the center of gravity via the horizontal lever arm. Decide here according to perceived effectiveness.
- If the head cannot yet be placed on the floor, lower it to the floor with a clear flexion in the cervical spine.
- The dorsiflexors of the ankle should be as soft as possible; under no circumstances should they be used so intensively that they begin to cramp. The need to work with the dorsiflexors indicates that the sum of the flexibility in the ankle joint (dorsiflexion), back (flexion) and hip joint (flexion) is not sufficient. Then examine all the individual factors and try to improve the most important ones first.
- The connection between dorsiflexion, flexion of the spine and flexion in the hip joints on the one hand and the ability to place the forehead on the ground is obvious, but according to the premise that the inner foot (i.e. primarily the metatarsophalangeal joint area) should remain pressed to the ground, there is also a connection between the achievable degree of pronation in the ankle joint and the ability to place the forehead on the ground: if pronation is not sufficient, the knees will not fall apart enough to move the upper body far enough forwards and downwards to allow the forehead to touch down.
Forward bend with holding on

Instructions
- Many types of objects are suitable for holding on to, from the feet of various pieces of furniture to door frames to a sufficiently heavy dumbbell, which should be placed lengthways for this purpose so that it does not start to roll, and thus also the tilting moment is much greater even with square dumbbells. If necessary, the dumbbell should be placed on a non-slip surface.
- Perform the forward bend as described above, holding on to a suitable object.
- If a dumbbell is used and practised with several people, e.g. as part of a yoga class, it is advisable for the dumbbells to be gripped by two exercisers from both sides at their respective ends. In this way, the friction of the dumbbell on the surface only has to withstand the difference between the two pulling forces and no longer a complete pulling force.
Details
- Many types of objects are suitable for holding on to, from the feet of various pieces of furniture to door frames to a sufficiently heavy dumbbell, which should be placed lengthwise for this purpose so that it does not start to roll.
- Use the strength of your arm flexors to pull yourself further into a forward bend.
Alternate between forehead and buttocks on the floor

Instructions
- Perform the forward bend as described above with your forehead on the floor.
- Using the strength of the triceps surae, press the forefoot harder on the floor to lift the forehead off the floor and tilt the pelvis slowly and without momentum so far back that the buttocks rest on the floor.
- To finish the position with the buttocks on the floor, use the dosriflexors and pull the lower leg more forcefully forwards and downwards towards the floor until the forehead touches down again.
- Alternate between the two positions as you wish.
Details
- The transition should be performed mainly using the strength of the lower leg muscles (plantar flexors and dorsiflexors).
- Depending on your flexibility and proportions, it may be necessary to stretch your arms forward so that your center of gravity is favorable for lifting your buttocks off the floor.
Forward bend with buttocks on the floor

Instructions
- Take the pose as described above, place your hands far in front of your body and then slowly sit down on your bottom.
Details
- Whether it is possible to slowly lower the buttocks without tipping backwards inevitably depends on several factors: The flexibility of the soleus so that the lower legs can tilt far forward, the hip flexibility especially of the monoarticular / short hip extensors and finally also the back muscles so that the upper body can perform a clear forward bend. The absence of even one of these factors can cause the pelvis to tilt backwards inevitably.
- Once the buttocks are lowered, run your fingers further forward.
Hands behind the back


Instructions and details with working links as PDF for downloading/printing
Detail photos

instructions
- Take the forward bend described above, but without bending so far forward that your forehead comes to rest on the floor.
- Wrap your arms around the legs from the inside to the outside backwards to hook the fingers of both hands on the back.
Details
- This variation requires very good flexibility in the hip joints so that the knees can be positioned through the armpits and further back than the shoulders. At the same time, good flexibility in the shoulder joint is required to turn in the arms and move them into retroversion so that the fingers meet on the back.
- With maximum forward flexion in the hip joints, the shoulders might be too far forward so that the length of the arms is no longer sufficient to grasp the fingers of the opposite hand on the back.
- The interlocking of the fingers results in a slight asymmetry, but this mainly relates to the position of the forearms (more pronation or supination) and has little influence on the upper arms or shoulders. Nevertheless, both possible interlocking of the fingers should of course be practiced.
- Whether this variation is successful depends not only on different flexibilities, but also on the length of the arms and the mass of leg muscles.
urdhva hastasana
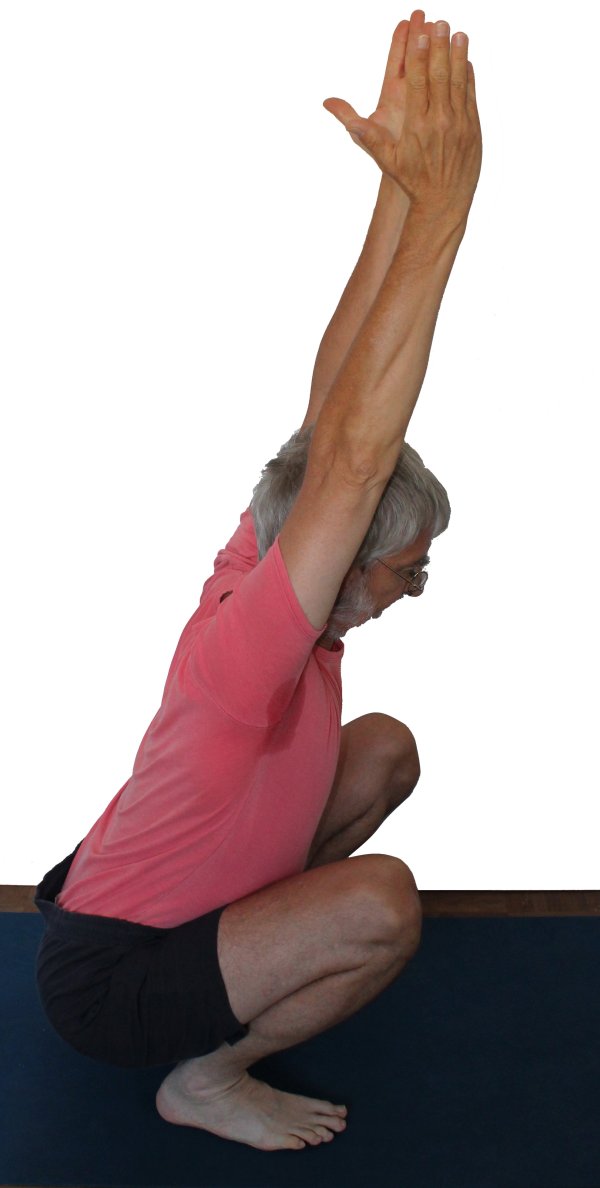
Purpose: Strengthening the autochthonous back muscles down to the sacrum
Contraindication: In addition to the contraindications due to the wide knee flexion under load, this pose is not recommended in the case of herniated lumbar discs unless the mobility in the soleus and short hip extensors is so good that the pelvis can be tilted so far forward that the back can remain straight with physiological lordosis.
Instructions
- Take malasana as described above.
- Take the arms into the urdhva-hastasana position and stretch the back as far as possible.
Details
- This variation represents an interesting strengthening of the autochthonous back muscles, from the profound muscles that attach to the sacrum to the middle/upper thoracic spine. This results from the fact that, except in the case of very good flexibility, the pelvis at best becomes approximately vertical or even tilts backwards in relation to the vertical. In this case, however, the back cannot simply be stretched, as the upper body would then stretch upwards or backwards and the gravity perpendicular of the body could no longer lie in the physical base of support. The pelvis must therefore be tilted into flexion with all the strength of the hip flexors in order to improve the gravity perpendicular. Depending on how the pelvis is tilted against the vertical, the pelvis can also be tilted slightly forwards with the help of the autochthonous back muscles. However, if the statics are very borderline, their use will predominantly shift body mass backwards and thus move the gravity perpendicular out of the physical base of support.
A further aggravating factor can be present in the form of less flexibile solei, which clearly limit the angle of the lower legs in relation to the vertical, i.e. do not allow the lower legs to tilt far forwards, which also shifts the pelvis backwards via the thighs and also tilts it further backwards, thus worsening the gravity perpendicular in two ways. These factors are all the more relevant as the lever from the hip joints to the fingertips is very large. The need to stabilise the pose with the dorsiflexors of the foot clearly indicates a rather limited flexibility of the solei. Depending on the case, it may be advisable to place the heels on an elevation that is just high enough to enable the exercise to be performed at all. If the elevation is too high, part of the effect of the pose disappears as the pelvis can tilt forwards much more easily and the autochthonous back muscles therefore have to work less. See also the variations „urdhva hastasana, heels raised“ and „(P) urdhva hastasana“.
urdhva hastasana with raised heels
Purpose: enables the urdhva hastasana variation to be performed even if the soleus is stiff.
Instructions
- Take the urdhva-hastasana variant as described above, but place the heels on an elevation just high enough so that you do not tip over backwards.
Details
- When the flexibility of the solei is fully utilised, a sufficiently high support under the heels tilts the lower legs and, with it, the knees and the pelvis so far forwards, that the gravity perpendicular is favourable. Choose the elevation just high enough so that the pose can be performed without tipping backwards. Any further elevation reduces the need to work intensively with the autochthonous back muscles and thus possibly reduces the strengthening to take place.This variation uses the same tool for the same reason that many athletes do not perform squats with or without weight without tipping backwards.
(P) urdhva hastasana
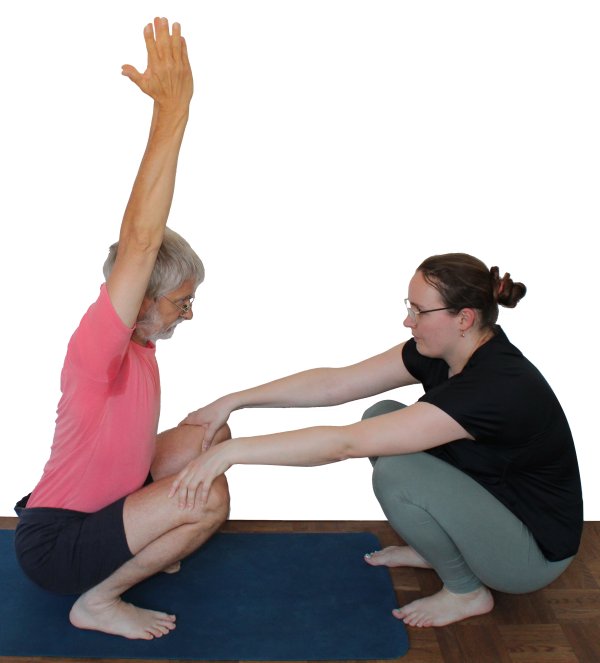
Purpose: To show that it is only the poor gravity perpendicular due to the stiffness of the solei that causes the body to tilt backwards without support.
Instruction
- Try the urdhva-hastasana variation as described above. At the point where it becomes clear that the body is threatening to tip backwards, the supporter sitting in front of the performer pulls both knees towards them with sufficient force.
Details
- This variation is based on a different principle to the one with raised heels. Here, the geometry in space is not changed for the better, but the force that causes the body to lose its balance is absorbed. The sensory pull on the knees makes it clear to the supporter and performer how strong this force is. Before the supporter gives up his effort, the performer must stretch his arms forwards and possibly give up stretching his back in order not to topple backwards. If the supporter pulls with sufficient force, the performer can leave the dorsiflexors of the foot inactive. If he pulls a little less forcefully, the performer does not necessarily have to tip over, but he will have to use his dorsiflexors of the foot to avoid tipping over, as can be seen from the emerging tendons of the toe dorsiflexors. It is also possible to support the back from behind.
(P) Forward bend
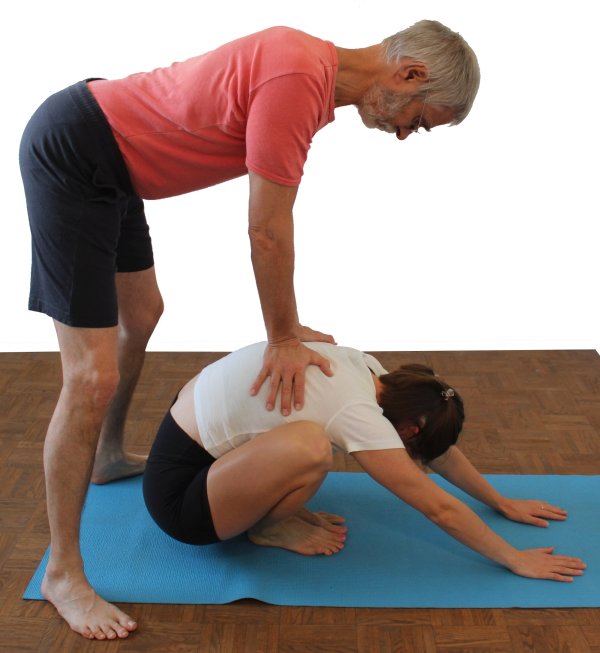
Instruction
- Take the forward bend described above.
- The supporter stands behind the performer, lightly supports the performer’s pelvis with the lower legs and presses on the back to encourage the forward bend and hip flexion.
Details
- The pressure of the supporter’s lower legs against the performer’s buttocks should be no more than a slight lean to give the performer stability during the support.
- The area on which the supporter’s hands should ideally press must be found from time to time. It is usually around the highest part of the back, which shifts as a result of the support, so that it may be necessary to re-grip it. A support rather close to the pelvis would of course be desirable, as the flexing effect on the spine is then small and the hip flexion-promoting effect is large.
(S) Hands behind the back

Instructions
- Take the forward bend described above.
- Wrap the legs with the arms from the inside to the outside backwards to hook the fingers of both hands on the back. If this is not possible, the supporter supports the performer’s bottom from behind with the lower legs so that the performer cannot tip backwards during the exercise.
- The supporter first pushes the upper body towards the floor with both hands and then exerts pressure with the head to keep the upper body in position.
- Next, the supporter brings the performer’s hands together behind the back with both hands, making sure that one of the two hands is turned around so that the fingers can grip face-to-face. The supporter can push the hands medially as well as push the elbows towards each other to bring the hands closer together.
(P) Support at the knees
Instructions
- Take the forward bend described above.
- The supporter stands behind the performer and, if comfortable, pushes the knees further forwards and down towards the floor to encourage hip flexion.
Details
In order to give the performer stability in the posture, the supporter can support the performer’s pelvis from behind with their lower legs. From this safe, bent-forward position, he can slowly put more weight on the thighs as tolerated.
This is a very good support, to promote the dorsiflexion of the ankles and thus the mobility of the soleus, which is not least due to the fact that this support is very immediate: the pressure goes from the distal femur directly via the maximally flexed knee joint onto the tibia to tilt it more towards the ground. This is why this version is often the most intense.