yogabook / asanas / adho mukha supta baddha konasana
Contents
- 1 adho mukha supta baddha konasana„lying fixed angle with the face downwards“
- 2 Variants
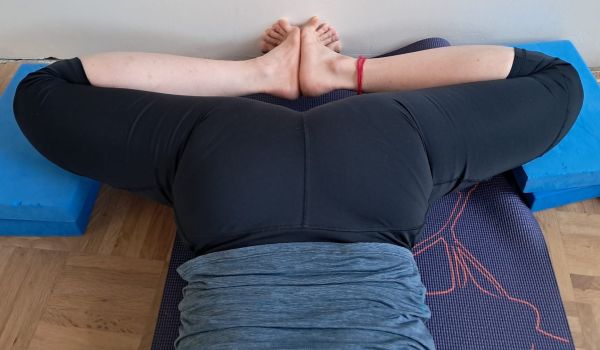
adho mukha supta baddha konasana
„lying fixed angle with the face downwards“
 instructions and details with working links as PDF for download/print
Do and don’t
push the butts away from the back 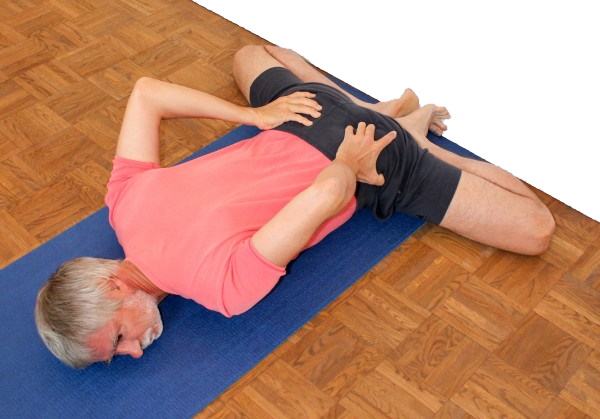 |
Feedback: We’d love to hear what you think about this description, give us feedback at
postmeister@yogabook.org
Last updated: 30.12.2018
Name: virabhadrasana 1
Trivial name: warrior 3 pose
Level: beginner
- classification
- contraindications
- effects
- preparation
- follow-up
- derived asanas
- similar asanas
- diagnostics
- instructions
- details
- variants
Classification
classic: lying pose
psychomental: calming, opening
physiological: passive lateral hip opening
Contraindication
If the flexibility of the hip flexors and adductors is not very good, a hyperlordosis will inevitably occur in this pose, which is why it can cause the known symptoms of spondylolisthesis (spondylolisthesis), spinal canal stenosis and facet syndrome. This is not an absolute contraindication, but the upper body should be elevated accordingly in order to avoid a hollow back or to reduce it to a tolerable level.
Effects
- (751) Stretching of the (monoarticular) adductors
Preparation
The outstanding characteristic of this pose is a wide, albeit not yet complete, external rotation in the hip joint with simultaneous maximum abduction. Preparation for rotation:
- baddha konasana
- supta baddha konasana
- half lotus forward bend
- hip opener at the edge of the mat
- hip opener 3
- warrior 2 pose
- caturkonasana
- parsvakonasana
- counter
Prepare for the abduction with:
- baddha konasana
- supta baddha konasana
- warrior 2 pose
- parsvakonasana
- counter
- caturkonasana
- upavista konasana
- trikonasana
- ardha chandrasana
- hip opener 4
As the adductors also have a hip-flexing effect, together with the effect of the hip flexors this can create an uncomfortable hollow back :
- hip opener 1
- hip opener 2
- warrior 1 pose
- upface dog
- setu bandha sarvangasana
- urdhva dhanurasana
- ustrasana
If the heels cannot be moved close to the pelvis, the ability to stretch the quadriceps may be limited. Practice for this:
- virasana
- supta virasana
- quadriceps stretch 1 on the wall
- quadriceps stretch 2 on the wall
- ardha supta krouncasana
- supta krouncasana
Follow-up
If your buttocks feel tense after the pose, try to remedy the situation:
- half lotus forward bend
- hip opener at the edge of the mat
- hip opener 3
- parivrtta trikonasana
- parivrtta ardha chandrasana
If the lower back feels uncomfortable after the pose due to a hollow back, the following poses can help:
- parsva uttanasana
- virasana forward bend (child’s pose)
- parsva upavista konasana
- parivrtta trikonasana
- parsvottanasana
- half lotus forward bend
- karnapidasana
Derived asanas:
Similar asanas:
Diagnostics (No.)
An excessively hollow back in this pose may be due to shortened adductors or shortened hip flexors.
Which of the two muscle groups is decisive here can be determined from the relationship between the hollow back and the opening angle of the thighs. If the hip flexors are the cause, there is usually also a general tendency towards a hollow back. For the risks of a hollow back, see the FAQ. The following are helpful:
- hip opener 1
- hip opener 2
- warrior 1 pose
- upface dog
- setu bandha sarvangasana
- urdhva dhanurasana (back arch)
- ustrasana (camel)
and other backbends with extension in the hip joint.
In this pose, the adductors are stretched. This can be used to detect damage and conditions:
- Shortening
- Irritation of the tendons at the origins and insertions, which manifests itself in pulling pain with a radiation. These are insertional tendinopathies, e.g. gracilis syndrome, although the name is misleading here as the gracilis has no part in the process due to the widely flexed knee joint. The more common term footballer’s groin is more appropriate here.
- Tension that causes an agonizing feeling in the muscles that goes far beyond normal stretching
- Tears/partial tears of adductor muscles, which make a loud noise when torn, followed by hematoma formation and swelling if necessary
- Side discrepancies in flexibility, which can cause pelvic obliquity and consecutive scoliosis. See the FAQ and the explanations on baddha konasana on the wall.
Especially the widely externally rotated, abducted poses and movements cause pain in the case of existing hip damage
- Arthrotic/osteoarthritic change (degenerative with cartilage atrophy) of the joint
- Arthritis (joint inflammation) of various kinds
- Perthes‘ disease in children or in general would react in a classically pronounced way to this posture
- Dislocation / subluxation, which would cause a significantly increased feeling of tension in various muscles covering the hip joint
- Joint trauma suffered, which may cause pain in the joint even after many weeks or months
The main cause of the inability to move the heels towards the pelvis and thus the distance of the heels from the pelvis in the pose is the extension moment in the knee, which results from the tension of the (especially monoarticular) quadriceps parts. It can regularly be seen that if the ischial tuberosities do not press firmly on the floor in virasana, the distance between the heels and the buttocks in this pose is at least the same as in virasana. Conversely, it can be estimated that if the buttocks reach the wall in the quadriceps stretch on the wall, this problem should no longer exist here. Accordingly, the following poses are mainly suitable for improving flexibility:
Variants:
(P) Limit movement of the pelvis with the foot
Instructions
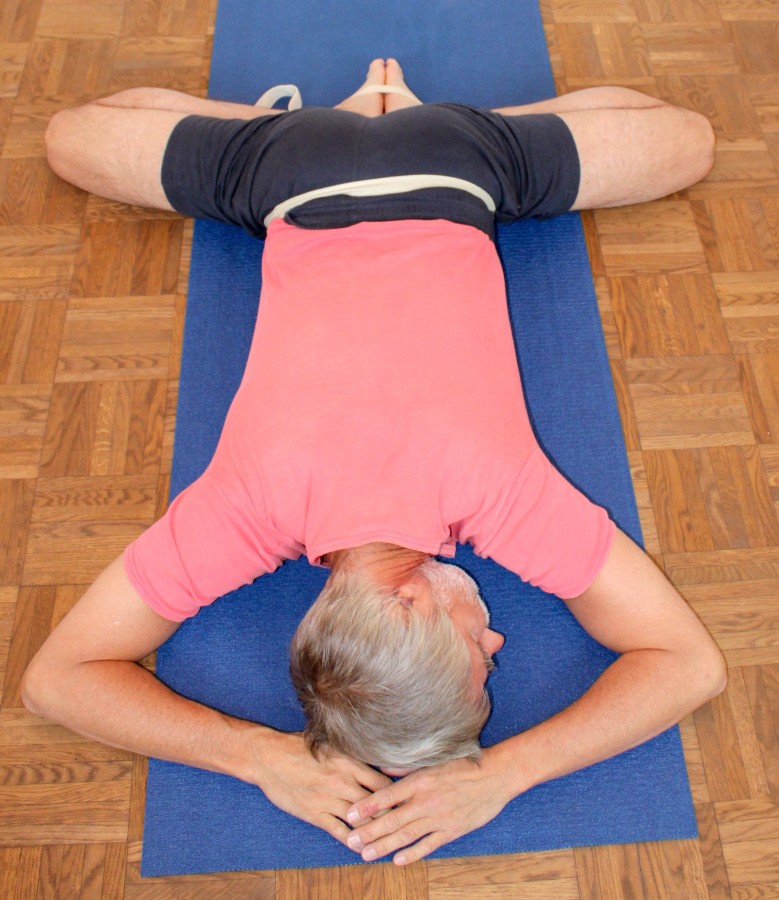
- From a prone position, turn the legs out to the maximum in the hip joints, bending the knee and hip joints to the maximum.
- Raise the pelvis high. In one movement, slide the upper body and pelvis towards the feet so that the knee joints bend to the maximum and move outwards to the maximum. Keep the soles of the feet together.
- Continue to push the body towards the feet and lower the pelvis as far as possible.
Details
- The standard pose should not be the basic pose, but rather the one against the wall, with or without a belt.
- This pose is not easy to assume, but in contrast to supta baddha konasana, it rewards you with good effectiveness and is generally quite back-friendly.
- This pose can cause high-intensity stretching in the adductors. If it becomes too intense, the knees must be held closer or the pelvis moved further away from the wall or (rarely) towards the wall.
- The pressure at the point of contact in the inner knees can be quite uncomfortable, especially if the adductors are relatively immobile, i.e. if the thighs are still relatively steep to the floor. Appropriate softness mediators can help against the pressure, but they should not have good friction – such as patches made from mats. Blankets are much more suitable so that the knees can slide further apart.
- In the version with roughly parallel lower legs, this pose is also known as mandukasana.
known problems that can occur even when performed correctly
Knee pain
As with all similar leg postures, depending on the health of the knee, pain can occur in the inner knee. Tricks for dealing with this type of knee pain can be found in the FAQ.
Lower back
As the adductor hip muscles have a flexing effect, the pelvis tends to tilt more or less clearly into a hollow back. Using the glutes (which would typically be passive in this pose) can help, as can repeatedly trying to pull the front of the upper body forward from the pelvis with the hands
Uncomfortable pressure on the knees
Especially with less mobile adductors, the pressure on the knees can be very uncomfortable and require softness mediators.
Variants
With belt

Instructions
- Take the pose as described above, but at the beginning place a belt as in supta baddha konasana around the caudal end of the sacrum (i.e. close to the tailbone), through the groins and around the outer feet.
Details
- Here, no less than in supta baddha konasana, there is a tendency for the knees joints to stretch due to the tension of the quadriceps. To prevent this, the belt next to the wall (see below) is the best aid.
- Be careful not to lie too much in a hollow back. The hip-flexing effect of the adductors is greater here than in supta baddha konasana, as a greater partial body weight stretches the adductors (and therefore forces the hip joints into flexion) more intensively. This makes it all the more important to ensure that the belt is positioned as low (caudally) as possible on the sacrum.
Against the wall
Contraindication
This pose may not be suitable for hallux valgus, hallux rigidus, hallux limitus and metatarsalgia.
Instructions
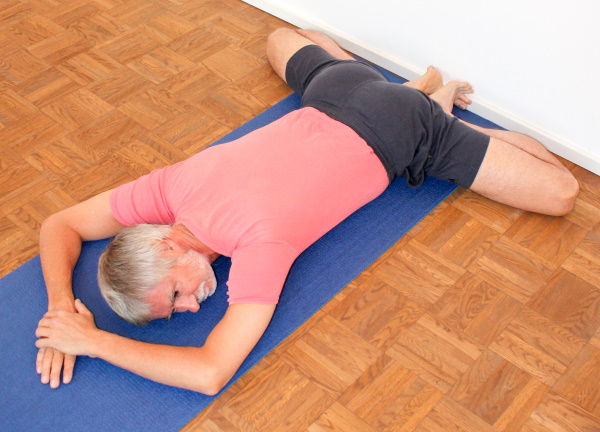
- Lie on your stomach with your feet in front of a wall.
- Bend your knees to the side as far as possible (in externally rotated–abducted flexion in the hip joints) and slide backwards towards the wall.
- Move the knees away from each other as far as possible and towards the wall. Let the undersides of the toes face outwards (away from each other) and push them onto the wall so that the inner edges of the feet are on the floor.
- If the pelvis has moved away from the floor during one of the last steps, drop it again, but avoid moving it significantly away from the wall beyond the line connecting the knees.
- If the upper body cannot be placed on the floor, push it towards the wall and lower it further over time.
Details
- This variation is not exactly easy to do, but rewards you with the best results.
- The undersides of the toes lie on the wall, point outwards and the metatarsophalangeal joints should be on the floor, i.e. in the edge of the room. Their required 90° dorsiflexion (extension) is of course not available to everyone without practice.
- In each phase, move your knees as far apart as possible and towards the wall. If you fail to do this, the angle of the lower legs to the wall will not match, the dorsiflexion in the ankles required under these conditions will not be available and the balls of the feet will come to rest on the wall at a distance from each other instead of against each other. It is then usually only possible to press the heels together.
- In this pose, the pelvis should not move significantly beyond the line connecting the knees away from the wall. The pose is often misunderstood and attempts are made to lower the chest as quickly as possible. In doing so, the upper body is moved away from the wall with the pelvis, which takes away much of the pose’s effectiveness. Instead, the aim is to avoid moving the pelvis away from the wall as much as possible and to place the shoulders on the floor first, followed by the chest and, if you are very flexible, the pelvis at some point.
- Move your heels towards the floor. Together with the friction of the feet against the wall, there is a good opportunity to move the heels further towards the floor and intensify the pose by actively turning out the lower leg in the knee joint.
- Once the feet have detached from the floor, much of the effectiveness of the posture is lost. It should then be left to the point where it is possible to place the feet back on the floor and fully resume from this position.
- The underside of the toes rest on the wall, while the big toes with their metatarsophalangeal joints are on the floor, i.e. in the edge of the room. The soles of the feet lie on top of each other as far as possible. As is usual in baddha konasana-like poses, it is not expected that the entire soles of the feet lie on top of each other, but this should at least apply to the outer edges. Pressing the inner edges together would contradict the aim of achieving good effectiveness in terms of stretching the adductors.
- The movement of the upper body as well as the pelvis towards the wall is extremely important for the success and effectiveness of the pose.
- In practice, often performers find it difficult to get into the pose. The most important maxim here is to move the knees apart and towards the wall. If this is not done, the soles of the feet cannot be placed on top of each other.
- The position of the pelvis is important for the pose: it should be approximately above the line connecting the knees. Careless alignment often results in the pelvis moving away from the feet, sometimes even lying on the floor with the feet clearly detached from the floor. This means that the pose wil be significantly less effective. Once the pelvis is close to the floor, the only thing that usually helps is to raise it significantly and bring it back over the line connecting the knees and the place the feet on the floor again.
- In a nutshell, this all means: push the upper body continuously towards the feet or the wall, lowering the pelvis in the process, and if even more stretch is desired, press the heels towards the floor, which corresponds to the external rotation of the lower legs from the strength of the biceps femoris.
- One of the most important movements that helps to take the position correctly is to push the knees outwards and towards the wall with the hands.
against the wall with a belt

Instruction
- In this variation, the belt is first attached while you sit and then the body is tilted forward to take the pose against the wall.
Details
- In some cases it seems very difficult to keep the feet on the floor and at the pelvis, at least the latter can be ensured with the belt. The pose can then be built up so that the feet remain on the floor.
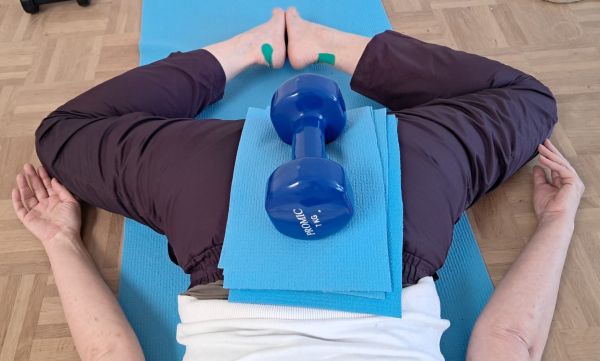
dumbbell on the feet

Instructions
- Take the pose as described above.
- Lasse Dir eine Hantel auf die Füße legen, vorzugsweise mit einer weichen Schulterstandplatte dazwischen.
details
- In principle, the movement of the heels towards the ground can also be undertaken using the strength of the external rotators of the lower leg in the knee joint, the biceps femoris. Anyone who cannot find the movement will benefit from an aid here.
Dumbbell on the pelvis
Instructions
- Take the pose as described above.
- Have a dumbbell placed on your pelvis, preferably with a cushioning layer such as a soft shoulder stand mat or a blanket in between
Details
- The dumbbell should be positioned as caudally as possible so that it does not exacerbate the natural tendency towards a hollow back inherent in this position.
- The blanket has the advantage over the shoulder stand board in that the dumbbell sinks deeper into it and lies more securely.
on shoulderstand plates
Instructions
- Assume the posture as described above, but with your knees on soft shoulder stands or other sufficiently soft elevations.
details
- In rather rare cases, the adductors are so flexible that no significant stretch is felt. In this case, elevations under the knees can provide further effectiveness. This variation is very reminiscent of upavista konasana against a wall with blocks.
(S) Pressure on the sacrum
Instructions
- Take the pose as described above.
- The supporter slowly presses with increasing force on the sacrum towards the floor and away from the back until the performer signals sufficient intensity.
Details
- This support makes it possible to counteract the hollow back and increase the intensity. It can be combined with both a belt and a wall.
- If the external pressure causes excessive pressure to be felt in the inner knees on the floor, softness mediators should be used here, preferably blankets, so that the knees can slide outwards unhindered. However, this should not be necessary if you already have good flexibility.
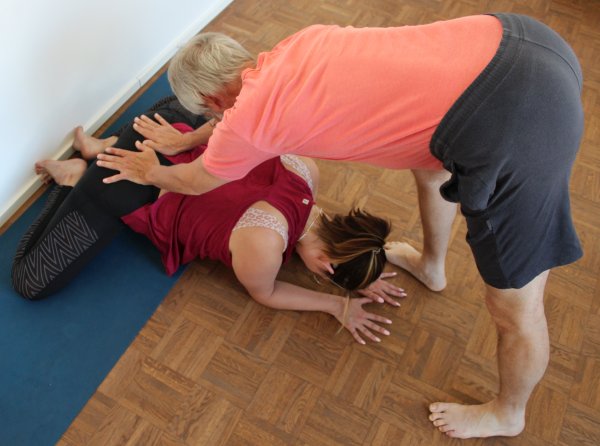
(S) Pull the knees outwards

Instructions
- Take the pose as described above, the variations with the wall are well suited for this.
- The supporter pulls the knees away from each other and from the pelvis and towards the wall, one after the other, several times if necessary.
Details
- This is a support that regularly proves to be very helpful when taking the pose.
(S) Limit the movement of the pelvis with the foot
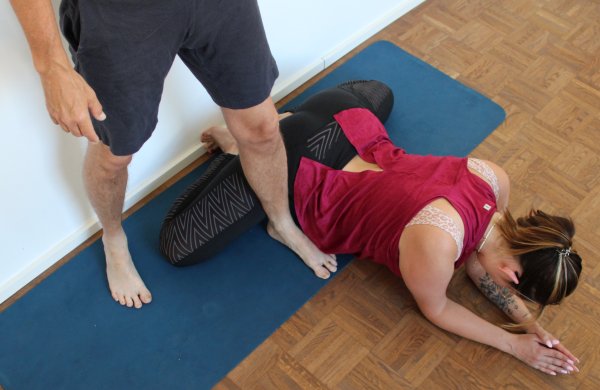
Instructions
- Take the pose against the wall as described above.
- When the performer holds the pelvis above the line connecting the knees, the supporter places one foot cranially in front of the thigh close to the pelvis so that the pelvis cannot move further away from the feet.
Details
- This is a support that regularly proves to be very helpful when taking the pose.