yogabuch / asanas / upavista konasana
Contents
- 1 upavista konasana„upright angle“
- 2 Variants
- 2.1 supported
- 2.2 Forward bend
- 2.3 Traction on the feet
- 2.4 Do and don’t
- 2.5 prone
- 2.6 Sternum against the wall
- 2.7 Against the wall
- 2.8 Mat under buttocks
- 2.9 With block
- 2.10 Pulling on the block
- 2.11 against the wall with blocks
- 2.12 (P) Pressing from behind
- 2.13 (P) Pull forward
- 2.14 (P) Adjusting the position of the foot
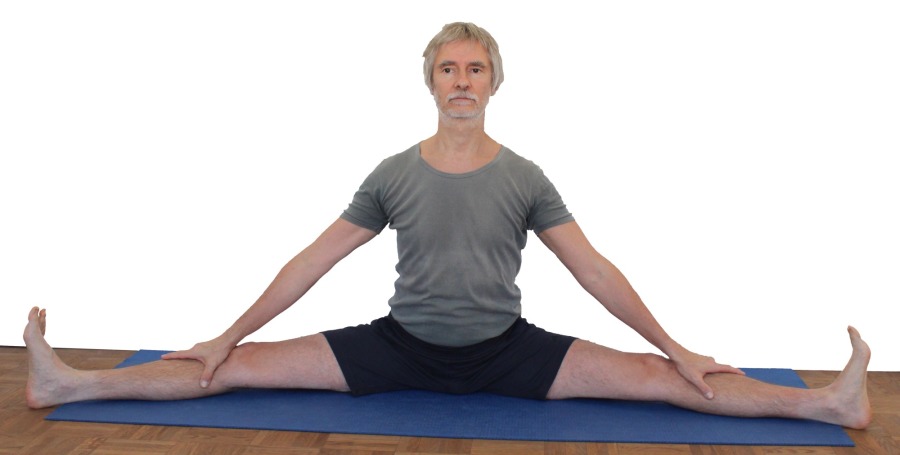
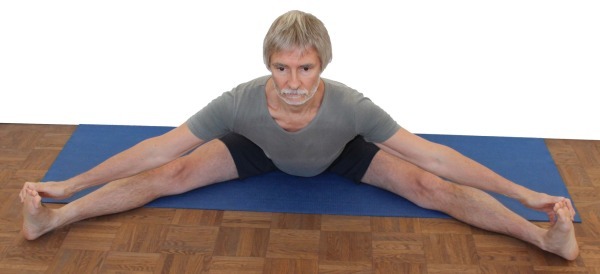
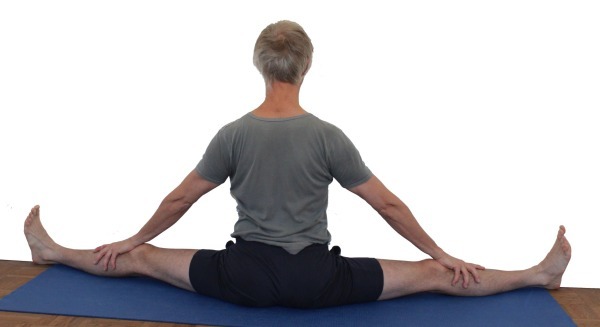
upavista konasana
„upright angle“
 instructions and details with working links as PDF for download/print
do and don’t
pull the butts backwards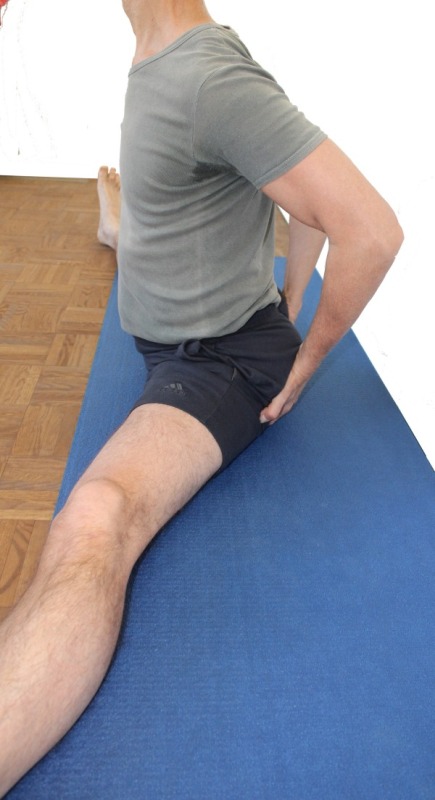 |
Feedback: We’d love to hear what you think about this description, give us feedback at:
postmeister@yogabook.org
last update: 30.12.2018
Name: upavista konasana
Trivial name: upright angle
Level: A
- Classification: A
- Contraindication
- Effects of
- Preparation
- follow-up
- derived asanas
- similar asanas
- diagnostics
- Instruction
- details
- Variants
Classification
classic: seated posture
physiological: stretching of most parts of the adductor muscles of the legs
Contraindication
Depending on the flexibility of the hamstrings and how the posture is performed, it cannot be performed in PHT(Proximal Hamstring Tendinopathy) without triggering the characteristic pain, which must be strictly avoided in this disorder.
For the same reason, this position is also contraindicated in pes anserinus syndrome and gracilis syndrome („footballer’s groin“). If the ischiocural group is still quite immobile, the posture cannot or should not generally be performed in the case of intervertebral disc disease because the lumbar spine then remains convex (kyphotic).
Effects
- (602) Moderate strengthening of the autochthonous back muscles, especially if the hamstrings is less mobile
- (751) Stretching of the adductors
- (756) Stretching of the gracilis
Preparation
This posture has two „construction sites“, the hamstrings, which, when shortened, causes the pelvis to tilt backwards, and the adductors, which limit the angle between the thighs. Practice the former:
- Uttanasana as a generally effective and efficient stretch of the hamstrings to prepare for flexion in the hip joints in this pose
- prasarita padottanasana
- parsvottanasana as a stretch that goes beyond uttanasana
- Head down dog is also a good preparation for the ischiocrural group when the pelvis is tilted powerfully
- hip opener 5 as a very effective stretch for the hamstrings that goes beyond uttanasana
- warrior 3 pose
- trikonasana
The other of the two building blocks and the actual key feature of the pose is the maximum (exorotated) abduction in the hip joints with simultaneous flexion. The upavista konasana is one of the key postures here; there are hardly any real, simpler preparations, but practise additionally to improve the stretch:
- Counter
- warrior 2 pose
- parsvakonasana
- trikonasana
- ardha chandrasana
- baddha konasana
- supta baddha konasana
If the variation „with block“ is performed, the frontal abduction abilityof the shoulder joint plays a major role and helps:
- Head down dog as a general stretch of the shoulder
- dog headup as a posture that prepares the shoulders for powerful work, especially through correctly executed transitions from and to downface dog
- Right-angled handstand as a related posture
- Back extension, especially the „elevated“ version as a general stretching of the shoulder in the direction of frontal abduction
- Dog elbow stand as a related and synergistic posture
- Hyperbola as one of the most effective and efficient stretches in the direction of frontal abduction without exorotation of the arms
- Shoulder opening on the chair as one of the most effective and efficient stretches in the direction of frontal abduction with exorotation of the arms
To make it easier to sit up straight, which is made more difficult by the tendency of the pelvis to tilt backwards, the following postures can be helpful: On the one hand, the autochthonous back muscles can be strengthened:
- urdhva dhanurasana (the bridge)
- uttanasana in the „table“ variation
- 3. warrior pose and variation backwards against the wall
- „Table„ variation ofuttanasana and right-angled uttanasana
- Deadlift
- halasana
- sarvangasana, also in the „right-angled“ variation
on the other hand, the flexibility of the thoracic spine in the direction of extension can be promoted so that the existing muscular competence can be used to straighten the thoracic spine more and hold it for longer:
- Lying on a roll
- ustrasana
- Right-angled handstand
- Back extension, especially the „elevated“ version
- Dog elbow pose
- hyperbola
- Shoulder opening on the chair
Follow-up
derived asanas:
parsva upavista konasana parivrtta parsva upavista konasana
similar asanas:
Diagnostics (No.)
The triceps are required in the „supported“ variant to limit the tilting of the pelvis backwards. A lack of strength endurance is noticeable through premature fatigue, whereby the intensity of the support must be taken into account. There may also be a tendency to cramp in the biarticular middle triceps due to the retroversion of the arms with simultaneous extension of the elbow joints. In this case, the hands should be placed on blocks in order to increase the sarcomere length in which the triceps work due to the necessary flexion in the elbow joint, which reduces the tendency to cramp.
(650) Kyphosis and lordosis of the spine:
The deviations from the physiological double-S shape of the human spine become quite visible in this posture. There should be a certain degree of lordosis (convex spine from the front) in the lumbar and cervical spine and a certain degree of kyphosis (convex spine from the back) in the thoracic spine. Due to flexibility restrictions in the hamstrings, the pelvis often tends to tilt backwards, so that the position of the lumbar spine in less mobile people inevitably deviates from the physiological lordosis towards a steep or convex position and therefore cannot be assessed well. See the FAQ.
(651) Unequal shoulder height/scoliosis of the spine:
Lateral deviations of the spine from the sagittal plane, known as scolioses, are also quite visible in this posture. See the FAQ. Any (anatomical or functional) leg length discrepancy that may be the cause of the scoliosis is ignored and irrelevant, as the ischial tuberosities rest on the floor and the pelvis should therefore be upright in the frontal plane.
In this pose, the strength endurance of the back extensors is evident when flexibility restrictions in the hamstrings tilt the pelvis backwards. Except in the case of good flexibility, the body’s internal resistance in the posture guarantees the need to stretch the back continuously and powerfully with the autochthonous back muscles. Any tension, whether caused by posture, occupational or other demands, scoliosis, hyperkyphosis of the thoracic spine or misaligned vertebrae, should become apparent here.
(712) Strength of the hip flexors
In this pose, a lack of strength in the hip flexors in less mobile people will mean that the pelvis cannot be held upright against the resistance of the hamstrings or cannot be held upright for long or even tilted forward. The hip flexors can only be considered here relative to the resistance of the hamstrings, and rarely other hip extensors.
Diseases of the hip joints may become apparent due to the wide abduction:
- Arthrotic change (degenerative with cartilage atrophy) of the joint
- Arthritis (joint inflammation) of various kinds
- Perthes‘ disease in children, or hip dysplasia in general, can react to this posture
- Dislocation / subluxation, which would cause a significantly increased feeling of tension in various muscles covering the hip joint
- joint trauma suffered, which may cause pain in the joint even after many weeks or months
In this forward bending movement(flexion in both hip joints), various disorders may be found:
- Shortening of the hamstrings, see FAQ
- Damage to the hamstrings that causes pain or functional limitations can also be easily recognized here, from simple tension to strains to muscle (attachment/detachment/tear). Tears can lead to lower resistance on the affected side.
- Irritation of the sciatic nerve: irritation of the sciatic nerve, which innervates the leg and foot, can become symptomatic in forward bends in particular, even if they are otherwise rather calm. See the FAQ.
- Irritation of the origin of the hamstrings at the ischial tuberosity (at the ischial tuberosities, also known as PHT: proximal hamstring tendinopathy) will be clearly evident in this posture and require protection from intensive stretching, as this posture demands; see the FAQ.
- Baker’s cysts create a feeling of tension or foreign body in the back of the knee, see FAQ.
(741) This posture provides a good indication of the flexibility of large parts of the adductor group, whereby the biarticular of the gracilis is naturally in the foreground due to the extended knee joint. However, other adductor muscles can also set the limit with very good and very low flexibility.
(756) The gracilis is the muscle that most frequently and most clearly restricts abduction in this posture, which is generally also clear from the clear stretching sensation that can be triggered here.
(754) Other disorders in the adductor group can also become aparent in this posture, above all pes anserinus syndrome and gracilis syndrome („footballer’s groin“), but also both insertion tendinopathies, the first at the insertion of the gracilis, the second in the area of origin of the adductor group at the pubic bone.
Variants:
(P) Adjust the position of the foot
Instructions
- Sit on the floor. Straighten both legs and assume as wide a straddle as possible.
- Pull both buttocks backwards and outwards, stretch the inner feet and heels away until each leg is in a posture similar to tadasana.
- Whenever the sensation of stretching in the inner legs(adductors) has subsided, support yourself on the floor with one hand in front of and the other behind the pelvis and carefully lift the pelvis forward a little to increase the angle between the legs.
Details
- The upper body should be extended. If the pelvis tilts backwards and downwards due to flexibility restrictions in the hamstrings, support yourself with both hands behind the pelvis (see the „supported“ variation below) to help straighten the pelvis and stretch the back with the arms. If there are still major difficulties in straightening the pelvis, especially if there is a tendency to spasm in the rectus femoris, it is advisable to sit with the rear edge of the buttocks on an elevation, e.g. a mat folded several times. The elevation is used correctly when you have the feeling that you are almost sliding forwards off it. If you support yourself with your hands, you will usually need blocks under your hands if you are sitting tall. The support should not affect the depression of the shoulder blades as much as possible; if necessary, the arms must be bent accordingly.
- If in doubt, the pelvis should tilt forwards rather than backwards.
- If the flexibility of the adductors is quite low, the stretch will not yet be felt in the gracilis covering the back of the knee joint, usually from the inner back of the knee in the direction of the pes anserinus. Only later will its sensation outweigh that of the other adductors, only to give way to other adductors even later.
- In some cases, no noticeable stretching of the adductors is achieved at first because smaller muscles in the posterior outer pelvis with a cramp-like sensation preclude further assumption of the posture. These may be the small gluteal muscles. It is then helpful to regularly practise.As a rule, this restrictive sensation soon disappears and intensive work on the adductors becomes possible. This is therefore a masking effect. In some cases there are several limiting factors, all of which must be eliminated first. This is then a masking cascade.
- The surface under the feet should have sufficient friction to prevent the feet from slipping back towards each other during execution. If in doubt, this can be achieved using patches. If the pelvis is lifted forward with the hands, thereby increasing the angle between the thighs, this force is generally sufficient to bring about the necessary adjustment of the position of the feet on patches, i.e. to overcome static friction. A blanket under the feet or socks on parquet flooring, on the other hand, are completely unsuitable as the static friction is unlikely to be sufficient to maintain an angle once it has been assumed, especially as the abductors, which can theoretically be used for this purpose according to the force-length function, cannot provide sufficient force and also cramp all too easily.
- Rarely, upavista konasana can cause localized discomfort, particularly in the inner knee area. They are usually associated with previous damage to the knee joint, especially the menisci, and result not least from slight valgus stress on the knee joint caused by the pelvis being pushed forward against the friction of the feet on the floor. These complaints can be significantly more severe in the „against the wall“ variant or in the partner exercise. It is then advisable to prevent the valgus momentsin the knee joint from occurring in the first place. This is best achieved in the partner exercise when the supporter presses against the thighs near the knees instead of the feet or lower legs. If you want to practise it alone, the lying version against the wall may be suitable.
- In very rare cases, a painful hyperextension of the knee joints can occur in upavista konasana, where the heel is often further away from the floor than the back of the knee. This can usually be controlled by using a small support for the knee with a few patches or a small roll.
Known problems that can occur even when performed correctly
Discomfort in the inner knee
see under Details
Variants
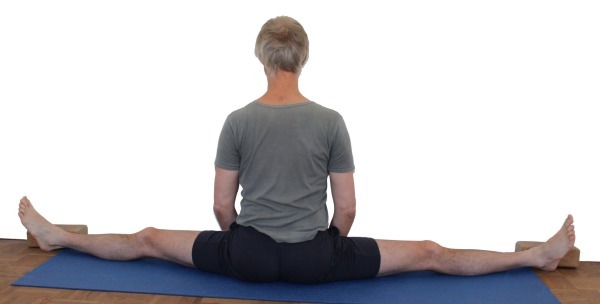
supported
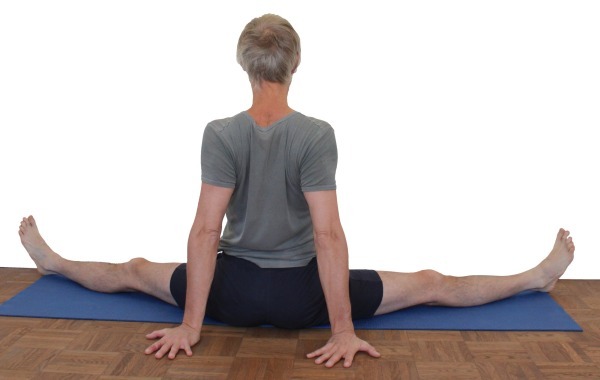
do and don’t
stretch the back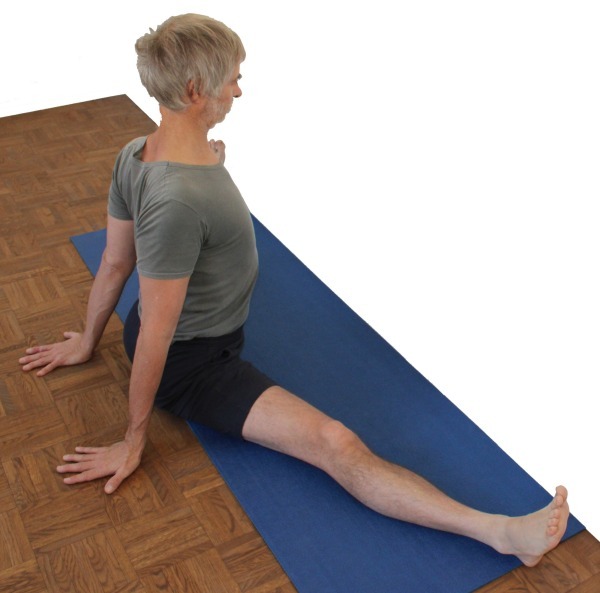 |
Instructions
- Take the pose as described above, but place your hands just behind your pelvis with your fingers pointing backwards so that you can work your arms to tilt your pelvis forward again and stretch your upper body.
Details
- If the hamstrings is not particularly flexible, the pelvis tends to tilt backwards in this posture, as does the upper body. Using the strength of the hip flexors to counteract this is not only very strenuous and can easily lead to a tendency to cramp in the rectus femoris, but some of the stretching effect of this posture is also lost. Supporting yourself with your hands behind your pelvis offsets these disadvantages.
- The upavista konasana is primarily about the angle between the thighs, but some of the effect is lost by tilting the pelvis backwards.
- This variation should help to completely avoid the tendency to cramp in the rectus femoris, which is caused by the attempt to tilt the pelvis backwards less due to (among other things) its strength.
- Sitting giants will not be able to place their palms on the floor and need blocks to press their palms on. If the triceps cramp when the elbow joints are almost extended, the sarcomere length of the triceps needs to be longer and therefore the elevation under the hands needs to be greater.
Forward bend

Forward bend
Effects: (721) Stretching the hamstrings
Instruction
- Take the pose as described above.
- Tilt forward as far as possible in the hip joints, stretching the upper body rather than deliberately rounding it. Depending on what is possible, place the hands on the floor, the forearms or rest the head or chest on the floor with the hands stretched forward.
Details
- This variation is not yet possible if there is very little flexibility in the hamstrings. If the flexibility is better, the pelvis can be tilted so far forward that the hands can be placed on the floor with the arms stretched out. The hands tend to slide towards the body to improve the extension of the upper body. If your flexibility is a little more advanced, you can place your forearms on the floor. More force can be used to push the forearms towards the pelvis, which supports flexion in the hips and extension of the upper body. With even more advanced flexibility, the forehead can be placed on the floor and the arms extended forwards. They are then no longer needed to tilt the pelvis, as the flexion anglein the hip joints is already so great that the gravity of the upper body tilts the pelvis sufficiently by itself. The rib cage can be lowered even later. The pelvis is already tilted so far that male performers are better off placing the pelvis on a significant elevation so as not to crush their primary sexual organs.
- While the original is mainly about stretching the adductors, this pose is predominantly a stretch of the hamstrings, i.e. the muscles at the back of the thigh. It therefore does not depend so much on the exact angle between the thighs.
Traction on the feet
Do and don’t
Crooked back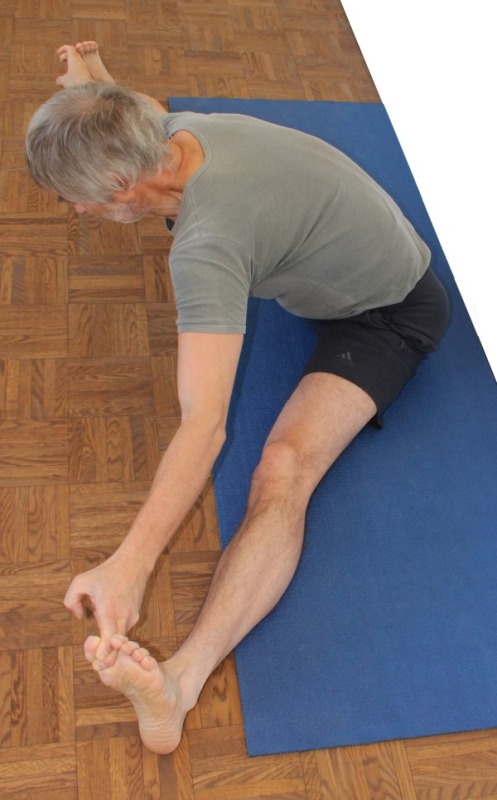 | Head on neck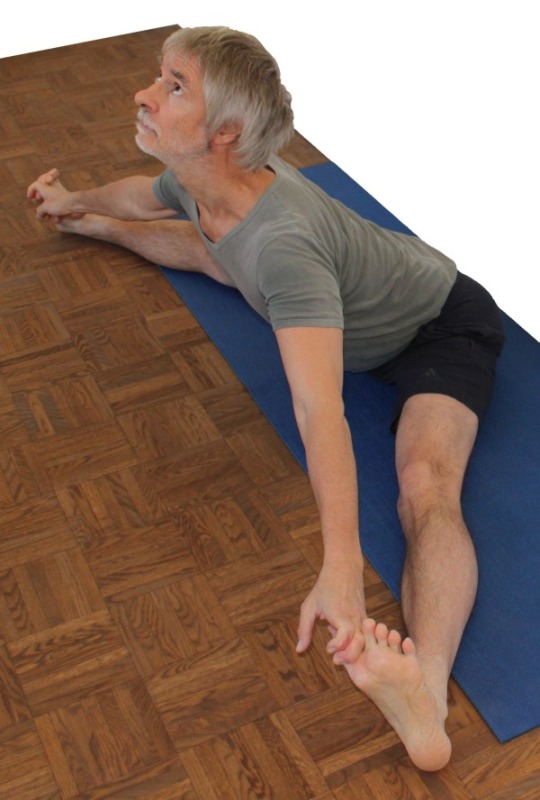 |
Detail photos

Contraindication
Due to the high tendon strength, which mainly occurs in the hamstrings if it is rather mobile, the exercise is not suitable for PHT and often for pes anserinus syndrome, see details below. Gracilis syndrome, on the other hand, should allow execution if the abduction angle of the legs remains moderate.
Instructions
- Take the pose as described above.
- Straighten your back as much as possible and reach your hands towards the outer edges of your feet.
- Pull strongly on the outer edges of the feet and try to keep the upper body stretched.
Details
- This is a strengthening variation, both for the back, which tends to bend due to the gravitational effect ofthe upper body and the flexibility restrictions (the greater, the more) of the hamstrings, and for the hamstrings, which is not only stretched but also – as unusual as this may sound for athletes, for example – strengthened, as it has to support the weight of the upper body, head and sometimes arms over the ischial tuberosities. Use the posture carefully so as not to overstrain the hamstrings in the back of the leg, especially its origin at the ischial tuberosities, otherwise this variation could promote or cause the development of a PHT. If such a condition exists, this variant is of course contraindicated, see above. Due to the high load in the hamstrings, this also applies to pes anserinus syndrome if the insertions of the inner hamstrings are affected by the disorder. If only the gracilis is affected, it may be possible to perform with a more moderate abduction angle. Gracilis syndrome should not cause any discomfort in this posture if the abduction angle remains clearly submaximal.
- To support the extension of the thoracic spine, the head can be raised slightly beyond the extension of the thoracic spine.
- In addition to the grip on the outer edge of the foot, it is also possible, as a slight simplification, to grip the big toe, which, however, cannot withstand such a strong pull as the outer edge of the foot, so that the achievable strengthening of the back is less. A version with 2 belts is also possible for less agile people.
- The hands on the feet are not intended to support body weight, but only to exert traction. The proprioceptively felt load in the autochthonous back muscles and the muscles of the inner hamstrings provides good feedback.
prone
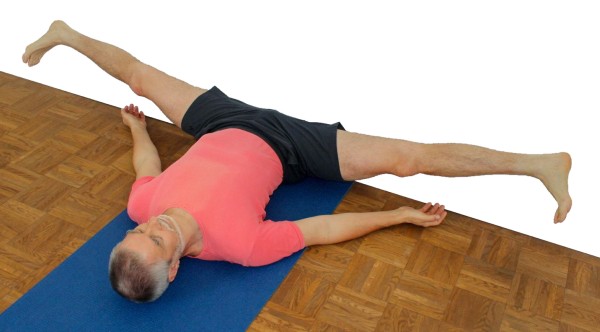
Altered stretching, here from the gravitational effect of the legs
Instructions
- Sit in front of a wall with your knees bent.
- While supporting yourself with your hands, tilt your pelvis backwards with your upper body, place your legs on the wall at the widest possible angle, slide your pelvis towards the wall and push your buttocks forwards towards the wall until they reach it.
- When the back is fully supported on the floor (except for the physiological lordosis), the pose is complete. An uncomfortable hollow back should not occur here, as the hamstrings tilts the pelvis in such a way that the lumbar spine is unloaded
- As the pose progresses, allow the legs to sink further and further sideways towards the floor.
Details
- This variation takes into account the fact that the adductor group including the gracilis have a slightly flexing effect in the hip joint. Due to the extended angle in the hip joints, certain parts are stretched more than in the upright version.
- Do not bring the buttocks all the way to the wall if the hamstrings is clearly immobile, as this would only tend to lift the pelvis in its lower(caudal) part – which has no benefit for the posture – or bend the knee joints. Instead, adjust the distance so that the pelvis can just rest completely on the floor and no quadriceps work is required to keep the knee joints extended.
- This posture is excellent for detecting and addressing side discrepancies in the flexibility of the two gracilis muscles (rarely other parts of the adductor group). To do this, lie as symmetrically as possible in front of the wall, i.e. make sure that both sides of the pelvis have the same weight on the floor and are the same distance from the wall. Furthermore, allow both legs to sink so far onto the wall that there is a clear or maximum stretch sensation, which must be equal on both sides regardless of the extent. The height of the heels can then be measured by a supporter. If one heel is further away from the ground, the gracilis is usually less mobile on this side.
Only rarely does another adductor, rather than the gracilis, set the limit of movement. This can usually be determined functionally and on the basis of the localization of the stretch sensation. If flexion of the knee joint reduces the sensation of extension, this is an indication that the gracilis is involved. This predisposes to a certain degree (largely independent of which part of the adductor groupit is caused by, the gracilis has a somewhat weaker causative effect than other adductors) to pelvic obliquity. Presumably not one adductor alone will be laterally mobile. In order to stretch this more difficult side more intensively and thus bring the flexibility closer together over time, hang a dumbbell of adequate weight in the loop of a belt, wrap the belt around the foot twice from the outside to the inside and hold the end of the belt firmly during the exercise. You should not need to apply any significant force to do this. - This variation can also be the first choice if you experience discomfort in the outer knee during normal execution. The valgus stress in the knee joint that usually causes this will not usually occur in the lying version, as the weight of the legs proximal to the heel exerts a varus stress on the knee joint rather than a valgus stress if the heels are not placed too low, see below.
- For some people, especially those with less mobile adductors whose opening angle in terms of abduction is still quite limited, this version may not be very effective. This applies all the more if they are muscularly well equipped. In contrast, the posture is often undesirably intense in people who are quite mobile, especially if their muscular equipment is not particularly well developed.
- The same applies to the prone version as to the painful hyperextension of the knee joint in the standard version. Here, the support between the back of the knee and the wall must be positioned in such a way that it does not slip away, in case of doubt with a belt.
- In some cases, it can be difficult to slide the pelvis against the wall. In this case, a supporter who stands a short distance away from the wall with their back to the wall can be a good help, as the performer pulls themselves towards the wall with their hands on their ankles. The supporter must ensure that they are not standing exactly vertically, but rather leaning backwards a little and leaning against the wall so that the pull on the lower legs cannot tip them over.
- Sometimes the person performing the exercise cannot tell exactly whether it is a stretching sensation in the gracilis or classic discomfort in the inner knee area caused by the meniscus. This type of discomfort increases if the foot is placed too high on the wall. The gravitational force of the thigh and lower leg will then cause varus stress in the knee joint with the corresponding complaints. If external (supporter) pressure is then applied to the outer knee and the symptoms are reduced, this is a clear indication of meniscus-associated non-muscular symptoms. If the foot is placed too low, this discomfort should no longer occur, but instead a more intense stretching sensation in the gracilis. If not only the intensity but also the type of sensation changes with a lower position of the foot, this indicates the presence of non-muscular, presumably inner meniscus-related symptoms that can be triggered by varus stress. If the patient has a tendency to suffer from external knee pain, positioning the foot too low will be unfavorable and increase the pain, whereas positioning the foot too high will be favorable and alleviate the pain. The following is meant by a foot position that is too high or too low: due to the tension of the ischiocrural group, the less mobile the more the heel presses on the wall and creates a corresponding static friction. This pressure is generally higher and the resulting friction is greater than that caused by the leg’s gravitational effect alone. This usually means that the position of the foot does not change due to the gravitational effect of the leg. The position of the foot is considered too high if the grav itational effect of the lower leg and thigh leads to varus stress in the knee joint, too low if it leads to valgus stress in the knee joint and correct if neither is caused.
Known problems that can occur even when performed correctly
Sternum against the wall

Reliably prevents the feet from slipping
Instructions
- Set up the variation with your feet against the wall as described above.
- Reach in front of and behind the pelvis with one hand to carefully move it as far as possible towards the wall and then place it back on the floor.
- Place your fingertips as high as possible on the wall and try to run your fingers further up the wall by stretching your upper body and tilting your pelvis forward.
- If your forehead reaches the wall, place it there. The fingers on the wall are then obsolete and the hands can be lowered.
- As soon as the sensation of stretching has decreased, you can lift the pelvis slightly forward again as described above.
- If you are very flexible, you can press the sternum onto the wall.
Details
- If there is enough free wall space available, this is an excellent variation, on the one hand because the feet cannot slip away, and on the other because the attempt to run up the wall with the fingertips tilts the pelvis forward more and increases the stretch.
- Release the posture carefully later. The resulting sensation can be quite intense.
- Those who are so flexible in the adductors that they can no longer fit a hand between the pelvis and the wall to lift the pelvis forward can work with a block between the foot and the wall to make this possible again. In this way, a seamless path to samakonasana is created and 180° can also be exceeded with one or more blocks.
- Next, after the head, the chest is placed against the wall.
- Depending on the flexibility of the hamstrings and adductors, this variation may not yet be possible.
Against the wall
Prevents the feet from slipping
Instructions
- Set up the pose as described above, but with your feet against the wall and without your hands on the wall.
- Reach in front of and behind the pelvis with one hand to carefully move it as far as possible towards the wall and place it back on the floor.
Details
- This variation is the same as the one above without the increased forward tilt of the pelvis and, if necessary, with the hands behind the pelvis for support.
Mat under buttocks
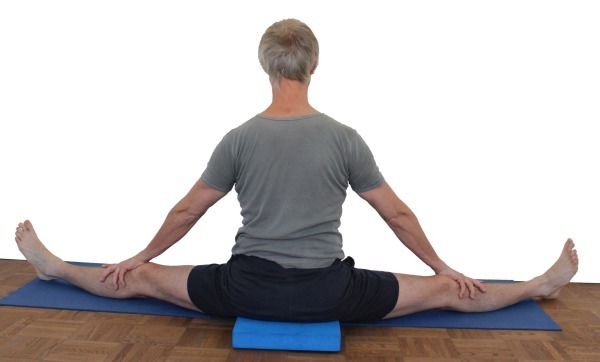
Makes it easier to sit upright
Instructions
- Take the pose as described above, but sit on one or more folded mats or similar.
Details
- Mobility restrictions in the hamstrings cause the pelvis to tilt backwards, which makes it necessary to use the arms with the hands behind the pelvis as described above. This variation does not require the use of the arms and can therefore often be held for longer, but the elevation can also be used in addition to the use of the arms.
- For example, mats that are folded 3 or 4 times are suitable. If one mat is not enough, two can be used. This mat is used correctly when you have the feeling that you are almost slipping forward off the mat, so sit with your ischial tuberosities very close to it so that your pelvis can tilt forward as much as possible.
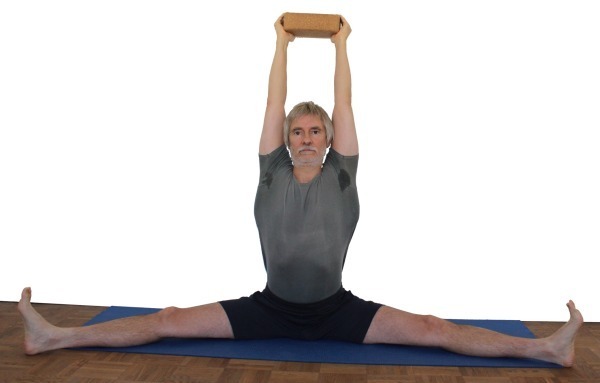
With block

Straightens the back, strengthens the autochthonous back muscles
Effects: (232) Shoulder joint: strength for frontal abduction
(231) Shoulder joint: stretching for frontal abduction
Instructions
- Place a block in the middle in front of you and assume upavista konasana as described above.
- With your arms outstretched, grasp the block with your forearms close to your wrists and lift it up.
- Move the block up and back as far as possible. Lift the arms with the shoulder blades to the maximum(elevation of the shoulder blades). Turn your arms out to the maximum and straighten them at the elbow joints.
Details
- Lifting the block requires that the forearms are pressed against the block with sufficient force from the outside. Depending on how practiced you are, this may lead to cramp-like tension in the front part of the shoulder muscles (pars clavicularis of the deltoid) or in the pectoralis major muscle at the start of the lift.
- Depending on the flexibility of the hamstrings, the pelvis will not be able to straighten completely or the back will not be completely straight. If it is more difficult to sit up straight, especially if cramps occur in the rectus femoris of the thighs on one or both sides, it is advisable to sit with the „rear edge of the buttocks“ on a raised surface, e.g. a mat folded several times, see the variant above. In the opposite case, i.e. when the hamstrings is very mobile, the pelvis is not tilted backwards by this group and the resulting need to work with the autochthonous back muscles can be very low. It is then advisable to place the feet on blocks.
- The arms should perform four movements continuously:
- upwards – this works best with each inhalation
- backwards – ideally synchronized with the exhalation
- stretch through the elbow joints
- turn out to avoid or reduce the tendency to cramp in the trapezius muscles
- Depending on the flexibility of the hamstrings and the shoulder joint, this variation strengthens the back to a greater or lesser extent (to be precise, mainly strength endurance of the autochthonous back muscles and the muscles responsible for elevating the shoulder blade, such as the trapezius).
- As a rule, the maximum duration of the posture is largely determined by the flexibility restrictions in the hamstrings and the shoulder joint, and less by the strength in the deltoids, trapezius or hip flexors.
- Extension of the elbow joints is often made more difficult by flexion moments generated by the biceps as the frontal abductor. More serious, however, is the tendency of the upper arms to move outwards as an evasive movement in the shoulder joint during frontal abduction. As the hands are fixed in a similar way to a punctum fixum (at least in the sagittal plane), this has the effect of flexing the elbow joint. This requires a more or less pronounced use of force from the triceps, as well as synergistic movement of the upper arms to the medial side of the pars clavicularis of the deltoideus and the pectoralis with its fibers extending from the sternum and the clavicle.
Pulling on the block
Straightening the back, strengthening the back muscles
Instructions
- Perform upavista konasana as described above, holding a block overhead between your hands with your arms stretched and turned out and pulling on it from the side with both hands.
Details
- This variation is a modification of the variation with the block, which on the one hand simplifies the work of the arms and shoulder muscles (pars clavicularis of the deltoid) because you no longer have to press against the block to prevent it from slipping or falling. On the other hand, the elimination of this movement results in a significantly reduced tendency to cramp, which is very beneficial for those who are prone to cramps in the trapezius. However, the improved stretching of the back associated with working the arms is essentially retained.
- The traction can be used to get the adductors of the shoulder joint working and the shoulder blades lateralize, which benefits trapezius muscles that tend to cramp.
against the wall with blocks
Detailed photos
block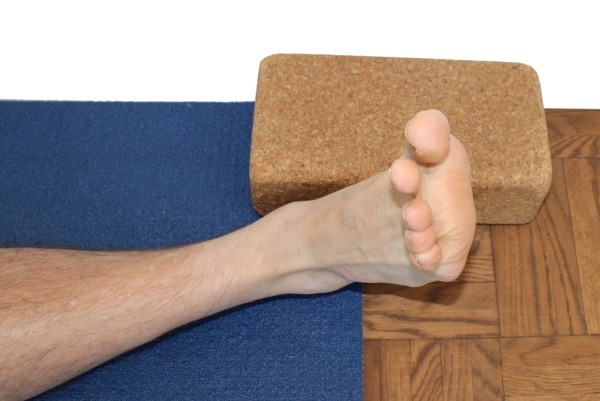 |
Instructions
- Assume upavista konasana in the variation against the wall with a block between the wall and the feet (along the wall and on the largest side).
Details
- This variation makes it possible to lift the pelvis further forward using the usual technique even if there is no more room to position a hand at a slight distance in front of the pelvis and also to lift the pelvis towards the hand and the wall.
Known problems that can occur even when performed correctly
(P) Pressing from behind

Instructions
- Take the pose as described above. The supporter presses against the back with hands or feet in the area of the upper sacrum or iliac crest.
Details
- Depending on the flexibility of the performer and the strength endurance of the supporter, press with the hands or feet. The hands or feet not only press against the back but also upwards. This proves to be much more difficult when pressing with the feet.
- Make sure that the pressure is symmetrical and ideally applied mainly in the area of the upper sacrum or the upper iliac crest.
- Depending on the force applied, it is important that the performer and the supporter have good friction on their support, or the performer should work with their feet against the wall, see the variation above.
(P) Pull forward

The „classic“ partner exercise, also known in Western gymnastics, in which everyone is both performer and supporter at the same time
Instructions
- Sit facing your partner with your legs stretched out in a straddle position and support yourself with your feet on their feet or lower legs.
- Both of you grab your partner’s hands or elbows and pull their upper body towards you.
Details
- If the partners‘ flexibility is quite different or their leg lengths are quite different, it is not foot on foot but foot on lower leg. However, this does not affect the posture
- Both partners use the strength of their hip flexors to tilt the pelvis forward into flexion at the hip joints (but not far beyond the vertical). Both stretch the back as far as possible using the autochthonous back muscles without really extending the spine.
- Depending on the proportions, it makes more sense to grasp the hands or the elbows. In the case of the hands, the arm flexors can be better used for pulling up, which represents an interesting strength endurance challenge for them. In the case of the elbows, the pull-up is mainly performed using the strength of the back muscles, e.g. the latissimus dorsi, which subjectively requires much less strength and can therefore be held more easily over a longer period of time. However, both require a certain degree of flexibility in the hamstrings.
- This posture often leads to undesirable conversation that goes beyond the necessary agreements regarding the posture.
(P) Adjusting the position of the foot

In the case of pre-damaged knee joints (especially menisci), it may be necessary to adjust the position of the feet externally.
Instructions
- Take the lying position against the wall as described above.
- The supporter stands with their back to the wall and grips with their fingertips between the wall and the performer’s Achilles tendon on the side on which the position of the foot is to be adjusted due to the laterally damaged knee joint.
- With the back of the hand resting on the wall, the lower leg is released from the wall at the Achilles tendon and slowly brought into the correct position. The details explain how this can be found.
Details
- In the case of damage to the inner knee, especially the inner meniscus, valgus stress on the knee joint can cause pain. If the outer knee is damaged, varus stress can lead to pain. The greater the flexibility restrictions in the hamstrings, the more forcefully the foot presses on the wall in the supta variant, as the hip extensors generate an extensor moment in the hip joint. This pressure creates friction on the wall – especially when practising without socks – which generally makes it impossible to automatically adjust the position of the foot to the extensibility of the adductor group. If the foot is positioned higher than the stretching capacity of the adductor group allows, the gravity of the leg results in varus stress with a tendency to pain in the inner knee, if the foot is positioned too low, valgus stress with possible pain in the outer knee during execution. The procedure described above can be used to adjust the position of the foot so that no varusor valgus stress-induced pain occurs in the knee joint. As a rule of thumb, the foot must be positioned lower if there is pain in the inner knee and higher if there is pain in the outer knee.
- As already discussed above, a distinction must be made in medial pain phenomena in the knee joint between, on the one hand, the typical pain in the area of the medial meniscus, which tends to have a transverse course and typically no longitudinal (along the cranial-caudal axis) radiation and reacts to pressure against the outer knee with a reduction in pain intensity and, on the other hand, the stretching pain in the gracilis and, to a lesser extent, the hamstrings, which is extended longitudinally and shows no improvement with pressure against the outer knee. If the knee joint is very unstable, it would even react by intensifying the pain. Bending the knee joint in position is less helpful diagnostically, as both pain phenomena would decrease with increasing flexion angle, although the gracilis extension pain would probably decrease more quickly than the pain caused by inner meniscus stress.