yogabuch / asanas / uttanasana
Contents
- 1 uttanasana„intensive stretching“
- 2 variants
- 2.1 1
- 2.2 2
- 2.3 Arms stretched
- 2.4 Arms behind the body
- 2.5 stretch from bent knees
- 2.6 Grip to the big toe
- 2.7 Handle to the outer foot
- 2.8 Handle to the inner foot
- 2.9 Head raised
- 2.10 Maximum endorotation of the legs
- 2.11 with one leg raised (ekapada prasarita)
- 2.12 namaste on the back
- 2.13 parsva
- 2.14 parivrtta
- 2.15 right-angled
- 2.15.1 Effects: (552) Strengthening the quadratus lumborum(722) Strengthening the ischiocrural group(602) Strengthening the autochthonous backmusc le s („back exte nsors“)(632) Strengthening the muscles of the thoracic spine (642) Strengthening the muscles of the lumbar spine Strengthening the muscles of the thoracic spine(642) Strengthening the muscles of the lumbar spine(822) Strengthening the hamstrings as exorotators of the knee joint(972) Strengthening the toe flexors
- 2.15.2 instructions
- 2.15.3 details
- 2.16 right-angled: practise tilting the pelvis
- 2.17 right-angled: practicing tilting the pelvis with a wall
- 2.18 right-angled: practicing pelvic tilt with bolster
- 2.19 Forehead on the shin
- 2.20 Table
- 2.21 Clasp lower leg
- 2.22 Traction on the lower legs
- 2.23 Hands with block behind the body
- 2.24 Ball of foot on block
- 2.25 with belt
- 2.26 Butt on the wall
- 2.27 Butt against the wall and arms behind your back
- 2.28 Butt against the wall and block overhead
- 2.29 Butt against the wall and block between the legs
- 2.30 Butt and heels on the wall
- 2.31 Back against the wall
- 2.32 crossed
- 2.33 crossed
- 2.34 on blocks
- 2.35 (P) Practise tilting the pelvis
- 2.36 (P) rectangular: practise tilting the pelvis
- 2.37 (P) rectangular: practise tilting the pelvis with fixed shoulders
- 2.38 (P) rectangular: practise tilting the pelvis with arms held out
- 2.39 (2P) rectangular: practise tilting the pelvis
- 2.40 (P) parivrtta
- 2.41 (P) namaste on the back
- 2.42 (P) Arms behind the body
- 2.43 (P) Back against the wall
- 2.44 (P) ekapada prasarita (with one leg raised)
- 2.45 (P) Butt and heels on the wall
- 2.46 (S) in table variant tilt pelvis
- 2.47 (P) Table: Straighten back 1
- 2.48 (P) rectangular: straighten back 2
- 2.49 Transition to rod
- 2.50 Transition to utkatasana
- 2.51 Transition to upface dog
- 2.52 Transition to downface dog
- 2.53 Transition to rectangular handstand
- 2.54 Transition to headstand
- 2.55 Transition to handstand
- 2.56 Transition to rectangular elbow stand
- 2.57 Transition to elbow stand
- 2.58 Transition to tadasana
- 2.59 Transition to urdhva hastasana
- 2.60 Transition to karnapidasana
- 2.61 Transition to halasana
- 2.62 Transition to trikonasana
- 2.63 Transition to parivrtta trikonasana
- 2.64 Transition to ardha chandrasana
- 2.65 Transition to parivrtta ardha chandrasana
- 2.66 Transition to parsvakonasana
- 2.67 Transition to Warrior II pose
- 2.68 Transition to Warrior I pose
- 2.69 Transition to Warrior III pose
- 2.70 Transition to ardha vasisthasana
uttanasana
„intensive stretching“
 instructions and details with working links as PDF for download/print
Feedback: We’d love to hear what you think about this description, give us feedback at:
postmeister@yogabook.org
last update: 30.12.2018
Name: uttanasana
Trivial name: intense stretch
Level: FA
- Classification
- Contraindication
- Effects
- Preparation
- Follow-up
- derived asanas
- similar asanas
- Diagnostics
- Instructions
- Details
- Variants
Table of contents [show]
Classification
classical: forward bend while standing
psychomental: slightly calming, introverting
physiological: intensive stretching of the hamstrings
contraindications
In the case of acute disc problems, uttanasana may only be performed in the variations with a straight back, i.e. table and right-angled. However, these are therapeutically valuable for intervertebral disc problems.
effects
- (972) Strengthening the toe flexors (if the toes are pressed to the floor in a way that deviates from the standard)
- (246) Shoulder joint: stretching for retroversion
- (511) Stretching the pectoralis major inthe variant with arms behind the back
- (721) Elongation of the hamstrings
Preparations
As uttanasana is much easier and more effective in practice than seated forward bends and is the simplest form of standing forward bend, it is difficult to give preliminary exercises. Rather, synergistic poses are listed here:
- parsvottanasana may be significantly more intense, not least due to the asymmetry, and has a slight balance component
- prasarita padottanasana as a type of grazed uttanasana
- trikonasana, effective with sufficiently deep support in the leg to which the upper body is moving
- parivrtta trikonasana in the front leg very effective
- ardha chandrasana is effective in the standing leg
- parivrtta ardha chandrasana in the standing leg very effective
- Warrior stance 3 in standing leg effective
- hip opener 5 as a very effective stretch of the hamstrings that goes beyond uttanasana
Of course, all seated forward bends are also synergistic, but uttanasana would be used as a preparation for these rather than the other way around and less flexible beginners would be advised against seated forward bends:
- janu sirsasana
- parivrtta janu sirsasana
- ardha baddha padma pascimottanasana
- tryangamukhaikapada pascimottanasana
- upavista konasana Forward bend
- parsva upavista konasana
- parivrtta parsva upavista konasana
- pascimottanasana
Simple postures that could actually be considered preparation for uttanasana are:
- Back extension
- Back extension variant „in stepping position“
- Dog position head down and especially its one-legged variants
Very rarely the muscles of the back are so tense that uttanasana is very uncomfortable, then try it:
- karnapidasana
- parsva upavista konasana
- the „table“ variation of the uttanasana
- Headstand
- Shoulder stand
follow-up
The uttanasana rarely causes discomfort in the muscles of the lumbar spine, especially if there is still little flexionin the hip joints, in which case the following postures can be tried:
If the neck shows signs of discomfort due to the slight passive forward bend in uttanasana – which is almost exclusively the case when the hip joints are less able to flex – try this:
derived asanas:
similar asanas:
diagnostics (no.)
(880) Hyperextension of the knee joint
Overextension of the knee joint refers to the ability to or the current state of an angle of more than 180° in the knee joint. To a certain extent, this is considered normal by anatomists and is on average more common and more pronounced in females. However, it can also indicate weakness of the quadriceps or hamstrings. Furthermore, hyperextension often causes unphysiological sensations that are not caused by stretching or straining the muscles and should be avoided, see also the FAQ.(650) Kyphosis and lordosis of the spine:
Irregularities in the kyphosis of the thoracic spine are clearly visible when the back is rounded in uttanasana. If the lumbar spine is not able to lift the lordosis, a hyperlordosis of the lumbar spine must be suspected. Physiologically, the back should be rounded, starting approximately at the sacrum and slowly increasing towards the thoracic spine. Of course, the flexion of the spine depends on the degree of flexion in the hip joints: the greater the flexion in the hip joints, the less the curvature of the back, especially in the lumbar spine. If there is poor flexion in the hip joints, the lumbar spine must be excessively flexed. See also the FAQ.(611) Pelvicobliquity/scoliosis of the spine:
The lateral deviations of the spine from the median plane known as scolioses are also quite visible in this posture. See the FAQ.(721) Ischiocrural group
Various disorders can be found in forward bending movements(flexion in one/both hip joints), but also under load in the muscles of the back of the leg:
- Shortening of the hamstrings, see FAQ
- Damage to the hamstrings that causes pain or functional limitations can also be clearly seen here, from simple tension to strains and muscle (partial) tears. Tears would lead to a reduction in strength when leaving the posture quickly.
- Irritation of the ischiadicus nerve: irritation of the ischiadicus nerve, which innervates the leg and foot, can become symptomatic during forward bends in particular, even if they are otherwise rather calm. FAQ.
- Baker’s cysts create a feeling of tension or a foreign body in the back of the knee, see FAQ.
- Irritation of the origin of the hamstrings at the ischial tuberosity (at the ischial tuberosities, also called PHT: proximal hamstring tendinopathy) can occur in this posture and require protection before intensive stretching, see the FAQ.
(852) Calves:
In this pose, the calf muscles are put under considerable strain, the further the load moves from the heel towards the balls of the feet, the greater the strength endurance demand on the calf muscles (the triceps surae). However, the calf tends to cramp with increasing duration in this position. If calf cramps occur quickly, this often indicates a lack of strength endurance or a supply problem such as a lack of calcium (also cramps at rest) and magnesium (cramp tendency more dependent on exertion) in the blood or a lack of blood circulation. As a rule, this has nothing to do with nocturnal calf cramps, which are usually caused by persistent stretching movements(plantar flexion) in the ankle due to the current dream event. A distinction must be made between the soleus and the gastrocnemius; the former works here at a little more than medium sarcomere length, but the latter, due to the stretched knee joint that it bends over, at quite a long sarcomere length, so that if it is shortened, stretching can already be felt here. Subjectively, the combination of a long sarcomere length and a significant load, which results from the fact that the gravity perpendicular is moved well in front of the heels and this muscle performs significant work in supporting the large partial body weight, can lead to a very intense sensation of the gastrocnemius.
variants:
Maximum endorotation of the legs
with one leg raised (ekapada prasarita)
right-angled: practise tilting the pelvis
right-angled: practicing tilting the pelvis with a wall
right-angled: practicing pelvic tilt with bolster
Hands with block behind the body
Butt against the wall and arms behind your back
Butt against the wall and block overhead
Butt against the wall and block between the legs
(S) exercise tilting the pelvis
(S) right-angled: practise tilting the pelvis
(S) right-angled: practise tilting the pelvis with fixed shoulders
(S) right-angled: practise tilting the pelvis with arms held out
(S) ekapada prasarita (with one leg raised)
(S) Butt and heels on the wall
(S) right-angled: straighten back 2
(2S) right-angled: practise tilting the pelvis
Transition to right-angled handstand
Transition to right-angled elbow position
Transition to urdhva hastasana
Transition to parivrtta trikonasana
Transition to ardha chandrasana
Transition to parivrtta ardha chandrasana
Transition to ardha vasisthasana
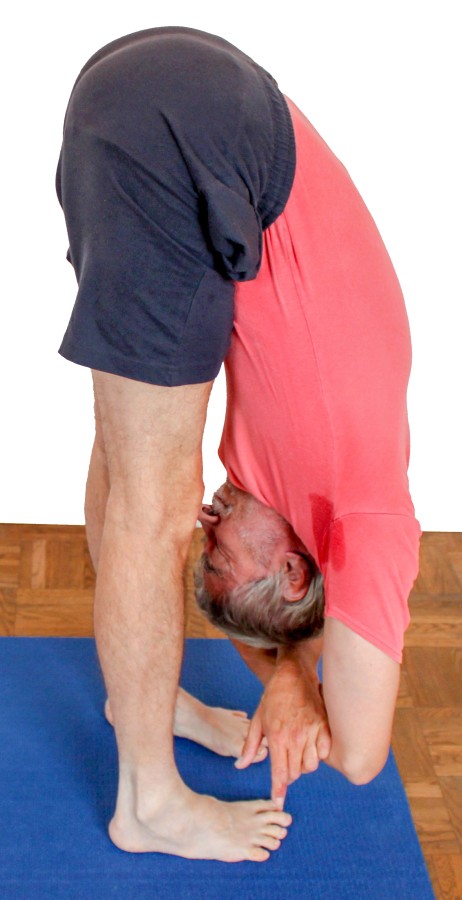
instructions
- Stand in tadasana, feet hip-width apart, midline of the feet parallel, upper body stretched.
- Straighten your legs and hold your kneecaps up by working your quadriceps a little. Turn the legs in slightly and move the ischial tuberosities away from each other.
- Grasp both elbows with the other hand and stretch them to the ceiling with your shoulder blades elevated (raised). Also stretch your upper body towards the ceiling.
- Quickly tilt the pelvis forwards as far as possible(flexion in the hip joints) while maintaining the arm position and lower the upper body at the same speed as you tilt the pelvis.
- Now move your head, shoulders and arms down as far as possible. Tilt the pelvis to the maximum using the strength of the hip flexors so that the maximum reasonable extension occurs in the backs of the legs.
- maintain a slight torsion of the thighs.
details
- When tilting the pelvis into flexion in the hip joints, naturally move the pelvis backwards a little so that the center of gravity is still in the base of support. Later, move the pelvis forward again as far as possible. How far the pelvis is forward determines how intensively the calf muscles are worked. For people with weak calf muscles, especially those with a tendency to shin splints, it is recommended to (also) practise uttanasana as a calf strengthening pose. To do this, experiment with foot positions other than parallel forward-facing, e.g. turn the feet noticeably out or in instead.
- Any relief of the back of the legs by using the back muscles or reducing the use of the hip flexors can mean a greater or lesser strain on the lower back. Therefore, always do the exercise with the legs intensively. Never tilt the pelvis forward half-heartedly. Never hang almost passively in the exercise. These requirements apply all the more to stiff beginners than to people who are already very flexible. There are several reasons why the hamstrings in the back of the thigh does not have a sufficient stretch sensation or effect:
- Conscious or unconscious avoidance of the intense stretch sensation in the back of the leg or even
- Incorrect perception of the posture – which is generally the responsibility of the teacher – and
- The (as yet) undiscovered use of the hip flexors for flexion in the hip joints to supplement the effect of gravityand direct it to the correct point of action.
- Rarely are constitutional factors responsible for this, such as the fact that the hamstrings or the monoarticular hip extensors can tolerate more traction without already reporting a sensation of stretching than the gravitational effect ofthe partial body weight of the upper body, head and arms causes. This can be the case after prolonged practice of certain activities or sports. For example, long-time cross-country skiers are generally less muscular in the upper body and therefore also rather light, while the hip extensors that provide propulsion during running have developed great robustness. However, the hip flexors, which are supposed to tilt the pelvis into flexion in the hip joints, have not become as strong as the hip extensors in this case, as the former only have to pull the leg forward again to make the next step possible, while the latter are regularly responsible for propulsion over many kilometers. This may manifest itself in uttanasana in such a way that, unlike most other people with different constitutions, neither the gravitational effect of the aforementioned partial body weight nor the force exerted by the hip flexors nor both together can cause any significant stretching sensation and therefore no significant progress is made, but rather there is a risk that the greater part of the gravitational effect of the partial body weight will lead to a further development of the flexion abilityof the lumbar spine region. In these cases, a practicable solution must be found. This may consist of increasing the effective torque in both hip joints, as would be the case with the deadlift using the external weight, which is primarily used for stretching, or the available body weight may not be distributed to both hip joints, but only act on the hip extensors on one side of the body. Since standing forward bends are known to be more powerful, at least if the flexibility in the hamstrings is not outstanding, and are also much less problematic in terms of the condition of the lower back (which is particularly important in the case described), postures such as parivrtta trikonasana, parsvottanasana, hasta padangusthasana standing against a support such as a windowsill or a table and hip opener 5 should be used here.
- Make sure you don’t just hang on the outer edges of your feet, which is usually associated with a tendency to turn your legs out. However, the legs should tend to turn inwards, i.e. the inner knees go backwards more than the outer knees. One of the effects of turning the legs in is that the ischial tuberosities move slightly apart, which promotes forward flexion in the hip joints.
- As in many forward bends, the last 1 to 2 degrees of extension in the knee joint are the most interesting.
- Trembling in the knees is a completely normal phenomenon for the stiff beginner and results from the blatant disproportion between the inadequate ability of the quadriceps to perform concentric contraction in an almost extended knee joint (i.e. very short sarcomere length of the quadriceps) and the stiffness of the antagonists to be stretched, namely the hamstrings. This often leads to a resonance phenomenon with amplitudes of possibly more than 1 cm. From a less physiological perspective, we observe the start of the knee joint system from the tamas into the rajas.
- To tilt the pelvis forward better and stretch the hamstrings better, you can
- reach for the buttocks and pull them up. This indirectly raises the ischial tuberosities, which directly improves the extension of many muscles in the hamstrings, as this is where they attach.
- Bend the knee joints, then tilt the pelvis forward as far as possible (using the strength of the iliopsoas or the strength of the arms by pulling on the lower legs) (in many cases the upper body can then be pressed onto the thighs) and then restore the extension of the knee joints, maintaining contact between the upper body and the thighs as best as possible, see the corresponding variation.
- Do not use the m. rectus femoris to tilt the pelvis forward, as it has a pronounced tendency to spasm in this position (due to the flexion in the hip joints and the extension of the knee joints) and therefore a very short sarcomere length.
- Some people have a tendency to irritate the origin of the hamstrings at the ischial tuberosity when practicing forward bends intensively. This is referred to as PHT (Proximal Hamstring Tendinopathy), see also the pathology page and the FAQ. As a rule, this is not a serious injury but, depending on how it is handled, it can be long-lasting. However, in some forward bends, including uttanasana, it causes a painful sensation from one or both ischial tuberosities a few centimetres down the leg towards the knee. This disorder does not usually resolve itself easily unless you do not perform any forward bends for months. However, even this would improve the sensation in the affected region, but would not solve the underlying problem, as it is highly likely that the symptoms would reappear when the forward bends were resumed. This can be remedied, for example, by stretching the hamstrings in a different way to the one usually practiced: from a bent knee joint with maximum flexion held in the hip joints (pelvic forward bend), stretch the knee joints instead of bending the pelvis forward in the hip joints(hip flexion), as is usually done with the legs extended. It is a good recommendation to performers and teachers alike to practise/let them practise forward bends in this second way again and again. This variation can be excellently combined with different ways of using the arms, e.g. in the form of pulling on the lower legs. In any case, this is an excellent variation for anyone whose knee joint can hyperextend. Another way to tackle this problem is to stretch the affected hamstrings by applying physical pressure across the direction of the muscle fibers. The easiest way to achieve this is to place a stick (across the leg) or similar under the middle of the back of the leg in one-sided seated forward bends such as janu sirsasana or tryangamukhaikapada pascimottanasana, which then presses on the ischiocrural group in the pose and which it has to avoid. Rehabilitative training of the hamstrings is another very helpful means of getting these complaints under control in the long term. The most effective posture for this is probably the deadlift, in which the hip joints are only flexed to the extent that there is no sensation other than stretching and exertion. Experience has shown that the point at which discomfort occurs depends more on the degree of flexion than on the weight, but basically on both.
- Keep the abdominal muscles (especially the rectus abdominis) soft. The aim is not to move the head and shoulders towards the lower leg, but down towards the floor. The upper body does not bend beyond the effect of gravity(flexion of the spine), just as it would not stretch in any way using the strength of the autochthonous back muscles. Any rudimentary stretching that does not achieve at least the steep position of the lumbar spine, or better the physiological lordosis, puts more strain on the lumbar spine than in the case of passive back muscles.
known problems that can occur even when executed correctly
Pain in the lower back
Despite correct execution, pain can (rather rarely) occur in the lower back. This is usually the case for people who have started practicing relatively stiffly and do not use the hip flexors in forward bends to promote flexion because they want to avoid at least some of the stretch sensation in the hamstrings. This means nothing other than that they get into the habit of practicing forward bends incorrectly and over time develop more and more flexibility in the lumbar spine in the direction of kyphosis instead of stretching the hamstrings in the back of the leg as urgently needed. If the process is already relatively advanced, you will see a sometimes quite impressive ability of the lumbar spine to bend forward. It will then make sense to protect the lumbar spine by placing the hands on upright blocks or other adequate support so that the lumbar spine area can be kept fairly straight. It should also be checked whether the autochthonous back muscles in the area of the lumbar spine are strong enough. In contrast to powerful stretches, gentle stretches, such as those applied to the autochthonous back muscles in the lumbar spine area in such cases, do not help to strengthen the muscles. It is fundamental here to gain an understanding and feeling for the powerful tilting of the pelvis into flexion through the strength of the hip flexors! The feeling for this is generally easier to achieve with less flexion in the hip joints than with maximum forward flexion, see the corresponding exploration. Pain in the back of the knee
See article in the FAQPain at the origin of the hamstrings on the ischium (Proximal Hamstring Tendinopathy PHT)
See article in the FAQ.
variants
1

A variation on using the arms.
instructions
- Do uttanasana as described above, but place the palms on the floor almost as far to the side behind the feet as possible, so that the fingers are pointing backwards, and bend the arms as far as strength and the resulting stretch sensation in the back of the legs allow.
details
- The main difference between uttanasana 1 and 2 is the rotation of the forearm: in 1 it is supinated, in 2 it is pronated, which results in different use of the arm flexors. In addition, the friction of the hand on the floor is slightly greater in this variation, so that the hand does not slip away as quickly when a lot of force is applied.
- This variation slightly encourages you to use your abdominal muscles. This is due to the fact that the bending of the arms moves the upper body mainly towards the legs and hardly downwards. Try to keep the abdominal muscles soft and generate the movement of the upper body purely from the arms.
2

A variation on using the arms.
instructions
- Perform uttanasana as described above, but place the palms on the floor almost as far to the side behind the feet as possible so that the fingers are pointing forwards.
details
- The main difference between uttanasana 1 and 2 is the rotation of the forearm: in 1 it is pronated, in 2 it is supinated, which results in a different use of the arm flexors: in supination the biceps can work a little more powerfully than in pronation.
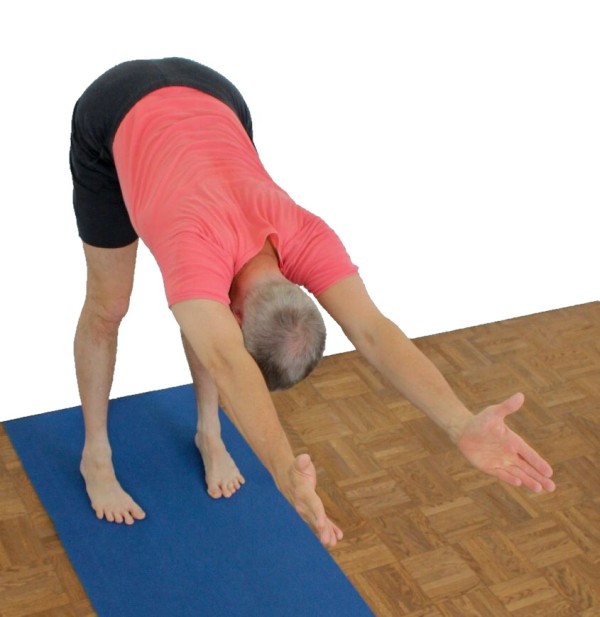
Arms stretched

Stable, intensive variation that flexes the lumbar spine less.
instructions
- Perform uttanasana as described above.
- Place your fingertips shoulder-width apart on the floor and start to move your fingers further and further forward using the strength of your finger flexors, keeping your fingers as light as possible.
- The pelvis does not move forward.
details
- Especially when relatively immobile beginners without strong body awareness start practicing forward bends intensively, there is a risk that the gravitational force of the upper body, arms and head will not mainly lead to a stretching of the hamstrings but will instead bend the lumbar spine. This variation mitigates this somewhat. Once the habit of flexing the lumbar spine (to an absurd extent) instead of stretching the ischiocrural group has become ingrained, this requires focused intervention. It is not uncommon for these participants to report an uncomfortable feeling in the area of the lumbar spine in the posture. At the same time, prolonged intense force on the intervertebral discs of the lumbar spine is anything but desirable. This variation can help to convey what uttanasana is all about.
- By placing the fingers only slightly on the floor and moving them forwards, the spine tends to be stretched from the thoracic spine to the lumbar spine and at the same time the effective torque in the hip joints is increased by the longer effective lever arm, especially when the weight of the fingers on the floor is continually reduced. This results in improved stretching of the back of the leg with minimal stretching of the lumbar spine and correspondingly minimal strain on the intervertebral discs.
- This variation, possibly with appropriate support under the fingers so that the back can remain stretched, should also be suitable for people with damaged intervertebral discs in the lumbar spine, for whom the normal uttanasana is contraindicated.
Arms behind the body

Details if required:
Increasing the tilting moment in the hip joints, stretching the shoulder joint in the sense of retroversion
Effects: (246) Shoulder joint: stretching for retroversion
(311) Biceps: stretching
instructions
- Perform uttanasana as described above, but with your hands clasped, stretch your arms behind your back and lower them over your back towards the floor. The palms should be facing the back.
details
- This variation has two advantages: the tilting moment in the hip joints is noticeably greater than in the normal uttanasana(at least if the shoulder joints are reasonably capable of retroversion) due to the larger effective lever arm when the arms are extended, and it is also a good way to improve shoulder flexibility in terms of retroversion.
- Turn your arms out as in all other poses. Also extend the elbow joints. The palms face the back and the wrists move away from each other. Let go of the back of the shoulders so that the arms can sink further as the pose progresses.
- In cases of low shoulder flexibility in the sense of retroversion, the arms may hardly be able to be moved away from the back. If there is also poor flexibility in the hamstrings, the weight of the arms may pull them towards the back again and again. In such cases, it is advisable for a supporter to pull the arms away from the back by the hands or to clamp a block, shoulder support plate or other suitable object between the back and wrists.
- Limited flexibility of the (arm)biceps may mean that the arms cannot be stretched because their biarticularity causes a significant flexion moment in the elbow joint when the arm is retroverted in the shoulder joint. Use this position to stretch the biceps by trying to stretch the elbow joint with the triceps.
- In principle, this posture can also be performed with an external weight such as a block or dumbbell or as a posture with support.
- The tendency to hyperextend the elbow joints is often reduced in this posture. This is particularly true if the biceps have a certain tone, as they create a flexion moment in the elbow joint during retroversion of the arm when the elbow joint is extended.
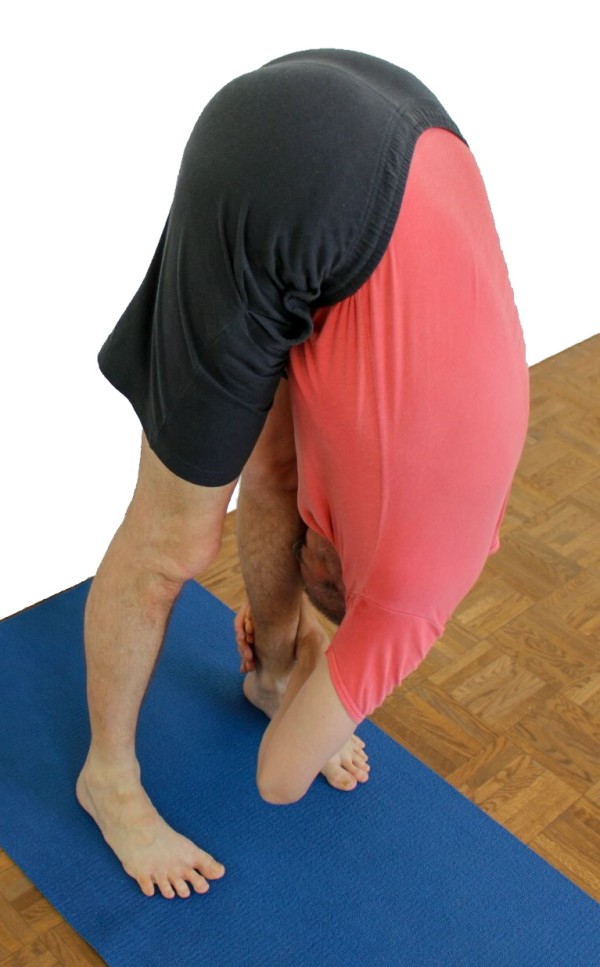
stretch from bent knees

instructions
- Take uttanasana, but bend the knee joints wide.
- Press your upper body onto your thighs.
- Slowly extend your knees in a controlled manner without losing contact and pressure between your upper body and thighs.
- The knee joints do not have to be able to be stretched; what is important is the intensity of the stretch in the hamstrings in the back of the leg.
details
- This variant is very suitable for cases in which the area of origin of the hamstrings at the ischial tuberosity is irritated. A reasonably intensive stretch of the back of the thigh can often be achieved without producing pain in the area of origin. It seems as if the tension in the muscles is initiated from below, from the extension of the knee joint, leaving the area of origin largely unaffected. To a certain extent, this can be argued via the friction of the fascia.
- To maintain the pressure of the upper body on the thighs, it is very helpful to keep a firm grip on the lower legs with the forearms.
- In most cases, this variant is ideal for avoiding hyperextension of the knee joint.
- If you are prone to complaints in the lumbar spine area, this variant is more suitable than most others.
Grip to the big toe

A variant to use the armsA variant to use the arms
instructions
- Perform uttanasana as described above, but do not cross your arms. Instead, grasp the big toe with your index and middle fingers and pull your upper body downwards.
details
- Do not pull the big toe away from the ground, otherwise the weight distribution on the ball of the toe will change too much. Only push it towards the ground as hard as the pull on it requires.
- The elbows also move outwards in this variation.
Handle to the outer foot

A variation on using the arms
instructions
- Perform uttanasana as described above, but do not cross your arms. Instead, briefly lift one outer foot to reach under the corresponding outer edge of the foot with your fingers and pull on it.
details
- For those who can pull harder on the big toe than it can handle due to good flexibility in the back of the leg and a lot of strength (and strength endurance) in the arms, pulling on the outer foot is a good option. As the outer foot is bony, it provides a solid area where the arm strength can be applied permanently. Especially with greater strength in the arm flexors and greater strength required for adequate stretching of the hamstrings, the finger flexors can also prove to be the weakest link in this variation and show a tendency to cramp localized in the forearm. In this case, traction on the pasterns will be more favorable.
Handle to the inner foot

A variation on using the arms
instructions
- Perform uttanasana as described above, but do not cross your arms, instead pull the fingers of each hand towards the corresponding inner edge of the foot.
details
- This variant has two disadvantages compared to the traction on the outer foot, namely that the inner edge of the foot is not bony but fleshy, i.e. muscular, and secondly, the ergonomics are considerably worse due to the wrist bending significantly into palmar flexion with good flexibility in the hip joints. Palmar flexion can bring the finger flexors in the forearm close to a tendency to spasm.
Head raised

instructions
- Do uttanasana as described above, reach your hands towards the restraints and pull on them.
- Raise the head to the extension of the thoracic spine or beyond if tolerated and stretch the back as far as the stretched arms on the one hand and the flexibility of the hamstrings on the other allow.
details
- As always in postures with the head raised, make sure that the neck muscles do not build up an uncomfortably high tone.
- Raising your head and trying to stretch your back can increase the stretching effect in the back of your legs.
Maximum endorotation of the legs

Getting to know the movement of the ischial tuberosities.
instructions
- Perform uttanasana as described above.
- Turn your thighs in at the hip joints as far as possible and push your heels away from each other on the floor so that you can move your ischial tuberosities as far apart as possible.
details
- ..
with one leg raised (ekapada prasarita)

Effects: (852) Strengthening the calves
(727) Strengthening the monoarticular hipextensors gluteusmaximus
(852) Strengthening the monoarticular calf muscles (soleus)
instructions
- Do uttanasana as described above.
- Support yourself with your hands on the floor in front of you, shift your weight onto one leg and slowly lift the other one backwards and upwards to the maximum.
- Make sure that the pelvis remains completely straight.
- When you are stable enough, take both hands off the floor, grasp the ankles and pull yourself towards the leg with your hands.
details
- This pose, especially in the unsupported version with clasped ankles, has the character of a balancing pose with intensive stretching at the same time. As the center of gravity, which must lie under the standing foot in this posture, depends heavily on the exact position of the lifted leg and its lever arm is extremely long, it is necessary to work very attentively. All movements of the pelvis, both deviation and correction, have a significant influence on the center of gravity. Therefore, try to keep the pelvis completely straight right from the start instead of using the leg to achieve a seemingly good height, which is only due to the pelvis turning away.
- The pelvis has a strong tendency to rotate away from the standing leg, as this provides relief from the stretch in the standing leg. So make sure that you feel the pelvis moving towards the standing leg rather than away from it, which is an evasive movement in the hip joint that seeks to reduce the sensation of stretching in the hamstrings. This variation is one of the two possibilities of the standing forward split(hanumanasana), the other would be a very wide hasta padangusthasana (forward), in which the upper body and raised leg resemble krouncasana.
- Even releasing your previously supporting hands from the ground has a significant effect on your center of gravity. If necessary, run your fingers further and further towards your feet and then gradually take more and more weight off your hands while observing how you react.
- The lifted leg wants to deviate in the hip joint in all three dimensions:
- Tilt away from the supporting leg, i.e. lift the contralateral side
- rotate in the plane away from the standing leg
- reduce flexion in the hip joint
namaste on the back

A variation on using the arms.
instructions
- From tadasana, fold the hands behind the back in namaste.
- Tilt the hips forward into flexion for uttanasana as described above.
- Press the edges of your hands onto your back, press your palms together and move your elbows up and towards your pelvis, moving your shoulder blades towards each other(retraction) and towards your pelvis(depression).
details
- As in other postures with namaste on the back, we may encounter restrictions in the flexibility of the shoulder joint in the direction of retroversion and the forearm muscles. The latter often make it impossible to press the palms together, while the former limit the movement of the elbows backwards and towards the pelvis, but also the movement of the elbows inwards and thus the pressing of the palms together.
- Due to the lateral abduction angle of the arms, less tendency to cramp in the muscles at the back of the shoulders is to be expected than was described for the variant „with block behind the body“ for the attempt to push against the block from the side.
- Gravity pulls the arms towards the front, which is reinforced by the pull of the pectoralis major. Counteract this and pull the shoulder blades into both retraction and depression.
parsva
This variant often helps with complaints of the lower back.
Effects: (641) Stretching the muscles of the lumbar spine
instructions
- Perform uttanasana as described above.
- Turn your pelvis a good 20° to one side and use both hands to pull your upper body towards the corresponding leg.
details
- This variation stretches the muscles on one side of the back more than the other. In addition, there is usually a slight lateral flexion of the lumbar spine so that the spine can move a little sideways. Taken together, this leads to a faster and more pleasant stretching of the autochthonous back muscles in the lumbar spine area, which is perceived as pleasant and helpful for many forms and causes of discomfort there. In contrast, the classic uttanasana can sometimes be uncomfortable for lumbar spine complaints, the longer it is performed, the more so. This naturally affects those who are less flexible in the hamstrings more, as there is more flexion in the lumbar spine. If this variation is used for complaints in the lumbar spine, it is usually advisable to change sides every 20 – 30 seconds without lifting the upper body: swing from one side directly to the other without lifting the upper body! Of course, this variation is also contraindicated in the case of disc problems.
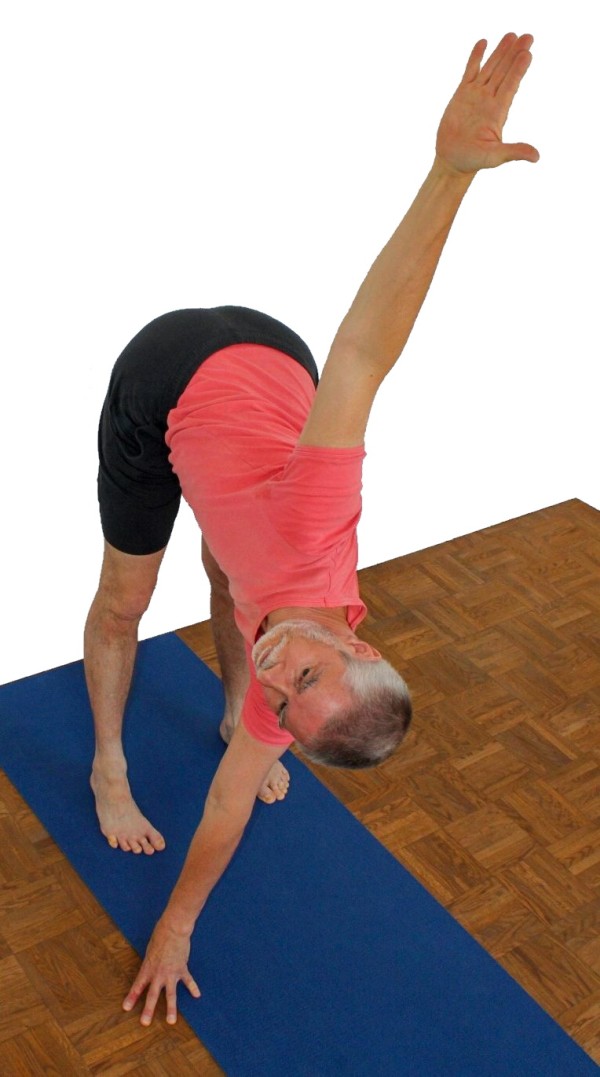
parivrtta
Effects: (212) Neck: rotation force
(211) Neck: rotation stretch
(601) Stretch to rotate the spine
instructions
- Perform uttanasana as described above.
- Stretch your upper body horizontally and place the fingertips of your left hand on the floor slightly in front of and to the right of your right shoulder.
- Turn your upper body to the right and stretch your right arm towards the ceiling.
- Also turn your head to the right and look as far as possible into your upper hand.
- The left arm pushes diagonally back towards the heel as in parivrtta trikonasana. It must remain extended.
details
- The ability to extend the upper body horizontally naturally depends on the flexibility of the hamstrings. If in doubt, use a block to help.
- The strength to turn the upper body does not come from the core muscles alone. The arm, whose fingers are resting on the floor, works powerfully on the rotation. Similar to parivrtta trikonasana, press the fingertips towards the opposite heel; this is a combination of lateral adduction and retroversion. The upper arm must not lose its extension so that the elbow is aligned in its dimension of movement and the force exerted can be absorbed by the triceps and not create a joint-straining varus stress that no muscles exist to absorb. Apart from the fact that this requirement serves the health of the elbow joint, it also provides a good opportunity to strengthen the triceps, especially the middle, biarticular part, which is involved in the retroversion and at the same time has to absorb the flexion moment in the elbow joint resulting from the retroversion. Because of the extended elbow joint and the position of the upper arm in or near retroversion, this middle part of the triceps is very short in sarcomere length and should not only be felt working strongly, but can also take on a cramp-like character. As always, it is important to avert pulling cramps.
- Only turn your head so vigorously that the neck muscles do not start to cramp. Avoid reclining the head.
- A slight tilt of the pelvis in this posture seems almost unavoidable, as does taking the weight off one leg. Try to keep the weight distributed as evenly as possible on the feet and avoid shifting the pelvis to one side and thus changing the angle of the legs to the pelvis and floor. The inclination of the pelvis anatomically means an adduction in the hip joint of the front leg and an abduction in the hip joint of the back leg. Again, this is very similar to parivrtta trikonasana.
- As in other twisting poses, the stretching of the upper body decreases with increased rotation. Keep checking whether you are still stretching your back with the strength of your back muscles and whether this can be done even more powerfully.
- Keep the fingertips very light so that the resulting friction is just enough to prevent the fingers from slipping. Any additional weight on the fingers does not tend to destabilize the posture as much as in the case of parivrtta trikonasana, but the maxim of keeping the fingertips as light as possible should also be maintained here so that the analogy to parivrtta trikonasana becomes clearer and is practiced further, i.e. also as preparatory work for parivrtta trikonasana. Apart from this, the triceps surae benefits from the greater load in terms of strengthening.
- In an analogy to the requirement that the upper arm rotates out so far in the shoulder joint that the elbow joint is loaded exactly in its plane of movement, i.e. the horizontal part of the vector of the exerted force lies in the flexion plane of the elbow joint, it is required as an approximation for the fingers that the tendon of the middle finger should also lie in this plane so that the finger flexors transmit the exerted force and no varusor valgus stress occurs in the various groups of the finger joints. In other words, the tendon of the middle finger points diagonally backwards towards the heel, the arm is pressed in the same direction and the elbow joint would bend in the corresponding vertical plane. Keep your fingers only slightly apart.
right-angled
Intensive stretching and strengthening
Effects: (552) Strengthening the quadratus lumborum
(722) Strengthening the ischiocrural group
(602) Strengthening the autochthonous backmusc le s („back exte nsors“)
(632) Strengthening the muscles of the thoracic spine (642) Strengthening the muscles of the lumbar spine Strengthening the muscles of the thoracic spine
(642) Strengthening the muscles of the lumbar spine
(822) Strengthening the hamstrings as exorotators of the knee joint
(972) Strengthening the toe flexors
instructions
- Take urdhva hastasana.
- Keeping the back in physiological lordosis, tilt the pelvis forward towards uttanasana, but only until the pelvis has reached a horizontal position.
- Keep the arms fully extended, stretch out from the shoulders(elevation of the shoulder blades) and move the arms as far as possible towards the ceiling.
- Stretch the back until the physiological thoracic spine kyphosis is eliminated.
details
- The requirement to tilt the pelvis into a horizontal position is naturally not feasible for those who are less mobile in the hamstrings. If the muscles at the back of the thigh do not allow such a wide flexion in the hip joints, tilt it as far as possible and extend the back from the pelvis.
- As is often the case in similar postures, a tendency to spasm in the trapezius can also occur here. Maximum extension of the arms is then very important, and the forearms can also be maximally supinated for support, with the palms facing upwards. Also make sure to stretch out of the shoulders(shoulder blades in elevation).
- In cases of very good flexibility in the hamstrings, the pelvis can tilt significantly beyond the horizontal. In combination with a horizontally held back, this results in an uncomfortable hollow back, which is not in the spirit of the posture. Tilt the pelvis only as far as the horizontal. If there is a lack of body awareness and external control and an uncomfortable hollow back occurs, consciously tilt the pelvis slightly out of flexion using the strength of the pomus muscles and the hamstrings without lifting the back at the same time, see the corresponding exploration.
- As in all variations of uttanasana, do not hang too far back with the pelvis (and therefore the center of gravity) but go forward to the limit (which is given by the center of gravity and strength endurance of the calf muscles), just before the point at which you would be forced to use the toes for support.
- If there is manifest irritation of the muscle origin of the hamstrings(PHT „Proximal Hamstring Tendinopathy“, see also the FAQ) at the ischial tuberosity, this posture is prohibited by itself. Otherwise, it can be used to strengthen these anatomical structures without the loss of flexibility often associated with strengthening. If there is latent or manifest irritation, this variation can be performed until just before the point at which the pain occurs. Do not go into the pain, as this is not constructive stretching pain.
- This posture obviously shows great parallels to the 3rd warrior stance. However, the fact that both feet are on the ground almost completely eliminates its balancing character, especially with hip-width feet. With closed feet, very little of this character remains. Due to the one-legged stance, however, the 3rd warrior stance has a richer spectrum of action, e.g. the two smaller glutes(gluteus minimus and gluteus medius) must ensure a horizontal position of the pelvis against the gravitational effect of a significant part of the body weight. Of course, this is not necessary in the uttanasana variation. The above-mentioned balancing character of the 3rd warrior pose has a lasting strengthening effect on many parts of the lower leg muscles, which have to compensate for the small rocking movements along the longitudinal axis of the foot through constant pronatory and supinatory work, and is therefore often helpful in getting a grip on an existing false leg edge syndrome. This effect is also largely absent from the uttanasana variation. There are also differences in the autochthonous back muscles. For example, the muscles on one side are challenged more in the 3rd warrior pose than those on the other and are therefore strengthened more intensively than in this uttanasana variation. Nevertheless, it can be an excellent preparatory exercise for the 3rd Warrior pose in several respects, as it exercises the stretching and strength development of the hamstrings as well as the enduring strength of the autochthonous back muscles and finally at least the plantarflexor part of the lower leg muscles and thus simplifies the execution of the 3rd Warrior pose and allows it to be performed for longer.
- From a static point of view, flexion in the hip joints with a constantly physiologically extended back is a state of equilibrium between the torque from the pull of the hip extensors on the one hand and the torque from the gravitational effect ofthe supported partial body weight and the pull of the hip flexors on the other. This means that a certain degree of flexion occurs in the hip joints without the use of the hip flexors, which can be increased with the use of the hip flexors. Whether a stretching sensation already occurs in the hamstrings in the described state of equilibrium, whether a stretching effect occurs and how great these two would be, is very individual and cannot be predicted on the basis of the parameters that can be collected. The optimum state of balance is the one in which the important limiting parameters of stretching the hamstrings, force exerted by the hip flexors and force exerted by the autochthonous back muscles are such that the posture can still be maintained for the intended duration. As a rule, depending on a person’s current constitution, one of the three parameters is clearly the limiting one, and the other two allow more leeway.
right-angled: practise tilting the pelvis

instructions
- Assume the right-angled uttanasana as described. Hold the shoulder area where it is and tilt the pelvis alternately out of flexion in the hip joints to create a rounded spine and into a hyperlordosis so that the back becomes concave.
details
- This variation is a continuation of the same exercise in utkatasana. In both postures, the hip extensors work to hold the pelvis in position, but the leverage exerted by the free partial body weight is significantly different in the two postures: in utkatasana the upper body is rather upright, in cases of good flexibility even clearly straightened towards the vertical, whereas in the right-angled uttanasana it is ideally horizontal, and in general it is only raised far enough from the horizontal that the upper body can remain in the extension of the pelvis while maintaining physiological lordosis. In order to be able to practise tilting the pelvis in the direction of hyperlordosis from this position, the hip flexors must tilt the pelvis a little further into flexion and the extensibility of the antagonistic hip extensors must allow this. If the right-angled uttanasana was already taken to about the limit of the available stretch of the hamstrings, no further flexion can take place. The hip joints must therefore be moved out of flexion by at least 5 to 10 degrees and the upper body lifted accordingly so that further flexion can lead to hyperlordosis. If an attempt is then made to keep the shoulder area in as constant a position as possible, the interplay of the two movements can take place: on the one hand, the hip flexors pull the pelvis into further flexion in the hip joints, resulting in a certain degree of hyperlordosis. This must be supported by intensive work of the autochthonous back muscles, which extend the spine and thus further hyperlordosis of the lumbar spine as well as further flexion of the hip joints. On the other hand, the pelvis is then successively brought out of flexion in the hip joints with the strength of the hip extensors as the use of the autochthonous back muscles decreases, so that first the hyperlordosis changes to physiological lordosis, then a steep position of the lumbar spine is achieved and finally a convex kyphosis in the lumbar spine.
- This variation involves sustained and alternating intervention in the state of balance described in the right-angled uttanasana from the lever of the hip extensors on the one hand and that of the supported partial body weight and the use of the hip flexors on the other. For this to be possible to a meaningful extent, the balance point must be shifted significantly in the direction of less flexion in the hip joints, otherwise neither the stretching of the hamstrings nor the use of the hip flexors would be feasible.
- The interplay between the two positions makes it clear in an outstanding way which muscles are responsible for each of the two directions and promotes strength and body awareness in this respect.
- With the described kyphosis of the lumbar spine, the thoracic spine naturally also becomes convex, as the shoulder area is held at the same height.
- Of course, this variant is contraindicated for the respective groups of patients: People with intervertebral disc damage in the lumbar spine area must not flex the lumbar spine; in acute cases, an inclined position may be enough to trigger the familiar neuroradicular pain again. In the case of facet syndrome, spondylolisthesis and spinal canal stenosis, the hyperlordosis triggers pain.
right-angled: practicing tilting the pelvis with a wall

instructions
- Perform the pelvic tilt exercise described above, but place your fingertips on a wall.
details
- This variation makes it much easier not to move the arms up and down as a result of the pelvic movement, which is otherwise frequently observed. Nevertheless, even with the fingertips as punctum fixum, it is still possible to move the shoulder area by changing the frontal abduction in the shoulder joint. To prevent this, the variation should be performed with a supporter that fixes the shoulder to the upper arm.
right-angled: practicing pelvic tilt with bolster

instructions
- Practice tilting the pelvis into more and less flexion as described above. To prevent the knee from going into hyperextension, hold the buttocks against the wall, stand with the feet at a distance of approx. 20 cm from the wall and clamp a sufficiently thick bolster with the backs of the knees so that the knee joints are protected from hyperextension in every situation.
details
- In the variation in which the tilting of the pelvis is practiced, it is much more difficult than usual to prevent the knee joint from overstretching. Anyone who already finds this difficult and is perhaps not equipped with an excess of strength in the extensors and flexors of the knee joint may be overwhelmed here. The bolster can therefore be a good way of preventing overstretching. The pressure with which the popliteal region presses against the bolster is variable and the bolster provides good feedback with its compressibility, so that the performer can learn well based on the pressure felt. The greater difficulty in preventing overextension in the dynamic movement compared to the static right-angled uttanasana is due to the fact that the hamstrings, which is involved in the tilting movement of the pelvis to be practiced, is simultaneously active in a knee-bending manner. The movement of the pelvis must therefore have a direct effect on the position of the knee joints if it is not consciously counteracted.
- The distance to be maintained between the feet and the wall must be determined experimentally. It depends largely on the thickness and a little on the compressibility of the bolster. If the distance is suitable, the knee joints are protected from overstretching and the bolster cannot fall to the floor. A distance that is too small would require excessive force to be applied to the quadriceps and would therefore not be of any use, as this would be an impractical level of force application in the variant without a bolster.
Forehead on the shin

Intensive variant
instructions
- Perform uttanasana as described above. Alternately press your forehead onto your left lower leg, then onto your right lower leg and hold them there for approx. 30 seconds each.
details
- Even if uttanasana is not intended as a pose for consciously curving the back(bending the spine), just like pascimottanasana, the question of whether and where the forehead comes into contact with the lower legs only arises if the flexibility in the hamstrings is quite good, This is because an excessive or unphysiological curvature of the spine or a loss of the stretching effect on the hamstrings due to the curvature of the back can also be expected here with incorrect execution, especially if the hamstrings is still relatively immobile. However, if the flexibility is already good, the stretching effect is slightly increased via the back muscles by placing the forehead on the lower leg at the back of the leg in line with the posture.
- Another option for where the head should move is to stand with the hips well apart so that the head is moved between the legs, which means that reclination of the head is no longer necessary even with good flexibility.
Table
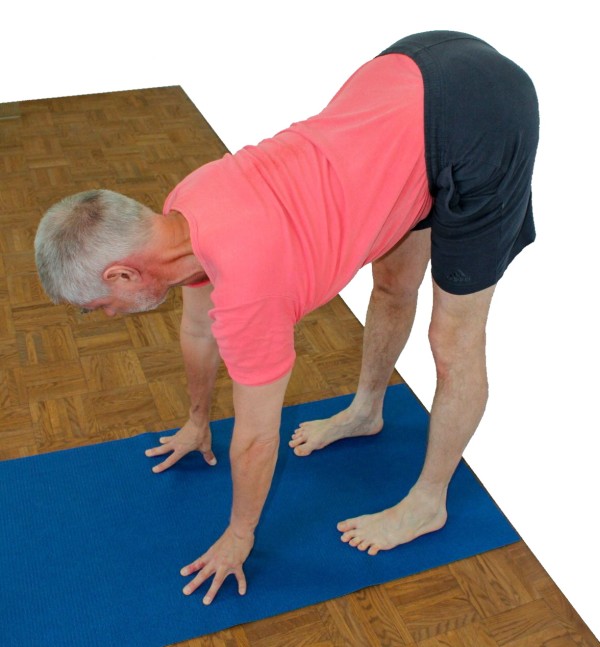
Effects: (602) Strengthening the back extensors
instructions
- Assume urdhva hastasana, tilt forward in the hip joints as far as the back can remain stretched with physiological lordosis.
- With your arms outstretched, place your fingertips under your shoulders and push your hands forcefully towards your feet.
- Use the strength of your hip flexors to tilt your hips as far as possible and use the strength of your back muscles to stretch your back as far as possible, even beyond the stretched position, i.e. into a concave bend seen from above (thoracic spine backbend).
- The pelvis is as far forward as possible and the fingertips are placed on the floor with hardly any weight on them.
details
- Push your fingers towards your feet with all your strength to help stretch your back a little. The weight on your fingertips should be just enough to prevent your fingers from slipping. If you have a lot of strength, you can use your fingers to push or fold the mat on the floor. Keep your arms extended to allow the triceps to work correctly. If the rotation is not complete, i.e. the inner elbow points approximately towards the pelvis, the elbow joint cannot bend due to its joint structure and does not remain stretched out of triceps strengthas it should, but because of the joint structure, which means nothing other than valgus stress on the elbow joints. As the triceps are involved in the extension of the elbow joint as well as in the frontal adduction with its long, biarticular head, it is fully and strongly engaged and can develop a tendency to spasm in individual cases. In this case, check whether a slight flexion of the elbow joints can provide relief while maintaining exertion.
- Whether the back straightens as desired in this posture or can even bend backwards in the thoracic spine depends on several factors. As the human arms (including the hand and outstretched fingers) are shorter than the legs, the pelvis must tilt beyond the horizontal into flexion at the hip joints. Whether this is possible naturally depends largely on the flexibility of the hamstrings. If this is not sufficient, the fingers should be placed on blocks so that the back can become at least halfway straight with the appropriate application of force. In addition to using the autochthonous back muscles to stretch the back, the hip flexors also need to be used vigorously to achieve the best possible flexion in the hip joints. It is helpful to move the ischial tuberosities not only upwards but also outwards. The second point that determines whether the back can be straightened is the flexibility of the back and the strength of the back muscles. As the thoracic spine is naturally kyphotic and not overly flexible from a purely anatomical point of view, strength and acquired flexibility must be present in order to lift the kyphosis and, if necessary, go beyond it. This flexibility is promoted, for example, by lying on the roller at right angles to the spine below the shoulder blades. Here, the extension of the thoracic spine is supported by the arms, which push the hands towards the feet, creating a moment of frontal adduction in the shoulder joints, which helps to straighten the thoracic spine, albeit not very strongly.
- If the head is reclined, this slightly supports the extension of the thoracic spine. Of course, this should not be attempted if the neck muscles have a known tendency to spasm. In these cases, it would be better to first promote flexibility for reclination over a longer period of time, for example with purvottanasana, and to strengthen the neck muscles with warrior 3 pose and trikonasana / ardha chandrasana as well as headand shoulder stand or salabhasana. If the head is lowered, however, this suppresses the extension of the thoracic spine somewhat. It is then better to hold it in extension of the spine.
- In this variation, the pelvis is again as far forward as possible without putting any significant weight on the fingertips, see above.
- The shoulder blades move towards the pelvis (i.e. in depression) – which is caused by the work of the arms alone – and tend to move towards each other (i.e. in retraction). The upper body does not sink down between the arms but the entire shoulder area moves towards the ceiling, while the middle back does the opposite: it moves towards the floor.
- In contrast to the rectangular version, the flexion moments resulting from the lever of the arms do not have to be absorbed in the thoracic spine, but the difference in length between the arms and legs usually results, depending on the individual flexibility of the hamstrings, in large flexion moments from the caudal end of the spine.
Clasp lower leg

instructions
- Perform uttanasana as described, but do not cross your arms, instead clasp your lower legs with your forearms.
details
- Depending on your flexibility, it is either easy or very difficult, perhaps impossible, and probably causes very strong stretching to grip the lower legs or attempt to do so. Accordingly, the practical value of this variation varies greatly.
Traction on the lower legs

More intensive stretching
Effects: (312) Strengthening the biceps
(502) Strengthening the latissimus dorsi
instructions
- Do uttanasana as described above, but don’t cross your arms, instead reach your hands towards your ankles.
- Do not pull jerkily with your hands, but slowly increase and finally pull strongly on the ankles to tilt the pelvis further into flexion at the hip joints.
- The elbows move outwards and the activity of the arm flexors (especially the biceps) should be clearly noticeable.
- The grip on the cuffs is quite ergonomic with regard to the wrist, but the grip around less slender cuffs can be more difficult with small hands.
details
- To simplify matters for all arm flexors, only the biceps are mentioned here. The brachioradialis and brachialis muscles are naturally also active as synergists; which muscle bears the main load also depends to some extent on the angle in the elbow joint, as the brachialis and biceps in particular differ significantly in their insertions and origins. Rarely is the flexibility in the back of the leg so good and the work in the arms so intense that a tendency to cramp occurs in the arm muscles, but it is theoretically possible, especially if the arm flexors are already highly toned or if arm-related sports training has preceded this. As a biarticular muscle, the biceps would be more predisposed to cramp than the brachialis.
- At the same time, the lower legs can be turned in with the hands on the ankles. The lower legs can also be pulled away from each other.
- Without adequate use of the arm flexors, body weight would be supported here, which runs counter to the purpose of the posture and brings with it the danger of falling into moving the lumbar spine more in the direction of kyphosis than stretching the hamstrings.
Hands with block behind the body

Largely corresponds to the previous variation, it may be easier to stretch the elbow joints
instructions
- Instead of crossing your fingers, hold a block between your hands.
details
- The greater distance between the hands may make it a little easier to lower or stretch the arms.
- The arms move apart. If they were to press against the block as in upavista konasana with block, this would probably result in a rapid and pronounced tensing of the muscles moving the arms backwards and the muscles moving the shoulder blades inwards.
- Instead of a block, a small dumbbell can also be gripped at the end, which is often easier to grip. Due to its weight and position at the end of the lever arm, it has a significant influence on the center of gravity, which is why it must be moved carefully over the head towards the floor.
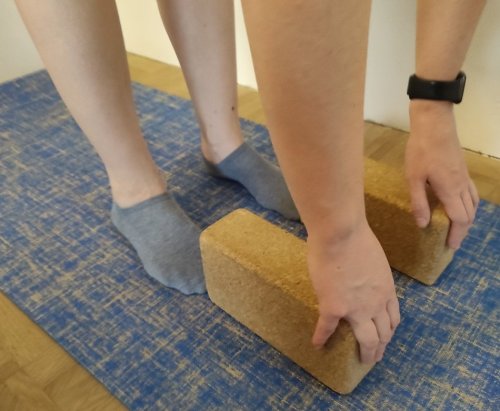
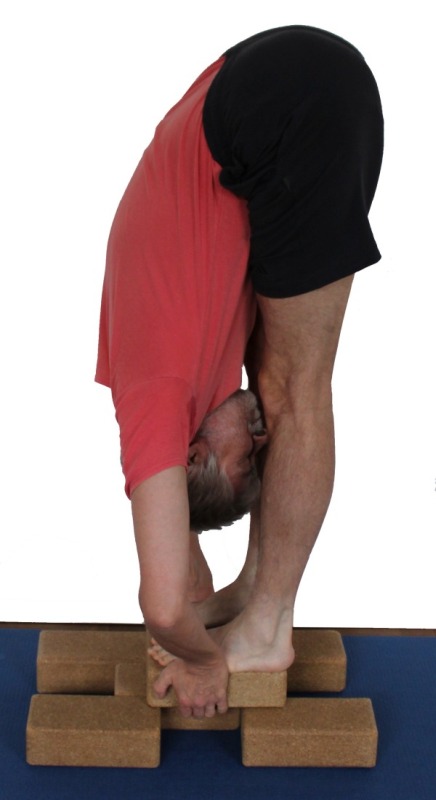
Ball of foot on block
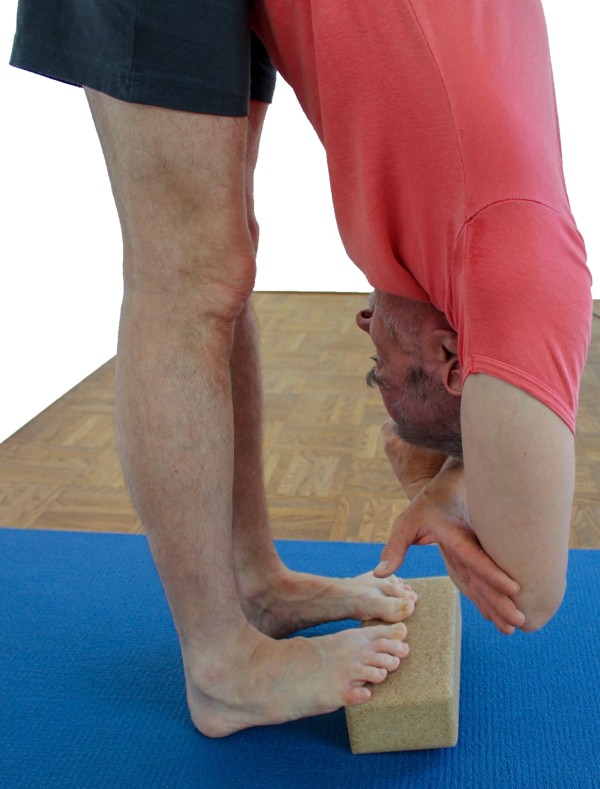
Intensive stretching of the gastrocnemius
Effects: (857) Strengthening the gastrocnemius
(851) Stretching the biarticular calf muscles ( gastrocnemius)
(851) Stretching the monoarticular calf muscles (soleus)
instructions
- Perform uttanasana as described above, but place the balls of your feet on a block.
details
- Depending on the distance between the feet, one block taken crosswise is sufficient. If the distance is greater, use two blocks.
- Do not place the balls of your feet too close to the block, they must be completely on the block, including the ball of the little toe. On the other hand, avoid placing the feet too far onto the block; if possible, no part of the arch of the foot should be on the block, not least because otherwise the edge of the block often creates uncomfortable pressure.
- The significant elevation of the forefoot causes a significant stretching of the gastrocnemius muscle, which may initially override the stretching of the hamstrings. Don’t be surprised if the forward bend in the hip joints is initially quite limited due to this intensive stretching. The gastrocnemius has two joints and, unlike its synergist with regard to plantar flexion in the ankle joint (the soleus), it also covers the knee joint, which means that it cannot be stretched when the knee joint is clearly flexed. In addition, as an extremely strong muscle, it requires a large applied force and corresponding duration of action in order to achieve a significant stretching effect. This exercise is a valuable way of stretching the gastrocnemius effectively and efficiently and in this sense is a good complement to the head down dog pose and its variations with one leg raised. In fact, its effect goes far beyond this as more weight (namely the entire body weight) is placed on the feet and used to stretch them.
- If the feet are close together, there is little pronation in the ankles, which is relevant for the supinating plantarflexors such as gastrocnemius, soleus and also tibialis posterior enable more intensive stretching.
- Move the pelvis as far forwards as possible. On the one hand, this increases the sarcomere length of soleus and gastrocnemius, which improves the stretching effect, On the other hand, these muscles have to hold the supported gravity perpendicular more powerfully on the lever arm of the feet due to the forward shift of the part-body-weight, which also results in more intensive feedback from the Golgi receptors and an improved strengthening effect.
with belt

instructions
- Take the pose as described above, but tie a belt around each thigh near the pelvis.
details
- When working fully with the legs turned in slightly (pushing the forefoot towards each other), the belt tightens slightly, which can be used as an indicator.
Butt on the wall
More relaxed variant
instructions
- Place the feet one foot or more away from the wall and assume uttanasana.
details
- The bottom leaning against the wall largely relieves the calf muscles of work. The question of where the center of gravity is under the feet and how the load is distributed between the heels and the balls of the feet also fades into the background: the load is mainly on the heels.
- Depending on the other (e.g. sporting) demands placed on the calf muscles, they can set the limit for the duration of a correctly performed and long uttanasana. This variation avoids this limit.
- With good flexibility of the muscles at the back of the leg(hamstrings), gravity has a somewhat more favorable effect here in terms of flexion in the hip joints.
- The bottom against the wall makes it easy to feel how the ischial tuberosities move upwards on the wall with further hip flexion.
- You should be able to feel the movement of the ischial tuberosities upwards and outwards on the wall.
- This variant is not recommended if the hamstrings is not very mobile, as the pelvis rises even more in relation to the horizontal. On the one hand, this increases the tendency to kyphosis the lumbar spine instead of stretching the hamstrings and, on the other hand, the load on the intervertebral discs is higher.
- As hardly any body weight needs to be supported with the triceps surae, this variant should also be possible for metatarsalgia.
Butt against the wall and arms behind your back

instructions
- Assume uttanasana with the buttocks against the wall as described above. Move your arms outstretched over your back and head towards the floor.
details
- In this variation, the gravity of the arms promotes flexion in the hip joints. At the same time, the anterior part (pars clavicularis) of the deltoid is stretched. If you want to further strengthen both effects, we recommend the variation in which an object is held between the hands.
Butt against the wall and block overhead

instructions
- Perform uttanasana with your bottom against the wall as described above. The arms move outstretched over the back and head towards the floor, with the hands holding a block or dumbbell for weight.
details
- Basically, this variation is similar to prasarita padottanasana. Here too, the wrists move away from each other. As in upavista konasana with block, you should not try to hold the block between the forearms with counter pressure, as this can very quickly lead to a pronounced tendency to cramp. Instead, the block or dumbbell should be held at both ends.
Butt against the wall and block between the legs

instructions
- Take the variant with your bottom against the wall as described above.
- Place a block between your thighs to better feel the slight twisting of your legs and the resulting movement of your ischial tuberosities on the wall.
details
- The block must visibly move towards the wall while the ischial tuberosities move away from each other.
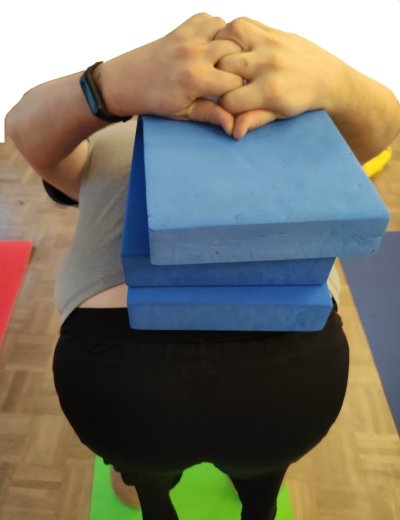
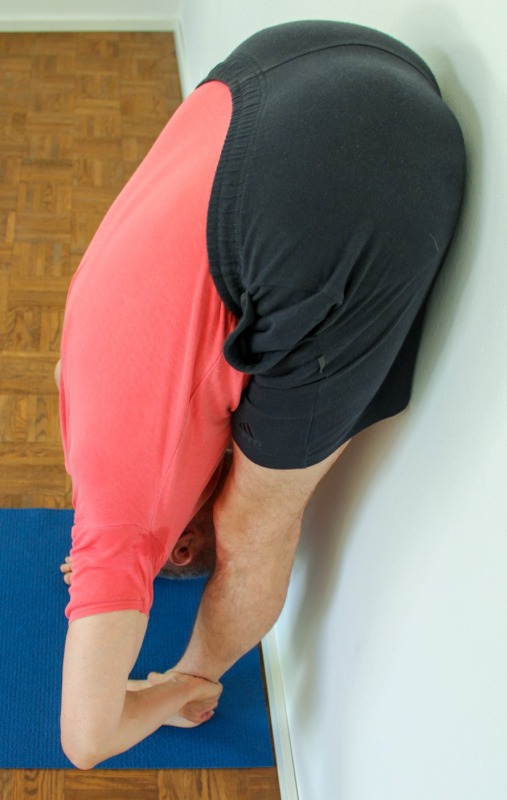
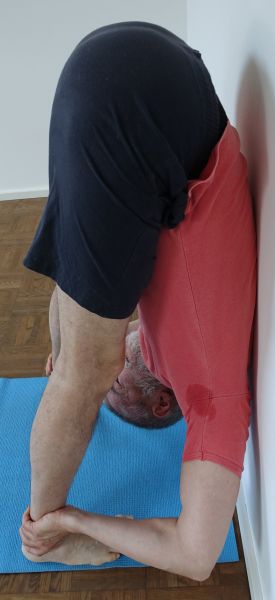
Butt and heels on the wall
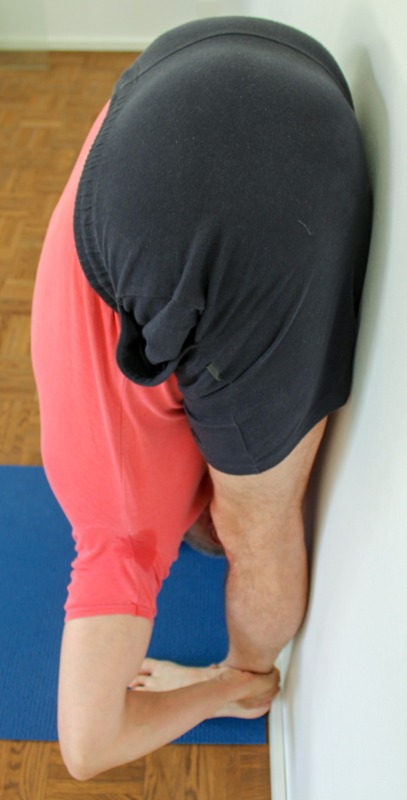
Detail photos
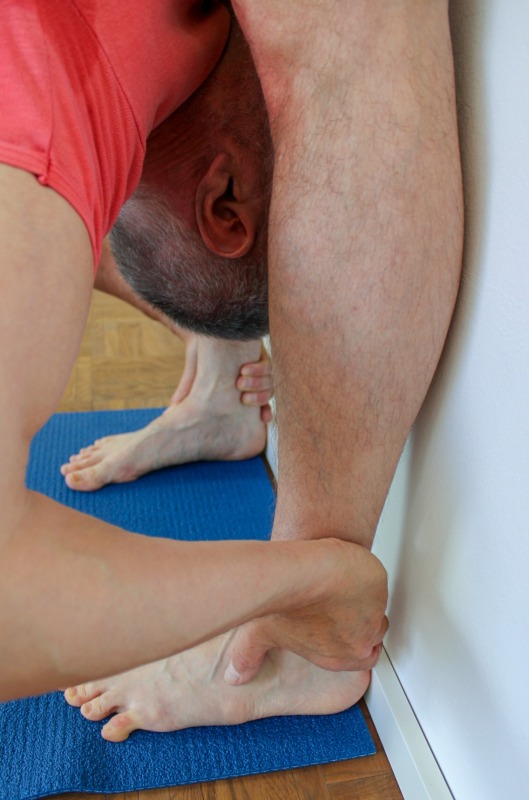
Effects: (852) Strengthening the monoarticular calf muscles (soleus)
(972) Strengthening the toe flexors
instructions
- Lean against the wall with your bottom against the wall and your feet so far away from the wall that you are stable.
- Support yourself on the floor with the fingers of both hands.
- Place one foot directly against the wall so that your heel is in contact with the wall.
- Release one hand from the floor and reach with this hand to the side of the lower leg above the ankle.
- Pull as hard as you can with your hand on your lower leg to bring your upper body as close as possible to your legs.
- Place the second foot directly against the wall.
- Take more and more weight off the fingers of the hand that is still on the floor and see if you can stand stably without your fingers on the floor.
- Finally, if possible, grasp the corresponding lower leg with your second hand and pull as firmly as possible with this arm on the same side of the lower leg.
- If possible, place your nose or forehead on the wall.
details
- The flexibility of the hamstrings in the back of the legs is often not sufficient to be able to stand with the heels on the wall without support from the fingers on the floor. A few centimeters of distance can make this possible, as can the use of a supporter that presses the back towards the wall. The pressure should be applied in an arc roughly perpendicular to the sacrum.
- Keep the toes soft here too. The plumb bob should be positioned on the side of the balls of the feet, but this requires very good flexibility of the hamstrings.
- The statics of the posture require a lot of use of the calf muscles.
- The elbows move towards the wall instead of outwards as is standard in uttanasana in order to improve mass distribution and the center of gravity; with very good flexibility they can also move outwards.
Back against the wall
instructions
- Depending on how flexible the backs of your legs are, stand between one and a half and over two feet away from the wall, facing the wall.
- Bend the knee joints wide, tilt the pelvis in the hip joints as far forward as possible into flexion in order to be able to press the upper body onto the thighs as described in the variation „stretching from bent knees“ above.
- Lean your back against the wall and begin to slowly extend your legs further and further, whereby the extension of the knee joint pushes the pelvis upwards (slightly out of flexion ) and the friction of the back against the wall causes the pelvis to tilt further and further into flexion.
- At the end, the knee joints should be stretched.
details
- This variation is unsuitable for beginners and those with less flexibility in the backs of their legs.
- If the pressure of the back on the wall is too uncomfortable, the supporter can hold a blanket between the back and the wall, which provides both the desired softness/better pressure distribution and also improves any necessary sliding of the back on the wall.
- The distance to be chosen between the toes and the wall depends heavily on the flexibility in the hamstrings, the better, the smaller.
- This variant requires a certain amount of dorsiflexion in the ankles. However, it is very rarely not available to those for whom this variant is an option.
- To take the pose, the knees are bent significantly, which causes the lower legs to be flatter to the floor. If the flexibility in the ankle is not sufficient for this, a small elevation under the heels can be used.
crossed
Instructions
- Take the pose as described above, but place one foot in the opposite outer foot area so that the front knee joint can still be extended.
Details
- The longitudinal offset between the feet should be just large enough for the front knee joint can be straightened. In principle, one may deviate from this rule and deliberately choose a greater distance.
- There are essentially two ways of performing the exercise: with minimal lateral offset and with a significant lateral offset. The minimal offset gives the posture a moderate sense of balance, whilst the greater offset eliminates this in favour of a moderate stretch of the fibular muscle group. The adduction also increases with the distance, resulting in stretching of the small gluteal muscles, the gluteus maximus or in the dorsal hip muscles. The stretch in the biceps femoris, particularly in the front of the leg, may be felt more intensely.
- As each foot rests on the contralateral outer edge, this results in pronation in the subtalar joint, which significantly exceeds the degree observed when the feet are together. There are very few postures that allow for any pronation; in most cases, it arises because the centre of gravity must be maintained beneath a single supporting foot. Consequently, it is not very pronounced in each instance. Here, there is the possibility that the extent of the pronation can be increased almost at will by shifting the feet sideways. The same applies to adduction. This, too, occurs only rarely, is only slightly pronounced and usually arises for the same reason as pronation. The only notable exception to this rule is trikonasana, which, provided the distance between the feet is chosen sensibly, always involves adduction, which depends primarily on the distance between the feet.
crossed
instructions
details
on blocks
instructions
- Build a stable platform from several layers of blocks so that the bottom layer leaves a little space to pull on the second bottom layer with your hands.
- Step onto the top layer of the blocks and pull on the second lowest layer with your hands in the recessed area.
details
- The above-mentioned stable structure can be achieved, for example, by placing two blocks lengthwise one behind the other and placing one to the right and one to the left of the middle of each block, making a total of four blocks. Two crosswise blocks can now be placed one behind the other on this base (one at the front, one at the back) so that the corners of the rectangle formed from them lie on the bottom layer. Further layers of blocks are formed from two blocks each, each layer rotated by 90°.
(P) Practise tilting the pelvis
Instructions
- The supporter stands behind the performer and together with the performer tries to practise tilting the pelvis in both possible directions (more and less flexion in the hip joints) so that the performer learns to perform the correct movement powerfully.
Details
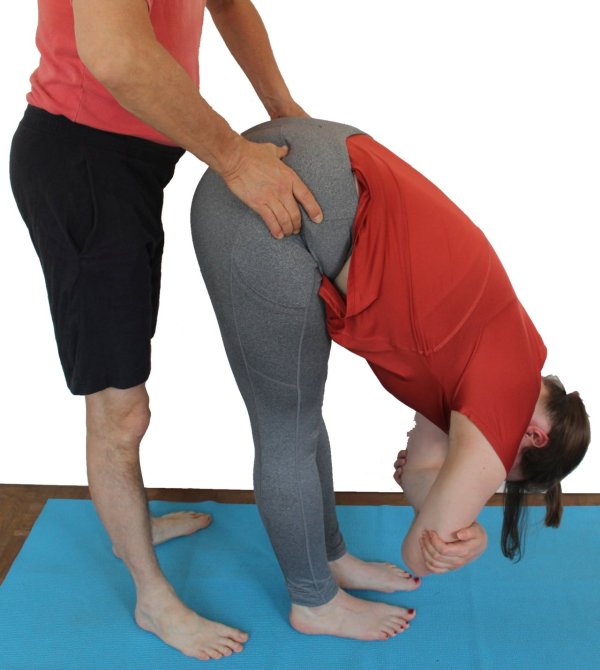
(P) rectangular: practise tilting the pelvis

instructions
- Practice tilting the pelvis in the right-angled uttanasana, alternating between more and less wide flexion as described above. The supporter supports the respective movement of the pelvis with both hands by tilting the pelvis in the respective direction with the thumbs on the pomus muscles and the fingers on the SIAS.
details
- Depending on the performer’s constitution, one movement or another may be more difficult for them, for example because it is more difficult for them to control the relevant muscles(hip flexors, hip extensors) or because their limited flexibility makes it more difficult to find them. For this reason, the pelvis may initially have to be moved a little further out of flexion in the hip joints so that the movements can be found and controlled.
(P) rectangular: practise tilting the pelvis with fixed shoulders

instructions
- Perform the rectangular pelvic tilt practising variation described above. The supporter holds the upper arms just in front of the performer’s shoulders on one or, if possible, both sides so that the performer does not move them up or down.
details
- This variation with the shoulders as punctum fixum reduces the evasive movements of the shoulder area with the arms to a minimum, so that the performer can concentrate fully on the movement in the hip joints and their effects on the upper body.
(P) rectangular: practise tilting the pelvis with arms held out

instructions
- Practice tilting the pelvis in the right-angled uttanasana, alternating between more and less wide flexion as described above. The supporter only lightly holds the forearms close to the wrists to give the movement a fixed point which is difficult for the performer to maintain.
details
- A typical difficulty at the beginning is finding the two movements to be performed. The position of the upper body is often changed significantly in the shoulder area. A fixed point in the area of the upper extremity is therefore helpful. As the lever arm of the supported partial body weight is large, it is sufficient to support the forearms near the wrists. In most cases, very little weight is sufficient, as the performer includes this parameter in the evaluation of his actions and tries to keep the pressure or support force more or less constant. The fact that this is usually successful is also due to the greater fine motor skills and greater sensitivity of the upper extremity.
- This variation makes it much easier not to move the arms up and down as a result of the pelvic movement, which is otherwise frequently observed. Nevertheless, it is still possible to move the shoulders as a punctum fixum by changing the frontal abduction in the shoulder joint. To prevent this, the variation should be performed with a supporter that fixes the shoulder to the upper arm.
(2P) rectangular: practise tilting the pelvis

instructions
- Practice tilting the pelvis in the right-angled uttanasana, alternating between more and less wide flexion as described above, with one supporter supporting the arms and the other helping to tilt the pelvis in the respective direction.
details
- The supporter, who tilts the pelvis, has the incomparably more strenuous part and must not only provide support with considerable effort if necessary, but also find out what makes it difficult for the performer and, if necessary, give supportive instructions, for example to bring the pelvis further out of flexion in the hip joints so that the movements become easier.
(P) parivrtta

instructions
- Perform parivrtta uttanasana as described above.
- The supporter stands on the chest side of the performer and pushes the upper shoulder backwards with the hand on the same side while pushing the performer’s lower shoulder blade forward from behind with the other hand.
details
- Of course, the two forces must correspond so as not to tilt the performer in one direction.
- With increasing rotation, the spine tends more and more towards flexion. The supporter can easily recognize this and encourage correction.
- Build up the support slowly and then reduce it again. The force that can be applied can make the support unusually strenuous, especially in the area of the pectoralis major:
- The supporter should bend their elbow joints quite far in order to have a favorable lever arm for exerting force. This makes the work easier for him, but also means that he can apply the force more sensitively. The supporter stands stably with their back straight and knees bent.
(P) namaste on the back

A variant to use the armeA variant to use the arme
instructions
- Take the variant hands in namaste on the back as described above.
- The supporter stands behind the performer and carefully pulls both elbows backwards away from the body with their hands, pushing them downwards and towards each other, i.e. inwards. The supporter has two options for counteracting the pressure exerted so that the performer does not topple over:
- pressing with the head against the area between the shoulder blades. This is much more ergonomic, but care must be taken to ensure that the supporter’s cervical spine remains stretched. The advantage of this option is that it is easy to see if the performer is hunched over.
- Press with one shoulder on the area between the shoulder blades. The advantage of this option is that the softness of the performer’s face and therefore the limit of tolerance of the move can be immediately visually assessed.
details
- Pressure with the head against the back is easier to apply and easier to dose, which is why this is the standard version.
(P) Arms behind the body

Increasing the tilting moment in the hip joints, stretching the shoulder joint in the sense of retroversion
instructions
- Perform uttanasana with arms behind the body as described above.
- The supporter stands behind the performer’s back and grasps the clasped hands from below with one hand in order to slowly pull them further towards retroversion, i.e. away from the pelvis and over the head, with the other hand while applying corresponding counter-pressure to the performer’s upper back.
details
- Beyond the details of the individual exercise, make sure that tension and pressure correspond so that the performer is not tilted in one direction.
- Depending on the size differences between the performer and the supporter and the angle at which the arms reach the floor, it may be necessary to press down on the interlocked hands from above rather than pulling them down with an underhand grip. This is generally only the case if the performer is very mobile in the hamstrings and in the shoulder joint in the direction of retroversion and may be necessary if the supporter is significantly larger than the performer.
(P) Back against the wall

More intensive stretching of the back of the leg through the use of a supporter
instructions
- Depending on the flexibility in the back of your legs, stand between one and a half and over two foot lengths away from the wall, facing the wall and assume uttanasana with your back against the wall as described above.
- The supporter then presses the body at the pelvis further towards the wall until the maximum tolerable stretch sensation is reached. The supporter can press on the pomus muscles to the side of the ischial tuberosities or on the ischial tuberosities, pushing them upwards at the same time.
details
- This version can achieve very intensive stretching in the backs of the legs and requires careful use of the supporter.
- This variation is unsuitable for beginners and those with less flexibility in the backs of their legs.
- If the pressure of the back on the wall is too uncomfortable, the supporter can hold a blanket between the back and the wall, which provides both the desired softness/better pressure distribution and also improves any necessary sliding of the back on the wall.
- The distance to be chosen between the toes and the wall depends heavily on the flexibility in the hamstrings, the better, the smaller.
- This variant requires a certain amount of dorsiflexion in the ankles. However, it is very rarely not available to those for whom this variant is an option.
- Here it is important to lift the ischial tuberosities in good time before the knee joints are stretched so that the back does not slide up the wall.
(P) ekapada prasarita (with one leg raised)

Effects: (852) Strengthening calves
(727) Strengthening the monoarticular hip extensors gluteusmaximus
instructions
- Take the ekapada prasarita variation of uttanasana as described above.
- The supporter stands next to the performer on the side of the lifted leg, grips it by the thigh near the knee with one hand from the inside to lift it and pushes down the hip on the same side (i.e. the lifted leg) with the other hand.
details
- The upward pull on the inner leg creates an endorotation moment that counteracts the exorotation tendencyof the leg resulting from the work of the gluteus maximus.
- The supporter has a good view and can check for straightness of the pelvis and extension of the lifted leg. They can also recognize any lateralflexion of the upper body and instruct the patient to correct it.
- The support must be performed slowly and sensitively, as both lifting the leg via the flexibility restrictions of the hip flexors and pushing the hip down causes an increased stretch sensation in the hamstrings of the performer’s standing leg.
(P) Butt and heels on the wall

Intensive variant with supporter for more advanced users
instructions
- Use the „buttocks and heels on the wall“ variation as described above.
- The supporter slowly pushes the back increasingly towards the wall and downwards to further tilt the performer in the hip joints.
details
- This variation is not suitable for beginners and those with little flexibility in the hamstrings. This variation only makes sense if the pelvis is able to tilt well beyond 90° flexion in the hip joints.
(S) in table variant tilt pelvis

instructions
- Do uttanasana in the „table“ version as described above.
- Standing behind the performer, the supporter pushes the sacrum further into flexion at the hips, i.e. downwards and away from the buttocks, with both hands placed on top of each other. The supporter must be careful not to push the performer’s pelvis towards the toes or head, but towards the knees. If the performer feels tilted backwards as a result, the performer’s pelvis/buttocks can be supported with a hip if necessary.
details
- The direction in which the supporter presses on the performer’s sacrum is crucial for success. The pressure is applied to the upper end of the sacrum/junction of the lumbar spine and away from the pelvis, i.e. perpendicular to the lever arm on which the hip joints are tilted.
(P) Table: Straighten back 1

Effects: (231) Shoulder joint: stretching for frontal abduction
instructions
- Do uttanasana in the „table“ version as described above.
- The supporter stands to the side of the performer and reaches with one hand dorsally under the collarbone to lift the shoulder area there while pressing with the other hand dorsally on the thoracic spine to straighten it.
details
- Make sure you have a firm grip on the collarbone with three or four fingers so that you cannot slip, which could lead to a reflexive tightening of the performer’s back.
- Press approximately in the middle of the curvature of the thoracic spine.
- Of course, the pull on the collarbone is one-sided, but this should give the performer a clear impulse to stretch the back.
- In addition or before the intervention, the supporter can press the thumb on one side and the fingers on the other side of the maximum curvature of the thoracic spine towards each other to indicate the area to be stretched and give an impulse to do so.
(P) rectangular: straighten back 2

instructions
- Take the right-angled uttanasana as described above.
- The supporter stands to the side of the performer and supports the upper arms of the performer from below (i.e. from the front) with the arm bent and the forearm held horizontally (!) while pressing on the thoracic spine from the dorsal side with the other hand to straighten it.
details
- It is not necessarily easy to keep the forearms exactly horizontal. The supporter may have to bend a little in the knee joint.
- As force is exerted on the shoulder joints via the arms, the movements of the upper arms in the shoulder joints are of course important: extend out of the shoulders, i.e. elevate the shoulder blades, turn them out and keep them parallel.
- Press approximately in the middle of the curvature of the thoracic spine.
- Support the upper arms proximally directly in front of the elbows. Avoid supporting the forearms to prevent an unphysiological load across the axis of movement of the elbow joint, which would have to be absorbed by the ligamentous structure of the joint.
- The supporting arm is on the same side as the hand on which the performer is standing.
- Support the upper arms instead of the forearms to avoid a bending moment or an unphysiological load on the elbow joints.
Transition to rod

Nice dynamic transition to the rod
contraindications:
SLAP lesions, acromioclavicular joint injuries (ACG fusion) and other shoulder injuries that prohibit the application of impact forces.
instructions
- Perform uttanasana as described above.
- Place your palms shoulder-width apart in front of your feet and bend your knees if necessary. The fingers point away from the heels.
- Shift as much weight as possible onto the hands, keep as much weight on the hands as possible and keep the elbow joints stretched.
- Jump the feet far back, straighten the knee joints in the flight of the legs and tense the pomus muscles to come out of the flexion of uttanasana, bending the arms quickly and widely to stop just before the chest reaches the floor.
- Land on the balls of your feet with your hips extended, knees straight, arms bent wide and buttocks tensed.
- Develop the pole position further: push the body backwards using the strength of the arms and shoulder muscles, check the straightness of the pelvis, the position of the head, shoulders and pelvis.
details
- This is a very dynamic, powerful transition. Not only must there be enough strength available to perform the bar, but enough to safely (!) stop the offensive movement of the upper body towards the floor using the strength of the triceps, pectoralis and anterior deltoid. This immediately shows that this exercise is not suitable for beginners. As this is an eccentric contraction in the triceps and pectoralis, it can still be perceived as easier than pushing yourself up from the bar into the dog position.
- Ideally, the shoulder area is already in the correct position (which corresponds to the bar ) when the balls of the feet land on the floor. When landing, the knee joints are stretched and the hip extensors have stretched the angle between the pelvis and legs. On the front of the body, the hip flexors and abdominal muscles (especially the rectus abdominis) must secure the pelvis and lower torso against the effect of inertia, which would otherwise cause them to fall to the ground (accelerated as they are). In the same way, the quadriceps must keep the knee joints extended so that the inertia does not throw the knees to the ground. To put it simply: the whole body caudal to the sternum is stretched and tensed as early as possible in flight.
- To be on the safe side, you should start with a significantly lower bend in the elbow joints and only bend your arms up to the bar once your feet have reached the floor. This makes a lot of sense and can then be gradually increased.
- Once the feet have landed, extend the pole cleanly and also push backwards forcefully, which was not possible during the flight.
- The transition is contraindicated for various shoulder injuries such as SLAP lesions.
Transition to utkatasana

instructions
- Perform uttanasana as described above.
- Stretch your arms forward parallel and assume the right-angled uttanasana.
- bend your knees and lower your pelvis while simultaneously straightening your upper body until your thighs are approximately horizontal.
- Check the details of the resulting utkatasana.
details
- With this variation, it may be a little more difficult for those who are flexible to find the correct posture for the pelvis and avoid falling into a hollow back. If in doubt, briefly try out both directions in which you can tilt the pelvis in the hip joints, see the corresponding variation of utkatasana.
Transition to upface dog

contraindications:
Hallux valgus, hallux rigidus, metatarsalgia
instructions
- Do uttanasana as described above, place your hands in front of and slightly outside your feet with your arms straight.
- Shift as much weight as possible onto the hands. Jump your feet back and up, but leave the ankles as in uttanasana.
- Straighten the knee joints in flight and tense the pomus muscles as strongly as possible.
- When the feet (with the undersides of the toes) land on the floor, the upper body and pelvis should already be in approximately the correct position for the head-up dog position.
- Continue to develop the head up dog position.
details
- This transition is not for beginners! In a sense, it is even more challenging than the jump into the pole. The maximum tension of the pomus muscles at the moment of landing is extremely important for the lower back.
- If in doubt about the health of the lumbar spine, avoid this jump! This jump is contraindicated in particular in the case of known or suspected disc problems(lumbalgia, ischialgia, disc prolapse, disc protrusion and the like), but even more so in the case of facet syndrome, spondylolisthesis and spinal canal stenosis! Lumbago (lumbago) without neuroradicular symptoms is a contraindication in acute cases, but not after it has been completely overcome. Nevertheless, more preparation is then required. Asymptomatic or currently mild chronic lumbago also requires more preparation and careful awareness of the effect of this jump on the lower back.
- Keep your arms as still as possible. The whole body rotates in the shoulder joint around the stationary arms. The shoulders are positioned slightly in front of the wrists and the forearm muscles ( palmar flexors) ensure that the arms are standing firmly.
- Jump with your feet far backwards and upwards without pulling your shoulders backwards.
- Ideally, the pelvis should already be almost in the correct position when the feet land, and the hip joints in particular should be actively extended.
Transition to downface dog

instructions
- Perform uttanasana as described above, place the hands slightly in front of and slightly outside the feet with the elbow joints extended.
- Shift as much weight as possible onto your hands. Jump with your feet hardly backwards but more upwards, pushing your upper body backwards as powerfully as possible using the strength of your arms and shoulder muscles.
- Land with your feet on the ground with your knees clearly bent in the position of the feet and upper body corresponding to the dog position head down.
- Then stretch the knee joints without moving the pelvis and upper body forward again.
details
- In contrast to jumping into the head-up dog position, the feet should not take the pose by jumping backwards and pulling the upper body backwards using the strength of the hip flexors, but rather by the arms and shoulders heaving the body backwards from the hands, which is extremely powerful work for the deltoids and other frontal abductors of the shoulder joint, especially as the effect of gravity on the body means that only a limited amount of time is available for the feet to reach their destination. A jump „in slow motion“ is therefore not possible, as gravity throws the feet back to the ground „in between“. All the more important here is the strength of the deltoid and palmar flexors, which, by reducing the dorsiflexion in the wrist and increasing the frontal abduction in the shoulder joints, heave the body backwards until the feet have landed on the ground.
- Ideally, the upper body would be in the correct position when the feet land, so that only the legs need to be stretched for the full downward dog position, which also pushes the heels towards the floor.
- To get a feel for the type and intensity of the deltoid work, a chair can be lifted frontally from tadasana with an overhand grip and (almost) straight arm. A well and intensively performed transition to dog pose head down feels very similar and no less intense.
- One difficulty lies in providing the great strength required in the deltoids and arms, but also in deliberately not using the hip flexors. The transition should – as far as possible – be managed using the strength of the deltoids. They therefore push the upper body instead of the hip flexors pulling it backwards. Leaving the hip flexors inactive is also difficult because you cannot feel the work of the iliopsoas lying in the pelvis, just as you cannot feel that you are not using it.
Transition to rectangular handstand

instructions
- Stand with your back less than one meter away from a wall. Perform uttanasana as described above.
- Place your hands shoulder-width apart in front of your feet and shift as much weight as possible onto your hands.
- Press your shoulders and chest towards the wall and, with your knees bent, jump onto the wall with both feet at the same time, at a height that corresponds to the length of your upper body plus the length of your arms.
- With your knees clearly bent, land with your feet on the wall, straighten your knees and extend the right-angled handstand further.
details
- Of course, the much more elegant jump into the right-angled handstand is described here and not the method of placing one foot after the other on the wall.
- A common mistake is not jumping high enough with the feet. If the feet land too low on the wall, they fall to the ground much more easily. In addition, the higher position of the feet has the advantage that the feet are in the flight phase for longer and there is more time to push the upper body towards the wall, which increases the pressure when the feet hit the wall and makes slipping less likely. Another common mistake is to jump from a position that is too close to the wall. Here too, the argument is that this shortens the time in which the upper body can be pushed towards the wall so that there is enough friction to prevent the feet from slipping.
- The arms are largely stationary during the jump. After the feet have landed on the wall and the knee joints have been extended, move the upper body as far as possible towards the wall, whereby the shoulders and arms also move towards the wall, i.e. the arms lean towards the wall.
- The mental readiness to jump with both legs is often lacking at the beginning. Repeated attempts to land gently when transitioning back to uttanasana can help to overcome obstacles.
- Land on the wall with your knees clearly bent. Extended knee joints are not only forbidden for the sake of protecting the knee joints, but the more the knee joints are bent, the longer the time until landing and – in analogy to the argument used for the height of the feet – the more time is available to push the upper body towards the wall, which reduces the likelihood of the feet slipping off.
Transition to headstand

instructions
- Perform uttanasana as described above.
- Bend the knee joints, bring the hands into the position typical of a normal headstand and place the elbows on the floor, bending the knee joints further if necessary.
- Shift more and more of your body weight onto your arms and carefully (!) place your head on the floor in a typical headstand position.
- Shift your body weight, which is still on your legs, onto your head and arms and come into a headstand with your knees straight. The pelvis will have to move over the head for a short time. Later, move it back again as far as possible.
details
- This transition is not an exercise for beginners! It requires a high degree of flexibility, sufficient body awareness and a certain amount of strength, both in the back and especially in the triceps and deltoids.
- The more elegant version of the transition is described here. Of course, you can also swing with one leg as an alternative, and when this has reached the vertical (or the wall in the case of the leaning headstand), the other leg can be pulled in.
- After the head has been positioned, for static reasons the pelvis and upper body must tend to move slightly beyond the position of the head away from the feet so that the weight plumb bob lies in the trapeze of elbows and wrists as the legs lift off and swing up. Be careful not to hollow the neck too much! Also make sure to press your elbows into the floor as forcefully and continuously as possible to relieve the cervical spine. The less the pelvis is moved towards the wall, the more forcefully the shoulders(deltoids) must be pressed. Conversely, it can be said that the less strong the shoulders and back are, the more the pelvis is generally moved towards the wall and the more the back is arched. Pressing the elbows down pushes the shoulder blades towards the pelvis(depression).
- This transition is not elementary. It requires some strength in the shoulders, but even more flexibility in the hamstrings and strength in the back of the body, especially the autochthonous back muscles, the pomus muscles and the hamstrings. Ideally, at the moment of lifting the feet, the upper body should be straight and vertical, the feet not far from the elbows and the hip joints in the sharpest possible flexion, which is limited mainly by the lower ribs resting on the thighs.
- Ideally, it should be possible to perform the transition as slowly and even reversibly as desired, and it should be possible to stop at any angle of the legs to the floor for any length of time.
- When the headstand is reached, the pelvis, which was previously shifted over the head, must be moved slightly towards the elbows again so that the center of gravity is as close as possible to the contact area of the head – except in cases where significant relief of the head is required or desired through massive work of the arms, then the center of gravity must be shifted or remain further towards the elbows.
Transition to handstand

instructions
- Stand facing a wall less than one meter away.
- Perform uttanasana as described above, but place your hands on the floor shoulder-width apart in front of your feet.
- Shift as much weight as possible onto your hands and keep your arms straight.
- Bend your knees wide and jump into a handstand on both legs with all the bounce in your legs.
details
- This transition is not an exercise for beginners! It requires a high degree of agility and jumping power, as well as sufficient body awareness.
- When bending the knee joint, the shoulder area will move a little away from the wall, and when jumping it will move a little towards the wall. The movement of the shoulders towards the wall must be limited so that they do not hit the wall or get into a position where they can no longer be moved away from the wall under their own power! In addition to careful execution and experience, the strength of the palmar flexors of the forearms, which can keep the shoulders away from the wall by influencing the angle of the forearms to the floor, is crucial for this.
- When the legs swing up, the knee joints are bent immediately after jumping, but are extended when the feet hit the wall. The precise extension of the knee joints during their flight phase is very important for whether and how the upswing is successful: if they are extended too early or too quickly (given the jumping force), the upswing is stalled (according to the principle of the variable lever and the energy absorption depending on the lever arm ) and the wall is not reached; if they are extended too late, the heels may land very roughly on the wall. This requires practice and body awareness.
- Depending on the available jumping power, a slight bending of the elbow joints during the upswing is acceptable. With a moderate angle in the elbow joint and in view of the accelerated mass of the upper body with the legs in the upward movement, there should be little doubt that the strength of the triceps is sufficient to be able to straighten the elbow joints again before the feet hit the wall or shortly afterwards.
- In order to get a better feel for how to work evenly, the two-legged handstand lift can be practiced in isolation.
Transition to rectangular elbow stand

instructions
- Stand with your back less than one meter away from a wall. Perform uttanasana as described above.
- Bend the knee joints wide, bring the hands into the position typical for the elbow stand and place the elbows on the floor, bending the knee joints further if necessary.
- Shift more and more of your body weight onto your arms, pushing your upper body towards the wall.
- Shift the body weight still on your legs to your arms, bending your knees further if necessary, and jump to a right-angled elbow position on both legs.
- Continue to develop the right-angled elbow position, especially elevate the shoulder blades and press the upper body towards the wall.
details
- This transition is not a beginner’s exercise! It requires a high degree of flexibility, sufficient body awareness and a certain amount of strength.
- The hands usually slip towards each other when assuming the elbow stand and right-angled elbow stand as well as in the postures themselves. This can possibly be prevented by applying a lot of force to the triceps to press the flat hands to the floor. But even then, the mat may still slip under the hands and fold. To prevent these effects, use a block in the transverse direction between the thumbs and the inner edges of the hands (on the index finger side) to mechanically block this evasive movement.
- As a rule, the knee joints must be able to bend very far so that the arms can be raised. How far, of course, depends on the flexibility of the hamstrings; this transition can only be practiced if this is well developed. It is of course advisable to prepare the backs of the legs beforehand with standing forward bends. If there is not enough flexibility available, there is a risk that the elbows cannot be placed gently, but this is necessary in order not to endanger them!
- The distance between the feet – and therefore the elbows – and the wall must not be too small to be able to perform the jump at all. If, on the other hand, it is significantly too large, this may endanger the shoulder joints.
- If the distance between the elbows and the feet is too small, this transition will be extremely difficult.
- The movement of the upper body towards the wall is very important for the jump and also for the posture. If this is not done during the jump, there is a risk that the head will land roughly on the ground.
Transition to elbow stand

instructions
- Stand less than one meter away from a wall, facing the wall. Perform uttanasana as described above.
- Bend the knee joints wide, bring the hands into the position typical of the elbow position and, if necessary, place the elbows on the floor while bending the knee joints further.
- Shift more and more of your body weight onto your arms, pushing your upper body away from the wall.
- Shift the body weight still on your legs to your arms, bending your knees further if necessary, move your shoulders away from the wall and jump into an elbow position on both legs.
- Continue to build up the elbow position.
details
- This transition is not a beginner’s exercise! It requires a high degree of flexibility, sufficient body awareness and a certain amount of strength.
- The hands usually slip when assuming the elbow stand and right-angled elbow stand as well as in the postures. This can possibly be prevented by applying a lot of force to the triceps to press the flat hands to the floor. But even then, the mat may still slip under the hands and fold. To prevent these effects, use a cross block between the thumbs and the inner edges of the hands (on the index finger side) to mechanically block this evasive movement.
- As a rule, the knee joints must be able to bend very far so that the arms can be raised. How far, of course, depends on the flexibility of the hamstrings; this transition can only be practiced if this is well developed. It is of course advisable to prepare the backs of the legs beforehand with standing forward bends. If there is not enough flexibility available, there is a risk that the elbows cannot be placed gently, but this is necessary in order not to endanger them!
- It is important to move your shoulders away from the wall so that they do not move uncontrollably towards the wall and your head may land roughly on the floor.
- The head never touches the floor. If it does, the elbows have been placed too far apart or they have slipped apart when taking the pose, or the movement of the shoulders towards the wall has not been sufficiently limited.
- The movement of the upper body away from the wall is very important for the jump and also for the posture. If this is not done during the jump, there is a risk that the head will land roughly on the ground.
Transition to tadasana

instructions
- Perform uttanasana as described above.
- Release the interlocking of the arms and stretch the upper body out of the current flexion in the hip joints so that the back becomes straight from the sacrum. Stretch the elbow joints with the palms facing the pelvis.
- Raise your stretched upper body at the same speed as you raise your pelvis out of flexion.
details
- During this transition, make sure that the upper body lifts at the same speed as the pelvis straightens. If the upper body is raised more quickly, this will result in a hollow back, which may put the back muscles in an uncomfortably high tone or cause them to spasm. If the upper body is raised more slowly than the pelvis is straightened, the lumbar spine is bent in between(kyphotic), which is also an excessive and avoidable strain on the lumbar spine and must be avoided by people with known previous damage to the intervertebral discs in the lumbar spine area.
- To lift the upper body, the pelvis must move backwards a little in between so that the weight plumb line remains under the feet. Push it forward as little as possible later on.
- Get the strength for the transition from the hamstrings and the pomus muscles.
Transition to urdhva hastasana

instructions
- Perform uttanasana as described above.
- Release the interlocking of the arms and stretch the upper body with pelvis out of the current flexion in the hip joints and the arms in extension of the trunk forwards and downwards.
- Fully rotate the upper arms in the shoulder joints, elevate the shoulder blades to the maximum and keep the palms facing each other.
- Raise your stretched upper body at the same speed as you raise your torso and pelvis out of flexion.
- When the upper body and arms are in a vertical position, urdhva hastasana has been assumed.
details
- During this transition, make sure that the upper body lifts at the same speed as the pelvis straightens. If the upper body is raised more quickly, this will result in a hollow back in between, which may put the autochthonous back muscles in an uncomfortably high tone or in a tendency to spasm. If the upper body is raised more slowly than the pelvis is straightened, the lumbar spine is bent in between (kyphotic), which is also an excessive and avoidable strain on the lumbar spine and must be avoided by people with known previous damage to the intervertebral discs in the lumbar spine area.
- To lift the upper body, the pelvis must move backwards a little in between so that the weight plumb line remains under the feet. Later, push it forward as little as possible.
- Get the strength for the transition from the hamstrings and the pomus muscles.
Transition to karnapidasana

instructions
- Perform uttanasana as described above.
- Bend the knees, lower the pelvis and raise the upper body opposite the pelvis.
- Gently place your bottom on the floor close to your feet, lift your feet off the floor and roll backwards into karnapidasana.
details
- Depending on the flexibility of the ankles, thighs and hips, it may not be possible to place the buttocks slowly and close to the feet on the floor, but only in the sense of an irreversible transition falling backwards, whereby there is usually also a clear distance from the feet.
- The usual cervical spine instructions for karnapidasana apply.
Transition to halasana

instructions
- This transition is the same as the one described above in karnapidasana, only the posture assumed after placing the feet on the floor is different: halasana instead of karnapidasana.
- Perform uttanasana as described above.
- bend the knees, lower the pelvis and raise the upper body in relation to the pelvis.
- Gently place your bottom on the floor close to your feet, lift your feet off the floor and roll backwards.
- Stretch your back and legs, resulting in halasana.
details
- Depending on the flexibility of the ankles, thighs and hips, it may not be possible to place the buttocks slowly and close to the feet on the floor, but only in the sense of an irreversible transition falling backwards, whereby there is usually also a clear distance from the feet.
- The usual cervical spine instructions for halasana apply.
Transition to trikonasana

instructions
- Perform uttanasana as described above.
- Place your right hand pointing forward to the right of your right foot.
- Stretch the left arm to the left at 90° to the spine in the shoulder line.
- Shift your body weight completely onto your right foot, bend your right knee slightly and lift your left foot slightly off the floor.
- Turn your upper body and left arm to the left and, with your left leg slightly bent, place your left foot on the floor at a 70° angle to your right, about one leg length behind you.
- Straighten the left leg and extend trikonasana.
details
- When the left foot is placed on the ground, the ankle is clearly stretched. To prevent this from putting strain on the knee joint, the ball of the left foot must touch down in front of the heel and any momentum must be absorbed by the calf muscles.
Transition to parivrtta trikonasana

instructions
- Perform uttanasana as described above.
- With your left arm slightly bent, place your left fingertips on the floor on the outside of your right foot, pointing forwards and outwards, without putting any significant weight on them.
- Raise your upper body slightly, bend your right knee a little and stretch your right arm upwards to the right in line with your shoulder.
- Turn your left leg out a little and place your left foot on the floor behind you at an angle of approx. 45°, just under leg length away.
- Stretch the right knee joint and the left arm and extend the rotation of the upper body.
details
- Similar to the transition to trikonasana, the ankle is stretched a little when the left foot touches down. To prevent this from putting strain on the knee joint, the ball of the left foot must be placed in front of the heel and any momentum must be absorbed by the calf muscles.
Transition to ardha chandrasana

instructions
- Perform uttanasana as described above.
- Place the fingertips of the right hand pointing forwards on the right outer foot area: next to the right foot and offset forwards by about the length of the upper body.
- Stretch the left arm to the left at 90° to the spine in the shoulder line.
- Shift your body weight completely onto your right foot and lift your left foot slightly off the floor.
- Turn the upper body and the left arm to the left away from the standing leg and raise the flexion in the left hip joint until it is stretched.
- Raise the turned out left leg to the maximum.
details
- ..
Transition to parivrtta ardha chandrasana

instructions
- Perform uttanasana as described above.
- With your left arm bent, place the fingertips of your left hand pointing forwards and outwards on the outside of your right foot.
- Shift your body weight completely onto your right foot and lift your left foot slightly off the ground.
- Turn your upper body to the right, stretch it approximately horizontally forwards, lift your left leg backwards and upwards until your left hip joint is stretched.
- Extend your left arm without putting any significant weight on your fingertips.
- Bring your head in line with your thoracic spine. When you are standing stably, turn your head to the right as far as possible.
details
- ..
Transition to parsvakonasana

instructions
- Perform uttanasana as described above.
- Place your right hand next to your right foot, pointing forwards.
- Raise your upper body a little, stretch your left arm in the extension of the left side of your body.
- Bend your right knee joint wide, turn your upper body to the left and stretch it forward while you place your left foot on the floor far behind you (in the direction of the right foot) at a 70° angle with your left leg extended and your left hip joint stretched.
- Turn the upper body to the left as far as possible and, if necessary, adjust the distance between the feet so that the right lower leg is vertical with the upper leg horizontal.
details
- ..
Transition to Warrior II pose

instructions
- Perform uttanasana as described above.
- Release the interlocked arms, shift your body weight onto your right foot and bend your right knee slightly.
- Place your left foot far behind you at a 70° angle to your right, turn your upper body and pelvis to the left and straighten your upper body vertically.
- Stretch your arms out horizontally from your body to the side and bend your right knee to a right angle.
details
- ..
Transition to Warrior I pose

instructions
- Perform uttanasana as described above.
- Release the interlocking of the arms.
- Shift your body weight onto your right foot and bend your right knee joint.
- Raise your upper body slightly and place your left foot on the floor far behind you with your knee slightly bent at a 45° angle to your right foot. Extend your left leg fully and turn it in.
- Use your hip extensors to bring your pelvis and upper body into a vertical position, stretch your arms backwards and upwards, fold your hands.
- Continue to bend the right knee joint, keeping the pelvis upright and turned straight forward.
details
- ..
Transition to Warrior III pose

instructions
- Perform uttanasana as described above.
- Place your fingertips on the floor in front of your shoulders.
- Shift your weight completely onto one foot and lift the other leg backwards and upwards.
- Release your fingertips from the floor, straighten your arms as soon as possible and bring them into a horizontal position.
details
- This transition can be practiced in different ways and at different levels of difficulty. This description shows the simplest version.
- If you are very mobile in the ischiocrural group, the pelvis can remain in a flexion of over 90°, which corresponds to a slight hollow back in the lumbar spine when the back is horizontal, but this is not the intention of this variation and can be perceived as uncomfortable. Then tilt the pelvis slightly out of flexion using the hamstrings and the pomus muscles or hold the upper body in extension of the pelvis and lift the leg in its extension.
- Depending on the sequence of the following three items, the center of gravity will change noticeably forwards or backwards, which must be corrected carefully and sensitively:
- Take the weight off your fingers and lift your hands off the floor.
- Raise the upper body to a horizontal position.
- Raise the leg to be lifted.
- Each of these three factors influences the center of gravity. If these items are performed one after the other, it is comparatively easy to keep the center of gravity in the favorable range. Performing all three at the same time requires a little experience. Note that changes in the centre of gravity in the direction of the longitudinal axis of the foot also influence the work required in the tension belt, because most plantarflexors are also supinators.
- The instructions for right-angled uttanasana and warrior 3 pose regarding the tendency to spasm in the trapezius apply here accordingly.
Transition to ardha vasisthasana

instructions
- Perform uttanasana as described above.
- Place your right hand on the floor next to your right foot, pointing forwards.
- Bend your knees and jump backwards with your feet closed for more than one leg length, landing with your knees slightly bent.
- Stretch the knee joints and turn the feet 90° to the left so that the outer edge of the right foot comes to rest on the floor.
- Bring the head into the extension of the spine, stretch in the hip joints and stretch the left arm 90° to the spine to the upper left.
- Move both shoulder blades away from the spine and turn both arms out to the maximum.
details
- ..