yogabook / asanas / ardha baddha padma pascimottanasana
ardha baddha padma pascimottanasana
„half held Lotus pincers“
 instructions and details with working links as PDF for downloaden/print
Feedback: We’d love to hear what you think about this description, give us feedback at:
postmeister@yogabook.org
Last modified: 30.12.2018
Name: ardha baddha padma pascimottanasana
Trivial name: lying lotus pincers
Level: FA
- classification
- contraindications
- effects
- preparation
- follow-up
- derived asanas
- similar asanas
- diagnostics
- instructions
- details
- variants
Classification
classic: forward bend
Contraindication
Disk hernia pose a clear contraindication.
Effects
- (312) Strengthening of the biceps
- (712) Stretching the monoarticular hip extensors (especially gluteus maximus)
- (721) Stretching the hamstrings
- (851) Stretching the monoarticular calf muscles (soleus)
Preparation
The hamstrings should be very well prepared here, firstly so that the forward bend is successful enough for the foot to be gripped and secondly, as this is a seated forward bend, so that the lumbar spine does not feel uncomfortable afterwards, as can sometimes be observed after seated forward bends. These are helpful:
- uttanasana as a generally effective and efficient stretch of the hamstrings to prepare for flexion in the hip joints in this pose
- prasarita padottanasana very similar to uttanasana
- parsvottanasana as a stretch that goes beyond uttanasana
- pascimottanasana
- janu sirsasana
- tryangamukhaikapada pascimottanasana
- downface dog as another good preparation for the hamstrings when the pelvis is tilted powerfully
- hip opener 5 as a very effective stretch of the hamstrings that goes beyond uttanasana
- warrior 3 pose
- trikonasana
- parivrtta trikonasana
- ardha chandrasana
- parivrtta ardha chandrasana
- hip opener 5
Preliminary exercises for external rotation in the hip joint are also useful:
- baddha konasana
- supta baddha konasana
- half lotus forward bend
- hip opener at the edge of the mat
- hip opener 3
- warrior 2 pose
- caturkonasana
- parsvakonasana
- counter
As the arm whose hand grasps the leg is in retroversion and internal rotation, preparations may also be necessary here:
- upface dog warms up the deltoids
- purvottanasana if the tone in the deltoid is too high for the retroversion of the arm
- uttanasana variation „arms behind the body“ also for retroversion capability
- prasarita padottanasana variation „arms behind the body“ also for retroversion capability
- namaste variation „on the back “ retroversion with slight internal rotation
- maricyasana 1 for the internal rotation of the shoulder
- maricyasana 3 for the internal rotation of the shoulder
To prevent cramps in the sole of the foot when stretching, gripping and holding the foot, preparation for plantar flexion is useful and sometimes necessary. This is mainly performed by:
- baddha padasana as probably the most precise exercise for plantar flexion in the ankle joint
- virasana does this if attention is paid to the precise plantar flexion of the ankle joint
- supta virasana also achieves this if attention is paid to the plantar flexion of the ankle, but has other, greater challenges and less weight on the foot, which stretches it in a plantar direction
- krouncasana and variations do this if attention is paid to the plantar flexion of the ankle
- tryangamukhaikapada pascimottanasana also achieves this if attention is paid to the plantar flexion of the ankle joint
The higher the tension of the quadriceps, the more difficult it is to bend the lotus leg. The following poses are suitable for reducing this:
Follow-up
Derived asanas:
Similar asanas:
Diagnostics (No.)
Various disorders can be found in forward bending movements (flexion in one/both hip joints), but also under load in the muscles of the back of the leg:
- Shortening of the hamstrings, see FAQ.
- Damage to the hamstrings, which causes pain or functional limitations, can also be easily recognized here, from simple tension to strains to muscle (attachment/detachment/tear). Tears would lead to a reduction in strength when leaving the posture quickly.
- Irritation of the sciatic nerve: irritation of the sciatic nerve, which innervates the leg and foot, can become symptomatic during forward bends in particular, even if they are otherwise rather calm. See the FAQ.
- Irritations of the origin of the hamstrings at the ischial tuberosity (also known as PHT: proximal hamstring tendinopathy) will become clearly evident in this pose and require protection from intensive stretching, as this pose demands. See also the FAQ.
- Baker’s cysts create a feeling of tension or a foreign body in the back of the knee, see also FAQ.
(650) Kyphosis and lordosis of the spine:
Irregularities in the kyphosis of the thoracic spine are clearly visible here with a rounded back. If the lumbar spine is not in a position to cancel out the lordosis in this pose, a tendency to hyperlordosis of the lumbar spine in an upright posture must be suspected. Physiologically, the back should be rounded, starting just above the sacrum and slowly increasing towards the thoracic spine. See also the FAQ
(611) Pelvic obliquity / scoliosis of the spine:
The lateral deviations of the spine from the sagittal plane known as scoliosis are also quite visible in this pose. See also the FAQ
(241) Shoulder:
The flexibility of the shoulder can be recognized here, especially in the direction of internal rotation, and to a lesser extent retroversion, as well as side discrepancies, and there may be indications of diseases of the shoulder:
- Shortening of the deltoid, especially the pars clavicularis, and other muscles that do not allow sufficient internal rotation or retroversion.
- Various painful pathological changes of the shoulder joint, which cannot all be discussed here and require clarification.
- Side discrepancies in flexibility.
Variants:
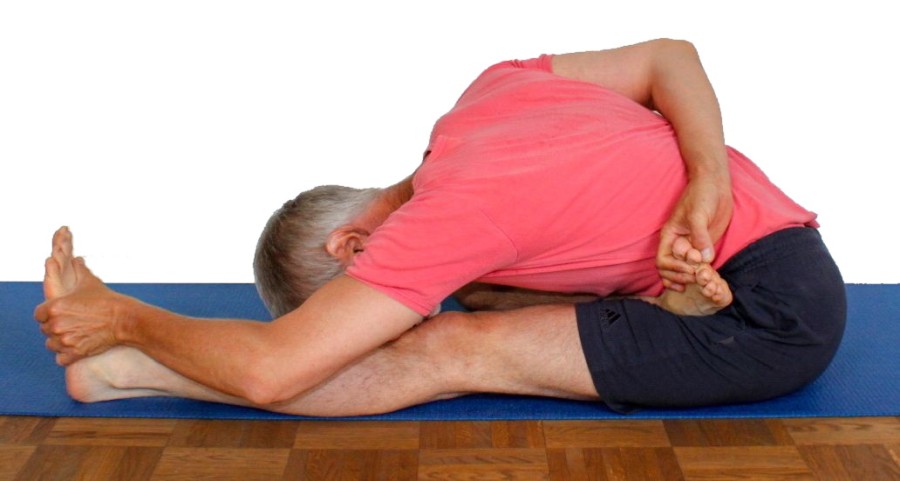
Instructions
- Sit in dandasana.
- Take the left leg out of the pose, bend significantly at the hip joint and bend the leg at the same time.
- Turn the left leg out at the hip, take the left foot with the right hand, grasp the left inner thigh with the left hand and turn the left leg out as far as possible.
- Bend the left leg and, turning it out further, place the left foot in the right hip, i.e. on the pelvis and upper body, on the right thigh, the left knee sinks towards the floor in the direction of the other knee, preferably right next to it.
- Turn your upper body to the left to grasp your right big toe with your left hand behind your back.
- Turn your upper body back to the straight forward position.
- Tilt the upper body forwards and downwards, tilting the pelvis as far as possible into flexion in the hip joints, and reach with the right hand to the right outer foot.
- Using the strength of the arm flexors, pull the upper body towards the right foot, if possible resting the forehead on the right lower leg.
Details
- The most difficult detail of the pose is probably the lotus foot, which can only be achieved with a healthy knee joint and good flexibility in the hip joint, especially in terms of external rotation in the hip joint. Similar to lotus, the knee should not be positioned far out on the floor but as far medially as possible, that is, as close as possible to the knee of the extended leg. In practice, however, tension in the muscles that prevent a wide external rotation in the hip joint often keep the knee away from the other knee and a little above the floor, even if the situation may be slightly better in a full forward bend compared to sitting upright. It should also be noted here that the lotus position of the leg should not be forced or practiced in a forced manner. Rather, in the interests of knee health, more gentle preliminary exercises should be practiced over a longer period of time, especially hip opener 3.
- Turn the lotus leg out very carefully. Try to place your knee on the floor directly next to the other knee. Place the foot of the lotus leg as far as possible to the right and as close to the pelvis as possible on the thigh of the extended leg. Ideally, mainly the ankle should rest on the thigh so that the midfoot and forefoot are suspended in the air and no stress is exerted on the ankle (e.g. in the sense of a strong supination or plantar flexion demand). These parameters prevent uncomfortable pressure from the foot on the quadriceps as far as possible.
- With good flexion in the hip joints, the pelvis tilts in relation to the legs to such an extent that the lower ribs no longer collide with the heel of the lotus leg.
- As in other similar poses, make sure that the straight leg is not turned out but the middle line of the foot ist vertical, the heel is stretched away and the knee is kept straight.
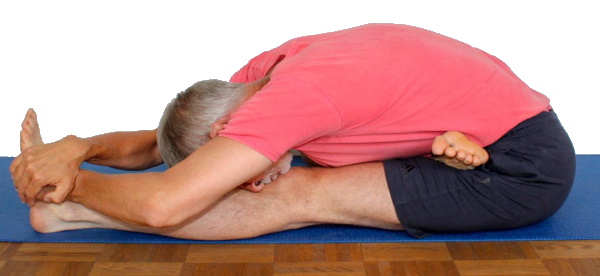
The grip with the contralateral hand on the outer foot would not reduce the tendency of the leg to turn out, but actually increase it. However, the described contralateral grip not only suppresses the tendency of the leg to turn out, but also pulls the upper body in the direction of the leg. In janu sirsasana, this pull also suppresses the tendency of the upper body to move into the free space between the legs, i.e. inwards, away from the stretching leg. This is less the case here, as the tension of the monoarticular parts of the quadriceps lifts the pelvis on its side and reduces this tendency of the upper body to deviate. This is all the more important as in janu sirsasana the pelvis can hardly ever be turned straight forwards but always turns slightly away from the stretching leg. - In the basic pose, the lotus foot is gripped behind the back with the contralateral hand, on the big toe or, if possible, on the outer edge of the foot. As a simplification, you can alternatively practise the „do not hold the foot“ variation described below, in which the contralateral hand grips over the hand on the same side and also pulls on the outer foot of the extended leg.
known problems that can occur even when performed correctly
As is always the case in lotus-style leg positions, depending on the health of the knee, pain can also occur in the inner knee. Tricks for dealing with this type of knee pain can be found in the FAQ.
Variants
do not hold the foot
detail photos

Instructions
- ..
Details
- ..