yogabook / asanas / janu sirsasana
Contents
- 1 janu sirsasana„head-knee-pose“
- 2 Variants
- 2.1 Head on the floor
- 2.2 parsva (head on the outer leg towards the floor)
- 2.3 With a block
- 2.4 With belt
- 2.5 with belt and stretched back
- 2.6 with stick under the biceps
- 2.7 Stretched back
- 2.8 (P) Tilting the pelvis with the hands
- 2.9 (P) Tilt the pelvis and press towards the floor with the hands and bent legs
- 2.10 (P) Pressing the back down
- 2.11 (P) Tilting the pelvis with the feet
- 2.12 (P) Pulling on the hands
- 2.13 (2S)
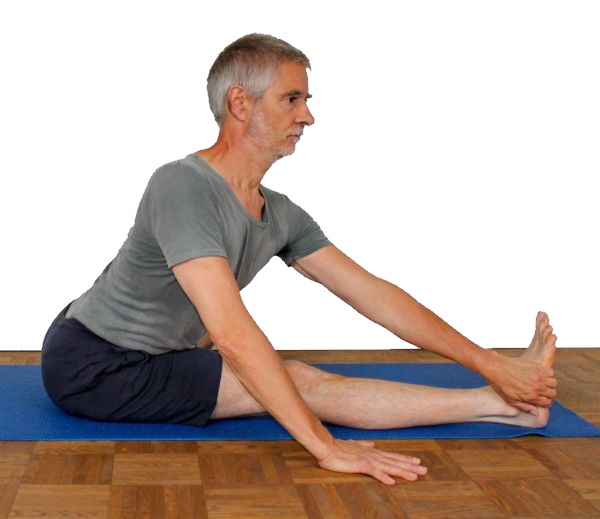
janu sirsasana
„head-knee-pose“
 instructions and details with working links as PDF for download/print
Do and don’t
Forward bend by arching your back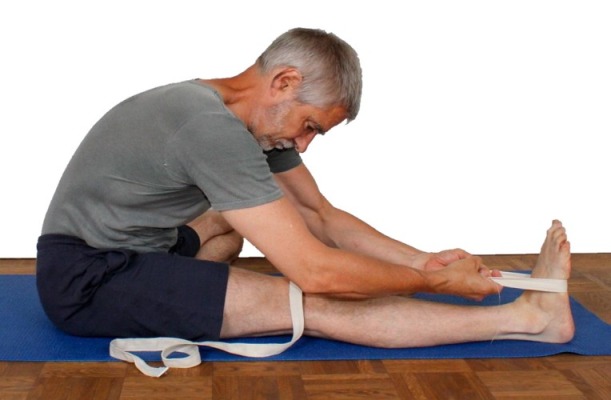 | Either: Stretch your back (variant) | Or better: maximum hip flexion, pull on the feet |
distance foot-thigh | no distance foot-thigh |
Feedback: We would love to hear what you think about this description, please give us feedback at
postmeister@yogabook.org
last update: 30.12.2018
Name: janu sirsasana
Trivial name: head-knee pose
Level: A
- Classification: A
- Contraindication
- Effects of
- Preparation
- follow-up
- derived asanas
- similar asanas
- diagnostics
- Instruction
- details
- Variants
Classification
classic: forward bend
psychomental: calming
physiological: forward bend
Contraindication
This pose, like all other seated forward bends with a convex back, is contraindicated in the case of herniated disc in the lumbar spine. In the case of damage to the knee joint, such as meniscus damage, it may be necessary to bend the bending knee less. In the case of severe damage, this posture should possibly not be performed and standing forward bends should be used instead.
Effects
- (312) Strengthening of the biceps
- (422) Strength of the finger flexors
- (502) Strengthening the latissimus dorsi
by pulling on the foot - (712) Stretching the monoarticular hip extensors (especially the gluteus maximus).
- (721) Stretching the hamstrings
- (501) Stretching the latissimus dorsi
only with less good flexibility - (551) Stretching of the quadratus lumborum
- (641) Stretching the muscles of the lumbar spine
- (851) Stretching of the monoarticular calf muscles (soleus).
Preparation
As a seated forward bend, this pose should be prepared well with standing forward bends, especially if you are less flexible:
- uttanasana as a generally effective and efficient stretch of the hamstrings to prepare for flexion in the hip joints in this pose
- prasarita padottanasana very similar to uttanasana
- parsvottanasana as a stretch that goes beyond uttanasana
- downface dog is also a good preparation for the hamstrings when the pelvis is tilted powerfully
- hip opener 5 as a very effective stretch for the hamstrings that goes beyond uttanasana
- warrior 3 pose
- trikonasana
- parivrtta trikonasana
If, in addition to the hamstrings, the monoarticular extensors of the hip joints in/around the pelvis are also hindering flexion, these can be specially prepared with:
- half lotus forward bend
- hip opener at the edge of the mat
- hip opener 3
- parivrtta trikonasana with bend front knee
- parivrtta ardha chandrasana with bent standing leg
Follow up
If the lower back feels uncomfortable after this pose – which quickly occurs when practising seated forward bends intensively, especially for beginners without preparation through standing forward bends – a sequence of downface dog and upface dog alternating with a higher proportion (up to 80% if tolerated) of upface dog can provide relief:
- Downface dog as a general stretching of the hamstrings and, depending on the constitution, also of the lower back
- upface dog as a pose that reduces the tone of the hip flexors acquired in forward bends and thus reduces the pull of the psoas major on the lumbar spine
Other poses can normalise the condition of the back: warrior 3 pose
Derived asanas:
parsva janu sirsasana parivrtta janu sirsasana
Similar asanas:
Diagnostics (No.)
In forward bending movements (flexion in one or both hip joints), various disorders can be found in the muscles of the back of the leg:
- Shortening of the hamstrings, see FAQ
- Damage to the hamstrings, which causes pain or functional limitations, can also be easily recognised here, from simple tension to strains to muscle tear (partial or complete). Tears would lead to a reduction in strength when leaving the pose quickly
- Irritation of the sciatic nerve, which innervates the leg and foot, can become symptomatic during forward bends in particular, even if they are otherwise rather calm. See the FAQ.
- Irritation of the origin of the hamstrings at the ischial tuberosity will be clearly evident in this pose and requires protection from the intensive stretching that this pose demands; see the FAQ.
- Baker’s cysts create a feeling of tension or a foreign body on the back of the knee, see FAQ.
(880) Hyperextension of the knee joint in the extended leg:
Hyperextension of the knee joint refers to the ability to, or the current state of, an angle of more than 180° in the knee joint. To a certain extent, this is considered normal by anatomists and is on average more common and more pronounced in women. However, it can also indicate weakness of the quadriceps or hamstrings. Furthermore, hyperextension often causes unphysiological sensations that are not caused by stretching or exertion of the muscles and should be avoided, see also FAQ.
(501) Shortening in the latissimus dorsi:
Great flexibility is required from the latissimus dorsi when reaching for the front outside foot. If this is not the case, it is noticeable as a significant stretch to the side of the shoulder blade, radiating into the side of the back. It is also possible that the arm will only turn out to a limited extent.
(650) Kyphosis and lordosis of the spine:
the deviations from the physiological double-S shape of the human spine and its behaviour in movements are somewhat less visible here than in symmetrical poses, as the upper body tends to have a lateral curve that is not easy to correct completely. The back should round more or less evenly, and the lumbar spine should also exhibit a certain kyphosis that increases caudally. The thoracic spine must not be hyperkyphotic at any point. See the FAQ.
(611) Pelvic obliquity/unequal shoulder height/scoliosis of the spine:
The lateral deviations of the spine from the sagittal plane known as scoliosis are also quite visible in this pose. See the FAQ.
Variants:
parsva (head to the floor in the outer leg area)
(P) Tilt pelvis with hands and bent legs pressing towards the floor
(P) Tilt your pelvis with your feet
Instructions
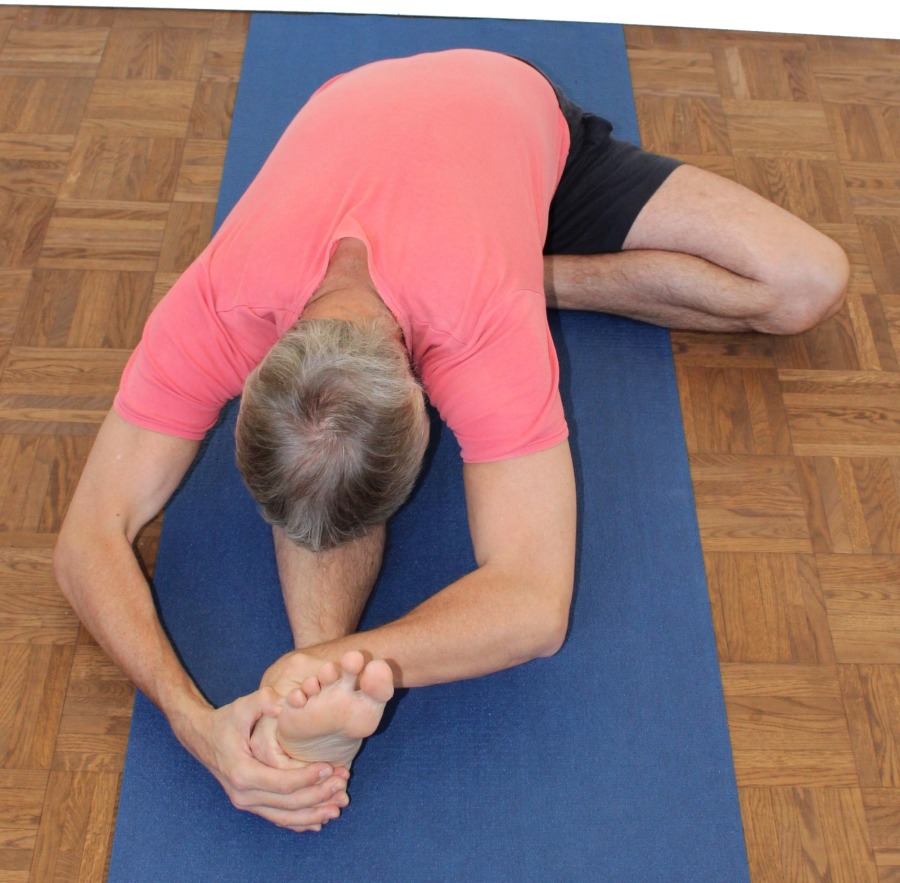
- Sit in dandasana. Bend the left leg, turn it out well and place the sole of the left foot on the right inner thigh with the heel close to the perineum. If the left knee hangs in the air, support it if necessary (e.g. with a mat or block or both). Turn out the left thigh with the hand again.
- Stretch the upper body upwards and then tilt the pelvis forwards in the hip joints, stretching the upper body as far as possible forwards towards the right foot and moving it frontally onto the right leg and, as far as possible, pressing down on it.
- Grasp the outer edge of the right foot with your left hand and pull yourself forwards by flexing the arm (using the biceps and brachialis).
- Place your right hand over your left hand on your right outer foot and pull forwards using the strength of your right arm. Press the upper body frontally onto the right leg.
Details
- Make sure that the right leg does not turn out: the right knee moves towards the floor but points straight up.
- Push the right heel forwards so that the back of the leg can stretch better.
- It is often helpful to pull the right buttock slightly backwards and outwards. This moves the ischial tuberosities slightly backwards and outwards. The former pulls the origin of the hamstrings backwards and therefore allows the muscle to stretch more fully. In addition, the pelvis tilts forwards better, allowing the back to remain straighter. This correction should be omitted if there are acute difficulties at the origin of these muscles at the ischial tuberosity as a PHT, see also the FAQ. The second pulls the ischial tuberosities outwards and thus enables a slightly better forward bend.
- The elbow flexor group, consisting mainly of the biceps and brachialis of the forward-reaching arms, can work vigorously, with the brachialis working harder due to the pronation in the left forearm and the biceps working harder in the right forearm. To put it simply, many forward bends (especially almost all those that work without any significant gravitational effect of the upper body) work according to the principle of „biceps stretching biceps“, i.e. the strength of the arm biceps (and brachialis) stretches the leg biceps (and of course the rest of the hamstrings).
- Make sure that the left hip is sufficiently far forward when taking the pose and remains so, as the pelvis tends to turn away from the extended leg. The foot placed against the inner thigh of the extended leg also contributes to this evasion.
- In many cases, the upper body wants to tilt to the lower right (so that the shoulders are no longer at the same height). To prevent this, you can support yourself with your right hand beside the pelvis with the hand pointing dorsally and bring the right shoulder back to the same height as the left.
- The pulling force of the left arm should be at least as high as that of the right arm so that the upper body does not – as is otherwise possible and likely – move to the left.
- It is the grip of the left hand on the right outer heel that generally gives the upper body the right direction and maintains it. Alternatively, less mobile people can reach for the right outer lower leg or use a belt around the foot to pull on (see below). Both largely prevent the upper body from shifting to the left and also to some extent the associated backward movement of the left hip.
- Although this pose is called „head-knee pose“, this is exactly what should not happen: the forehead must not be placed on the knee, as this would mean that the forward bend would be less a flexion of the hip joints (and therefore stretching of the hamstrings) but more a bend of the upper body (flexion of the spine). When performed correctly, the forehead drops on the lower leg clearly distal to the knee (see image above). For flexible people, the collision of the nose with the lower leg can be disturbing. Turn the head outwards as little as necessary (here: to the right) to avoid this and, if necessary, place the forehead on the floor in the area beyond the outer lower leg. This is better than resting your head on your neck.
- If it is certain that the upper body will not move sideways thanks to good flexibility in the hamstrings and in the hip joint in the sense of externally rotated abducted flexion (as with the left leg), a symmetrical grip can be applied to the front foot, see also the variation with the block.
- It is helpful to perform the poses baddha konasana and baddha konasana forward bend before janu sirsasana. The first involves some of the movements of the left leg in janu sirsasana and the second also involves the additional flexion in the hip joint.
- If problems occur in the inner meniscus of the bending leg in this pose, it is necessary to
- turn out the left thigh more.
- If necessary, use an aid to weigh down the rear front of the left thigh in order to maintain the above-mentioned rotation.
- If necessary, have a supporter use a belt to ensure and control the extension of the left leg.
- If necessary, support the left thigh with a folded mat, block or something else.
- support the heel to improve the rotation situation in the knee.
See also the FAQ. In order to get the complaints in the medial meniscus of the bending leg under control in the long term, it is necessary to practise this exorotated abducted flexion in the hip joint with the hip opener 3, among other things, in a way that is gentle on the knee.
- The grip of the contralateral hand on the outer foot of the extended leg becomes less ergonomic with increasing flexibility, as the elbow moves further forwards due to the improved forward flexion and thus bends the wrist further into palmar flexion, which may lead to cramp-like sensations in the palmar flexors of the wrist and the finger flexors. Stretchings the palmar palmar flexors and finger flexors, such as the normal seated palmar flexion pose and the one performed in upavista konasana, practised in advance and, if necessary, regularly, can help a little. Despite this ergonomic deficiency, the grip of the contralateral hand on the outer foot remains the method of choice due to its advantages.
Known problems that can occur even when performed correctly
Discomfort in the lumbar spine
This pose can cause discomfort in the lower back, especially if several of the following factors come together:
- Beginners
- Rather low flexibility
- Prolonged practice of seated forward bends
- No preparation through standing forward bends
- Shortened hip flexors
It has not yet been possible to specify precise criteria for the exact conditions under which discomfort occurs in the lumbar spine in janu sirsasana. For information on how to deal with discomfort that has already occurred, see Follow-up.
Variants
Head on the floor

Purpose: This variant is an increase with good mobility.
Anleitung
- Set up the pose as described above if you have sufficient mobility, but place your head on the floor next to the outer lower leg.
Details
- If the flexibility of the hamstrings is very good, you may feel that your head is interfering with the forward bend. Then place your forehead on the floor next to your lower leg.
parsva (head on the outer leg towards the floor)
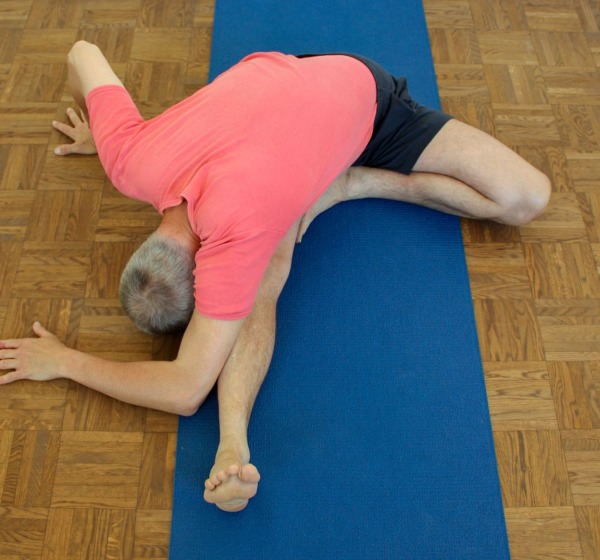
This variation can cause a fairly complete stretching of some back muscles, which is often necessary or helpful in the case of lumbago.
Instructions
- Set up the pose as described above, but instead of reaching with your left hand to your right foot, press with your left elbow from the outside against your right lower leg while maximising the forward bend (flexion in the hip joints).
Details
- The demand on the flexibility of the hamstrings is higher here than in the standard variant. It is not enough to be able to pull on the right foot with the left hand, but the hip joints must tilt into flexion to such an extent that the left elbow can press against the right lower leg from the outside; the left forearm lies on the floor to the right of the right leg.
- The right hand is on the floor to the far right of the right thigh and works to move the upper body to the right.
- This pose can be used if the back muscles have gone into an extremely painful spasm due to lumbago.
- If possible, place the head on the floor to the right of the leg, like the left forearm.
With a block
This variant for slightly more advanced users allows a more even pull with the arms and a less cramped hand position.
Instructions
- Similar to pascimottanasana, place a block across the sole of the foot and pull on it with both hands.
Details
- In contrast to pascimottanasana, the use of the block has a slight disadvantage here due to the asymmetry of the pose: the grip of the contralateral hand on the outer foot in the standard version of janu sirsasana prevents the upper body from moving towards the centre between the legs and into a slight twist away from the outstretched leg. This corrective is now lost here and a more intensive attempt must be made to prevent the upper body from deviating towards the centre in order to move it frontally towards the leg.
- The hand position required in the standard version with strong palmar flexion of the wrist and a possible corresponding tendency to cramp of the palmar flexors of the wrist is no longer necessary here and both wrists are in more favourable positions.
- Compared to the standard version, the desirable stretching of the latissimus dorsi is largely omitted here.
- The forearms can also be crossed here, i.e. the block can be gripped contralaterally.
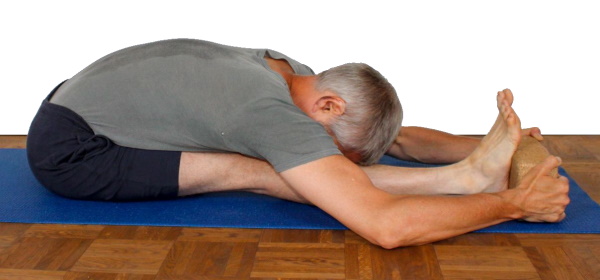
With belt

This variant is also intended to enable more immobile beginners to perform the exercise
Instructions
- Take the pose as described above, but instead of reaching for the right outer foot with the left hand, place a belt around the foot and pull on the belt with the contralateral hand. It is also possible to pull on one end of the belt with both hands, but then the contralateral hand must pull harder so that the upper body does not move to the left.
Details
- Like the variation with the block, this variation also harbours the increased risk of the upper body moving towards the space between the legs. As the pull of both arms has the same effect on the foot apart from the friction of the belt on the foot, this is also rather difficult to correct.
- The belt can be used closed or the loose ends can be gripped with both hands. In all cases, care should be taken to ensure that the foot is pulled as little as possible into supination or pronation, as supination would favour undesirable external rotation of the thigh in the hip joint, while pronation would favour endorotation. It may be possible to prevent the upper body from deviating somewhat better by pulling with both hands at opposite ends or by using the belt closed. However, the standard is to pull contralaterally.
- In contrast to the standard version, the desirable stretching of the latissimus dorsi is omitted here.
with belt and stretched back

Instructions
- Nimm die Variante mit Gürtel wie oben beschrieben ein, halte aber den Rücken korrekt gestreckt anstatt ihn dem Zug am Gürtel und der Schwerkraftwirkung des Oberkörpers folgend zu runden.
Details
- A lot of strength is required here from the autochthonous back muscles in order to caudally counteract the pull of the ischiocrural group, which tilts the pelvis backwards, and cranially to keep the back extended and stretched by the pull of the arms.
with stick under the biceps

This variant is sometimes tried for improving the irritation of the origin of the hamstrings (the PHT) at the ischial tuberosities, or more precisely, to create the preconditions for this.
Instructions
- Place a stick crosswise under the affected thigh, approximately halfway along the thigh.
- Now perform janu sirsasana so that the hamstrings press firmly on the stick when the leg is fully extended. As the stick will not move out of the way, the hamstrings is forced to move out of the way of the stick, which stretches it a little and reduces the tension at the origin a little in all situations.
Details
- Even if this variant is considered the method of choice in other traditions, its effectiveness is by no means sufficient as the sole method of dealing with a PHT if it is already halfway pronounced. See also the FAQ.
Stretched back
This variation is clearly different in nature to the others, as the aim here is to stretch the back, which requires a significant exertion of the autochthonous back muscles. In addition, the greater effective lever can result in a more intensive stretching and strengthening of the hamstrings on the back of the leg if you pull hard. This variation is also suitable in case of a intervertebral disc problem, provided that the back remains at least straight in the lumbar spine region, or better still in physiological lordosis.
Instructions
- Take the pose as described above, but do not try to rest your upper body on the outstretched leg, instead stretch it straight from the pelvis. If possible, still reach for the outer foot with the contralateral hand. How far the arm bends or stretches is determined by the position of the upper body.
Details
- This position is contraindicated for injuries to the hamstrings, in particular irritation of the ischial origin (PHT), as the load on the corresponding area is too high.
(P) Tilting the pelvis with the hands
Instructions
- Take the pose as described above.
- The supporter sits behind the performer and tilts the pelvis forwards in the upper sacrum area with both hands parallel to the spine and pointing towards the head. The pressure is applied forwards (towards the feet) and slightly upwards.
Details
- Instead of pressing with the hands parallel on the back, the hands can also be placed on the iliac crest. Depending on the force to be applied, the triceps or pectoralis major of the supporter will fatigue quickly, then it is advisable to press with the feet, see below.
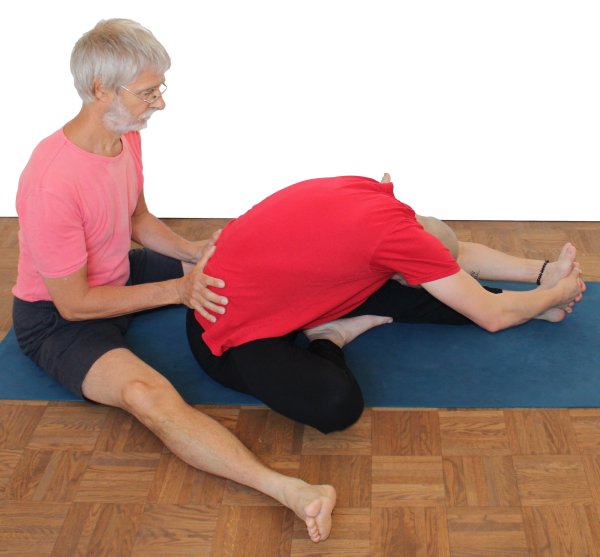
(P) Tilt the pelvis and press towards the floor with the hands and bent legs

Instructions
- Take the pose as described above.
- As described above, the supporter tilts the pelvis forwards in the hip joints with the hands (flexion), but stands instead of sitting and also presses with one foot close to the performers knee pushes the bent leg towards the floor.
Details
- Of course, the pressure with the foot must be carefully dosed and care must be taken to ensure that the supporter has a stable stance. It should be noted that pushing the thigh of the bent leg towards the floor can cause pain in the knee joint, which should be avoided.
(P) Pressing the back down
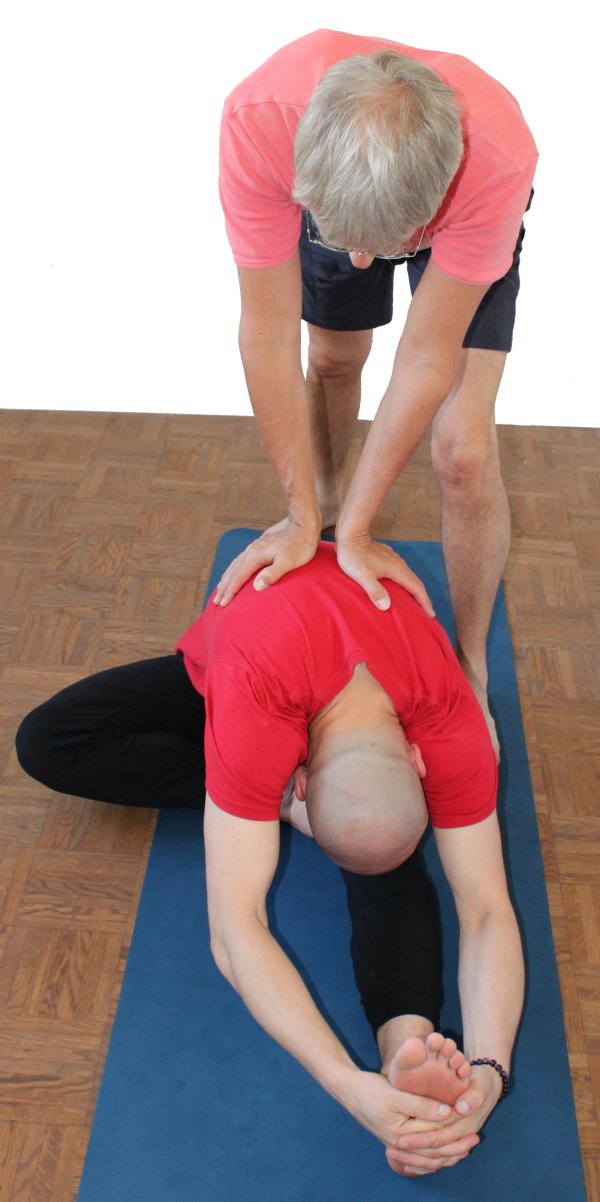
Instructions
- Take the pose as described above.
- The supporter presses the thoracic spine towards the floor at approximately the highest point and tries to push it away from the pelvis.
Details
- This variation only works if the performer’s hamstrings are already quite flexible and the upper body is beginning to approach the horizontal.
(P) Tilting the pelvis with the feet

Instructions
- Take the pose as described above.
- The supporter sits behind the performer and tilts the pelvis forwards in the upper sacrum area / iliac crest with both feet next to the spine pointing parallel towards the head. The pressure is applied forwards (towards the feet) and slightly upwards.
Details
- It is less easy to apply pressure with the feet than with the hands, but the force that can be exerted is significantly greater and the legs tire less quickly with this support. Depending on the exact structure and constitution of the supporter, the rectus femoris of the supporter may cramp if he presses not only against the back but also a little towards the head as recommended.
- A non-slip base is required so that the performer is not pushed away. If necessary, the performer can place their feet on a wall to prevent this.
(P) Pulling on the hands

Instructions
- Take the pose as described above.
- The supporter sits in front of the performer and pulls their outstretched arms towards them with both hands.
Details
- The problem resulting from the asymmetrical structure of the pose also occurs again in this variation: the pelvis and upper body tend to turn slightly away from the outstretched leg. If the pull on both arms is equally strong, this tendency to deviate is not counteracted to any great extent. It therefore makes more sense to pull more on the arm whose ipsilateral leg is bent.
(2S)
Instructions
- Take the pose as described above.
- The first supporter sits behind the performer and tilts the pelvis with both hands or both feet. The second supporter sits next to the bent leg and presses it to the floor as tolerated.
Details
- In cases of discomfort in the inner knee, which is often due to a meniscus condition, the thigh may only be pressed to the floor to the extent that there is no pain. If the bent leg of the basic posture is already painful, the bending angle of the knee joint must be kept smaller. If the leg is now pressed towards the floor, an even smaller bending angle may be necessary.