yogabuch / asanas / supta virasana
Contents
- 1 supta virasana„lying hero“
- 2 Variants
- 2.1 Arms above the head
- 2.2 Arms next to the torso
- 2.3 with head in the fish
- 2.4 on the elbows
- 2.5 Feet up
- 2.6 As a backbend
- 2.7 Hands on the back in Namaste
- 2.8 Roll your back off the floor
- 2.9 Lower leg support
- 2.10 with weight on the thighs
- 2.11 Mat in the knees
- 2.12 Butt on a block
- 2.13 Dumbbells on thighs
- 2.14 (P) Pressure on the hip bones
- 2.15 (P) Pressure on the hip bones, standing on the thighs
- 2.16 (P) Standing on your feet
- 2.17 (P) Belt in the knees
- 2.18 (P) Pressure on the thighs
- 2.19 (P) Right-angled handstand on the SIAS
- 2.20 (P) Rotate leg with belt
- 2.21 Jump into the dog
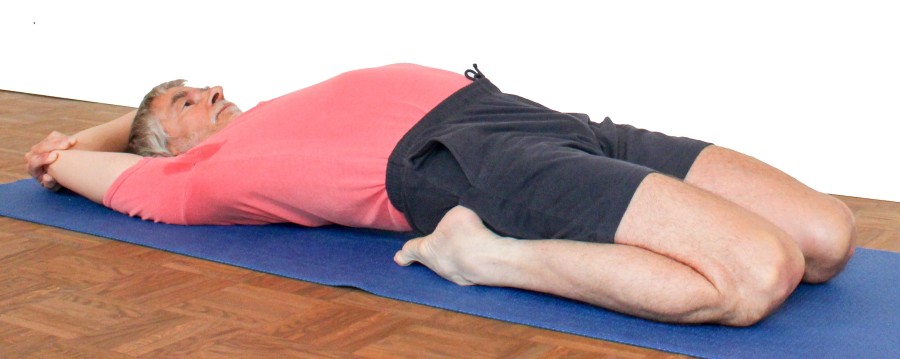
supta virasana
„lying hero“
 instructions and details with working links as PDF for download/print
Tue und lasse
knees fall apart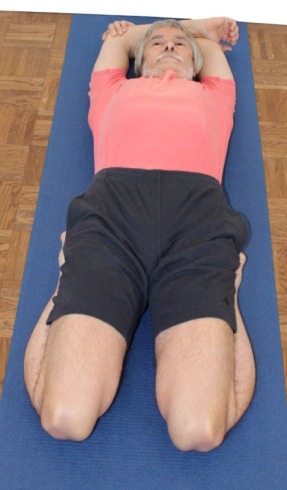 | no maximal hip flexion 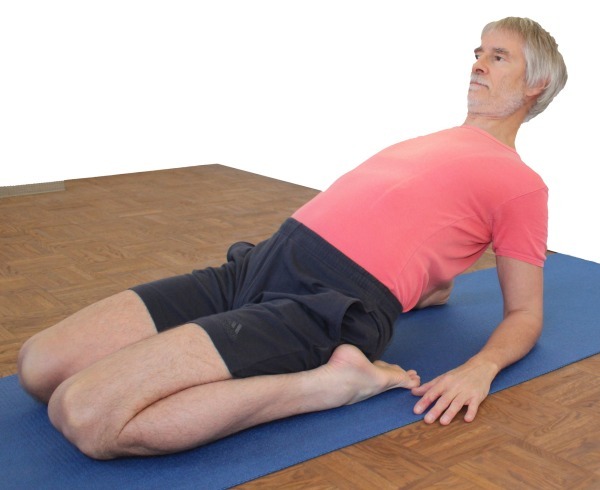 |
Detailfotos
first: pull your knees forward | then: turn out the calves |
Feedback: We would love to hear what you think about this description, please give us feedback at:
postmeister@yogabook.org
last update: 30.12.2018
Name: supta virasana
Trivial name: lying hero
Level: A
- Classification: A
- Contraindication
- effects
- Preparation
- follow-up
- derived asanas
- similar asanas
- diagnostics
- Instruction
- details
- Variants
Classification
classic: lying posture
physiological: relaxation and stretching of the legs(quadriceps, especially the rectus femoris)
Contraindication
In the case of facet syndrome, spondylolisthesis (slipped vertebrae) and spinal canal stenosis, care must be taken to avoid a hollow back. This can be ensured by providing sufficient support for the back in conjunction with strong work of the gluteus maximus as a hip extensor. If the flexibility of the hip flexors is good, the back roll-up variation can also be practiced as long as there is sufficient strength.
Effects
- (231) Shoulder joint: stretching for frontal abduction
- (811) Stretching the quadriceps
- (816) Stretching of the rectus femoris
- (841) Stretching the foot lifts
Preparation
An essential requirement of the posture is to be able to bend the knee joints as fully as possible. Preparatory or synergistic are:
The additional prerequisite of the posture compared to the similar virasana is the flexibility of the hip joint in the direction of extension:
and all backbends. Depending on the flexibility of the hip flexors, a more or less pronounced hyperlordosis of the lumbar spine occurs. To reduce the tension in the muscles in advance so that there is no discomfort, practise:
- parsva uttanasana
- balasana (virasana forward bend, child’s pose)
- parsva upavista konasana
- parivrtta trikonasana
- parsvottanasana
- Half lotus forward bend
- karnapidasana
Wrap-up
derived asanas:
similar asanas:
Diagnostics (No.)
(186) Neck:
Depending on the flexibility of the hip flexors and quadriceps, the head clearly goes into reclination here. On the one hand, this shows and promotes the flexibility of the cervical spine in this direction; on the other hand, depending on the constitution and damage to the cervical spine, associated symptoms such as dizziness or neuroradicular symptoms may occur.
(501) Shortening in latissimus dorsi and pectoralis major
Shortening of the latissimus dorsi or pectoralis major would result in the elbows not reaching the ground, even if the shoulder section can be laid down, because the frontal abduction in the shoulder joint is not sufficient.
(650) Kyphosis and lordosis of the spine:
Depending on flexibility, the back is more or less evenly concavely rounded in this posture. With good flexibility, there is hardly any visible hyperlordosis of the lumbar spine and the rest of the back lies more or less flat on the floor. The less mobile the iliopsoas and quadriceps (especially the rectus femoris) are, the more concave the back will be. Even if the rectus femoris plays the greater role within the quadriceps because it determines the flexion angle in the hip joint, stiff monoarticular parts of the quadriceps also result in a less flat thigh and therefore a greater tendency to hyperlordosis of the lumbar spine with the shoulders at the same height (ideally on the floor).
A sharp hyperlordosis with an otherwise moderately concave rounded back can also indicate a hollow back when standing. A hyperkyphosis of the thoracic spine can result in the middle thoracic spine being able to be laid down, but the shoulder section floats in the air, while the upper back of the head is back on the ground in the case of hyperlordosis of the cervical spine. The hyperlordosis of the lumbar spine would then also tend to be more pronounced. See the FAQ.
(611) Pelvic obliquity/unequal shoulder height/scoliosis of the spine:
If the hip bones(SIAS) are of unequal height or if a side-by-side comparison shows different heights in the rib cage or shoulders, this may be the result of unequally mobile quadriceps or hip flexors, but it may also be due to scoliosis of the spine. Even if all parts of the quadriceps are equally mobile, an SI joint blockage can cause the upper body to be distorted, with the abdominal area being higher on one side up to the ribcage. Further examination is required here. See also the FAQ.
This pose can reveal problems with the lumbar spine or its muscles. Supta virasana is usually, but not always, compatible with disc problems. If there is accompanying spinal canal stenosis, for example, the lumbar spine may be positioned as steeply as possible,
sometimes even this is not pain-free. Even with spondylolisthesis, the lumbar spine must remain physiologically lordotic; in some cases, an upright position is still tolerable. See also the FAQ on the subject of intervertebral discs.
(671) Rectus abdominis: stretching
If there is a sensation of stretching in the rectus abdominis when the hip flexors are not very mobile and the back is clearly concave (seen from behind), other postures such as
check whether they are sufficiently flexible.
(681) Intercostal muscles: stretching
If there is a sensation of stretching in the intercostal muscles when the hip flexors are not very mobile and the back is clearly concave (seen from behind), other postures such as
it is important to check whether this is sufficiently flexible so as not to make inhalation more difficult.
In this pose, knee problems associated with wide flexion become very apparent. It is often observed that increased tilting of the pelvis, i.e. greater traction of the rectus femoris over its distal structures such as the quadriceps tendon, the patella and the lig. patellae, leads to increased discomfort. There are therefore two main types of knee pain with regard to the postures for the widely/fully flexed knee:
- those caused under flexion by a high flexion moment, as created by the gravity of the upper body in virasana (these would be more pronounced in virasana than in supta virasana)- and
- those caused by additional traction of the rectus femoris
For the latter, stretching the quadriceps on wall 1 and stretching the quadriceps on wall 2 can prove to be a valuable alternative until sufficient flexibility is achieved to perform supta virasana. The parts of the distal quadriceps tendon already described in virasana, from which the medial retinaculum patellae and the lateral retinaculum patellae are formed, are felt much more frequently here than in virasana. There may also be other damage to the knee such as traumatic or degenerative meniscus damage, arthrosis, arthritis, subluxations, ligament damage, plica syndrome (occurs during the extension movement) and others, see the FAQ.
(722) Hip extensorstrength:
Depending on the flexibility restriction of the hip flexors, a corresponding amount of force must be applied for the duration of the posture in order to avoid the unpleasant hyperlordosis of the lumbar spine that would otherwise occur or to limit the existing one. This shows the strength/stamina of the extensors of the hip joint, such as the gluteus maximus. The hamstrings has less tendency to spasm here than in comparable postures in which it also works in a very short sarcomere length and therefore close to active insufficiency, but the hip joint or knee joint is extended or flexed against gravity.
Variants:
(P) Pressure on the hip bones, standing on the thighs
(P) Right-angled handstand on the SIAS
Instruction
- Sit in virasana. Check whether you can stretch your ankles even more, i.e. pull your knees forward even more. Push the buttocks forward as far as possible.
- Support yourself with your hands behind your pelvis and tilt your pelvis backwards. Always stretch the torso backwards away from the pelvis as far as possible. First support yourself with your elbows on the floor before you try to rest your head and shoulders on the floor. Keep checking whether you can tilt your pelvis backwards more. To do this, push your buttocks forward several times if necessary.
- Once you have assumed the final position that is within your reach, continue to use the strength of your glutes to keep your pelvis as flat as possible.
- Stretch your torso to the maximum and pull the back of your head away from your back. Turn your arms out, bring them overhead in frontal abduction and stretch them backwards as far as possible away from the pelvis, elevating the shoulder blades.
- Keep the knees hip-width apart. Turn the thighs out as far as possible.
Details
- All the comments on the position of the legs and feet and the use of the knees made in the description of virasana also apply here.
- „Tilt the pelvis as far as possible towards the floor“ is a rule that applies well to almost all less flexible beginners. However, advanced performers should avoid bringing the lower spine into a convex posture(kyphosis), especially when entering and exiting the pose. In such cases, focus more on letting the pelvis sink heavily towards the floor and extending the trunk away from the pelvis.
- This pose is excellent after eating as it stretches the abdomen and gives the intestines more space, thus aiding digestion.
- If the lower back feels uncomfortable after supta virasana, this should disappear after one of the following poses:
Head down dog pose,
1st hip opening,
balasana (virasana forward bend, child’s pose),
ardha padmasana forward bend. - It is normal for less experienced people not to be able to straighten their knee joints immediately after supta virasana. This is due to the slight contracture of the hamstrings in the exercise and resolves itself when you come to a standing position or perform other exercises with the knee joint extended. One of the best ways to test the knee’s ability to extend after supta virasana is the head-up dog pose. The effect of the flexion moment generated by the iliopsoas in the hip joint, which pulls the thigh downwards, is usually greater than that generated by the hamstrings in the knee joint, which is why the head down dog pose is less suitable as a test than the head up dog pose.
A good immediate measure against tension in the lower back after supta virasana, especially for the inexperienced, is to lean the upper body forward onto the thighs while maintaining the position of the legs; this corresponds to balasana (virasana forward bend, child’s pose). - However, depending on how you behave in everyday life, work, sport and hobbies, the tone of the rectus femoris can become higher than desired or comfortable despite regular supta virasana. Sports such as kickboxing or cycling with a click or bar are particularly suitable for increasing the tone of the rectus femoris in general, but also faster than that of the rest of the quadriceps. Test and then regulate it with:
- Depending on your constitution, it is a good recommendation to practise virasana to stretch the monoarticular parts of the quadriceps femoris before supta virasana, especially if these parts are still so immobile that the ischial tuberosities do not reach the floor in virasana or only reach the floor after a longer period of time. As already argued, inflexible monoarticular parts can lead to a greater hyperlordosis of the lumbar spine due to the steeper position of the thighs and the shoulders are less likely to reach the floor.
- When you lean your upper body backwards, take care not to pull your buttocks backwards so that the lower back is not compressed, but instead push your buttocks forwards towards the support surface of the knees. The knees should also not slide backwards, which would increase the tendency to cramp in the soles of the feet.
- In supta virasana there is often unpleasant pressure on the back of the feet. This is more pronounced here than in virasana, partly because the center of gravity is further back (away from the knees) and partly because the rectus femoris pulls the knees up more or less clearly, taking weight from the knees, which is then partially transferred to the floor via the feet. The standard way to deal with this is to place a sufficiently thick folded blanket under the feet. However, this also creates an elevation and makes the knees lift up all the more, which in turn does not exactly relieve the feet. In addition, the feet tend to slide sideways, which can make patches between the feet and the blanket necessary. The key here is probably a balanced mixture of a soft mat and support (raised support) for the upper body. If a supporter is available, this can push the knees towards the floor, which often significantly reduces the discomfort in the back of the feet and foot lifts. During this process, the pressure felt on the back of the feet can first increase until the knees are resting on the floor with sufficient weight or are pressing on the floor, thus relieving the pressure on the feet. Only very rarely does this procedure have the opposite effect. It is also very rare for the ankles to be particularly sensitive to pressure. In this case, part of the lower leg must be additionally supported so that it can also absorb pressure or weight.
- The lower back, or more precisely the autochthonous back muscles in the area of the lumbar spine, is often an issue in supta virasana. Even slight restrictions in the flexibility of the hip flexors lead to hyperlordosis, which is felt as compression, possibly with a slight cramp-like note. The first and simplest measure would of course be to lower the back less, but this would be less effective in stretching the hip flexors. It is better to use more of the pomus muscles to achieve a posture in which the lower back does not feel any discomfort. External pressure on the hip bones(SIAS) from above and on the knee also helps to tilt the pelvis and thus relieve the lower back, see corresponding variants.
- The knees sometimes show a massive tendency to push outwards, i.e. the thighs abduct in the hip joints. This evasive movement results from three components:
- the pomusculature generates a clear exorotationand slight abduction moment in the hip joints when attempting to reduce flexion in the hip joints.
- Since the powerful hip flexor iliopsoas attaches to the lesser trochanter on the inside of the femur, its intensive stretching also has an exorotatory effect. As the possible exorotation is limited by the lower legs lying on the ground, the thigh increasingly deviates into abduction.
- The rectus femoris, which runs lateral to the hip joint, also pulls the thigh laterally under tension.
- In supta virasana, sensations of discomfort in the inner knee clearly dominate over those in the outer knee. Part of the cause presumably lies in the position of the feet next to the pelvis, i.e. on the outside to the side of the thighs, whereby the individually very inconsistently flexible mass of the calf muscles rotates the thighs into endorotation and leads to compression, particularly in the inner knee. This can often be remedied at least to some extent by actively or passively rotating the thighs with force. Very rarely does a knee joint react in exactly the opposite way, namely that exorotation of the thigh worsens the condition of the knee joint. If the knee pain cannot be controlled in this way, the next sensible step is to place the buttocks on a more or less flat elevation so that the flexion angle in the knee joint becomes more favorable, i.e. the knee joint is flexed less. In almost all cases to date, this has resulted in freedom from pain. Pathologically altered knee joints are of course special cases in which it is necessary to find out individually how a knee joint reacts and what is possible and how.
- In supta virasana, it is not uncommon to encounter cramps in the muscles of the inner sole of the foot. It is helpful to pull the knees forward once when assuming the pose as a preventative measure, which noticeably reduces the tendency to cramp. Whenever the position of the feet has been changed, the knees should be pulled forward again. Once the cramp has occurred, squatting 1 helps to prevent it. It is also often observed that the cramp occurs or the tendency to cramp increases when trying to move the feet more in line with the lower legs. Increased tension in the muscles is probably at least one of the causes. It is helpful to stretch the corresponding muscles on a semi-regular basis, whether with a fascia roll, massage or postures in which the sole of the foot is on the floor but the toes are pointing upwards on the wall, i.e. the metatarsophalangeal joints are dorsiflexed 90°, for example setu bandha sarvangasana against the wall. Another remedy that sometimes helps to relieve cramping in the soles of the feet is to press the forefoot and especially the toes onto the floor throughout supta virasana. The trick known from virasana or ustrasana of striking the back of the feet on the floor several times with moderate force beforehand can also be used here.
- It is not uncommon for athletes to experience an overly intense stretching sensation in the foot lifts, such as the tibialis anterior or extensor hallucis longus or their tendons in the ankle area. To remedy this, a piece of the mat can be rolled up and placed under the ankles. The elevation created in this way relieves the stretching requirementin the ankle joint. Instead of 180° (seen from the front), the ankle may then only have to be stretched to 150°
- For further information on the type of possible pain in the knee joint and how to deal with it sensibly, see the corresponding FAQ entries:as well as the suggestions made in the variation „Butt on block“.
- In supta virasana, side discrepancies in the tension of the rectus femoris are very easy to recognize, as they appear as a lateral deviation of the more tensed thigh (thigh deviation sign). In principle, both thighs have a tendency to move outwards for the reasons mentioned above. In practice, it is not uncommon to see this lateral deviation. The thigh whose rectus femoris is more taut is then at a greater abduction angle, which is due to the course of the rectus femoris close to its origin, laterally past the hip joint. Despite its course, however, it would not be appropriate to classify it as an abductor. Since the rectus femoris in supta virasana experiences by far the most intensive stretching compared to other muscles, its tension and its course are also decisive for the evasive movements. For people who spend a lot of time on their feet, especially in sports whose movements are fundamentally symmetrical and at the same time leg-oriented, side discrepancies of this kind pose a risk, especially for the joints of the lower extremities, but also beyond this, for example in the direction of the upper body or with regard to the development of disorders of the foot, including stress fractures with a high level of training. Since supta virasana, as a symmetrical pose, is less suitable for eliminating side discrepancies, the use of asymmetrical poses such as the two quadriceps stretches on the wall(1 and 2) is indicated for this purpose. However, supta virasana can still make a small contribution to reducing the problem, because the lower the excessive tone present in both legs, albeit to varying degrees, the less harmful the effect of side differences would be. In this case, unlike in other cases, this effect in no way replaces the use of asymmetrical postures.
- Another side difference that could be observed in supta virasana would be a higher SIAS on one side. It is then necessary to check whether the bending angle in the knee joint is equal, as can be seen from the contour of the thigh, or unequal. If it is unequal, there is a side-differentiated tension in the monoarticular parts of the quadriceps, which can be treated with virasana, for example, which should then reveal a tilted pelvis. If, after practicing virasana for some time, the pelvis has become straight, i.e. the same height on both sides, this does not mean that there is no longer a lateral difference or that it would be visible in supta virasana, as the bending moment in the knee joint due to the gravitational effect of the supported partial body weight is much greater in virasana than in supta virasana.
- If, however, the flexion angle in the knee joint is the same, a distinction must be made: is there an SI joint blockage or does the lateral difference originate from the hip joints? After all, there are only two joints between the knee resting on the floor with the assumed equal inclination of the thighs on the one hand and the SI joint on the other: the hip joint, whose flexion angle is largely subject to the influence of the two hip flexors iliopsoas and rectus femoris, and the SI joint. In the case of an SIJ block, one would typically see a pelvic torsion, i.e. one hip bone is tilted by up to approx. 4° (maximum nutation) in relation to the other. Dorsally, this would also result in a laterally different position of the SIPS in the longitudinal direction(cranial-caudal), which cannot be seen in the posture but can be palpated. If SIAS and SIPS are at the same level longitudinally within the pelvis, the difference must come from the hip joints, and we may see the rare case that one iliopsoas is so clearly more tense on one side than the other that it – and not the rectus femoris as is normal – causes different angles in the hip joint. This is rare anyway, but it would be even rarer without pelvic twisting occurring. However, it is also possible that the pelvis is abnormally shaped.
Variants
Arms above the head

Instructions
- Take the pose as described above, but cross your arms and lower them.
Details
- The folded arms behind the head exert tension on the upper body via the pectoralis major and the latissimus dorsi, which can be used to tilt the pelvis. This pull is slightly greater than in the standard variation if the elbows (and therefore the rest of the arms) do not reach the floor. The prerequisite for this variation is, of course, that the shoulder line comes to rest on the floor and the arms are not needed to support the upper body.
- A tendency to cramp in the trapezius can usually be countered by turning the arms out more. This can either be done passively with a supporter or actively on one side by rotating the opposite upper arm with one hand.
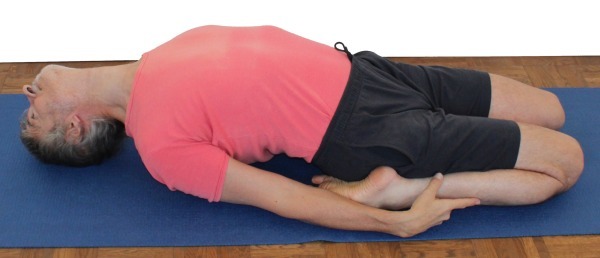
Arms next to the torso

Instructions
- Take the pose as described above, but place your arms next to your body.
Details
- In this pose, there is slightly less tension on the upper body and pelvis than in the standard version.
with head in the fish
Instructions
- Assume supta virasana, but only tilt the pelvis so far that the head can be positioned as if in a fish.
Details
- This pose is a backbend in the upper body and cervical spine. If the cervical spine is damaged, this variation may have to be avoided.
- The backbend should be performed using the strength of the autochthonous back muscles; the arms can be used on the floor for support. The head is placed in reclination, the shoulder blades are in depression and retraction (moved towards the pelvis and spine ).
- As the pelvis does not tilt backwards out of flexion to the maximum, no significant stretching of the iliopsoas hip flexor or rectus femoris in the pelvis is to be expected in most cases. The focus is clearly on the backbend of the upper body and the posture of the cervical spine.
- Care must be taken to ensure that no cramps occur in the back muscles. If these occur, the pelvis must be tilted slightly out of the flexion of the hip joints in the direction of the basic posture of supta virasana.
on the elbows

Instructions
- Take the pose as described above, but support yourself on the floor with your forearms pointing forwards and your upper arms vertical instead of resting your shoulders on the floor.
Details
- This variation is a standard simplification that can be used if resting the upper body on the floor causes too much discomfort in the lumbar spine region. The support not only takes a lot of the effective weight that is pulled into hyperlordosis (or out of flexion in the hip joints if the buttocks and abdominal muscles are working hard enough), it also creates a distance between the shoulders and the floor in the posture that corresponds to the length of the upper arm. However, the exact position of the elbows can be varied; if they are further back or outside than the vertical upper arms, the shoulders are lower and the effect on the lumbar spine and hip flexors is greater.
- If the forearms cannot be placed on the floor, place them on blocks. This is not listed as a separate variation.
Feet up

Effects: (971) Strengthening the toe flexors
Instructions
- Place the feet on the undersides of the toes and assume supta virasana.
Details
- This variation is not for beginners. It requires a great deal of flexibility in the monoarticular quadriceps parts but also in the metatarsophalangeal joints.
- It is similar to the quadriceps stretch 1 on the wall in the way the heels move further past the pelvis towards the buttocks than in the standard variation, in which the buttocks limit the movement of the pelvis towards the feet by resting on the floor.
- The tendency to cramp in the muscles of the sole of the foot is considerably lower here, but intense tension or stretching can be felt there instead, including in the intrinsic toe flexors, which can be very helpful in the case of plantar fasciitis and plantar heel spurs.
- Due to the much greater flexion possible in the knee joint, the potential to feel discomfort in the knee joint is of course also much greater.
- Normally, this variation requires practicing dorsiflexion exercises for the metatarsophalangeal joints over a longer period of time, such as setu bandha sarvangasana with wall or quadriceps stretch on wall 1.
- If the knees are pushed slightly backwards in relation to the feet, this improves the angle in the metatarsophalangeal joints, i.e. increases the dorsiflexion, which is often perceived as very pleasant, especially if the flexibility of the metatarsophalangeal joints is limited.
As a backbend

A cautious approach to backbends in the upper body
Instruction
- Take the pose as described above, but do not tilt the pelvis as far as possible out of flexion. Instead, maintain a sufficient amount of flexion so that the shoulder can just be supported (via the intermediate step of supporting with the elbows).
Details
- This variation is a completely different interpretation and runs counter to the main effect of the other supta virasana variations, which is to stretch the hip flexors and in particular the rectus femoris. By design, this pose does not have a significant stretching effect on the rectus femoris or the other hip flexors, but at the same time it also has much less of a stretching effect on the monoarticular quadriceps parts, as the weight of the upper body is not available to bend the knee joints as in virasana. The main benefit of the pose is therefore probably the opportunity to approach the topic of backbending the upper body without heavy loads.
- Once the pose has been constructed, there should be little sensation in the legs and knee joints. However, you should be able to feel the (paravertebral autochthonous) back muscles working. A tendency to spasm in other parts of the back muscles should be strictly avoided!
- The significantly increased tendency to spasm in the back muscles shows why in most variations, unlike here, intensive work is done with the hip extensors in order to pull the lumbar spine out of the hyperlordosis in the best possible way.
Known problems that can occur even when performed correctly
Tendency to spasm in the back
Not only in the paravertebral autochthonous back muscles, especially in the lumbar spine area, but also in other parts of the back muscles, e.g. in the latissimus dorsi, a tendency to spasm can become noticeable with further and active flexion of the spine. Do not go into spasm, but stay just before it.
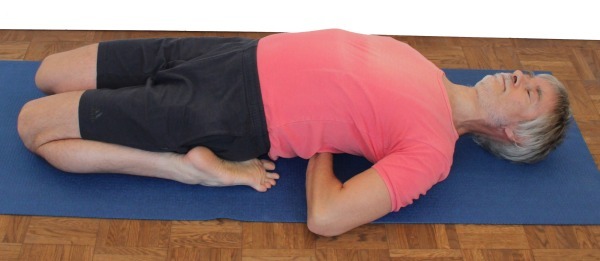
Hands on the back in Namaste
Instructions
- Take the pose as described above.
- After the shoulder area has been laid down, raise the back again slightly to fold the hands on the floor under the back in namaste pose and rest the back on them.
Details
- Under the pressure of the upper body it is not easy to keep the hands neatly folded on top of each other, the pressure tends to bend the transverse arch of the hand, i.e. to bring the metacarpophalangeal joints 2 and 5 closer together. The muscles responsible for the curvature (transverse flexion) of the hand are normally sufficiently developed, but transverse extension is quite difficult and is achieved almost exclusively by stretching the extensors of the fingers.
- The main purpose of the posture is of course to „open the ribcage in a transverse direction“, i.e. to stretch the pectoralis major and the deltoid, pars clavicularis, and to retract the shoulder blades. Allow the shoulder blades to move backwards and inwards and towards the pelvis as far as possible, i.e. retract and depress. There is no other „transverse thoracic opening“, as is sometimes heard in jargon: the bony vertebrae and the sternocostal joints as well as the two vertebral joints of the ribs do not allow any significant movement in the transverse plane, nor should they.
- This posture is very similar to passive postures in which the thoracic spine is placed on a (longitudinally aligned) block: Lying on block.
Known problems that can occur even when performed correctly
Clear sensation of pressure on the thumbs and edges of the hands
Both the pressure of the hands on the back and the pressure of the floor on the hands can be perceived as unpleasant. Patches or a blanket can help against the latter, while the most tolerable position of the thumbs on the back must be sought for the former.
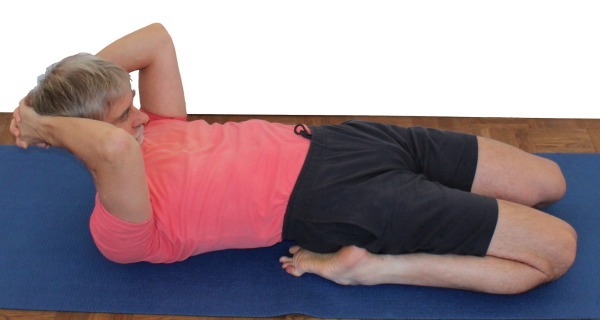
Roll your back off the floor
Instructions
- Take the pose as described above.
- Clasp your hands behind your head and lift first your head and then more and more of your head-side(cranial) back off the floor, whereby the spine curves convexly from the neck and lifts off the floor.
Details
- This is a very interesting variation for more advanced performers. The first prerequisite is that the shoulders and larger parts of the thoracic spine lie flat on the floor. Then you need strength endurance in the abdominal muscles(rectus abdominis) to roll the upper body further and further off the floor. This pose is incomparably more comfortable in the lumbar spine region than most other supta virasana variations because the strong work of the abdominal muscles synergizes with the pomus muscles to pull the pelvis out of the residual flexion that is usually present in the hip joints, resulting in hyperlordosis of the lumbar spine – even more so with good flexibility, making it convex, i.e. kyphotic. This can be considered uncritical if there is no disc disease, as sufficient weight of the upper body is transferred to the floor via the spine. After a short period of time, the strength demand on the rectus abdominis should become quite clear.
- In cases of sufficiently good flexibility but a persistent tendency towards discomfort in the (musculature of the) lumbar spine, this variation is probably the most comfortable and at the same time a very effective variation in this theme alongside ardha supta krouncasana. However, it is likely to remain on the wish list for the average beginner with less flexibility for some time.
- This variation can also work if the back can only be barely supported by placing one or two shoulder plates or a block under the back. However, the higher the support needs to be, the greater the remaining hyperlordosis of the lumbar spine, which can no longer be compensated for by the force that the flexion of the spine transmits to the lumbar spine region.
- Depending on the tension of the rectus femoris, the knees will tend to lift even further from the floor than they already do due to the rolling up of the back, so that aids are advised to keep them on the floor. The easiest way to do this is with a supporter sitting comfortably in front of the performer and resting the folded forearms on the performer’s thighs. If no supporter is available, an external weight is needed, but this must not slip off the thighs. The tendency of the thighs to move outwards, as described in the basic posture, should also be taken into account. It is well known that the latter can be prevented with a belt, which provides a safe basis for using the weight. For the sake of softness and good pressure distribution, the weight can be placed on the thighs using a shoulder support plate, but it must not be placed too close to the knees, as otherwise – depending on the shape of the thighs, the more muscular they are – it may slip towards the floor. Another useful variation that avoids this problem is to place a sufficiently heavy dumbbell lengthwise between the thighs, whereby the belt fulfills two important tasks: on the one hand, it prevents the thighs from moving apart even faster under the pressure of the dumbbell, and on the other hand, it can prevent the dumbbell from slipping to the floor, away from the pelvis. This is presumably the optimal execution without a supporter.
Lower leg support
Instruction
- take the pose as described above, but do not place your lower legs on the floor but on shoulder plates so that your feet are unsupported.
Details
- This variation makes the pose feasible if there are injuries to the feet or ankle joints that make the standard variation impossible to perform. These can be injuries or diseases of the lower or upper ankle joints or other joints in the foot, a fracture of a tarsal bone, significant shortening of the foot lifts or painful malpositions of tarsal bones.
- The support of the lower leg creates a distance between the tibia and the ground, which on the one hand relieves the ankle joint so that it only has to plantarflex according to gravity, and on the other hand also takes pressure off the bones and structures of the foot and eliminates bending moments in the joints between the bones of the foot.
with weight on the thighs

Instructions
- take the pose as described, but first place a weight on your thighs while your upper body is still upright or have it placed on your thighs while you are still in the posture.
Details
- This variation is not identical to the variation with the dumbbells on your thighs. Here, the dumbbells are also used as much as possible to support the exorotation of the thighs and prevent them from moving to the side.
- If the hip flexors have limited flexibility, the angle between the pelvis and thighs may be so limited that the lower legs lift off the floor when you try to put your shoulders down. Not only is this not good for posture, but it can also put even more pressure on the back of the foot and cause more intense stretching in the foot lifts as the ankle is forced into even more plantar flexion. To avoid both effects, you can place an adequate, even greater weight on the thighs. Objects with a certain degree of flexibility are ideal, or at least those that act as an intermediate layer so that the pressure of the weight on the thighs at the contact surfaces is not too high. Sandbags, for example, are recommended. A large weight plate can put too much pressure on individual muscle bellies (usually the rectus femoris) and should therefore be padded with a cushion, for example. This application of pressure is also available as a partner exercise, see below. The thighs can then also be rotated.
Known problems that can occur even when performed correctly
Localized pressure sensation on a muscle
Local pressure sensations on individual muscle bellies can always occur if they become prominent and the local pressure becomes too high due to too much weight or too little contact surface.
Mat in the knees

Relieving painful knees in supta virasana
Instructions
- Take the pose but, as described in virasana, pull a rolled-up or folded mat from behind into the knees before lowering the pose to the floor (or lowering the pelvis).
Details
- Similar to the corresponding virasana variation, the mat in the knees serves to relieve the knees in cases where they are not behaving completely physiologically, whether known or unknown. Compared to virasana, however, the bending moment in the knees is significantly lower due to the lowered upper body, so that the mat may need to be rolled up a little less thickly than in virasana.
- All the comments made in the corresponding virsasana variation apply analogously here.
- Of course, the mat increases the sensation of compression, especially in the calves. It may be necessary to limit the flexion in the knee joint by raising it under the buttocks.
Known problems that can occur even when performed correctly
Massive pressure sensation, especially in the calves
Similar to, but less than in the corresponding virasana variation, you may feel significant pressure, mostly in the calves.
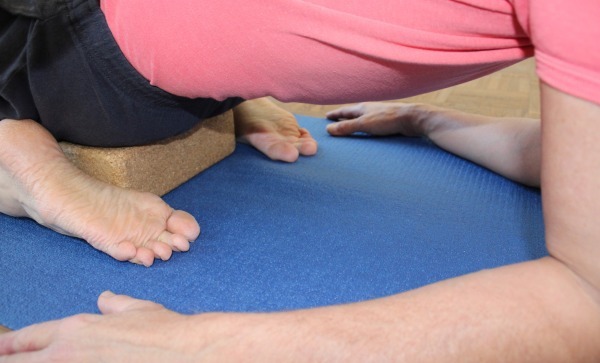
Butt on a block
Instructions
- Assume supta virasana, but first place your bottom on a block.
Details
- There can be various reasons why a knee joint cannot tolerate extensive bending. Statistically speaking, in most cases this should be damage to the meniscus: tears of various shapes or splinters. There are, of course, a number of other secondary causes. For knee damage, see also the entries in the FAQ:
- Knee problems in generalArthroscopy: pro/contraKnee painin lotus/half lotus or baddha konasana-like postures
- if the pain subsides over time, this may indicate a connection with overstretched quadriceps muscles, for example. The test should then be repeated at the next opportunity
- If the pain remains the same, the test should not be repeated, or at least not promptly
- If the pain increases, the test should be aborted
- If the pain does not subside quickly after the attempt, this is also a sign that the knee should be subjected to less flexion
- If the pain is still present hours later or the next day, this is a clear indication of damage to the knee joint that requires clarification.
- The block under the buttocks can usually be used crosswise and is narrow enough so that the feet still fit exactly next to the pelvis. In principle, other, less compressible aids are also possible, such as shoulder support plates. The height of the support should be as low as possible so that the pain no longer occurs, so that there is still a residual effect on the three monoarticular parts of the quadriceps. The effect on the rectus femoris is largely independent of the height of the block, as in addition to the flexion of the knee joint, the unwanted degree of flexion or, if possible, the extension already achieved is also responsible. In cases of good flexibility in the hip joints and upper body, the shoulder line or even parts of the upper back can be placed on the floor despite the support of the buttocks. In these cases, it is helpful if the aid chosen to support the buttocks is not too large (in longitudinal alignment) so that the pelvis can tilt as freely as possible from the aid towards the back. The achievable stretch in the rectus femoris and the other hip flexors is greater if the buttocks rest on an elevation and the pelvis can tilt further than to the floor or parallel to it. If aids with different thicknesses are available, they can be sensibly combined so that the optimum height can usually be approximated quite well.
Dumbbells on thighs
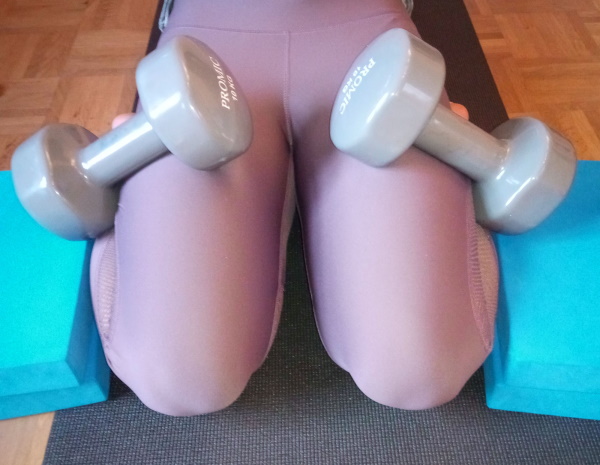
Instructions
- Assume supta virasana.
- Depending on the circumference of the thighs, place 1-3 shoulder plates or a block at a suitable height next to both lower legs.
- Place a sufficiently heavy dumbbell on each thigh so that it tilts slightly outwards and rests on the shoulder plates (the block).
- If the dumbbells threaten to roll away, place a rolled-up patch in front of the dumbbell on the knee side to prevent it from rolling.
Details
- This variation goes beyond the one above, in which a weight simply holds the thighs down.
- The further towards the knee the dumbbells are positioned, the better they work to keep the thighs down, following the principle of the lever. The catch is that the shape of the thighs means that the dumbbells roll away much more quickly. However, this can be prevented by placing a folded patch on the knee side of the shoulder plates under the barbell.
- In addition to the optimal arrangement of the dumbbells described above, the following variations are also possible:
- Dumbbells placed crosswise on top of each other, pressing on the thigh via a shoulder stand plate
- One dumbbell lengthwise between the thighs, which are tied together with a belt. Without the belt, the dumbbell would increase the tendency of the thighs to move outwards. The belt also secures the dumbbell against slipping.
(P) Pressure on the hip bones

Reduction of residual flexion in the hip joints and discomfort in the lumbar spine region.
Instructions
- Take the pose as described above.
- The supporter simultaneously exerts pressure on both hip bones(SIAS) towards the head and the floor. To do this, the supporter stands slightly straddled next to both thighs of the performer, facing the performer’s chest and pelvis.
Details
- This is one or rather THE standard support in supta virasana. The pressure is applied in an arc as the hip bones (the SIAS) move in a cranial-dorsal direction relative to the hip joint (i.e. the acetabulum), i.e. towards the head and the floor. In individual cases, the pressure on the hip bone itself can be uncomfortable, in which case vary the pressure and the pressure distribution. The best choice is usually to distribute the pressure as evenly as possible, i.e. slightly dome-shaped palms pressing on the SIAS. The cranial component of the movement may cause too much tension or pulling of the skin on the SIAS and must be reduced. As the pressure on the SIAS increases, more stretch should be felt in the rectus femoris and the knees may move away from the floor or become lighter. There is nothing to be said against keeping them on the floor. It would be desirable for the performer to be able to largely maintain the position of the pelvis with the strength of their hip extensors when the supporter slowly releases the pressure later after the announcement.
- The pressure on the SIAS may cause the knees to lift off the floor due to the restricted flexibility of the hip flexors. This often results in excessive pressure on the backs of the feet or stretching sensations in the foot lifts or their tendons in the ankle area. This should not be considered critical, but the stretch sensation in the rectus femoris should not be significantly reduced and fall below the level without any support. In a more advanced support variation (see below), the supporter also stands on the performer’s thighs so that the thighs are turned out a little more at the same time, see below.
(P) Pressure on the hip bones, standing on the thighs

Reduce the residual flexion in the hip joints and the discomfort in the lumbar spine region, complete one-man support.
Instructions
- Take the pose as described above.
- The supporter simultaneously exerts pressure on both hip bones(SIAS) towards the head and the floor.
- In addition, the supporter stands on the performer’s thighs, with the heels slightly inwards, just next to the rectus femoris, and the forefoot outwards, so that the exorotation of the thighs is encouraged. The optimum position for the feet should be around the middle of the thighs, beyond which they often fall too far.
Details
- This is the complete version of the above support.
- It is possible that pressure on the SIAS alone may cause the knees to lift off the ground due to the restricted flexibility of the hip flexors. As this has a significant effect and can have side effects in the area of the feet, the thighs are also pressed down.
- Position the feet in such a way that the pressure is sufficiently comfortable for the performer and at the same time maximizes the exorotation of the thighs.
- The assumption that the middle of the thighs, i.e. halfway from the hips, is the optimal point is based on the two items to be achieved with the pressure of the feet and their priorities: exorotation and pressing down. The latter requires a favorable lever arm.
- This variation requires the supporter to use a little sensitivity and a slow, controlled shift in weight.
Known problems that can occur even when performed correctly
Unpleasant pressure on the thigh muscles
Depending on how and where pressure is exerted on the thighs with the feet, this can be perceived as clearly uncomfortable pressure. Vary until you find a position that is tolerable.
(P) Standing on your feet

The part of the full support standing on the thighs
Instructions
- Take the pose as described above.
- The supporter stands on the performer’s thighs as described in the full support above.
Details
- See details above.
(P) Belt in the knees

Instruction
- Take the pose as described above, placing a belt from behind in the squat.
- The supporter pulls horizontally on the belt from the front away from the pelvis and only slightly upwards .
Details
- Sometimes the pressure conditions in a painful knee joint can be positively influenced in this way.
- Be careful not to pull the knees away from the floor.
(P) Pressure on the thighs

Instructions
- Take the pose as described above. The supporter presses the thighs down and it is a good idea to turn them out (lift the inner knee, outer knee towards the floor).
Details
- Another good option for a longer support is for the supporter to sit in front of the performer in upavista konasana and press the thighs down with the forearms supported. However, it is then not possible to support the exorotation, but the support can be held for a very long time.
- The fact that the knees lift off the floor and the thighs have to be pressed down at all is due to a shortened iliopsoas or, even more so, a shortened rectus femoris. However, this also means that pressing the thighs or knees down can raise the pelvis a little further from the horizontal or increase flexion in the hip joints, which may lead to an unpleasant hollow back sensation that must then be controlled by applying force to the gluteus maximus. The height of the support under the elbows may need to be adjusted.
- If the ankles are supported in order to alleviate the 180°stretching requirement in the ankles and the possibly associated intense stretching sensation in the foot lifts, the knees will detach from the ground all the sooner and more. This quickly results in the need to push the thighs or knees towards the floor.
- If the pressure on the thigh muscles is felt to be too uncomfortable, a mat folded several times or a blanket can help.
(P) Right-angled handstand on the SIAS

Instructions
- Take the pose as described above, with the knees facing the wall and 20 – 50 cm away from the wall, depending on the supporter’s flexibility and the height of both of them.
- The supporter stands straddled next to the knees of the performer with their back to the wall.
- He then rests his hands on the hip bones(SIAS) and pushes them towards the head (of the performer) and the floor.
- The supporter assumes a right-angled handstand on the performer’s hip bones.
Details
- In many cases, the force required to adequately tilt a performer in the pelvis is quite high and the upper limb tires quickly when the elbow joints are flexed, especially the triceps or shoulder muscles. Muscles that hold the upper body in the forward bend, i.e. the back of the body, are also required. This posture now offers an interesting opportunity to combine two useful training exercises. However, the force exerted by the hands on the SIAS cannot be further dosed, as around 100% of the supporter’s body weight is always applied. It is therefore advisable to try out the standing support with pressure on the hip bones beforehand to see whether the person performing the exercise can withstand this much pressure. If this is the case, the pressure distribution within the supporting hands can be modulated a little in this support. The supporter must be careful not to place the wrists too far distal or medial to the SIAS, as otherwise they may move further into dorsiflexion of the wrists than is tolerable and the lever arm becomes less favorable, at which point the pelvis tilts out of flexion. In addition, a wrist that is set too far medially would possibly put too much pressure on the abdominal wall. It is therefore advisable to press on the SIAS with the carpus.
(P) Rotate leg with belt

Instructions
- Take the pose as described above, whereby a belt is attached close to the knee around a thigh whose corresponding inner knee tends to cause discomfort during normal execution, with the fastener at the top of the thigh and the free end pointing outwards.
- The supporter slowly pulls harder and harder on the belt, holding the thigh in position with one foot so that the leg is not pulled outwards.
Details
- This is a way of turning the leg outwards in an attempt to relieve discomfort in the inner knee.
- Normally, the friction of the belt against the skin or clothing is sufficient to prevent slippage if the belt is pulled tight enough. Otherwise a patch could be placed between the skin/clothing and the belt.
- The supporter must also fix the thigh as close to the knee as possible with one foot, as otherwise it would inevitably be pulled to the side.
Jump into the dog

Instructions
- Take the pose as described above.
- Place the hands under the lower legs close to the ankles.
- Press the elbows to the floor.
- With a combined effort of the hip flexors, abdominal muscles (mainly rectus abdominis) and arm flexors, swing the upper body upwards.
- Place your palms shoulder-width apart on the floor in front of you.
- Jump back with your feet so that there is a distance between your feet and hands that is suitable for the head down dog position.
- Land with the knees bent wide so that the upper body can already take the pose it should have in the dog head down position.
- Straighten the knee joints and complete the dog head down.
Details
- Beginners in particular often lack the resources to perform this transition dynamically: Flexibility of the hip flexors and the back as well as the strength of the three main executing muscle groups. If the flexibility of the hip flexors is lacking, the hip joints are still in too much flexion and the upper body cannot reach far enough into flexion as a result, which stalls the attempt at an upswing.
- The transition should not be performed if there are known problems in the knee joint or lumbar spine.
- Initially, the transition may only be possible asymmetrically with the upper body moving slightly to the side. Depending on the condition of the lumbar spine, this should be avoided.
- Depending on the proportions of the body, it may not be possible to reach under the ankles, but this does not detract from the execution.
- The use of the arm flexors is not immediately obvious to everyone. This can be practiced in advance. The arm flexors must also not be used too late in the jump, as otherwise the hip flexors may have already pulled the lumbar spine into an uncomfortable hyperlordosis.
- A lack of flexibility of the lumbar spine in the direction of kyphosis makes the jump considerably more difficult because it can increase the hyperlordosis unpleasantly, on the other hand because the effective lever arm and the mass distribution are considerably less favorable as a result.