yogabook / asanas / maricyasana 3
Contents
maricyasana 3
 instructions and details with working links as PDF for download/print
Detailfotos
View from behind: Fingers on top of each other | As soon as possible: pull on the forearm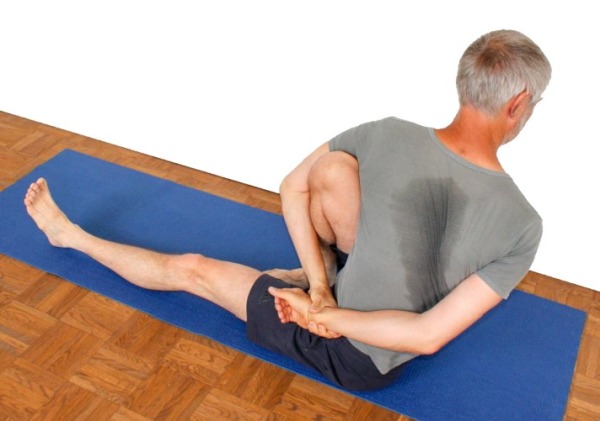 | As long as necessary: pull with belt |
Feedback: We would love to hear what you think about this description, give us feedback at:
postmeister@yogabook.org
last update: 30.12.2018
Name: maricyasana 3
Level: A
- Classification: A
- Contraindication
- Effects of
- Preparation
- follow-up
- derived asanas
- similar asanas
- diagnostics
- Instruction
- details
- Variants
Classification
classic: sitting twist
Contraindication
Postures and movements that convexly round (flex) the spine are contraindicated in herniated discs in the lumbar spine, can cause pain and have a detrimental effect on the resolution of symptoms. Even if the ideal pose is an extended back, in practice the pelvis will usually tilt backwards a little and the lumbar spine area will round.
Effects
- (212) Neck: strength for rotation
- (602) Strengthening the erector spinae
- (211) Neck: stretching for rotation
- (276) Shoulder joint: stretching for internal rotation
- (601) Stretching for rotation of the spine
- (726) Stretching the monoarticular/short hip extensors (especially gluteus maximus)
Preparation
A flexibility-restricted hamstrings on the side of the extended leg causes the pelvis to tilt backwards, so prepare with:
- uttanasana as a generally effective and efficient stretch of the hamstrings
- prasarita padottanasana
- parsvottanasana
- pascimottanasana
- janu sirsasana
- tryangamukhaikapada pascimottanasana
- downface dog as another good preparation for the hamstrings when the pelvis is tilted powerfully
- hip opener 5 as a very effective stretch of the hamstrings that goes beyond uttanasana
- warrior 3 pose
- warrior 3 pose: variation „backwards against the wall“
- trikonasana
- parivrtta trikonasana
Prepare to twist away from the leg with:
- seated twisting as a very effective and efficient exercise for twisting
- parivrtta trikonasana same-sense twist in relation to the legs
- parivrtta ardha chandrasana same-sense twist in relation to the legs
- jathara parivartanasana
In a similar way to how the pelvis tilts backwards due to flexibility restrictions of the hamstrings on the side of the straight leg, flexibility restrictions of the short extensors of the hip joint (pomus muscles and dorsal hip muscles) of the upright leg tilt the pelvis backwards, so prepare with:
- half lotus forward bend
- hip opener at the edge of the mat
- hip opener 3
- parivrtta trikonasana
- parivrtta ardha chandrasana
The back muscles must stretch the back with sustained strength against the pelvis tilting backwards. This can be prepared with:
- „Table“ variation of uttanasana
- right-angled uttanasana
- warrior 3 pose, also in a backward variation against the wall
- upavistakonasana in the „pull on the feet“ variation
- upavistakonasana in the „with block“ variation
- salabhasana
Both arms are in retroversion, this can also be prepared:
- purvottanasana („8 treasures“)
- shoulder stand
- setu bandha sarvangasana
- gomukhasana
- „Arms behind the body“ variation of uttanasana
- „Arms behind the back“ variation of prasarita padottanasana
Follow-up
You may feel tension in the middle or lower back after the pose:
- parsva uttanasana
- balasana (virasana forward bend, child’s pose)
- parsva upavista konasana
- parivrtta trikonasana
- parsvottanasana
- Half lotus forward bend
- karnapidasana
derived asanas:
similar asanas:
Diagnostics (No.)
(246)(276) Shoulder endorotated retroversion:
The flexibility in terms of retroversion depends on the endorotation and may already reach its limit here, but this can be significantly exceeded again if the endorotation is removed. The anterior parts of the deltoid (pars clavicularis) are the main limiting factors, where corresponding stretching will also be felt.
(721)(724) Ischiocrural group:
In this forward bending movement(flexion in a hip joint), various disorders can be found:
- Shortening of the hamstrings, see FAQ.
- Damage to the hamstrings that causes pain or functional limitations can also be easily recognized here, from simple tension to strains to muscle (attachment/detachment/tear). Tears would lead to an easier forward bend(flexion in the hip joint) in the posture.
- Irritation of the sciatic nerve: irritation of the sciatic nerve, which innervates the leg and foot, can become symptomatic during forward bends in particular, even if they are otherwise rather calm. See the FAQ.
- Irritation of the origin of the hamstrings at the ischial tuberosity (at the ischial tuberosity, also known as PHT: proximal hamstring tendinopathy) may become apparent in this posture, but the force exerted is usually not great enough. If it does, it requires protection before intensive stretching, see the FAQ.
- Baker’s cysts produce a feeling of tension or foreign body sensation, see FAQ.
This posture reveals the strength endurance capacity of the back extensors. Except in the case of good flexibility, the body’s internal resistance in the posture guarantees the need to stretch the back continuously and powerfully with the back extens ors. Any tension, whether caused by posture, professional or other demands, scoliosis, hyperkyphosis of the thoracic spine or misaligned vertebrae, should be clearly visible here.
(712) Pelvic alignment and back extension:
Lack of ability to straighten the pelvis in this posture, resulting in a round back that requires a great deal of effort to stretch (to be precise, one can often only try to prevent it from becoming even rounder), does not allow a clear conclusion to be drawn, causes may be:
- Shortening of the hamstrings, which causes the pelvis to tilt backwards from the extended leg
- Shortening of the hip extensors (i.e. mainly the pomus muscles), which tilt the pelvis backwards from the side of the upright leg
- Lack of strength in the hip flexors to work against the two muscle groups mentioned above
The less the pelvis straightens, the more difficult it becomes to straighten the back and also to grip the leg; the back muscles may then tire very quickly and lose performance. It is therefore also possible to make a statement about the performance of the back muscles
Pain occurring under the wide flexion in the hip joint of the raised leg may indicate hip damage:
- Arthrotic change (degenerative with cartilage atrophy) of the joint
- Arthritis (joint inflammation) of various kinds
- Dislocation / subluxation, which would cause a significantly increased sensation of tension in various muscles covering the hip joint
- Joint trauma, which may cause pain in the joint even after many weeks or months
(680) Abdomen:
In contrast to maricyasana 1, the abdominal area is under significant pressure in this pose and inhalation is significantly more difficult, including and especially abdominal breathing. The pressure on the abdomen may indicate conditions or events in its organs. The pressure on the abdomen also increases an existing tendency to reflux.
Variants:
Press against the thigh from the outside with the arm only
Instructions
- Sit in dandasana.
- Keep the right leg straight on the floor.
- Draw the left foot in and place it as close as possible to the pelvis, a hand’s width away from the right thigh.
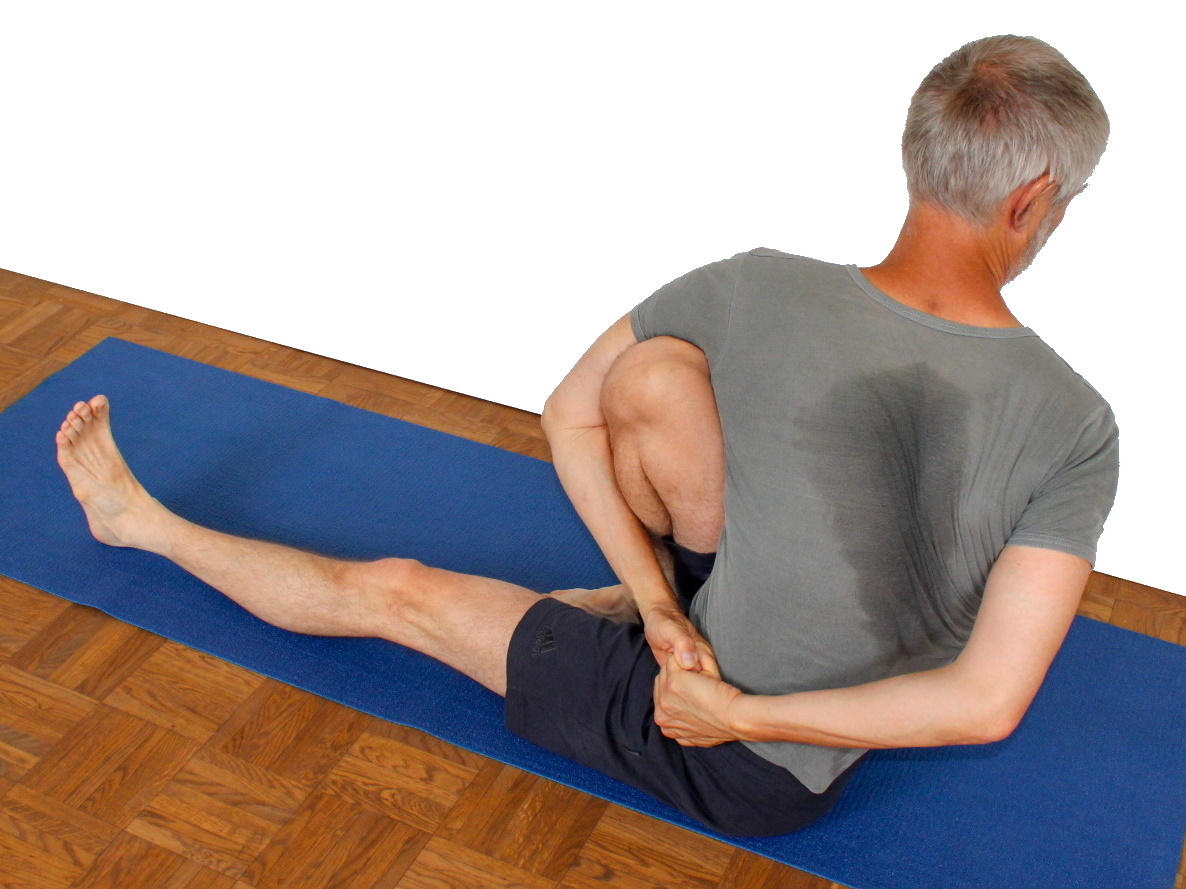
- Turn the upper body to the left and bring the right arm past the left outer thigh as far forward as possible. Rotate the right arm so that the inner elbow points towards the floor. Then bend the right arm so that the hand can be brought past the outside of the left lower leg to the right. Place the back of the left hand as far back as possible on the right side of the body or – even better – on the back. Reach back to the left with your left arm and grab the fingers of your left hand, your left hand or whatever you can grab from your left forearm with your right hand.
- Straighten your upper body again, press your left foot firmly onto the floor and continue the twist.
- When the upper body is fully rotated, turn the head in the same direction.
- If possible, push against the shoulder area from behind with your left knee to rotate the upper body even further.
Details
- If possible, remain upright in the pelvis throughout the exercise and avoid arching the back as much as possible.
- Pushing down on the left foot provides stability for the twist. Further strength for the twist can be obtained by pushing the right leg slightly to the right. This small movement should be done against the resistance of the floor and should not lead to a cramp in the right abductor muscles, otherwise ease off a little. However, the tendency of the abductors to cramp is significantly less than that of the adductors in maricyasana 1.
In the same way, the left foot can be pressed to the right against the resistance of the floor. - In some cases, beginners will not be able to reach their fingers. Here, a belt can help to mediate contact between the hands. The fingertips are reached first, whereby the strong pull from bending the distal finger joints can already help with the rotation. Later, it is possible to bring several phalanges on top of each other and bend them. Later still, try to grasp the back of the right hand with the left hand, then the right wrist and finally – as shown in the picture – the forearm. The sequence of grips corresponds to maricyasana 1.
- A good variation is to turn the head in the opposite direction to the upper body. This has a more intensive effect on stretching the neck muscles. However, always make sure that the rotation of the torso remains at its maximum, as this is easily lost when concentrating on the rotation of the head in the opposite direction.
- Try to implement the three parameters relevant for an upright posture:
- It may be quite difficult for less agile people to adopt this posture. Stiffness of the trunk or shoulder joints, as well as the hip joints, can prevent the hands from being brought together on the back. The first prerequisite for this, and therefore essential for posture, is that the right elbow can be moved forward slightly beyond the left lower leg. A stiff torso and stiff hip joints, especially the pomus muscles, can prevent this. If this is difficult, try the trick already described in maricyasana 1: place the upper arm as if you wanted to reach around the leg. If the elbow is not significantly further forward than the lower leg, it will be almost impossible to bend the arm around the leg. Then grip the upper arm with the inner edge of the other hand so that the outer edge of the hand rests on the lower leg and the elbow is pulled further forward by supinating the forearm. In many cases, this makes it possible to take the pose.
- On the side of the free arm (the one that is not gripping the leg), the retraction of the shoulder blade – in contrast to the other side, on which the gripped leg prevents this – is at a maximum, which leads to a feeling of compressed muscles that may be cramping, but rarely actually cramping, particularly in the area of the inner lower edge of the shoulder blade.
- In cases where the shoulder joints are less mobile, the anterior parts of the deltoid (pars clavicularis) are stretched intensively. This sensation can be even greater on the side of the gripped leg because the arm has to rotate more. In principle, however, the sensation is possible on both sides. The exorotators of the shoulder joint can also be perceived as stretching: infraspinatus, teres minor and pars spinalis of the deltoideus.
- If it is impossible to take the pose due to flexibility restrictions, practise the variation below „only pressing against the thigh with the arm“ instead.
- Do not let the outstretched leg turn out, stretch the heel and inner foot away.
- In dandasana, from which maricyasana 3 is taken, start by pulling the buttocks backwards and outwards.
- In addition to the above, there is another trick to move the elbow of the arm that is supposed to embrace the leg further forward: Bend the outstretched leg far enough, lifting its heel so that you can grab the outside foot with the contralateral hand. Then straighten the leg again. This pulls the shoulder forward and makes it easier to reach around the leg. The grip on the outer foot to pull the upper body forward and improve the flexion of the hip joints is an analogy to the same procedure in maricyasana 1:
Known problems that can occur even when performed correctly
Feeling of excessive strain on the back muscles
See above
Cramp in the rectus femoris of the raised leg
The tendency to cramp can occur when the muscle is also used to straighten the pelvis. Although the knee joint is flexed so that the muscle is not in a particularly short sarcomere length, the hip joint is fully flexed and this outweighs the relieving flexion in the knee joint, which is why a tendency to cramp can occur here.
Compressed, cramp-like feeling in the shoulder blade
See above; this feeling rarely leads to real cramps.
Variants
Only press against the thigh from the outside with the arm

Effects: (247) Shoulder joint: force for retroversion
Instruction
- Take the pose as described above, but do not grasp the raised leg with your arm. Instead, bend your arm at an angle of around 90°, keep it largely but not fully extended and press against the thigh of the raised leg from the outside with your arm.
- Place the other hand on the floor behind the pelvis and work with the corresponding arm to rotate the upper body beyond the leg.
Details
- maricyasana 3 is a pose that requires a lot of flexibility in various parts of the body – even more so than maricyasana 1, which is why many beginners are unable to reach around the leg or are unable to reach far enough behind the back to grasp their fingers. This variation is ideal for practicing the rotation of the upper body and applying sufficient strength.
With a belt

Instructions
- Take the pose as described above, but grasp a belt with both hands if the fingers on the back do not meet. The free hand pulls the hand grasping the leg backwards and downwards.
Details
- It is advisable to keep the arm pulling the hand gripping the leg stretched out rather than bent. On the one hand, this is more comfortable for the elbow joint and on the other hand, it avoids not being able to apply the full force of the triceps due to excessive sarcomere length, see the force-length function.
(P)
 | 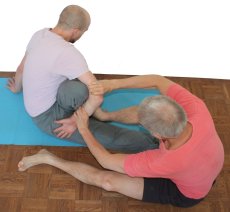 |  |
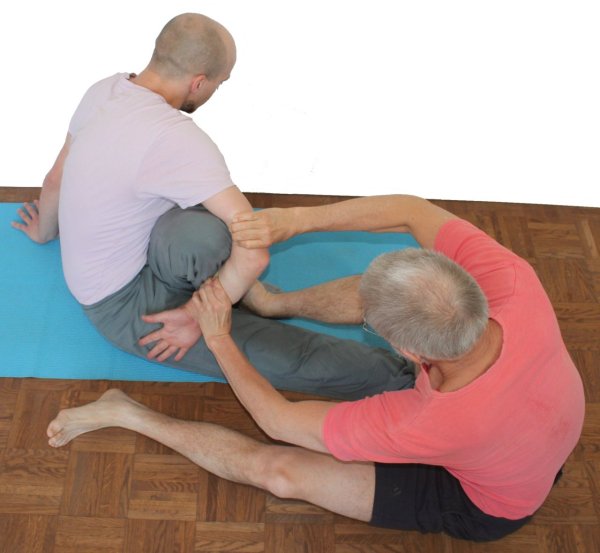
Instructions
- Sit with one leg straight and one leg up to build up the posture.
- Turn the upper body as far as possible over the raised leg and reach the arm of the supporter sitting in front of you to grasp the leg.
- The supporter then pulls the arm towards them until their elbow is clearly in front of the raised lower leg of the performer’s raised leg, then turn the arm in and then bend it at the elbow joint as soon as it is clear that the hand can be passed over the thigh of the extended leg.
- If necessary, the supporter then changes position to help the performer grasp the fingers of the other hand with the fingers of the hand gripping the leg. This may require the free arm to be pulled a little.
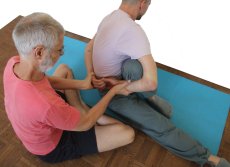
Details
- The success of the stance depends first of all on whether the elbow of the arm that is to grasp the leg reaches far enough in front of the lower leg so that the elbow can be bent far enough to grasp the raised leg. As a rule, a supporter can pull the arm further forward than the performer could push it there, even if they use the trick described in maricyasana 1, in which they pull the arm gripping the leg forward with their free hand. To do this, the supporter rests one foot on the lower leg of the upright leg and pulls with both hands on the arm that the performer is holding out to them. He then switches to the same upper arm with one hand to turn it in and the second hand guides the forearm around the leg with the elbow now bent. Once this is done, the supporter changes position to bring the hands together on the back, whereby one hand does not let go of the arm wrapped around the leg so that its position does not deteriorate.
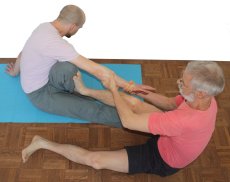
- If the performer tends to tip backwards because the hip extensors tilt the pelvis backwards too much, the weight plumb line is probably right on or just behind the ischial tuberosities. The supporter can then place one leg on the performer’s outstretched leg so that the performer can straighten the pelvis with the strength of the hip flexors without tipping backwards as would be the case without this. This does not hinder the development of the posture and safely prevents tipping over.
- To bring the performer’s hands together in the best possible way, the supporter sitting behind the performer’s back can pull on the shoulder of the free arm with one hand while pushing against the performer’s corresponding upper arm with his forearm to bring this arm closer to the arm gripping the leg. To prevent the upper body from being pulled backwards(dorsally) under the pull on the shoulder, the supporter supports the performer’s back with his head. With the other hand, the supporter pulls the elbow of the performer’s leg-grasping hand towards the hand of the free arm