parivrtta sukhasana
„Drehsitz“
 instructions and details with working links as PDF for download/print
Feedback: We’d love to hear what you think about this description, give us feedback at:
postmeister@yogabook.org
Last modified: 30.12.2018
Name: parivrtta sukhasana
Trivial name: sitting twist
Level: FA
- classification
- contraindications
- effects
- preparation
- follow-up
- derived asanas
- similar asanas
- diagnostics
- instructions
- details
- variants
classification
classic: sitting pose
Contraindication
Forceful rotation of the spine is contraindicated in
disc hernia.
Effects
- (212) Neck: strength for rotation
- (312) Strengthening the biceps
- (422) Strengthening the finger flexors (finger flexors)
- (512) Strengthening the pectoralis major
- (211) Neck: Stretching for rotation
- (226) Shoulder blade: stretching for retraction
- (227) Shoulder blade : strengthening for retraction
- (601) Stretching the trapezius
- (601) Stretching for rotation of the spine
Preparation
The twisting p ose is one of the simplest and most effective postures for rotating the upper body, also because the posture practises this in isolation and all the strength of the arms can be used for this. There are no real pre-exercises, but there are synergistic ones, e.g:
- parivrtta trikonasana
- parivrtta ardha chandrasana
- jathara parivartanasana
- maricyasana 1
- maricyasana 3
Wrap-up
derived asanas:
similar asanas:
Diagnostics (No.)
(650) Kyphosis and lordosis of the spine:
The deviations from the physiological double-S shape of the human spine become visible in this posture. There should be a certain degree of lordosis (convex spine from the front) in the lumbar and cervical spine and at best (see below) a small degree of kyphosis (convex spine from behind) in the thoracic spine. However, restrictions in flexibility, particularly of the monoarticular hip extensors, often lead to the pelvis tilting backwards and the physiological lordosis of the lumbar spine being cancelled out or even reversed. On the other hand, the thoracic spine can and should be extended beyond the physiological kyphosis. If this is not possible, there is hyperkyphosis of the thoracic spine. See also the FAQ.
(611) Unequal shoulder height/scoliosis of the spine:
The lateral deviations of the spine in the frontal plane known as scolioses are also visible in this posture. However, the posture must be performed precisely and evasive effects must be corrected, such as lateral flexion of the spine, which results, among other things, from one arm pulling down on the knee and thus the associated shoulder. See the FAQ for more information.
(704) Hip joint:
It is precisely the widely exorotated, abducted postures and movements that cause pain with existing hip damage
- Arthrotic change (degenerative with cartilage atrophy) of the joint
- Arthritis (joint inflammation) of various kinds
- Perthes‘ disease would classically react to this posture
- Dislocation / subluxation, which would cause a significantly increased sensation of tension in various muscles covering the hip joint
- joint trauma suffered, which may cause pain in the joint even after many weeks or months
The wrist of the pulling arm in palmar flexion can show various types of damage and weakness:
- Tenosynovitis of the tendons of the palmar flexors or finger flexors
- Carpal tunnel syndrome: occurrence of symptoms or worsening of symptoms in this position
- Fractures and fractures of carpal bones, especially the scaphoid bone
- Arthrotic change (degenerative with cartilage atrophy) of the joint
- Arthritis (joint inflammation) of various kinds
- Dislocation / subluxation, which would cause a significantly increased sensation of tension in various muscles covering the wrist joint
- Joint trauma, which may cause pain in the joint even after many weeks or months
but also purely muscular symptoms such as
- Shortening/hypertonus of the palmar flexors of the wrist and the finger flexors of the hand pressing on the floor or wall, which is noticeable by a clear stretching sensation
- Shortening of the dorsal flexors of the wrist or the finger extensors, which can cause a marked tendency to cramp on the back of the hand or in the dorsal wrist
- Golfer’s elbow: Strain pain at the point of origin of muscles on the medial (inner) side of the forearm in the transition to the upper arm
(884) Knee:
This posture reveals knee problems associated with wide stooping and the cross-legged position. These can be, for example: traumatic or degenerative meniscus damage, arthrosis, arthritis, subluxations, ligament damage, plica syndrome and others, see the FAQ, also generally on dealing with knee complaints in this type of leg position.
(312)(314) Biceps and other arm flexors:
Injuries to the arm flexors, especially the biceps or their tendons, can become noticeable in this posture. A shortening of the biceps in particular will also be noticeable here in a strongly irritating sensation in the tendon in the direction of the insertion in the forearm.
(602) Back extensors:
The strength endurance of the back extensors is evident in this posture. Except in the case of good flexibility of the monoarticular hip extensors and therefore good ability to straighten the pelvis and thus also to stretch the thoracic spine in a straight direction, the body’s internal resistance in the posture guarantees the need to stretch the back continuously and powerfully with the back muscles. Any tension, whether caused by posture, professional or other demands, scoliosis, hyperkyphosis of the thoracic spine or misaligned vertebrae, should become apparent here.
(751) Adductors: shortening
Shortening of the monoarticular adductors, which prevent the knees from sinking laterally and towards the floor in 90° flexion at the hip joint, is very evident in this posture. This desired movement includes both abduction and exorotation in the hip joint.
(754) Adductor muscles : Gracilis syndrome
In this pose, gracilis syndrome may present with pain at the origin of the adductors at the pubic bone. However, a pes anserinus syndrome associated with gracilis would not be noticeable due to the widely flexed knee joint.
Variants:
Instructions
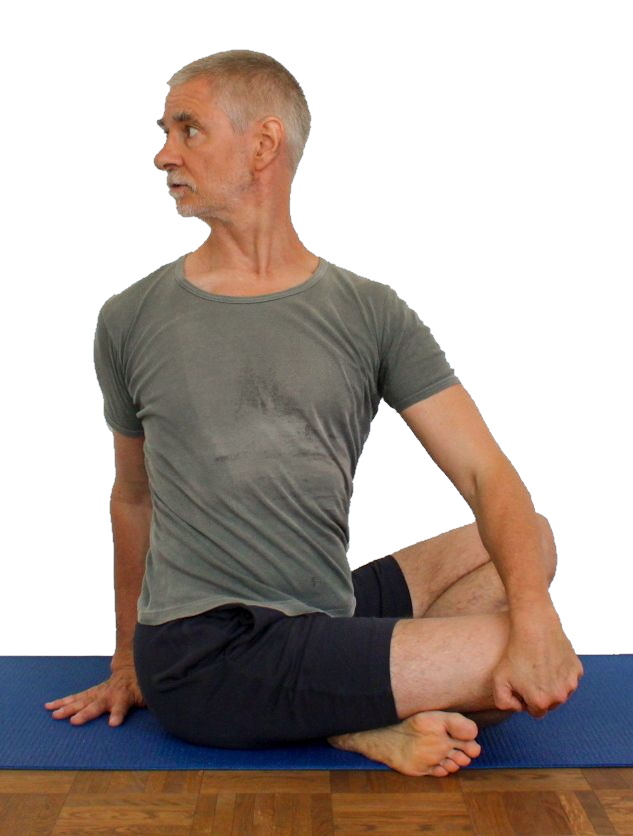
- Sit cross-legged.
- Turn your upper body to the right.
- Reach your left hand over your right knee and pull strongly to turn your upper body further.
- Place the right hand on the floor as far to the left behind the pelvis as possible so that the tendon of the middle finger on the back of the hand points in the same direction as the sternum when the upper body is maximally rotated.
- Push the hand against the friction on the floor with as much force as possible in the same direction as the sternum when fully rotated.
- Keep the pelvis upright using the hip flexors and stretch the upper body using the back extensors.
- Turn the head in the same direction as the upper body, but only with enough force to prevent the neck muscles from cramping.
Details
- Depending on the flexibility of the short extensors of the hip joint in particular (e.g. the gluteus maximus pomuscle) and only to a lesser extent the hamstrings, the pelvis tends to tilt backwards to a greater or lesser extent. It is only possible to keep the pelvis upright with good flexibility. Otherwise it is necessary to constantly work with the strength of the hip flexors to keep the pelvis as upright as possible. In some cases, it is advisable to sit on an elevation that is used in such a way that the pelvis almost slides forwards off it. This makes it much easier to keep the pelvis upright.
- The more forcefully the upper body is rotated, the more it wants to bend, i.e. the more the thoracic spine wants to kyphosis. This must be counteracted with the strength of the back extensors. The thoracic spine does not necessarily have to remain in its physiological kyphosis; it can also stretch further. However, a backward bend of the spine should be avoided just as much as hyperkyphosis (curvature more than normal).
- Together with the tendency of the upper body to bend kyphotically, there is a slight lateral tilt ( lateral flexion, especially of the thoracic spine). The shoulder whose same-sided hand pulls on the knee or pushes forwards on the floor will tend to fall in relation to the other, combined with a slightly laterally inclined thoracic spine. This must also be counteracted. Furthermore, the shoulder blades must remain pulled downwards, i.e. into depression. In particular, the shoulder blade, whose equilateral hand is on the floor, or in the variant against the wall presses on the wall, is often unconsciously pulled up a little.
- Depending on flexibility, the knee that is being pulled can move upwards under the pull. This is particularly the case when flexibility is poor and is a factor that is not easy to deal with, as strength is lost in order to turn the upper body. If, on the other hand, you try to pull the leg back down using the strength of the pomus muscles, this can lead to unpleasant tension. A reasonably useful way to avoid this is to pull on one foot instead of the knee, the opposite foot or lower leg is usually best suited for this purpose.
- Remain seated evenly on both ischial tuberosities.
- Experiment with crossing the legs/feet; one of the two options will result in a subjectively more stable posture.
- Pulling on the knee and the work of the arm whose hand is pushing on the floor can be performed with as much force as you like. This provides a good opportunity to strengthen the shoulder-arm apparatus. A large number of muscles are involved in pulling and pushing, including the biceps, deltoid, coracobrachialis, latissimus dorsi, pectoralis major, palmar flexors of the forearm and finger flexors.
- A tendency to cramp can occur in the palmar flexors of the forearm on the side of the pull on the knee. This can be counteracted before, during and after the posture with:
- The elbow of the arm pulling on the knee does not move outwards, but remains largely down but backward, so it stays close to the body.
- Depending on the proportions of the body, the hand that is supposed to touch the floor may not be able to do this because the arm is too short. In this case, use at least enough support, e.g. a block, so that the elbow can be slightly bent. The work of the biceps must be felt in the arm pushing forwards. The hand is pushed forwards (in the same direction as the sternum ) against the friction of the floor (the mat) using all available muscles. As the hand is fixed to the floor, the flexion of the elbow joint also causes the upper arm and shoulder to push backwards and therefore rotate more. At the same time, the front area of the deltoid and the pectoralis major work on this side. On the other side, the latissimus dorsi, a little of the biceps and the forearm muscles should be felt.
- The position of the hand on the floor results from the requirement that
- the arm should be able to transfer as much force as possible
- the position should be as physiological and side-effect-free as possible
- If you have golfer’s elbow, the pulling sensation in the knee can be painful if it is of the finger-bending golfer’s elbow type, so the pulling must be avoided. It may help to put a belt around the leg and wrap the end around the pulling wrist so that the finger flexors hardly need to be used.
Variants
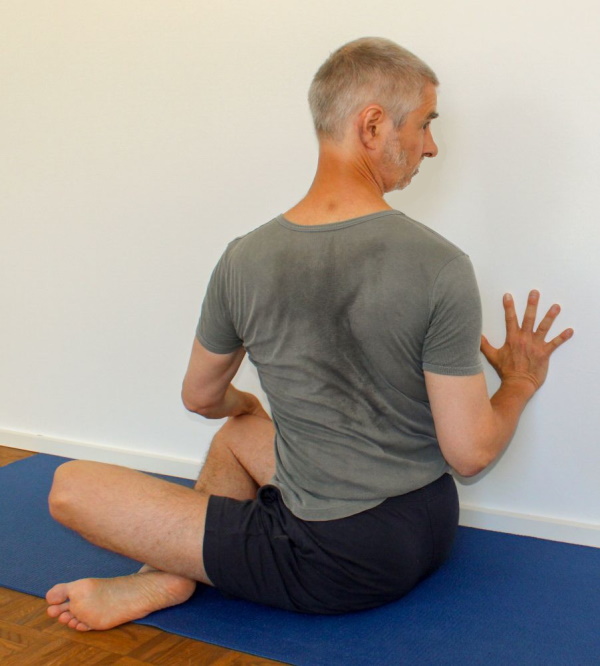
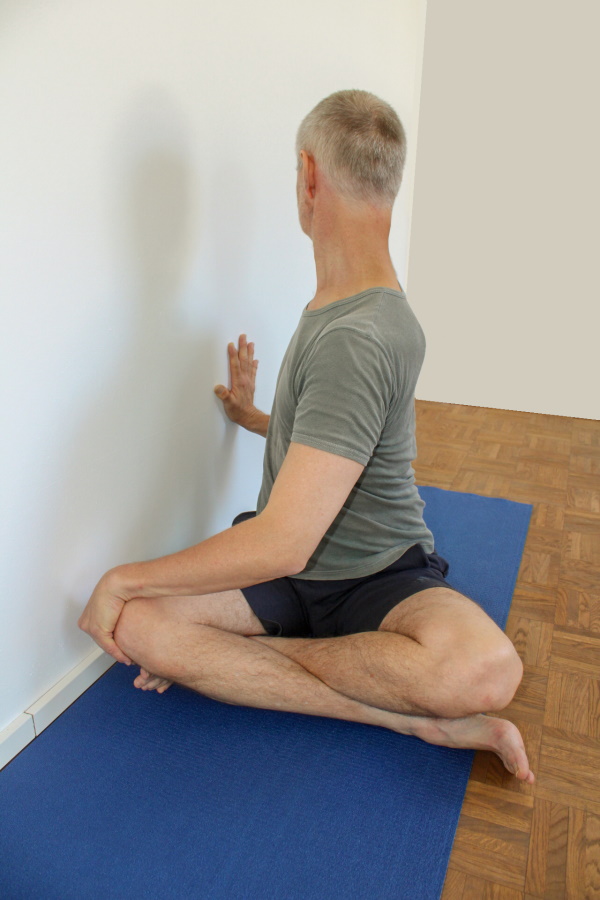
with wall
Detail photos
Instructions
- Take the pose as described above, but press one hand onto the wall behind your body, pointing upwards, instead of pushing it forwards on the floor.
- Press the hand firmly against the wall, push the hand up and forwards on the wall (in the direction of the other hand).
Details
- The pressure of the hand on the wall is three-dimensional: the upward pressure helps to keep the shoulder blade in depression and the shoulder at the same level as the other. The combined pressure against the wall and medially (in relation to the shoulder area) is a rough approximation of the tangent to the circle on which the force vector must lie for optimum torque.
- In this variation, the tendency for the thoracic spine to fall into lateral flexion and the shoulder blade of the arm pressing on the wall to be lifted is greater than in the basic pose.
With a block
Instructions
- Use the posture as described above, but do not place your hand on the floor but on a block lying next to the pelvis.
- Push your hand forwards with force.
Details
- Depending on the body proportions, it may be impossible, to place the wrist on the floor without tilting the upper body to the side. This difficulty affects many sitting giants. However, since the arm flexors work better according to force-length function, if the elbow joint is not extended but at least slightly bent, it is not enough to be able to place the wrist joint just above the ground. In these cases, the block is a good help. If it proves to be too slippery, for example with very dry hands, a friction agent such as a patch can be used on the block.
- Even when using the block, make sure that the elbowelbowjoint is bent backwards and the elbow remains close to the body.
- Sometimes using the block tends to lift the equilateral shoulder blade. Instead, keep it active in depression.
Sitting in an elevated position
Instructions
- Adopt the posture as described above, but sit on an elevation such as one or two shoulder stands.
Details
- People with less mobile short hip extensors tend to tilt the pelvis backwards in the hip joints, so that the pelvis is anything but upright and the upper body slouches all too easily. This is often impossible to control with your own strength and certainly not for the planned duration of the exercise. In this case, it helps significantly to reduce the mobility requirement by raising the pelvis in relation to the knees. The associated disadvantage is that the shoulders are also higher, so it is likely that the hand pushing forwards will have to be placed on a block.
- Also in those cases, in which hip flexor muscles such as rectus femoris or above all sartorius tend to spasm, raising the buttocks can alleviate the problem.
Free, without using the arms
Instructions
- Build up for the posture as described above, but omit the use of the arms and turn using only the strength of the upper body.
Details
- This variation achieves significantly less rotation of the upper body and therefore hardly any significant stretching of the rotator muscles, but considerably more strengthening of them.
(P) with wall

Instructions
- Take the pose against the wall as described above. If the performer has good flexibility, the supporter sits to the side of the pelvis; if the performer has less flexibility, the supporter sits to the dorsal side of the pelvis.
- The supporter pulls on the shoulder with the hand on the same side as the performer, whose opposite hand presses on the wall, and pushes the lower lateral edge of the shoulder blade towards the wall with the other hand. Pull and push must correspond.
Details
- Both the performer and the supporter are responsible for ensuring that the performer sits up straight and stops the frequently occurring errors and evasive movements:
- Pelvis tilting backwards (in less flexion in the hip joints)
- uneven height of the shoulders, which corresponds to lateral flex ion of the spine
- lateral flexion of the spine and reclination, lateral flexion or flexion of the cervical spine
- not completely depressed shoulder blades
- all types of deviation of the spine from the idealised vertical
- If the tension and pressure exerted are not equally strong, the performer’s spine is tilted from the vertical.
- If the performer can turn their shoulder line approximately parallel to the wall, the supporter should sit to the side of the pelvis.
- Thanks to the joint effort, very mobile performers may find that the arm pressing against the wall can be extended or even lose contact with the wall. This effect is reduced if the performer sits with the pelvis closer to the wall and turns a few degrees if necessary.