yogabook / asanas / ardha chandasana
Contents
- 1 ardha chandrasana„half moon“
- 2 Variants
- 2.1 Look towards the standing foot
- 2.2 unsupported
- 2.3 on the wall
- 2.4 with a block
- 2.5 Block in the hand
- 2.6 (S)
- 2.7 (S) on the wall
- 2.8 (P) On the wall: apply pressure to ASIS and turn leg
- 2.9 (2S)
- 2.10 (2S) on the wall: turn out standing leg, lift free leg
- 2.11 Details
- 2.12 (2S) at the wall: trunc and ASIS
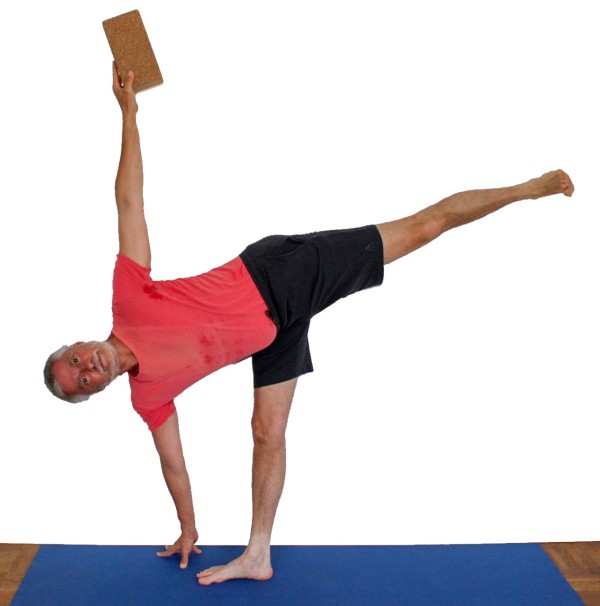
ardha chandrasana
„half moon“

 instructions and details with working links as PDF for download/print
detail images
As long as necessary for stability: look at the foot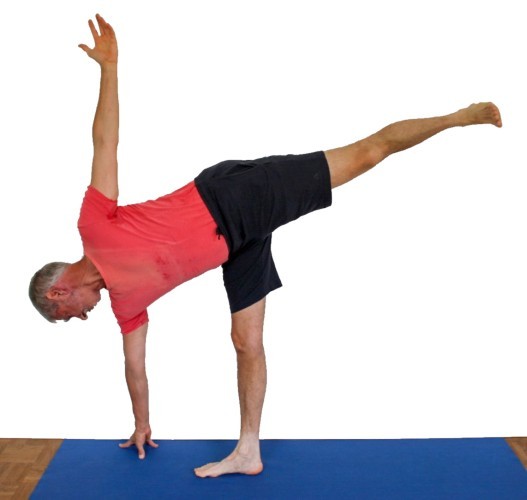 |
Feedback: We’d love to hear what you think about this description, give us feedback at:
postmeister@yogabook.org
Last modified: 30.12.2018
Name: ardha chandrasana
Trivial name: half moon pose
Level: FA
- classification
- contraindications
- effects
- preparation
- follow-up
- derived asanas
- similar asanas
- diagnostics
- instructions
- details
- variants
Classification
classic: standing pose
psychomental:
physiological:
Contraindication
A PHT prohibits wide tilting of the pelvis in the pose because of the intense stretching of the hamstrings that then occurs. Gracilis syndrome can, depending on how intensively the pelvis is turned away from the standing leg, trigger the corresponding pain, which must of course be avoided. In the case of pes anserinus syndrome, a distinction must be made as to which insertion of the four muscles attached there is affected. In the unlikely event that it is not the gracilis or the muscles of the inner hamstrings, but the sartorius, it may be possible to perform the exercise without any restrictions.
Effects
- (212) Neck: force for rotation
- (217) Neck: force for lateral flexion
- (247) Shoulder joint: force for retroversion
- (502) Strengthening the latissimus dorsi
as lateral flexor of the spine - (552) Strengthening the quadratus lumborum
- (602) Strengthening the erector spinae in all three dimensions of movement
- (677) Strengthening the oblique abdominal muscles obliqui abdomini
- (742) Strengthening the abductors of the upper hip joint
- (852) Strengthening the calves of the standing leg
- (857) Strengthening the gastrocnemius of the standing leg
- (862) Strengthening the supinators of the ankle
- (872) Strengthening the pronators of the ankle
- (211) Neck : rotation stretching
- (216) Neck : lateral flexion stretching
with gravitational lowering of the head - (721) Stretching of the hamstrings of the standing leg
- (751) Stretching the adductors of the standing leg
- (756) Stretching the gracilis of the standing leg
Preparation
The most important prerequisites are provided by a very related pose:
An important functional preparation for this pose is probably that of the muscles on the back of the legs. Practice for this:
- uttanasana as a generally effective and efficient stretch of the hamstrings to prepare for flexion in the hip joints in this pose
- prasarita padottanasana very similar to uttanasana
- parsvottanasana with a stretching intensity that goes beyond uttanasana
- pascimottanasana
- janu sirsasana
- tryangamukhaikapada pascimottanasana
- downface dog as another good preparation for the hamstrings when the pelvis is tilted powerfully
- hip opener 5 as a very effective stretch of the hamstrings that goes beyond uttanasana
- warrior 3 pose
- parivrtta trikonasana
In order for the lifted leg to come into elongation of the upper body in the sagitta direction (and therefore the hip joint to come into 0° only through the strength of the hip extensors ), the hip flexors of the side in question must have a certain minimum flexibility, prepare them with:
- hip opener 1
- hip opener 2
- warrior stance 1
- upface dog
- urdhva dhanurasana (back arch)
- ustrasana (camel)
and other backbends with extension in the hip joint. The next most important prerequisite is the abduction of the turned out lifted leg, which depends on the flexibility of the adductors, especially the gracilis. Practice for this:
- upavista konasana as by far the most important pre-exercise, as it challenges and promotes the flexibility of the gracilis in a very similar way to ardha chandrasana. Most of the other pre-exercises have no significant effect on the gracilis due to the bent knee, but only on the monoarticular adductors.
- warrior 2 pose
- caturkonasana
- parsvakonasana
- counter
- vasisthasana
- hip opener 4
- hasta padangusthasana
- supta padangusthasana
The preliminary exercises for external rotation in the hip joint:
- baddha konasana, also the forward bend and the supta variation
- supta baddha konasana
- half lotus forward bend
- hip opener at the edge of the mat
- hip opener 3
- warrior 2 pose
- caturkonasana
- parsvakonasana
- counter
One element of the pose is the sideways straightening (not sideways bend) of the back. Preparatory are:
The following active poses can help to stretch the back and reduce the kyphosis of the thoracic spine:
- „desk“ variation of uttanasana
- right-rectanluar uttanasana
- rectangular handstand
- warrior 3 pose
- warrior 3 pose, „backwards against the wall“ variation
- halasana
- upavista konasana in the variation „pull on the feet“
Passive poses to improve the ability to extend the thoracic spine are also good preparation:
Balance on one foot can be prepared with:
- warrior 3 pose
- vrksasana
- hasta padangusthasana
- hastapadangusthasana, „sideways“ variation
- eka pada prasarita (one leg raised)-variant of uttanasana
- eka pada prasarita tadasana
Finally, the rotation of the upper body can be prepared:
- seated twisting as a very effective and efficient exercise for twisting
- maricyasana 1
- maricyasana3 (subordinate, as it turns contralaterally)
- trikonasana
- parivrtta trikonasana (subordinate, as it rotates contralaterally)
- jathara parivartanasana
Follow-up
Derived asanas:
Similar asanas:
Diagnostics (No.)
(711) Hip flexors:
In ardha chandrasana, a possible incorrect angle of the raised leg in relation to the upper body in the sagittal plane (it remains too far forward despite intensive work of the extensors in the hip joint of the raised leg) indicates a shortening of the hip flexors, possibly also a hollow back that cannot be eliminated, in particular a dependence of the position of the lumbar spine on the position of the raised leg.
(293) Excessive tension in the trapezius:
The trapezius, which is significantly involved in the lifting and outward rotation of the shoulder blades, is probably one of the most tense muscles in Western civilization. Internal and external posture, including today’s widespread VDU workstations, contribute significantly to this. If the trapezius of the upper arm in ardha chandrasana shows a tendency to cramp after only a short time, excessive tension must be assumed.
(880) Hyperextension of the knee joint of the standing leg:
Overextension of the knee joint refers to the ability to or even the current state of an angle of more than 180° in the knee joint. To a certain extent, this is considered normal by anatomists and is on average more common and more pronounced in women. However, it can also indicate weakness of the quadriceps or hamstrings, which are possible causes. Furthermore, hyperextension often causes unphysiological sensations that are not caused by stretching or exertion of the muscles and should be avoided, see also the FAQ.
(650) Kyphosis and lordosis of the spine:
The deviations from the physiological double-S shape of the human spine are somewhat less visible in this pose than, for example, in urdhva hastasana, tadasana and other upright poses. There should be a certain degree of lordosis (convex spine from the front) in the lumbar spine and cervical spine and a certain degree of kyphosis (convex spine from the back) in the thoracic spine, but it should be possible to correct this in this pose, as well as in standing upright, by actively stretching. See the FAQ.
(751)(756) Gracilis and other adductors:
The main cause of the restriction in turning the pelvis away from the standing leg is the restriced flexibility of the adductors and, because of the extended knee joint, particularly of the gracilis. As a biarticular knee flexor and adductor, the gracilis is subjected to maximum stretching felt on the inner back of the knee of the standing leg with stretching pain, which would subside both by bending the knee joint and by turning the pelvis away from the standing leg less intensively. In addition to the gracilis and in all cases in which it is not clearly noticeable in this pose as well as in upavista konasana and ardha chandrasana, the other (monoarticular) adductors are responsible for the fact that the pelvis can only be turned away from the supporting leg to a limited extent. A side discrepance in the erecting (that is, turning away from the standing leg) of the pelvis in ardha chandrasana should be confirmed as a side difference in upavista konasana and indicates side-different flexibility of the adductors, which may be the cause of a pelvic obliquity, see the FAQ. Irritation of the tendons of the origins and attachments can also be noticeable, which manifests itself in pulling pain with an elongated course. These are insertional tendinopathies, e.g. gracilis syndrome or Promal Hamstring Tendinopathy (PHT).
(852) Calves:
In this pose, the calf muscles are significantly stressed; the further the load moves from the heel towards the balls of the feet, the greater the strength endurance demand on the calf muscles (the triceps surae). Due to the length of the sarcomere here, a tendency to cramp is rather unlikely. However, if calf cramps occur quickly, this often indicates a lack of strength endurance or a supply problem such as a lack of magnesium in the blood or poor circulation. Resting cramps, on the other hand, woule more likely to be due to a calcium deficiency than of magnesium. As a rule, this has nothing to do with calf cramps occurring at night, which are usually caused by any persistent extending movements (plantar flexion) in the ankle due to the current dream events.
The standing leg is in clear flexion in the hip joint, in addition, the hamstrings carry a significant load, therefore various disorders may be found there:
- Shortening of the hamstrings, see FAQ.
- Damage to the hamstrings that causes pain or functional limitations can also be easily recognized here, from simple tension to strains to partial or complete muscle tears. Tears could lead to a reduction in strength when leaving the pose quickly.
- Irritation of the sciatic nerve: irritation of the sciatic nerve, which innervates leg and foot, can become symptomatic during forward bends in particular, even if they are otherwise rather calm. FAQ.
- Irritation of the origin of the hamstrings at the ischial tuberosity (also known as Proximal Hamstring Tendinopathy PHT) will be clearly evident in this pose and requires protection from the intensive stretching that this pose demands; see the FAQ.
- Baker’s cysts create a feeling of tension or foreign body in the back of the knee, see FAQ.
(217) Weakness of the lateral neck muscles:
Weakness in the lateral flexor muscles of the cervical spine may be revealed here by premature exhaustion.
(742) Weakness of the abductor muscles of the hip joint:
If lifting or holding the leg to be lifted is limited, can only be held briefly or is perceived as strenuous, this may indicate weakness of the abductor muscles of the hip joint, including the gluteus maximus, tensor fasciae latae, lesser gluteae and parts of the dorsal hip musculature. A positive Trendenenburg sign or Duchenne sign indicates weakness of the lesser glutes. If both tests are negative, the ardha vasisthasana and vasisthasana can be used to test whether the pelvis can be held against the gravitational effect of a large partial body weight. If this is not possible or only possible with difficulty, this is a further indication of weakness in the abductors. If it is possible in ardha vasisthasana, a forced test is available with vasisthasana. However, it should be borne in mind that the wide lifting of the leg is heavily dependent on the flexibility of the hamstrings and the adductors of the hip joint. However, a drop in the pelvis even with a slight lift can still be interpreted as a sign of weakness in the abductors.
Variants:
(S) on the wall press ASIS plus lift leg
(2S) on the wall: ASIS and trunc
Instructions
- Stand in trikonasana, upper body to the right leg. Bend the right knee wide and place the fingertips of the right hand on the floor outside of the right foot.
- Draw the left foot in approx. 30-40 cm and place it back on the floor; it is sufficient to lower the metatarsophalangeal joint. Move the hand a little further, approx. 10-15 cm outwards and approx. three times as far forwards (away from the heel) so that it will be positioned roughly under the shoulder once the pose is taken.
- Carefully shift your entire body weight onto your right leg without letting your foot wobble.
- Slowly lift your left leg off the floor without any swing and lift it as far up as possible.
- Slowly straighten the right knee until the leg is fully extended.
- Turn the pelvis and chest as far up to the left, away from the standing leg, as possible.
- Turn out the left leg as far as possible so that the left foot is also pointing sideways and upwards as far as possible.
- Extend the left arm as far as possible to the left with the hand outstretched, lateralizing the shoulder blade as far as possible.
- Now also turn your head to the maximum upwards to the left.
- Turn out both arms to the maximum, so that the biceps and the inner elbow point towards the head (instead of the sternum or pelvis).
- The stability of the pose itself must not depend on the lower arm or its fingertips on the floor. Only when the arm is used to support the rotation and extension of the upper body does a dependency arise. As soon as the force exerted by the lower arm is reduced to zero, the pose must be stable again even without the fingertips on the floor.
Details
- Spread your toes as far apart as possible before starting the pose. In particular, make sure that the little toe is abducted as much as possible so that its underside is stretched and it is not curled sideways. This can also be recognized by a roughly horizontal toenail.
- Whenever you shift your weight while taking the pose, make sure that you do not jeopardize your balance, but that you perform the movements slowly and attentively enough to be able to react appropriately and calmly to changes in your centre of gravity. Of course, this applies in particular to movements in which the center of gravity is changed in the transverse direction of the foot, as the base of support is very narrow in this pose; therefore, „turning out/away“ the pelvis (anatomically speaking, abduction in the hip joint of the standing leg) is a movement that requires great attention.
- The phase of taking the the pose, when the body weight is shifted to the foot and the phase in which the knee joint of the support leg are extended require a special combination of attention and sustained use of strength. If the weight is shifted in the direction of the future foot, the ankle moves into more and more dorsiflexion. In the process, the soleus, which reaches the edge of its space of movement in this dimension of movement, generates an ever-increasing supinatory moment in the subtalar joint, which also becomes significant due to the load in its main direction of plantar flexion. As a result, the metatarsophalangeal joint tends to become lighter or even lift off. This makes a more significant use of the fibular group necessary. If the knee joint is slowly stretched, the soleus is then slowly released, the supinatory moment decreases, so that the use of the fibularis group must be reduced. With further and ultimately complete stretching of the knee joint, the fundamentally same phenomenon occurs again, this time induced by the gastrocnemius, which, depending on its flexibility, however, reaches a less extreme sarcomere length. Nevertheless, an additional supinatory moment will again arise in the subtalar joint, which must again and now permanently be balanced with work of the fibular group.
- Always keep the midline of the right foot pressed firmly and evenly onto the floor and of this, especially the front part of the foot (ball of the foot area). It is particularly important not to take the weight off the inner ball of the foot (MTP1, the ball of the big toe), but to apply good, sustained pressure so that the inner foot does not become lighter than the outer foot. After all, if you break this rule, you will almost always tip over onto the outside foot. It is also easier to react to changes in the center of gravity in a well-dosed manner if all parts of the foot receive equal pressure and the gravity perpendicular is on the midline of the foot.
- Keep the toes soft. Any use of the toes is likely to disturb the calm pressure of the balls of the feet. See also the FAQ.
- The lifted leg should turn out as far as possible in the hip joint.
- In the lifted foot, stretch the heel away instead of the ball of the foot, but not so forcefully that you can clearly feel the shin muscles lifting the foot.
- Stretch the upper body sideways; if you do not pay attention to this, the upper body will normally hang in a right (side) curve (lateral flexion of the spine). To prevent this, in addition to using the corresponding back muscles, it is also necessary not to support yourself too low on the floor with your right hand (relative to the flexibility in the hip joint). This usually means not placing your entire right hand flat on the floor, but only supporting yourself with your fingertips. This can also mean using a block to support the right hand.
- Turn both arms out, i.e. the inner elbows point away from the pelvis and towards the head, i.e. cranially.
- Extend the standing leg with calm, relaxed strength. Since small compensatory movements in the ankle joint are unlikely to be completely eliminated and the right hip joint is constantly straining to turn out, the knee joint would be the third unsteady joint on top of the other; this coordinative effort is likely to overtax the untrained human brain. Bending the knee joint creates two further degrees of freedom of movement: firstly, the straight-line flexion and extension of the knee joint, which is unlikely to be used for balancing, as extending against gravity requires a certain amount of effort and also takes some time due to the body’s inertia, and secondly, the movement of the knees inwards and outwards, which can be performed almost effortlessly and involves a combination of internal rotation in the hip joint and adduction or external rotation in the hip joint and abduction in the hip joint in conjunction with the counter-movements in the ankle joint. The muscle groups working here are strong enough to make these movements appear very easy, especially as the body’s center of gravity is hardly changed in height and only slightly in the horizontal. This means, however, that these movements are almost an invitation to balance. Of course, they should be avoided at all costs because they prevent the performer from learning to balance from the correct muscles.
- Try bringing the knee joint from a bent position, concentrating on the use of the quadriceps and its antagonistic muscles, the hamstrings, to a 180° angle, i.e. having both muscles, the front and back of the thigh, work against each other.
- Always turn out the thigh of the standing leg well; i.e. the outer groin moves backwards and the upper body stretches away from the outer groin towards the front. Otherwise the tendency to bend the upper body to the side would be increased.
- Always stretch the sternum away from the pubic bone so that the upper body stretches. However, the upper body does not go into a real backbend, but remains comparable to standard anatomical position, if possible with a removed thoracic spine kyphosis. Take particular care not to bring the lower back into a backbend, while the middle back stretches beyond standard anatomical position in the direction of straight (removing the thoracic spine kyphosis) or can also be brought into a real backbend for exercise purposes if this does not cause an unpleasant hollow back feeling in the lumbar spine. In any case, „move your bottom away from your back“.
- Make sure to stretch the arms sideways away from the upper body (lateralization of the shoulder blades), i.e. in particular to move the left arm upwards from the flank; this helps to counteract the frequent tendency to cramp in the trapezius, especially if the arm is carefully turned out.
- Stretch the fingertips of the left hand towards the ceiling, stretch the joints of the fingers and hand wothout hyperextending them with force.
- In the pose, there is usually a clear stretch of the gracilis on the inner back of the knee of the standing leg, which increases when the pelvis is turned out and when the pelvis tilts further sideways towards the standing leg. This stretching is a normal part of the pose and must be well dosed. Dosing is made more difficult if the knee is not permanently stretched. This stretch can only occur in poses with the knee extended. In addition to this pose, a comparable stretch can also be found in trikonasana, upavista konasana, vasisthasana, hasta padangusthasana sideways, supta padangusthasana sideways and hip opener 4. In upavista konasana and trikonasana, the stretch is somewhat easier to control than in ardha chandrasana. Those who have significant difficulties (old injuries, acute irritations) in this muscle may be better served by practicing these two poses for a longer period of time before starting to practice ardha chandrasana.
- Support yourself with the fingertips on the floor very lightly but firmly enough so that there is enough friction to support the upper body in its twisting movement with the strength of the arm. Any unnecessary pressure on the fingertips takes weight off the standing leg and distracts from the need to work well there. Furthermore, when two parts of the body are on the floor (foot and fingertips in this case), poses in which the gravity perpendicular is under one of the two body parts and not between them are much more stable, as the kinetics of all the other body parts play a much smaller role in the former case than in the latter.
- Try to push the hand resting on the ground diagonally backwards: in the direction of the heel and simultaneously out of the field of vision to the rear. In contrast, in parivrtta trikonasana and parivrtta ardha chandrasana, the hand is also pushed dorsally out of the field of vision, but this is towards the foot instead of away from the foot. There should be no movement against the friction of the mat or floor, but the resulting effort should support the pose of the upper body: the component of movement
- in the direction of the pelvis (lateral adduction in the shoulder joint), i.e. parallel to the longitudinal axis of the body, helps to stretch the upper body (eliminating lateral flexion of the spine).
- in the direction out of the field of vision (retroversion in the shoulder joint), i.e. transversal to the upper body, helps to rotate the upper body.
The fingers are only slightly spread apart and point 180° in the direction of the force exerted so that this does not lead to valgus or varus stress in the finger joints. In this position, the finger flexors transmit the force exerted as far as possible and the finger joints are not stressed.
- in the direction out of the field of vision (retroversion in the shoulder joint), i.e. transversal to the upper body, helps to rotate the upper body.
- in the direction of the pelvis (lateral adduction in the shoulder joint), i.e. parallel to the longitudinal axis of the body, helps to stretch the upper body (eliminating lateral flexion of the spine).
- In the full pose, the head is turned upwards as far as possible. However, this requires a longer familiarization and practice phase. Be rather defensive with the rotation at first to prevent a very unpleasant sternocleidomastoid muscle soreness, which, in addition to the extensive inability to rotate the head, can bring a certain feeling of sickness, as this muscle is located directly next to the cervical lymph nodes, which can be affected in some viral infections, possibly causing a false feeling of sickness if you have already experienced an infection involving them. As long as it is necessary for standing stable, look to the foot. After all, the neurological feedback of one’s own balancing work via the eye is incomparably faster (there is a two-digit factor between the nerval conduction time via the optic nerve and that from the foot to the brain) than via the pressure sensors of the foot. The first step beyond this is to look freely straight ahead, i.e. in the direction in which the sternum is pointing, before turning the head upwards as far as possible in the final step.
Known problems that can occur even when performed correctly
Lower back
In cases where the autochthonous back muscles are not very robust, they may be exhausted relatively quickly with the holding work in terms of compensating for the tendency to lateral flexion and develop a tendency to cramp, in rare cases even lumbago, especially as some of their parts are also involved in turnung the upper body and preventing flexion.
Variants
Look towards the standing foot
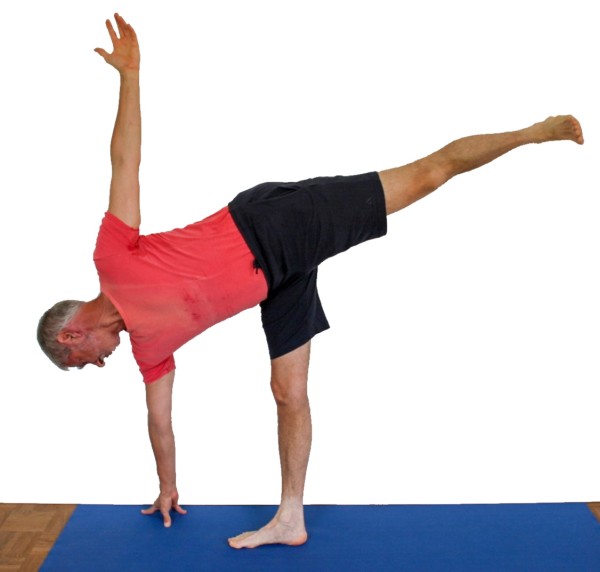
Instructions
- Take the pose as described above, but look towards the the standing instead of upwards.
Details
- Many people find this variation much easier than balancing with their head turned upwards. This is mainly due to the very fast neurological feedback from the eyes, which have a much shorter nerval conduction time than the foot’s pressoreceptors and other aspects of peripheral proprioception.
unsupported

Instructions
- Take the pose without placing the fingertips of the lower hand on the floor.
Details
- This variation requires more strength in the lateral flexor aspect of the autochthonous back muscles and the oblique abdominal muscles due to the lack of support, but above all the possibility of using the lower arm to promote the rotation and extension of the upper body is lost, which places greater demands on some muscles of the oblique system of the autochthonous back muscles in two ways. Basically, this can become an excessive demand on these muscles. So keep an eye on your tone and reduce the intensity if necessary.
known problems that can occur even when performed correctly
Lower back
In cases where the autochthonous back muscles are not very robust, they may be overtaxed relatively quickly with the holding work in terms of lateral flexion and develop a tendency to cramp, rarely also lumbago. The tendency is greater here than in the supported variant.
on the wall
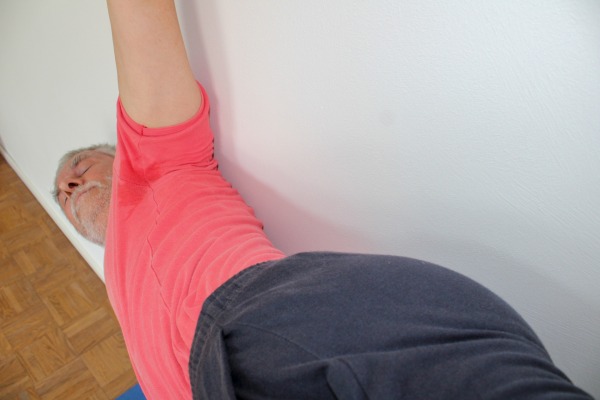
This variant allows beginners in particular to concentrate on some important details without the constant threat of tipping over.
Instructions
- The set-up is the same as described above, but stand 10-15 cm away from the wall, parallel to it, with your outer foot facing the wall. Lean against the wall with your bottom and back and, if possible, your upper shoulder.
Details
- Do not neglect the work in the inner leg and lower leg, but use the calmness and security that this variation provides to improve these parameters. The focus in this variation can often be on many parameters, such as turning the pelvis and chest or stretching the upper body. However, do not neglect the lower leg and supporting leg work, as these are the most important prerequisites for this pose. In this variation, there is no risk of overemphasizing these parameters, which could jeopardize the execution of the pose by tipping over.
- In this variation, the rotation of the ribcage can be practiced and checked particularly well by trying to get the upper shoulder against the wall while moving the lower shoulder away from the wall. The latter is primarily the result of good work in the lower arm, which pushes the hand towards the wall against the resistance of the floor, resulting in the shoulder moving in the opposite direction, i.e. away from the wall.
- In rarer cases, a hypertonicity of the muscles of the lower back occurs in ardha chandrasana. This variation hardly has this effect.
- The distance between the standing foot and the wall should be approx. 10-15 cm – not least depending on the volume of the bottom – so that on the one hand a secure stance is achieved and on the other hand the gravity perpendicular is not too far away from the foot, which would make the work in the lower leg too different from that of the actual pose.
- Trying to move your upper back towards the wall can quickly lead to a hollow back. So move the buttocks away from the back, which corresponds to less flexion in both hip joints.
with a block
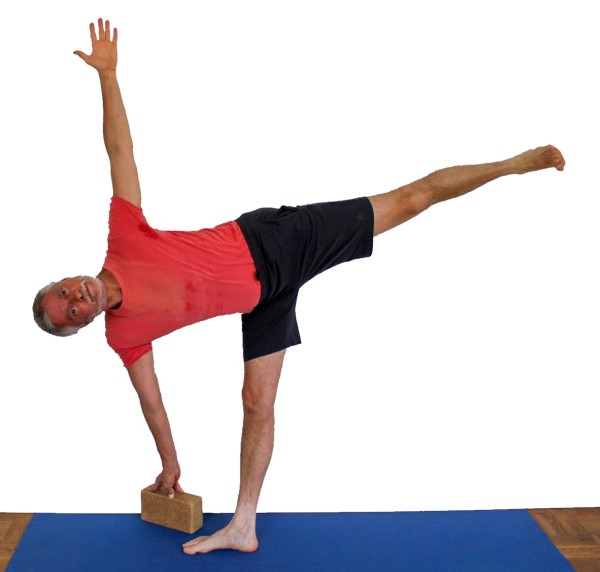
allows beginners and less flexible people to perform the pose more safely.
Instructions
- Take the pose as described above, but place your fingertips on a block rather than on the floor.
Details
- Since a steady position of the fingers on the floor is very helpful for a safe execution of the pose, but in many cases the flexibility of the hip joints is restricted and therefore the placement of the fingertips is restricted or prevented by stretching pain in the standing leg, you have to „bring the floor closer“. In order to bring the fingertips to the floor, the upper body is often brought into a lateral bend. The use of the block should generally eliminate the need to do this.
- As the block generally has three different edges, three different heights of support can be achieved here, and others can be achieved by placing one or more blocks flat under the top block.
- As the fingertips are dragged diagonally backwards and out of the field of vision, i.e. towards the heel, which in this combination results in a better extension of the upper body (the part pushing parallel to the outer foot) and a better rotation of the upper body (the part pushing out of the field of vision), it may be advisable to align the block accordingly. Align the only slightly spread fingers 180° to the force exerted, as in the basic pose.
Block in the hand
Instructions
- Take the pose as described above, but hold a block or a light dumbbell in your upper hand.
Details
- The object in the upper hand serves to provide much better feedback on the position of the arm and possibly also the rotation of the upper body via its weight or leverage. This applies in particular to the movement dimension „forwards“ (i.e. in the direction of the field of vision) or „backwards“, i.e. out of the field of vision. Moving the arm backwards beyond the plane of the back is reasonably easy with average flexibility, so that it often occurs as a surrogate movement instead of rotation of the upper body. In special cases, it may actually be advisable to move the arm backwards as far as possible, for example if you want to achieve better flexibility of the pectoralis major. In general, however, it is all too often a distraction from insufficient or submaximal rotation of the upper body. If a heavier object (such as a small dumbbell) is used instead of a block, the leverage effect (proportional to the weight) becomes greater from the vertical according to the sine function, so that large and pose-destabilizing effects may quickly occur once the arm has exceeded a certain angle to the vertical. In particular, if weight is used carelessly and the arm is moved significantly backwards with this weight, there is a tendency to tip over backwards. Instead, tension on the pectoralis major and pars clavicularis of the deltoid must be used to try to convert the lever into a rotational movement of the upper body.
(S)

Instructions
- Take the pose as described above. The supporter stands behind the performer and, if necessary, supports the performer’s pelvis with their hips in case the performer does not have a particularly secure stance or their stability is impaired too much by the support. The supporter pulls the upper shoulder towards them with one hand while pushing the lower shoulder blade away from them with the same force with the other.
Details
- The force used to pull must correspond to the force used to push and the directions are exactly opposite. The time so start to apply the force and its increase must also be the same so as not to jeopardize the stability of the pose. Any imbalance would tip the performer forwards or backwards. Note that the lever arm of the pull is greater than that of the push and pulling is easier than pushing.
(S) on the wall
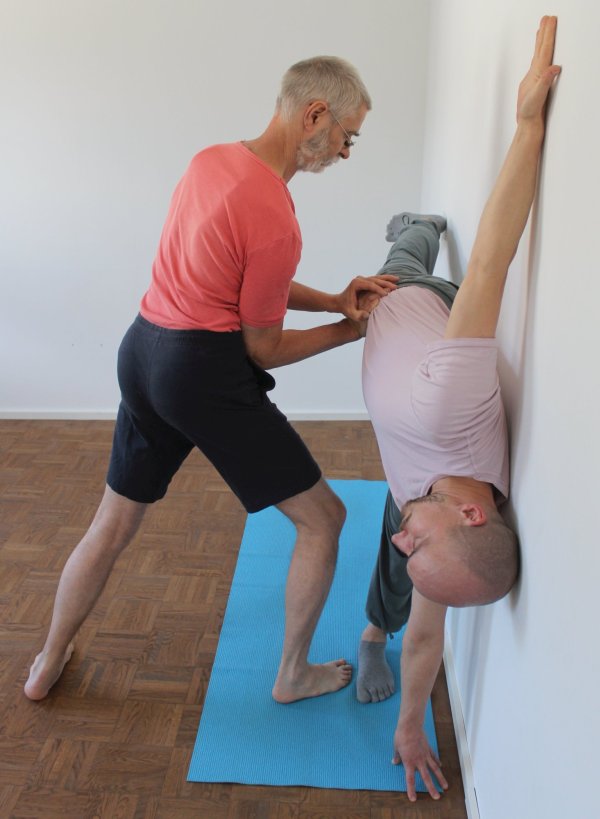
Instructions
- Take the variation on the wall as described above.
- The supporter grasps the performer’s lower flank past the shoulder blade on the same side to pull it towards him and at the same time pushes the upper shoulder at the acromion away from him with the other hand to turn the performer’s upper body more.
Details
- As in the previous variations with the supporter, the supporter stands with his pelvis sideways to the performer, facing the performer’s head and upper body. This allows him to turn the performer’s upper body and monitor the action.
- The pull on the shoulder blade should not be greater than the pressure on the acromion.
(P) On the wall: apply pressure to ASIS and turn leg
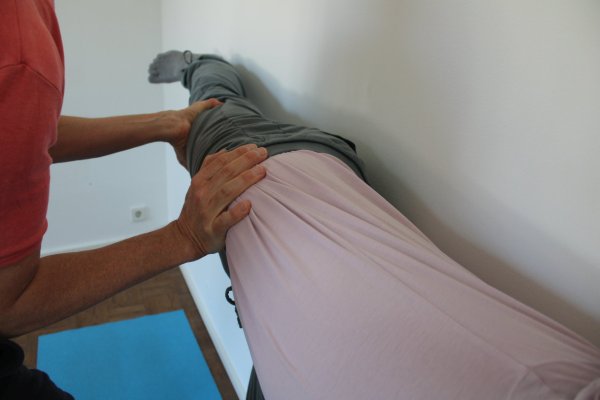
Instructions
- Take the pose against the wall as described above.
- The supporter presses on the upper ASIS with the same sided hand and turns the leg out with the other hand and tries to lift it further.
Details
(2S)

Instructions
- Take the described above with a supporter, i.e. the supporter turns the upper body and supports the performer’s pelvis from behind.
- The second supporter lifts the lifted leg to the maximum, turns it out to the maximum and moves it backwards to the limit of the available extension in the hip joint. Then check the extension in the knee joint of the lifted leg.
Details
- The force applied by the second supporter must be applied with particular care, as all components of the correction can jeopardize stability:
- Lifting the leg creates more stretching in the performer’s standing leg and tilts him towards his forefoot.
- Turning the leg out is also not completely without effect on stability, even if it is more subtle: it tilts the upper body slightly backwards. The resulting movement may be smaller, but it acts transversely to the longitudinal direction of the foot and can therefore also be serious due to the narrow physical base of support.
- Of these three, the movement of the lifted leg backwards is the most direct threat to stability because, due to restricted flexibility of the hip flexors, it leads directly to a shift in mass and center of gravity transverse to the main alignment of the base of support. This pushes the latter in the direction of the outer foot, to which,if the pose is not executed precisely, the gravity perpendicular is often already too close anyway, so that there are hardly any reserves left for balancing.
- The first supporter can limit the effects of the second supporter’s intervention somewhat, especially if he supports the performer’s pelvis with his hips.
- If there is a lateral curve in the upper body (lateral flexion of the spine) such that the spine is convex when viewed from above, this is usually corrected slightly by lifting the leg. If it is to be corrected beyond this, a support or a higher level of support under the fingertips than that provided must be considered.
(2S) on the wall: turn out standing leg, lift free leg

Instructions
- Use the variation with one supporter against the wall as described above. The second supporter stands next to the lifted leg to lift it further (abduction in the hip joint), turn it out, press it against the wall, i.e. extend it in the hip joint and straighten it in the knee joint. If possible, the heel should be pressed against the wall, which automatically stretches the knee joint more with the pressure against the thigh.
Details
- This is a fairly complete support for ardha chandrasana.
- The supporter who lifts the raised leg further must be careful not to tilt the performer too much towards the hand on the floor. The tendency to do so also depends on the pressure that the first supporter exerts with his pelvis or flank against the performer’s pelvis. He must also proceed with caution, as any further lifting of the leg usually leads directly to an increase in the stretching sensation in the gracilis of the standing leg.
(2S) at the wall: trunc and ASIS
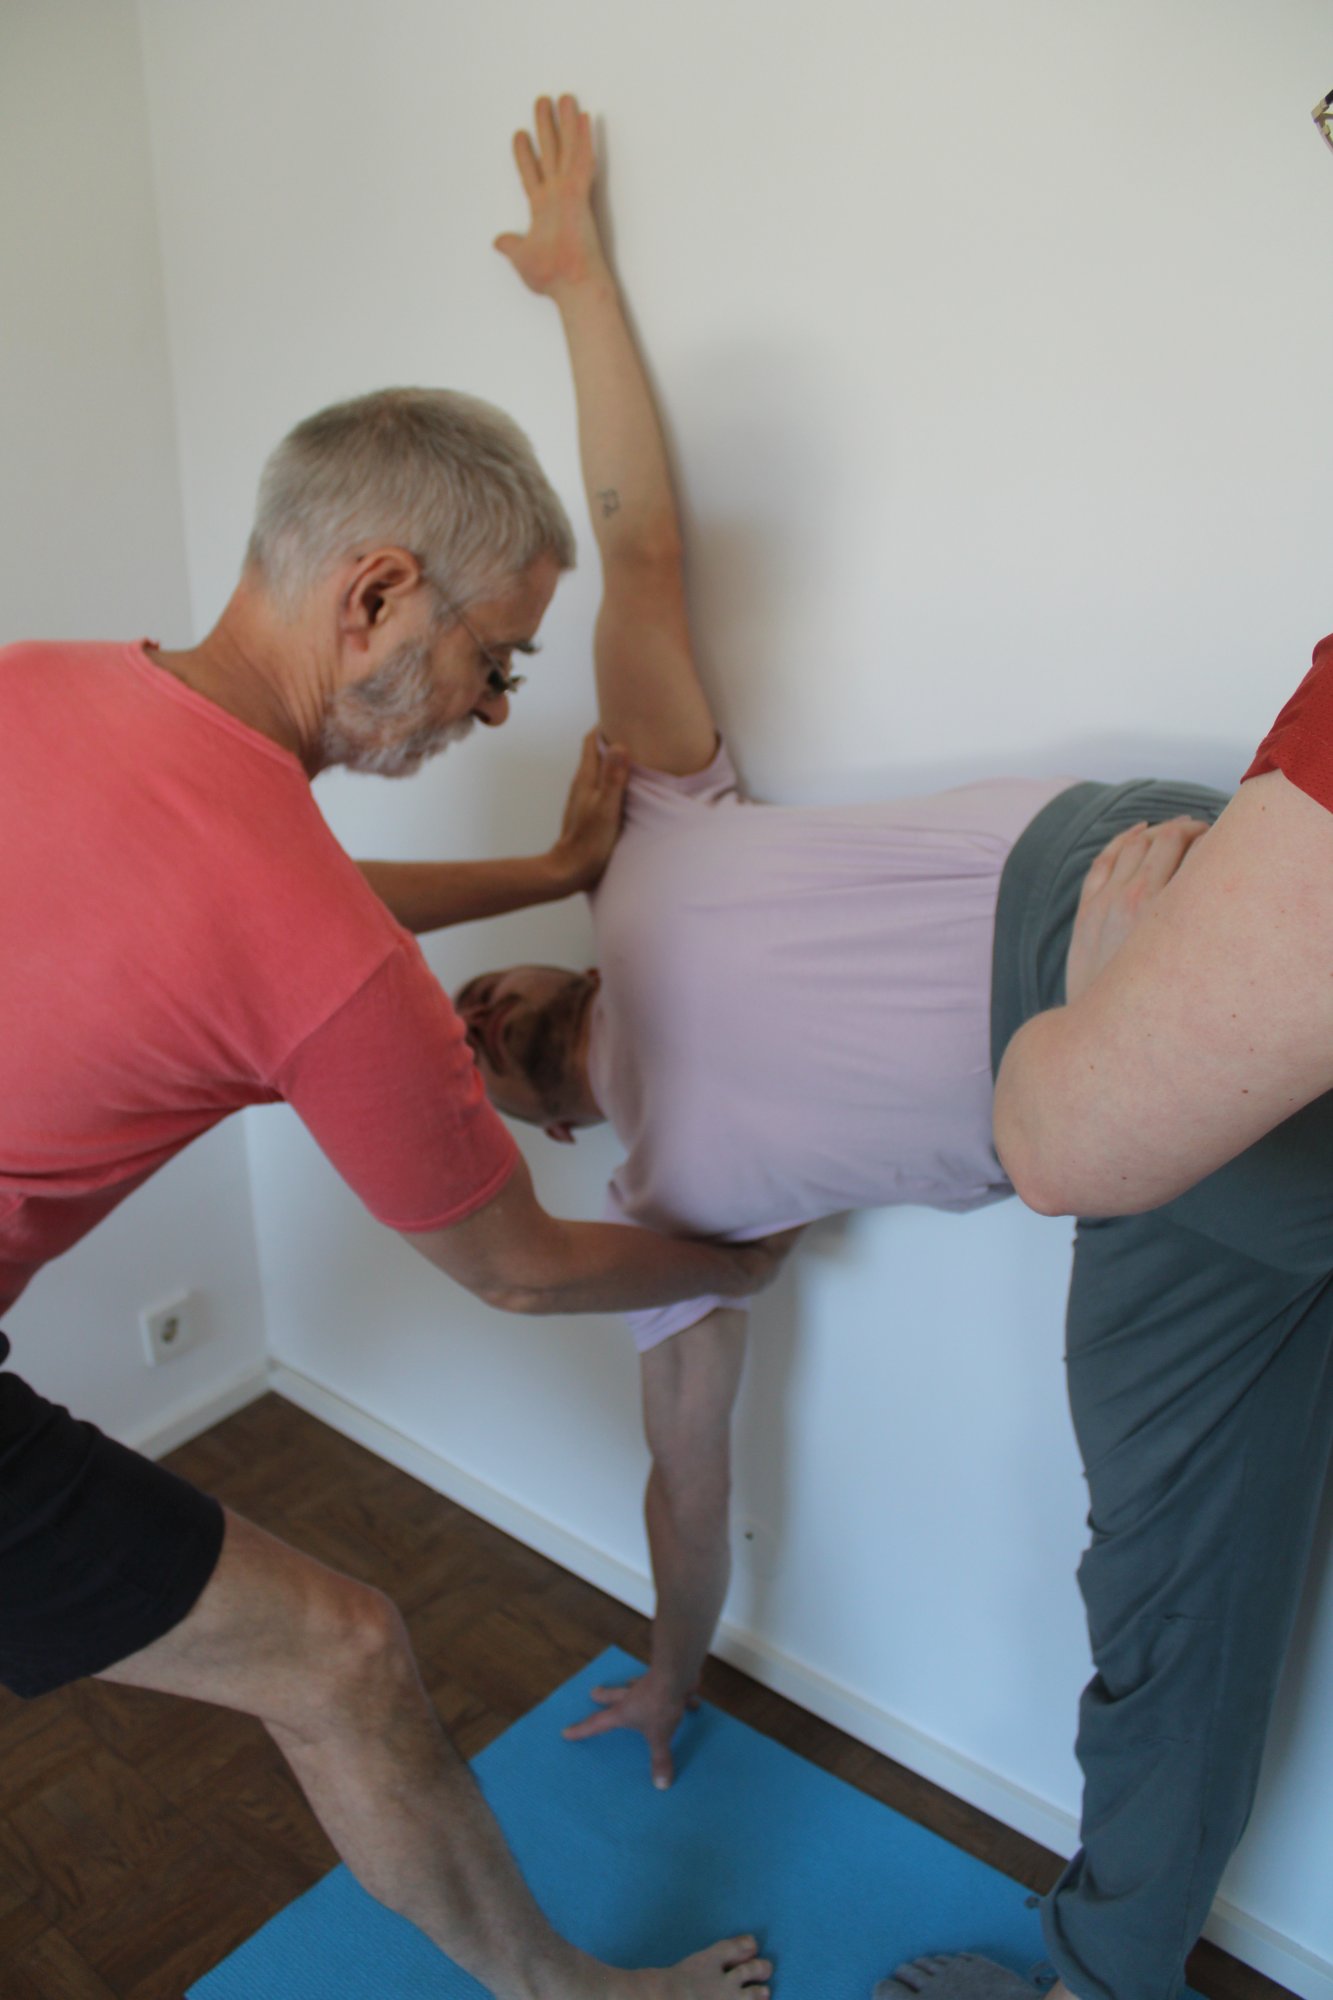
Instructions
- Take the pose against the wall as described above.
- The first supporter presses on the upper ASIS as described here, the second turns the upper body as described here, but this time he stands in front of the upper body instead of behind the back.