yogabook / asanas / hip opener 4 – lateral half split
„hip opener 4 – lateral half split“
 instructions and details with working links as PDF for download/print
do and don’t
keep the hip up |
detailed images
step 1: turn the thigh | step 2: turn the lower leg | step 3: turn the foot | step 4: turn with both hands |
Feedback: We’d love to hear what you think about this description, give us feedback at:
postmeister@yogabook.org
Last modified: 30.12.2018
Trivial name: hip opener 4 – lateral half split
Level: FA
- classification
- contraindications
- effects
- preparation
- follow-up
- derived asanas
- similar asanas
- diagnostics
- instructions
- details
- variants
Classification
classic:
physiological: hip opening
Contraindication
A PHT prohibits performing the pose due to the intensive stretching of the hamstrings, especially if the side-lying leg is moved towards the head with a certain intensity. However, it will usually be possible to find an angle at which the pain characeristic for PHT is not triggered simply by stretching the adductors. Gracilis syndrome is generally an absolute contraindication. In the case of pes anserinus syndrome, a distinction must be made as to which insertion of the four muscles attached there is affected. If it is not the
gracilis, it may be possible to perform the pose.
Effects
- (322) Strength to supinate the forearm
- (721) Stretching of the hamstrings
- (751) Stretching of the adductors
- (756) Stretching of the gracilis
Preparation
One of the most important preparations is to stretch the back of the leg (hamstrings), the further forward the side leg is, the more:
- uttanasana as a generally effective and efficient stretch of the hamstrings to prepare for flexion in the front hip joint in this pose
- prasarita padottanasana very similar to uttanasana
- parsvottanasana as a stretch that goes beyond uttanasana
- pascimottanasana
- janu sirsasana
- tryangamukhaikapada pascimottanasana
- downface dog as another good preparation for the hamstrings when the pelvis is tilted powerfully
- hip opener 5 as a very effective stretch of the hamstrings that goes beyond uttanasana
- warrior 3 pose
- trikonasana
- parivrtta trikonasana
Until the stages in which this pose approaches the forward split, the flexibility of the biarticular adductor gracilis is an important issue; prepare with:
Depending on individual flexibility, not only the gracilis, but also its monoarticular adductor synergists should be warmed up:
- baddha konasana
- supta baddha konasana
- adho mukha supta baddha konasana
- warrior 2 pose
- parsvakonasana
- counter
- caturkonasana
In many cases less important, but in later stages, if they are still rather immobile, the short extensors of the hip joint should also be prepared, as the front hip joint is in sharp flexion.
- half lotus forward bend
- hip opener at the edge of the mat
- hip opener 3 (front leg)
- parivrtta trikonasana (with bent front knee and dropping hip)
- parivrtta ardha chandrasana
Follow-up
Normally, the glutes do not need any follow-up treatment even after a long pose. However, if they have contracted uncomfortably during the pose, this can help:
- half lotus forward bend
- hip opener at the edge of the mat
- hip opener 3
- parivrtta trikonasana
- parivrtta ardha chandrasana
Derived asanas:
Similar asanas:
Diagnostics (No.)
Various disorders can be detected at the latest when the leg that is placed sideways can be moved further forwards and the load shifts more to the back of the leg (the inner parts of the hamstrings):
- Shortening of the hamstrings, see FAQ
- Damage to the hamstrings that causes pain or functional limitations can also be easily recognised here, from simple tension to strains to muscle (attachment/detachment/tear). Tears would lead to reduced resistance to movement in the posture.
- Irritation of the ischiadicus nerve, which innervates the leg and foot, can become symptomatic, especially in forward bends, even if they are otherwise rather calm. See the FAQ.
- Irritation of the origin of the hamstrings on the ischial tuberosity (also known as PHT: Proximal Hamstring Tendinopathy) will become quite apparent in this pose and require protection from the intensive stretching that this pose demands.
- Baker’s cysts create a feeling of tension or a foreign body, see FAQ.
This pose stretches the adductors. This can be used to recognise damage to them:
- Shortening.
- Irritation of the tendons at the origins and insertions, which manifests itself in pulling pain with an elongated course. These are insertional tendinopathies, e.g. gracilis syndrome, when the pain occurs at the origin of the adductor muscles on the pubic bone, or pes anserinus syndrome, when it occurs at the insertion on the pes anserinus at the pes anserinus.
- Tension that causes an agonising sensation in the muscles that goes far beyond normal stretching.
- Muscle (complete or partial) tears of adductor muscles, which make a loud noise in the event of a tear and may be followed by haematoma formation and swelling; previous tears may cause an increase in flexibility, which can be seen above all in a lateral comparison.
- side discrepancies in flexibility that can cause pelvic torsion as far as the hamstrings or other hip extensors are concerned or, less visible in this pose, the hip flexors. If it affects the adductors, this can result in pelvic obliquity.
It the leg is the widely turned out, abducted poses and movements can trigger pain with existing hip damage.
- Arthrotic/osteoarthritic change (degenerative with cartilage atrophy) of the joint
- Arthritis (joint inflammation) of various kinds
- Perthes‘ disease in children or hip dysplasia in general can react to this pose
- Dislocation / subluxation, which would cause a significantly increased sensation of tension in various muscles covering the hip joint
- Joint trauma suffered, which may cause pain in the joint even after many weeks or months
(884) Knee:
Even if the pose requires the lateral leg to be extended and turned out, damage to the knee joint can be found here in rare cases. These can be, for example: traumatic or degenerative meniscus damage, arthrosis, arthritis, subluxations, ligament damage, plica syndrome, Hoffa syndrome (of the extended leg) and others, see also the FAQ. If the leg is still more to the side of the pelvis, this results in a certain degree of varus stress, which can cause pain in the event of damage to the inner meniscus, for example.
Variants:
Instructions
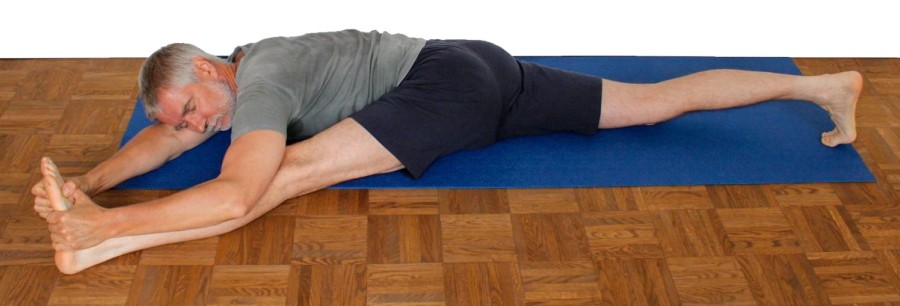
- Lie in a prone position.
- Pull the right leg outwards and forwards as far as possible, turning it out as far as possible.
- Push the leg to the side in its own direction away from the pelvis.
- If you have good flexibility, turn the leg out as far as possible with the ipsilateral arm with the hand on the lower leg or foot and later pull the leg further and further forwards towards the head.
Details
- The leg placed sideways should turn out as far as possible. The further the leg can be moved forwards towards the head, the further it can turn out. The heel remains on the floor and the forefoot lifts as far as possible. If you have good flexibility, you can reach towards the lower leg or even the foot with the ipsilateral hand in order to turn out the leg further from there. The hand then grasps the inner edge of the foot and supports the leg’s external rotation by supinating the forearm. As supination is performed by strong muscles, including the biceps brachii, sufficient strength is available here. In cases of very good flexibility, both hands can turn the leg out from the foot side, the second hand then reaches over the first, also to the inner foot, and supports with pronation of the forearm.
- Push the leg that has been placed sideways away from the pelvis in its own direction, bringing the associated hip closer to the floor and moving the leg further into (turned out) lateral abduction. Ideally, the pelvis would lie flat on the floor.
- At the limit, this pose transitions into the forward split. It therefore represents a gradual transition from lateral splits to forward splits. In line with the character of the side splits or its precursor, upavista konasana, it usually begins with the stretching of the adductors, in particular the gracilis due to the stretched knee joint, whereby the hamstrings does not yet play a very significant role because the leg cannot be pulled towards the head with much force. The more flexibility improves and the leg can be pulled more towards the head and turned out, the more the pose changes to a – later pure, aside from the flexors – stretching of the hamstrings. The stretching of the adductors is then no longer part of the pose. As the legs are then in a 180° scissor, the sum of the extension and flexion in the hip joints must be 180°, which means that the more restricted one group is, the greater the demand on the other. In practice, the limited possible extension will generally be a major issue. The position of the pelvis, i.e. the angle in relation to the vertical, results from the relationship between the flexibility of the two groups. In most cases, the pelvis will be relatively flat to the floor and slightly upright towards the vertical.
- The back leg lies loosely on the floor in this position. It cannot be assigned an exciting task, unless you want to increase the demand on the extension capability in the event of (at least approximate) success of the forward splits by placing the back foot on the floor with the dorsiflexed toes and the back leg extended. For the stages in which the sideways movement still plays the dominant role, however, the rear leg is irrelevant.
- The upper body lies loosely and comfortably on the floor. The arms can support the head as long as they are not involved in turning out the leg.
- In the sideway leg (later the front leg), don’t just straighten the knee but turn out the leg as far as possible. It is important to avoid the leg doing the opposite in both cases at the same time: turning in and bending, as this is unphysiological for the knee due to the rotational moment (with the foot gripped) and valgus stress and may cause pain. When the knee is precisely extended, the collateral ligaments largely cancel out the rotational moment and valgus stress; the best possible exorotation in the hip joint also shifts the direction of the force acting on the knee joint in the physiological anterior-posterior (saggital) direction.
- Stretch the heel of the lateral leg away to support the extension in the knee joint. Similarly, stretch the inner foot away so that the ankle joint is not in inversion according to its minimal muscle tension.
- Depending on the constitution, there may be a tendency to cramp on the outside of the hip of the rear leg; this is probably the tensor fasciae latae or small small glutes. A slight change in the rotation of the rear leg in the hip joint usually helps.
- This pose can be held for a long time as it is not very strenuous. Apart from extending the knee joint and possibly working one or both arms to pull the leg forwards, the pose is passive.
Known problems that can occur even when performed correctly
Cramps in the contralateral outer hip area
If there is a tendency to cramp in the contralateral m. tensor fasciae latae (lateral transition from pelvis to leg) or the small glutes as described above, a modified rotation of the rear leg often helps.
Variants
Upright the upper body
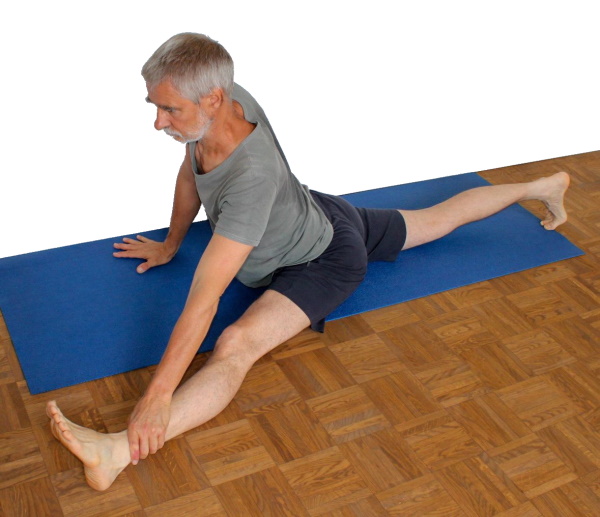
Instructions
- Take the pose as described above, but do not rest your upper body on the floor. Instead, upright your pelvis and upper body as far as possible by supporting yourself at the side with your arm.
Details
- This variation only makes sense if the leg can already be pulled relatively far towards the head; it then causes an additional extension in the hip joint of the back leg, which prepares you for hanumanasana. If the pressure on the kneecap becomes too uncomfortable or if the extension in the hip joint is to be forced, the back leg should be extended.
- In this variation, care must be taken to ensure that either the rear ankle is extended or the balls of the feet are in contact with the floor and that the inner foot of the rear leg is not placed on the floor at right angles, as this would place rotational stress on the rear internal ligament of the knee joint and additionally a valgus stress.
With belt

Instructions
- Take the pose as described above, but place a belt around the foot and pull the leg forwards towards the head.
Details
- This variation helps less mobile beginners to counteract the evasive movement of the leg away from the head due to the pull of the less mobile hamstrings.
- Take care not to pull the leg towards the pelvis but in an arc towards the head, i.e. not to pull the corresponding hip away from the floor.
- If possible, place the belt only around the heel to promote external rotation in the hip joint of the leg.
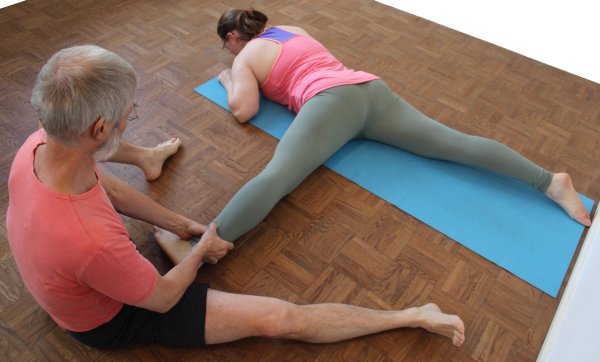
(P) Push the foot forwards
Instructions
- Take the pose as described above.
- The supporter sits at an angle between the two legs and, with the knee joint bent, pushes the heel of the performer’s side leg upwards and away from the pelvis with one heel. At the same time, the supporter uses one or both hands on the inner thigh close to the knee to rotate the leg into further external rotation in the hip joint and extension in the knee joint.
Details
- Be careful not to slip with the heel, which could lead to reflex tension.
- Do not neglect turning out the leg, as the flexion moment in the knee joint increases with the promotion of flexion in the hip joint by pushing the foot forwards and, if the knee joint is already flexed, the internal rotation tendency of the thigh in the hip joint increases with simultaneous external rotation of the lower leg in the knee joint.
Only in rare cases of pre-damaged knee joints will too little or excessive manual rotation of the thigh lead to discomfort in the knee joint, as in physiological cases the collateral ligaments ensure that the manually generated rotational moment is transmitted to the lower leg as fully as possible.
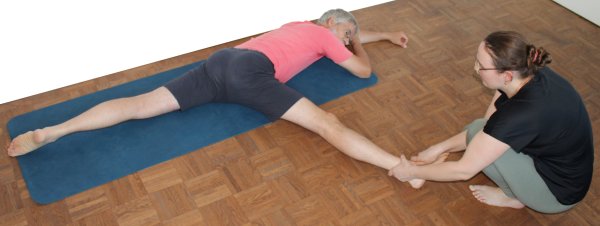
(S) Pulling the leg outwards
Instructions
- Take the pose described above.
- The supporter sits on the other side of the foot of the sideways dropped leg and pulls it outwards by the foot or lower leg, moves it in an arc towards the head and turns it out.
Details
- As this support is partly performed with the upper limb of the supporter on the lower limb of the performer, it can be quite strenuous. In terms of supporting external rotation in the hip joint, the variant with the pushing heel is superior to the variant performed alone, as it is performed closer to the point where rotation is restricted (the hip joint) and no rotational forces have to be transmitted via the knee joint. The arched movement of the leg towards the head is also more powerful and much less strenuous in this variation. Only the pull of the leg away from the pelvis may work a little better in this variation than in the one with the phshing heel.