yogabuch / asanas / rectangular elbowstand
Contents
- 1 „rectangular elbowstand“
- 2 Variants
- 2.1 only with heels on the wall
- 2.2 tight
- 2.3 Shrug
- 2.4 Feet lower
- 2.5 with a block between the legs
- 2.6 with block
- 2.7 with block and belt
- 2.8 with feet tied together
- 2.9 With belt
- 2.10 (P) Pressure on the sacrum
- 2.11 (P)
- 2.12 (P) Shrug
- 2.13 (P) With bound feet
- 2.14 (2P) Pressure on the sacrum and shoulders
- 2.15 Transition to uttanasana
- 2.16 Jumping around on the wall
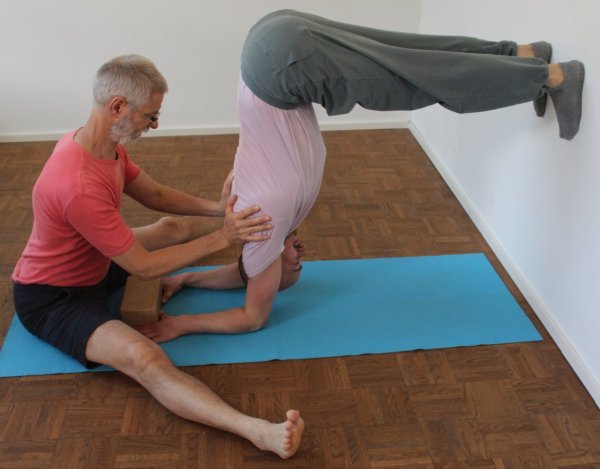
„rectangular elbowstand“

 instructions and details with working links as PDF for download/print
Contraindication
Effects
- (332) Force for pronation of the forearm
- (221) Shoulder blade: stretch for protraction
- (231) Shoulder joint: stretch for frontal abduction
- (271) Shoulder joint: stretch for exorotation
- (321) Stretch for supination of the forearm
- (501) Stretching the latissimus dorsi
- (721) Stretching the hamstrings
Preparation
The following postures can be performed in preparation so that flexibility restrictions in the hamstrings do not lead to restricted work and stretching in the shoulder area, or lead to less restricted work and stretching:
- uttanasana as a generally effective and efficient stretch of the hamstrings to prepare for flexion in the hip joints in this pose.
- prasarita padottanasana very similar to uttanasana
- parsvottanasana as a stretch that goes beyond uttanasana
- pascimottanasana
- janu sirsasana
- tryangamukhaikapada pascimottanasana
- downface dog as another good preparation for the hamstrings when the pelvis is tilted powerfully
- hip opener 5 as a very effective stretch of the hamstrings that goes beyond uttanasana
- warrior 3 pose
- trikonasana
- parivrtta trikonasana
As poses with widely exorotated arms, all variations of elbowstand, including right-angled elbowstand and dog elbowstand, require a very flexible shoulder in terms of frontal abduction. Depending on the flexibility and resilience of the shoulder joint, some preliminary exercises should therefore be carried out:
- downface dog, especially the „wide“ variation as a general stretch of the shoulder joint muscles
- Back extension, especially the „elevated “ variation as a general stretch for the muscles of the shoulder joint
- Right-angled handstand as a related posture
- Handstand as a related and synergistic posture
- Elbow stand as a very related and highly synergistic posture
- Dog elbow stand as a very related and highly synergistic posture
- Hyperbola as one of the most effective and efficient stretches in the direction of frontal abduction without exorotation of the arms
- Shoulder opening on the chair as one of the most effective and efficient stretches in the direction of frontal abduction with exorotation of the arms
Extending out of the shoulders (elevation of the shoulder blades) can also be prepared:
- „with block“ variation of upavista konasana
- urdhva hastasana
- Shrug in downface dog
- Shrug in handstand
Follow-up
derived asanas:
similar asanas:
Diagnostics (No.)
The triceps is one of the relevant agonists here, it presses the hands to the floor and pushes the shoulder area towards the wall relative to this. A lack of strength manifests itself, among other things, in light hands, but also in shoulders that move little towards the wall and possibly little sensation of stretching, although this also depends on a number of other factors.
In this pose, flexibility restrictions of the supinators or weakness of the pronators are noticeable in that the palmar wrists cannot be pressed to the floor.
The flexibility of the shoulder joint can be seen very clearly here, as the fixed exorotation places increased demands on flexibility. side discrepancies are also visible. Very good flexibility of the hamstrings but low flexibility of the shoulder joint may result in a visible or uncomfortable hollow back. There may be indications of diseases of the shoulder joint:
- Irritable hypertonus of the deltoid muscle: ambitious beginners in yoga in particular tend to develop irritation in the deltoid muscle, which is localized in the area of the muscle origins, presumably due to overstraining of the structures through frequent repetitive demands in full frontal abduction and is also noticeable under such stress, see FAQ.
- Various pathological changes in the shoulder joint such as impingement syndrome, frozen shoulder, calcification of the biceps tendon, biceps tendinitis, subacromial syndrome, rotator cuff lesions, which cannot all be discussed here and require clarification.
- side discrepancies in flexibility
(721)(724) Ischiocrural group:
As in many forward bending movements(flexion in both hip joints), various disorders can be found here:
- Shortening of the hamstrings, see FAQ
- Damage to the hamstrings, which causes pain or functional limitations, can also be easily recognized here, from simple tension to strains to muscle (attachment/detachment/tear). Tears would lead to a reduction in strength when leaving the posture quickly.
- Irritation of the sciatic nerve: irritation of the sciatic nerve, which innervates the leg and foot, can become symptomatic during forward bends in particular, even if they are otherwise rather calm. See the FAQ.
- Irritation of the origin of the hamstrings at the ischial tuberosity (at the ischial tuberosities, also known as PHT: proximal hamstring tendinopathy) will be clearly evident in this posture and require protection from intensive stretching, as this posture demands; see the FAQ.
- Baker’s cysts create a feeling of tension or foreign body in the back of the knee, see FAQ.
(880) Hyperextension of the knee joint:
Overextension of the knee joint refers to the ability to or even the current state of an angle of more than 180° in the knee joint. To a certain extent, this is considered normal by anatomists and is on average more common and more pronounced in females. However, it can also indicate a weakness of the quadriceps. Furthermore, hyperextension often causes unphysiological sensations that are not caused by stretching or exertion of the muscles and should be avoided, see also FAQ.
Variants:
(2P) Pressure on sacrum and shoulders
Instructions
- Kneel with your back to the wall. Place your forearms shoulder-width apart and pointing parallel away from the wall so that your elbows are a little further away from the wall than your own leg length. This measurement applies to reasonably flexible shoulder joints.
- Press your hands firmly to the floor so that they do not slide towards each other later.
- Move your upper body, especially your shoulders, strongly towards the wall.
- Place one foot on the wall with the toes pointing towards the floor so that the heel is approximately as high as the combined length of the upper body and upper arm, i.e. the backs of the legs should be horizontal. The knee joint of the lifted leg, like the other, is still bent.
- Move your upper body even more strongly towards the wall and put all your weight on your hands so that you can take your second foot off the floor and place it next to the first on the wall without your feet slipping down.
- Straighten your legs and increase the movement of your upper body towards the wall.
- Stretch out from the shoulders and move the upper body towards the wall as far as possible.
Details
- If you are unable to prevent your hands from sliding towards each other even by pressing your hands firmly on the floor, practise the variation with a block. This is due to the evasive moments that arise in the shoulder joint when a wide frontal abduction is required and exorotation is fixed at the same time.
- Take into account that the forearms roll outwards over their own muscles and thus the elbows also move away from each other. After this slide, the forearms should be parallel, i.e. the elbows should be at the same distance as the wrists. For certain purposes, the elbows can also be placed closer together. Rarely, in the case of very restricted flexibility of the shoulder joints, it is necessary to allow a greater distance between the elbows so that the posture is possible at all.
- The inner wrists, the index fingers and in particular their base joints and the thumbs should be on the floor and pressing on the floor, i.e. the forearm is clearly pronated.
- Avoid hanging in the shoulders and instead push the upper body upwards out of the shoulders(elevation of the shoulder blade). This movement can be very restricted or even impossible in people with significantly restricted flexibility in the shoulder joints, which is usually accompanied by the inability to achieve 180° frontal abduction (stretched angle) in the shoulder joints, see next point.
- If the flexibility of the shoulder joints is severely restricted, it is probably impossible both to extend out of the shoulders(elevation of the shoulder blades) and to achieve 180° of frontal abduction. Depending on the chosen distance of the elbows from the wall, it may not be possible to maintain the posture or only for a few seconds. However, a minimum duration of 10-15 seconds should be considered, whereby this corresponds to the focus on „intensity“ and the intention of strengthening. To promote flexibility in the shoulder joints, it should be possible to hold the posture for at least 30 seconds. If necessary, increase the distance between the elbows and the wall until this is possible. A clear indication that the distance from the wall is too small would be the inability to move the shoulders as close to the wall as the elbows, i.e. to bring the upper arms into a vertical position. This would make the pose a pure strengthening exercise, mainly for the deltoids. On the other hand, it is important to ensure that the distance is not too great because otherwise, in the case of a person who is quite mobile in the shoulder joint, there would be no stretching of the muscles but a destructive effect on the ligament and bone structure of the joint, which would also be noticeable due to the absence of any kind of muscular stretching sensation. The distance should therefore be chosen in such a way that standing for a few minutes in this position is only possible with clearly recognizable effort.
- Press the heels in particular onto the wall. The balls of the feet/toes are „given“ the pressure, even if you do not tilt forward. However, this alone does not provide sufficient friction to prevent the feet from sliding down, and even less does it mean working the shoulders appropriately for the posture. Since the resting muscle tension in the lower leg muscles corresponds to a plantar flexion (strictly speaking an inversion, i.e. by no means standard anatomical position) (the foot position in standard anatomical position is not far from the flexibility limit in the direction of dorsal flexion ), you have to work adequately with the shoulder muscles (and parts of the muscles of the upper back) for every pressure of the heel on the wall. Conversely, if the distance between the elbows and the wall is not too great, the amount of pressure felt from the heels on the wall can be a relatively reliable indicator of the amount of work done in the shoulders.
- In the variation with the balls of the feet lifted, i.e. only the heels on the wall, the relationship between the work in the shoulders and the pressure on the heels described above becomes even clearer.
- Tilt the hips into maximum flexion, which improves the ability to move the upper body towards the wall. Make sure that the knee joints do not bend but move the inner knees in particular towards the ceiling. Make sure that the rectus femoris, the hip flexor that also performs the movement, does not spasm. This tendency certainly exists, as it is a biarticular muscle with a very short sarcomere length, i.e. close to active insufficiency, because the knee joint is extended, to which it must itself contribute a certain amount of force in order to counteract the flexion effectof the hamstrings under tension, which arises from flexion in the hip joints.
- It is not uncommon for the large forces with which the elbows are pushed outwards as an evasive movement in the shoulder joint to cause an „abrasive effect“ on the skin of the forearms, i.e. an abrasion. This can and should be prevented by wearing a belt around the forearms close to the elbows to absorb the forces so that they cannot affect the skin of the forearms. Using a soft blanket alone would be the wrong way to go, as the elbows would slide outwards significantly on it, but in combination with a belt the blanket can be used to good effect.
- Due to the position of the elbows on the floor, the exorotation of the arms in the shoulder joints is fixed at a high level, which leads to a far greater demand on the flexibility of the shoulder joints on the one hand and a greater demand on them to exert force on the other compared to comparable postures with outstretched arms such as the right-angled handstand. It is not uncommon to observe that people who can stand quite passably in the right-angled handstand are barely able to perform the right-angled elbow stand.
- Rather rare is the combination of very good flexibility in the hamstrings in the back of the leg, a weak lower back and very stiff shoulder joints, which can lead to pain in the lumbar spine in this posture. The tendency to these complaints then decreases with a smaller distance between the elbows and the wall and increased flexion in the hip joints, i.e. feet positioned lower on the wall.
- The distance of the elbows from the wall is probably the most important parameter of the posture. A rather large distance serves to promote the flexibility of the shoulder joint in the direction of frontal abduction, a rather small distance serves to strengthen the agonists that push the shoulder area towards the wall, i.e. primarily the deltoids, and secondarily also the external rotators of the shoulder blade. As a rule, a distance can be selected that allows the posture to be maintained for at least 10 seconds. However, if the shoulder joints are very stiff in the direction of frontal abduction, the misalignment angle towards 180° can be and remain so great that any further increase in the distance of the elbows from the wall is expressed primarily in increased hyperlordosis of the lumbar spine. In any case, there are some cases of shoulder joints with very little flexibility and at least average flexibility of the hamstrings in which an uncomfortable hollow back occurs. These cases are more common in the right-angled elbow stand than in the right-angled handstand. This should preferably be countered with sufficiently low feet. The minimum height of the feet results not only from the nature of the wall and the question of whether socks are worn, but also from the force with which the performer can press against the wall and thus generate friction. Basically, feet placed lower on the wall, especially if the hamstrings is less mobile, lead to a pelvis that is tilted more towards the vertical and more necessary work in the deltoid and autochthonous back muscles, thus offering more opportunities for strengthening.
Variants
only with heels on the wall

Forcing flexion in the hips
Instructions
- Take the pose as described above.
- Lift the forefoot off the wall.
- Go into maximum flexion in the hip joints and push the heels up on the wall from this exertion of strength.
Details
- This variation forces the work of the deltoids and thus the pressure of the heels against the wall and the flexion in the hips which, when performed vigorously, pushes the feet upwards on the wall.
- Of course, the pressure on the heels is so great that they remain stationary, but there should be a slight movement of the heel bone in the surrounding skin if the upper body is pressed much harder against the wall than the friction required to prevent the feet from slipping or falling.
tight

Instruction
- Take the pose as described above, but place your elbows closer than your wrists.
Details
- In some cases of deltoid pain, this variation can provide relief because the narrower distance between the elbows causes increased exorotation of the upper arms and therefore a different load distribution in the muscles.
- Of course, increased exorotation places greater demands on flexibility; in practice, this means that the angle of frontal abduction is probably slightly less than in the standard version.
Shrug

Instructions
- Take the pose as described above.
- As usual, stretch out from the shoulders to the maximum, i.e. elevate the shoulder blades to the maximum.
- Then lower the shoulder blades with the upper body until they are maximally depressed.
- Then alternate between elevation and depression of the shoulder blades by repeatedly stretching the upper body away from the elbows and lowering it back towards the elbows.
Details
- As in other postures with shrugging in an overhead movement of the arms, such as the handstand (see the shrugging variation) or the head down dog pose (see the shrugging variation), the change between depression and elevation is likely to be quite an unusual challenge. Even more than in the aforementioned postures, however, flexibility restrictions in the direction of frontal abduction in the shoulder joints have an effect here, which result from shortening of the adductor muscles of the shoulder joint, especially the latissimus dorsi, which in addition to the shoulder joint also covers the scapulothoracic gliding joint and must show the greatest possible flexibility or impose the greatest restriction in exorotated frontal abduction with elevation of the shoulder blade. Therefore, if exorotation is fixed at a high level according to the design of the posture and frontal abduction is demanded to the maximum, there is no more room for elevation without impairing one of the other parameters if the shoulders are less mobile, which in this case can only refer to frontal abduction due to the position of the arms. Nevertheless, the opposite is often seen in practice, namely that the frontal abduction deteriorates when the elevation (or the attempt at elevation) decreases, which is probably due to a significantly reduced energy input, as the abandonment of the elevation is perceived as a rest phase. In contrast, shrugging the shoulders in the dog position head up is almost easy because the adductors do not hinder elevation. Moreover, they do not impose any restrictions on depression either.
- Depending on the flexibility of the adductors of the shoulder joint, hardly any or no elevation of the shoulder blades is possible. The attempt made in this variant often results in a movement of the shoulder section away from the feet and back towards the feet, which corresponds to a reduced and then increased frontal abduction in the shoulder joints. If the movement cannot yet be found, but should already be possible due to the existing shoulder flexibility, the shrug variant can be helpful as a partner exercise.
Feet lower
Instructions
- Take the pose as described above, place your feet significantly lower on the wall than horizontal thighs.
Details
- If the shoulder joints are not very mobile in the direction of frontal abduction, the lower position of the feet leads to a pelvis that is more inclined towards the vertical due to the reduced flexibility of the hamstrings, which in turn forces the back more into flexion compared to the punctum fixum of the hands and thus increases the necessary strength of both the deltoid and the autochthonous back muscles and therefore has a more strengthening effect.
- In cases of less mobile shoulder joints and a fairly mobile hamstrings as well as less robust autochthonous back muscles, this variation can significantly reduce the tendency to lumbar discomfort.
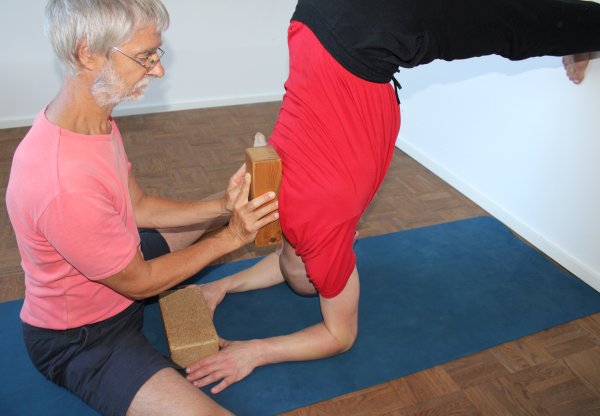
with a block between the legs

Instructions
- Take the pose by jumping onto the wall with your thighs clamping a block.
Details
- The block between the thighs largely ensures that the jump is synchronized. It is also a good way of checking whether you are turning your legs in the right direction, i.e. turning them in, which makes it easier to move the ischial tuberosities away from each other and bend the hip joints forward.
- If you are worried that the block could fall down during the jump and hit your arms or head, you can practise the variation with bound feet instead.
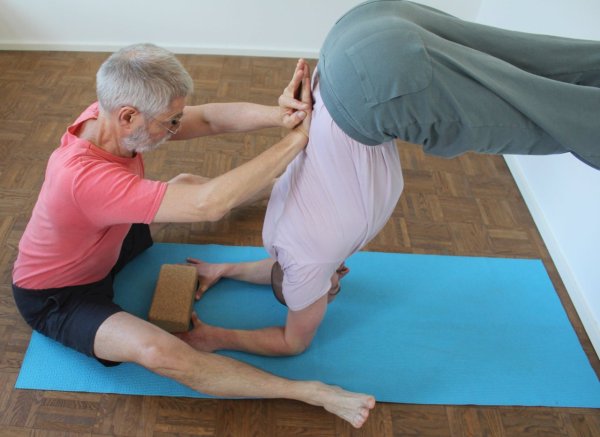
with block

Instructions
- Place a block crosswise at a suitable distance from the wall. The distance depends very much on the length of the leg and the flexibility of the shoulder joints and, to a lesser extent, on the hamstrings. As a first approximation, it should be a little more than your own leg length.
- Position the hands as follows: the thumbs point towards each other along the long edge of the block, place the inner edges of the hands slightly diverging from the outside of the block.
- Place your elbows on the block and assume a right-angled elbow position.
Details
- One problem with the right-angled elbow position is the moments in the shoulder joint. As a three-dimensionally mobile joint with many muscles that generally perform a combined movement, the arm will tend to deviate into lateral adduction and endorotation if maximum frontal abduction is required. As some moments of both sides cancel each other out, both elbows push massively outwards (the aforementioned lateral adduction) and the endorotation inclination pushes the hands towards each other at the same time. The latter can be prevented simply by a mechanical block, such as a block between the hands. The former manifests itself as a tendency for the elbows to forcefully reach outwards, whereby if the friction between the mat and the forearm is sufficiently high – and it usually is – a layer of skin often remains on the mat as an abrasive effect. To rule this out – see next variant – a belt can be placed around the forearms near the elbows to absorb these forces so that the skin remains unharmed. If the pressure of the inner edges of the hands against the block is felt to be too high, a softer material can be used, such as a shoulder support plate made of a medium-soft foam.
- Unless a belt is used to prevent the elbows from drifting apart, a blanket should not be placed under the forearms to soften the forearms, as this will worsen friction and increase drifting apart.
Known problems that can occur even when performed correctly
Loss of a layer of skin
The main problem with the variant without using a belt is likely to be the loss of a layer of skin to the mat due to the high friction and the large forces that push the elbows outwards.
with block and belt

Instructions
- Take the „with block“ variation as described above, but also place a belt around the forearms close to the elbows so that the elbows cannot move further apart than the distance between the wrists.
- Position the hands as follows: the thumbs point towards each other along the long edge of the block, the inner edges of the hands are placed slightly diverging from the outside of the block.
- Place your elbows on the block and assume a right-angled elbow position
Details
- As described in the last variation, the elbows push outwards with force and often rub a layer of skin on the mat. To prevent this, place a belt around the forearms near the elbows. The belt is placed around the forearms and not the upper arms because this has the advantage that the head can still fit past the belt – in almost all people, the upper arms are longer than the head and neck combined. The law of leverage dictates that the elbows should be close together.
- If the pressure on the forearm near the elbow or the pressure of the elbow itself on the floor is felt to be too uncomfortable, a blanket can also be used under the forearms when using a belt – as opposed to without.
- In some cases of stress in the anterior parts of the deltoid, it is worth trying to further reduce the distance between the elbows using a belt so that the forces are directed away from the painful muscle parts through increased exorotation of the arms.
with feet tied together
Develop better control over the shoulder area and confidence in the arms/shoulders.
Instruction
- Tie a belt tightly around the ankles.
- Take the pose jumping with both legs.
Details
- This variation requires significantly more control over the movement of the shoulders. Whereas in the normal variation, the pressure of the first foot on the wall can be built up slowly by working the shoulders, a quick, strong grip of the deltoid muscle is required here to prevent tipping forward. This is therefore not a beginner’s variation. This variation begins by moving the shoulders towards the wall and forcing this movement with the jump. Pushing the shoulders towards the wall is often and correctly perceived as a movement that slightly contradicts the jump. Find the right amount of strength to prevent you from tipping forwards and still be able to perform the jump into the stance regularly.
With belt

Prevent the elbows from moving out of position and the forearms from losing skin.
Instructions
- Place a belt around the forearms near the elbows.
- Take the pose as described above.
Details
- The belt prevents the elbows from moving outwards as described above and the sometimes associated abrasive effect on the skin of the forearm.
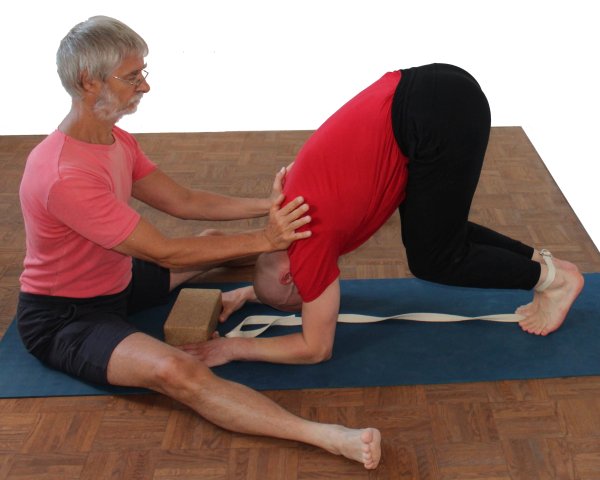
(P) Pressure on the sacrum
Improve flexion so that the hamstrings does not interfere with the work in the shoulders.
Instructions
- The performer assumes the posture as described above.
- The supporter stands in front of the performer on the back and presses downwards and wallwards on the sacrum with their hands placed on top of each other so that the pelvis is tilted further into flexion. This movement is performed forcefully so that the stretch in the performer’s hamstrings is still bearable.
Details
- As with all passively supported forward bends, the pressure on the sacrum is applied to the cranial end of the sacrum(on the back side, not the leg side).
- The maximum tilt of the pelvis into flexion is the prerequisite for the movement of the upper body and shoulders towards the wall and thus for their stretching. This support can therefore be performed very well before the standard support(pressure on the back in the shoulder area). The supporter can press on the sacrum while seated with hands placed on top of each other or standing on the iliac crests. If the supporter is seated, his hands are significantly higher than his shoulders so that even if the performer’s pelvis continues to press in the direction of flexion in the hip joints, his wrists are significantly removed from 90° dorsiflexion and therefore remain uncritical. In a standing position, however, this would be the case or is already the case with the hands pointing upwards on the sacrum. If the hands were pointing downwards, their tendency to slip away would be greater. This is why pressure on the iliac crests is particularly useful when standing.
(P)
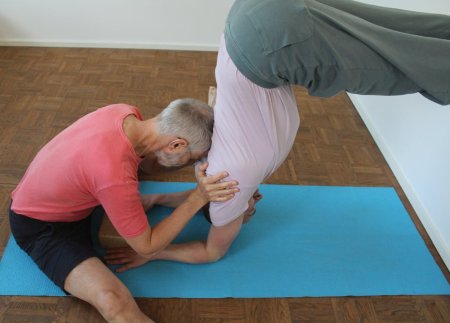
Passive strengthening of the stretch in the shoulders.
Instruction
- The performer assumes the posture as described above.
- The supporter tilts the pelvis into maximum flexion as described above and sits in front of the performer on the back.
- The supporter can grasp both upper arms from the outside and press them towards the wall or, with the head between the shoulder blades, press the upper body and in particular the shoulder area further towards the wall. A combination of both also works well. If the feet are used instead of the hands, the mat should be moved slightly away from the wall so that the performer and supporter are on the same mat. The supporter leans backwards and rests on their elbows.
Details
- When the supporter presses with the head, it is important that the cervical spine is stretched so that the cervical spine can transmit the force applied without damage.
(P) Shrug
Instructions
- Adopt the shrug variation.
- The supporter holds an elongated object with low friction lengthwise to the area of the upper thoracic spine and thus limits the movement of the shoulder joints out of frontal abduction.
Details
- The performer’s task is to alternate between elevation and depression of the shoulder blades with as even pressure as possible. The block should be held steady by the supporter so that the performer can use it as a guide.
(P) With bound feet
Instructions
- The supporter presses the shoulders against the wall with little force, ready to quickly increase the force significantly if he realizes that they are moving too far away from the wall and that there is a risk that the feet will not put enough pressure on the wall.
Details
- The supporter may not have to exert much or any pressure, but he may also have to intervene strongly at short notice, so he must be prepared for this.
(2P) Pressure on the sacrum and shoulders

Full support
Instructions
- Assume the right-angled elbow position as described above.
- One supporter presses with both hands on the sacrum or with both hands on the two iliac crests to tilt the pelvis further into flexion, the other sits on the back in front of the performer and presses the body towards the wall with the arms in a twisting movement while pressing with the head on the shoulder area of the performer.
Details
- This variation is a combination of the above corrections: pressure on the sacrum and pressure against the shoulders.
- Of course, the supporter cannot do much more by turning the performer’s upper arms out, as the arms are fixed in a more exorotic position by the parallel forearms on the floor. The supporter should therefore not apply too much force in the direction of the exorotation in order to avoid side effects.
- The pressure of the supporter should be applied with the hands pointing downwards so that the angle of dorsiflexion in the wrists becomes more comfortable and not more difficult with increasing movement.
- If the supporter is standing, they can also press between the shoulder blades of the performer with their knee.
Transition to uttanasana

strengthening landing
Instruction
- Assume the right-angled elbow position as described above.
- Give up a little movement of the shoulders towards the wall and jump with the feet on the floor.
- First stretch the arms, shifting the body weight completely to the legs, and then straighten the legs and correct the remaining parameters of the posture.
Details
- This transition requires strength in the arms and flexibility in the hamstrings: the more flexible the hamstrings is, the closer the feet can jump towards the elbows, which in turn requires more strength in the arms to lift the elbows off the floor from a forward leaning position with the forearms on the floor and to extend the arms, pushing the upper body back into the uttanasana position.
- Of course, the aim of this variation is to slow down the landing as much as possible. So rather than trying to jump quickly to the position you want to reach with your feet, try to use the strength of your arms, shoulders and back to slow your upper body down to the floor.
- Land on your whole feet, not just the balls of your feet and toes.
Jumping around on the wall

A posture that strengthens the shoulders.
Instructions
- Assume the right-angled elbow position as described above.
- Keep your knees straight and jump off the wall by stretching your ankles with the strength of your calves, only to land on the wall again shortly afterwards with the balls of your feet due to the pressure generated by your shoulders and forearms in the direction of the wall.
Details
- This pose is excellent for developing strength and awareness of the strength exerted in the shoulders and the relevant muscles of the upper back. Of course, this variation is less easy than the corresponding variation of the right-angled handstand, which should be practiced and mastered first.
- The distance of the arms from the wall is the most important parameter after the height of the feet. If the arms are too close to the wall, there is a certain risk of tipping forward or at least a feeling that this could happen in the short term. If the distance is clearly too great, it is a little more difficult to jump off the wall, but more serious is that the necessary work of the shoulder(deltoid) can be found less well and, above all, that the feet land too roughly on the wall with the knee joint extended! Both jumping off and landing are done on the balls of the feet. Even if the heels also land on the wall a fraction of a second later, the triceps surae absorbs the biggest impact with an eccentric contraction – which is not very big anyway – which is important for the knees.
- As with the right-angled handstand, the feet can be held a little higher than the horizontal backs of the thighs if the hamstrings is quite immobile, so that the unfavorable angle of the pelvis to the floor resulting from shortened backs of the legs and the resulting curved back with the tendency to move the upper body away from the wall does not have a limiting effect on this variation. Always try to land on the same spot on the wall. The movement of the pelvis away from the wall corresponds to an (at least minimal) increased frontal adduction in the shoulder joints due to the force of the deltoid and a larger flexion angle in the elbow joint with a changed angle of the upper body to the floor, so that the required flexion anglein the hip joints would have to be increased in the short term in order to keep the legs horizontal. If this is not possible, there may be a tendency to land with the feet higher than when you jumped off. This should not be the case any more than landing lower each time. However, the feet should not be placed so high that the heels can no longer be pressed against the wall.
- The effort of pushing the upper body towards the wall should be felt in three areas: upper back, deltoids, triceps