Contents
- 1 adho mukha vrksasana„handstand“
- 2 Variants
- 2.1 Shrug
- 2.2 Bend arms
- 2.3 Turn your arms the wrong way
- 2.4 on fists
- 2.5 on fingertips
- 2.6 Upswing without rotating leg
- 2.7 baddha konasana
- 2.8 supta baddha konasana
- 2.9 two-legged upswing
- 2.10 Do not move your arms
- 2.11 two-legged upswing as jumping
- 2.12 Dips
- 2.13 eka pada
- 2.14 free
- 2.15 Hands on the wall
- 2.16 Hands turned inwards
- 2.17 Hands turned outwards
- 2.18 Hands turned backwards
- 2.19 Push hands towards each other
- 2.20 Head and back against the wall
- 2.21 stand with your feet on the wall
- 2.22 with backbend
- 2.23 swing up with the unfamiliar leg
- 2.24 jump from maximum forward splits
- 2.25 only head against the wall
- 2.26 padmasana
- 2.27 padmasana Forward bend
- 2.28 supta padmasana
- 2.29 Bottom on the wall
- 2.30 Bottom against the wall, lower legs (dvi pada)
- 2.31 Shoulders to and from the wall
- 2.32 Shoulders towards the wall
- 2.33 Twist in handstand
- 2.34 virasana in handstand
- 2.35 krouncasana in handstand
- 2.36 look at your feet
- 2.37 look at the hands
- 2.38 samakonasana (side splits)
- 2.39 on blocks
- 2.40 two-legged lift with a block between the thighs
- 2.41 two-legged upswing with feet tied together
- 2.42 Wrists on patches
- 2.43 (P) free
- 2.44 (P) Support during the upswing
- 2.45 (S) eka pada
- 2.46 (2S) Butt against the wall, lower legs (dvi pada)
- 2.47 Transition to uttanasana
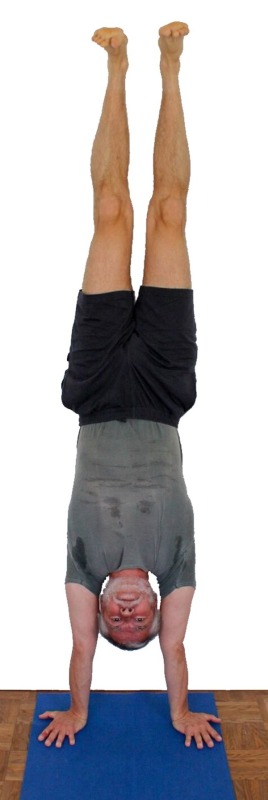
adho mukha vrksasana
„handstand“

 instructions and details with working links as PDF for download/print
Feedback: We’d love to hear what you think about this description, give us feedback at postmeister@yogabook.org
Last modification: 30.12.2018
Name: adho mukha vrksasana
Trivial name: handstand
Level: A
- Classification
- Contraindication
- Effects
- Preparation
- Follow-up
- derived asanas
- similar asanas
- Diagnostics
- Instructions
- Details
- Variants
Classification
classical: inversion pose
psychomental: energizing
physiological: arm and shoulder strengthening
Contraindication
When taking the pose, the familiar symptoms can flare up again in the event of an acute disc herniation of the lumbar spine. This is all the more true the less flexible the hamstrings are. The pose itself is not contraindicated, but taking it is very delicate. Only advanced performers can keep the lumbar spine straight during the two-legged upswing. Various desease and injuries can prohibit handstand.
Effects
- (423) Tone of the finger flexors
- (232) Strengthening the frontal abductors of the shoulder (deltoids, biceps, coracobrachialis): Maintaining the angle of frontal abduction against existing flexibility restrictions strengthens the deltoids in particular
- (292) Strengthening the trapezius: Elevating the shoulder blades against the body’s gravity strengthens the trapezius.
- (352) Strengthening the palmar flexors of the wrist: pressing down on the metacarpophalangeal joints strengthens the palmar flexors of the wrist.
- (302) Strengthening the triceps: stretching the arms against the flexion angle of the arms caused by flexibility restrictions strengthens the triceps, the more so the less flexible the shoulders are in terms of frontal abduction
- (332) Force for pronation of the forearm
- (352) Strengthening the palmar flexors
- (231) Stretching: frontal abduction shoulder: The overhead movement of the arms stretches the shoulders in the sense of maximum frontal abduction
- (321) Stretching to supination of the forearm
- (351) Stretching of the palmar flexors
- (341) Stretching for dorsiflexion in the wrist
- (351) Stretching the palmar flexors of the wrist: The angle of dorsiflexion of approx. 90° stretches the palmar flexors.
- (421) Stretching the finger flexors
- (501) Stretching the latissimus dorsi
Preparation
Warming up the hamstrings is an important preparation for anyone who doesn’t jump very easily into a handstand, so that no strains occur during the vehement swinging movement:
- uttanasana THE standard for warming up and stretching the hamstrings
- prasarita padottanasana similar to uttanasana
- downface dog good preparation with strong tilting of the pelvis
- parsvottanasana preparation beyond the uttanasana
- hip opener 5 preparation beyond the uttanasana
Depending on the flexibility and resilience of the shoulder, it may also be necessary to warm it up well:
- downface dog as a general stretch of the shoulder and hamstrings
- upface dog as a posture that prepares the shoulders for powerful work, especially through correctly executed transitions from and to downface dog
- rectangular handstand as a very related and highly synergistic pose
- back stretching, especially the „elevated“ version as a general stretch of the shoulder and hamstrings
- dog elbow stand as a related pose, which differs mainly in the rotation of the arms
- hyperbola as one of the most effective and efficient stretches in the direction of frontal abduction without turned out arms
- Shoulder opening on the chair as one of the most effective and efficient stretches in the direction of frontal abduction with turned out arms
- purvottanasana if the tone in the anterior deltoid is too high or has become too high due to preparation
To prepare for work in the shoulders with a similar movement without fixed hands:
- upavista konasana with block makes you aware of the type and intensity of work in the shoulders
- dandasana with block between raised arms, like upavista konasana with block
Preparation of the palmar flexors of the forearm in terms of pre-activation
- tolasana
- ardha vasisthasana
- vasisthasana
- rectangular handstand
- downface dog, transition to upface dog an back
„Energetic“ preparation for all those whose upswing fails due to unconscious or partially conscious internal factors that are not rooted in the musculoskeletal system:
- surya namaskar (the sun salutation) stimulates the flow of energy and clears the mind a little
- rectangular handstand gets you used to losing the ground under your feet
Follow-up
In cases of significantly restricted flexibility in the shoulder joints, a more or less pronounced hollow back can occur. In order to eliminate the resulting discomfort, the following poses can be performed symptomatically to reduce the tension in the muscles of the lumbar spine:
- uttanasana, especially the „parsva“ variation
- parsva upavista konasana
- parsvottanasana
- downface dog
- hip opener 5
If there is discomfort in the dorsal wrists after handstand due to the limited ability to dorsiflex the wrists, it may be necessary to use the poses, which can also be used as preparation, as a cure:
- Forearm stretching for the palmar flexors to stretch the muscles in the wrist that perform the stretch
- Forearm stretching for the dorsal flexors to prevent the antagonists of the executing muscles in the wrist from cramping
- Forearm stretch in upavista konasana for the palmar flexors for further stretching of the wrist muscles
Derived asanas:
Similar asanas:
As an inverted posture:
General:
Geometry:
Effect in the shoulder:
Diagnostics (No.)
Handstands can reveal weaknesses in the wrists:
- Ganglion in the dorsal wrist area: the ganglion is a proliferation of tissue that can cause pressure pain
- Shortening of the palmar flexors: in addition to stretching sensation on the palmar side, this also causes pressure in the dorsal wrist area. Stretching usually improves the situation.
- Tendency to cramp of the dorsiflexors of the wrist: these develop a tendency to cramp in their tendon area in the wrists and distal forearm. Stretching usually improves.
(354) Forearm:
A golfer’s elbow can be noticeable when standing on the hand: Pain in the inner elbow (more precisely in the area of the medial humeral epicondyle) in the area of the tendons of the palmar flexors usually indicates a more or less pronounced epicondylitis humeri ulnaris („golfer’s elbow„). In every day life, rest before exerting greater force, especially of the impact type, and regular, rather gentle and prolonged stretching are then indicated as well as additional rehab training to promote blood circulation and strengthening. See golfer’s elbow and insertional tendopathy.
(724) Back of the leg:
During a handstand, especially the upswing, irritation of the area of origin of the hamstrings at the ischial tuberosity (ischial tuberosity), a so-called proximal hamstring tendinopathy (PHT), can be noticeable: the area of origin of the hamstrings is stressed by the speed strength used for swinging when the hip joint is extended. These irritations are then particularly noticeable, even if they may be completely inconspicuous in everyday life (see FAQ).
(231)(232)(233)(234) Shoulder:
Various conditions and pathologies of the shoulder can become apparent in the handstand:
- Irritable hypertonus of the deltoid: especially ambitious beginners in yoga tend to develop irritation in the deltoid, which is localized in the area of the muscle origins, presumably due to an overstrain of the structures caused by frequently repeated demands in full frontal abduction and is also noticeable under such stress, see FAQ.
- pathologically increased tone of the trapezius, see FAQ.
- Various pathological changes of the shoulder joint such as impingement syndrome, frozen shoulder, calcifications of the biceps tendon, which cannot all be discussed here and require clarification.
- side discrepancies in flexibility
Furthermore, the handstand provides relatively good information about the flexibility of the shoulder in the form of the degree of evasion in the three dimensions of movement, recognizable as:
- Moving the upper arms outwards with (as the hands are fixed) consecutive bending of the elbows
- Loss of external rotation of the arms
- Insufficient angle of frontal abduction that does not reach 180° or does not reach it permanently
(101) Head:
Pain in the head can increase significantly in handstand. These can be:
- Latent headache can be significantly intensified under increased pressure. As the differential diagnosis of headache is very large and headache must be differentiated from migraine, it is not possible to go into this in detail. Sometimes a prolonged headstand, where the pain worsens slightly in the first 3-4 minutes and then subsides, helps against headaches of varying origin and intensity. Running also often helps very well. Running will be very unpleasant at the beginning, but the headache often starts to get better while you are running.
- Pressure on the eyes: increased intraocular pressure needs to be clarified.
- Latent or manifest colds can cause an increased sensation of pressure in the head.
- Pressure in the head due to a vascular system that has not (yet) adapted. It is advisable to practise headstand with precisely this focus, as the headstand can generally be held for much longer than handstand and therefore enables a much greater degree of adaptation.
(680) Esophagus/stomach/intestine:
A disturbed closure function of the stomach or esophagus can be particularly noticeable here, as can an overfilled stomach or intestine, which can exert pressure on the heart and lungs.
(302) Arms:
Low strength endurance of the triceps will be clearly evident if the shoulder is less mobile, as the triceps must limit the outward movement of the upper arms and the resulting bending of the arms.
(711) Pelvis (hip flexors, adductors):
Low flexibility of the hip flexors in a handstand may mean that it is not possible to create an extended angle (180°) in the hip joints, even if the extensors of the hip joint (e.g. the glutes) are doing their best. As a result, the upper body is tilted towards the legs, especially in the lumbar spine area, and there is often discomfort in the lumbar spine area. Shortened adductors with excessive tone would develop a tendency to cramp when the glutes attempt to eliminate the flexion in the hip joints because they have to absorb the external rotation moments of the pomus muscles, as can be observed even more clearly in the shoulder position.
(650) Kyphosis and lordosis of the spine:
The deviations from the physiological double-S shape of the human spine are better visible from the wall of from the side in this pose than from the front. There should be a certain degree of lordosis (convex spine from the front) in the lumbar and cervical spine and a certain degree of kyphosis (convex spine from the back) in the thoracic spine. The kyphosis of the thoracic spine can and should be removed in the sense of handstand and this area of the spine extended until it is stretched. See the FAQ. Restricted mobility of the shoulder (in the direction of frontal abduction) causes the upper body to tilt unfavourably in relation to the arms and legs, resulting in hyperlordosis of the lumbar spine.
(611) Pelvic obliquity/unequal shoulder height/scoliosis of the spine:
A lateral deviation of the spine from the sagittal plane, known as scoliosis, is also visible in this pose, but would be best seen from the wall, alternatively you can observe the linea alba instead. It is possible that both heels are unevenly high on the wall, the pelvis is noticeably slanted or the lower ribs are unevenly high, and possibly a slanted linea alba against arms and legs can be recognised in the frontal plane. If this is not the result of unevenly flexible shoulders, the spine is a possible cause. See the FAQ.
Variants:
Head and back against the wall
stand with your feet on the wall
Butt against the wall, lower legs (dvi pada)
Shoulders to and from the wall
two-legged lift with a block between the thighs
two-legged upswing with feet tied together
(S) Support during the upswing
(2S) Butt against the wall, lower legs (dvi pada)
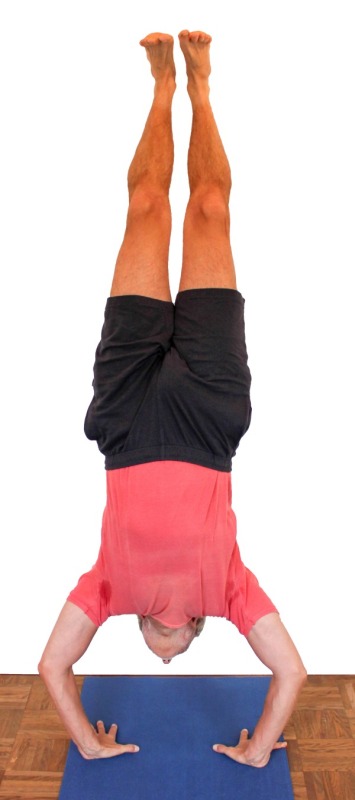
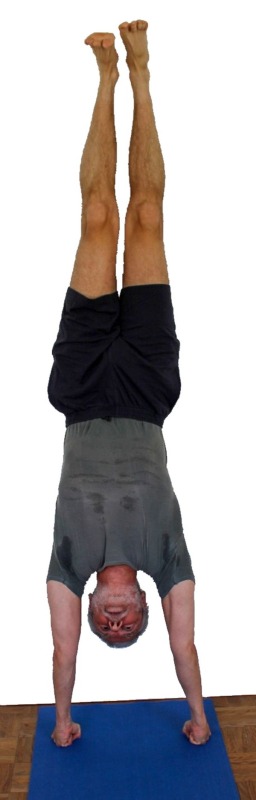
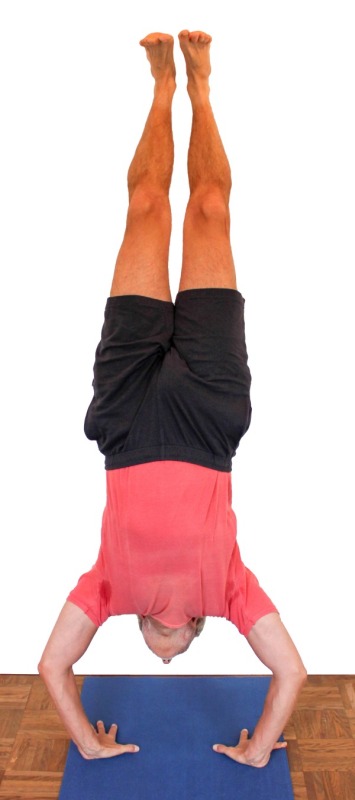
Instructions
- Take downface dog.
- Place one foot (the corresponding leg becomes the „jumping leg“ and for taking the pose will be the standing leg) with the knee joint bent about 30 cm forward and put most of your weight on this foot.
- Lift the other leg (the „swinging leg“, a free leg) off the floor, keep it extended and swing it up and down several times in succession.
- On a strong swing up, decide to also jump off with the other leg. Keep your shoulders sufficiently away from the wall during the upswing.
- When handstand is taken, use the strength of the arms to stretch upwards to the maximum, also elevating the shoulder blades to the maximum (moving away from the pelvis).
- Keep the shoulders moving away from the wall in every phase, even if this makes it more difficult to take the pose, especially the upswing.
Details
- For people who are inflexible in the back of the leg (hamstrings), it is necessary to warm up these muscles well, e.g. by doing a downface dog or forward bends such as uttanasana, in order to minimize the risk of straining the muscles when swinging the leg up vigorously. The less practiced the performer is, the more vehement their swinging movement will often have to be in order to be able to take handstand. However, the vehement swinging movement in particular is a clear demand on the muscles and tendons of the hamstrings. Adequate stretching and warming up of the muscles before handstand and additional strengthening exercises, regardless of the execution, should significantly reduce the risk. The performer will later be able to take the handstand with minimal momentum or even without any momentum at all, so that the risk of straining the hamstrings is no longer present.
- Avoid the frequently observed bending of the swing leg when swinging up, as this has two disadvantages:
- the momentum that can be achieved with this leg is reduced with increased bending of the leg because the effective lever arm is reduced as a result.
- when the leg is bent, there is a tendency to push off the wall again when the foot reaches the wall, as with a bent leg the foot usually reaches the wall before the center of gravity is above the hands or between the hands and the wall.
- Beginners may find it difficult to control the movement of the body towards the wall when jumping up, which is transmitted to the shoulder area, i.e. to keep the shoulders at a sufficient distance from the wall so that the head does not hit the wall. For most people there is a „point of no return“: once the shoulders have passed a certain point, you are no longer able to bring them back and are forced to leave the pose uncontrolled, often frightened and collapsing with a corresponding risk to the cervical spine and head. Another difficulty resulting from this movement is the reduction of the dorsal external angles in the wrists: for most people, the angles of dorsiflexion of the wrist resulting from the uncontrolled movement of the shoulders exceed the available amount of extension and strength at this angle.
- A challenge for many people is the constant, possibly not insignificant use of strength in the arms, especially if the shoulders are quite immobile: the more immobile the shoulders are, the greater the tendency to bend in the arms, so the more strength is required. Stiff shoulders force
- bending in the arms
- an insufficient angle between the upper arms and upper body
- an internal rotation of the arm or reduction of the extension
The first two of these require many times more effort than would normally be necessary for standing in handstand and the last one poses a risk if the shoulder joints are unstable.
- A major problem for many people is overcoming the challenge of lifting their feet off the ground to stand upside down on their hands. This clearly shows the influence of psychological factors on the performance of the physical body. In some cases, it takes years for a performer to get into handstand on their own for the first time without assistance, even though the physiological factors such as flexibility and strength have been in place for a long time. Even after handstand has been successfully performed alone one or more times, there may still be occasional slumps before the whole phenomenon stabilizes to the point where you can almost always get into handstand on the first attempt.
- Handstand is easier to take and hold when the hands (and upper arms in the shoulder joints) are turned outwards. Please note, however, that the stretching and strengthening effect on the shoulders is reduced and the necessary balancing also changes, in the sense that it requires a little more attention to balance in a forward/backward direction, partly because the base of support is reduced. What is more serious, however, is that the more the hands are turned out, the greater the loss of the ability to keep the shoulder and therefore the rest of the body away from the wall by pressing the palm of the hand downwards using the strength of the palmar flexors in the forearm! Don’t underestimate this effect, especially as a beginner, but learn by slowly turning your hands out further and further how this changes your pose and, above all, how you can still hold it safely.
- An important movement is the stretching from of the shoulder (elevation of the shoulder blades), i.e. the utilization or expansion of the range of motion (ROM) of the shoulder blades in the scapulothoracic sliding bearing, which (if the arms are not in the overhead position but next to the body, e.g. in standard anatomical position) corresponds to the shrug, i.e. the movement of the shoulder blades on the back in a cranial direction (or as a repeated movement alternating with the movement in a caudal direction). To do this, without changing the angle between the legs and pelvis or between the upper arms and upper body, try to push the heels up the wall using the strength of the muscles required for the „shrug“, i.e. primarily the trapezius and levator scapulae, i.e. convert every exertion of the aforementioned muscles directly 1:1 into a movement of the heels on the wall.
- When being assisted by a supporter, the following must be observed when swinging the legs up:
- the swinging leg represents a potential danger to the supporter. Contact between the swinging foot and the supporter’s head can result in serious injuries, including loss of consciousness.
- If the performer is only helped by the leg, there is a risk that the force applied will be transferred to the performer’s shoulder and push it towards the wall. If the performer does not have the necessary flexibility in the shoulder joint or does not have sufficient orientation as to which movements are necessary, he will translate the applied force into a evasion of the shoulder towards the wall (instead of moving the legs and pelvis further towards the wall, increasing the angle in the shoulder joints and decreasing the angle in the hip joints) and lose the support to continue holding on to the arms. It is therefore necessary to limit the movement of the shoulder towards the wall for a while, e.g. by using a hand or knee to prevent it from moving too far towards the wall. It should also be noted that a passively raised leg causes rotation of the upper body and shoulders and therefore puts more strain on one shoulder or the corresponding arm.
- People who are infelxible in the shoulder tend to stand in handstand with a hollow back. This is the result of the angle in the shoulder joints remaining significantly less than 180°, which prevents the upper body from reaching a vertical position (and certainly from tilting further towards the wall). As the heels are against the wall, a bend must occur somewhere between the shoulders and feet. This usually occurs in the lower back because, firstly, the flexibility of the lumbar spine is much greater than that of the thoracic spine, secondly, in most such cases the thoracic spine (in which a backbend could also occur) will not necessarily be flexible and, thirdly, the possibility of extension in the hip joints (or at least sufficient reduction of flexion) will usually not be sufficiently available. Affected performers often leave the handstand with a tense feeling in the muscles of the lower back, but in most cases this is harmless and can be remedied in the short term with poses such as downface dog or, even better, 1st hip opening. The supporter should therefore also try to increase the angle between the upper body and upper arms, not simply by pushing the upper body towards the wall, of course, but by applying this same pressure at the same time countering it in the shoulder area, for example by holding the shoulders or slightly pulling on the shoulders with the hands and pushing the upper body against the wall with the head in the area of the upper abdominal muscles (just distal to the origin of the rectus abdominis) with simultaneous traction on the shoulders.
- These factors must be taken into account when practicing with or without assistance.
- Straightening the upper body, i.e. increasing the angle of frontal abduction in the shoulder joints, is one of the essential efforts in handstand, at least until great shoulder flexibility is achieved. After that, the focus should be on stretching from the shoulder (elevation of the shoulder blades) or turning out the arms. See above for further comments on straightening the upper body.
- Free handstand is a variation that requires years of preparation when performed correctly in terms of even pressure distribution between all the metacarpophalangeal joints and between these and the wrist area. There is an extreme relationship here between the external moment occurring during balancing, resulting from the maximum length of the lever arm (in this case the length from the heels to the wrists) and the weight present (exactly the whole body weight minus only the weight of the hands) and the means available to manage it, namely the lever arm of the forearm muscles for palmar flexion and dorsiflexion (in the wrist this lever arm is in the order of approx. 10 cm) multiplied by the force that the forearm muscles can exert (they are not „designed“ or trained for such loads). In addition, many people who are not particularly flexible in their wrists are in the area of maximum stretching, i.e. very long sarcomere length, and therefore have significantly reduced strength and performance of the forearm muscles, apart from the stretching sensation that may restrict exerting force. As with headstand, it is advisable to try to slowly and synchronously detach yourself from the wall with outstretched legs, in this case – in comparison to headstand – not from the strength of the skeletal muscles and pressure of the elbows against the floor from the strength of the shoulder muscles (deltoids), but also from the strength of the forearm muscles. It is therefore highly advisable to plan intensive pre-exercises to strengthen the forearm in preparation for free standing, as well as to ensure sufficient flexibility of the wrist in the direction of palmar flexion and dorsiflexion and to warm it up sufficiently.
- Even more frequently than in headstand, it is observed in handstand that the outstretched, swinging leg is bent shortly before reaching the wall during the upswing, which guarantees that the pelvis does not fall below a certain distance from the wall and that the center of gravity is not shifted from the wrists sufficiently towards the wall, so that the pose will not be not achieved. This is probably an unconscious mechanism to prevent control being taken away from the legs and given to the arms, i.e. an expression of fear of the pose and its imponderables.
- Swing into a handstand as quickly as possible. For the less experienced, swinging up slowly may result in the rotational moments in the spine (which propagate downwards from the pelvis in the direction of the head) acting on the shoulder area over a longer rather than shorter period of time and causing a certain tendency to tip over. Due to the inertia of the upper body, the time factor plays a role here. Another argument in favour of the fast upswing are the gyroscopic forces that stabilize the upswing depending on the speed.
- Do not look at the hands or wrists. This would suggest the wrong movement in the shoulder joint, namely to reduce frontal abduction. As a result, the upper body would usually tilt and a hollow back would develop. On the other hand, looking straight ahead or even beyond upwards (in spatial coordinates) promotes the correct movement in the shoulder joints, namely frontal abduction.
- Information on dealing with cubitus valgus can be found in movement physiology under axial misalignment.
Known problems that can occur even when executed correctly
Pain in the wrist occurs in many poses in which the wrist is at an angle of around 90° of dorsiflexion, e.g. upface dog. In addition to pressing the palm of the hand down more forcefully, stretching the palmar flexors of the forearm helps; the wrist can possibly be placed on a few patches so that the palm tilts a little and the angle of the necessary dorsal flexion is smaller.
A tendency to cramp in the trapezius
As with other overhead poses of the arms, a tendency to cramp in the trapezius can also occur here. This is almost always the result of a combination of several factors:
- insufficient flexibility in the shoulder joints, i.e. the ability to increase the angle between the upper arm and upper body, where the trapezius must rotate the shoulder blades outward, and to stretch from the shoulder (elevation of the shoulder blade) in the sense of a shrug.
- a high basic tension (tone) of this part of the trapezius, possibly combined with low resilience of this muscle.
- lack of external rotation of the arms or lack of ability to turn it out.
Pain in a hollow back: If the shoulders are not very flexible, the upper body may lean significantly against the arms (angle of snaller than 180°), resulting in a hollow back. The less you try to counteract this with your core muscles, the greater the pain will be felt.
Tendency to cramp in the deltoids: Depending on the tension in the trapezius, a tendency to cramp may occur in rare cases. This would be increased by inadequate external rotation of the arms and reduced by more vigorous external rotation.
Dizziness: this usually occurs when leaving handstand, mostly as a result of problems in the cervical spine or as a result of the changed circulatory situation: leaving handstand may lead to a deterioration in the good supply situation of the brain in the handstand, which requires counter-regulation until dizziness can occur. However, this should not last longer than a minute. If the dizziness lasts longer, the cause is often to be found in the cervical spine.
Variants
Shrug

Creates awareness for the movement of the shoulder blades on the back and strengthens the related musculature
Instructions
- Take the pose as described above.
- After you have stretched from the shoulders (elevated the shoulder blades), as required in handstand, slowly lower the upper body again with the arms still stretched in the shoulders and raise it again. Establish a confident control of the movement and find the range of motion to gradually extend it further.
Details
- With less flexibility in the shoulders, the scope for shrugging is small to barely perceptible. The first step is to differentiate between the attempt to stretch from the shoulder and the pure slump in the shoulders, so that both can be clearly and purposefully elicited and alternated between the states.
- Often, and especially with less flexible shoulders, the exact stretching (elevation) movement in the shoulders cannot be precisely separated from the tilting of the upper body relative to the arms (a reduction of frontal abduction in the shoulder joints) or the extension of the arms or possibly a rotational movement of the arms in the shoulder joint. A supporter is then often needed for correction.
- Make sure that you don’t perform a movement in your upper body but keep it stretched so that stretching from of the shoulders is converted 1:1 into an upward movement of the heels on the wall.
- Depending on the nature of the wall, the sliding of the heels on the wall resulting from stretching from the shoulders (elevation of the shoulder blades) in particular will cause a perceptible noise combined with a vibration sensation at the heel. This is a good indication that you are working correctly.
Known problems that can occur even when executed correctly
Tendency of the trapezius to cramp: When you stretch forcefully from the shoulder (elevate) and repeatedly, the trapezius involved in the movement may become noticeable with a tendency to cramp.
Bend arms
This variation brings powerful work to the triceps and deltoids and, in addition to strengthening the shoulders and arms, can sometimes also be used – assuming sufficient strength – to reduce the cramp-prone tension in the deltoids that sometimes occurs after frequent practice of the downface down.
Instructions
- Take handstand the usual way. The hands should not be closer than shoulder-width apart, rather (for starters) a little further apart.
- Begin to bend your arms carefully. Depending on the exercises you have already done, give the triceps some time to warm up at the beginning to protect the elbow joint.
- When the triceps are warmed up and the elbow joint is no longer uncomfortable, start to bend further and hold the bend for longer.
Details
- In extreme cases, you can go from handstand to headstand and vice versa. Beginners are urgently warned against this! Even advanced performers should practise the transition from headstand to handstand for a long time until it has become a matter of course before they start practising the reverse transition, if this is at all desirable. The risk of damage to the cervical spine resulting in trauma and long-lasting dizziness is out of all proportion to the benefits of the transition from handstand to headstand!
- Make sure you don’t move in your upper body but keep it straight and also keep your hips 180° stretched the whole time, so that bending or stretching the elbow joints is converted 1:1 into an upward movement of the heels on the wall.
- It is not always easy to bend and straighten the elbows without tilting the upper body
- The ulnar (away from the thumb) side of the wrist may be noticeable when bending far, see below. Turning the hands in slightly can reduce the discomfort, as can a moderate increase in the distance between the hands.
- The distance between the hands should be greater than shoulder width for this variation so that the ulnar abduction in the wrist, which inevitably occurs when the arms are bent, is not too great.
Known problems that can occur even when executed correctly
Pain in the wrists: Particularly with far bending of the elbows, pain may occur in the ulnar-dorsal area of the wrist due to the compression of the structures. Apart from less bending, a greater distance between the hands or patches under the inner hands can help.
Pain in the shoulder: Depending on the training status and tone of the shoulder muscles, they could quickly become overstrained, possibly with a cramp-like touch. In this case, gomukhasana and the powerful transition between downface dog and upface dog can help.
Turn your arms the wrong way

Makes clear why the arms should be turned out.
Instructions
- Take the pose as described above.
- Now carefully turn the upper arms maximally inwards in the shoulder joints. When the maximum internal rotation is reached or the expected tendency to cramp in the trapezius becomes too great, slowly turn the arms the right way round again (turn the out).
Details
- This variation clearly shows why the arms are turned out and not in, at the same time the difference between the two states shows the range of movement.
Known problems that can occur even when executed correctly
A tendency to cramp in the trapezius: Depending on the degree to which the upper arms are turned in in the shoulder joints, a tendency to cramp in the trapezius is not only possible but probable. This is precisely the purpose of this variation: to show why turning out the arms is so important, although the obvious effect is not the only reason.
on fists
This variation can be practiced in the event of various hand or wrist injuries as a substitute for normal handstand, which may then not be possible. However, this variation lacks the important ability to hold the shoulders away from the wall using the strength of the palmar flexors of the wrist, which requires a clean technique in which the torso swings up around arms that are held still.
Effects:
(428) Tone of the finger extensors
Instructions
- Place your fists instead of your palms with your palms facing each other.
- Keep your arms as still as possible during the upswing.
Details
- In contrast to normal handstand upswing, the body weight does not rest on the palms but on the fists, i.e. on the base joints of the fingers and the proximal interphalangeal joints. This can result in quite a lot of pressure being felt, especially on the base joints of the fingers. The more important difference, however, is that the palmar flexors of the wrist in the forearm can – and must – hold the shoulder area away from the wall in normal handstand upswing. These are no longer available for this purpose in this variation. It is therefore important to learn handstand upswing so well that the arms remain very still, i.e. the whole body swings upwards in the shoulder joint without the arms moving much and, in particular, without the shoulder area moving towards the wall, see also the variant do not move your arms. It is not a bad idea to have a supporter at your side for the first few attempts, who can support your shoulder in case of doubt.
- Keep your thumbs on the outside of your fist, never on the inside! Bend all finger joints with a certain maximum force, the fists must be compact and resilient!
- Due to the stretched wrist, the handstand on fists is the only variation that can still be performed with some hand injuries, apart from the more advanced handstand on fingertips.
- In this variation, the forearm muscles must keep the wrist stable and immobile. Don’t just press your fists aggressively against the floor, but also tense the forearm muscles responsible for flexing the wrist in dorsal direction (dorsiflexors) and in palmar direction (palmar flexors) to keep the wrist stable and immobile.
- Due to a slightly different rotation of the upper arm in the shoulder joint compared to normal handstand and because of the stretched wrist and the palmar flexors in the forearm that are not working on the edge of strength and flexibility, this variation can feel lighter in terms of arms and shoulder.
- While you can play and experiment with the parameter „pushing the hands away from / towards each other“ in a normal handstand, this would lead to a loss of stability in the wrist and, in extreme cases, to a twisted wrist, probably with serious consequences. Refrain from such experiments here.
Known problems that can occur even when executed correctly
Pressure on the knuckles Pressure on the „knuckles“, i.e. in particular the metacarpophalangeal joints, but also on the proximal finger joints, is subjectively perceived very differently, sometimes as hardly bearable. A much softer pad is helpful here, but it must not shift. A mat folded several times or patches on a mat should be ideal.
on fingertips

Strengthening the finger flexors
Effects:
(422) Strengthening the finger flexors
Instructions
- Place the fingertips with the fingers stretched out, the fingers form a semicircle with the thumb, the hands are turned out 15 – 20°.
- Keep your fingers powerfully extended, put maximum weight on your fingers and come into handstand without moving your arms significantly.
Details
- Before this variation can be practiced, the fingers must be strong enough and have proven themselves in comparable but simpler poses. This can be assessed as follows in terms of increasing difficulty and also increased in the following sequence:
- Downface dog: is possible for many, as only about half of the body weight rests on the fingers here, i.e. a quarter on each hand
- Upface dog: should definitely be performed from the downface dog. During the transition, slowly shift the weight further onto the fingers and assess whether upface dog will be possible. Often the doubt is greater than the lack of strength. The finger flexors are often felt intensely shortly after the pose.
- Staff position: the center of gravity is further forward here than in upface dog.
- Rectangular handstand, tolasana: in both poses, the entire body weight already rests on both hands, tolasana also requires a little balancing, so dynamic forces occur in addition to the static forces. Rectangular handstand is less difficult as it can be performed slowly and carefully. Of course, taking a jump is more challenging.
- Ardha vasisthasana, vasisthasana: in these poses, slightly more than half of the body weight rests on one hand.
- Handstand: just like in the right-angled handstand, only half the body weight rests on each hand, but the dynamic forces that occur during the upswing can require more strength and resilience.
- The finger joints are pushed into hyperextension by the body weight, forcefully push the fingertips towards the thumb, which is an exertion of force in all finger joints in the direction of flexion to minimize the effect of the forces that want to hyperextend the fingers.
- The upswing required for this variant resembles an exclusive rotation of the body in the shoulder joints (i.e. around the line connecting the two glenohumeral joints).
- The more steep you position your fingers and palm , the lower the hyperextensive moments in the finger joints. Use your finger flexors to resist hyperextension to the best of your ability.
Known problems that can occur even when executed correctly
Intense sensation in the fingers after leaving the posture: This pose represents a very unusual, great effort for the fingers. Accordingly, an intense sensation in the fingers can occur not only during the pose but also afterwards.
Temporary restriction of fine motor skills: Musicians in particular, but perhaps also precision mechanics such as watchmakers, may experience a temporary restriction of their fine motor skills, which is why it is recommended not to perform this variant the day before a concert, for example.
Upswing without rotating leg

Instructions
- Swing into a handstand without turning the swinging leg out or turning the pelvis sideways away from the jumping leg (the standing leg during swinging).
Details
- This variation can of course also be practiced well with a supporter who keeps a close eye on the leg and pelvis.
- Due to its inertia and the restricted flexibility of the hip flexors, the swinging leg tends to turn the pelvis sideways away from the trailing (jumping) leg. This is all the more true the more restricted the flexibility of the hip flexors is and the more momentum has to be used because there is not enough jumping power available. This effect should be reduced further and further, not least because the momentum of the leg is transmitted via the upper body to the shoulders and arms, causing unequal strain and demands on the shoulder joints and arms.
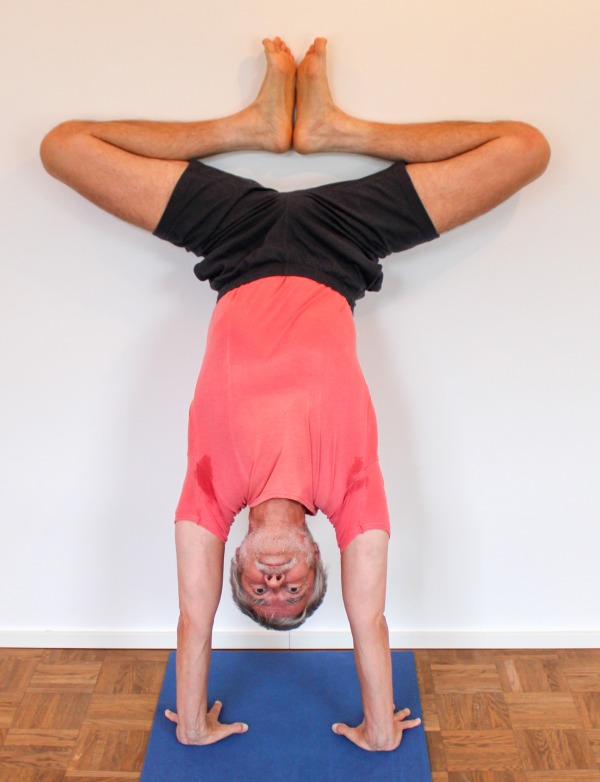
baddha konasana
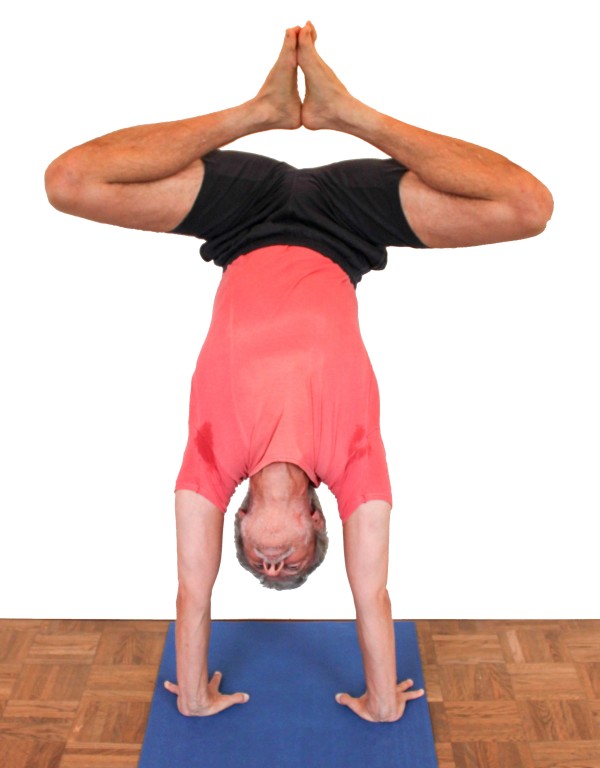
Instructions
- Take the pose as described above.
- Place your bottom on the wall and keep your glutes slightly engaged to avoid falling into a hollow back.
- Bend the knees, pull the feet towards the pelvis and fold the legs from the hip joints towards the horizontal, i.e. into turned out abduction, and bend the thighs at the hip joints until the outer edges of the feet are horizontal and the legs are in the baddha konasana position.
Details
- With turned out thighs, move the feet on the wall towards the pelvis and the knees towards the wall so that the gravity perpendicular remains sufficiently favorable and you do not fall out of the pose towards the floor. If the knee joints are bent further, the knees will move slightly further away from the wall because the bending of the knee joints when the feet are placed on top of each other also causes the hip joints to flex with further abduction of the legs, since the adductors have a hip-flexing effect. This effect naturally has a detrimental effect on the gravity perpendicular.
- If the knees are actively bent with force for too long in order to pull the feet towards the pelvis, a cramp could occur in the hamstrings.
- Work against the hollow back with your abdominal muscles; in this pose your bottom moves upwards, away from your lower back.
Known problems that can occur even when executed correctly
Baddha konasana-typical knee problems that can occur if the knee joints are not fully intact. As is usual in baddha konasana, pain can also occur in the knee joint if the knee is not fully intact. A smaller bending angle often solves this.
Cramp in the back of the thigh: When the heels are pulled forcefully towards the pelvis, the hamstrings may tend to cramp, especially if this is actively attempted for a longer period of time. Let the gravity of the lower legs largely bend the knees and only briefly give an impulse to bend the knees further.
supta baddha konasana
Instructions
- Take the pose as described above.
- Place your buttocks on the wall, keep your gluteal muscles and, if necessary, your abdominal muscles slightly engaged to avoid falling into a hollow back. This effect naturally depends on the distance of the hands from the wall. Reduced mobility, particularly of the shoulder joints, makes a smaller distance necessary and increases this effect.
- Turn the thighs out in the hip joints, place the outer edges of the feet on the wall with the soles of the feet on top of each other, bend the hip joints and pull the feet towards the pelvis until the legs are in a supta baddha konasana position. The feet remain on the wall. Pull your knees as close to the wall as possible.
Details
- Move your knees towards the wall so that the gravity perpendicular remains sufficiently favorable and you do not fall out of the position towards the floor.
- Use the strength of your abdominal muscles to move your bottom up the wall so that you do not fall into a hollow back. If you press the outer edges of your feet onto the wall with moderate force, you can also use your glutes, which is the superior method as this does not affect your inhalation.
Known problems that can occur even when executed correctly
Baddha konasana-typical knee problems that can occur if the knee joints are not fully intact: As is usual in baddha konasana, pain in the knee can also occur here if the knee is not fully intact. A smaller bending angle often solves this.
Cramp in the glutes: When the knees are pulled forcefully towards the wall for long periods of time, the glutes may cramp, which may persist even after the pose. You can then try to remedy this with poses such as half lotus forward bend, hip opener at the edge of the mat, hip opener 3.
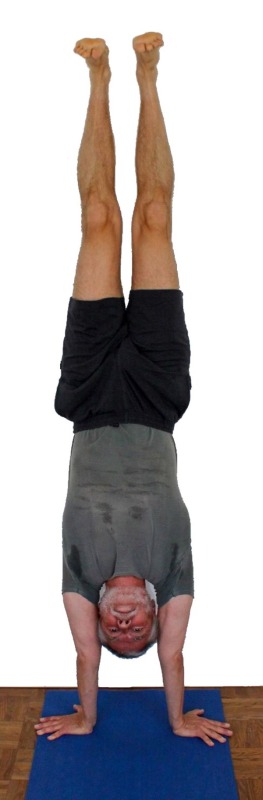
two-legged upswing

Instructions
- Place your hands shoulder-width apart with your fingertips approx. 20 cm from the wall and the tendons of your middle fingers pointing parallel to the wall.
- With the knee joints bent, place the feet at a significantly smaller distance than in downface dog, also parallel (with regard to the center lines of the feet) and pointing towards the wall.
- Press your palms firmly to the floor, give them maximum weight, straighten your arms well, keep your shoulders away from the wall and jump with all the necessary bounce in your legs.
- As your legs fly up towards the wall, straighten your legs and land gently with your heels on the wall.
- Check all parameters of handstand.
Details
- The optimum distance of the feet from the wall depends not least on the flexibility of the hamstrings and the glutes as well as the available power for jumping (bounce): the greater the bounce, the greater the distance can be, the lower the flexibility, the greater the distance must be.
- Even more so than the normal handstand upswing, this requires a great explosion of power for jumping, which requires a completely clear mind. Quite a few people have sort of a „mind issue“ during normal handstand upswing, and this is no less the case here. In contrast to normal upswing, where momentum can be gained a few times with the swinging leg before it is supplemented with the jumping leg for sufficient energy development, these times and processes coincide here, which requires concentration of energy and will. It is normal if this variation does not succeed over a longer period of time. It can be helpful to bounce slightly on the knees several times, although this is very far from the physical energy development of the swinging leg in normal upswing. In order to simplify the upswing, the elbows are often bent by a few degrees so that the potential energy that has to be achieved from the jumping power of the legs becomes affordable, and only then can the rest of the potential energy be added by stretching the elbows from the deltoids and triceps. As long as this flexion in the elbows remains controlled and the flexion angle does not become so large that stretching is no longer possible or only possible to a limited extent, there is nothing to be said against this aid. Another method that has proven to be effective is to first take handstand swinging normally with one leg, then land with two knees bent wide and immediately jump off again with full force without delay and without delaying mental processes. The bending knees absorb a lot of the potential energy from the landing and bend widely so that they can cover a large angular range during the subsequent stretch. The longer the force of the thighs has time to accelerate the body mass, the greater the energy used and the greater the height that can be achieved! This is all the more important as the available jumping power is usually quite limited. This procedure naturally requires healthy knee joints; disorders such as jumper’s knee, Osgood Schlatter’s disease in young people, gonarthrosis or meniscus damage are of course contraindications.
- In all cases, controlling the movement of the shoulder area is an essential requirement: it must not move uncontrollably towards the wall! The movement of the shoulders during the upswing has to be away from the wall, which makes the upswing more difficult and complicated. For your own safety, never violate this requirement. Practicing normal handstand upswing without moving the arms as described above, i.e. turning the whole body with the shoulder joint remaining in the same position and jumping around on the wall in a rectangular handstand, can prove helpful.
- Meaningful assistance from a supporter as in a normal upswing is much more difficult here, as both legs would have to be gripped. This means that the arm gripping the legs has to be pushed further forward by the supporter (from the supporter’s perspective) and the head is more likely to collide with one of the swinging legs.
- It takes some experience to find the right point at which to start stretching the swinging legs and the right speed of stretching. If the legs are stretched too early or too quickly, this may stifle the upswing, if they are stretched too late or too slowly, the heels may hit the wall roughly or even the buttocks may come into contact with the wall and, in the worst case, the shoulder area.
- It can be helpful to internalize the differentiation that although the pelvis jumps towards the wall and upwards, the shoulder area jumps less; its movement towards the wall is incomparably smaller and must remain very limited.
- In contrast to the normal upswing, this variation can be practiced better with injuries to the hamstrings (especially strains, irritations of the origin at the ischial tuberosity, the PHT), as the bounce hardly comes from the back of the leg, which is also not stretched at the beginning as with the swing leg of the normal upswing. This variation places far greater demands on the performance of the quadriceps and knee health, but less on the hamstrings.
- Don’t practise when you’re tired, so as not to put yourself at risk
Do not move your arms

Controlling the movement of the shoulder during the upswing
Instructions
- Jump into a one-legged handstand as described above, but try not to move your arms.
Details
- The shoulder often moves towards the wall during the handstand upswing. This movement must be controlled and limited for several reasons:
- the shoulders must not hit the wall, as this could trigger a shock and uncontrolled bending of the arms, which in most cases is no longer controllable due to a lack of strength, so that the end result could be an uncontrolled, rough landing of the head on the floor with a risk to the cervical spine.
- Even if the shoulders reach the wall with the arms stretched (and not uncontrollably bent), depending on the distance of the hands from the wall, many performers no longer have the strength to release the shoulders from the wall and assume the correct handstand.
- Wrist joints could be forced into dorsiflexion beyond their range of motion, and the resulting pain could be so irritating that it distracts from the necessary corrective movement.
- Even if the shoulders reach the wall with the arms stretched (and not uncontrollably bent), depending on the distance of the hands from the wall, many performers no longer have the strength to release the shoulders from the wall and assume the correct handstand.
- the shoulders must not hit the wall, as this could trigger a shock and uncontrolled bending of the arms, which in most cases is no longer controllable due to a lack of strength, so that the end result could be an uncontrolled, rough landing of the head on the floor with a risk to the cervical spine.
- This variation is intended to give you a better feel for the movement and control of the shoulder. In general, the upswing with shoulder control is perceived as more difficult than without; moving the shoulder away from the wall contradicts the body’s natural kinetics and requires more and more concentrated effort. It has often been observed that performers who are asked not to move their shoulders towards the wall, or to move them less towards the wall, are initially unable to perform the handstand lift with this requirement.
two-legged upswing as jumping

Instructions
- Do the handstand jumping on both legs as described above.
- As soon as you are in handstand, jump back to the floor on both legs, dip your knees and jump off again immediately without delay and without thinking about it.
- Repeat this for as long as your stamina allows or until you lose control, which could lead to danger.
Details
- As already described in the two-legged lift, this is not accessible to everyone. The trick described there of landing on both legs after a one-legged upswing, landing low on the knees and immediately jumping off again without delay or hesitant thinking, usually with full jumping power, becomes a jumping movement that can be repeated at will. Getting into the flow in this way can make it easier to get up on both legs, firstly because the movement becomes more conscious and the parameters and dependencies are better known and felt, and secondly because the psychological blockages that often lead to insufficiently powerful jumping in the sense of subconscious or partially conscious avoidance behavior become smaller, not least because of the successful action and confirmation, but also because of the extraordinary focus required.
- If your strength/endurance or control decreases, stop!
- Here the dependence of the time at which the stretching of the legs is started, its speed and the resulting force with which the heels hit the wall (if at all) can be well investigated and it becomes clear that too early a start or too great a speed of the stretching leads to a slowing down or even to the termination of the upswing movement, the reason is of course the swing energy consuming increased lever arm of the center of gravity of the accelerated body mass.
- Most thought processes that are not proactively closely linked to movement and the evaluation thereof are extremely obstructive here.
Dips
Effects: (302) Triceps strength
Instructions
- Take a handstand, jumping off with one or two legs.
- Slowly bend your elbows outwards to the limit of your strength, but not more than approx. 120°, even if you have a lot of strength in your arms.
- Slowly extend your elbows again in a controlled manner and then bend them again, stretch them and so on…
Details
- Excessive bending in the elbow joints puts undue strain on them as well as on the ulnar side of the wrist. Even if, which is rather rare, there is enough strength available to bend the arms significantly more than 90° (and extend them again), approx. 120° should be the upper limit for bending.
- If there is little strength available in the arms and shoulders, this variation may start with a few degrees, as is also known from the pole position. Younger women in particular often have less arm strength, statistically speaking and due to their average movement patterns, and need to build this up slowly.
- If there is significant discomfort in the ulnar sides of the wrists, the angle of the hands to each other can be varied, in particular the hands can be turned in a little. It is also quite helpful to increase the distance between the hands.
eka pada
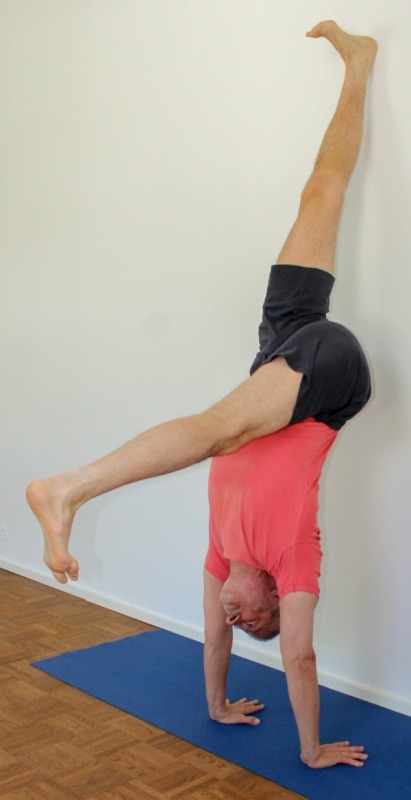
Effects: (721) Stretching of the hamstrings
Instructions
- Take the pose as described above.
- Slowly move one leg further and further away from the wall towards the floor until you reach the limit of the hamstrings’s flexibility.
Details
- When moving the leg towards the floor, depending on the exact position of the pelvis, the shoulder and the distance from the wall, there is a point of no return at which you will inevitably fall out of the pose because the gravity perpendicular is beyond the wrists when viewed from the wall. You can feel how far you are from this point by the weight with which the remaining heel presses on the wall. If the distance between your hands and the wall is not too great, it is important to shift body mass towards the wall, i.e. to move your shoulders or pelvis or both towards the wall. As already described above, the movement of the shoulders towards the wall should be treated with great respect, because for almost everyone there comes a point at which the strength of the deltoids is no longer sufficient to move the shoulders away from the wall back to the starting position. Care must therefore be taken when moving the shoulders. The movement of the pelvis towards the wall is far less critical. If the leg has been lowered a little, it is often enough to release the tension in the abdominal muscles. If the pelvis is moved towards the wall without having already bent one leg in the hip joint, an uncomfortable hollow back can naturally occur. Sequence and measure are therefore not unimportant here. Move the leg away from the wall towards the floor in such a way that you can feel sufficient pressure from the heel on the wall at all times by moving the pelvis and, if necessary, the shoulder. If the leg is moved very quickly from the flexed hip joint position back up to the wall, the heel of the upper leg may briefly leave the wall despite the other parameters being correct. However, this does not indicate that the gravity perpendicular, i.e. the position of the pelvis and shoulder in relation to the distance of the hands from the wall, is not suitable, but is a kinetic phenomenon due to the inertia of the leg to be lifted, which would not occur statically or very slowly in the same position of the leg and disappears again when the leg is lifted further. Even if, towards the end of the movement, the gravity perpendicular was still slightly unfavorable, the inertia of the already accelerated leg would move the pelvis and possibly the upper body a little towards the wall. Another reason not to accelerate the leg to be lifted too much is the limit of the hamstrings at the ischial tuberosity: if the leg is accelerated with the full muscular capacity of the hamstrings, there is not only a risk of the above-mentioned tipping over but maybe over time also of overloading its tendinous origin with strain or PHT, Proximal Hamstring Tendinopathy.
- As already described in the last point, the distance between the hands and the wall must not be too small, because otherwise the gravity perpendicular would be beyond the wrists when the leg is lowered as far as possible, meaning that the pose could no longer be maintained from a purely physical point of view.
- The gravitational force of the lowered leg creates a moment in the respective hip joint, which tilts the pelvis in such a way that the lumbar spine is moved in a convex (kyphotic) direction (in relation to the other leg in direction of extension in the hip joint) and continues through the back into the shoulder joints in the sense reducing frontal adduction, i.e. the opposite of the maximum frontal abduction to be performed. Consequently, lowering the leg will increase the work required in the shoulders and arms so that the shoulder joints remain extended (in the sagittal plane) and do not move towards the wall. At the same time, the lowered leg largely protects against an uncomfortable hollow back due to the moment created in the hip joint and the resulting tendency to straighten (in direction of convex) the lumbar spine.
- The lowered leg tilts the pelvis as described above and moves the contralateral hip joint into extension or at least in the direction of extension in the hip joint. This in turn leads to evasive movements of the leg in the respective hip joint at the limit of flexibility with regard to extension in the hip joint, in which it tends to turn out and the pelvis may take a slightly inclined position in the frontal plane. In addition, the knee joint of the upper leg wants to bend and the pressure of the heel on the wall is reduced.
- Extend the lowered leg and avoid to turn it out.
- As the knee of the lowered leg approaches the flexibility limit of its hamstrings, it shows an increasing tendency to bend, which is not compensated for by the gravity of the lower leg, which contributes to stretchint the knee in the direction of extension according to the design of the pose. An extended knee joint can therefore generally only be achieved by using the quadriceps when the leg is lowered far. The tendency of the rectus femoris to cramp, which is very common when the knee is extended while the hip joint is flexed, is significantly less than in poses in which the knee has to be extended against gravity.
free

Instructions
- ..
Details
- ..
Hands on the wall
Instructions
- Place your hands so close to the wall that the first fingertips (usually the middle fingers) touch the wall.
- Take handstand one-legged.
Details
- This variation requires a lot of fine-tuning so that the body does not fall out of handstand again. The relationship between the individual components of the upswing must be just right. If the swing is too big, you will „bounce“ off the wall again. If, on the other hand, it is too small, the pose will not be achieved. The relationship between the individual components of the movement must also be precisely coordinated.
- The pressure usually exerted on the wall with the heels will only be minimal here.
Hands turned inwards

Instructions
- Place your hands with the wrists shoulder-width apart approx. 20 cm in front of the wall so that the tendons of your middle fingers are pointing towards each other, i.e. turned inwards.
- Take the pose as described above (one-legged upswing).
Details
- In this variation, as with hands turned outwards or backwards (away from the wall), the strength of the palmar flexors, which help to limit or intercept the movement of the shoulder towards the wall, is missing. This variation is therefore not suitable for inexperienced beginners. The only rather weak substitute available is the increased supination of the forearm/wrist, which is significantly weaker in terms of muscles, but also due to the smaller lever arm (half the width of the hand compared to the length of the palm). Experience and mindfulness are therefore required to prevent the shoulders from moving significantly towards the wall, which can no longer be intercepted from a certain, relatively early point.
- The changed position of the hands results in a different effect on the shoulder and forearm muscles. If the hands were placed too far apart, the stretching requirement in the wrist in terms of dorsiflexion would increase to an unmanageable degree. Even before this, compression pain in the dorsal wrist area is likely to occur, which can hardly be controlled even with vigorous use of the palmar flexors of the forearm. In addition, depending on the flexibility, a clear to excessive stretching sensation of the palmar flexors may occur. On the other hand, it is not advisable to keep the hands too close together as this would result in a loss of lateral stability, which is particularly true for beginners with an insecure and not very powerful upswing, see the discussion above (inertia of the upper body and gyroscopic forces).
- If the body threatens to tip to the right, the right arm must be pressed more firmly against the floor for a short time, and the left arm can also be bent slightly for a short time.
Hands turned outwards
This variation allows you to feel the stretch in the inner arm area better and gives you a little more feeling for free standing than normal handstand.
Instructions
- Place your hands facing outwards, about shoulder-width apart, not narrower, and swing into handstand.
Details
- If the distance between the hands is too narrow, the width of the physical support base is reduced, making it more susceptible to lateral wobbling. This is not normally a problem in handstand, but it may be a problem for performers who do not apply much momentum when taking up handstand, as the upward swing of the leg and the upward swing itself, due to their asymmetry and dynamics, involve the need to balance torques around the body’s longitudinal axis and rotational moments. The lower the speed of the up-swinging leg, and subsequently the pelvis and upper body, with which they move into the pose, the more force and attention must be applied to compensate for these moments, see again the discussion above (inertia of the upper body and gyroscopic forces).
- As already described elsewhere, there is no possibility of using the palmar flexors of the wrist to keep the shoulder away from the wall, which is very important for taking handstand, especially for the inexperienced. It follows that this is not a variation for the less experienced. You need to have a confident command of the upswing in order to practise this variation safely. A gradual approach to the 90° rotated position is recommended, e.g. by rotating the hands 10° – 20° further in a quick sequence compared to the normal position and not holding the handstand for long, so that the change caused by the rotation can be perceived and evaluated in a close temporal context.
- If pain occurs in the dorsal wrist, the distance between the hands can be increased slightly.
- This variation feels a little „freer“ and looser in the shoulders and arms; however, this must not lead to a loss of care. There is a certain risk of hanging in one of the two shoulders. Instead, stretch upwards evenly and powerfully from both shoulders.
Hands turned backwards
This variation is very different from normal handstand. Here, the tendency of the shoulder to move towards the wall while swinging up into the handstand is very pronounced, which requires careful approach through various harmless angles of turning out the hands. This pose should not be practiced at all for a long time by beginners and should definitely be practiced under the supervision of an experienced teacher by more advanced students. In addition, the flexibility requirements of the shoulder and forearm muscles are pronounced.
Instructions
- Place your hands on the floor facing away from the wall, the tendons of your middle fingers parallel. Be sure to keep the shoulder moving away from the wall, as it will want to move towards the wall during the upswing, which is very difficult to control here.
- Take handstand.
Details
- Approach the 180 degree turn of the arms step by step. Observe the tendency to be able to control the shoulder less easily (in terms of evading the wall) with each additional step.
- A typical (and initially justified) protective measure taken by many people who are not practiced in this pose is to try to make the impact of the first heel on the wall more gentle by bending the leg a little. This is justified and sensible to the extent that the body wants to move further towards the wall after the first heel touches down due to inertia. The harder the stop, the more pronounced the effect of the inertia will be and the more the upper body will move towards the wall. There is no way of counteracting this in the forearms/hands; this has to be done solely from the strength of the shoulders and a clever choice of the gravity perpendicular just in front of the wrists (on the finger side), which is generally a very unusual requirement that also may take place at the limit of shoulder flexibility and dorsiflexion: The more favorably you try to hold the gravity perpendicular (i.e. further away from the wall), the greater the dorsiflexion required, especially in the upswing. It follows that this variation should not be practiced without sufficient dorsiflexion of the wrist that can significantly exceed 90° under load.
- The necessary and correct effort to keep the shoulder away from the wall leads to the upswing becoming somewhat more difficult, i.e. requiring more momentum.
- Bending the elbow joints slightly at the beginning of the swing up can make it easier to control the shoulders. Of course, this must remain controlled. It should be noted that the slight bending of the elbow joints in the direction of dorsiflexion beyond 90° places even greater demands on the flexibility and strength of the wrists, i.e. the forearm muscles, than the sole attempt described above to hold the gravity perpendicular in a favorable position.
- Ideally, the arms should be completely still during the upswing. It makes sense to practise this in advance with the normal hand position, see above.
Push hands towards each other

The purpose of this variant is to get more feeling for stretching upwards. It also involves the pectoralis major working in the pose and reduces the tendency to hyperextend the elbow joints.
Instructions
- Take handstand the normal way and make sure that your hands are no more than shoulder-width apart.
- Start to push your hands towards each other against the resistance of the floor.
Details
- Avoid reducing the angle of frontal abduction in the shoulder joints from the required 180° in order to have more strength for pushing the hands towards each other, which is equivalent to a partial shift of the load from the weaker anterior deltoid (pars clavicularis) towards the stronger pectoralis major muscle. For several reasons, the upper arms are often moved slightly outwards when the elbow joints are flexed, which also provides significant relief:
- The load arm from the glenohumeral joint to the place where the force acts (the floor) becomes shorter, so the available force can act more favorably.
- The working points of both the deltoid and the pectoralis major are shifted to a more favorable range according to the force-length function.
- As well as pushing your hands towards each other, stretch as far as possible from your shoulders (elevate the shoulderblade). This is a good preliminary exercise for free standing in handstand.
- Those who hyperextend the elbow joints have another good option for reducing or preventing hyperextension in addition to the pure use of the biceps described in the FAQ: vigorously pushing the hands towards each other is unlikely to be compatible with hyperextension, as the biceps (more precisely: its adducting caput breve; caput longum belongs to the abductors due to its course lateral to the glenohumeral joint) is almost inevitably also used. Rather, care must be taken to ensure that the arms do not bend significantly here, especially in less flexible shoulder joints where this inclination is present anyway.
- Pushing the hands towards each other tends to reduce the external rotation of the arms by using the internally rotating anterior deltoids and the pectoralis major. Ensure that this is maintained as fully as possible.
Known problems that can occur even when executed correctly
Tendency to cramp
A tendency to cramp can occur in the anterior shoulder muscles pars clavicularis of the deltoids or the pectoralis major.
Head and back against the wall

Instructions
- Place your hands on the floor a short distance from the wall, palms facing the wall as usual, fingers slightly apart.
- Swing into handstand.
- Slowly place your bottom on the wall, keeping your shoulder away from the wall for the first step.
- When your bottom is resting on the wall, carefully and slowly start to move your back and shoulders towards the wall until they finally rest on the wall.
- Check the work of the arms again and push the upper body upwards on the wall against the existing friction (from the force of the shoulder blade elevators).
- To exit this variation, go back the same way: first release your shoulders from the wall, then your back and bottom (not the other way round!) and then come out of handstand.
Details
- Warning: this variant is completely unsuitable for beginners! It requires experience, strength and control!
- This variation requires a great deal of strength in the arms and shoulders, especially if the distance between the hands and the wall is not exactly small, just a few centimeters can make a big difference!
- Less experienced users in particular should start with a very small distance between their hands and the wall. There is a conflict of goals here: if the hands are directly on the wall, it is very difficult for the inexperienced not to fall straight back out of handstand; if it is too large, the strength of the deltoids (and the upper back) will not be sufficient to slowly place the shoulder on the wall in a controlled manner, much less to release it from the wall again later in a controlled manner.
- If at any point during this variation you feel a lack of strength in your arms or feel that you can no longer release your shoulders from the wall, pull one leg out of the pose towards the floor, which will immediately relieve the strain on your arms and allow you to exit handstand in an orderly and safe manner.
- The wrists are well over 90° dorsiflexed here! Depending on the selected distance and flexibility of the forearm muscles (palmar flexors and finger flexors), a clear discomfort can occur in the dorsal side of the wrist. This is a sensation that does not indicate anything constructive such as stretching or strengthening, but simply compression of non-muscular structures of the joint, which must be avoided. If more forceful use of the palmar flexors is not sufficient, build up the pose again with the hands at a smaller distance from the wall.
- The buttocks are placed on the wall by gradually reducing the tension in the abdominal muscles and, if necessary, using the strength of the autochthonous back muscles to bend the lower back slightly backwards. To raise the shoulders, this slight backbend must be released again and the angle of frontal abduction in the shoulder joints must be reduced. This combination is not known from other poses and is more likely to occur when exiting poses such as back arch. If the shoulder area is placed on the wall, the force required increases the closer the shoulders are to the wall. The maximum required force of the deltoid increases significantly with the distance of the hands from the wall. Similarly, the required flexibility in the direction of dorsiflexion of the wrist increases. Both values quickly exceed any reasonable level!
- Keep your arms stretched consistently, even and especially when it gets strenuous!
- If your hip flexors are clearly restricted, your heels may lift off the wall if you place your back and shoulders on the wall after having placed the bottom on the wall. This is not fundamentally problematic, but it does take away some of the feeling of security in the pose and costs lateral stability! From a diagnostic point of view, a clear restriction of flexibility in the hip flexors is made visible in this way.
- If this variant is successful and the forces occurring can be assessed, the head can also be removed from the wall.
- The neck muscles that move the head should not be subjected to too much strain; in cases of known damage to the cervical spine, this variant may be contraindicated.
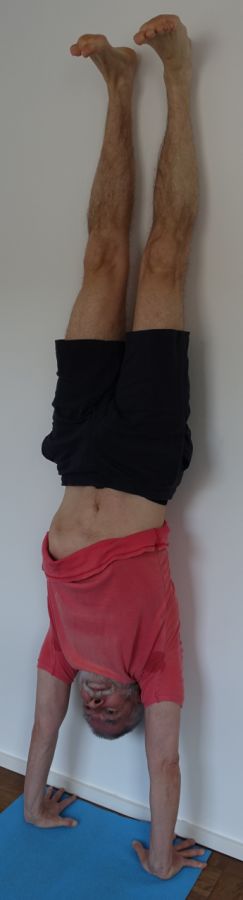
stand with your feet on the wall

Demands and gives more sense of balance
Instructions
- Assume the handstand position and choose a distance between your hands and the wall that is slightly longer than the length of your lower leg.
- Place one foot after the other with the sole on the wall so that the lower legs are horizontal. The whole body moves from the initial incline of normal handstand to the vertical.
Details
- As already mentioned in the instructions, this variant differs significantly from normal handstand in terms of the alignment of the body: while in most variations the body leans against the wall and so that a significant pressure of the heels on the wall can be felt and thus a certain stability can be conveyed, the purpose of this variation is to bring the body so well into a vertical position that the pressure of the heels on the wall is close to zero. In this respect, this variation is a good preparation for free handstand, in which there is no longer a wall for the heels to press against. When the first sole of the foot is placed on the wall, the body is still in the usual alignment, which results in a clear flexion in the hip joint of the leg placed with the sole of the foot on the wall. The foot is then pressed more firmly onto the wall so that the whole body moves more or less vertically and the corresponding hip joint moves almost in an extended direction. In the next step, the second heel is removed from the wall, with the other sole of the foot taking over its pressure, which should be felt, even if the pressure is now rather low due to the almost vertical position of the body. Once the second sole of the foot has been placed on the wall, distribute the pressure evenly over both feet and align the whole body as vertically as possible, with the pressure of the soles of the feet on the wall approaching zero. The gravity perpendicular is then under the palms of your hands. If there is a risk of falling out of the handstand, you can quickly move your pelvis a little towards the wall by flexing the hip joints, which will make the gravity perpendicular more favorable again and put pressure on the soles of your feet. Do not move the shoulders towards the wall instead of the pelvis, see the discussion above.
- If the feet threaten to become so light on the wall that free standing is close, the goal of the pose has been achieved. If slightly greater stability is required, i.e. a little more pressure of the soles on the wall, both the pelvis and shoulders can be moved slightly towards the wall. It is much easier to move the pelvis towards the wall than the shoulders due to their unequal power.
with backbend
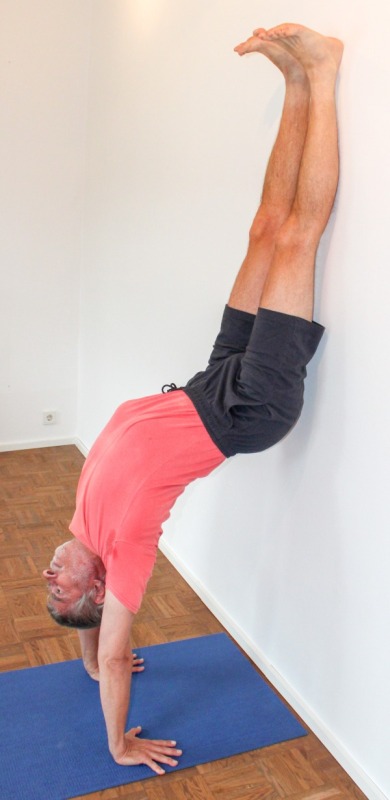
Instructions
- Place your hands at a much greater distance from the wall than usual.
- Take handstand as usual.
- Move the pelvis beyond the hands, tilt the hip joints into flexion using the hip flexors and straighten the legs on the wall.
Details
- Move your shoulders away from the wall and your buttocks on the wall towards the floor.
- In comparison to the version above with the soles of the feet on the wall, here the heels press on the wall with noticeable weight.
- Make sure you continue to extend your arms, turn them out and elevate your shoulder blades.
- Depending on the distance of the hands from the wall, the buttocks either remain at a distance from the wall or touch down.
swing up with the unfamiliar leg

Instructions
- Get into handstand as usual, but now use the other, probably unfamiliar leg to swing and jump off.
Details
- This pose shows many people once again how accustomed we are to poses and movements and how unfamiliar it feels when we try to perform them laterally reversed. This applies not only to the trained fine motor skills of the arms, e.g. when writing, painting, making music or cooking, but also to the legs. Many people who are able to do handstand with aplomb initially falter the first time they try to do it laterally reversed. As explained above, a certain minimum swing is necessary in order to avoid the risk of tipping over sideways during the end of a slowing upswing. It is well known that many people have a „mind issue“ during handstand upswing, and this is all the more evident or reappears here.
jump from maximum forward splits

Instructions
- Lift the swinging leg to the maximum of the upswing position and hold it there.
- Jump off with the jumping leg without moving the swinging leg as hard as necessary to take handstand.
Details
- This variation begins with an attempt at the standing splits with the hands on the floor. The handstand upswing is only undertaken with a moderate jump with the jumping leg, if possible without bending the lifted leg.
- This variant requires very good flexibility in the hamstrings. If the flexibility is still significantly restricted, this results in a significantly less steep pelvis and, due to restricted flexibility of the contralateral hip flexors, a less raised leg and therefore a less favorable gravity perpendicular, which results in a significantly increased need for jumping power in the standing leg. Regardless of the flexibility of the hamstrings, the flexibility of the hip flexors is also an important prerequisite for the above reason.
only head against the wall

This is a comparatively simple preliminary exercise for free standing, which helps you to learn how to use your muscles and balance using the strength of your skeletal muscles.
Instructions
- Take handstand against the wall the usual way so that the distance between your hands and the wall is no more than approx. 10-15 cm.
- Tilt your head clearly back and look at your hands.
- Move your shoulders towards the wall in a controlled manner until your head rests on the wall.
- With even pressure of the head against the wall, start to use the hip flexors and the rectus abdominis to move the feet away from the wall with the legs straight.
Details
- Be sure to stretch your legs so that you can develop a precise feel for the use of the skeletal muscles, especially the rectus abdominis. If balancing was only partially achieved by stretching and bending the knee joints, hardly any intensive work in the hip flexors and rectus abdominis would be necessary and there would be hardly any gain in body awareness and strength.
- In some cases of injured cervical spine or significant tension there, this variant should not be used.
- A certain degree of strength in the deltoids and arms is a prerequisite for practicing this variant safely. If you feel that you cannot detach your head from the wall, you can place your heels on the wall and use the strength of the back of your body, especially the hip extensors, to detach your head from the wall. To quit the pose as quickly as possible, one leg can of course also be accelerated quickly towards the floor, which relieves the head and neck muscles and arms a little.
- Balance attentively. React in time but do not overreact.
padmasana
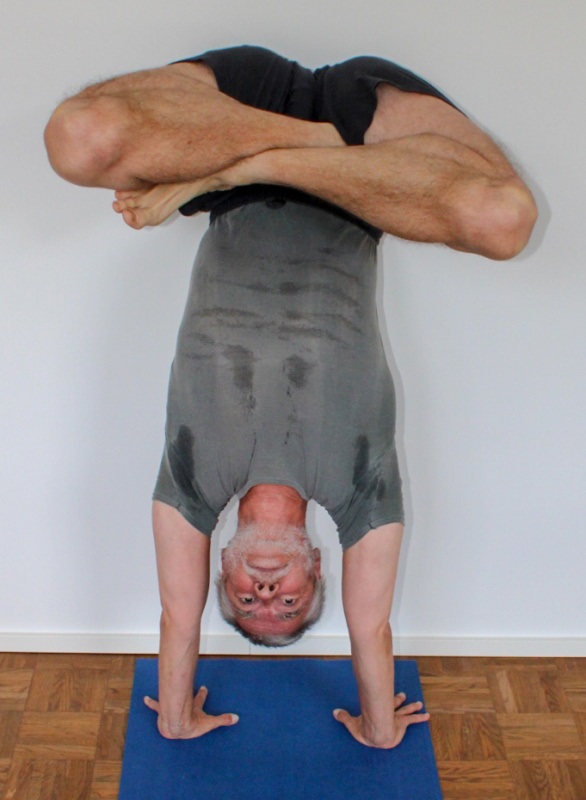
Instructions
- Take handstand as usual.
- Press one heel more firmly onto the wall and lift the other off the wall.
- Start to bend the leg released from the wall, abduct it a little, bend it at the hip joint and turn it out, aim the back of the foot at the opposite groin and then take this position with momentum.
- Place your bottom on the wall and perform the same movement with the second leg as with the first.
- Bring both legs into a horizontal position.
Details
- This pose is not quite elementary. The prerequisite is not only that padmasana is possible, but also that it can be taken easily; after all, the two hands are not available to bring the legs into the corresponding position. Instead, the combination of the effect of gravity (in this pose, gravity works against the normal lotus to help you take the pose) and the swinging movement must be sufficient. In contrast to the supta-padmasana variant, however, the sartorius is already in very short sarcomere length. Although the sartorius is the muscle that performs precisely this movement, which is where its name „sartorius muscle“ comes from, but it is supported by synergistic muscles for all movement components, some of which – if we think of knee flexion, for example – run into active insufficiency and a tendency to cramp due to the short sarcomere length, which is why the movement should be performed with momentum. It is helpful to perform the swinging movement of the two legs not in 90° flexion in the hip joints but at a significantly lower flexion angle, i.e. when the legs are still slightly closer to the wall.
- As always with lotus-like poses, pain can occur in the knee joints. It is difficult to predict whether it will be greater or less than in normal lotus. On the one hand, there is no gravitational effect of the leg on the inner knee, and on the other hand, the hands are not available to turn each leg out vigorously.
- In most handstand variations with the buttocks resting on the wall, there is a hollow back. However, this is less pronounced here because the gravity of the legs causes moments in the hip joints and further in the segments of the lumbar spine that counteract this.
- The easiest way to exit the pose is to abduct and extend one of the two legs further, which releases the foot from the interlock and allows both legs to move freely again. After one leg has been stretched upwards, the corresponding heel is pressed onto the wall, then stretch in the corresponding hip joint to release the buttocks from the wall. It is IMPERATIVE to release the interlocking of the legs before leaving the pose. A rough landing on the knee with crossed legs would result in injury!
- If not enough momentum is taken and an attempt is therefore made to bend the knee joint further with the strength of the hamstrings in order to get the foot into the required position, a tendency to cramp in the hamstrings easily occurs.
- For normal lotus, the knees are pulled inwards again with the hands after take the pose; this is of course not possible here. The best possible position for the knees is achieved by applying appropriate momentum when taking the pose.
padmasana Forward bend
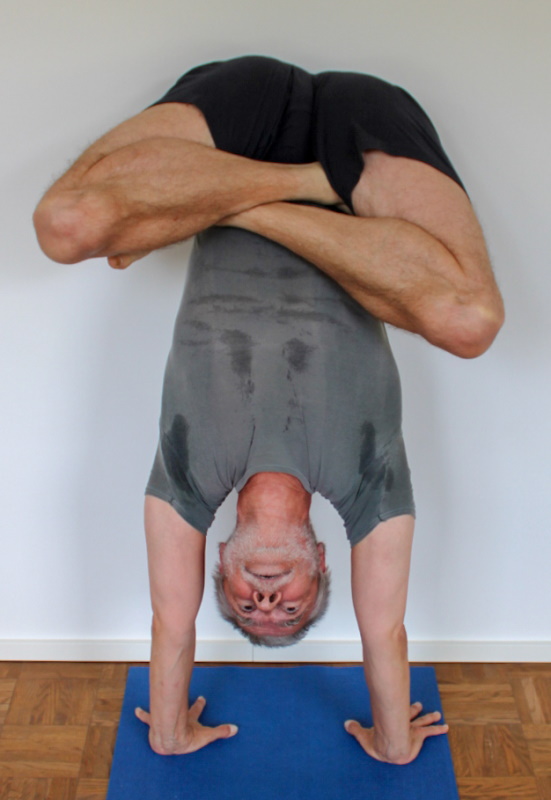
Instructions
- Take the padmasana variant as described above.
- Bend in both hip joints as far as possible to pull the legs towards the upper body.
Details
- When performing the forward bend, the bottom may slide up a little on the wall and the lumbar spine will start to become convex. However, this is not a problem except in the case of lumbar disc damage.
- As the legs move towards the upper body under gravity, there is no tendency to cramp, which would otherwise occur, especially in the sartorius. The main limiting factor for the movement of the legs towards the upper body is probably the flexibility of the glutes, especially the gluteus maximus.
- All comments on knee problems in lotus-like poses also apply here, but the pain may be slightly less. See also the FAQ.
- The easiest way to exit the pose is to abduct and extend one of the two legs further, which releases the foot from the interlock and allows both legs to move freely again. After one leg has been stretched upwards, the corresponding heel is pressed onto the wall and stretched in the corresponding hip joint to release the buttocks from the wall. It is IMPERATIVE to release the interlocking of the legs before leaving the pose. A rough landing on the knees tieh crossed legs would result in injury!
supta padmasana
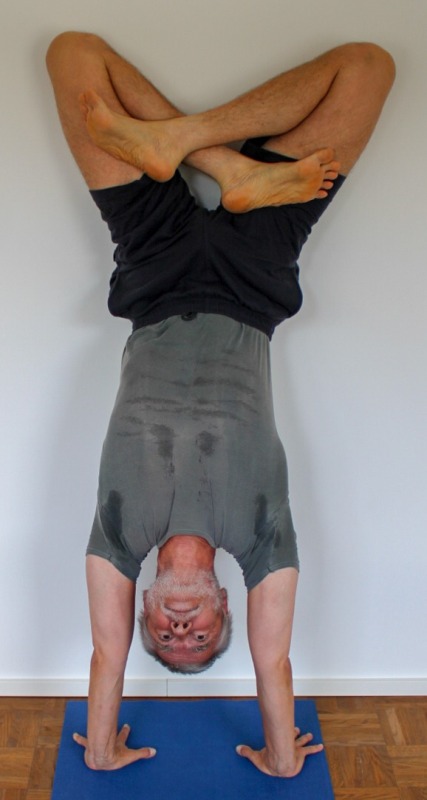
Instructions
- Take the padmasana variation as described above.
- Stretch your hips and move your legs away from your upper body until they come to rest on the wall as best as possible.
- Press your thighs so hard against the wall that your bottom lifts off the wall and your hips are stretched as far as possible with the flexibility you have.
Details
- If the pose is held for a longer period of time and a certain amount of force is used to press the knees against the wall and keep the pelvis away from the wall, this could result in tension in the glutes or other parts of the muscular abduction, external rotation and extension apparatus; the gluteus maximus, tensor fasciae latae and iliotibial tract can become uncomfortably tense.
- The easiest way to exit the pose is to abduct one of the two legs further, releasing the foot from the interlock and allowing both legs to move freely again. After one leg has been stretched upwards, the corresponding heel is pressed onto the wall and stretched in the corresponding hip joint to release the buttocks from the wall. It is IMPERATIVE to release the interlocking of the legs before leaving the pose. A rough landing on the knees with crossed legs would result in injury!
- In contrast to the last padmasana variations of handstand, the inclination to a hollow back is significantly greater here, as the adductors are clearly under tension and, with their hip-flexing effect, tilt the hip joints into flexion against the upper body.
Known problems that can occur even when executed correctly
Tension in the buttocks/pelvic muscles
Parts of the muscles in the buttocks/pelvis may become tense after pressing the knees hard against the wall for a long time. Attempts to release this tension should always include the half lotus forward bend, hip opening at the edge of the mat and hip opener 3.
Bottom on the wall

Backbend
Instructions
- Take handstand as described above.
- Release the tension in your abdominal muscles (rectus abdominis) and lower your bottom towards the wall. If possible, lean your legs completely against the wall.
- Let your bottom and the legs slide further and further down the wall until you have reached maximum flexibility.
Details
- This is a backbend for the thoracic and lumbar spine with simultaneous forward bend (flexion) in the hip joints. This is one of the rarer and more interesting cases. In contrast to poses such as the uttanasana variant desk or the corresponding variant of prasarita padottanasana, hardly any work of the autochthonous back muscles is required here to get far into the backbend, as the gravity of the legs and pelvis already brings this about to a large extent. By design, there is relatively little load on the lumbar spine here, so that the backbend can usually be performed without major discomfort in the lower back.
- The backbend increases the stretching requirement in the shoulder area in the direction of frontal abduction, so pay particular attention to the important movements of the arms here: external rotation of the upper arms, stretching the elbow joints, stretching from the shoulders (elevation of the shoulder blades).
- To exit the pose, apply pressure to the heels, then tense the glutes and stretch in the hip joints, which pushes the legs up on the wall and later releases them from the wall until normal handstand is reached.
- As the upper body is positioned above the shoulders like a backbend, it may be a little unusual to elevate the shoulder blades. However, this movement is the same as in other backbends, e.g. the back arch, and is no less necessary here.
- The legs are leaned against the wall with little weight.
- With good flexibility of the shoulder joints in terms of frontal abduction, the forearms are more or less vertical, stress in the dorsal wrist is then not to be expected to any great extent and the work in the shoulders is moderate. If the shoulders are less flexible, the forearms are clearly inclined towards the vertical so that the wrists may have to work at or beyond their limit; the shoulders then have to work much harder to keep the upper body in position. In addition, depending on the distance of the hands from the wall, it may be impossible to perform the pose if the shoulder mobility is poor because the buttocks cannot rest on the wall.
Bottom against the wall, lower legs (dvi pada)
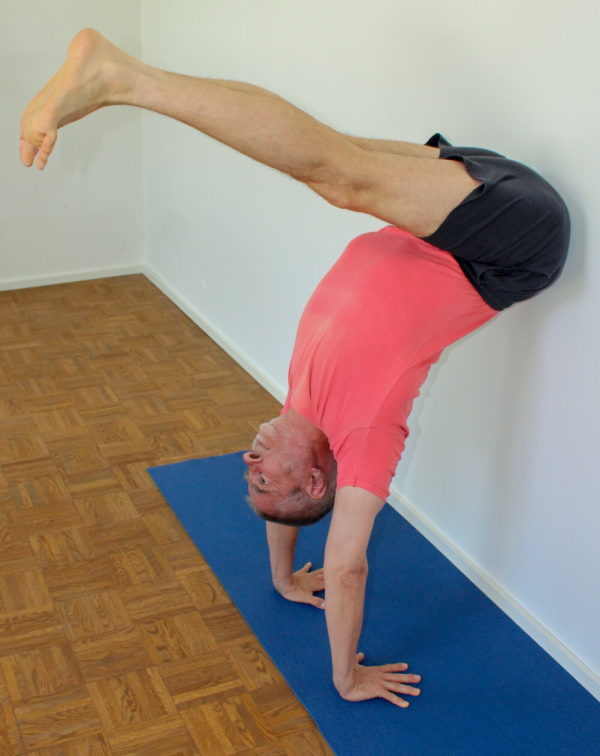
This variation is a good strengthening exercise for large areas of the back and the muscles at the back of the shoulders.
Effects:
(602) Strengthening the erector spinae
(642) Strengthening the muscles of the lumbar spine
(681) Stretching the intercostal muscles
Instructions
- Take the variant described above with the bottom on the wall .
- Slowly pull your legs away from the wall without momentum using the strength of your hip flexors and tensed abdominal muscles and lower them as far as possible towards your head, moving your shoulders away from the wall.
Details
- People who are little flexible in the hamstrings will not be able to move their legs far away from the wall, so apart from increased work in the shoulders/arms they will not be able to achieve the other benefits of the pose, namely strengthening of the autochthonous back muscles in the lumbar spine.
- In the phase in which the legs are moved away from the wall, there is an increasing torque in the shoulder joints that wants to push them towards the wall and bend the arms. Take great care to withstand this by increasing the strength in the deltoids and arms (especially the triceps): the shoulders must be kept as far away from the wall as possible, the arms must be turned out and extended and the stretch from the shoulders (elevation of the shoulder blades) must not be lost.
- When lowering the legs, the knee joints tend to bend, as the hamstrings are put under significant tension by the flexion in the hip joint. Use quadriceps strength to extend the knees, except if there is a tendency to cramp in the rectus femoris, although this should occur relatively rarely as the legs have to be extended with gravity rather than against it.
- Significant forces also occur in the wrists. Press the base joints of the fingers firmly against the floor to relieve the pressure on the dorsal side of the wrist (i.e. on the back of the hand).
- Due to the large lever of the legs, rotational movements may occur in the upper body and shoulder area if the legs are not moved exactly vertically or not moved simultaneously downwards. This leads to unusually high one-sided loads or moments in shoulders and arms.
- The further you get into the pose, i.e. the further the legs sink towards the horizontal, the greater the torque in the hip joints, which primarily has a delordosing effect on the physiologically concave lumbar spine, which can become convex (kyphotic) as a result. However, the torque also acts in parts of the spine further up; this is noticeable as the need fot a great exertion of force, especially in the lower back, but possibly also in the middle back, and has a good strengthening effect.
- The distance between the hands and the wall is very important here. If the distance is too small, no significant backbend will be achieved. Instead, when you try to lower your legs, the gravity perpendicular will shift to the area beyond (away from the wall) the wrists, causing you to fall back onto your own feet. If the distance is too great, the pelvis may sink far enough, but depending on the flexibility, the buttocks will not reach the wall or, if they do, the muscular demands on the autochthonous back muscles and deltoids will quickly become excessive, and the forearms may no longer be able to stand vertically but will be inclined towards the wall at the top, forcing the wrists into dorsiflexion angles that may not be feasible.
- If the pose can be performed well and without pain, the forearms are approximately vertical and the abdominal wall approximately horizontal so that a cup can be placed on it, which corresponds to a 90° flexion in the hip joints. The legs then move closer to the upper body.
- Lifting the heels off the wall may require considerable effort. Once the legs have passed the vertical, they continue to sink on their own until the pull of the biarticular and later also monoarticular hip extensors outweighs the effect of gravity. The hip flexors must then be used for further flexion.
Shoulders to and from the wall

Assessment and development of shoulder strength.
Instructions
- Take handstand as usual, but first with your hands at a smaller distance from the wall.
- Move your shoulders carefully and at low speed towards the wall, possibly until they can be placed on the wall, and then back into the normal handstand position.
- As long as there is strength, the back and forth movement of the shoulders can be repeated at will.
Details
- This is not a beginner’s variation! Not everyone has the strength to gently place the shoulders onto the wall and move them away from the wall again at a given distance from the hands! If it becomes clear that the limit of the available strength has been exceeded and the strength is running out, the pose can be exited at any time by pulling one leg towards the floor; this immediately relieves the shoulders and arms and you to leave the pose safely.
- Proceed very slowly and carefully! With every centimeter that your shoulders move towards the wall, the strength required in your shoulders, upper back, upper arms and forearms increases, the further you move towards the wall, the faster!
- Depending on the distance from the wall and the available flexibility of the wrists in the direction of dorsiflexion and strength in the palmar flexors, the limit of the strength or extensibility of the forearm muscles or compression pain in the dorsal wrist line may become apparent. If this cannot be controlled with more use of the respective forearm muscles, choose a smaller distance between the hands and the wall or work with an elevation of the wrists, such as, e.g., a few layers of patches.
- The shoulders do not move towards the wall in isolation but the whole back of the body moves towards the wall with the shoulders. The weight with which the heels press on the wall increases when the body is moved towards the wall because the gravity perpendicular changes until shoulders and butt drop on the wall.
- Moving the shoulders back and forth is a good way to strengthen the shoulders and upper back and at the same time demonstrates why it is so important to keep the shoulders moved away from the wall during the handstand upswing.
Known problems that can occur even when executed correctly
Pain in the wrist
If the shoulders are moved towards the wall, the forearms may reach the limit of their felxibility and pain may occur in the dorsal wrist gap despite strong use of the palmar flexors.
Shoulders towards the wall

Instructions
- Take handstand as described above.
- As described in the variation with the shoulders back and forth, carefully and slowly move the shoulders towards the wall, taking into account the available strength and load capacity of the wrists, and set them down there.
Details
- Make sure that you do not put your shoulders on the wall with maximum weight but maintain a high level of activity in the deltoids, which can remove the shoulders from the wall any time.
- To leave the pose, press your heels firmly onto the wall to make it easier to lift your shoulders off the wall.
- Depending on the distance from the wall and the available flexibility of the wrists in the direction of dorsal flexion and strength in the palmar flexors, the limit of the strength of the forearm muscles or compression pain in the dorsal wrist joint line may become apparent. If this cannot be controlled with more use of the forearm muscles, choose a smaller distance between the hands and the wall; alternatively, the wrists can of course also be placed elevated, for example on a few layers of patches.
Twist in handstand
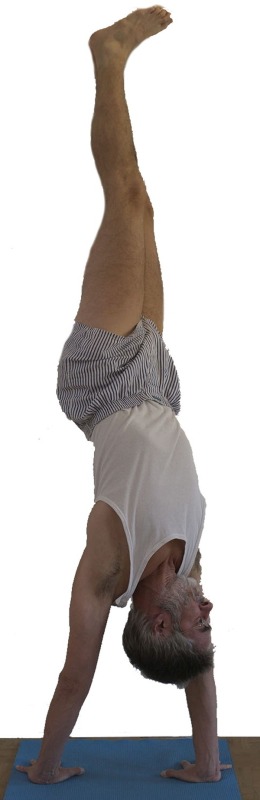
Instructions
- Take the pose as described above.
- Turn the right leg out from the hip to place the outer edge of the foot on the wall without changing the position of the heel on the wall next to the left heel.
- Tense your buttocks to avoid falling into a hollow back during the following movement and turn your whole body to the right as far as possible. Only the hands remain on the floor where they were. When the maximum rotation is reached, place the inside edge of the left foot on the right.
Details
- The rotation causes the shoulders to work differently and with varying intensity. If these are clearly restricted in their flexibility, the upper body can tilt a little as a result of the rotation, i.e. reduce the angle of frontal abduction in the shoulders. If the upper body tilts, and the more it does so, the greater the hollow back tendency, which must be countered with the help of the glutes. Basically, the rotation possible in the lumbar spine, removes, albeit not very pronounced, the origin of the iliopsoas from the insertion, which creates a torque for flexion in the hip joint.
- The second inner edge of the foot does not have to be placed on the other inner foot at the end. This can also be done at the beginning.
- Apart from the hands, the rotation involves the whole body, even the arms become skewed, i.e. the shoulders are also at a significantly different distance from the wall. You may have the feeling that you are standing more on one arm and you may notice a wrist uncomfortably because the dorsiflexion increases there.
- Before leaving the pose, return to the starting position.
virasana in handstand

Effects:
(811) Stretching the quadriceps
Instructions
- To transition fron regular handstand to virasana in handstand, bend one leg at the hip and knee joint, taking the foot off the wall, and turn the leg in slightly at the hip joint.
- Swing the leg into the virasana-typical folded position and align it exactly.
- Do the same with the second leg.
- Press your knees hip-width apart on the wall, perform a maximum extension in the hip joints using your glutes and move your shoulders and pelvis away from the wall and turn out the thighs well.
Details
- Strictly speaking, it is neither virasana nor supta virasana, but rather a very flat ustrasana, as the movement in the knee joint is not a flexion movement and certainly not a bending due to gravity as in virasana / supta virasana, but rather an extension movement in the knee joint, comparable to that in ustrasana.
- The distance between the hands and the wall is a very important parameter. If the distance is too small, the virasana position of the leg cannot be taken because the knee joints cannot bend sufficiently. If the distance is borderline too small, the ability to bend the knee joint would be sufficient, but it would not be possible to bring the legs into this position. This is either because the pelvis would have to be moved a little further away from the wall in the short term in order to bring the leg underneath, which would put the gravity perpendicular outside the physical support base, or because the necessary bending of the knee joint causes a tendency to cramp in the hamstrings, which forces you to stop. The more force is used to bend the knee joint, the further the knee joint is bent and the longer the process of actively bending the knee joint lasts, the more likely this tendency to cramp will occur! It is therefore advisable to bring the legs into the position with a brisk movement, bending them in the hip joints and in the knee joints and turning the thigh in in between to give the knees a little more space towards the wall.
- In this position, press the feet moderately, but especially the knees, onto the wall. Use the glutes for maximum extension in the hip joints or at least best possible reduction of flexion, possibly allowing the knees to slide down a little against the friction on the wall. Of course, the shoulder area also moves away from the wall, but without the knees becoming too light.
- To exit the pose, first bring your legs out of the folded position.
- The abduction inclination of the legs is difficult to control, i.e. the knees and also the feet push outwards. Try to bring the knees back to hip width using the strength of the adductors, correct the presumably reduced extension in the hip joints (the working adductors flex the hip joints), and turn the legs out to a neutral position again. When correcting the adduction of the legs, i.e. trying to bring the knees closer together, try not to turn the legs in.
- Supta virasana-typical discomfort in the lower back is also known here, but to a lesser extent, not least because the knee joints are less bent than in supta virasana: firstly because of the lack of gravitational effect of the upper body, which would bend the knee joints, and secondly because of the slight stretching movement undertaken in the knee joints, the acting forces of which improve the situation in the knee joints.
- If the knees are not resting against the wall, it is not the knees but the feet that provide support, with the weight of the legs then acting as a lever arm corresponding to the length of one’s own lower legs. Furthermore, the tops of the feet rest against the wall, so that there is still considerable movement possible in the subtalar joints, which makes this position appear rather unstable.
krouncasana in handstand

Effects:
(811) Stretching the quadriceps
(816) Stretching the rectus femoris
Instructions
- Take the virasana variation described above.
- Bring one leg out of the folded position, straighten it in the knee joint, cancel out any rotation of the leg and flex hip joint to the maximum in order to move the leg towards the upper body.
Details
- This variation is incomparably more back-friendly (for the lumbar spine) than the virasana variation, comparable to supta virasana and supta krouncasana.
- The hip joints of the leg on the wall is maximally tilted into extension or at least out of the flexion that causes a hollow back in relation to the leg against the wall on the lever arm of the extended leg, so when the hip joint of the extended leg is flexed a long way, the rectus femoris of the lower leg should be well stretched and the lumbar spine should feel good. In addition, the hamstrings of the extended leg may be stretched, and in most cases due to the tension of the hamstrings results in flexion of the knee joint. The tendency to cramp in the rectus femoris of the extended leg is significantly less than in poses in which it has to be lifted against gravity.
- There is also a point of no return here. Slowly move the outstretched leg away from the wall towards the chest to observe how the pressure of the knee of the folded leg on the wall develops. If the pressure is too low, you are not only close to the point of no return, but together with a movement of the outstretched leg that is not straight to the floor (but slightly sideways), this could result in instability in a lateral direction, which must be strictly avoided. This risk is particularly high if the supporting knee is not pressing firmly against the wall.
- Of course, the shoulder also has to move away from the wall as much as possible here, but this reduces the weight of the knee on the wall, which this reduces the weight of the knee on the wall and increases the demand on the extension in the hip joint of the lower leg. Therefore if the extension capability in the hip joint and the frontal abduction capability in the shoulder joints is rather good, make the distance from the wall rather large so that the knee can rest firmly on the wall even if the outstretched leg comes a long way down. Another argument in favor of a large distance is the reduced tendency to cramp when one leg folding the leg. An argument against a large distance is the strength required in the deltoids, which increases with distance, and additionally the flexibility requirements in the back and shoulders.
- To leave the pose, first bring the lowered straight leg back to the wall until the heel touches the wall, then apply pressure to the heel and take the other leg out of the folded position.
look at your feet
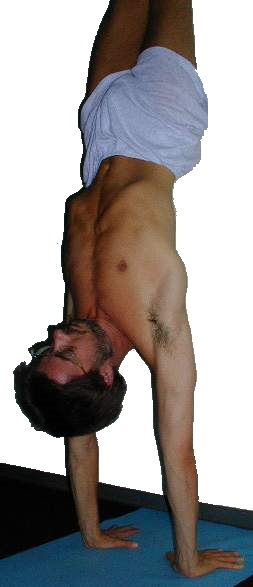
Alignment of the shoulders
Instructions
- Take the pose as described above.
- Bend the cervical spine and look towards the feet.
Details
- Contrary to what is often seen, you should not look at the hands or wrists in handstand. Not only should there be little exciting to see if you exclude the finger joints and metacarpophalangeal joints that are often seen lifted off the floor: the movement of putting the head on the neck can also make it tense and continues to suppress the correct relative movement of the arms to the torso, namely maximum frontal abduction. Trying to look towards the feet now reverses this relationship and supports the maximum frontal abduction of the arms. Of course, not everyone will see their own feet, but the important thing is that this improves the position of the upper body in relation to the arms.
- When moving the head, make sure that the glutes do not become inactive at the same time and the hip joints do not fall into flexion with the lumbar spine in a hollow back. If this instruction helps, try looking at the pubic tuberosities instead of the feet.
look at the hands
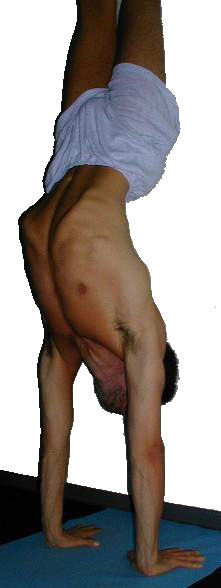
Instructions
- Take the pose as described above.
- Look at the hands.
Details
- In order to look towards the hands, the head usually has to be tilted slightly backwards. This movement usually causes a reduction in frontal abduction in the shoulder joints, i.e. the upper body is tilted the wrong direction in the shoulders in relation to the arms. Of course, this is not in the sense of handstand, but this variation illustrates the connection well, especially when observed from the outside.
- Many people who attempt free handstand use aids such as the reduced frontal abduction in the shoulder joints (compared to 180°) or the backbend in order to distribute the body mass better and thus make balancing easier or to increase the space in the shoulders with which balancing is possible.
samakonasana (side splits)
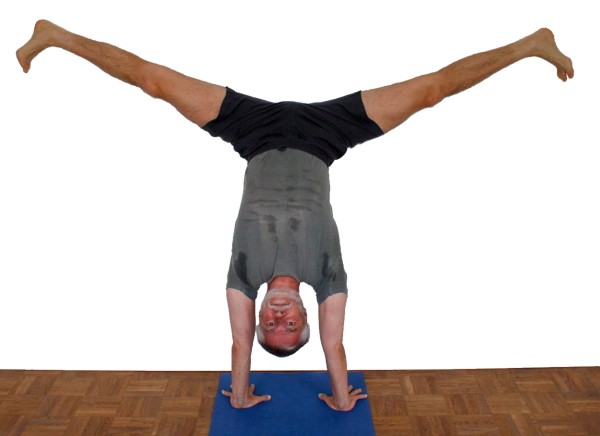
Instructions
- Do handstand as described above.
- Place your bottom on the wall and bring both legs into the side splits, turning them out, horizontally on the wall to the maximum.
Details
- Depending on the flexibility of the adductors the distance to the wall must be kept a little larger for the gravity perpendicular to remain in the physical support base.
Known problems that can occur even when executed correctly
on blocks

Greater demands on the swing and bounce.
Instructions
- Place two blocks with their largest surfaces on the floor, the longest side perpendicular to the wall.
- Place your hands on the blocks. The tendons of the middle fingers point 90° to the wall.
- Swing harder than usual into a handstand.
Details
- Depending on your experience, the elevation by the thickness of the block may be very noticeable. If you are just barely able to get into a handstand, you may fail at first or have to gather all your momentum.
- Instead of one block, you can also use two on top of each other. However, placing the block on the second largest side is a less good idea because of the risk of it tipping over!
- The distance of the blocks from the wall is, like the distance of the hands from the wall in normal handstand, also a matter of experience: the more practiced you are, the further you can reduce the distance without falling off the wall again.
- It may be possible to place the thumb completely or partially on the inside next to the horizontal surface of the block, i.e. on the inside of the block from the side, which can provide further relief depending on the flexibility of the hand and forearm.
- Adequate momentum is the key to avoiding the risk of tipping over sideways on the upswing: the lower the momentum, the lower the gyroscopic forces, the easier it is to tip over sideways on the upswing.
two-legged lift with a block between the thighs
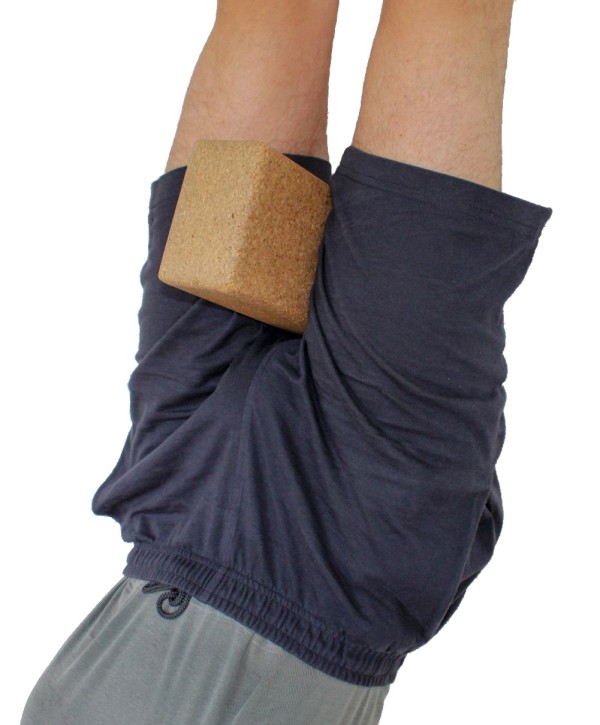
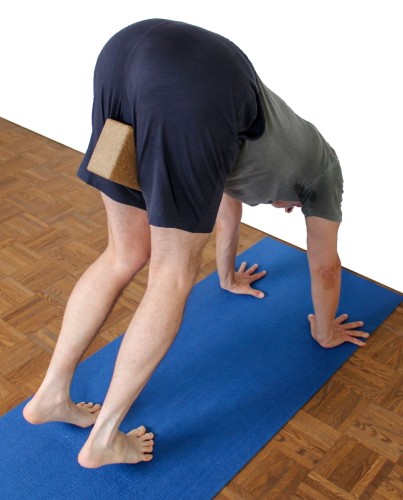
Learn to keep your legs closed and get rid of asynchrony.
Instructions
- Jump into a handstand on both legs as described above, but hold a block between your thighs.
Details
- The purpose of this variation is to achieve good control over keeping the legs closed. A certain degree of asynchrony is often observed when attempting a two-legged upswing, i.e. one leg is more or less clearly pulled past the other because the mind is not yet ready. In a similar way handstand represents the loss of the ground under the feet even swinging up with one leg, this is still moderate in comparison to the two-legged swing, here you have to push off the ground on both legs with all determination and at once and uncompromisingly give up your grip on the ground, literally consciously pushing away with force.
- Especially when using cork blocks, this variant is less dangerous in terms of „losing the block on the way“. Only if the block is lost when the legs are already close to the wall could it hit the chin or face.
two-legged upswing with feet tied together
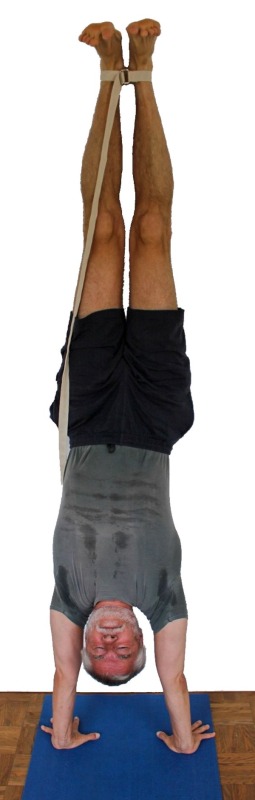
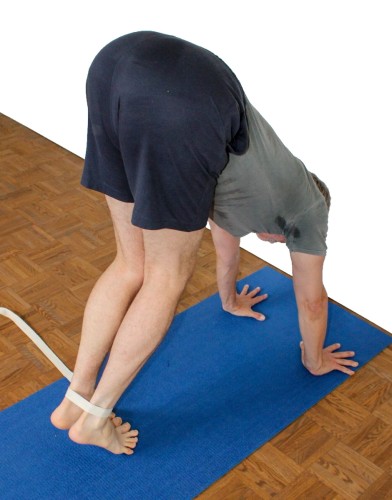
Learn to keep your legs closed
Instructions
- Tie a belt tightly around the ankles so that the two legs can only be moved as one whole.
- Jump into a handstand on both legs as described above.
Details
- The purpose of this variation is to achieve good control over keeping the legs closed and better focus on the jump. It is often observed that the two-legged upswing is practiced as an attempt to pull the second leg faster and yet faster in a normal one-legged handspring, which is completely contrary to the nature of the two-legged handspring and does not necessarily lead to learning it. This variation nips this mistake in the bud.
Wrists on patches
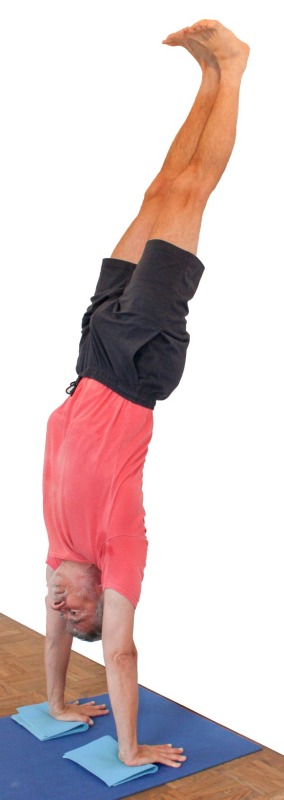
Enables the pose with severely restricted dorsal flexion in the wrist.
Instructions
- Place several patches on top of each other under the wrists up to about 3, maximum 4 cm below the palm.
- Take the pose as described above.
Details
- The patches under the wrists are sometimes the only way to take the correct pose without pain if dorsiflexion in the wrists is severely restricted and 90° can only be achieved with pain under load. The patches tilt the palms and the angle remains significantly smaller. Other aids can also be used instead of patches if they fulfill the most important conditions: low compressibility, soft edge and good slip resistance.
- The patches should only support the carpus so that the hand can tilt as freely as possible for maximum relief of the wrists.
(P) free

Instructions
- Take the pose as described above with your fingertips no less than 20 cm from the wall.
- The supporter stands sideways to the performer and holds one arm horizonttally and parallel to the wall in front of the performer at the level of the distal lower leg.
- The performer shifts the center of gravity slightly away from the wall and pulls the feet away from the wall using the force of the front of the body, similar to the procedure when learning free headstand.
- While the legs are still moving in a vertical direction, the shift in the gravity perpendicular must be gradually reduced again.
Details
- The supporter’s arm, which is held parallel to the wall, only serves as a possible support so that the performer does not have to retake their pose every time they lose their balance. It is not intended as a permanent support. However, if the performer considers it helpful, it can be used in this way to improve the performer’s feeling for standing upright in a handstand.
(P) Support during the upswing

Instructions
- Set up for the handstand as described above.
- The supporter stands on the side of the swinging leg, not the jumping leg. It must be agreed on how many swings the performer will jump off with the jumping leg.
- It is important for the supporter to keep their own body and especially their head out of the „line of fire“, i.e. the plane of movement of the performer’s swinging leg; a heel hitting the temple can easily knock out the supporter!
- The performer swings the swinging leg and jumps off with the jumping leg as agreed. The supporter holds the hand that will not support the upswing behind the shoulder area/upper back in order to be able to quickly and powerfully intercept any excessive movement of the performer’s shoulder towards the wall. If it is foreseeable that the swing energy plus the jumping power will not be sufficient, the supporter grasps the swinging leg with one hand and supports the upswing by accelerating the thigh from the front. The other hand must remain in the shoulder area of the performer and is only removed when the performer is recognizably calm and secure in their pose!
Details
- If the strength of one supporting arm is not sufficient to support the upswing movement, this is not a fault of the supporter, but the cause lies in the performer: presumably psychological processes revolving around fear or concerns prevent sufficient use of strength!
- Especially inexperienced beginners who want to learn handstand sometimes lack body awareness and do not control the movement of the shoulder area sufficiently. It is therefore extremely important that one of the supporter’s hands is in the area of the shoulder or upper back in order to be able to intercept the person swinging up if necessary, i.e. to be able to push the shoulder away from the wall. It should be noted that, depending on how the performer behaves, simply lifting their swinging leg can already cause the shoulders to move further towards the wall. If it becomes apparent that the performer lacks information or body awareness, stop the attempt and work on the prerequisites. If the lift is successful together, it is strongly recommended that you only remove your hand from the shoulder area when the performer is visibly and tangibly calm and stable in the pose. During the support, the supporter may have to act quickly and forcefully, perhaps faster and more forcefully than expected, to keep the shoulder area of the performer away from the wall.
- One of the two should count out loud the swings that precede the jump; it is recommended that the supporter does this as they are in a more comfortable position. Counting out loud avoids misinterpretation of the performer’s movements.
- Be very careful to stand on the side of the swinging leg! The grip from the other side, i.e. that of the jumping leg, can lead to the jumping leg of the performer injuring the arm or wrist of the supporter at a moment when the supporter’s hand is still on the performer’s thigh.
- As a supporter, keep your head out of the swinging leg’s range of motion, any contact between the swinging leg and the head can be very dangerous.
(S) eka pada
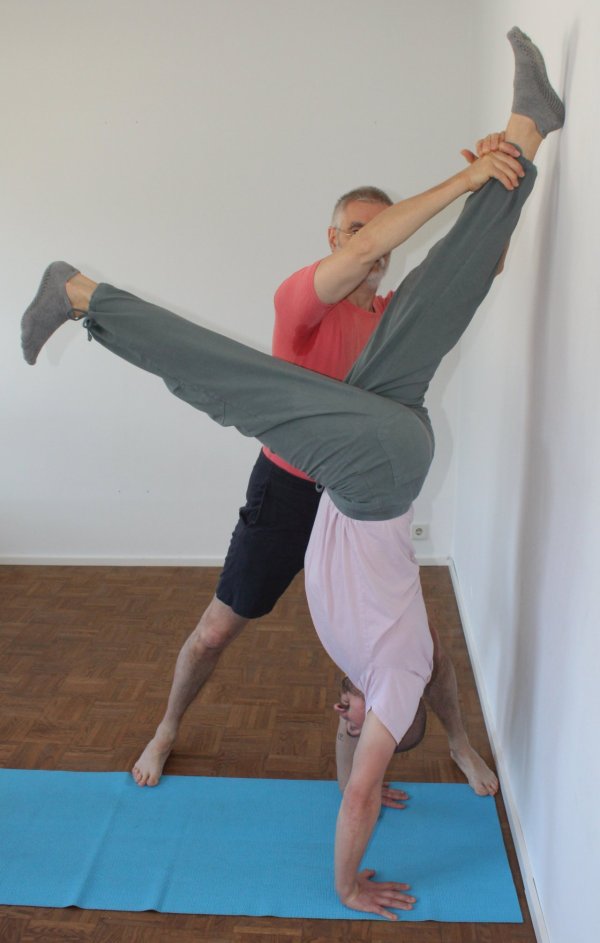
Instructions
- Take handstand as described above. The supporter stands on the side of the leg remaining on the wall.
- The supporter holds one or two hands near the ankle of the leg on the wall to keep the performer in the pose when the performer threatens to reach the point of no return.
- The supporter observes how far the shoulder area moves towards the wall when the leg is lowered and gives the performer feedback on this.
Details
(2S) Butt against the wall, lower legs (dvi pada)

Support for the not-so-easy dvi pada variation so that the performer does not fall out of the pose.
Instructions
- Take the variant described above with your bottom on the wall.
- Two supporters tighten a belt facing away from the wall in the position directly in front of the upper pelvis (at the groin) so that the performer cannot fall out of the position when lowering the legs.
Details
- At the beginning, both supporters stand on one side of the performer. As soon as the performer’s buttocks are against the wall, one of the supporters switches to the other side so that both can hold a taut belt in the crook of their hips. When the performer wants to leave the pose, one of the two supporters immediately drops his end so that the belt no longer hinders the downswing.
- In addition to holding the belt, one of the supporters can push the shoulder area away from the wall. This should not be done by both supporters at the same time, as they would probably act with different intensity on the shoulder of the performer on both sides.
- The first supporter hands the second supporter the side of the belt with the free end, i.e. without the buckle. When the performer finishes the pose after the announcement, the second supporter lets go of the belt and the first supporter pulls it to his side away from his body so that the belt does not hit the performer.
Transition to uttanasana

Instructions
- Take the pose as described above.
- To transition to uttanasana, release the heels from the wall which leads to standing in the air for one to two seconds before the feet reach the floor again. In the course of this bend the knee joints and flex the hip joints using the strength of the hip flexors to accelerate the legs towards the floor.
- Land on the floor with the knees moderately but sufficiently bent, bring the gravity perpendicular under the feet, straighten the knee joints and release the hands from the floor to take uttanasana.
Details
- On the one hand, the hip flexion pulls the legs into an area where they are no longer completely above the gravity perpendicular or further towards the wall, and on the other hand, their acceleration creates a force that irreversibly pulls the body out of handstand. This process must be designed in such a way that a clean uttanasana is created as quickly and physiologically as possible. It goes without saying that you should land with your knees bent and not extended, as the latter would put them at great risk. Land in such a way that the gravity perpendicular is already under the feet and the necessary steps for the uttanasana only consist of stretching the knee joints and crossing the arms and not shifting some of the body weight away from the hands onto the feet.
- The transition has far more of an offensive character than simply falling out of the handstand.