yogabook / asanas / elbow stand
Contents
- 1 pinca mayurasana„elbow stand“
- 2 Variants
- 2.1 narrow
- 2.2 With belt
- 2.3 two-legged upswing with feet tied together
- 2.4 Upswing with the unfamiliar leg
- 2.5 virasana
- 2.6 krouncasana
- 2.7 supta baddha konasana
- 2.8 baddha konasana
- 2.9 Shrug
- 2.10 two-legged upswing
- 2.11 eka pada
- 2.12 dvi pada
- 2.13 padmasana
- 2.14 padmasana forward bend
- 2.15 free
- 2.16 pinca mayurasana
- 2.17 With block
- 2.18 free with block
- 2.19 (P)
- 2.20 (P) Support during the upswing
- 2.21 Transition to uttanasana
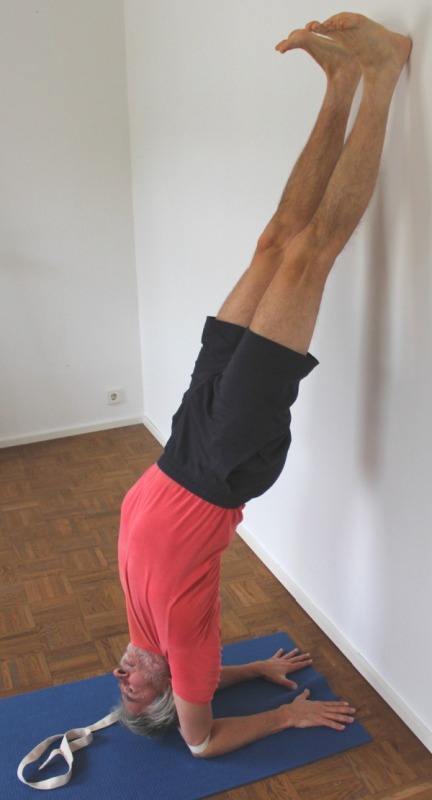
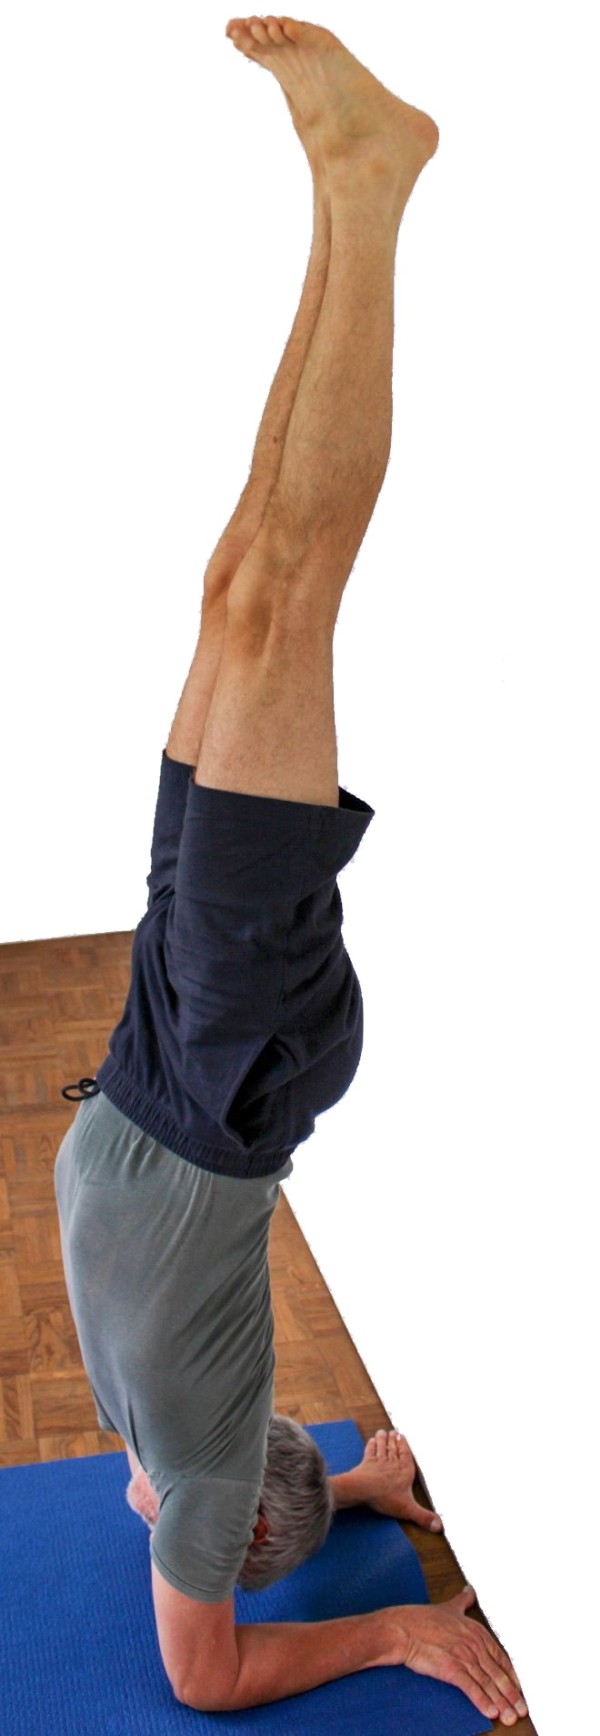
pinca mayurasana
„elbow stand“

 instructions and details with working links as PDF for download/print
Feedback: We’d love to hear what you think about this description, give us feedback at:
postmeister@yogabook.org
Last modified: 30.12.2018
Name: pinca mayurasana
trivial name: elbow stand
Level: FA
- classification
- contraindications
- effects
- preparation
- follow-up
- derived asanas
- similar asanas
- diagnostics
- instructions
- details
- variants
Classification
classical: inverted pose
psychomental:
physiological: inversion pose, shoulder opening (frontal abduction), strengthening the deltoid
Contraindication
The elbow position in itself is not a contraindication for facet syndrome, spondylolisthesis and spinal canal stenosis if care is taken to avoid a hollow back in the pose. When taking the pose, the lumbar spine may take a convex shape and the known symptoms can flare up again in the event of acute disc damage. This is all the more true the less mobile the hamstrings is.
Effects
- (292) Strengthening the trapezius
- (332) Strength for pronation of the forearm
- (221) Shoulder blade: stretch for protraction
- (231) Shoulder joint: stretch for frontal abduction
- (271) Shoulder joint: stretch for external rotation
- (501) Stretch of the latissimus dorsi
- (321) Stretch for supination of the forearm
Preparation
As poses with turned out arms, all variations of the elbow stand, including the rectangular and dog elbow stand, require a very flexible shoulder in terms of frontal abduction. Depending on the flexibility and resilience of the shoulder, some preliminary exercises should therefore be carried out, whereby in addition to stretching preparation, the muscles should also be prepared for powerful use, as due to the external rotation of the upper arms, the deviation of the shoulders towards the wall is usually more pronounced:
- Downface dog as a general stretching of the shoulder
- Upface dog as a pose that prepares the shoulders for powerful work, especially through correctly executed transitions from and to downface dog
- Rectangular handstand as a pose related to downface dog, which differs from elbowstand in the rotation of the arms
- Back stretching, especially the „elevated“ variant as a general stretching of the shoulders
- Dog elbow stand as a very related and highly synergistic posture
- Rectangular elbow stand as a very related pose
- Hyperbola as one of the most effective and efficient stretches in the direction of frontal abduction without turned out arms
- Shoulder opening on the chair as one of the most effective and efficient stretches in the direction of frontal abduction with turned out arms
If the shoulders are not very mobile, a hollow back can easily develop, especially if you are not particularly aware of how this can be countered using the strength of the glutes (specifically all the extensors of the hip joint). The muscles of the lumbar spine can be prepared a little for this, but the corresponding poses can also be used after the elbow stand if an uncomfortable feeling remains in the lumbar spine, which is why they are listed again below:
- parsva uttanasana
- balasana (child’s pose)
- parsva upavista konasana
- parivrtta trikonasana
- parsvottanasana
- half lotus forward bend
- karnapidasana
Although less momentum is required to take elbow stand than for the handstand, since the forearms are placed instead of the hands, thus the elbows are lower by the length of the forearms, a certain amount of flexibility in the hamstrings is also required in order to be able to place the elbows bent forwards and downwards, and it is advisable to warm them up, especially if the elbow stand is not assumed from the dog elbow stand, but from a forward-bent standing pose:
- uttanasana as a generally effective and efficient stretch of the hamstrings to prepare for flexion in the hip joints
- prasarita padottanasana very similar to uttanasana
- parsvottanasana as a stretch that goes beyond uttanasana
- pascimottanasana
- janu sirsasana
- tryangamukhaikapada pascimottanasana
- downface dog as another good preparation for the hamstrings when the pelvis is tilted powerfully
- hip opener 5 as a very effective stretch of the hamstrings that goes beyond uttanasana
- warrior 3 pose
- trikonasana
- parivrtta trikonasana
Follow-up
If an uncomfortable feeling in the lumbar spine remains after the elbow stand due to a hollow back in the pose, this can be countered with the following postures:
- parsva uttanasana
- balasana (child’s pose)
- parsva upavista konasana
- parivrtta trikonasana
- parsvottanasana
- half lotus forward bend
- karnapidasana
Derived asanas:
Similar asanas:
Diagnostics (No.)
An excessive hollow back in this pose often indicates shortened hip flexors. However, the hollow back tendency in this pose is amplified in case of significant restrictions in flexibility in the shoulder joints, because the back is flatter to the floor as a result and since the feet are on the wall, there must be a significant curve somewhere to compensate for the sloping position of the back. For the risks of a hollow back, see the FAQ. Helpful exercises include
- hip opener 1
- hip opener 2
- warrior 1 pose
- upface dog
- urdhva dhanurasana (back arch)
- ustrasana (camel)
and other backbends with extension in the hip joint.
(230) Shoulder :
This pose is an excellent way of recognising how flexible the shoulders are. The forced and fixed external rotation places far greater demands on their flexibility than in less externally rotated poses such as handstand. There may also be indications of shoulder disorders:
- irritable hypertonus of the deltoid: ambitious beginners in yoga in particular tend to develop irritation in the deltoid, which is localised in the area of the muscle origins, presumably stems from an overstraining of the structures due to frequent repetitive demands in full frontal abduction and is also noticeable in the same kind of strain, see the FAQ.
- Various pathological changes in the shoulder joint such as impingement syndrome, frozen shoulder, calcification of the biceps tendon, bizeps tendinitis, subacromial syndrome, rotator cuff lesions, which cannot all be discussed here and require clarification.
- side discrepancies in flexibility.
The flexibility of the shoulder can be recognised by the degree of deviation in the three dimensions of movement:
- Outward deviation of the upper arms with consecutive flexion of the elbow joints
- Loss of external rotation of the arms
- Insufficient angle of frontal abduction that does not reach 180° or not permanently
As it is not possible to move into lateral adduction and change the external rotation due to the fixed forearms, the restriction of flexibility is fully reflected in the insufficient angle compared to 180° frontal abduction in the shoulder. A lateral tilt or rotation of the body in elbow stand can be the result of a difference in flexibility in the shoulder joints on both sides.
(650) Kyphosis and lordosis of the spine
The deviations from the physiological double-S shape of the human spine are quite clearly visible in this pose, although they can only be seen from the wall side. Maybe the course of the linea alba gives hints instead. There should be a certain degree of lordosis (convex spine from the front) in the lumbar and cervical spine and a certain degree of kyphosis (convex spine from the back) in the thoracic spine, even if it must be taken into account that restricted flexibility of the shoulders in this pose often leads to a hollow back. See the FAQ.
The lateral deviations of the spine from the sagittal plane known as scolioses are also quite visible in this posture, if not from the back, then at course of the linea alba and its angle to the shoulder line. See the FAQ.
Variants:
two-legged swing with feet tied together
(P) Support during the upswing
Instruction
- From downface dog, place the forearms shoulder-width apart on the floor for dog elbow pose.
- Spread the fingers as wide as possible, keeping the extensor tendons of the middle fingers parallel.
- Bring the shoulders over the elbows and press the entire forearms and hands firmly onto the floor.
- Walk slightly forwards with both feet to shift more weight onto your arms. From now on, keep your shoulders as precise as possible above your elbows.
- Decide on one swing leg and one jumping leg. Place the jumping leg a little closer to your elbows and bend it slightly. Stand on the balls of your feet.
- Swing the swinging leg up and down vigorously until you know that you will be able to reach the full pose with additional bouncing of the jumping leg.
- With a powerful upward swing of the swinging leg, jump off. Pull the jumping leg so that it reaches the wall a little later than the first leg. As soon as the first heel has reached the wall, pull the second leg towards the wall. Then stretch it completely.
- Improve the extension of both legs and push the heels up until the foot is at a right angle to the lower leg.
- Move the shoulders as far away from the wall as possible and straighten the upper body in relation to the upper arms, maximising the frontal abduction in the shoulder joints.
- Press down the thumb side of the hands and the wrist using the strength of the pronators.
Details
- Take into account that the elbows will move outwards by about 2-4 cm over their own muscles near the elbows. The forearms should be parallel after taking the pose.
- Move the shoulders away from the wall.
- Advanced users no longer need the technique of swinging one leg up and down, but can take the pose immediately.
- When pulling the jumping leg towards the wall, measure its acceleration so that it interferes as little as possible with the upswing of the swinging leg. Sigfificant pull may take place only when the first heel is on the wall. It can still happen that the first heel lifts off the wall again when the second leg is pulled up. In this case, the acceleration of the second leg was too great.
- The momentum required for the elbow stand is considerably less than that required for handstand. Make sure that you don’t smash the wall or the heel with the upswing.
- Some people tend to allow the swinging leg to bend, which often leads to them pushing off the wall again, especially if the bending angle is significant. There are two possible causes:
- A misunderstanding of the upswing of the swinging leg: this should not happen from the up and down of the calf or heel, but should be a movement of the thigh in the hip joint that moves the rest of the leg (forcibly when the knee joint is extended) with it. Try to feel the tension of the quadriceps extending the knee joint of the standing leg as you swing upwards.
- The immobility in the hip joints, which often limits the angle between the thighs („scissor movement of the legs“) to around 90° or even less, especially when the front leg is extended.
- Tend to turn your legs inwards, in order to counteract the external rotation tendency of the swinging free leg, i.e. move your inner knees more towards the wall. Also, do not turn your legs out in the pose.
- Stretch the inner ankles and the entire inner foot upwards.
- Keep the gluteal muscles active to extend the hip joint straight so that you stretch from the elboxs to the feet. As in standard anatomical position, the hip joints are neither in extension nor in flexion.
- People who are immobile in the shoulder joints do not achieve a 180° angle of frontal abduction, which means that the trunk tilts in relation to the arms. This can easily lead to an uncontrolled hollow back. Minimise this deviation and straighten the upper body to the maximum (up to the elongation of the upper arms) by performing a movement in the arms such as in utkatasana or urdhva hastasana. This makes it easier to feel the lower back in this pose.
- Use a block between the hands if the hands move too much towards each other during the upswing or in the pose.
- Use a belt close to the elbows to keep the upper arms close if the elbows tend to move too far apart. The belt is also appropriate if the forces causing the elbows to move outwards push them outwards so forcefully that the skin cannot withstand the strain, which in practice can actually look like skin being „rubbed“ off the forearm onto the mat. It is also possible to use a blanket under the forearms in the elbow area, but only in combination with a belt, as the tendency of the elbows to slide outwards is much greater on the blanket.
- This pose is not recommended for beginners with poor shoulder flexibility, as it is usually not possible to adequately control the movement of the shoulder towards the wall. As soon as your shoulder flexibility is a little better, try elbow stand with the distance between the elbows increased by up to 5 cm on each side.
- Reach upwards from the shoulders (elevation of the shoulder blades) so that you can follow the movement in the shoulders as the heels slide up the wall. This of course refers to the movement of the body relative to the shoulder blades with the arms fixed to the floor. Further effort fo turn out the arms is no longer necessary or possible due to the fixed forearms.
- The pose described here is not the often shown pinca mayurasana, in which the shoulders are not at an extended angle, but far from 180° and the upper body is in a backbend with the lower legs hanging down, with the knee joints bent. In this variation, the head is also tucked into the neck, which also runs counter to the aim of opening the shoulders. In addition, the sloping upper body and bent knees distribute the body mass much more around the centre of gravity, which makes balance much easier. This variation is also much easier because the working point of the deltoids is shifted in a more favourable direction in terms of sarcomere length.
Known problems that can occur even when performed correctly
Abrasion on the forearm
The evasive forces can cause the skin of the forearm to be pushed outwards so forcefully that it cannot withstand this and a layer of skin remains on the mat. This can be prevented with a belt as described above.
Variants
narrow

Instructions
- Take the pose as described above, but place the elbows closer than the wrists so that the forearms diverge.
Details
- This variation requires and promotes a little more flexibility in the shoulder than the standard variant. Of course, this is not a variation for beginners.
- The tendency of the inner hands and wrists to move away from the floor may increase slightly.
With belt
Instructions
- ..
Details
- ..
two-legged upswing with feet tied together
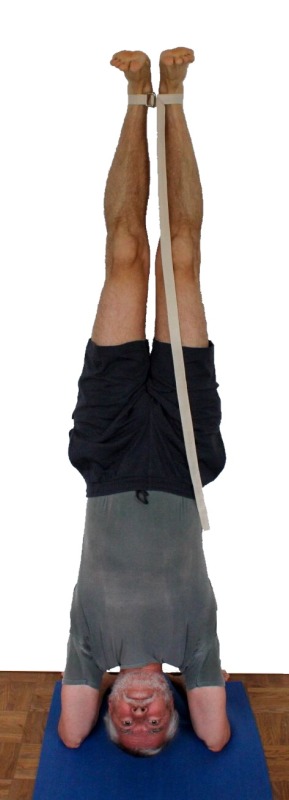
Instruction
- Place a belt relatively tightly around the ankles.
- Take the pose as described above but with a two-legged bounce.
Details
- This variation is more challenging than the one-legged upswing, but slightly easier than the two-legged upswing into handstand as the body mass does not have to be accelerated upwards as far using the strength of the legs. The difference lies approximately in the length of the forearms, which is quite noticeable. However, compared to handstand, the movement of the shoulder towards the wall must be limited with more strength and attention.
Upswing with the unfamiliar leg

Instructions
- Take the pose with the unfamiliar leg as swinging lag.
Details
- Similar to handstand, trying to get up with the unfamiliar leg often shows resistance in the mind.
- As with the corresponding handstand variation, the same applies here: The distance between the hands and the wall must not be too small, otherwise there will not be enough space to fold the leg under. Bend it with momentum and not slowly with force, otherwise the hamstrings could start to cramp. Put as much weight as possible on the knees against the wall, which, depending on the distance of the hands from the wall, requires a good extension capacity of the hip joints. If this is too low, only the feet will press on the wall instead of the knees, which feels much less stable.
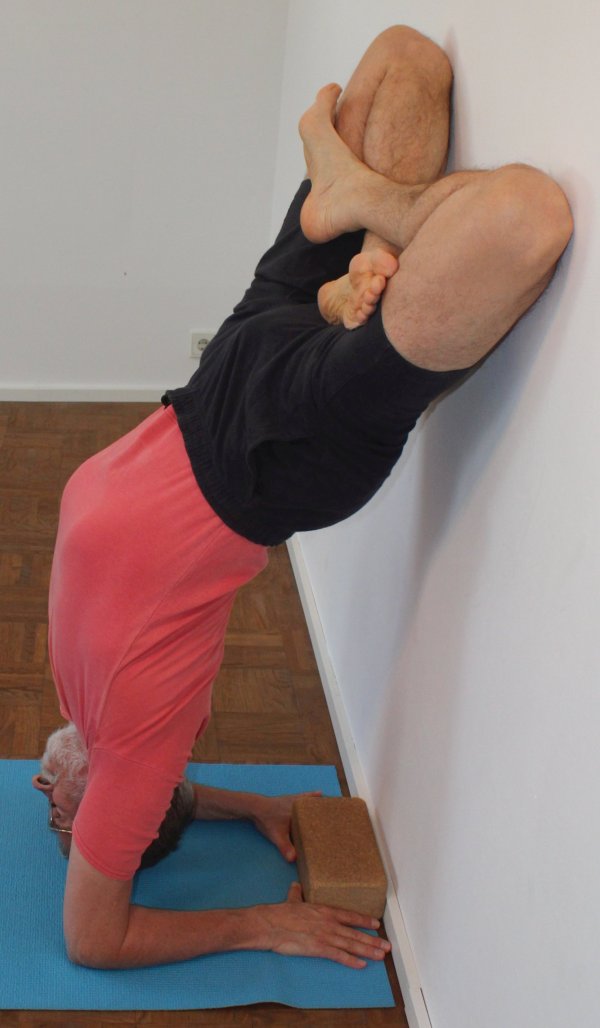
virasana
Instructions
- Take the pose as described above, but with the elbows slightly further away from the wall.
- Take one leg out of the pose, bend the knee wide, turn in the leg and bring it into the virasana position.
- Apply pressure with the bent knee against the wall and take the weight off the second leg. Do the same with the second leg as with the first.
- Use the strength of the glutes to maximise the extension of the hip joints and press the knees onto the wall.
Details
- This pose is very similar to handstand with virasana, but it will be more difficult to get pressure on the knees against the wall here, as flexibility restrictions in the shoulder joints keep the upper body and therefore the pelvis and knees further away from the wall. For this very reason, the tendency towards a hollow back and possible discomfort in the lower back will also tend to be greater.
Known problems that can occur even when performed correctly
Tendency to cramp in the shoulder
As with all variations of the elbow stand, there may be a tendency to cramp in the shoulders (deltoids) which is difficult to control.
krouncasana

Effects:
(811) Stretching the quadriceps
(816) Stretching the rectus femoris
Instructions
- Take theelbow stand as described above.
- Take one leg out of the pose and fold it under as described in the virasana variation of the elbow stand so that the knee comes to rest on the wall.
- Press the knee firmly onto the wall and move the other leg, stretched out, further and further towards away from the wall in the direction of the ribcage.
Details
- As in the corresponding handstand variation, it is also very difficult here not to allow the leg that is folded under to turn in and move outwards. There is no possibility to intervene with the arms, so that only the hip muscles themselves are available for this.
- The large lever with which the leg pushes the pelvis out of hyperlordosis in the direction of the straight or even convex (kyphotic) lumbar spine moves the upper body and shoulders towards the wall, so that even more powerful work is required in the shoulders. For this very reason, the tendency of the arms to deviate from parallelism and push the forearms in a converging direction will also be correspondingly increased. On the other hand, this construction creates a much more relaxed situation in the muscles of the lumbar spine which, in contrast to the virasana variation and the elbow pose itself, is generally perceived as stress-free, as the lowered leg generates delordosing moments in the lumbar spine.
Known problems that can occur even when performed correctly
Tendency to cramp in the shoulder
As in all variations of elbowstand, there may be a tendency to cramp in the shoulders that is difficult to control.
supta baddha konasana
Instructions
- Take elbow stand as described above and slowly place the buttocks on the wall, if possible without allowing the shoulders to move towards the wall.
- Take both heels off the wall, bend in the hip joints and knee joints, turn the legs out and place the outer edges of the feet on the wall in the baddha konasana pose, moving the knees towards the wall.
Details
- As the adductors stretched in baddha konasana also have a hip-flexing effect, the pelvis is pulled slightly into a hollow back here.
- If the mobility of the adductors is not good, the weight of the legs generates significant flexion moments in the hip joints und thus delordosing moments in the hip joints, which continue as flexion moments via the back into the shoulder area and force you to work harder there.
Known problems that can occur even when performed correctly
Tendency to cramp in the shoulder
As in all variations of elbowstand, there may be a tendency to cramp in the front deltoids that is difficult to control.
baddha konasana

Instructions
- Take the baddha konasana variation of elbow stand as described above.
- Bend in the hip joints until the thighs are horizontal.
Details
- Bending the hip joints joints creates a moment that pushes the lumbar spine out of the hyperlordosis. As a result, this variation is generally perceived as more comfortable for the lumbar spine than the supta baddha konasana variation above.
Shrug

Instructions
- Take elbow stand as described above and stretch from the shoulders as far as possible (elevation of the shoulder blades: relative movement of the upper body away from the elbows).
- Stop stretching from the shoulders (elevation of the shoulder blades) and allow the upper body to sink as far as possible.
- Stretch from the shoulders as far as possible again and continue in this way until the movement itself is completely clear, the range of movement is explored and the movement is free from tilting movements of the upper body and from the movement of the shoulder to and from the wall.
Details
- The more pronounced the flexibility restrictions in the shoulders, the closer the connection between the various movements: Tilting of the upper body relative to the arms (more or less frontal abduction), movement of the shoulders away from and towards the wall (as an expression of evasion from maximum frontal abduction), stretching from the shoulders (elevation of the shoulder blades). This is due to the direction of pull of the adductors of the shoulder joint latissimus dorsi and teres major, which are under high tension here.
- If the flexibility restrictions are quite pronounced, the movement may not be found at first, as there is no room for manoeuvre. Initial success can only be expected once the shoulders have become a little more flexible.
two-legged upswing

Instruction
- From a dog elbow pose with bent knee joints and a slightly smaller distance between the feet and the elbows, jump synchronised with both legs into elbow stand.
Details
- More than in the two-legged upswing into a handstand, it is necessary here to prevent the shoulders from moving towards the wall as far as possible or to keep the movement very limited. The forces required for this are greater and the available room for manoeuvre is significantly smaller than in the two-legged handstand upswing. This variation is therefore not recommended for beginners whose shoulders are rather immobile!
- After the jump, the shoulders inevitably will be pushed towards the wall slightly and you may have to use a lot of strength to hold them above your elbows, for example. It may be advisable to do this with a supporter first, who will energetically limit the movement of the shoulders towards the wall in case of doubt.
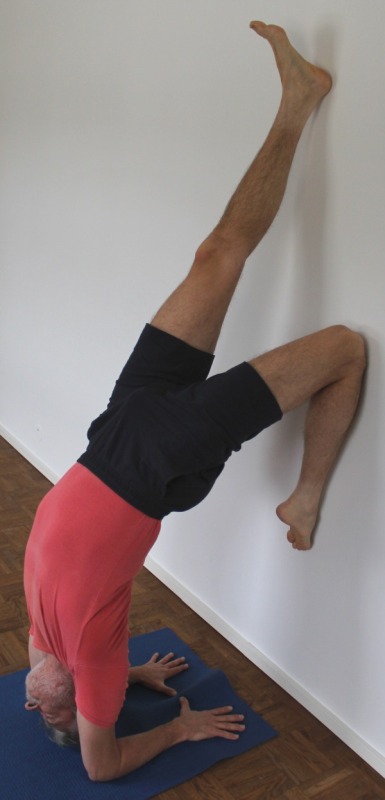
eka pada

Effects:
(721) Stretching the hamstrings
Instruction
- Take elbow stand as described above.
- Move the shoulders well away from the wall and begin to lower one leg further and further away from the wall towards the chest.
Details
- In this variation, the large lever provided by the lowering leg pushes the pelvis out of the neutral position of the lumbar spine or out of the slight hyperlordosis in those with significantly restricted flexibility in the shoulder. This causes forces that also push the shoulder area towards the wall via the upper body. Therefore, more and stronger control over the shoulder area is required and developed here.
- As in the eka pada variation of handstand, the heel remaining on the wall often becomes very light. When the weight approaches zero, this is a sign that you are very close to the point of no return, at which point you will inevitably fall out of the pose, which is generally not critical as you will fall onto your own feet. Lower the leg so slowly and allow the pelvis to move so far towards the wall – without allowing the shoulders to move towards the wall – that the weight on the heel always stays sufficient to remain stable in the pose.
- As in the eka pada variation of handstand, the lowered leg also wants to bend and turn out and the foot wants to move out of the tadasana posture in the direction of dorsiflexion.
dvi pada

Instructions
- Take the elbow position as described above.
- Ease the pressure of the heels on the wall and place the buttocks on the wall.
- Slowly pull the legs away from the wall to move them towards the upper body, moving the shoulders away from the wall rather than towards it.
Details
- This variation is more advanced and requires very good flexibility and strength in the shoulders. Unlike the eka pada variation, here the buttocks are placed on the wall, which requires more flexibility in the upper body and especially the shoulders. Whereas in the dvi pada variation of handstand it was still possible to simply position the hands closer to the wall, the length of the forearms plus the hand is the minimum distance here. Much more than in the baddha konasana- and padmasana variants of elbow stand, the lowering leg clearly pushes the upper body and shoulders towards the wall. This is therefore one of the most powerful and difficult variants.
padmasana
Instructions
- Take elbow stand as described above.
- Release the tension from the back of your legs and buttocks and slowly place your buttocks on the wall.
- As described in the corresponding handstand variation, bring both legs into the lotus position.
- So, begin to bend the leg that has been released from the wall, abduct it a little, bend it in the hip joint and turn it out, aim the back of the foot at the opposite groin and then take this position with momentum.
- Place your bottom on the wall, move the knee of the first leg towards the wall, and perform the same movement with the second leg as with the first.
- Bring both legs into a horizontal position.
Details
- This variation is very similar to the corresponding handstand variation, except that it is less easy to place the buttocks on the wall here because significantly more flexibility is required in the shoulders. The hands and forearms pointing towards the wall create a certain minimum distance and the turned out arms make frontal abduction more difficult.
- This pose is not elementary. The prerequisite is not only that padmasana is possible, but also that it is easy to take, as the two hands are not available to bring the legs into the appropriate position. Instead, the combination of the effect of gravity (in this pose, gravity works against the normal lotus to help you take the pose) and the swinging movement must be sufficient. It is helpful to perform the swinging movement of the two legs not in 90° flexion in the hip joints but at a significantly lower flexion angle, i.e. when the legs are still slightly closer to the wall. Of course, the sartorius is the muscle that performs precisely this movement, which is where its name „sartorius“ comes from, but it is supported by synergistic muscles for all components of the movement, some of which – the flexion in the knee joint, for example – run into active insufficiency and a tendency to cramp, which is why the movement should be performed with momentum.
- As always with lotus-like leg postures, pain can occur in the knee. It is difficult to predict whether it will be greater or less than in normal lotus. On the one hand, the gravitational effect of the leg on the inner knee is missing here, and on the other hand, the hands are not available to turn each of the legs out vigorously once or continuously during the pose.
- The easiest way to exit the pose is to abduct one of the two legs further, which releases the foot from the interlock and allows both legs to move freely again. After one leg has been stretched upwards, the corresponding heel is pressed onto the wall and stretched in the corresponding hip to release the buttocks from the wall. It is IMPERATIVE to release the interlocking of the legs before leaving the pose. A rough landing on the crossed knees would result in injury!
- If you do not take enough momentum and therefore try to bend the knee joint further with the strength of the hamstrings in order to get the foot into the pose, a tendency to cramp in the hamstrings can easily occur.
padmasana forward bend

Instructions
- Take the padmasana variation as described above.
- Bend in both hip joints to draw the legs towards the upper body.
Details
- When performing the forward bend, the buttocks may slide up a little on the wall and the lumbar spine will start to become convex. However, this is not a problem.
- As the legs move towards the upper body due to gravity, there is no tendency to cramp, which would otherwise occur in the sartorius in particular. The main limiting factor for the movement of the legs towards the upper body is probably the flexibility of the gluteus maximus.
- All comments on knee problems in lotus-like leg postures also apply here (see the FAQ), but the pain may be slightly less severe.
- The easiest way to exit the pose is to abduct one of the two legs further, which releases the foot from the interlock and allows both legs to move freely again. After one leg has been stretched upwards, the corresponding heel is pressed onto the wall and stretched in the corresponding hip to release the buttocks from the wall. It is IMPERATIVE to release the interlocking of the legs before leaving the pose. A rough landing on the crossed knees would result in injury!
free
Instructions
- Take the elbow position with the heels laning on the wall as described above.
- Using strength from the front of the body, pull the upper body away from the wall with the arms extended until the gravity perpendicular is just in front of the elbows and maintain the required muscular activity.
Details
- The free elbow stand is a challenging exercise for balance from the shoulder and elbow joints, i.e. from the strength of the deltoids and triceps in particular. The basic rule is
- the smaller the angle in the shoulder, i.e. the further away from 180°
- the more widely the body mass is distributed over the arms
- the more body regions can be involved in the balancing activity and therefore the better the load can be distributed away from the shoulders and triceps, where great strength is required,
the easier it is to balance. This means that the less some of the actual target parameters of the exercise are realised, the easier it becomes or, conversely, the more precisely it is performed, the more demanding it becomes. The partial body weight to be balanced is extremely high and the load arm is almost as unfavourable as it can be, which is why it requires an extraordinary amount of body awareness, attention and strength to perform this variation cleanly. The strength and endurance in the deltoids and triceps is likely to exceed the average beginner. In the classic version as pinca mayurasana, the knee joints are often bent, which simplifies the pose in two ways: - the maximum and effective lever arm shrinks considerably
- the mass distribution of the body becomes more favourable. It is possible to keep the thighs on one side of the centre of gravity and the lower legs on the other.
In the classic pinca mayurasana variation, the shoulder joints are frontal abducted significantly less than 180°, which gives the upper body a significant incline that further improves the mass distribution and the effective lever arm. Balancing can also be performed from other regions of the body or divided between different regions: firstly, of course, from the shoulder joint, which is the most difficult, but also through flexion and extension of the knee joints and movement in the hip joints in the direction of more or less extension in the hip joint. However, the resulting hyperlordosis in the lumbar spine must be compensated as best as possible with the strength of the glutes. Apart from its external form as an inversion pose with the turned out arm position, pinca mayurasana has very little to do with the pose described here, at least in terms of muscular activity.
- the more body regions can be involved in the balancing activity and therefore the better the load can be distributed away from the shoulders and triceps, where great strength is required,
- Balancing is more successful if the gravity perpendicular is chosen favourably, a few centimetres away from the elbows, so that there is a certain amount of security that you won’t immediately fall back onto your feet at the slightest movement, but also not so far away that the strength endurance of the triceps is no longer sufficient: the further the gravity perpendicular is shifted towards the wall, the more strenuous it will necessarily be for the triceps. There will therefore be an optimum point for the gravity perpendicular when weighing up these two opposing objectives.
- This variation is an excellent exercise in maintaining even tension in different parts of the body.
pinca mayurasana

Instructions
- Take free elbow stand as described above with sufficient distance from a wall.
- Tilt the shoulder joints out of 180° frontal abduction, bend the knee joints at the same time and extend the hip joints so that the gravity perpendicular remains close to the elbows under the forearms.
Details
- As already described in the details of the basic pose, some key parameters are different in pinca mayurasana. The significantly lower frontal abduction in the shoulder joint allows for easier balancing due to the much more favourable sarcomere length of all relevant muscles for the exertion of force. Furthermore, the lever arm to the centre of gravity of the balanced partial body weight is significantly more favourable not only due to the lower frontal abduction in the shoulder joints, but also due to the extended hip joints and the widely flexed knee joints. All in all, this makes balancing much easier. However, you need to use the gluteus maximus muscles significantly to avoid having to hyperlordosis the lumbar spine area with maximum extension in the hip joints.
- Avoid balancing by flexing and extending the knee joints.
- Maintain maximum extension in the hip joints with sufficient force of the gluteus maximus so that the lumbar spine area does not become uncomfortable.
With block
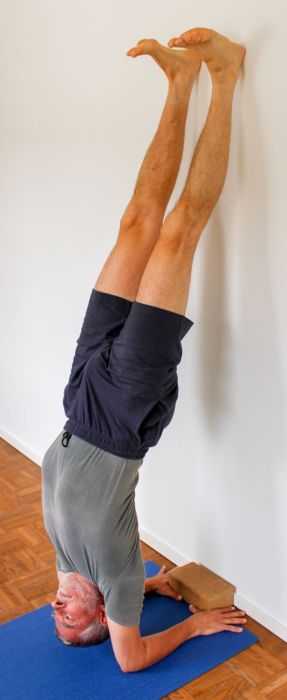
Instructions
- Take the position as described above, but use a block between the hands so that the thumbs point past the block towards each other and the fingers point forwards away from the feet along the other edge.
Details
- Sometimes the pressure of the hand against the edge of the block can be uncomfortable. This can possibly be remedied with the help of patches. As the block only serves to prevent the hands from sliding unsteadily towards each other, any other means that mechanically blocks the movement of the hands towards each other, such as the much softer shoulder support plates, is also fine. It is also conceivable, if this is perceived as more comfortable, to place the hands as fists next to the blocks, but then the palmar flexion of the wrist is usually restricted by the pressure sensation of the knuckles and the palm can be pressed down less well.
free with block

Instructions
- Take the free pose described above, but use a block, as also described above, to absorb the externally rotating moments occurring in the shoulder that want to push the hands towards each other.
Details
- ..
(P)

Instructions
- Take the pose as described above.
- The supporter corrects conspicuous details, especially the angle in the shoulders.
Details
- The details to be corrected by the supporter in detail: Due to restricted flexibility in the shoulders, the upper body often tilts away from the wall on the pelvis end, resulting in an uncomfortable hollow back in addition to the obvious misalignment in the shoulders. To improve the angle in the shoulders, counter-pressure in the area of the shoulders or upper arms must be applied while pushing the centre of the upper body towards the wall. If there is no counter-pressure, the shoulders will almost inevitably move towards the wall, which not only results in an undesirable reduction of the angle in the shoulder joints, but from a certain point onwards many people will no longer be able to maintain it due to a lack of strength. Another way to correct this is to press the feet against the wall while pushing the shoulder area away from the wall from behind. The best ways to correct this are probably:
- sit or squat as a supporter to the side of the performer. Support with one hand between the upper end of the shoulder blades and push with equal force on the lower sternum or upper abdomen towards the wall and upwards.
- sit facing the performer, pull from behind on the shoulder heads while pushing with your head against the lower sternum or upper abdomen.
- stand next to the performer, pull the shoulders away from the wall from behind with one hand while the other hand fixes the feet on the wall.
For 1) and 2) it is important that pressure and counterpressure or pressure and pull are equally strong.
- sit or squat as a supporter to the side of the performer. Support with one hand between the upper end of the shoulder blades and push with equal force on the lower sternum or upper abdomen towards the wall and upwards.
- In cases of pronounced flexibility restrictions in the shoulders, it may be that the head would hardly lift off the floor without support. This variant can make this possible for the first time.
(P) Support during the upswing

Instructions
- Take dog elbow pose with the head facing the wall.
- The supporter stands sideways on the side of the swinging leg, holds the hand at the same height as the performer’s shoulder to be able to intercept any excessive movement of the shoulder towards the wall and reaches into the flight of the thigh with the other hand to support the upswing as required.
- The hand supporting the shoulder area is only removed when the performer is standing cleanly, calmly and securely in the position.
Details
- If the strength of the one supporting arm is not sufficient to support the upswing movement, this is not a fault of the supporter, but the cause lies in the performer, probably his mind or subconscious prevents sufficient use of strength out of fear.
- Untrained beginners in particular who want to learn elbow stand sometimes lack a little body awareness and do not control their shoulders sufficiently. It is therefore extremely important that one of the supporter’s hands is in the area of the shoulder or upper back in order to be able to intercept the person swinging up if necessary, i.e. to push the shoulder away from the wall. This is even more important in elbowstand than in handstand. It should be noted that, depending on the performer’s behaviour, lifting the swinging leg can, in the worst case, lead to the shoulders moving further towards the wall. If it becomes apparent that the performer lacks information or body awareness, stop the attempt and work on the prerequisites instead. If the lift is successful together, it is strongly recommended that you only remove your hand from the shoulder area when the performer is visibly calm and stable in the position. During the support, the supporter may have to act quickly and forcefully, perhaps faster and more forcefully than expected, to keep the performer’s shoulder area away from the wall.
- One of the two should count out loud the swings that precede the jump, it is recommended that the supporter does this as they are in a more comfortable position. Counting out loud prevents misinterpretation of the performer’s movements.
- Be very careful to stand on the side of the swinging leg! The grip from the other side, i.e. that of the jumping leg, can lead to the jumping leg of the performer injuring the hand or wrist of the supporter when the supporter’s hand is still on the performer’s thigh.
- The supporter should stand in a caturkonasana-like position with clearly bent knees in order to be able to support the performer far enough in the upper back (instead of the lower back!).
Transition to uttanasana

Instruction
- Take elbow stand as described above.
- Bring more strength into the shoulders to keep them away from the wall.
- Flex both hip joints and flex the knee joints to move both legs away from the wall. With the knee joints clearly bent, land as gently as possible with the feet on the floor.
- Push the pelvis backwards towards the feet, shifting weight from the arms to the feet. Use the strength of the triceps to stretch the elbow joints until they lift up and finally uttanasana is held with the arms straight.
Details
- If the legs are released from the wall at the same time, this creates moments in the shoulders and upper body that push them towards the wall. This must be counteracted using the strength of the shoulders and upper back.
- As always with two-legged landings, land as gently as possible and with your knees clearly bent.
- To lift the elbows off the floor and stretch the arms, you need a lot of flexibility in the hamstrings and a lot of strength in the arms (in the triceps), otherwise it will hardly be possible. It would be desirable to shift the weight from the strength of the arms to the legs with the knees stretched as far as possible