yogabook / asanas / back stretching
Contents
„back stretching“
 instructions and details with working links as PDF for download/print
Detailfotos
with good flexibility |
Feedback: We’d love to hear what you think about this description, give us feedback at:
postmeister@yogabook.org
last update: 12/30/2018
Name:
Trivia name: Back stretching
Level: A
- Classification: A
- Contraindication
- Effects of
- Preparation
- follow-up
- derived asanas
- similar asanas
- diagnostics
- Instruction
- details
- Variants
Classification
classic: warm-up
psychomental:
physiological:
Contraindication
Effects
- (231) Stretching in the shoulder joint in direction of frontal abduction
- (601) Stretching for rotation of the spine (variant „twisted“)
- (721) Stretching the hamstrings
Preparation
An important preparation for all those who are not particularly flexible in the hamstrings is to warm them up so that flexion in this pose is easier and the pelvis tilts better:
- uttanasana as a generally effective and efficient stretch of the hamstrings to prepare for flexion in the hips in this pose
- prasarita padottanasana very similar to uttanasana
- parsvottanasana as a stretch that goes beyond uttanasana
- pascimottanasana
- janu sirsasana
- tryangamukhaikapada pascimottanasana
- downface dog as another good preparation for the hamstrings when the pelvis is tilted powerfully
- hip opener 5 as a very effective stretch of the hamstrings that goes beyond uttanasana
- warrior 3 pose
- trikonasana
- parivrtta trikonasana
For problems with the dorsiflexion of the wrists, which manifest as pain in the extensor sides of the wrists (i.e. dorsal) or difficulty in pressing the wrists or finger joints onto the wall, as well as a tendency to cramp in the dorsiflexors:
- Forearm stretching for the palmar flexors to stretch the muscles in the wrist that perform the stretch
- Forearm stretch for the dorsal flexors to prevent the antagonists of the executing muscles in the wrist from cramping
- Forearm stretch in upavista konasana for the palmar flexors for further stretching of the executive muscles in the wrist
Back stretching is one of the simplest poses for stretching the shoulder joints in the direction of frontal abduction, which is why it is difficult to specify pre-exercises; rather, it is the pre-exercise for many others. Nevertheless, many synergistic poses can be specified for this movement:
- downface dog, especially the „wide“ variation as a general stretch of the shoulder and hamstrings
- rectangular handstand as a related pose
- handstand as a related and synergistic pose
- elbow stand as a related and synergistic pore
- rectangular elbowstand stand as a related pose
- elbow downface dog as a related and synergistic pose with arms turned out wide
- hyperbola as one of the most effective and efficient stretches in the direction of frontal abduction without external rotation of the arms
- shoulder opening on the chair as one of the most effective and efficient stretches in the direction of frontal abduction with external rotation of the arms
as well as backbends with frontal abduction such as
- urdhva dhanurasana as one of the most effective and efficient stretches in the direction of frontal abduction without extensive external rotation of the arms.
Follow-up
derived asanas:
similar asanas:
Geometry:
- rectangular handstand
- downface dog
- urdhva hastasana variation of dandasana
- supta dandasana
- rectangular uttanasana
- rectangular headstand
- navasana
- dvi-pada variation of the handstand
Diagnostics (No.)
(880) Hyperextension of the knee joint:
Hyperextension of the knee joint refers to the ability to or the current state of an angle of more than 180° in the knee joint. To a certain extent, this is considered normal by anatomists and is on average more common and more pronounced in females. However, it can also indicate weakness of the quadriceps or hamstrings. Furthermore, hyperextension often causes unphysiological sensations that are not caused by stretching or exertion of the muscles and should be avoided, see also the FAQ.
Pelvic obliquity or unequal leg lengths can be recognized excellently in the back extension, in that one side of the pelvis and usually then also a part of the lower back is higher than the other. This usually results in a slight rotation of the spine. The causes often lie in dislocations / subluxations of the hip joint, knee joint and ankle joints, and quite rarely can actually be bones of different lengths. Other causes are differences in the musculature in the pelvis and leg: adductors or abductors that are tensed on one side tend to move the pelvis sideways in relation to the feet, which means that it is then higher on one side. Pelvic misalignments often lead to consecutive scoliosis. If possible, the causes should be identified and remedied.
Weaknesses of the wrists are most likely to become apparent in extensive dorsiflexion and under greater load.
- Ganglion, usually in the dorsal area between the hand and forearm, produces a sensation of pressure when the wrist is dorsiflexed
- Tendinitis of the tendons of the palmar flexors or finger flexors
- Carpal tunnel syndrome: worsening of symptoms in this position
- Fractures and fractures of carpal bones, especially the scaphoid bone
- Arthritic/osteoarthritis changes (degenerative with cartilage atrophy) of the joint
- Arthritis (joint inflammation) of various kinds
- Dislocation / subluxation, which would cause a significantly increased sensation of tension in various muscles covering the wrist joint
- Joint trauma, which may cause pain in the joint even after many weeks or months
but also purely muscular symptoms such as
- Shortening/hypertonus of the dorsiflexors of the wrist, which then become noticeable in the dorsal side of the elbow joint in a cramp-like manner.
- Shortening/hypertonus of the palmar flexors of the wrist, which causes pain in the dorsal flexion of the wrist in the performing muscles on the palmar side of the forearm due to stretching.
- Golfer’s elbow: Strain pain at the point of origin of muscles on the ulnar side of the forearm in the transition to the upper arm.
In this pose, the flexibility of the shoulder joint can be recognized, including side discrepancies, and there may be indications of diseases of the shoulder joint:
- irritable hypertonus of the deltoid: especially ambitious beginners in yoga tend to develop irritations in the deltoid, which are localized in the area of the muscle origins, probably result from an overstrain of the structures due to frequent repetitive demands in full frontal abduction and are also noticeable in such stress, see FAQ.
- Various pathological changes in the shoulder joint such as impingement syndrome, frozen shoulder, calcification of the biceps tendon, which cannot all be discussed here and require clarification.
- side discrepancies in flexibility
The flexibility of the shoulder joint can be recognized by the degree of deviation in the three dimensions of movement:
- Outward deviation of the upper arms with consecutive flexion of the elbows
- Loss of rotation of the arms
- Incorrect angle of frontal abduction that does not reach 180° or not permanently
(650) Kyphosis and lordosis of the spine:
The deviations from the physiological double-S shape of the human spine become quite visible in this pose. There should be a certain degree of lordosis (convex spine from the front) in the lumbar and cervical spine and at most a small degree of kyphosis (convex spine from the back) in the thoracic spine. In many cases, there will not be much left of the possible lordosis of the lumbar spine due to the restricted flexibility of the hamstrings. The thoracic spine should be at least straight or even slightly extended. See the FAQ.
(611) Pelvic obliquity/unequal shoulder height/scoliosis of the spine:
The lateral deviations of the spine from the median plane known as scolioses are also quite visible in this pose. See the FAQ.
Variants:
Instructions
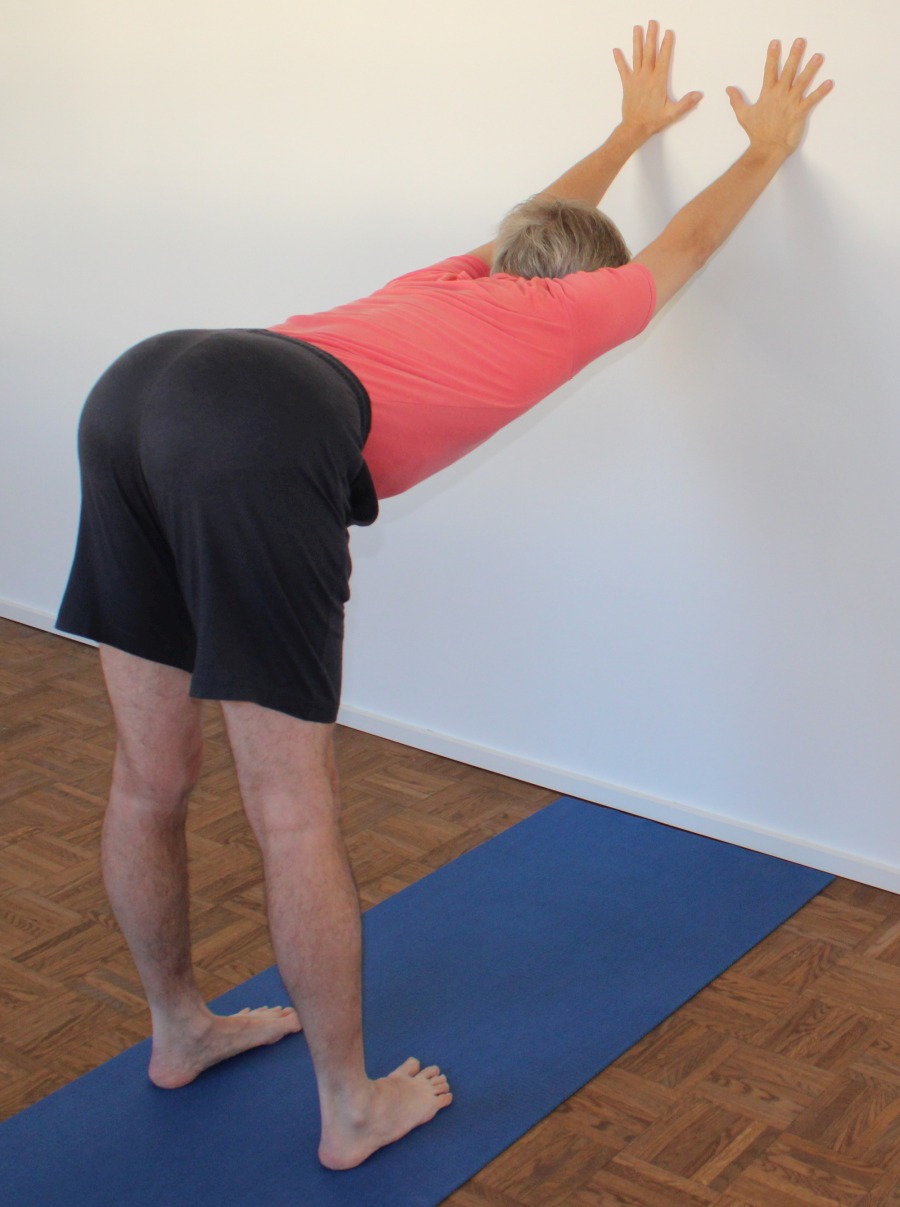
- Stand with the midlines of your feet parallel, feet hip-width apart in front of the wall.
- Bend forward and place your hands against the wall at pelvic height (wrists at the same height as the ischial tuberosities) with the tendons of the middle fingers pointing upwards in parallel.
- Lower the upper body to a horizontal position and push the ischial tuberosities (ischial tuberosity) away from the wall using the strength of the arms and shoulders.
- Straighten the legs properly and keep the kneecaps up by activating the quadriceps.
- Turn in the legs in slightly and press the inner feet in particular firmly onto the floor. The heels should move apart rather than towards each other and the front feet towards each other.
- Turn out your arms as far as possible and keep your elbows straight.
- Over time, tilt the pelvis further forward until you reach the maximum stretch in the hamstrings and lower the upper body accordingly.
Details
- Pay attention to the footwork.
- Use the strength of your arms and shoulders (elevation of the shoulder blades) to push the ischial tuberosities away from the wall.
- Two things can be done when you start to see some movement:
- Tilt the pelvis more forcefully in the hip joints, which will later create a concave back, as shown in the picture. Be aware of the contraindications of hyperlordosis, such as spondylolisthesis and spinal canal stenosis.
- Concentrate on pushing the wall away more without letting the upper body sink further. This will further activate some of the back muscles.
- The usual instructions for the hands also apply to the head down dog pose: tendons of the middle fingers parallel, fingers spread, all finger joints pressed against the wall, arms stretched through in the elbows, turned out and stretched out from the shoulders (shoulder blades elevated).
- The back may sink below the horizontal, but the further it sinks, the more it is important to stretch from of the shoulders, i.e. to elevate the shoulder blades and pay more attention to turning out the arms. Letting the upper body sink noticeably contradicts the stretching and external rotation of the arms, especially if the shoulders are less mobile.
- In rare cases, the relationship between a very imflexible shoulder joint and relatively flexible hamstrings is so unfavorable that an uncomfortable hollow back is felt. This can be countered by lowering the hands. If this is not sufficient, the pelvis should be tilted slightly less forcefully into flexion at the hip joints.
- In some cases, there is an unpleasant sensation in the dorsal wrist. This is usually caused by a lack of muscular work to press the palm and fingers onto the wall. This is sometimes aggravated by insufficient flexibility of the forearm muscles in the direction of dorsiflexion in the wrist, which can be countered in the long term with palmar forearm stretching, see the preparation and diagnostic notes.
- In some cases, hyperextension of the elbow joint causes pain on the extensor side of the elbow joint. The best solution is to learn to voluntarily tense the arm biceps (or the entire flexor group of the elbow joint) in the pose in order to pull it out of the hyperextension. Even a significant tensing of the biceps without a noticeable change in the angle of the elbow joint can lead to noticeable relief.
- In some cases, hyperextension of the knee joint causes pain on the back of the knee. As with hyperextension of the elbow joints, the best solution here is to learn to voluntarily pull the knee joint out of hyperextension by using the corresponding flexor group of the mid-limb joint, i.e. the hamstrings, which flexes the knee joint. However, the voluntary, differentiated use of the leg muscles is not quite as simple as that of the arm muscles. Hyperextension can also cause pain on the front of the knee (ventral side), so only stretch so far that this pain does not occur, but only the physiological stretching pain in the hamstrings.
- Information on dealing with cubitus valgus can be found in movement physiology under axial misalignment.
Variants
with the leg raised

Instructions
- Take the pose as described above.
- Shift your weight completely onto your left foot.
- Raise the right leg backwards and upwards.
- Align the pelvis again precisely so that the pelvis is horizontal, the knee joint of the lifted leg is fully extended and the same leg is not turned out, the foot is as in tadasana, i.e. the midline of the foot points downwards.
Details
- The expected evasive movements of the pelvis usually occur very clearly here, as the lifted leg is not fixed anywhere: the pelvis lifts on the side of the leg to be lifted, it rotates horizontally around the standing leg so that the lifted leg moves backwards and it would tilt forwards (into further flexion in the hip joint of the standing leg) if the flexibility of the hamstrings of the standing leg did not set a limit to this. However, as this is usually the case, other evasive movements such as lifting the hip of the lifted leg occur more frequently. Try to keep all evasive movements under control.
- As the lifted leg lifts further, there is more stretching in the standing leg. However, the actual limit for the lift is usually the restricted flexibility of the hip flexors of the lifted leg.
- Do not lift the heel or the lower leg, but the back of the thigh, especially the inner knee.
- Stretch the heel of the lifted leg away and straighten the knee joint. Because of the tendency of the lifted leg to turn out, lift the inner knee more than the outer knee, stretch the inner foot just as well as the outer foot.
- The pelvis tends to rotate in the plane, the side of the lifted leg wants to move backwards.
- When taking the pose, the pelvis must shift slightly to the side of the standing leg in relation to the standard variant so that the gravity plumb comes under the standing foot.
- The asymmetrical load often also affects the shoulder area, consciously keep both shoulders equally high and both arms equally in 180° (or more) frontal abduction and do not allow either arm to adduct laterally, which means the shoulder muscles must stabilize the position of the arms and upper body.
- Raising the leg by increasing flexion in the hip joints and consecutively lowering the upper body may not only lead to increased stretching in the shoulder joints but also to greater evasive movements, which may be laterally unequal.
elevated
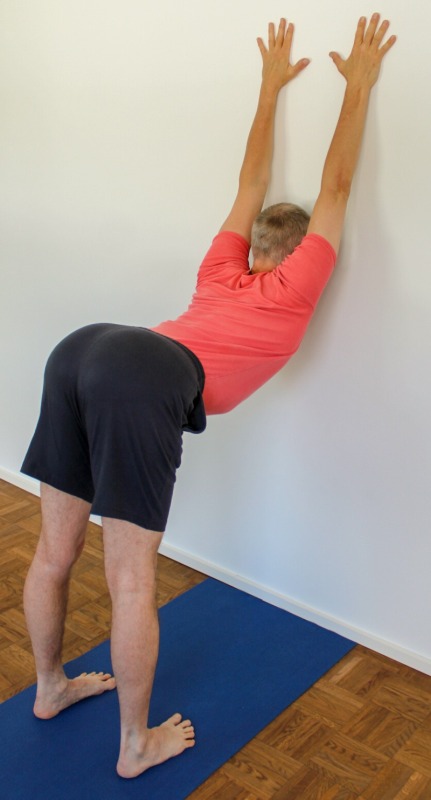
The main purpose of this exercise is to improve shoulder flexibility.
Effects: (231) Shoulder joint: stretch for frontal abduction
(501) Stretching the latissimus dorsi
Instructions
- Place your hands shoulder-width apart on the wall so that your wrists are at eye level (in relation to standing up straight). The tendons of the middle fingers point parallel upwards. Straighten your arms. Turn your arms out vigorously. Lower your chest as far as possible. Adjust the distance from the wall so that the backs of the legs are vertical.
Details
- In cases where the back of the legs are very stiff (hamstrings), the angle of the pelvis to the legs may remain much greater than 90 degrees, which means that it rises significantly towards the wall, so that the gravitational force of the upper body cannot be transferred well and the effect on the shoulder joint is rather poor. In such cases, the distance from the wall should be increased slightly so that the legs are no longer vertical but tilt slightly forward, which also allows the upper body to be tilted further towards the floor and improves the effect on the shoulder joint.
- It is quite common for the deltoid muscle to become noticeably crampy after a short time. This is considered normal and can be remedied after the exercise with the usual means.
- If the shoulder joints are less mobile, lowering the upper body is at odds with extending and turning out the arms. Try to combine these three with the appropriate use of force to achieve the desired stretching effect on the shoulder area.
- In rare cases, the relationship between a very immobile shoulder joint and a relatively flexible hamstrings is so unfavorable that an uncomfortable hollow back is felt. This can be countered by lowering the hands, which of course reduces the stretching effect in the shoulder area. Other related poses may then be more suitable for stretching the shoulder area, such as the shoulder opener on the chair or the hyperbola.
slightly elevated

If there is an imbalance between the flexibility of the shoulder and hip joint in terms of flexion.
Instructions
- Extend your back, but hold your hands so much higher that you can feel a stretch in the shoulder area (specifically the adductors of the shoulder joint).
Details
- In rare cases, flexibility in the hamstrings is good, but shoulder flexibility is so much worse that the pose results in an uncomfortable hollow back feeling, so that the hands have to be held lower. The exact opposite case is treated here: that the flexibility of the hamstrings is poor and the hands must be positioned higher in order to achieve an adequate stretch in the adductor muscles of the shoulder joint from the gravitational effect of the partial body weight proximal to the pelvis.
elevated with adduction

This exercise is primarily used to strengthen the adductor muscles of the shoulder joint in people who are very mobile in the direction of frontal abduction.
Instructions
- Perform the variation in an elevated position as described above. However, do not lower the upper body as far as possible in order to achieve maximum frontal abduction in the shoulder joint, but press the hands firmly against the wall and downwards using the strength of the frontal adductors shortly before reaching maximum frontal abduction.
Details
- In cases of very flexible shoulder joints, in which no stretching of the frontal adductors of the shoulder joint can be felt, it is advisable not to perform the pose as usual, as any effect in the shoulder area would probably no longer affect the muscles, but the non-muscular, i.e. ligamentous, capsular or even osseous structures, which should not be changed in any poses. In addition, the above condition often applies if the frontal adductors of the shoulder joint have little strength and tone anyway, so that more of both can be beneficial for the safety and stability of the joint. The exercise described is suitable for this purpose without the risk of losing flexibility, as the strengthening is performed in a very long sarcomere length. Seen from the outside, the frontal abduction may still be significantly greater than 180° and therefore greater than in many other people, but the external appearance is hardly ever a sufficient criterion. It is important that the adductors of the shoulder joint are intensively working and strengthened, which must be perceived as a corresponding effort. The direction in which the hands should push corresponds to the arc described by the wrists around the glenohumeral joints.
- In principle, unusually high flexibility in the direction of frontal abduction in the shoulder joint is independent of the flexibility of the hamstrings, so it can occur with both low and good flexibility of the latter. However, this influences the execution of this variant. If the flexibility of the hamstrings is very good, even a normal distance, which is provided by vertical backs of the legs, can allow this variation to be performed well and intensively. However, if the hamstrings are not very flexible, the distance between the feet and the wall must be increased regularly so that the frontal abduction in the shoulder joint does not raise the upper body to such an extent that a stretching effect on the hamstrings can no longer take place.
in stepping position
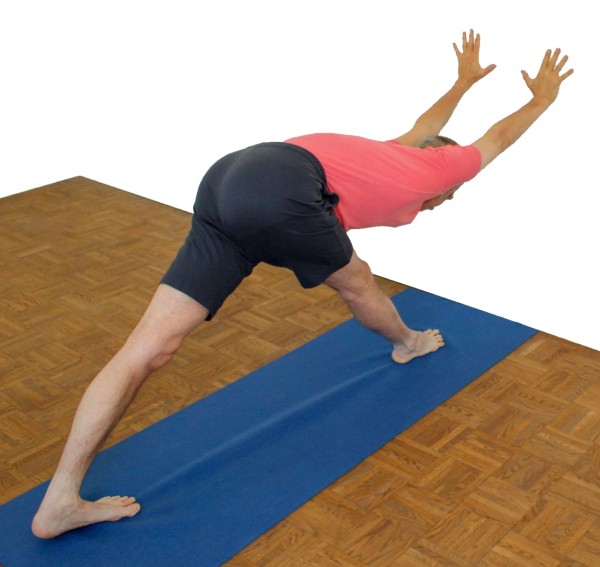
This pose is reminiscent of parsvottanasana and can be practiced in preparation for it
Instructions
- Place both feet in a line at a distance at least equal to your own leg length. Both feet point 90° to the wall.
- Tilt your pelvis and with your upper body forward.
- Place your hands on the wall, wrists approximately at the level of your sitting bones.
- Lower the upper body as far as possible, stretch out from the shoulders (elevation of the shoulder blades) and try to keep the pelvis straight and not turn away from the front leg.
Details
- The calf muscles (gastrocnemius) in the rear lower leg may stretch considerably. This is very much in the meaning of the pose.
- The straightness of the pelvis is not an easy issue in this variant. The hip of the back leg wants to move upwards and backwards, which makes it easier to extend the front leg (due to the hamstrings).
- Depending on the flexibility of the hamstrings and the distance between the feet, it may not yet be possible to achieve a straight back; in particular, the lumbar spine will often remain convex.
- In cases where one of the two hips cannot be brought to the same height without the pelvis turning horizontally, the distance between the feet is usually not correct. Since a reduced distance between the feet, which would result from placing the front foot a little further back, is not usually desirable, as this reduces the stretching in the hamstrings of the front leg, as well as the stretching in the gastrocnemius of the back leg, place the back foot a little further away from the wall so that both hips can be brought back to the same height without rotating the pelvis.
twisted

Instructions
- Take back stretching as described above.
- Keep the right arm in the pose and take the left arm out of the pose without changing the position of the right arm.
- Place the fingertips of the left hand on the outside of the right foot, if necessary on a block.
- Walk your left fingertips as far to the right as possible to rotate your upper body as far as possible.
Details
- As the shoulder joint is a joint with three-dimensional flexibility, some evasive movements are possible, all of which should be prevented with appropriate attention. Above all, the arm bends and the shoulder deviates; in addition, the elevation of the shoulder blade is often lost. If the arm turns in instead of staying turned out, a lot of stretching effect is lost in the adductor muscles of the shoulder joint. Make sure that the arm remains exactly in line with the side of the body. To shift the effect between the adductor area of the shoulder joint and the hamstrings of the front leg, the height of the hand can be adjusted.
- The fingers on the floor try to walk further away by to the strength of the finger flexors in the outer foot area.
- Of course, the rotation of the upper body creates forces in the pelvis that influence the position of the hips; compensate for this as best you can!
- A position of the hand on the wall at shoulder height might be too high, especially with quite flexible hamstrings. It would cause the arm to move outwards in relation to the upper body, and he would usually lose its exorotation, which is especially dangerous to people with tendency to shoulder luxation and must be strictly avoided.
Twisted, in step position

Instructions
- Take back stretching in a stepping position as described above.
- Keep the right arm in the pose and take the left arm out of the pose without changing the position of the right arm.
- Place the fingertips of the left hand on the outside of the right foot, if necessary on a block.
- Walk your left fingertips as far to the right as possible to rotate your upper body as far as possible.
Details
- This is a combination of the „in step “ and „twisted“ variations. Here too, it is important to ensure that the upper arm does not bend, lose its rotation or lose the elevation of the shoulder blades, for which the correct distance between the pelvis and the wall is very important.
- The fingers on the floor try to walk further away in the outer foot area, palallel to the wall, by to the strength of the finger flexors.
- For good stability, the back foot can be placed at an angle of 30-45° as it is in parivrtta trikonasana, to which this variation is very similar.
- As in back stretching in stepping position, there is a clear distance between the pelvis and the wall at which the upper body can sink and the arms can stretch through. If the distance is greater, the hands can no longer be pressed against the wall while the pelvis is held straight; if it is smaller, the upper body cannot sink without the arms having to bend. If the distance turns out to be too small, move the back foot slightly backwards. If the front foot were placed backwards, this would reduce the distance between the feet, which would cost both stretching intensity in the gastrocnemius of the back leg and stretching intensity in the hamstrings of the front leg. If the rear foot is further back, the corresponding hip will also be lower, which leads to better stretching not only in the gastrocnemius of this leg, but also in the abductor and extensor gluteus maximus of the front leg, as there is an adduction in the relevant hip joint.
elevated with blocks
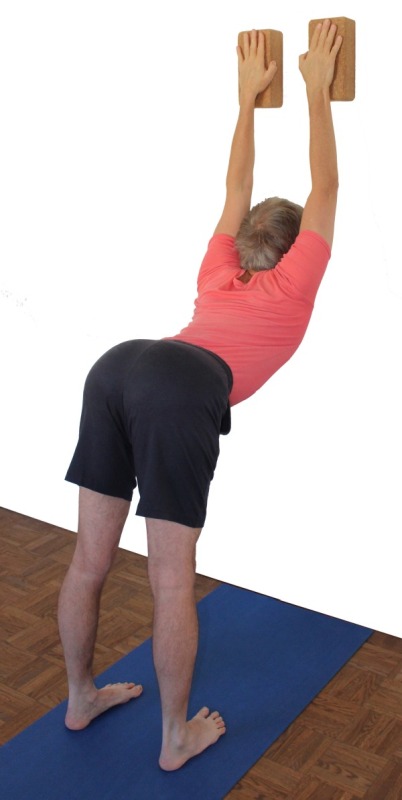
Instruction
- Take the pose as described above, but press an upright block against the wall with each hand.
Details
- In some cases of very good shoulder flexibility, the upper arms go so far into frontal abduction in the shoulder joints that the head is in the way. This variation can then provide a remedy. However, it is important to consider whether the raised variant, the purpose of which is to promote the ability for frontal abduction, should still be practiced at all. On the one hand, this variation can of course be used from time to time to test whether shoulder flexibility has changed adversely; on the other hand, the pose should not be practiced if there is no longer any muscular sensation in the adductor region of the shoulder joint (outside the deltoids). If there is no stretching sensation here, this is an indication that the glenohumeral joint is sufficiently flexible in the direction of frontal abduction, including the necessary outward rotation of the shoulder blade, not only for everyday purposes but also for all yoga poses. This may be slightly different for frontal abductions with external rotation of the upper arm, as these place greater demands on internally rotating adductors and must be checked with corresponding poses such as the elbow stand and its relatives rectangular elbow stand and dog elbow stand as well as the shoulder opener on the chair. Without the sensation of stretching, the force applied will act on non-muscular structures, which must be avoided. Instead, it should be checked whether the strength and endurance of the adductors of the shoulder joint are sufficient. It is not uncommon for younger women with a rather „delicate“ physical disposition, who hardly ever engage in vigorous activity in everyday life, work and sport, to have a very flexible constitution with low muscular competence and rather low resilience to unaccustomed demands. In addition to the classic pull-overs, rows and pull-ups in the area of functional weight training, poses and variations to strengthen the adductors of the shoulder joint such as downface dog and upface dog are recommended, each in the variation in which the direction in which the hands push is reversed, i.e. downface dog with the stretched feet and upface dog with stretched feet. The back stretching and its variations can also be modified accordingly in such a way that the muscles adducting the shoulder joint are specifically used, so that the hands on the wall are pushed towards the floor, which means that the position of the upper body is held by the hip flexors and the abdominal muscles. In this way, the pose changes its character significantly and becomes a good pose for strengthening. This modification may not be immediately obvious to beginners with little body awareness.
(P) with lifted leg

Instruction
- Take back stretching with the leg lifted as described above.
- The supporter presses against the back of the thigh to counteract the lifting of the leg and thus provoke a more conscious and greater exertion of force.
Details
- As the supporter, pay attention to the straightness of the performer’s pelvis.
- Press against the back of the thigh and ensure that the calf or heel is not predominantly lifted.
- When pressing against the hand, the lifted leg must not turn out, which often happens because the performer uses the gluteus maximus too forcefully without counteracting the evasise rotation, since as a force extensor the gluteus maximus can lift the leg more easily than the hamstrings.