yogabuch / asanas / warrior 2 pose
Contents
- 1 virabhadrasana 2„warrior 2 pose“
- 2 variants
- 2.1 ball of foot against the wall
- 2.2 hands on the hips
- 2.3 arms stretched behind the back
- 2.4 turn your head the other way around
- 2.5 do not turn your head
- 2.6 arms crossed behind
- 2.7 outer foot on the wall
- 2.8 outer foot at an angle to the wall
- 2.9 knees against the wall
- 2.10 press a block against the wall with your knee
- 2.11 back against the wall
- 2.12 (S) Turn out leg
- 2.13 (S) straighten the pelvis
- 2.14 (S) Straighten pelvis with traction on extended leg
- 2.15 (S) back against the wall
- 2.16 (S) pull on the lower leg
- 2.17 (S) turn out straight leg with belt
- 2.18 (S) pull legs back
- 2.19 (S) pressure against the fingertips
- 2.20 (S) pushing down the arms
- 2.21 (S) pushing up the arms
- 2.22 (S) press against the inner foot of the supporter
- 2.23 (2S)
- 2.24 transition to parsvakonasana and back
- 2.25 Transition to parsvakonasana and back
- 2.26 (S) transition to parsvakonasana and back
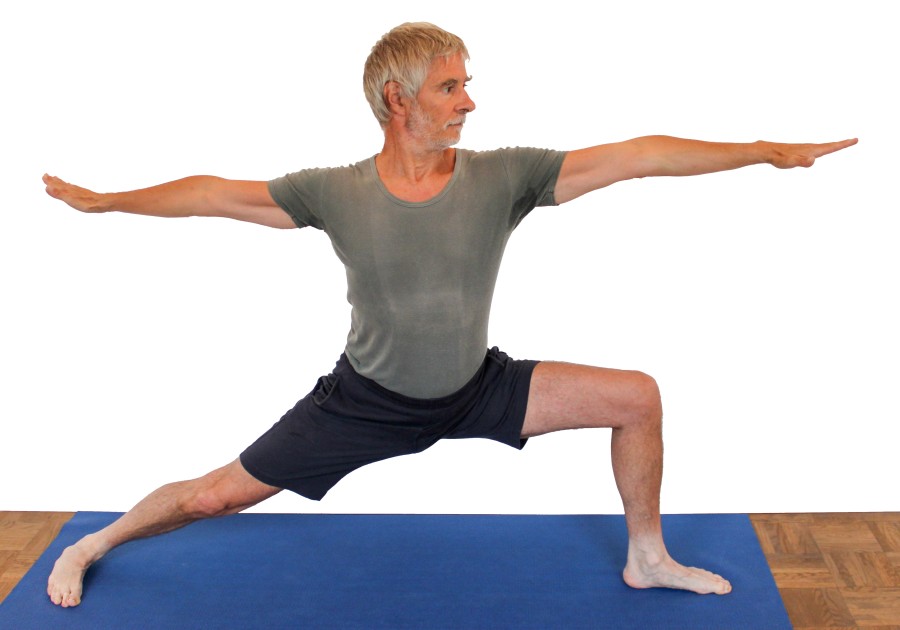
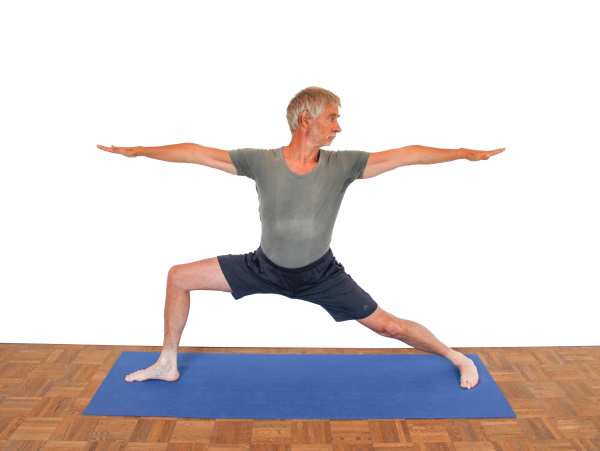
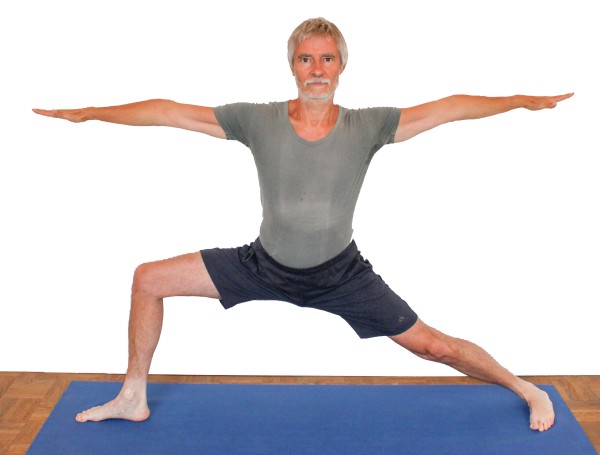
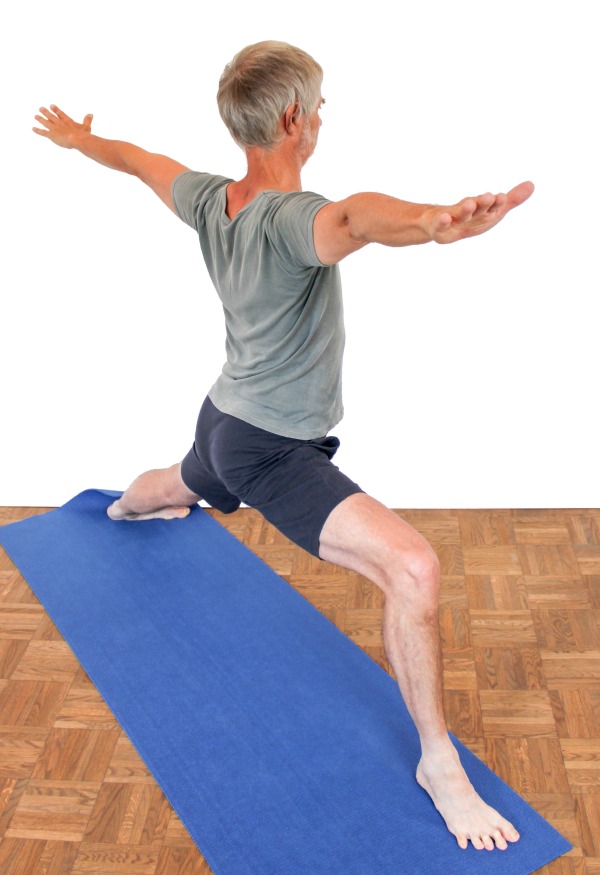
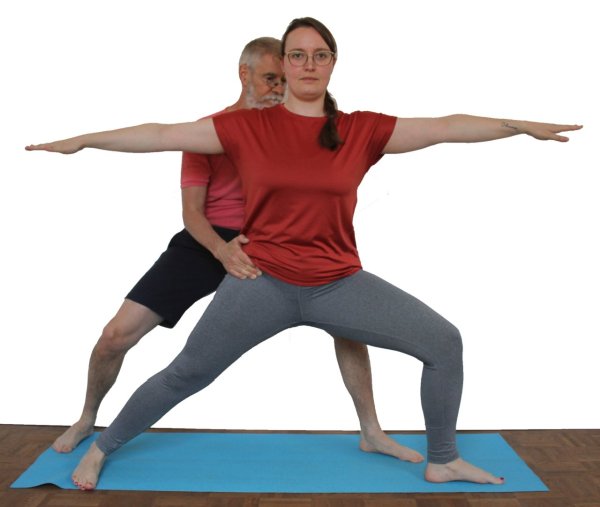
virabhadrasana 2
„warrior 2 pose“
 instructions and details with working links as PDF for download/print
Feedback: We’d love to hear what you think about this description, give us feedback at:
postmeister@yogabook.org
Last updated: 30.12.2018
Name: virabhadrasana 21
Trivial name: warrior 2 pose
Level: beginner
- classification
- contraindications
- effects
- preparation
- follow-up
- derived asanas
- similar asanas
- diagnostics
- instructions
- details
- variants
classification
classical: Stehhaltung
psychomental: stabilizing
physiological: seidward hip opening (stretching of adductors), strenghtning of the quadriceps
contraindication
effects
- (252) shoulder joint: force for lateral abduction
rather weaker and in terms of endurance - (727) strengthening of the short hip extensors (a.a. gluteus maximus).
- (737) strengthening of the external rotators of the hip joint
- (742) strengthening of the abductors
- (752) strengthening of the adductors
- (812) strengthening of the quadriceps
- (822) strengthening of the hamstrings as external rotators of the knee joint und extensors of the hip joint.
- (291) stretching of the trapezius
- (751) stretching of the adductors
- (871) stretching of the pronators of the ankle
preparation
The butt muscles and other exorotators and extensors are among the muscle groups that work most intensively in this pose. They can be prepared for the intensive work with:
- caturkonasana
- parsvakonasana
- Theke
- purvottanasana
- urdhva dhanurasana
- eka pada-variant of urdhva dhanurasana
- setu bandha sarvangasana
- eka pada-variant of setu bandha sarvangasana
- warrior 3 pose
- „backwards against the wall“-variant of warrior 3 pose
and other various backbends. In this pose, the adductors, together with the hip flexors, tend to tilt the pelvis into the hollow cross or forwards. To reduce this, practise:
- hip opener 1
- hip opener 2
- warrior 1 pose
- upface dog
- urdhva dhanurasana (back arch)
- ustrasana (camel)
- setu bandha sarvangasana
and other backbends with extension in the hip joint. As the flexing leg has to perform powerful work in the quadriceps, here are some preparatory exercises for this too:
The flexibility of the adductors, which both tilt the pelvis forwards and prevent the pelvis from rotating away from the bending leg and straight forwards and also prevent the bending leg from moving sufficiently backwards, is a major limitation of the pose. Lowering the pelvis is also hindered by the adductors of the extended leg. Prepare this well with:
and also the poses that involve the gracilis:
- upavista konasana
- trikonasana
- ardha chandrasana
- hip opener 4
- hasta padangusthasana sideways
- supta padangusthasana sideways
Since the flexing leg must extend, this should also be prepared:
- baddha konasana
- supta baddha konasana
- half lotus forward bend
- hip opener at the edge of the mat
- hip opener 3
- caturkonasana
- parsvakonasana
- counter
The supination of the foot can also be prepared so that the outer foot of the extended leg remains on the ground:
- parsvakonasana
- counter
- prasarita padottanasana – with large distance between feet
- padmasana
- ardha padmasana
follow-up
derived asanas:
similar asanas:
diagnostics (Nr.)
If the pelvis tilts significantly forwards, it is important to find out whether the hip flexors or the adductors are mainly responsible for this. It is possible that the hip flexors are shortened and cause this, in which case they would cause a hollow-cross tendency in everyday life. For the risks of hollow back, see the FAQ.(880) Overstretching of the knee joint in the extended leg:
Due to the tension of the hip flexors and adductors in this pose, the stretched leg should hardly overstretch, If this does happen, you should find out how great the inclination to overstretch is and how it can be controlled. See also the FAQ.
(650) kyphosis and lordosis of the spine:
Apart from the tendency of the pelvis to tilt forward and create a hollow back, the deviations from the physiological double-S shape of the human spine become quite visible in this pose. There should be a certain degree of lordosis (convex spine from the front) in the lumbar spine and cervical spine and a certain degree of kyphosis (convex spine from the back) in the thoracic spine. However, the lumbar spine hyperlordosis in this pose is often caused by restricted flexibility of the hip flexors and the adductors. See the FAQ.
(611) uneven shoulder height/scoliosis of the spine:
Although the hip of the extended leg tends to be significantly higher than the other, pelvic obliquity cannot be assessed, its usual consequences such as scoliosis would usually still be visible. The term scoliosis refers to lateral deviations of the spine from the median plane. See the FAQ.
(812) quadriceps:
In this pose, the quadriceps are clearly required to keep the straight leg extended against the flexion of the hip flexors caused by the restricted flexibility of the knee joint. What’s more, the quadriceps of the flexed leg is very active in order to counteract the gravitational force of the pelvis and the part-body-weight resting on it. This can lead to a tendency to cramp, which can have various causes such as the supply of blood to the muscles, electrolyte deficiency or neurological causes. If you stand bent over for a long time, you will inevitably reach the limits of your muscle endurance. You should then feel a burning sensation, but this will subside once you leave the pose. A certain amount of trembling in the muscles is physiological during great exertion. If it occurs with little or no exertion, it may be a symptom.
In this position, the adductors are stretched. Damage can be detected in the process:
- Shortenings
- Irritation of the insertion and origin tendons, which manifests itself in pulling pain with an elongated course. These are insertion tendinopathies, e.g. gracilis syndrome, which are characterized by pain with an elongated course along the course of the tendon.
- Tension that causes an agonizing feeling in the muscles that goes far beyond normal stretching
- tears/tears/tears of adductors, which make a loud noise in the event of a tear, followed by hematoma formation and swelling if necessary
- side differences in flexibility, which can cause pelvic obliquity and consecutive scoliosis, see the FAQ.
It is precisely the widely turned out, abducted poses and movements that trigger pain in existing hip damage.
- Arthrotic change in the joint
- Arthritis (inflammation of the joints) of various kinds
- Perthes‘ disease in children and hip dysplasia in general can react strongly to this pose
- dislocation / subluxation, which would cause a significantly increased sensation of tension in various muscles covering the hip joint
- suffered joint trauma, which may cause pain in the joint even after many weeks or months
(885) knee joint:
In this position, knee problems associated with wide bending under load of one leg or extension of the other leg become very apparent. These can be, for example traumatic or degenerative meniscus damage, arthrosis, retropatellar events such as chondropathia patellae or retropatellar arthrosis, arthritides, subluxations, ligament damage, plica syndromes, Hoffa syndromes (of the outstretched leg) and others, see the FAQ.
Shortening of the pectoralis major and other muscles moving ventrally from the lateral abduction (transversely adducting) muscles and endorotators can prevent the arms from being rotated exactly sideways, the arms from being stretched out exactly sideways to 90° to the spine and being able to be held.
variants:
arms stretched behind the back
turn your head the other way around
outer foot at an angle to the wall
press a block against the wall with your knee
(S) correct the pelvis at the leg
(S) turn out straight leg with belt
(S) pressure against the fingertips
(S) press against the inner foot of the supporter
Übergang zu parsvakonasana und zurück
(S) transition to parsvakonasana and back
instructions
- Stand in tadasana. Bring your hands together in front of your chest so that your fingertips are touching and your elbows are apart, i.e. your arms are almost horizontal.
- Jump your feet into a straddle slightly wider than leg-width and stretch your arms apart. The straddle can also be performed without jumping.
- From parallel midlines of the feet, turn the left leg in the hip joint inwards by about 20° and the whole right leg (from the hip joint) outwards by 90°. Keep the pelvis in the (imaginary) plane of the two legs or bring it back there as far as possible.
- Make sure that you are standing securely on both feet with equal pressure distribution on the parts of the sole of the foot (equally between the heel and the 5 balls of the foot and between the inner and outer edges of the foot). Then
– extend the left leg fully.
– move it backwards as far as possible and
– turn out the left leg strongly
Press the outer left foot against the floor. Erect the pelvis until it is vertical. - Bend the right leg at a moderate speed so that the pelvis remains upright and does not tilt forward. Furthermore, the pelvis should not come further forward on the left than on the right and should not be higher on the left than on the right.
- Stretch the upper body vertically upwards from the pelvis and the arms horizontally outwards, the shoulder blades are therefore lateralized and maximally lowered (in depression).
details
- Since the hip joints allow for movements in 3 dimensions the pelvis usually evades in a combination of all three dimensions:
- the left hip comes forward.the left hip lifts upwards.
- the pelvis tilts to the front, so that the butts lift and
- the ASIS drop. In order to avoid these evational movements or at least to limit them:
- push the feet away from each other with force. The more the right thigh approaches the horizontal, the better this becomes possible. This works a little against 1) and 2) .
- Turn the left thigh to the maximum out. Press the left outer foot down with the same force as the inner foot. Turning out encourages the left outer foot to be pressed down and vice versa. Both promote the straightening of the pelvis. These three factors are interrelated and promote the straightening and stretching of the upper body. These movements only reach their limits when the left inner foot begins to lift or the outer ankle area is subjectively overstretched. However, a more or less pronounced stretching sensation in the fibularis group of the outer lower leg is physiological in this pose. It can also occur in parsvakonasana and prasarita padottanasana. This stretch can be practised better there because both poses can be held for longer. In the 2nd warrior pose, the stretching effect depends on further flexion of the contralateral knee joint, which reduces the time spent in the pose. This detail also works against 1) and 2). However, it also increases the tendency for the knee joint of the extended leg to bend, which means that the quadriceps may need to work hard to counteract this.
- use a lot of strength in the butt muscles to erect the pelvis. This works against 3)
- Measure the distance between the feet so that the right knee is above the right heel (so that the lower leg is vertical) when the pose is fully taken (the right thigh is horizontal). As not everyone can bend the knee this far due to a lack of strength in the quadriceps of the bending leg or the ability to stretch the adductors, especially of the extended leg, a shorter distance may be advisable in some cases, as too great a distance largely destroys the muscular work. The quadriceps should work for this:
- that the pool does not sink to the bottom
- pushing the feet away from each otherSince the stretching ability of the adductors cited above actually limits the angle between the two legs (or between the pelvis and the flexed or extended leg) and not the flexion of the knee joint itself, in order to achieve maximum activity of the muscles, the distance can be chosen slightly smaller so that with maximum stretching of the adductors (instead of with the thigh horizontal) the knee is exactly over the heel. Note: if the distance between the feet is too great, the sense of the ability to push the feet away from each other is also lost.
- There is another reason why the distance between the feet should not be too small and the knee of the bending leg should not protrude beyond the heels, as this puts avoidable pressure on the area of the front knee below the kneecap and unnecessary strain on the retropatellar cartilage. This must be avoided, especially in the case of disorders such as patellar tendinopathy, Morbus Osgood-Schlatter, Jumpers knee / chondropathy patellae, retropatellararthrosis.
- When trying to keep the pelvis in the plane of the legs (i.e. the left hip as far back as the right), the right knee will inevitably come forward a little, at least as long as you have not mastered samakonasana (side splits), and even then usually still. Do not completely prevent the knee from moving forward if this would cause the pelvis to tilt. The straightness of the pelvis is more important. The knee of the bending leg that moves inwards/forwards also moves slightly downwards in an arc. These movements tend to put strain on the inner knee, but this is rarely associated with subjectively perceived strain if the associated pomus muscles pull the leg backwards with maximum force. Objectively, this also reduces the forces that can cause pain in the inner knee. In the rare case that pain nevertheless occurs in the inner knee, the pelvis can be allowed a little evasive movement in the horizontal plane towards the flexing leg and, above all, the position of the foot can be adjusted to the angle of the thigh of the flexing leg so that the exorotation of the lower leg in the knee joint is removed, meaning that the requirement that this foot should be parallel to the pelvis and the long edge of the mat with its midline and thus point towards the opposite heel is waived.
- Also turn the right leg out, even if this is only marginally possible; this makes it easier to move the right knee backwards and protects the inner knee, where unpleasant pressure could otherwise occur.
- Push the feet away from each other against the resistance of the floor without pushing the pelvis up, which is the most common tendency. This movement allows the quadriceps in the bending leg to work more fully and is essential for correcting the position of the pelvic. Keep the right heel just as heavy as the ball of the right foot, i.e. do not lift it. The frequently observed lifting of the heel is probably an unconscious attempt to relieve the quadriceps by making it impossible to push the feet forcefully away from each other, which significantly relieves it. In any case, the position of the pelvis will tend to suffer as a result.
- The force exerted in the knee on the fully planted foot to correct the lower leg to turn in in order to improve the position of the knee is then also missing. This is the work of the inner hamstrings, which moves the knee slightly backwards in relation to the foot.
- Use the power of the butt muscles in two ways:
- the right pomus muscles: to move the right knee further backwards while keeping the pelvis in the plane of the legs
- both sides: to straighten the pelvis
- As is well known, the abduction ability in the hip joint is a function of exorotation in the sense that the further it is possible to move the leg outwards into abduction, the further it is possible to move the leg outwards into abduction, the further it is exorotated. An exorotation of the leg from neutral zero can be achieved with well-mobile hamstrings can improve the ability to abduct by more than 90°. In the second warrior stance, this causes the pelvis to tilt in the frontal plane to the side of the flexing leg, as the abduction – depending on the distance between the feet and the degree of flexion of the flexed knee joint – is also very limited due to the slightly endorotated position of the extended leg. Note: the extended leg IS in the endorotated position, but MAKES an exorotation movement. Furthermore, without exorotation, the very limited abduction ability justifies the inclination of the foot of the extended leg compared to the initial, 20° rotated position and to rotate out with the entire thigh in the hip joint .
- People with shortened hip flexors as well as significantly shortened adductors (these also have a hip-bending effect) may not be able to erect their pelvis sufficiently. The more the right knee joint flexes, the more the pelvis will tilt forward (the hip joints flex). In extreme cases, it is advisable not to bend to the horizontal of the thigh in order to avoid straining the lower back due to the resulting hollow back and the necessary work of the muscles in the lumbar spine to straighten the upper body, but to focus on straightening the pelvis.
- The arms should be horizontal. To do this, however, lift your arms less than move them apart, i.e. away from the spine. This movement lateralizes the shoulder blades to the maximum. This has the advantage that, firstly, the lateral range of motion in the shoulder region is used to actively relax the trapezius and, secondly, simply raising the arms sometimes causes the arm to move towards the body, which causes the trapezius to spasm more quickly. The 90°-lateral abduction not only provides the maximum gravitational effect of the arms to promote strength endurance of the deltoid (esp. pars acromialis) but is also the maximum angle that is possible without external rotation of the shoulder blade, so that the trapezius can remain as relaxed as possible. In fact, the 2nd warrior position is often perceived as relaxing rather than tensing in this respect.
- Stretch your arms and hands to your fingertips. In addition:
- stretch in the finger base joints and the finger joints until there is subjectively the same activity in the inside and outside of the hand.
- Do not let the forearms hang in the elbows, but instead use muscular activity to create even work in the biceps and triceps so that the joint space on the back of the elbow joint is relieved. This activity causes the triceps to work visibly instead of hanging down with little tone. This is particularly important for people with extension in the elbow joints as a preliminary exercise for postures, in which greater stretching moments occur in the elbow joints after the posture has been constructed. A good pre-exercise for this is tensing the elbows..
- The evasive movements of the pelvis (tilting forwards, tilting sideways towards the bending leg, turning in the horizontal plane towards the bending leg) inevitably lead to incorrect pose of the upper body above the pelvis. It makes no sense to suppress this with all your strength, for example by bringing the upper body into a lateral flexion or backbend. It is better to use the necessary energy to correct the position of the pelvis.
- If the outside foot of the extended leg comes up, this is almost always a sign that the feet are not being pushed away from each other with sufficient force or that the extended leg is not being turned out sufficiently, sometimes also that the quadriceps of the flexing leg is not being used to push the feet away from each other.
- The frequently observed tendency to bend the knee joint of the extended leg reflects the strong pull of the hip flexors, especially the m. iliopsoas, when the pelvis is straightened. Therefore, pay close attention to the complete extension of the „stretched“ leg, as
- this is essential for the statics of the pose
- otherwise any incorrect loads in the knee may cause pain (the effect of the valgus stress must be absorbed by the inner collateral ligament)
- the stretching of the hip flexors on this side of the body in this pose depends on the extension of the leg
- Note that the evasive movements in the pelvis increase significantly the further (towards the horizontal thigh) the flexed knee joint is flexed. Some only occur when the knee joint is widely flexed. As a result, poses that do little more than suggest flexion of the knee joint are largely ineffective.
- In some cases, this position causes a cramp in the abductors on the side of the extending leg. This is completely harmless and can be reduced by changing sides more quickly if necessary. It can also be helpful, either preventatively or after the cramp has occurred or if there is a recognizable tendency to cramp, to do one or two rounds of hip opening at the edge of the mat or trikonasana, in which the upper body is lowered further rather than being stretched completely to the side, as this stretches and relaxes the affected muscles.
- The ability to keep the outstretched leg 20° turned in has a lot to do with the exact degree of flexion of the flexed leg – if the pelvis is positioned correctly: the further it is flexed, the more difficult it is to keep the leg turned in. The exorotation capability in the hip joint and the individual structure of the hip joint (bony overlap, labrum, ligaments) also play a role, so that in many cases the angle of 20° cannot be maintained. As long as the leg does not turn out instead of in, this is not considered critical.
- In the original pose, the head turns 90° to the side of the bending leg and looks along the arm. However, this is not ideal for beginners and people with little flexibility in the hip joints or with little experience and body awareness, as it makes it more difficult to turn the pelvis correctly away from the bending leg using some of the muscles in the upper body. It would be better not to turn the head or even to turn it in the opposite direction, which favors the correct position of the pelvic.
variants
ball of foot against the wall
detail images
Metatarsophalangeal joints in edge of the room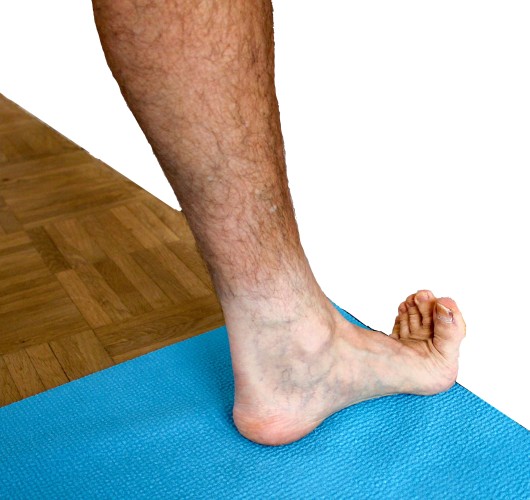 |
Gives more feeling for bending the leg
instructions
- Practice the pose so that the front toes are pointing upwards on a wall, i.e. the foot is perpendicular to the wall and the balls of the feet are directly in the edge of the room on the wall.
- Slowly bend the right leg further until the thigh is horizontal and always turn the pelvis away from the knee on the wall as best you can.
details
- A widespread evasive movement is prevented by this structure: increasing the distance between the feet beyond the extent at which the knee of the bending leg is above the heel or could be if the bend of the knee joint continues.
- The metatarsophalangeal joints are at a 90° angle, the sole of the foot on the floor and the toes on the wall. This ensures good stretching of the short toe flexors Flexor digitorum brevis located in the sole of the foot. This is particularly helpful for existing plantar fasciitis with or without an already pronounced heel spur.
- The knee of the bending leg maintains a distance from the wall so that the lower leg remains vertical. The pressure of the knee on the wall will be addressed in a later variation.
hands on the hips
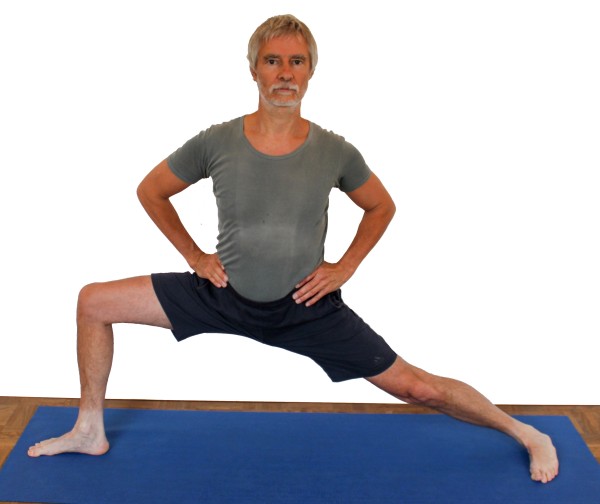
Concentration on work on the pelvis
instructions
- Do not hold your arms in the position described above, but place your fingertips on the SIAS („hip bone“).
details
- Align your pelvis better with the strength of your hands and arms:
- Turn the pelvis horizontally in the direction of the extending leg, i.e. away from the bending leg, where it tends to deviate.
- Push the hip belonging to the stretching leg back and down.
- With the fingertips as described and the thumb on the upper outer edge of the pomuscles, straighten the pelvis so that the buttocks and sacrum move more downwards and lift the SIAS („hip bones“). Make sure that the stretching leg does not start to bend.
- Hold the shoulder blades in depression.
- This variant is recommended for fatigue or injury to the lateral abductors of the shoulder joint.
arms stretched behind the back
You can switch to this variation if your arms become too heavy in the normal version and this would prevent a longer version. The effect on the trapezius is also pleasantly relaxing
instructions
- Take the pose as described above, but clasp your hands behind your body, turn your arms out and move your wrists away from each other.
details
- Move the shoulder blades backwards and downwards, i.e. in depression and retraction, but without using the retractors to such an extent that a tendency to spasm occurs. A sensation of compression between the shoulder blades and the spine is perfectly normal and harmless.
turn your head the other way around
A sensible variant, as it runs counter to the evasive movements.
instructions
- Take the pose as described above, but turn your head away from the side of the bending leg to the other side, i.e. look along the arm.
details
- The usual rotation of the head to the side of the bending leg tends to turn the upper body and pelvis in the wrong direction following the evasive movements, making corrections more difficult. The contralateral rotation supports them.
do not turn your head
This variation is very useful for beginners, as there is often not enough concentration and body awareness to turn the head without turning the pelvis and upper body as well.
instructions
- Look straight ahead instead of turning your head to the side.
details
- When turning the head to the side of the bending leg, the pelvis and chest are often involuntarily turned a little; there is no risk here. You can go further and turn your head to the side of the extending leg, which tends to further improve the posture of the upper body and pelvis, see the variation above.
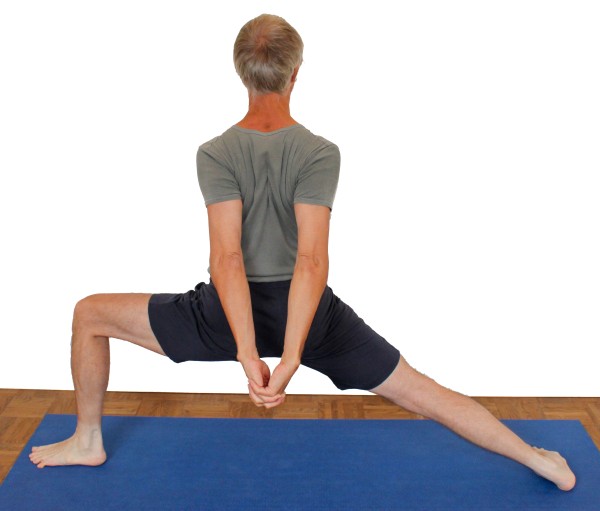
arms crossed behind
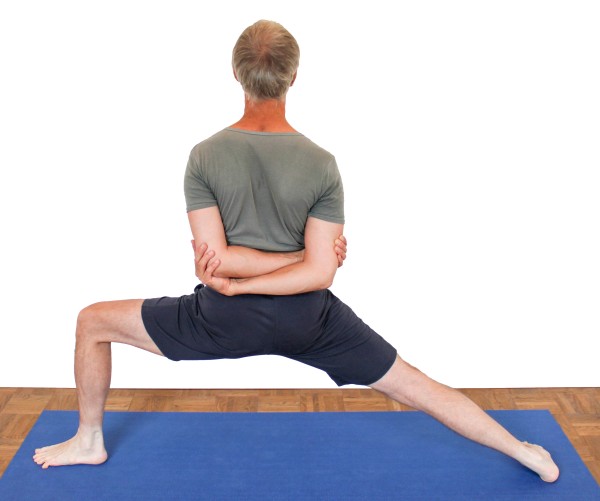
Gives a better feeling for the extension of the ribcage.
instructions
- Take the pose as described above, but without the arm position described.
- Fold your arms behind your back so that your hands grip the opposite elbows or upper arms close to the elbows.
details
- Don’t let the extension of the upper body and the lifting of the sternum tempt you into a backbend in the upper body. The thoracic spine should be stretched beyond the physiological kyphosis but not truly extended, the lumbar spine remains physiologically lordotic.
- Make sure that the sacrum and coccyx stay down, so do not bring the hip joints further into flexion when you stretch the chest.
- This variant can help with a pronounced tendency to spasm in the trapezius.
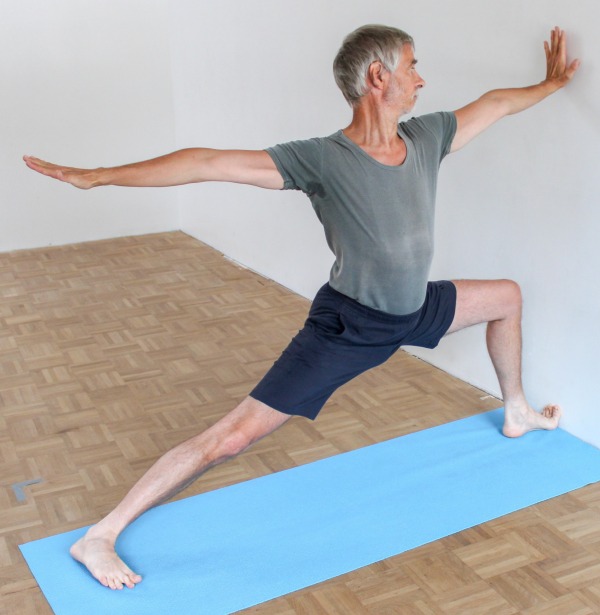
outer foot on the wall

More control over the extending leg
instructions
- Place the mat against the wall at a right angle so that you can press your outside foot against the wall in this position.
the feet are pushed away from each other using the strength of the quadriceps of the flexing leg
details
- If you have to choose between the contact of the forefoot and the heel with the wall due to the shape of the outer foot, opt for the area from the heel.
- This variant gives you a better feel:
- whether the feet are pushed away from each other by the force of the quadriceps of the flexing leg
- whether the feet are pushed away from each other using the strength of the quadriceps of the flexing leg
- Once both have been realised, a more stable feeling for the posture emerges, which enables the practitioner to concentrate more on the work in the pelvis.
- This variation deliberately dispenses with the requirement for a 20° turn in of the stretched leg and its foot, as this cannot usually be maintained in practice anyway with strict correction of the pelvis and wide flexion of the knee joint. However, it can of course also be practiced as a twisted variant in analogy to the comparable variant of warrior 1 pose with corresponding rotation and two mats, see below.
outer foot at an angle to the wall
detail images
Mat in front of the wall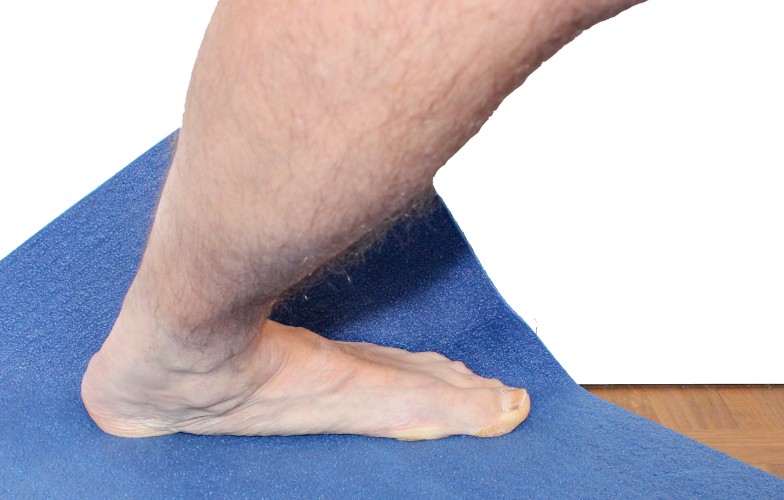 |
More control over the extending leg
instructions
- Place the mat at an angle of approx. 70° to the wall (i.e. 20° before the right-angled position) and press the outer foot against the wall.
- To change sides, place the mat the other way round, 20° from the wall against the perpendicular to the wall: clockwise for the bent leg on the left, anticlockwise for the bent leg on the right.
details
- If you have to choose between the contact of the forefoot and the heel with the wall due to the shape of the outer foot, opt for the heel.
- This pose addresses the issue of turning the outstretched leg even more clearly than the variation above. Here you can see more clearly whether and how this movement is performed and how the pelvis reacts. If the leg is not turned out properly, the same sided hip moves forwards and the pelvis tilts forwards at the top.
knees against the wall
Gives the bending leg extensive rest to allow concentration on the pelvis.
instructions
- Similar to warrior 1 pose, the knee is pressed against the wall to take the effort out of the bending leg, making it easier to concentrate on the details of the position of the pelvis.
details
- As the knee is fixed to the wall, the pelvis may not feel able to rotate quite as far in the direction of the extending leg as is possible in the free version, in which the bending knee can be moved a little forwards if necessary so that the pelvis rotates more towards the extending leg and discomfort in the inner knee can be avoided.
- This variation is an excellent way of practicing pushing your feet away from each other.
- Bring the metatarsophalangeal joints into the edge of the room and bend the toes upwards on the wall.
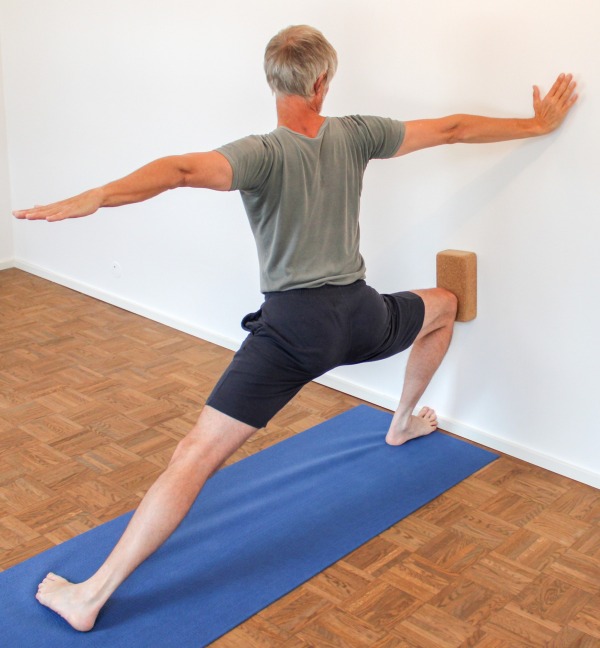
press a block against the wall with your knee

instructions
- Just like in warrior 1 pose, a block is pressed against the wall with the knee to take the effort out of the bending leg, making it easier to concentrate on the details of the pelvic posture.
details
- This is a weakening of the „knee against the wall“ variation because the bending knee has to bend slightly less.
- Again, be careful not to drop the block, which can happen especially when adjusting the foot of the extending leg and when correcting the pelvic posture.
- Blocks made of cork are generally found to be much more comfortable than those made of wood, and shoulder support plates are also found to be pleasant.
- Once the block is in place and has full pressure, concentrate on the details of the pelvic work:
- Turn the pelvis away from the bending leg
- Straighten the pelvis: Butt down, lift the hip bones
- Bring the hip of the extending leg further down until it is the same height as the bending leg
back against the wall
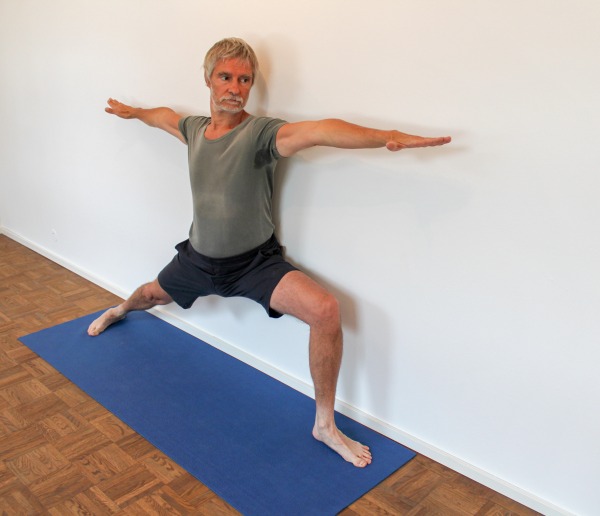
More control over the rotating evasive movements
instructions
- Perform the pose as described above, with the buttocks and back against the wall and the hip of the stretching leg pressed further against the wall.
details
- The fact that the back is against the wall makes it clearer whether there is an evasive movement of the upper body starting from the pelvis and rotating horizontally. Pressing the buttocks of the extending leg against the wall is often difficult with less good flexibility, but is the aim of this variation.
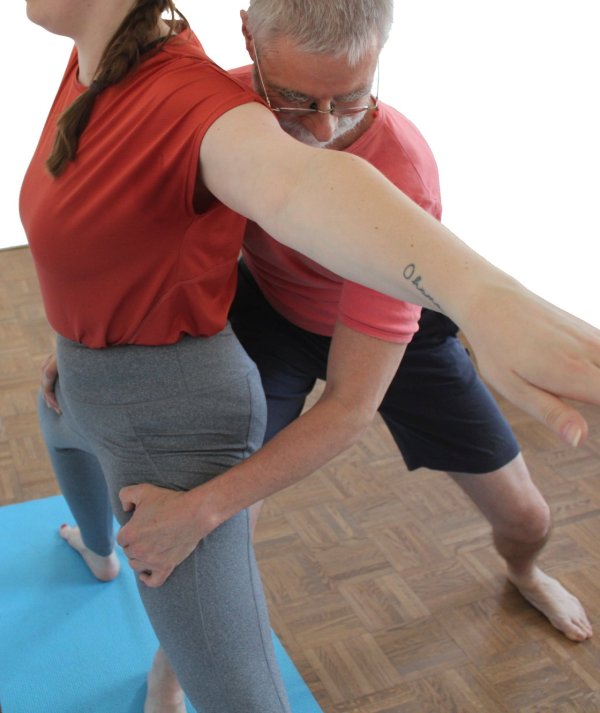
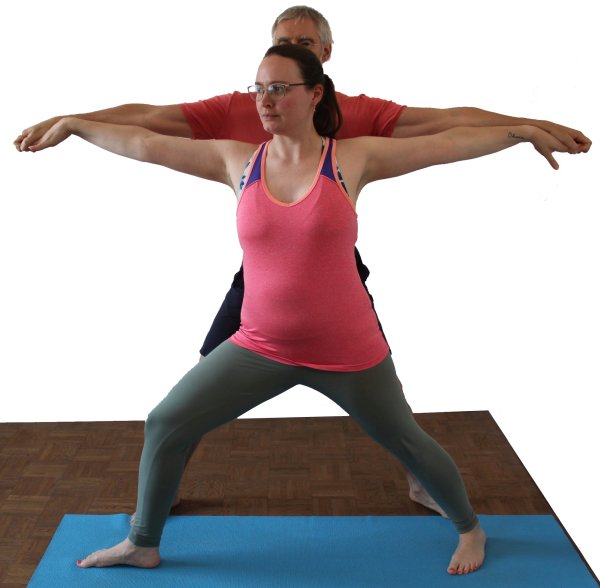
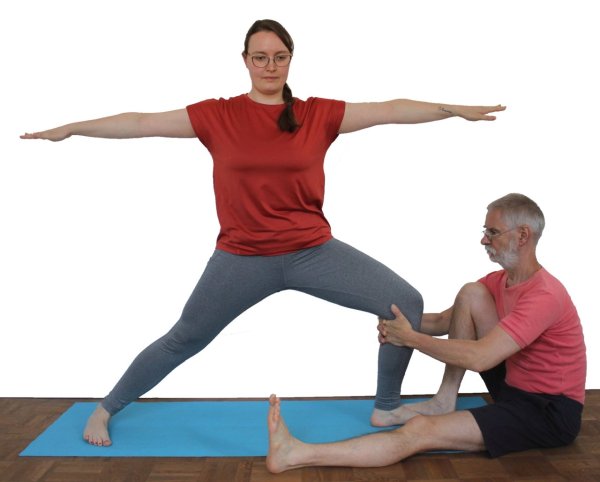
(S) Turn out leg

Correcting the pelvic posture is probably the most important support.
instructions
- Take the pose as described above.
- The supporter stands with one foot in front of and one foot behind the outstretched leg of the performer, with the chest facing the performer’s upper body, and turns the outstretched leg out with both hands in the middle of the thigh.
details
- The external rotation of the stretched leg is a very important prerequisite for correcting the pelvic posture and therefore also the position of the upper body, After all, the abduction capacity in the human hip joint is a function of rotation, in the sense that it increases with increasing exorotation. As far as the position of the pelvis is concerned, the 2nd warrior position requires full utilization of the range of possibilities anyway, especially if a lack of strength or strength endurance or an excessive stretch sensation in the area of the adductors (especially the extended leg) does not prevent the knee joint of the bending leg (ideally until the thigh is horizontal). A leg that is not sufficiently extended or rotatable will inevitably result in the relevant hip being higher than the other when the contralateral leg is flexed far. In most cases, it also stands further forward, which can also often be attributed in part to a lack of exorotation. The other part of the cause of the latter is, of course, the limited flexibility of the adductors on the side of the bent leg. In practice, these two factors often add up to a strongly sideways and forward-turned pelvis on the side of the extended leg, which also tilts forward instead of straightening up. A lack of exorotation is also partly responsible for the latter, as the hip moves in an arc when the leg is turned in or turned out.
- This correction is an important prerequisite for general and comprehensive correction of the position of the pelvis in this pose.
- As a supporter, observe the change in the pelvic position when turning out the leg to see which movement component is most important for correcting the position of the pelvis.
- By turning out the stretched leg, it can also be pushed slightly towards the floor if it can be assumed that the performer has sufficient strength in the bending leg. This measure then makes a lasting contribution to bringing the pelvis out of the frequently seen lateral tilt.
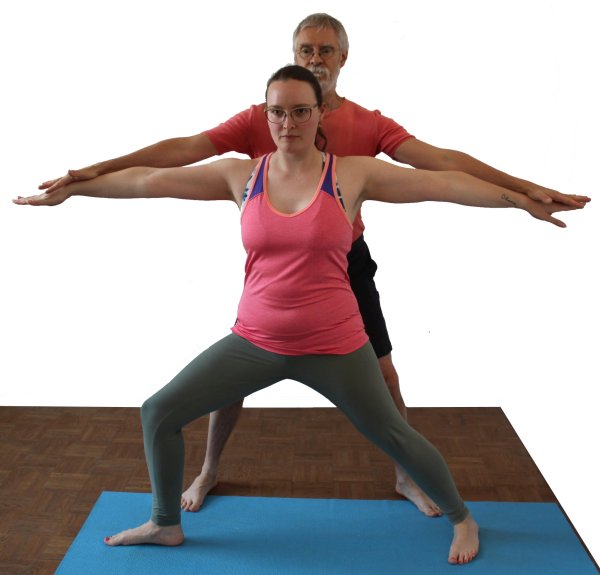
(S) straighten the pelvis
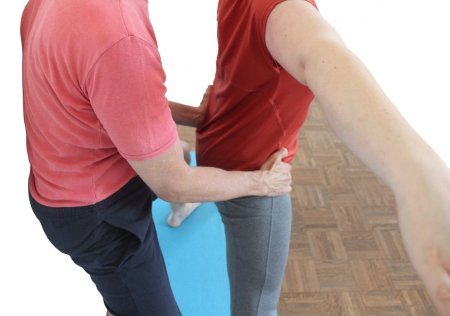
Correcting the pelvic posture is probably the most important support
instructions
- Take the pose as described above.
- The supporter stands behind the performer, pushes down the buttock on the side of the extended leg with one hand, while lifting the hip bone (ASIS) on the side of the bent leg with the same force with the other. It is also possible to pull from above on the thigh of the extended leg with one hand while the other hand supports the opposite buttock and pushes it downwards.
details
- Of course, the force of the pull and pressure exerted must correspond so that the performer is not tilted out of position.
- By applying pressure to the buttock of the outstretched leg, the degree of contraction of the gluteal muscles can be perceived at the same time and the performer can be given feedback about any lack of work there.
- The supporter will have to intervene very forcefully, after all he is operating with his upper limb against restrictions in the muscles of the performer’s lower limb. As the supporter, grip so firmly and skillfully that no hand slips; this could lead to reflex tension in the performer.
- The most favorable option is usually to press down on the buttocks with the palm of the hand largely on top, whereby the carpus transmits the greatest force. Pulling on the contralateral SIAS is best done with several slightly bent fingers. The supporter stands so that their lateral fingers (like the performer’s hip) pull or the lateral hand presses down on the buttocks.
- Pushing the buttocks down also addresses the typically common evasive movement of the hip of the extended leg being higher than the other. As maximum exorotation of the extended leg is a prerequisite for correcting the height of the hip, this support should be used first if necessary to ensure the best possible correction of the pelvis.
- Furthermore, pushing the buttocks down pushes this side of the pelvis forward a little. This naturally requires counterforce on the side of the hip bone to be lifted. This action also slightly corrects the undesired rotation of the pelvis in the plane of the bending leg.
- This correction of the position of the pelvis is an important prerequisite for better posture of the upper body. Without it, there is usually at least lateral flexion and rotation in the lumbar spine when trying to keep the upper body vertical and rotated exactly forwards, but often the whole upper body hangs askew.
- Naturally, this support also counteracts the hollow back tendency, which results from the lateral extension of the hip flexors (at the trochanter minor) due to their restricted flexibility, as they are under great tension here. Furthermore, restricted flexibility of the adductors, which also have a hip-flexing effect, often contributes to the hollow back. A corresponding counterforce is built up externally here.
(S) Straighten pelvis with traction on extended leg
Instructions
- Adopt the posture described above.
- The supporter stands behind the performer, supports the buttock of the bent leg with one hand and pulls with the other hand from above, gripping the centre of the thigh of the extended leg.
Details
- This support is well suited to reducing the evasive movement of the pelvis in the horizontal plane, as it pulls on a longer lever arm than the comparable support where the hands are placed directly on the pelvis.
(S) back against the wall
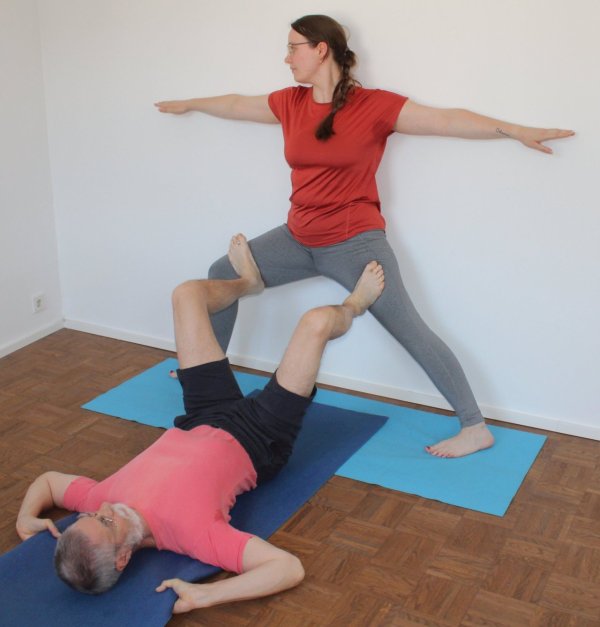
Allows significantly stronger hip opening through pressure from the supporter
instructions
- The performer stands in the posture described above, leaning against the wall with their buttocks and back; their mat lies lengthwise against the wall, their heels equidistant from the wall.
- The supporter places his mat across the center of the performer’s mat and lies backwards on his mat with his head away from the performer.
- The supporter first places one foot on the middle of the thigh of the performer’s extending leg and begins to apply increasing pressure there, also pushing their foot slightly upwards so that the performer’s thigh rotates more out.
- After the performer gives the signal to stop applying pressure, he brings his second foot to the middle of the other thigh (bending leg) and begins to press there.
details
- The pressure on the second (bending) leg must not be more than half as strong as the pressure on the other leg. It is already too strong if it causes a recognizable lateral rotation of the pelvis. For finer control, pressure can be applied in the bending leg just before the knee instead of in the middle of the thigh.
- The order in which the pressure is applied must be followed. If the order is reversed (pressure on the bending leg first), the pelvis would be moved sideways, which would probably no longer be compensated for by the pressure on the other leg.
- The supporter is well advised not to lie down too close to the performer, as the less he can extend his legs, i.e. the smaller the angle in his knee joint, the harder it will be for him to exert pressure. On the other hand, he should have a certain reserve to be able to stretch his legs further:
- in order to be able to meet the needs of the performer.
- because his thigh muscles are not able to develop their full strength when his knees are almost fully extended (force-length function).
- Care should be taken to ensure that the extended leg in particular is turned out with as much force as possible. To do this, the supporter supplements the pressure against the leg with an upward pushing component. It is important to push with the muscular inner arch of the foot so that the performer does not feel any uncomfortable pressure.
- For people whose pelvis tends to tilt forwards significantly, the same trick is recommended here as for caturkonasana on the wall alone or the same pose as a partner exercise: lower the pelvis slightly too low by excessively bending the knee joint a little too low, then have the supporter build up the pressure against the thighs and push the pelvis back up a little by slightly extending the knee joint of the bending leg, whereby the pelvis tends to be straightened or even noticeably straightened due to the friction against the wall. It is usually sufficient to raise the pelvis by 3-5 cm.
- The pressure on the thigh of the extended leg can easily lead to overstretching of this leg, especially as the heel of the same leg must maintain a significant distance from the wall so that the performer is not inclined to tilt forward. The easiest way to safely prevent overstretching is probably to use a shoulder support plate between the wall and the thigh.
(S) pull on the lower leg

Rechtwinkliges Beugen des KniesRectangular bending of the knee
instructions
- Take the pose described above. The supporter sits facing along the foot in front of the bending leg and places one of their feet on the foot of the bending leg to hold it in place.
- The supporter grasps the performer’s calf muscles from behind with their clasped hands and begins to pull the knee towards them until the lower leg is vertical. If the thigh does not become horizontal, the distance between the two feet must be adjusted until this is possible.
details
- Make sure that the performer does not run in with the foot of the stretching leg.
- Make sure that the performer does not let the outside foot of the extending leg come up, bend or twist the extending leg, but presses the outside foot to the floor by turning out and straightening the leg.
- Fixing the foot is necessary so that the performer does not increase the distance between the two feet, which would make it all the more difficult to achieve a right angle in the knee if the distance was already too great beforehand.
- The supporter grips as high up as possible, just below the knee around the lower leg,
- to be able to put his strength to better use
- to be able to dose the applied force better
- Make sure that the work in the pelvis is not lost due to the concentration on the bending knee.
- Further flexion of the knee joint by the supporter requires more strength and stretching ability from the performer. Depending on the strength in the quadriceps and stretching of the adductors of the extended leg, it may not be possible to achieve alignment of the lower leg and thigh parallel to the spatial axis.
(S) turn out straight leg with belt

Improved rotation of the extending leg
instructions
- Attach a belt around the thigh of the stretching leg so that its free end points downwards (and not upwards). The buckle of the belt should lie in front of its highest point, i.e. exactly frontally on the distal quadriceps.
- The supporter sits on the floor on the outside of the bending leg and supports the thigh of the bending leg near the knee with the foot while pulling the loose end of the belt towards him as far as tolerable.
details
- The point at which the buckle of the belt is located is important so that an optimal outward rotation movement is actually achieved.
- The point of support on the thigh should be chosen as far towards the knee as possible because the lever arm is more favorable (larger) there. This means that the force to be applied is lower and the force applied can be better controlled.
- If the buckle or belt cause uncomfortable pressure, a little fabric, e.g. a sock, can be placed between the belt and the skin.
- The tension on the free end of the belt and the pressure on the buttock must correspond to each other and be applied and released simultaneously and to the same extent so that the performer does not tip over forward or backward.
- This variant can sometimes alleviate discomfort in the inner knee when bending far.
(S) pull legs back
Gives a better feel for the movement of the legs
instructions
- Take the pose as described above.
- The supporter stands behind the performer and places one hand frontally on the outstretched leg, approximately in the middle of the thigh and the other on the other, slightly further towards the knee. The supporter uses the thigh to support the pelvis in the sacrum region.
- The supporter begins to exert more and more traction on the thighs with the hands and to support the pelvis with the thighs to the same extent until the performer instructs them not to increase the traction any further.
details
- As a supporter, make sure that the support on the sacrum does not push the performer’s pelvis upwards, which means in particular that the supporting thigh must not be too flat, but as steep as possible, ideally vertical or even with the knee slightly above the forefoot.
- Here too, the pull on the straight leg should be significantly greater than that on the bent leg so that the pelvis is not forced to rotate in the horizontal plane.
- The supporter has a good view of both legs thanks to his stance.
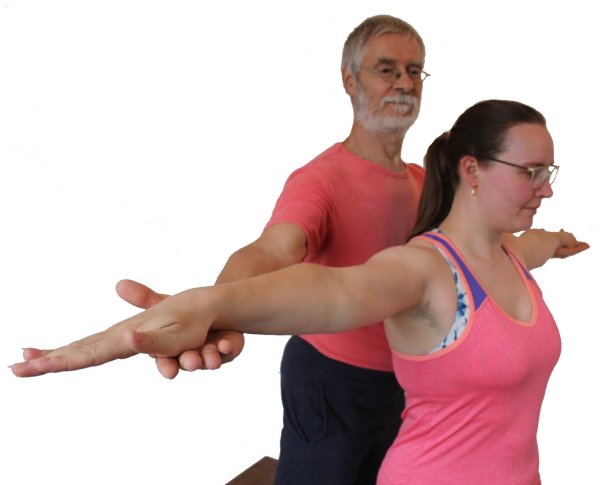
(S) pressure against the fingertips
Provides a feeling for the lateral stretching of the arms.
instructions
- The supporter is someone whose arm span is slightly larger than that of the performer.
- The supporter stands behind the performer and presses against their fingertips from the outside so that they can consciously stretch their arms outwards against this resistance and thus maximally lateralize the shoulder blades.
details
- If necessary, the performer’s fingernails should be shortened. If there are reasons that prohibit pressure against the fingertips, pressure can be applied against the closed fist instead.
- As the person performing the exercise, make sure that the finger joints and the hand as well as the wrist remain stretched in a controlled manner and do not bend under the pressure.
- This variation should give a good feel for lateralizing the shoulder blades, but they will not be fully protracted.
- By focusing on lateralizing the shoulder blades instead of lifting the arms, the trapezius feels less tense.
- Especially when the supporter’s arm span is barely longer than that of the performer, it is important that the former keeps his shoulders at the same height as the latter.
(S) pushing down the arms
Gives more feeling for lifting the arms.
instructions
- As the supporter, press down on both of the performer’s upper arms just before the elbow joint with slowly increasing force.
details
- As a supporter, make sure to increase the pressure slowly and not to reduce it abruptly. Increasing the pressure is best done in such a way that the performer – within the limits of their strength – has the opportunity to meet the increasing demand and constantly adapt their use of force.
- Make sure that the arms are fully rotated out so that the elbow joints are loaded in their movement dimension when pressure is applied to the forearms, i.e. no valgus stress occurs in the elbow joint. If the performer uses the biceps as frontal abductors of the shoulder joint strongly enough, an overstretching tendency of the elbow joints should be largely excluded.
- The performer’s shoulder muscles and – depending on their ability to extend the arms (the more the better) – the biceps should become noticeably and visibly active, as it acts as the frontal and also lateral abductor of the shoulder joint and must be active to keep the arm in position.
(S) pushing up the arms
instructions
- Proceed in exactly the same way as in the previous variation, except that here the arms are pressed upwards.
details
- The triceps and the latissimus dorsi are activated here, as well as some other adductors that are not quite as visible as the two mentioned, e.g. Teres major and Teres minor. The tension of the latissimus dorsi is not part of the basic pose, the work of the triceps and its antagonistic flexor group in the elbow joint consisting of biceps and subordinately also brachialis does, whereby the balance of the muscles involved must be such, that the elbow joint is not bent further into triceps overextension due to the strength of the triceps.
- Pay attention to the complete outward rotation of the arms, so that on the one hand the triceps and the other adductors of the shoulder joint are brought to work adequately, on the other hand, the elbow joint is loaded as far as possible without varus or valgus-stress in a purely physiological way.
(S) press against the inner foot of the supporter
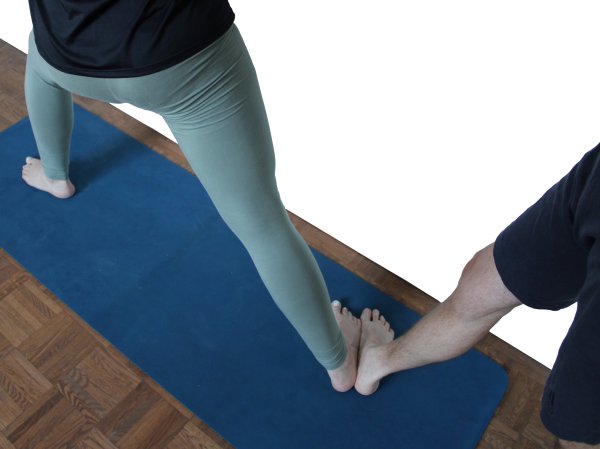
instructions
- Take the pose described above.
- The supporter stands behind the performer and places the inner foot of the same side against the outer foot of the performer’s outstretched leg so that the latter can press powerfully against the former’s inner foot.
details
- The inside foot provides a comfortable but stable resistance against which the performer can apply force from the quadriceps of the bending leg. This corresponds to the instruction in the basic posture to push the feet away from each other.
- Make sure that the force exerted does not cause the pelvis to lift.
(2S)

instructions
- Take the pose as described above. The two supporters simultaneously perform the support to rotate the extended leg and the correction of the pelvic position.
details
- As described in the two variants, the exorotation of the extended leg supports the correction and improvement of the position of the pelvis in the long term, so that both interventions should be carried out at the same time to the fullest extent possible. This often enables the upper body to be in a truly upright position for the first time without the lumbar spine having to laterally flex and rotate significantly.
transition to parsvakonasana and back

detail images
2. Krieger with straight pelvis | Inclined position of the pelvis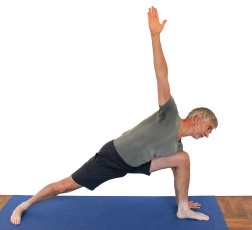 | parsvakonasana with typical arm |
instructions
- Stand in the warrior 2 pose.
- Consciously bring more strength into the bending leg and tilt the pelvis to the side of the bending leg.
- Slowly place your right hand in the right outer foot area.
- Bring the left arm into the extension of the left side of the body and turn it out to the maximum. Extend the arm with the shoulder blade away from the pelvis, elevate the shoulder blade.
- Realize the further details of the parsvakonasana:
– Rotate the chest to the maximum: the upper half backward
– Move the upper arm maximally backwards (this is the frontal abduction in the shoulder joint) and extend it maximally parallel to the body axis away from the pelvis
– Press the bending knee firmly against the upper arm behind it, this is mainly gluteus maximus strength.
– Stretch your neck and turn your head upwards around its longitudinal axis.
and stand in the position for some time. - To transition back to the 2nd crawl position, apply more pressure to the balls of the right foot and more strength to the right quadriceps.
- Stretch your left arm towards the ceiling, lift your right hand off the floor with your knee joint still bent at a right angle and straighten your pelvis and upper body to a vertical position.
- Align the pelvis for the warrior 2 pose and bring the arms into the corresponding position.
- Repeat the up and down as long as the leg, especially the quadriceps, has enough strength for a controlled movement.
- Stretch your right leg and come out of the pose.
details
- Both in the transition to parsvakonasana and back to warrior 2 pose, keep pressure on the outside foot of the stretching leg and keep the feet pushed away from each other.
- These transitions, like most others, should be completely reversible, i.e. it should be possible at any time not to complete a transition but to return to the original position.
- From the point at which the pelvis is tilted to the side during the transition to parsvakonasana, the shift of the center of gravity to the side of the bending leg means that more strength is required in this leg.
- During the transition to the 2nd warrior position, a great deal of strength is required in the lower leg muscles and the thigh of the bent leg for a few seconds.
- Do not use momentum at any time, but practise calm and confident power delivery, even if it is perhaps not yet available to the desired extent.
- When the pelvis is aligned after the transition back to the 2nd warrior position, a lot of strength and stability is required in the bending leg.
- Completely seperate the movements, esp. in transition to back to warrior 2 pose:
- erecting the trunc and the alignment of the pelvis (in all 3 dimensions, in which evasion occurs)
- a possible stretch of the bent leg occuring accitentally
- This variation is excellent for building strength in the quadriceps and the monoarticular adductor and pomus muscles, especially if it is performed several times in succession without stretching the bending leg in between.
- There are three phases in which the flexing knee is often stretched a little in an undesirable way to relieve the quadriceps:
- Tilting the pelvis during the transition to parsvakonasana.
- Raising the upper body from parsvakonasana; the knee is usually stretched the most and most frequently.
- Aligning the pelvis in warrior position 2, here the knee is often stretched a little.
- The pressure of the feet away from each other and the pressure of the outer foot of the stretching leg against the floor should be maintained without interruption.
- The bending leg should be as still as possible, apart from the pressure it exerts against the arm in parsvakonasana.
Transition to parsvakonasana and back
Instructions
- Transition between warrior pose 2 and parsvakonasana and back as described above, but keep the outside foot of the straight leg at a slight angle (up to max. 20°) against a wall.
Details
- The foot on the wall provides good feedback on whether the outer foot is getting lighter and moving away from the wall, which occurs very easily when there is a lack of strength in the quadriceps of the bent leg or when its strength is exhausted.
(S) transition to parsvakonasana and back
Restriction of an evasive movement that often occurs in the previous variation.
instructions
- The supporter sits looking along the midline of the foot in front of the bending leg and, as in the variation „pulling on the lower leg“, holds the lower leg firmly with their clasped hands by gripping the calf muscles from behind to prevent the knee joint from stretching.
details
- The moment when the performer begins to lift the upper body is the moment when there is the greatest tendency to stretch the knee joint. As described above, there are other phases in which the knee joint is also often stretched a little.
- The performer usually tends to walk a little forwards with the foot to increase the distance and ease the work of the quadriceps. The supporter’s foot now prevents this.